DIY 12V LED flashlight. Powerful LED flashlights. Finding the cause of the flashlight failure
As a rule, it is desirable to obtain maximum brightness from electric lamps. However, sometimes lighting is required that will minimally disrupt vision adaptation to darkness. As is known, the human eye can change its light sensitivity over a fairly wide range. This allows, on the one hand, to see at dusk and in poor lighting, and on the other hand, not to go blind on a bright sunny day. If you leave a well-lit room on the street at night, then for the first moments almost nothing will be visible, but gradually your eyes will adapt to the new conditions. Complete adaptation of vision to darkness takes about one hour, after which the eye reaches maximum sensitivity, which is 200 thousand times higher than during the day. Under such conditions, even short-term exposure to bright light (turning on a flashlight or car headlight) greatly reduces the sensitivity of the eyes. However, even with complete adaptation to the dark, it may be necessary, for example, to read a map, illuminate the instrument scale, etc., and this requires artificial lighting. Therefore, astronomy lovers, as well as everyone who needs to consider something, do not need a bright flashlight in poor lighting conditions.
When making an astronomical lantern, one should not strive for excessive miniaturization. The body of the astronomical flashlight should be light and large enough so that in poor lighting conditions it can be easily found (otherwise you will drop it under your feet and have to look for the flashlight for half an hour). A travel soap dish was used as the body. Switches should be such that they are easy to use by touch and with gloves.


The eye is maximally sensitive to light with a wavelength of 550 nm (green light), and in the dark the maximum sensitivity of the eye shifts towards short waves up to 510 nm (effect Purkinje). For this reason, it is preferable to use red LEDs in an astronomical flashlight rather than blue, or even more so green. The eyes are less sensitive to red light, which means red lighting is less likely to disrupt adaptation to darkness.
In addition to the main lantern, you can make several simple beacons to illuminate various objects. The fact is that few astronomy lovers can afford to have a full-fledged amateur observatory. Most watch from the balcony. And in a tight space, and even in the dark, you can easily hook your foot and overwhelm the tripod of a telescope or camera. In addition, unexpectedly meeting in the dark with your knee against the corner of some drawer or bedside table, the same pleasure is small. Therefore, it is advisable to use the simplest mini flashlights to illuminate tripod legs, sharp corners of furniture, shelves with accessories, and so on. In principle, a simple LED attached with adhesive tape to a 3 V battery type is suitable for this purpose. 2032 or similar. But, firstly, without a current-limiting resistor, the LED glow is too bright, and secondly, even in the simplest flashlight it is advisable to have a switch. Guided by these considerations, several such beacons were made.
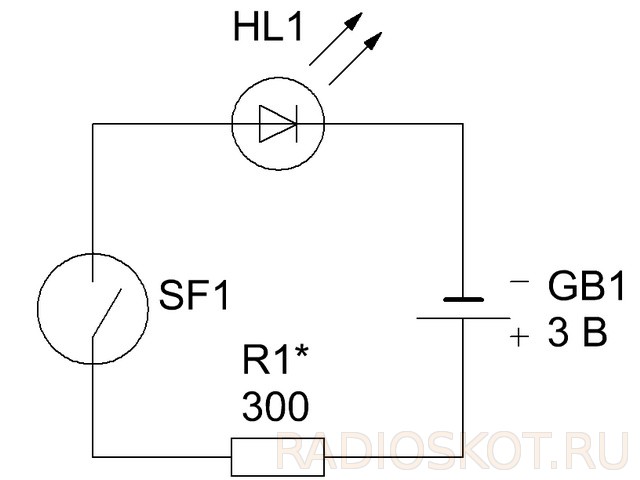
A reed switch paired with a magnet is used as a switch. The 3 V battery mount is homemade. A current-limiting resistor is connected in series with the LED; its value must be selected so that in the dark, when looking directly at the LED lens, the light does not blind the eyes even at close range. In different beacons, you can use LEDs of different colors to facilitate identification, while remembering that the eye does not have the same sensitivity to light with different wavelengths. Flashing LEDs can be used.


In addition, there are a couple more designs of simple LED lights. The designs described below were not specifically intended for astronomical purposes, but they can easily be adapted for such use.
A simple waterproof flashlight can be made using a film can. We will need: a new film can, a 3 V LED, 2-3 reed switches, a 3 V lithium battery 2032 , cotton wool (case filler), battery block from an old flashlight. To ensure water resistance, it is necessary that there are no holes in the flashlight body. So, as a switch, you can use sealed contacts. For reliable operation, it is better to take 2-3 reed switches, since when turning along the longitudinal axis, the sensitivity of the reed switch changes. So, let's assemble the flashlight according to the diagram.

We bend the wires so that everything fits in the case, I filled the empty space with cotton wool so that nothing dangles. We place the circuit in the case. It is important that the film can be new, i.e. so that the lid closes as tightly as possible. Any magnet will work as a switch. A flashlight of this design continued to work after 10 hours in the water. The cotton wool remained dry. So, lying in a puddle for a long time will not harm such a device.


Surely radio amateurs have pads from failed 9 V Krona batteries. Based on such a block, you can assemble a simple flashlight that actually does not need a housing. An LED is connected to the contacts of the block through a current-limiting resistor.
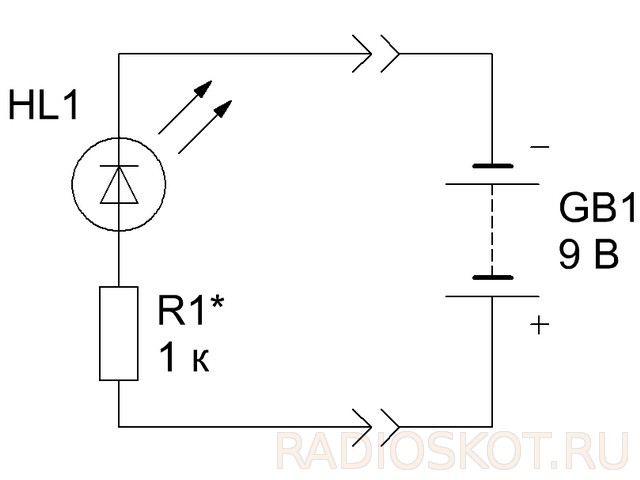
On the outside, the LED and resistor are wrapped with several layers of insulating tape. When placed on the battery, the flashlight forms a single unit with it.


Thus, you can adapt almost any suitable housing and battery for a homemade flashlight, although below 3.5 V you will already need to install an LED. Thank you for your attention. Author Denev.
Discuss the article DIY LED FLASHLIGHTS
More recently, the word LED was associated only with indicator devices. Since they were quite expensive and emitted only a few colors, they also shone faintly. With the development of technology, the price of LED products has gradually decreased, and the scope of application has expanded rapidly.
Today they are used in various devices and are used almost everywhere where lighting devices are needed. Headlights and lamps in cars are equipped with LEDs; advertising on billboards is highlighted by LED strips. In domestic conditions they are also used no less often.
Reasons to use LEDs
Lanterns were not spared either. Thanks to powerful LEDs, it has become possible to assemble a super-powerful and at the same time fairly autonomous flashlight. Such lanterns can emit very strong and bright light over a long distance or over a large area.
In this article we will tell you about the main advantages of high-power LEDs, and we will tell you how to fold an LED flashlight with your own hands. If you have already encountered this, then you will be able to supplement your knowledge; for beginners in this area, the article will answer many questions related to LEDs and flashlights with their use.
If you want to save money by using LED, there are some factors to consider. Since sometimes the price of such a lamp can exceed all the savings. If you have to spend a lot of money and time on maintaining light sources, and the total number of them consumes a lot of electricity, then you should consider whether an LED would be a better replacement.
Compared to conventional lamps, LEDs have a number of advantages that elevate them:
- There is no need for maintenance.
- Significant energy savings, sometimes savings up to 10 times.
- High quality luminous flux.
- Very high service life.
Necessary components
If you decide to assemble an LED flashlight with your own hands, for moving in the dark or for working at night, but don’t know where to start? We will help you with this. The first thing you need to do is find the necessary elements for assembly.
Here is a preliminary list of required parts:
- LED
- Winding wire, 20-30 cm.
- The ferrite ring is approximately 1-.1.5 cm in diameter.
- Transistor.
- 1000 ohm resistor.
Of course, this list needs to be supplemented with a battery, but this is an element that can be easily found in any home and does not require special preparation. You should also select a housing or some kind of base on which the entire circuit will be installed. A good case would be an old, non-working flashlight or one that you are going to modify.
How to assemble it yourself
When assembling the circuit, we will need a transformer, but it was not added to the list. We will make it ourselves from a ferrite ring and wire. This is very simple to do, take our ring and start winding the wire forty-five times, this wire will connect to the LED. We take the next wire, wind it thirty times already, and direct it to the base of the transistor.
The resistor used in the circuit should have a resistance of 2000 ohms, only by using such resistance can the circuit work without failure. When testing the circuit, replace resistor R1 with a similar one with adjustable resistance. Turn on the entire circuit and adjust the resistance of this resistor, adjust the voltage to approximately 25mA.
As a result, you will know what resistance should be at this point, and you will be able to select a suitable resistor with the resistance value you need.
If the circuit is drawn up in full accordance with the above requirements, then the flashlight should work immediately. If it doesn't work, then you may have made the following mistake:
- The ends of the winding are connected in reverse.
- The number of turns does not correspond to what is required.
- If the wound turns are less than 15, then current generation in the transformer ceases.
Assembling a 12 volt LED flashlight
If the amount of light from the flashlight is not enough, then you can assemble a powerful flashlight powered by a 12-volt battery. This flashlight is still portable, but much larger in size.
To assemble the circuit of such a lantern with our own hands, we will need the following parts:
- Plastic pipe, about 5 cm in diameter and PVC glue.
- Threaded fitting for PVC, two pieces.
- Threaded plug.
- Tumblr.
- Actually the LED lamp itself is designed for 12 volts.
- Battery for powering the LED, 12 volts.
Electrical tape, heat shrink tubing and small clamps to keep the wiring in order.
You can make your own battery from small batteries that are used in radio-controlled toys. You may need 8-12 pieces, depending on their power, to give a total of 12 volts.
Solder two wires to the contacts on the light bulb, the length of each should exceed the length of the battery by several centimeters. Everyone is carefully isolated. When connecting the lamp and battery, install the toggle switch so that it is located at the opposite end from the LED lamp.
At the ends of the wires coming from the lamp and from the battery pack, which we made with our own hands, we install special connectors for easy connection. We assemble the entire circuit and check its functionality.
Assembly diagram
If everything works, then we proceed to creating the case. Having cut the required length of the pipe, we insert our entire structure into it. We carefully secure the battery inside with glue so that it does not damage the light bulb during operation.
We install a fitting at both ends, secure it with glue, this way we will protect the lantern from accidental moisture getting inside. Next, we bring our toggle switch to the opposite edge from the lamp, and also carefully secure it. The rear fitting must completely cover the switch with its walls, and when the plug is screwed in, prevent moisture from entering there.
To use, just unscrew the cap, turn on the flashlight and screw it back tightly.
Price issue
The most expensive thing you will need is a 12 volt LED lamp. It costs about 4-5 dollars. After digging through children's old toys, batteries from a broken car will be free for you.
The toggle switch and pipe can also be found in the garage; scraps of such pipes are always left after repairs. If there are no pipes and batteries, you can ask friends and neighbors or buy them at the store. If you buy absolutely everything, then such a flashlight can cost you about $10.
Let's sum it up
LED technology is gaining more and more popularity. Having good characteristics, they can soon completely displace all competitors in the field of lighting. And assembling a powerful portable flashlight with an LED lamp yourself will not be difficult for you.
You must turn on low beam headlights or daytime running lights. The standard headlights of most cars mainly contain incandescent lamps, plus tail lights - as a result, we get energy consumption from the battery and generator of about 150-300W. But nothing comes for free - this leads to unnecessary consumption of gasoline, to premature failure of the car's incandescent lamps, that is, to additional costs and loss of time for repairs.
Daytime running lights make a car stand out well on the road and are a good addition to any vehicle. However, the price of branded DRLs in our stores is usually quite high. Let's try to make them ourselves, especially since the prices for materials will be minimal.
I tried different options for DRLs. But there was always something that didn’t suit me: the LEDs often burned out, the light-diffusing fittings quickly lost their transparency from dirt and sand, etc. But then I came across a headlamp from the Fix Price store for the ridiculous price of 50 rubles. It turned out to have a good mirror reflector and small dimensions. For the sake of experimentation, it was decided to modernize it. The converted flashlight can be used both in DRL mode and as a powerful flashlight in the garage, outdoor recreation, etc.
You can watch the process of making homemade products in the video:
List of tools and materials
- headlamp;
-screwdriver;
- soldering iron;
-tester;
-power supply 12V;
-white LED 1W-7 pieces;
- rectifier diodes 1A-4pcs;
- foil double-sided textolite;
-thermal paste;
- silicone sealant;
- sheet brass or copper metal 0.3 mm thick.
Step one. Disassembling the lantern.
Let's disassemble the lantern into its component parts. Disconnect the board with LEDs from the battery housing. By the way, you can make a power bank from this battery compartment by adding a battery charging board. But now we only need the flashlight body itself with a reflector and glass.

Step two. Manufacturing of printed circuit boards, heat sinks, flashlight assembly.
We make a printed circuit board from foil double-sided PCB with a size of 45x45mm. Using a cutter we make tracks for two groups of LEDs. The first group has four LEDs, the second group has three.

Then we install the LEDs on the printed circuit board using thermal paste and solder them according to the diagram below.


Additional diodes serve to equalize the voltage in a group of three LEDs. They are soldered to the board and protected by heat shrink. I removed these diodes from a faulty electronic board of an energy-saving lamp.
On the back side of the printed circuit board we solder brass strips, which are designed to remove the heat generated by the LEDs. We put the glass of the lantern on silicone sealant. We screw the reflector to the printed circuit board and assemble the flashlight. Brass strips are removed from the lantern body through slots and folded into an accordion on the outside. The threaded connection is also treated with sealant. The power wires are routed into the hole in the flashlight body through a sealing rubber tube. We screw a homemade metal bracket to the rotary clamp for fastening to the car.
Step three. Testing the converted lantern.
We connect the converted flashlight to the power source.


Comparative photo before alteration.

As you can see in the photographs, the result turned out quite good. When the supply voltage changes, the current through the LEDs changes sharply. At 12 volts - 0.25 amperes, 13 volts - 0.48 amperes, 13.4 volts - 0.62 amperes. The maximum current for these 1W LEDs is 0.3 amperes. The flashlight has two groups of LEDs, so I decided to increase the life of the LEDs, the total current should be within 0.5 amperes. In the car's electrical network, the voltage can fluctuate from 12 volts to 15 volts, which means that when connecting in DRL mode, it is advisable to add a current stabilizer on the LM317 chip.

The current stabilizer is assembled on an aluminum radiator and installed in a distribution box along with a terminal block and an intermediate relay. The distribution box with filling was installed next to the car battery. The relay supplies voltage when the engine starts. The relay coil is connected to the filament of the parking light lamp and the fuel pump power circuit. Thus, the relay turns on only when the engine is running and the headlights and headlights are off.
In this article we will look at how you can make a powerful LED-based flashlight yourself. It will consume significantly less energy than a regular one.
Today it is quite difficult to buy a high-quality LED flashlight at a good price. Therefore, we suggest that you saddle it with your own hands. Making a powerful LED flashlight yourself is absolutely easy. The total cost of making the flashlight will be less than what you would pay for a similar factory flashlight. You need a little patience and great desire, as well as a couple of tools. You can use this device for various purposes: in the garden or vegetable garden, near the house, to illuminate furniture, as headlights for a car, and even for scuba diving!
To create an LED flashlight with your own hands you will need:
- non-working flashlight
- several LED bulbs;
- resistors;
- glue – sealant or good quality silicone glue;
- the plate is preferably made of aluminum, but you can take another durable material;
- any reflector.
The main stages of our work:
- Drawing up an electrical diagram
- Manufacturing and preparation of a plate for LEDs
- Circuit assembly
3.1 Soldering the lamp leads
3.2 Filling contacts and checking them - Working with a reflector (preparation and assembly)
- Securing all the parts of the LED flashlight
So let's get started. The first step is to make a wiring diagram for resistors and LEDs. Lack of knowledge and experience in working with electricity is not a problem. You can complete the scheme by reading information on websites or through online programs. As a result, following the instructions, you will receive a completed project diagram on the screen.

For proper modeling and manufacturing of the circuit, you need to clearly determine the voltage strength of the power source and LED lamps, the number of LEDs and the current strength of one LED. All these parameters are indicated in the characteristics and descriptions in the instructions for the parts.
The first stage of making an LED flashlight with your own hands is completed. Let's move on to the next step - making the plate. This plate will be used as a holder. To begin, draw on a piece of paper a preliminary diagram of the plate with all the holes for the LEDs. There should be as many holes as there are LEDs. Then use scissors to cut out the diagram and glue it to the plate. Using the sketch on paper, make corresponding holes in the plate. This will be done conveniently and easily using a drill.
Next, pull all the LEDs into the resulting holes. It is important not to snag or damage the contacts. Make sure that cathodes and anodes alternate! It is advisable to do all this on a flat surface. As a final result, the LEDs should seem to “fall” into the holes. Don't forget to secure the LED bulbs with glue or adhesive sealant for greater strength and reliability.
The third stage of creating a DIY LED flashlight begins with one more additional layer of glue. Now solder the LEDs and resistors with a regular blowtorch. Be careful not to damage or touch the contacts. Remember that all ends of the LED bulbs must be shortened before soldering. To begin, mark the positive and negative conclusions so as not to confuse them.
Alternatively, you can simply make the negative conclusion a little shorter. This will not affect the quality. Now solder the leads.
Checking and filling contacts is an important step when assembling an LED flashlight. Before starting this task, check the operation of the already received device by connecting it to power. All lamps should light up. Now let's fill in the contacts. It is convenient to do this with regular wax or use paraffin. It is best to squeeze out the wax with a syringe so that the contacts do not touch each other. This is a short circuit precaution.

Let's move on to working with the reflector. It increases the power of the LED flashlight. You need to remove the halogen lamp from the reflector. We also recommend cleaning it from the resin that held the lamp in place.
Assembling an LED lamp is the penultimate stage of working on a DIY LED flashlight. To do this, we securely fix all contacts. Make sure everything fits snugly!

Finally, we have come to the completion of creating a DIY LED flashlight. Molten plastic is needed to fill the contacts. Wax that was used previously is not suitable, as it requires high reliability and strength. We solder it to a power source, for example, to a regular battery, or to a plug.

After the plastic hardens, cut off the excess leads. Then reconnect the resulting device to power. If there are no signs of a short circuit within 2 minutes, confidently install your DIY LED flashlight anywhere.
If 10 years ago many people could only find LEDs in expensive equipment, now this product is ubiquitous. The cost of LEDs has decreased significantly in recent years, so their use in many areas of technology is constantly growing. Just 3 years ago, few people could afford to buy, for example, a flashlight that glows not with an incandescent lamp, but with LEDs. Now this problem can be easily solved. However, not all options are good. There are often cheap fakes on the market, in which the LEDs quickly go out and burn out, so buying a ready-made unit is not always justified. Making an LED flashlight with your own hands is not so difficult now.
This design will likely be more durable than a store-bought flashlight. In addition, it can not only be powered by batteries, but be rechargeable. This is a fairly convenient and economical option that you will surely like.
Required materials and tools
So, now directly about how to make a rechargeable LED flashlight with your own hands.
The tools and materials necessary for construction can be found in every home; in extreme cases, go to the nearest specialized store. Of course, an LED flashlight will need LEDs.
They have a number of advantages compared to conventional lamps. They are brighter, more economical, and shock-resistant. You will also need a battery that produces a voltage of 12 V. You can buy it in a store or pull it out of some unnecessary thing, such as an old radio-controlled toy.

For work you will need the following materials:
- pipe 5 cm, it is advisable to use PVC material;
- PVC glue;
- PVC threaded fitting - 2 pieces;
- PVC threaded plug;
- toggle switch;
- 12 V battery;
- a piece of foam;
- LED lamp;
- insulating tape.
You will need the following tools:
- soldering iron;
- solder;
- hacksaw;
- sandpaper;
- needle file;
- side cutters.
Now you can start creating.
Return to contents
How to make such a device?

First, select a battery. It should be shaped to fit into the PVC pipe. You can use not only the one-piece model, but also connect several finger or little finger batteries in series to get a total voltage of 12 V.
Now it’s worth including a toggle switch in the circuit. It can also be soldered. It must be open so that when it is closed, current will flow through the circuit.
The DIY lantern is ready. All that remains is to create a housing for it, because a lamp with a separate toggle switch and battery does not have a very aesthetic appearance. By the way, at this stage it is better to test whether everything is in working order in order to exclude alterations.
If everything is fine, you can start making the case. It is also very easy to make with your own hands from the remaining material.
First, you need to cut a hole in the fitting and process its edges with a file so that the lamp can be easily inserted.
Now you need to measure the length of the lamp along with the battery in order to know exactly how long the pipe that acts as the housing will be needed.
- Before installing the LED lamp in its rightful place, the edges must be lubricated with glue to subsequently prevent moisture from getting inside the lamp. Now you can glue the fittings on both ends of the PVC tube to finally protect the lantern from moisture.
- The toggle switch must be installed on the side opposite to the lamp under the plug. Now you can wait a bit until the glue dries and the flashlight is completely ready for use. Although this, of course, is not quite a flashlight, but some semblance of it, which needs to be brought to mind.
The fittings and plug will protect the flashlight well from moisture getting into it. This is very important, because water is something that greatly affects electronic devices, in particular, a flashlight is no exception. That is why in this version of the battery manufacturing, much attention is paid to the issue of protection from moisture.
For this purpose, various devices and materials are used to prevent it from getting on electronic parts. You can, of course, neglect these safety measures, but there will be no guarantee of flawless operation for many months and years.
If everything is done correctly, the owner of the device will certainly be satisfied with his work.