Hip roof construction scheme. Roof rafter systems: calculation and schemes of a hip roof. Hip roof rafter system: device diagram
Supporters of the European style in the construction of suburban real estate in most cases opt for a hip roof, the advantage of which is not only visual appeal, but also the reliability of the structure. Choosing even the easiest option for execution, you can use a lot of interesting elements that can give the structure a special sophistication and uniqueness.
What is a hip roof
The most straightforward hip roof is made in the form of a frame with four slopes: two triangular end, called hips, and two frontal trapezoidal planes. All slopes are laid from the ridge element to the cornice, while the frontal surface has a larger area and length of the slope.
In addition to the standard design, there are half-hip roofs, which are usually used to create designs in the Dutch style. This option provides for the installation of the eaves of the front slopes significantly lower than the end ones. It is advisable to erect such a roof when arranging an attic room as a living space.
All four slopes of a hip roof converge on a ridge beam, which is smaller than on a gable roofThe installation of a hip roof is carried out on the basis of the assembly of units and elements that are also present in the structures of more complex roofs.
The main frame of the structure is assembled from the following elements:
- For the manufacture of side rafters and intermediate systems, boards with a section of 50 × 150 mm are harvested. When constructing a structure, it should be remembered that the extreme rafters should have a smaller angle at the top than the intermediate ones.
- The installation of short rafter legs is performed to the corner rafter, and not to the ridge, while their angle of inclination should be the same as that of the intermediate parts.
- For ridge elements, select material of the same section as for the rafters.
In the frame of the hip roof, it is customary to distinguish central and intermediate rafters. Elements are called central, the joining of which is performed at the corners of the ridge bar from three sides. Intermediate rafters are located between the central ones and connect the ridge with the Mauerlat, forming a cornice.
 The central rafters converge on the ridge element on three sides
 Additional, but no less important, in the construction of a hip roof are the following factors:

Photo gallery: houses with hip roofs
All the arches of the hip roof of a square house converge to one point. Part of the attic structure can be brought out onto the slope of the hip roof. The house can have extensions covered with a similar roof. The roofs of several equal parts of the house can be combined into a single structure. buildings in medieval style
Self-construction of a hip roof: detailed instructions
Do-it-yourself roof installation requires strict adherence to the construction stages, as well as the availability of skills for similar work and a set of special tools.
List of tools and materials for the construction of a hip roof
Installation of a roof frame is impossible not only without high-quality sawn timber or roofing, but also without appropriate fasteners.
Metal fasteners include:
- nails and screws for roofing works;
- anchor bolts;
- steel corners;
- other details that are responsible for the reliability and strength of the structure being erected.
An important point in the arrangement of the roof frame is the installation of a sliding fastening of rafter trusses both on the ridge and at the points of connection with the Mauerlat. This method of fixing the rafter elements eliminates the possibility of damage to the roofing system due to shrinkage of the load-bearing walls and seasonal deformations of the building. .
 Sliding fastening allows the rafter elements to move within the permissible deviations with small deformations of the building frame
 The rafter structure is assembled from the following materials:
- Mauerlat is made from a bar with a section of 100 × 150 mm.
- For the ridge and rafters, a bar with a section of 50 × 150 mm is selected. Experts engaged in the installation of rafters recommend using a beam or boards with the same section in work, only then will the maximum strength and quality of the structure be achieved.
- The rafter system, as it is ready, is equipped with a wooden crate with a board section of 25 × 150 mm.
When choosing a roofing material, several options are offered, among which a soft roof is considered the best. It is easiest to attach it to complex rafter systems like a hip . Before installing the coating, a layer of insulation and a vapor barrier film should be laid; if necessary, plywood can be additionally attached.
Before proceeding with the installation of the roofing cake, all wooden parts of the rafters should be treated with an antiseptic.
Installation of the structure will be carried out much faster if you have the necessary tools at hand:

Video: how to make a washed down rafters in a hip roof
What you need to know when designing and budgeting for construction
The design of the roof can be any, depending on the needs and capabilities of the owner of the house. The complexity of the work will depend on the location of the bearing walls. As the complexity of the project for its implementation, the consumption of materials, labor costs, and terms of order execution increase.
 The difficulty of erecting a hip roof primarily depends on the size and configuration of the building.
 It is better to leave the construction of a complex hip roof to professionals who will perform accurate calculations of all elements of the rafter system and will be able to manufacture the roof in strict accordance with the project. Those who like to try their hand at self-construction need to consider several factors:
- The ability of the structure and foundation to withstand the load of the future roof.
- Features of the rafter system - layered and hinged structures have their own subtleties of implementation.
- The permissible size of the cross-section of wooden structural elements for the given values of the length and distance between the trusses.
- Correspondence of the angles of inclination of the slopes and the rafter run when bringing them together on the ridge.
- The need to organize additional holes and protrusions, for example, for chimneys, ventilation, window and other openings.
 When designing a rafter system for a hip roof, many different factors must be taken into account.
 Step-by-step instructions for installing the rafter system
First, the wood is prepared - it dries well, is treated with antiseptic compounds and is dried again. As soon as the material is ready, you can proceed with its installation according to the scheme below:
- Along the perimeter of the supporting base, a Mauerlat with a mandatory waterproofing layer of roofing felt or similar materials is laid and securely fastened.
 Mauerlat roof is laid on a waterproofing material and fixed with studs
 - Mauerlat is marked out according to the previously calculated dimensions. To make the marks clearly visible, it is recommended to apply them with a bright marker or even drive in small beacons. It is important to observe the identity of the markings on opposite planes, otherwise the laying of the beams will be uneven.
 The markings must be done very carefully so that the trusses and puffs are installed evenly
 - Installation of floor beams is carried out on a Mauerlat or on an additional beam, reinforced just below the plane of the walls.
 Floor beams (tightening) can be attached to the Mauerlat
 - To reduce the load from the supporting frame, the Mauerlat is fastened with transverse ties.
 Transverse tightening redistributes the load from the roof evenly along the entire perimeter of the rafter system
 - Once the braces have been laid on top of the floor joists, it is recommended to build a plank flooring to be attached to the joists so that it will be comfortable and safe to walk on during further work.
 Temporary flooring is used for safe movement over the entire floor area when installing rafters
 - Further, the racks are installed to the puffs or to the floor beams.
- At the top, the racks are attached to the ridge beam. The central rafters from the end of the roof are also mounted on it.
- Then, the marking and the device of intermediate rafters from the side of the gables are carried out.
 Intermediate rafters are installed from the front
 - After that, diagonal rafters are laid, connecting the ridge element of the building with the corners. If necessary, it is possible to install additional racks.
 Diagonal rafters connect the ridge roof element to the corners
 - Short rafters called rafters are fixed to the diagonal rafters. The distance between them should be the same as between the intermediate elements.
 Narodniks connect the diagonal rafters with the Mauerlat
 - Other details of support and reinforcement may appear in the design diagram: struts, wind beams, a truss system.
- If the rafters end on the surface of the Mauerlat, they must be extended outside the building frame with the help of "filly", due to which cornices and roof overhangs are created.
The rafter legs can be attached to the Mauerlat with various rigid elements, for example:

The rafter legs are also attached to the ridge beam in several ways:
- Connecting the legs above each other and above the timber, followed by bolting.
- Creation of grooves in the rafters to strengthen the rigidity of the connection with the ridge element.
- Bringing the rafters to the ridge and then fastening them with wooden or metal linings.
In the place where the ridge bar is attached to the rafter legs, a rather complex knot is also obtained, and only with reliable mating and fixing of all parts can we talk about the durability of the hip roof. In this case, the ridge bar is laid on top of the racks, after which it is fastened with wooden pads on both sides. Then diagonal rafters are cut out, which are attached to the ridge and intermediate rafters. Similarly, the installation of the second rafter is carried out for another corner of the house.
Video: do-it-yourself installation of the rafter system of the hip roof
Roof preparation for roofing
When the rafter system is fully installed, you can start preparing the structure for laying the roofing material:
- Marking is carried out in the places of planned window and door openings, chimney outlets, ventilation openings, followed by framing the selected openings with wooden slats.
- Next, the roofing cake is mounted in the sequence given below:
- A layer of vapor barrier film is stretched and attached to the rafters.
- The next layer is the crate.
- In the intervals between the slats, an insulation with a windproof, like a plastic film, is attached.
- Next, a counter-lattice is installed.
The last stage before the installation of the covering is directly determined by the selected roofing material. So, if the choice fell on a metal tile, then it can be attached directly to the counter-lattice. If a soft roof is used, then an additional layer of plywood or OSB sheets will be needed.
 It is recommended to strictly follow the rules for laying roofing material
 Arrangement of a roof ventilation system
For air intake from the under-roof space, the ventilation hole is made at the bottom of the wind sheathing, and for its output - in the upper part of the roof - closer to the ridge element. When creating a filing with wooden planks, you can leave a small gap between them to create better ventilation.
If the filing is tightly assembled, it is recommended to make several small wooden gratings and expand them over the entire length of the wind filing in 80 cm increments. To drill the desired hole, you will have to arm yourself with a drill with a cup attachment. A place for the upper air outlet is provided in the roof itself.
When using shingles, ventilation is carried out by means of a ventilated ridge; ceramic tiles allow air to be supplied through a roof valve. Ventilation of slate, ondulin and other similar coatings is carried out through standard ridge skates. The metal tile is ventilated with a ridge seal.
Video: metal hip roof
Gazebo with a hipped roof
A gazebo with a hip roof will become the standard of design solutions, and, subject to competent calculation and arrangement, it will be distinguished by reliability and durability of operation. It will be easy to assemble a hipped roof with your own hands. This design is suitable for a gazebo in the form of a rectangle or square. The first option is an assembly of a hip structure with two triangular and the same number of trapezoidal slopes. The second option is a hip hip roof, consisting of 4 isosceles triangular slopes.
 The hip roof for a square gazebo consists of four identical triangular sections
 A four-pitched roof is an excellent choice when building a gazebo, since it allows the use of any roofing, and a convenient design provides a free viewing angle, it can be easily equipped, for example, in the Chinese style, adding lengths to overhangs and several curved diagonal rafters.
At the preparatory stage of the work, a drawing of the future roof is made, taking into account the main factors:
- the weights of all rafters and their additional elements;
- roofing and waterproofing masses;
- the level of climatic loads, the layer of snow masses;
- the weights of the builders serving the roof;
- loads from equipment that is planned to be installed on the rafter system.
The features of the installation directly depend on what the slope of the slopes will be and what materials are chosen for covering the roof, for example, the pitch of the battens of the sheathing and the rafter system. And all this affects the total weight of the building.
You can extend the service life of a wooden gazebo by pretreating all its elements with special antiseptic impregnations, as well as a fire retardant. All these compositions are applied quite simply with an ordinary brush or roller.
The support for the hipped roof of the gazebo can be wooden, brick walls or support frame racks. If a brick is used in the work, then the structure will turn out to be capital and will require the construction of a solid foundation that can withstand heavy loads. The construction of a hip roof on such a gazebo is generally similar to installing a roof on a residential building or other large-sized structure.
 Small hip roofs can be assembled on supports from pillars, which must first be well fixed
 If the gazebo is installed on wooden pillars, then you should first check the strength of the fastening of its supports, they should be strictly vertical, and for the rigidity and stability of the frame from below they are tied with jumpers. Jumpers are also mounted on top, which will be a strapping for a pitched structure. Due to the high load, the supports may gradually disperse, therefore it is recommended to fasten them in advance at the upper ends using diagonal jumpers, and lay wooden or steel plates at the joints.
Step-by-step instructions for installing a hip roof for a gazebo

The hip roof is assembled in the same way as a regular hip roof, excluding the installation of a ridge bar. In this case, a bunch of diagonal rafters is made into a ridge knot.
Video: building a gazebo and barbecue with your own hands
Lack of experience in the construction of roofing structures can negatively affect the quality of the future roof and the degree of protection of the entire structure, therefore, to perform this kind of work, it is recommended to contact professional construction teams. With the right approach, a hip roof will be an excellent architectural structure for a house, a gazebo and any other buildings.
Suburban areas are not large in size. Therefore, many people build small houses and increase living space by creating additional living quarters in the attic. This is possible if the device of the hip roof rafter system is correctly performed.
Such a roof is made in the form of four slopes. Two of them are the classic side ones in the form of a trapezoid, and two more are triangular at the ends of the roof. Unlike a hipped roof, where all four slopes converge at one point, the hip roof has two peaks connected by a ridge.
Hip roof with four slopes
It is the lateral triangular pediments, which are performed with a slope, and are called hips. The gable roof also has triangular end gables, but they are located strictly vertically; at the hip roof, these slopes are inclined, which is a distinctive feature of this type of roof.

Gable hip roof
A hip roof is called if the end slopes, starting from the ridge, reach the outer wall, that is, to the cornice. But there are options when the slope is interrupted and in one place goes into a vertical plane. Then such a roof is called half-hip or Dutch.
According to the method of installation and the use of various materials, such roofs can be classified as complex structures. In general, the structure of the hip roof consists of a Mauerlat, a ridge bar, rafters - angular, short and intermediate.
Mauerlat is a wooden beam mounted around the entire perimeter of the house at the very top of the walls. It serves to correctly transfer and distribute the loads exerted by the wind, snow cover, the weight of the roof and on the load-bearing walls of the building itself. This element is a connecting upper rail for walls made of piece materials - bricks, concrete blocks.

Mauerlat hip roof
For walls made of logs or beams, the Mauerlat is not suitable. Its role is played by the upper rims of the frame.
The ridge beam is the main element of the rafter system, which connects all the roof slopes into a single structure. It should be of the same cross-section with the rafter legs. Otherwise, in the future, there may be a skew of the entire rafter structure and the roof as a whole.
Corner rafters, also called in a different way slant or diagonal rafters, are the basic strength parts that connect the corners of the building box with the ridge beam. For their manufacture, you will need a board equal in thickness to the ridge bar. At one end it is attached to the ridge, with the other it rests on the Mauerlat. Depending on the roof project, a different number of such rafters is used, but not less than four.

Hip roof corner rafters
Short rafters can be of different lengths, but when assembling the roof structure, they are all brought out at the same angle and are located parallel to the intermediate rafters. When the necessary calculation of their number is made, first of all, the area of the entire roof is taken into account. One end of the short rafter legs is connected to the corner rafter, and the other rests on the outer wall of the building.
The central rafters are installed with the upper end on the ridge beam, with the lower end resting on the load-bearing walls of the house. As a rule, their calculation is as follows: three on one side of the roof and the same amount on the other, but when designing rafter systems for houses of a large area, an increase in their number is allowed.

Intermediate rafters are elements mounted on the ridge on one side, and on the Mauerlat on the other. On hip slopes, they are usually not used, since the entire area is covered with short rafters. The calculation of the cross-section and the number of intermediate elements is based on the bearing capacity of the rafter structure and the type of roofing material.
With a large building, it will be necessary to install additional reinforcing elements in the form of struts and vertical struts supporting the ridge beam, and truss structures to prevent the diagonal rafters from sagging.
Rafter systems in these types of roofs are made in various versions. For example, if the hip slope does not reach the ridge, as a result of which a vertical small pediment of a triangular shape is formed at the top, then such a roof is called Dutch.

Dutch hip roof
Hip roofs also stand out. They all have four slopes of the same shape, and there are simply no side gables in such structures. Hips in this version are triangular surfaces, the slope of which is made at the same angle with other slopes. As a rule, such systems are used for buildings that have a square-shaped area in the projection. In the group of hip roofs, there are semi-hip roofs, hipped roofs, gable roofs, multi-gable roofs and gable roofs.

Hipped roof
In addition, there are broken roofs, consisting of slopes of various sizes, the angle of inclination of which is different. Such structures are very complex in the device, it is also difficult to make their calculation. Therefore, they are not often found, but it should be noted that they have a very attractive appearance. You can evaluate the effectiveness of roofs with a broken structure of the rafter system in the video, which also tells about the features of their construction.
The device of hip rafter systems begins with the development of their project. A correct and competent project will allow you to assemble the roof in a short time. The optimal choice of the angle of inclination of the slopes is determined depending on the climatic conditions:
- In a region where windy weather prevails, the angle of inclination should be less, this will reduce the load from the wind on the roof.
- In snowier winters, the slope of the slopes, on the contrary, is increased so that ice and snow do not accumulate on the roof.

Hip truss system project
When choosing the angle of inclination of the rafters, respectively, the calculation of the required amount of material is carried out. And if for the lathing in almost all cases the calculation is based on the total roof area, then the number and cross-section of corner and short rafters are calculated separately, depending on the selected type of roof.
In addition to the climatic features of the region, when choosing the angle of inclination, the type of roofing material is taken into account:
- If typesetting material is used, for example, slate or metal tiles, then in order not to increase the load on the rafters, it is better to make the angle at least 22 °.
- When using roll coatings, the number of layers is taken into account. The more there are, the less you can make the slope of the slopes.
- The device of a larger angle of inclination of the slopes allows the use of roofing material - corrugated board, but the height of the profile is taken into account. In this case, the angle of inclination can vary from 20 to 45 degrees.

The choice of the angle of inclination of the roof by material
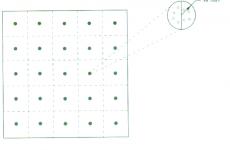
The correct calculation of the angle of inclination of the roof begins with determining the end axis of the building on the upper trim. After that, it is necessary to mark the middle of the ridge bar, at this point the central rafter leg will be located. Then it is necessary to determine the location of the next intermediate rafter, for which the distance is measured, corresponding to the calculation of the distribution of the intermediate rafter legs. In most cases, it does not exceed 70–90 cm.
The length of the rafters is determined so that their lower end protrudes 40–50 cm above the outer wall, and the upper end rested against the ridge beam.
A similar calculation is carried out on all four sides of the roof to calculate the location of the intermediate rafter legs on the ridge bar. An example of their correct location is shown in the photo.
When designing hip roofs, you can use two types of rafters - hanging and layered. Hanging ones rest only on the walls of the building, transferring all the spacer loads to the Mauerlat. If an attic is supposed to be installed, then additionally it will be necessary to install screeds made of metal or wood, which are laid on the load-bearing walls of the building and subsequently serve as the basis for the overlapping device. The photo shows how the mansard hip roofs with a hanging rafter system are arranged.

Mansard hip roof with hanging rafter system
Reinforced rafters are used if they have support in the form of columns or internal load-bearing walls. When designing the system, alternation of two types of rafters is allowed. Where the inner walls play the role of supports, layered ones are attached, and in other places they are hanging.
Fastening of rafters is mainly carried out by means of saws (saddles). But their depth cannot exceed a quarter of the width of the rafter board. In order for the gash to be the same on all legs, it is necessary to make a template. In addition, the elements of the rafter system are attached using metal corners, self-tapping screws, nails. Fastening can also be done with staples, bolts and studs.

Fastening the elements of the rafter system of the hip roof
When installing the Mauerlat, do not forget to lay a layer of waterproofing along the top of the walls. If the walls are lined with bricks, then embedded parts are installed in the last rows of the masonry for further fastening the Mauerlat. Such fasteners can be made in the form of vertical studs or bolts, installed in increments of no more than one and a half meters.
Hip roofs are complex structures, but this does not diminish their popularity in the least. Despite the complexity of the construction, they make it possible to arrange additional living quarters in the attic space, and if you carry out a high-quality one, then you can operate it in the winter.
Hip roofs have many benefits. They are beautiful, reliable under all weather loads, the four-sided design allows you to effectively insulate the house from the roof side. Some complexity is presented by the structure of the rafter system. We will deal with its schemes and calculations in this article.
Hip roofs, sometimes called Dutch and Danish, are distinguished by good quality, reliability and spectacular European design. The rafter base of such roofs consists of many basic and reinforcing elements that require sketches or three-dimensional drawings, precise calculations and execution.
Varieties of hip roof
Hip roofs, in addition to the basic classical design, consisting of two trapezoidal slopes and two triangular end hips, also include their varieties:
- Semi-hip gable.
- Half-hip four-slope.
- Tent.
- Hip-pediment.


Each type has its own rafter system scheme. Next, we consider and calculate the classic hip roof.
Scheme and main elements
To calculate the rafter system, you need to familiarize yourself with its basic diagram, main and auxiliary elements.
The main elements of the rafter system
The main elements are (see figure below):
- Mauerlat. It is a timber fixed along the perimeter of the outer walls with an indent from the outer edge. Wall mounted. Mauerlat distributes the load from the pressure of the rafters, connects the rafter system with the walls of the house, and is the basis of the roof.
- Skate. Upper crossbar for fastening the rafters of the roof slopes. The height of the ridge is based on the angle of inclination of the slopes. Gives the system rigidity and strength.
- The central rafters of the slopes. The ends of the ridge are supported on the sides of the Mauerlat. There are 4 such elements in the system. - 2 pcs. on each slope.
- Central rafters of the hips. The ends of the ridge are supported on the end sides of the Mauerlat. There are 2 such elements in the system. - 1 pc. on each hip.
- Slant legs (diagonal, angled rafters). Connect the corners of the Mauerlat with the ends of the ridge. They are part of the supporting structure. There are 4 of them in the rafter system.
- Intermediate rafters of the slopes. They are installed parallel to the central rafters of the slope between them with the same pitch, leaning on the side of the Mauerlat and the ridge bar. If the length of the skate is insignificant, it may not be used.
- Shortened rafters of the slopes. They are installed parallel to the central rafters of the slopes and have a variable length - the closer to the corner, the shorter. Lean on the side of the Mauerlat and on the slant legs. The number of elements depends on the installation step.
- Shortened hip rafters or wedges. They are installed parallel to the center rafters of the hips and have variable length - the closer to the corner, the shorter. They rest on the end part of the Mauerlat and the slant legs. The number of elements depends on the installation step.
 Diagram and main elements of the rafter system
You can read more about attaching rafters to the Mauerlat in our article.
The above elements are basic, basic. Other elements are designed to strengthen the main ones and are used in critical buildings, for example, for residential buildings:
- Vertical racks for supporting the ridge bar. They are supported by crossbars (see below), laid parallel to the end of the house or a bed, located along the longitudinal axis of the building (if there is a main wall under it).
- Crossbars or tightening. The rafter legs of the slopes are tied in pairs. Serve as a support for racks and diagonal struts (see below). They can serve as floor beams if they are built into the Mauerlat or installed directly into the longitudinal walls of the house. If the puffs are placed closer to the ridge, they will form the basis of the attic ceiling.
- Diagonal braces (braces). They are used to increase the rigidity of the system if the length of the rafters is more than 4.5 m. The use of struts allows you to reduce the cross-section of the rafters, which they reinforce.
- Sprengel. Beam installed in the corners of the Mauerlat. Serves for mounting a stand that supports and reinforces the slant leg.
- Wind beam. Serves to resist deformation of rafter legs in gusty, strong winds. Fastened to the rafters of the slopes from the inside, obliquely, on one or both sides - it depends on the wind load in the construction area.
- Filly. An element of a smaller section than the rafters themselves. Extends the leg of the rafters to organize the overhang of the roof in the event that a single element does not work due to the limited length of the lumber or for reasons of economy.
 Reinforcement elements
Calculation of the rafter system
The calculation of the system includes the choice of the angle of inclination of the slopes and hips and the calculation of the lengths of its main and auxiliary elements.
The choice of the angle of inclination of the longitudinal and end slopes
The choice of the angle of the slopes and hips ranges from 25-45 ° and depends on the desire to have an attic room, the adopted roofing material, the assessment of static (roof weight) and dynamic (wind, snow) loads.
In hipped roofs, the angle of inclination of the hips and slopes is the same. Hip roofs also often accept the same angles in terms of aesthetics, but they can be different if this is the architect's idea.
 Recommendations for the use of roofing materials
For a better understanding of the calculation algorithm, consider, as an example, a hip roof of a house with sides of 8 and 12 m, and a ridge height of 2.5 m.The slope angle of the slopes is 35 °, and the hip angle is 45 °.
Calculation of the main rafter elements
A classic hip roof consists of two trapezoidal slopes connected in a ridge, and two hips - end slopes in the form of triangles.
First you need to remember some formulas from the school algebra curriculum. This is the ratio of the lengths of the sides of a right-angled triangle, expressed in terms of the trigonometric function of the angle and the Pythagorean theorem.
 Trigonometric functions of an acute angle of a right triangle

Let's depict the frame of the truss system in axonometric form:

Let's calculate the main elements of the rafter system.
1. Calculate the length of the central hip rafter CD, which is the height of the isosceles triangle (hip) and the hypotenuse of the right triangle, the height of which is equal to the height of the ridge (CE = 2.5 m). Hip angle α = 45 °. Sin 45 ° = 0.71 (according to the Bradis table).
According to the trigonometric ratio:
- СD = CE / sin α = 2.5 / 0.71 = 3.52 m
2. Determine the length of the ridge K. For this, from the previous triangle, we find the length of the base ED, using the Pythagorean theorem:
House length: BL = 12 m.
Skate length:
- CF = 12 - 2.478 x 2 = 7.044 m
3. The length of the corner rafters CA can also be obtained from the Pythagorean theorem for the triangle ACD. Half the width of the house AD = 8/2 = 4 m, CD = 3.52 m:
4. The length of the central rafters of the slope GF is the hypotenuse of the triangle, the legs of which are the height of the ridge H (CE) and half the width of the house AD:
The intermediate rafters of the ramps are of the same length. Their number depends on the pitch and section of the beams and is determined by calculating the total load, including the weather one.
These tables correspond to the atmospheric loads of the Moscow region.
| Rafters step, cm | Rafters length, m | ||||||
| 3,0 | 3,5 | 4,0 | 4,5 | 5,0 | 5,5 | 6,0 | |
| 215 | 100x150 | 100x175 | 100x200 | 100x200 | 100x250 | 100x250 | — |
| 175 | 75x150 | 75x200 | 75x200 | 100x200 | 100x200 | 100x200 | 100x250 |
| 140 | 75x125 | 75x125 | 75x200 | 75x200 | 75x200 | 100x200 | 100x200 |
| 110 | 75x150 | 75x150 | 75x175 | 75x175 | 75x200 | 75x200 | 100x200 |
| 90 | 50x150 | 50x175 | 50x200 | 75x175 | 75x175 | 75x200 | 75x200 |
| 60 | 40x150 | 40x175 | 50x150 | 50x150 | 50x175 | 50x200 | 50x200 |
Let's compare the maximum, average and minimum cross-section of a bar with a length of 4.717 m (we look at the values for 5.0 m).
When cutting 100x250 mm the step will be 215 cm. With a ridge length of 7.044 m, the number of intermediate rafters will be: 7.044 / 2.15 = 3.28 segments. Rounding up - up to 4. The number of intermediate rafters of one slope - 3 pcs.
- 0.1 0.25 4.717 3 2 = 0.708 m 3
When cutting 75x200 mm the step will be 140 cm. With a ridge length of 7.044 m, the number of intermediate rafters will be: 7.044 / 1.4 = 5.03 segments. The number of intermediate rafters of one ramp - 4 pcs.
The volume of lumber on both slopes:
- 0.075 0.2 4.717 4 2 = 0.566 m 3
When cutting 50x175 mm the step will be 60 cm. With a ridge length of 7.044 m, the number of intermediate rafters will be: 7.044 / 0.6 = 11.74 segments. Rounding up - up to 12. The number of intermediate rafters of one slope - 11 pcs.
The volume of lumber on both slopes:
- 0.05 · 0.175 · 4.717 · 11 · 2 = 0.908 m 3
Therefore, for our geometry, the optimal option from the point of view of the economy would be a section of 75x200 mm with a step of 1.4 m.
5. To calculate the lengths of the shortened rafters of the MN slope, you will again have to remember the school curriculum, namely the rule of similarity of triangles.
 Similarity of triangles on three sides
The large triangle, which we need to reinforce with shortened rafters, has known dimensions: GF = 4.717 m, ED = 2.478 m.
If the shortened rafters are installed with the same pitch as the intermediate ones, their number will be 1 piece in each corner:
- 2.478 m / 1.4 m = 1.77 pcs.
That is, two segments are formed with one shortened rafter in the middle. A small triangle will have a leg half the ED:
- BN = 2.478 / 2 = 1.239 m
We compose the proportion of such triangles:
Based on this ratio:
At this height, the rafter section is taken according to the table - 75x125 mm. The total number of shortened rafters of both slopes is 4 pcs.
6. Determination of the length of the shortened rafters of the hips (rafters) is also carried out from the ratio of similar triangles. Since the length of the central rafters of the hips is CD = 3.52 m, the step between the shortened rafters may be larger. With AD = 4 m of shortened rafters with a step of 2 m, there will be one on each side of the central rafter of the hips:
- (2 3.52) / 4 = 1.76 m
At this height, the rafter section is taken as 75x125 mm. The total number of shortened rafters of both hips is 4 pcs.
Attention! In our calculations, we did not take into account the overhang.
Calculation of the area of the roofing
This calculation is reduced to determining the areas of the trapezoid (slope) and triangle (hip).

Let's do the calculation for our example.
1. The area of one hip with CD = 3.52 m and AB = 8.0 m, taking into account the overhang of 0.5 m:
- S = ((3.52 + 0.5) (8 + 2 0.5)) / 2 = 18.09 m 2
2. The area of one slope at BL = 12 m, CF = 7.044 m, ED = 2.478 m, taking into account the overhangs:
- S = (2.478 + 0.5) ((12.0 + 2 0.5) + 7.044) / 2 = 29.85 m 2
Total roof area:
- S Σ = (18.09 + 29.85) 2 = 95.88 m 2
Advice! When buying material, consider cutting and inevitable losses. The material produced by elements of a large area is not the best option for hip roofs.
Structures with hanging rafters are in demand when erecting a roof with support only on the outer walls of the house. This construction principle is applicable to both gable and hip roofs.
Hip roof design features
The calculation and construction of a hip roof is significantly more complicated than the construction of single-slope and dual-slope structures. The hipped roof has two slopes in the form of a trapezoid, and two triangular slopes (hips). This configuration allows to withstand high wind loads, reliably protect building structures from external influences. In addition, the resulting spacious attic room can be used as a living room (windows for natural light are mounted on the roof slopes).
A hipped roof with a ridge girder can be erected in two ways: with layered or hanging rafters. The use of layered roofs allows you to make the roof lighter, simplifies calculation and installation. But in this case, it is required that the building has a load-bearing middle wall. Hanging rafters in the construction of a hip roof can be used with a small width of the building and the absence of internal walls. The service load is transferred to the outer walls of the building.
The angle of inclination of the slopes of a hipped roof with hanging rafters must be more than 40 °.
The hanging rafters of the hip-type roof are supported either on the floor beams or on the Mauerlat. The design of the rafter system requires accurate calculations and the preparation of detailed drawings indicating the principles of installation of fasteners. For small buildings of the correct geometric shape, calculations can be performed independently, in other cases it is recommended to contact professionals, since design errors will cause a significant decrease in the reliability of the roof during operation.

At the first stage of calculations, it is necessary to choose the angle of inclination of the hip roof, which directly affects its height. For a system with hanging rafters, the optimum tilt angle is 40 - 60 °... The higher the ridge is located, the more material will be required for the construction of the roof. At the same time, a high roof is the best option for regions that are characterized by a large amount of precipitation. A flatter roof has less windage and better withstands wind loads.
When choosing the angle of inclination of the hip roof, it is recommended to adhere to the "golden mean" rule and proceed from aesthetic considerations. You can choose the angle of inclination of the slopes, and based on this, calculate the height of the ridge. Or vice versa, determine the desired height of the roof, and then calculate the angle of its slope.

When calculating the hip roof, it is required to ensure the correct positioning of the ridge girder. It should be located strictly parallel to the bearing side walls, exactly along the central axis of the building and equidistant from the end walls. Otherwise, the center of gravity of the roof will be displaced, which will lead to an uneven distribution of the load on the rafter structure and load-bearing walls, which is fraught with deformation and destruction of the roof.
Drawings prepared as part of the development of the project must contain information on the location, section, shape and dimensions of all elements of the rafter system. Their appearance and design features, fastening features, span width, ridge length, roof height are taken into account.
Rafter system of a hipped roof
The main elements of the rafter system of the hip-type roof include:
- Mauerlat / floor beams (support for rafter legs);
- ridge girder (an element that, together with the rafters, determines the configuration of the roof);
- ordinary side rafters (connect the ridge and load-bearing walls);
- diagonal (corner, oblique) rafters (directed from the corners of the walls to the ridge);
- central rafter hip;
- rafters (shortened rafter legs connecting the rafters to the Mauerlat);
- struts and struts (used as additional supports);
- crossbars (provide a rigid connection between the rafter legs in pairs);
- truss (serves as an additional support for the diagonal rafters).

When constructing a hip roof using hanging rafters, the ridge girder is not installed. Instead, central trusses are mounted - rafter legs connected by crossbars for rigidity. The rafter system in the central part of the future hip roof is performed in the same way as in the construction of a gable. Roof trusses are recommended to be made on the ground according to a pre-prepared template in order to accurately comply with all dimensions. When installing trusses, it is necessary to check the verticality of each structure. It is important that the outer rafter trusses are at the same distance from the corresponding end walls of the building to ensure the correct geometry and symmetry of the hips.
After installing a row of trusses in the ridge part of the resulting system (on both slopes), bars or boards are mounted that connect the trusses to each other. Then to the extreme farms, docked rafters resting on the corners of the building. At the next stage, the central rafter of the hip (on each triangular slope) and the rafters are mounted.
Roof trusses can be supported by a Mauerlat or floor beams. When developing a project, it should be borne in mind that in the second case, the step of laying the beams must correspond to the step of the rafters. If the rafter system provides for the installation of trusses on a Mauerlat, then the puffs located at the bottom of the trusses will not only ensure the rigidity of the structure, but can also serve as floor beams.

Bottom tightening can be used if the span does not exceed 6 meters. If the hanging rafters are installed in a span of 6 to 7.5 meters, the use of the crossbars at the top is necessary. With a span length of 7.5 - 9 meters, the upper part of the rafters should be tied with a tightening using a headstock (stand). If the span is from 9 to 10 meters, the previous type of structure should be reinforced with struts.
Before proceeding with the installation of the rafter system, it is necessary to check the geometry of the walls of the building. The upper part of the walls (Mauerlat, floor beams) should be located strictly horizontally.
Principles for the manufacture and installation of overhead rafters
The installation of diagonal rafters is a key step in the construction of a hip roof. It is important to ensure the correct geometry of the structure so that the rafter system evenly distributes the operating loads of the roof.
The diagonal rafters are longer than the side ones, they rest on the corners of the building frame, and in the upper part they are connected to the ridge element of the roof. In turn, the rafter half-legs (shortened) - the rafters - are based on the nakosny ones. Higher requirements for strength are imposed on overhead rafters, since they carry an increased load, acting as supporting elements of the system. The total load on diagonal rafters is twice as much as on conventional rafter legs. The lower part of the overhead rafters rests against the Mauerlat or a beam laid on the corner of the wall, or rests on them, depending on the design principle - spacer or non-spacer.

Slant rafters can be made of durable laminated veneer lumber of the required length. But, most often, double boards are used, spliced in compliance with certain requirements. Splicing the diagonal rafter leg allows:
- to increase the resistance of the element to loads due to the doubled cross-section;
- make a continuous beam of the required length;
- unify the dimensions of the hip roof parts.
Unification allows the use of the same material for the manufacture of diagonal elements as for standard rafter legs - the use of boards of the same standard size simplifies design solutions when designing and installing rafter system units.

One or two supports are installed under the diagonal rafter. The boards are spliced along the length in such a way that the joints are located at a distance of 0.15L from the center of the support. Accordingly, the length of the boards for the manufacture of roof rafters is selected depending on the length of the span and the number of required supports. In particular, if a 10 meter diagonal rafter is required for a hip roof, it is recommended to use 7 and 3 meter boards to position the rack 1/4 of the span from the top end of the rafter. In this case, the structure will be able to withstand the design loads - it is not recommended to put supports under the middle part of the rafter.
The support for the diagonal rafter is a brace or a rack made of timber or paired boards. The angle of installation is of no fundamental importance if the brace rests against a strong reinforced concrete floor (with the laying of a waterproofing layer). If the stand rests against a bed, the installation angle is usually 35 - 45 ° to the horizontal plane.

Additional supports are installed according to the following principle. Span lengths up to 7.5 meters require a single brace. If the span length is 7.5-9 meters, a support is installed at the bottom of the rafter, or a truss truss is mounted. With an increase in the length of the span, an additional support is installed. If the overlap is not strong enough, it is necessary to lay an additional intermediate beam to stop the uprights.
Sprengel - a beam that crosses an angle formed by two walls adjacent to each other. The truss truss is a structure in which the truss rafters are supported by supports that lie on the truss rods. At the same time, the entire system is reinforced with two struts. For the manufacture of truss truss, a beam of 100 × 150 mm is used for beams, 100 × 100 for racks and 50 × 100 for struts.
Installation of the upper part of the diagonal rafters
The upper end of the rafter rafters is attached to the ridge of the extreme truss when installing the hanging rafter system. To do this, it may be necessary to use a truss or a groove (a short board with a thickness of 50 mm), to which the ends of the diagonal rafters, sawn at the required angle, are attached. If the surf is positioned with an indent from the ridge, you get a Danish half-hip hipped roof. The following types of fasteners can be used to attach the slant rafters in the upper part:
Narodniks are attached to the nesting rafters by cutting or with the device of cranial bars (the second option allows you to get a more rigid structure). The cross-section of the bars that are sewn onto the rafter on both sides is 50 × 50 mm. Narodniks should be supported on the rafters with a shift so that the joints of the bars do not form at one point.
Hip roof with hanging rafters, hip roof rafter system
Features of the device of a hip roof with hanging rafters. Components included in the rafter system of the hip roof.
Hip roof rafter system: device specifics and description of the installation process
Hip roofs attract with an impressive list of convincing advantages. Among them are a spectacular shape, uniformity of heating and reliable protection of the house from precipitation. Due to the absence of gables, the hip structures are not afraid of significant wind loads. Compared to dual-slope options, there is much less reason to be afraid of deformations. The list of advantages can be continued, but their flow is slowed down by a very weighty circumstance: the rafter system of the hip roof does not please with the simplicity of the device. However, the complexity will not stop an independent builder if he is familiar with the nuances of the construction of a hipped frame.
Characteristic features of hip roofs
Hip roofs differ from gable counterparts in that there are no vertical gable walls in their design. The place of the pediments was taken by triangular slopes located at the ends, significantly reducing the real and visual volume of the roof. The economic effect of the volume reduction is a moot point. When cutting large-sheet material into hip slopes, costs, on the contrary, increase. For example, laying a profiled sheet or installing metal tiles will force you to fork out for the purchase of a coating one and a half times more than for the arrangement of a standard pitched structure. The purchase of material from the category of piece will reduce the construction budget, because you will not have to spend money on sheathing the ends of the roof.

By analogy with any of the building structures, the hip roof can be conditionally divided into simple geometric shapes. In the simplest version, without mates and valleys, it has two pairs of symmetrical slopes: two triangles and two trapezoids. On this basis, the hip roof received the parallel name "hipped roof".
In front view, its section resembles an ordinary triangular gable roof. In profile, the structure has a trapezoidal configuration, which can also be divided into a rectangle with two mirrored triangles on the sides. The shape of the trapezoid depends on the architectural preferences of the owner. It is determined by the ratio of the length of the eaves overhang to the length of the ridge. The part of the structure, limited by a rectangle, is constructed in accordance with hanging or layered technological roofing standards.

Replaced hip gables are installed at a certain angle to the horizon, because they must adjoin the inclined sides of the trapezoid. It is in their device that the main snag of the hip rafter system lies, because it will not work with the usual pitched method. After all, the ridge run does not completely cover the ramp. Therefore, the rafter legs of the hips and the triangular parts of the large slopes associated with them literally have nothing to rely on with their upper heels.
They will be supported by special rafter legs connecting the ridge girder with the corners of the structure. If you look at the hip rafter structure from above, then the nipple rafters will look like diagonals. The direction of the installation became the reason for obtaining the second technological name - "diagonal". Naturally, the rafter legs of different lengths will rely on the diagonals, because they are installed perpendicular to the eaves of the roof. They have their own name - wives.

Summing up the information, we get that in the construction of the rafter frame for the hip roof will be involved:
- Ordinary rafter legs supported by the lower part on the Mauerlat or on the floor beams. In accordance with the type of support, they can be hanging or layered.
- Diagonal rafters connecting the corners of the roof and the edges of the ridge girder. Note that they are used not only in the arrangement of convex corners of hip roofs, but also in the construction of concave corners of valleys.
- Narodniks forming the plane of the hips and parts of large slopes adjacent to the rafters.
The installation of hanging and layered rafter legs is carried out according to the rules according to which the rafter system of a gable roof is being built. We will deal with their diagonal counterparts and with rafter half-legs-freaks.

Diagonal rafter legs
Taking into account the diagonal arrangement, it is easy to guess that the length of the slings is greater than the length of ordinary rafter legs. In addition, they serve as supports for the wives. In view of this, the overhead rafters are loaded one and a half times more than ordinary counterparts. Therefore, it is customary to make them paired of two boards with a section equal to the same size of material for ordinary rafter legs.
The pairing of roof rafters simultaneously solves three technical problems:
- Allows you to increase the load without risk due to the double cross-section of the bearing element.
- Provides the ability to obtain a diagonal structural element of any length without sections weakened by building-up.
- Eliminates the need for a targeted purchase of rafters.
Due to their length, diagonal rafters need additional supports, the number of which depends on the length of the rafter leg.

Supports for diagonal rafters
Regardless of the scale of construction, any scheme of the hip roof rafter system includes supports to strengthen the diagonal rafter legs. If the design size of the miter is more than 9m, i.e. it covers a span of equal meters, its stability is provided by two additional supports. For smaller spans, one support located in the upper span is sufficient.
As a support for the diagonal rafters, the following can be used:
- Rack installed vertically directly on the floor. A piece of waterproofing is laid between it and the ceiling if the rack is to rest against a reinforced concrete slab.
- Brace... It is installed, as it should be for braced rafters, at an angle, the size of which is allowed to vary from 45º to 53º. The slope value does not play a special role. It is important that the strut itself supports the rafter in the most loaded area. The lower heel of the brace rests on the bed.
- Sprengel... It is a T-shaped short beam from a bar, turned upside down. It is used in the device of large spans that require two or more reinforcing supports. The truss is installed so that its base is perpendicular to the oblique rafter. Place it at the bottom of a large span closer to the corner of the roof. Instead of a truss, a conventional short strut can be used.
Additional supports are made, again from a double board or bar, installed at the most loaded points.

A video review will introduce the nuances of the device of supports for the frame of the hip roof:
The nuances of supporting the rafters
The upper heel of the diagonal rafter rests on the ridge girder in various ways. The choice of method depends on the design features of the rafter system:
- In rafter structures with one purlin along the central axis of the roof, the diagonal rafter legs are supported directly on the purlin console.
- In rafter systems with two girders and plank rafter legs, the diagonal rafters are supported on a truss, which in turn rests on both girders.
- In rafter frames with two girders and rafters from a bar, in addition to a sprengel, a surf is used - a plank shorty that sews ordinary rafter legs in the ridge area. The thickness of the reinforcing shorty is from 5 cm or more.
The heel of the diagonal rafters for landing on one of the listed upper stops is trimmed in fact. Fastening is done with nails. If necessary, the fixation can be strengthened with wire twists or metal clamps.

The lower heels of the braces can be resting against the corner of the Mauerlat or a specially installed corner beam. You can just lean on them. Fasten the diagonal rafter legs with metal staples, nail strikes over a wooden lining or corners.
Narodniks and methods of their device
Narcissists form the hips and triangular parts of the large rays. The top of the half-leg rests on a rafter rafter, the lower heel on a Mauerlat, a cut-in beam or a timber floor beam.

Installation of handicrafts can be carried out:
- Through cutting... In the slopes, nests are chosen so that the half-legs of adjacent slopes are not located opposite each other. It is recommended that the distance between the cuttings is at least 20 cm. Therefore, in the installation step, the wives are allowed to move, so as not to cut down the nests at one point.
- By installing cranial bars, serving as supports for half-legs. Bars 50x50mm are built up along the lower edges on both sides of the diagonal rafters. Their presence allows you to abandon the cuts, significantly weakening the bearing element.
The second option is easier to use and preferable due to the increased rigidity of the structure. In addition, it absolutely does not oblige to change the pitch of the half rafters: they can be located opposite each other. To the Mauerlat or beams, the beams are attached by the same method that was used to install ordinary rafters.

Elementary hip rafter system
The easiest way to crown a suburban property with a four-slope structure is to purchase and install prefabricated roof trusses. However, it is much more interesting, useful, cheaper to do it yourself with a hip roof and a rafter system suitable for it. Especially if it is planned to build it over a small outbuilding, a gazebo or a summer kitchen. It is even worth practicing on simple structures before applying efforts to more responsible objects.
Note that in the example below, there is no overlap, no fenced attic, and no insulation. Snow practically does not linger on the slopes, i.e. the load on the rafter legs is minimal by their standard standards. The principle of separation between the women is not preserved. All nodal connections are made with a nail surf and metal corners. The contractor will need a 5 × 25cm board for the manufacture of rafter legs and girders, as well as moisture-resistant plywood for the construction of a continuous sheathing, because the building is planned to be covered with bituminous tiles.

Stage 1: Modeling and design
Regardless of the architectural complexity of a building structure, it needs a project. It will help you determine the optimal shape and save you from buying unnecessary materials. For a simple hip roof with a standard rafter system, super-complex drawings are not required, but at least a simple sketch is necessary.
Instructions for simplified design:
- We measure the width / height / length of the building. According to the data, we draw the profile and full face of the structure on a sheet of paper on a scale, for example 1:50. This means that all sizes will need to be divided by 50. the wall of a house with dimensions of 5 × 2.5 m on a homemade drawing will be depicted as a rectangle with sides 10 × 5 cm. If it comes out too small, you can choose a larger scale - 1:40, 1:25, etc. It is advisable to duplicate the finished sketch a couple of times in stock.
- We select the optimal roof height and the angle of its slope. To do this, on one of the duplicates of the sketch, draw several options for the outline of the roof. We determine the most successful and measure the angle of inclination of future slopes with a protractor.
- We mark the installation points of the layered rafters on the sketch double, this is a step. We need to divide both walls into equal segments. It is not necessary that the pitch under the hip and pentagonal slope be the same. In the example, the distance between the rafter legs on both walls of the building is 20 inches, which is 50.8 cm. In fact, the installation step can vary from 0.4 to 2.1 m. However, we note that too often the installed rafters will increase the material consumption at times, and too rarely they will force the structure to be reinforced with an additional counter-lattice.
- Let's decide on the length of the skate. Let's draw it on the duplicate template, taking into account that the ridge beam should bind a whole number of pairs of rafters. Set aside equal distances from both edges of the long walls.
- We transfer all the results to the main sheet and calculate how much material is needed. We consider the length of the rafters on the outer sides, taking into account the length of the eaves overhangs of 40-50 cm. We calculate the consumption of plywood by the number of solid panels per each plane of the hipped roof.
By the number of rafters, we calculate the number of fasteners. We will need nails in literally all nodal fasteners. There should be a pair of corners for each rafter leg. Do not forget to buy a board with a small margin in case of flaws in our own work. To install a hip roof on brick and foam concrete walls, you will need a block for the construction of a Mauerlat. It is not needed if the installation of the truss system is carried out on wooden walls.

Stage 2: Construction of the main part of the hip roof
First of all, we will build auxiliary scaffolding on the basis that a home master should be placed in full growth between the plane of a homemade stand such as a high bench and a ridge run.
The start of the installation of the rafter system for the future hip roof is the device of the ridge part of the structure:
- We nail the walls of the building connected to the hips along an auxiliary board, one edge of which should coincide with the central axis. Pull a lace between the boards, repeating the central axis.
- Trying on a pair of rafters to the end of the building. They should intersect right under the lace. In fact, we outline the cut lines of the upper heels, not forgetting that there will be a 5 cm thick run between the rafter legs.
- According to the templates obtained, we prepare layered rafters.
- We install rafter legs in pairs according to the marks of the main part of the system. Temporarily fasten with one nail.
- We install a ridge run between the upper heels, which previously rested freely on each other.
- We nail the rafters to the girder with nails.
- We attach the bottom of the rafters to the Mauerlat or the upper crown of the house with metal corners.
We dismantle the auxiliary boards, we will no longer need them.

Stage 3: Construction of Hip Rays
We fasten the hip part of the rafter system in the same way: the lower heels with corners to the Mauerlat or to the upper crown, the upper ones are fixed with nails. We work in the following sequence:
- We try on the first slant rafter to the ramp, mark the cut line in fact. The lower part of the rafter must pass exactly through the corner mark point.
- Saw off the marked excess. We nail the diagonal leg to the ridge console, fix the bottom with corners.
- We do the same with the other three bevels.
- We fill the hip slope with wedges, having previously tried on every detail to the intended place and sawing off the excess.
- Install the pentagonal ramps.
At the end of the work, the rafters through one are screwed with wire twists to the wooden plugs laid in the walls or to the second crown, so that a strong gust of wind does not break the structure. There is a way of laying twists from annealed wire into the masonry even during the construction process for the subsequent fixation of the rafter system. There should be three more rows of brickwork or two rows of foam blocks on top of the wire strand.

The crate is laid according to the finished rafter system. In the case of using a soft roof, as in the above case, as a covering, the crate is made solid from inch, plywood or similar plates. A gap of 3 mm is left between the boards or boards. For rigid materials, the crate is constructed from a bar with the recommended step of the instructions.

Construction of complex hip roofs
The principle of the structure of hip roof frames with a more complex architecture is not much different from the example given. The sequence of work is exactly the same. True, layered rafter legs are still more reasonable and reliable to fix with the help of cuttings. It is highly desirable to use supports for diagonal rafters. And before the installation of the ridge part, support frames are installed with a bed at the bottom and a ridge run at the top. Another change in the angle of inclination of the slopes when supported by a cut should be taken into account at the design stage.
Hip roof rafter systems - installation instructions
What is a hip roof
This roof option has four slopes. Two of its long inclined surfaces are trapezoidal, and the other two, smaller ones, have the shape of a triangle - they are called hips. They are located along the gables of the building and connect the ridge with the cornice. Trapezoidal planes have a large area and a slope, also ranging from the upper horizontal rib to the cornice.

Hip roof has several different designs:
- Traditional with two trapezoidal slopes and two hips, it is called a "Dutch" roof.
- Hip - has slopes of the same size, triangular in shape. Ideal for square structures.
- Half-hip - hips cover only the upper part of the butt end no more than to the middle. Suitable for the construction of houses with an attic, it is called "Scandinavian" roofing.
- Semi-hip - hips are not triangular in shape, but are in the form of small trapeziums. Such a roof gives a large attic room, it is also called "Danish" roof.
Like any other type, the hip type of roof has a frame and a rafter system - the whole structure rests on them.
The device of the rafter system
The rafter system is the main component of the entire roof structure.
In contrast to the gable, the structure of the supporting structure of the hip-type roof is more complex.
Regardless of whether the building is rectangular or square, the shape of the slopes will not change.
Considering the device of the rafter system of the hip roof, it can be determined that it consists of several elements:
- Mauerlat - the base for the rafters, the connecting link between the load-bearing walls and the rafter system.
- Slant or diagonal supports - have the greatest length and bear the greatest load.
- Central rafters - serve to connect the ridge with the Mauerlat on the sides of the slopes, converge at the corners of the ridge from 3 sides.
- Intermediate rafters - connect the ridge and the cornice.
- Braces - create not only rigidity, but also provide confrontation to wind loads from the side of the gables of the building, are located at different angles to the rafter legs.
- Narodniks are the shortest rafters.
- Sprengels or truss trusses - enhance the bearing capacity of the roof structure. They represent a beam from a bar, located at the corner of connecting external walls.
- Racks - give additional stability to the legs of the supports, are installed at the junction of two rafters and a ridge beam.
- Corner rafter (rib) - located at a lower angle than the intermediate elements of the system.
- Short Rafter Legs - Attached to an angled support board.
- Skate.
- Tightening - serves as a floor beam.
- Wind Beam - Mounts with a slope on the windy side of the roof.
- Girders - the distance between the connection of the supports to the ridge.
Rafter system diagram

Installation of rafters
After the type of roof has been determined, all the necessary building materials have been purchased, you can directly proceed with the construction of the frame.
Before starting the construction of the supporting structure, it is necessary to draw up its project and drawing.
So, the structure of the support system consists of several stages:

- Before starting the construction, a wooden beam should be laid along the perimeter of the outer wall - Mauerlat. For its installation, it is necessary to equip a reinforced belt made of reinforced concrete structures that enhance the bearing capacity of the walls. It should be noted that the Mauerlat is securely fastened, avoiding the slightest displacement.
- If the walls are made of stone or brick, formwork is erected on their top, into which the reinforcement frame is mounted using galvanized threaded rods, with a caliber of at least 10 mm. The upper part of the studs should protrude 4-5 cm from the base for the supports (Mauerlat).
- After installing the frame, grout is poured.
- Then, as the concrete hardens, its surface is covered with bitumen and covered with a layer of roofing material or other waterproofing materials.
- Bars with drilled holes are put on the protruding part of the studs. Secure the structure with nuts.
- Mauerlat is made of 10 * 15 or 15 * 15 cm pine needles, dried and impregnated with anti-corrosion and anti-fire agents. The moisture content of the tree should not exceed 20%.
- The next step is to install the central beam on the Mauerlat, which is parallel to the ridge. Racks are attached to it. These struts support a specific part of the support system.
Types of rafters of a hip roof
Hip type roof supports are divided into two types:
- Hanging - beams are located on the ceiling beam of the two outer walls without additional support.
- Slab - along the upper edge of the inner walls there is a horizontal bar, to which vertical supports are attached. The outer walls are the basis for the end part of the timber.
The slab type of support is suitable for buildings with an intermediate retaining wall or columns.
This supporting structure has more base points, so it can be made much easier.
If the building has two load-bearing walls, a screed is installed to support the rafter legs and distribute the load to all vertical supports.
For a hip type roof, the most suitable is the layered system, which gives greater strength and lightens the roof structure.
This modification is used in the construction of an attic or mansard roof.
How to calculate the rafter system of a hip roof
Structural design is a major step in roof design. The slightest miscalculation in the calculations can cause deformation or destruction of the roof.
After studying the roof structure, it is necessary to calculate the angle of inclination of the rafter system. The higher it is, the more the roof is exposed to winds, but it clears snow and ice on its own.
The angle of inclination of the slopes can be 5-60 degrees, it depends on the load of wind and snow.
After determining the angle of inclination, calculations should begin to determine the main loads to which the roof is subject. These include the weight of the roof itself and natural phenomena - wind and precipitation.

The total weight of the supporting structure, lathing, coating and insulation is divided by the area of all inclined planes. The resulting value shows the load on 1 m2 of the roof. For a residential building, it must withstand a load of 45-50 kg / m2. This indicator is the same for any area.
Sediment loads vary depending on the terrain and amount to 80-150 kg / m2. This value can be found using the Building Code.
The load value must be multiplied by the correction factor:
- 1.0 when the tilt angle does not exceed 25 degrees;
- By 0.7 if the angle is 25-60 degrees.
If the roof is exposed to regular heavy snowfalls, it is recommended to install double supports or solid sheathing.
The indicator of loads (wind and snow) is multiplied by an index equal to the value of the rafter pitch. The step of the rafters is determined in meters.
The final stage is the calculation of the quantity and criteria of materials.
After calculating all loads on 1 m2 and on the area of the entire roof, the cross-section of the supports is determined (the smallest values):
- Mauerlat - 10 * 10 cm.
- Puffs and runs - 5 * 15 cm.
- Fillets, struts, crossbars - 10 * 10, 15 * 15 cm.
The number of beams on which the lathing and additional elements are attached is calculated by the length of the roof. For example, the length of the roof is 12 m, the pitch between the rafters is 1 m. Based on this, 24 construction legs are needed, 12 on each side.
When carrying out calculations for volumetric projects, it is recommended to use special computer programs for design.
All the indicators obtained must be applied to the drawing.
Precision-engineered assemblies make it possible to achieve the strength and attractive appearance of the roof.
The connection of the elements of the roof structures is made according to certain requirements.
Main units of the supporting structure:
- ridge knot - a pair of supports are fastened with nails or bolts, and reinforced with bolted beams;
- the node for supporting the beams on the Mauerlat - reinforced with metal corners, construction brackets, nails or bolts;
- the junction of the rafter with a tightening, which is located in the middle of the rafter - is carried out using nails or bolts;
- the combination of a brace, a rack and a support is performed using a die cut and reinforced with construction brackets.
Rafter system
The quality of the roof directly depends on the frame and the base for the roofing. The supporting structure of the roof serves as the basis and determines its service life.
Hip roof rafter system
This support system is resistant to strong wind loads due to the absence of a façade roof wall.
The roof of this form makes it possible to build large plumb lines that protect the walls and base of the house from rain, snow and ice.
Components of the mansard roof rafter system:
- Mauerlat.
- Ridge and side runs.
- Support beams.
- Rafting and hanging rafters.
- Braces.
- Support legs.
- Diagonal rafters.
A distinctive feature of the mansard hip roof is the use of layered and hanging rafters in its construction. The upper slope is made from hanging rafters supported by racks or side girders.
To avoid bending, they are equipped with ties. When installing the lower slope, layered rafters are used with a base on the Mauerlat, and a horizontal beam connecting the rafter system in its middle part.
The lower sloping surfaces have an angle of inclination of about 60 degrees, and the upper ones - at least 30 degrees.
Strengthening the rafter system
To ensure the strength and durability of the hip roof, it is not enough to make a rafter system, it must also be strengthened.
The most common ways to enhance are:
- Installation of trusses on the corners of the roof with a rack supporting the diagonal support. If the truss is located far from the corner, it is best to attach a truss truss to it.
- Installation of racks connected from above with a bar on the floor (reinforced concrete) or tightening. They function as props and provide an even distribution of the load on the house.
- The use of double beams instead of a single bar with an excessive length of diagonal rafters.
- The use of wooden boards 40 * 40 or 50 * 50 mm for the construction of the lathing.
Hip roof rafter systems - calculation, diagram and how it works
What is a hip roof - device, diagram, installation, types. How to calculate a hip roof rafter system - knots and reinforcement.
Hip roof is a kind of hipped roof, in which two slopes have a trapezoidal shape, and the other two (end) - triangular (having the same name as "hips"). If the end slopes occupy the entire area from the ridge to the cornice, this is a hip roof, if they do not reach the cornice, it is a half-hip roof.
The roof of the house performs a double function - on the one hand, it is entrusted with protecting the building from external influences, and on the other, it is designed to decorate the structure and give it individuality.
Historically, in Russia, preference was given to simpler one-, gable roofs, while Europeans prefer a four-slope or hip roof, which has advantages and disadvantages under certain conditions.
Hip roof - advantages and disadvantages
Pros:
- high rigidity of the structure. It is achieved due to the corner ribs connected near the ridge support beam;
- the possibility of arranging more protruding overhangs, which provides additional protection for the walls of the house;
- aesthetic appeal.
Minuses:
- the complexity of the calculation and installation;
- higher cost of project implementation;
- reducing the area of the attic (in particular, at the place where the diagonal supports are installed);
- the impossibility of arranging the attic;
- natural light is possible only by installing windows in the roofing cake.
Since the shortcomings are not critical, the hip-type hipped roof is actively practiced in the modern construction of private houses.
Varieties (types and types) of hip roof
Studying the device of the rafter system of the hip roof, it should be borne in mind that within this type, there are several types of structures. In turn, this makes adjustments to the general process of erecting the frame of the truss system.
Classic hip roof
It differs in the support of the diagonal ribs on the ridge support beam and the location of the overhangs at the same height. The individual elements of the hip roof correspond to a triangle (gables) and a trapezoid (slopes).

Hip roof
Differs in the absence of a ridge support beam. This leads to the fact that all diagonal edges converge at a single point, and ordinary short rafters are already adjacent to them. Such a roof is preferred if there is a square box at home. But the formation of a reliable ridge knot is quite difficult.

Half hip roof
Differs in the presence of vertical gables in which windows can be installed. The picture shows the difference between two types of semi-hip roofs (Dutch and Danish).


Sloping hip roof or mansard hipped roof
The most difficult construction of the rafter system of the hip roof in terms of construction, since in this case, all the roof slopes have a different area and diverge at different angles. The sloping (mansard) roof allows you to more rationally organize the internal under-roof space and, in addition to additional living space, give the house a spectacular appearance.

Hip roof structure
Regardless of the type of roof, all types have the same elements of the rafter system of the hip roof:
 ridge support beam or ridge beam - used for a classic hip roof, serves as a supporting element to which diagonal rafters are attached;
 a diagonal rafter (side, edge, slant or corner rafter) - a longer rafter leg that joins the end of the ridge bar at an acute angle, forming one of the sides of the triangle;
 central rafter - boards, of the same length, which adjoin the ridge beam and form the edges of the trapezoidal roof slope. Intermediate rafters are located between them;
 intermediate or ordinary rafter - forms the plane of the trapezoidal slope, the distance between them determines the run of the rafter system;
 a rafter or short rafter is a structural element that is attached to a diagonal rafter, forming a triangular overhang and corner parts of the trapezoid.
Calculation of the hip roof
The calculation of the rafter system of the hip roof is carried out taking into account the following prerequisites:
- wind load in the region. The higher it is, the more shallow the slope should be, and the stronger the whole structure. To level the strong wind, the central and diagonal rafters are made thicker;
- the amount of precipitation. An inverse relationship is observed. The higher the amount of precipitation, the steeper the slope should be, so that snow and rain do not create pressure on the rafter system;
- type of roofing material. Each type of roofing material puts forward its own requirements for the lathing, and also has a certain weight. These factors must be taken into account even at the design stage;
- the need for roof insulation. In this case, the pitch of the rafters is calculated taking into account the width of the insulating material. In addition, the distance between the rafters depends on the type and section of the wood.

The calculation of the roofing material is carried out according to the formulas, taking into account the angle of inclination of the roof. The optimal roof slope for different types of roofing materials is shown in the table:


The slope of the rafter angle determines the placement of the rafters. In turn, the laying of the intermediate rafter is calculated as follows:
- first, an axial line is applied to the upper trim of the end wall;
- then half the thickness of the ridge beam is calculated, and a line is drawn for the placement of the first of the number of central intermediate rafters;
- then the end of the measuring rod and the line of placement of the central intermediate rafter marked above are combined;
- the line of the inner contour of the side wall is applied to the opposite end of the measuring rod;
- the resulting point is the laying of the intermediate rafter.
The ratio between the length of the rafters and their placement is calculated using a correction factor, the value of which depends on the angle of inclination of the roof slope. The length of the rafter leg is determined by multiplying the laying by a factor.
 Material prepared for the site www.site
Formulas for calculating a hip roof
| Ridge height |  |
 |
| Ridge bar length |
House length minus its width |
 |
| Center length rafters (trapeze) |
Pythagorean theorem | |
| Length of ordinary rafters | Calculated similarly to the length of the center rafters | |
| Rafter extension to form frame overhang |
 |
 |
| Tilt angle ordinary rafters |
 |
|
| Diagonal length hip rafters |
 |
|
| Narodniks (short rafters) |
 First short rafter |
 |
 Second short rafter |
||
| Square hip roof |
 |
 |

How to calculate the area of a hip roof?
To know how much roofing material to buy, you need to know the total roof area.
To do this, you need to break the entire roof into simple geometric shapes and make a calculation for each of them.


Calculation of the area of the hip roof allows you to determine in advance not only the cost of purchasing roofing materials and installation, but also to determine the requirements for materials, as well as the need for arrangement and the exact configuration of the lathing.
Hip roof truss system drawing
The result of the development of the project and calculations will be a schematic drawing of the rafter system of the hip roof. There are no similar drawings ready for use without taking into account the characteristics of a particular structure and the place of its construction.
The development of a preliminary scheme can be done independently (a simple sketch will allow you to determine the direction of the project). But, it is better to entrust the drawing to specialists or use special programs for calculation. It should be remembered that the more complex the roof structure, the more accurately you need to calculate the rafter system: configuration and materials. This will also affect the cost and duration of the installation work.
The drawing of the hip roof should include an indication of the purpose of the material, the place of its installation and the method of fastening. The key components of the rafter system of the hip roof, for example, the adjoining of the diagonal supports to the ridge beam or the installation of rafter legs on the Mauerlat, is advisable to be taken out in a separate drawing and described in more detail.
Hip roof drawing (layered rafters with emphasis on two runs)

Drawing of the rafter system of a hip roof with a bay window

The presence of a schematic drawing will be a good help in the manufacture of blanks and the subsequent installation of the roof.
Hip roof construction tools
The design of the roof and the methods of arranging the nodes determine the set of tools that should be prepared before starting work.
For working with wood, it is useful: a level, a hacksaw, a hammer, a tape measure, a marking string, a stapler.
To work with metal structures, you will need an electric drill, a riveter, cut-through scissors.
The tool and consumables must be prepared in advance. the complex installation of the rafter system of the hip roof involves a large number of cuts and the installation of nails.
To simplify measurements and be able to make all parts of the same size, the masters advise replacing the tape measure with a measuring rod. The measuring rod is made of plywood 50 mm wide, on which the main dimensions are applied.
Hip roof material
The species and type of wood have a direct impact on the durability and reliability of the roof structure. Craftsmen are advised to give preference to larch or pine lumber. All workpieces require pre-treatment with fire retardants and antiseptics.

In addition to wood, you will need metal fasteners, nails, screws, anchor bolts.

Note. When forming a hip rafter system on a wooden house, which can shrink, the craftsmen advise using floating fasteners to connect the rafters to the Mauerlat. This method compensates for the movement of the crowns during natural shrinkage of the house from a bar or log.

Hip roof rafter system - installation technology
Diy rafter system devices step by step:
1. Preparation of blanks (rafters)
This is the most difficult and time-consuming part of the construction, because connected with:
- the need to ensure a given angle of inclination of the rafter legs;
- different lengths of rafters (short rafters);
- the presence of diagonal rafters (oblique), which are given special attention. Due to the length, the slant rafters carry a greater load than the main rafters, and therefore require the use of better quality lumber with a large cross section. In addition, diagonal rafters are often longer than standard plank lengths.
In order not to buy different lumber, in practice, the method of splicing (pairing) edged boards is used to obtain a given length.
Advantages of the rafter splicing technology:
- obtaining continuous beams of a given length;
- increasing the strength of the diagonal rafters of the hip roof due to the doubled section;
- simplification of the calculation and purchase of material (unification of dimensions: length and section);
- the possibility of using boards intended for the formation of ordinary rafters.

2. Mount the Mauerlat
Mauerlat for a hip roof is a large section of wood (100x100 or 100x150 mm) mounted along the perimeter of the walls. For Mauerlat wood of the first grade is used.
The peculiarity of laying the Mauerlat is that the timber is connected along the length only with an overlap, but not end-to-end, using many points of connection with the base of the wall. The connecting assemblies are additionally reinforced with metal brackets.

Since the purpose of the Mauerlat is to serve as a support for the rafter legs, it needs protection from moisture. For this purpose, a hydro-barrier is placed between the wall and the timber (for example, roofing material is used).
Note. Under the Mauerlat in brick houses (or made of aerated concrete, foam concrete, wood concrete), a belt of reinforced concrete with pre-installed studs for the installation of a bar is poured. The hairpin has a diameter of 10 mm or more and should protrude 20-30 mm beyond the Mauerlat plane. The stud installation step is 1000-1200 mm.
3. Installation of the purlin
A purlin is a beam that is installed parallel to the sides of the Mauerlat. The run serves as the basis for the installation of additional supports under the rafter legs. The device of the girder is not an obligatory stage of work and is performed only for hip roofs of a large area or with a configuration of increased complexity. The location of the purlin is shown in the diagram.

It should be borne in mind that the point of maximum load will differ depending on the location - on the ridge of the hip or on the edge of the valley.

Note. The hip hip roof is mounted without support, and a complex knot is formed at the junction of the diagonal rafters.
4. Installation of support legs
 The racks act as a support when installing the ridge bar (orange in the picture).
5. Installation of the ridge beam
Installation of the hip roof ridge is accompanied by accurate measurements. Since the entire roof structure will rest on the ridge, the correctness of its installation is checked in height and level.
6. Fastening the rafter legs
The opinions of the masters differ regarding the sequence of work at this stage. This makes it possible to distinguish two areas for performing work:
- central rafters are mounted, and then diagonal. This work order is simpler;
- diagonal rafters are mounted, and then the rest.
During installation, the lower part of the rafter leg rests on the Mauerlat.
The support of the rafters on the hip roof is shown in the diagram. The first option (with a cut) is simpler, but the second (with a support bar) is preferable, because in this case, the fastening does not weaken the rafter.

The formation of a knot on a ridge beam is possible in different ways.

The options for the upper fastening of the diagonal rafters are shown in the diagram.

Advice. For rigidity, it is advisable to reinforce all nodes with metal elements (brackets, plates, corners).
Since the diagonal rafters bear a significant load, they can be strengthened using such means as:
- installation of the rack. It is mounted vertically on the floor;
- installation of a brace. Mounted at an angle. The angle of inclination is not critical. The ability of the brace to strengthen the diagonal rafter is important;
- sprengel. In fact, it is a T-shaped short beam, turned 180 °. It is used on long spans and is installed so that its base is oriented perpendicular to the diagonal rafter.

7. Installation of ordinary rafters
The privates are installed in the same way as the central rafters, which form the edges of the trapezoid. Their lower part rests and is attached to the Mauerlat, and the upper one rests on the ridge beam. It is important to keep the same distance between ordinary rafters.
8. Installation of rafters (short rafters)
Narodniks are made only from solid lumber. In the place where the man joins the long rafter, cuts are made or support beams are installed. The installation site is additionally reinforced with metal elements.
Note. Installation of hip roof brackets is possible in a staggered manner to simplify installation.

In any case, the people are installed after the formation of the power frame of the roof. Their installation ends with the construction of the rafter system of the hip roof.
Do-it-yourself hip roof step by step - video
The program shows the process of installing the rafter system of a gable hip roof with a central bay window along a short wall.
After the rafter system is ready, you can proceed with the installation of the roof covering, the specifics of the fastening of which determines the need to install the lathing on the rafter legs.
Installation of the rafter system of the hip roof is a long process that requires attention to each stage of the work - from the calculation and selection of material, to the installation of parts and reinforcement of the attachment points. But, with the correct implementation of all stages, the result will be a beautiful and reliable roof for a private house.