How to lay laminate flooring step by step. How to lay a laminate with your own hands: methods and schemes Options for locking joints
DIY laminate installation guide. Step-by-step instructions with a video with a detailed description of the main stages of creating a coating.
Laminate is one of the most popular types of flooring. Panels made from polymer-based fiberboards are not inferior to traditional materials in terms of performance.

After studying the simple instructions, you can lay the laminate with your own hands
Laminate occupies an intermediate niche between linoleum and natural parquet, successfully combining the cheapness of the first and the undeniable advantages of the second. Displacing these players from the market, the laminate has also laid eyes on them, although they seem to have different niches!
Laying laminate flooring with your own hands is not an easy task, but knowing certain secrets and tricks, anyone can cope with it.
Interlock options
All variants of modern panels are attached using one of three methods:
- Adhesive - based on the "thorn-groove" system. The installation technology is similar to that used when laying parquet boards.

Laying laminate with glue
- "Click" - with this system, the spikes are flat hooks. They are inserted into grooves equipped with a platform for engaging with a hook, which can be made at an angle of 30°.

Click laying system
- "Lok" - this type of lock looks like a spike with a fixing comb, which is inserted into the milled groove of the adjacent panel.

Lok stacking system
The adhesive method allows for increased strength of the seams. But due to the use of glue, the structure is non-separable, which greatly complicates its dismantling.
Lok panels are mounted by hammering the spike into the groove until it sits snugly.
Seal the lamellas with a mallet or a metal hammer. In order not to damage the panels, a short piece of timber or a small wooden plate is preliminarily substituted to their end. The disadvantage of the system is that the connection combs are erased under load, which is often accompanied by the appearance of cracks.
Assembling the Click panels is not difficult, thanks to which the laying of the laminate can be done by hand, if necessary, assembling and disassembling the flooring up to six times. Having connected the grooves with the spikes, the joints are pressed to the floor until the hook engages with the groove platform, which will be confirmed by a characteristic click.

Diagram: Comparison of Laminate Laying Systems
Reliably fixed panels do not diverge even under heavy loads during operation, while maintaining the integrity of the web.
Tip: Regardless of the type of lock, the connection system is essentially the weakest point in the design. To prolong the service life of the joints, it is recommended to treat them with hermetic impregnations.
Panel layout options
When laying the lamellas, the craftsmen recommend adhering to the principle that they should be placed parallel to the direction of the light. Then the light falling from the window onto the floor will not create shadows on the seams, due to which the effect of an ideal surface is achieved.
But starting from the layout and constructive solution of the room, the laying of lamellas can be done by applying one of three options:
- In the direction of the world.
- Perpendicular to the light beam.
- Diagonally.

Laminate installation options
Choosing one or another laying scheme, you can favorably emphasize the originality of the design of the coating and even visually modify the geometry of the room, expanding or, conversely, narrowing the space.
The slats are always placed "out of order", laying out the elements of each subsequent row with a slight offset to the side by 15-20 cm relative to the previous one.
Step by step instructions for laying laminate flooring
Regardless of the type of material chosen and the method of laying the panels, when planning to lay the floor covering with your own hands, you can be guided by a universal step-by-step instruction, the main points of which we will consider below.
Preparing the necessary tools
When planning to lay the laminate with your own hands, you should prepare the tools in advance:
- Construction roulette;
- Metal square;
- Hacksaw with fine teeth;
- Electric jigsaw;
- Perforator;
- Wooden or rubber mallet;
- Marker for marking;
- padding bar;
- Dies 12-15 mm thick.

Tools needed for DIY laminate flooring
If a wooden mallet is not available, you can use an ordinary hammer. Wooden dies can be purchased at a hardware store, or you can make your own from timber cuts.
Performing a calculation
The determining factor in calculating the required number of panels is the way they are laid.
Choosing the classic option, which is considered the most economical of those listed, the calculation is made as follows: the area of \u200b\u200bthe room is determined by multiplying its width by its length, and a margin of 10% is added to the resulting value.
This 10% margin will offset the cost of the panels if they need to be trimmed to fit the room plan. When planning to arrange the panels diagonally, the stock of lamellas should be increased by 20%.

Before buying, make accurate calculations of the required amount of laminate
Foundation preparation
One of the prerequisites for the reliability and durability of the coating is laying it on a perfectly leveled surface. And the laminate in this regard is the most demanding.

Before laying laminate flooring, clean the floor surface
- Tiles and linoleum - they should fit snugly to the floor and be firmly fixed.
The concrete screed must stand for at least one and a half months before the coating is applied. Otherwise, the perspiration released by it will provoke the rotting of the coating.
When working with a wooden base floor, you can level the surface by laying the boards on top of the chipboard sheets and placing them in a checkerboard pattern.
Although laminate is known as a universal coating, there are a number of limitations when working with it, the main ones being:
- It is not recommended to install it in rooms where the humidity reaches 70% or more.

If laying is carried out on a concrete screed, it must be leveled
- Use as a finishing coat when arranging an electric underfloor heating.
- Attach to carpets.
Attention! Before laying the laminate with your own hands, the panels should be brought into the acclimatization room and laid out in a pile on a flat floor without unpacking, leaving for 1.5-2 days.
If you plan to use or, then it is advisable to use a laminate of 31-33 classes. When choosing this laminate, pay attention to the presence of special symbols, as well as to the safety level, it must be E1 or E0 (The minimum amount of harmful substances emitted by the board when heated).
Arrangement of the substrate
The substrate is designed to perform three functions: absorb noise, prevent the penetration of moisture and act as a shock absorber.
The concrete base before laying the coating is first lined with a vapor barrier layer of foamed polyethylene foam or polystyrene. The canvases are lined with an overlap of 20 cm, not forgetting to make overlaps on the walls of 12-15 cm.
The thickness of the substrate on the concrete screed should be 3 mm. If the surface of the concrete base is made with a “dry” screed, the insulation can not be lined, since this layer is already provided in it.

Laying laminate flooring
On wooden boards, the vapor barrier layer can not be laid out. But without fail, it is worth making a soundproof substrate made of cork wood or foamed polypropylene, the thickness of which is 2 mm.
When arranging it, the strips are laid out in the direction from the window to the door, fixing the joint to joint with construction tape. Linoleum and tiles do not need vapor barrier. The lamellas can be laid directly on the substrate.
Video: the subtleties of arranging the substrate
Panel laying
When laying panels with your own hands, most often they choose the traditional method (direct placement), which is the simplest and most waste-free.
The first row of the future coating is laid entirely, starting from the far corner of the room. The strip is moved to the wall and wedged with small spacers on three sides.
The wedges are designed to provide gaps of 15 mm, which allow you to compensate for the linear expansion of the floor covering. The expansion joint must be provided around the entire perimeter of the room; after installing the plinth, it will be invisible.

Scheme of laying laminate
When installing lamellas in the doorway, the gap is made slightly smaller. Subsequently, he will cover himself with a door trim. If this condition is not observed, you should be prepared for the fact that when expanding due to heating or high humidity, the lamellas can bend in an arc.
The second and subsequent strips are installed in the end lock of the previous one and laid on the floor, not forgetting to place wedges on the ends. To ensure the placement of panels in a run-up, the beginning of each next row is laid out with the remaining segment of the previous one.
Tip: Laying is best done from the corner where the pipes of the heating system are located and the radiator is installed, thereby facilitating the installation process.
If necessary, framing the risers, the panels falling on them are cut. Ideally - if a joint of panels forms opposite the riser, then it is much easier to cut a hole along the edge.

Panel docking scheme
If it is necessary to cut the whole panel, then several holes are pre-drilled at the intended point. Cut the panel, focusing on the hole, drawing a cut line clearly in the middle. Adhesives are used to attach these panels.
The last strip, if necessary, is cut to individual sizes. To do this, it is turned face down and applied to the wall with the end side. The cut line is applied with a marker, focusing on the last plate. Sections are made along the intended contour.
To install the last panel, you will need a special lever with a hook. In the absence of such, you can use the crowbar. After completion of laying, the wedges are carefully removed.
Fasteners for decorative thresholds and skirting boards
You can do without thresholds only if the coating is laid in several rooms, creating a single canvas. Docking wooden panels with tiles is performed by installing aluminum sills.
Their rounded surface hides a slight difference in height. To install them, holes are drilled along the edges of both coatings every 100 mm, into which dowels are hammered. Having applied the threshold, the nails are distributed over the holes and fixed by tapping lightly with a hammer.
Attention! When installing thresholds, a gap should be left between the coating and the hidden part of this element.
Video guide for installing the nut:
Skirting boards made of plastic, MDF or natural wood can act as a worthy frame for the flooring. To ensure uniform pressing of the panels to the floor, it is better to fix the skirting boards on special clamps.
Skirting boards begin to lay out from the corner of the room, moving clockwise. After mounting the strips, install the connecting elements and plugs.
The floor laid using the locking method can be used already on the same day. If glue is used when fastening the panels, it is necessary to wait for the time specified by the manufacturer in the instructions.
Do-it-yourself laminate laying: video
Laying laminate: photo


Creating the design of your apartment or house, you want to do everything in style and taste, using high-quality, innovative and aesthetically beautiful materials. If the question arises of choosing a floor, laminate coatings are most often used, which have a wide variety of textures and shades. Let's find out how do-it-yourself laminate flooring is done.
In the construction market you can find a wide variety of laminate. This material is classified according to several criteria.
Types of laminate by shape:
- Rectangular board. The main part of the coatings is made in the form of boards, the length of which is 1.2-2 meters. It is convenient to use such material when installing floors in large rooms. Laying laminate with your own hands takes a minimum amount of time, and convenient connections greatly simplify installation.
- Tile. Many manufacturers have recently produced square-shaped tile lamination, which allows you to create complex decorative patterns. It costs more, but has the advantage of not needing a backing. Laying such material is much more convenient, but there is one drawback: repairing tiles is somewhat more difficult than classic laminate.
The difference between the laminate on the top layer of its surface: the appearance of the coating largely depends on this. The diverse types of surface include: a classic wooden base, the look of an aged tree, gloss, relief, natural surface, oil wood, country.
Designers use the versatility of their imagination by creating different types of laminate design: classic wood, leather luxury, metallic sheen, stone calmness, designer laminate (decorated with original patterns and patterns burned into wood).
Correctly calculate the amount of material
How to lay a laminate with your own hands, so as not to be mistaken in its quantity and proper installation? There are several ways how to calculate the laminate per room, but they are not able to calculate the material without trimming. This is due to the fact that the boards must be cut during the laying of the coating.
First method
To correctly calculate the amount, you need to know the exact dimensions of the room. This method can be used to calculate not only at home, but also in industrial enterprises.
The knowledge acquired in school will be useful for this. You can calculate the area of a rectangle by multiplying its length by its width. There are cases of non-standard forms of premises, when there are not very large spaces in the room that cannot be taken into account in the total area. They need to be counted separately. After that, all individual areas are summed up and the total value is displayed.
Next, you need to find out how much material you need on the floor. The width of the laminate panel can be 185-195 mm, and usually 1260-1380 mm long. To get the area of one board, you need to multiply its length and width. And to find out how much material is needed, you need to divide the area of \u200b\u200bthe room by the area of \u200b\u200bthe panel, so you find out the number of pieces that you have to buy for the entire floor in the room. It is important to have material with a margin. Usually there are about 8 pieces in one package. Thus, you need to divide the total number of laminate boards by 8, and you get the number of packs that you need to buy for self-laying laminate.
Second method
When calculating the laminate in a room where there are protrusions or columns, let's say one is 0.4x1.17 m, and the room has dimensions of 6.5 × 3.25 m, the laminate board is 0.185 × 1.26 m. To begin with, the length of the room is 6 5 m divided by the length of the board - 1.26 m, so we find out the number of pieces that need to be taken. After that, we divide the width of the room - 3.25 m by the width of the board and again we get the pieces. We multiply the results and get the amount that will be required for laying the laminate with your own hands. Be sure to add the existing piece of area measuring 0.4 × 1.17 m, dividing 0.4 m by 0.185 m, we get 2 more pieces. So, let's add 2 more boards to the existing pieces, in which case we get 101 laminate panels. 101/8=12.625, or 12 packs and 5 pieces.
Recommendation. The second method differs from the first in that it focuses on the number of cuts when installing a laminated coating, that is, this technique will be more accurate and reliable. However, when calculating according to the first method, there is a sufficient amount of scraps left, this will help save money when laying the laminate with your own hands in an adjacent room. This is very convenient, and, most importantly, pay attention to the fact that you need to step back from the wall 1-1.5 cm and perform the calculation manually, so you can see the real picture and calculate the required stock of material.
How to lay laminate. Various flooring options
How to lay laminate on the floor, depending on the interior design project or the lighting conditions in the room? Laminate, like parquet, must be installed: parallel or perpendicular to the direction of light rays, as well as diagonally - this means at an angle to them. The correct selection of the method and scheme for flooring the material helps to visually change the geometry of the room, paying attention to the advantages and concealing any structural flaws.

Most often, the direct method is chosen for laying the laminate, placing the panels parallel to the direction of the light rays. But, if the geometric structure of the room allows, it is possible to use other options: and perpendicular.

Depending on the direction of the light flux, you need to choose one or another scheme for laying the laminate with your own hands, there are also three of them:
- classic version;
- brick or chess;
- diagonal flooring.

For any scheme of laying boards, the creation of the strength of the flooring remains the main point. This is ensured by the fact that each board in the next row is shifted by no less than 15-20 cm in relation to the adjacent panel of the previous row. By achieving harmony in the combination of lighting and a schematic masonry pattern, you can visually expand or narrow a room, hide or emphasize its unusual shape, or simply get a beautiful floor covering.
Instructions for the correct laying of laminate
The first key point when laying any type of laminate flooring is knowing how to lay laminate flooring on the following types of surfaces: concrete, wood, ceramic tiles and linoleum. Each of these coatings has its own characteristics that should be taken into account when installing the material.
Laminate on concrete floor. Styling nuances
Concrete screed is the best base for laminate flooring, but before proceeding with the installation of the coating, it is necessary to allow the concrete to dry completely. If the foundation has been poured for a long time, then before laying the laminate on the concrete floor, a thorough examination should be carried out for cracks and chips. After thorough cleaning, a special polyethylene film is laid, and its edges can be fixed with ordinary tape. Next, lay the substrate and the material itself. Choose the layout according to the characteristics of the room, lighting and type of laminate.

Laminate flooring on wood floor
The old base for the laminate, made of wood, must be examined for the possible presence of fungal infections or cracks and various deflections of the boards. Parts that are prone to rotting will have to be replaced with new ones, fixing them with self-tapping screws. If there are some irregularities, you need to correct the top layer and make the surface even.
It is allowed to install laminate on a floor covered with linoleum or tiles, in cases where the coating remains even and is mounted in compliance with all the conditions that will be required for the correct installation of the material. In this case, you can not use a plastic film, but the substrate is required. You can lay the laminate on the old laminate flooring without dismantling it. In this case, the main condition will be the obligatory evenness of the base.

Features of laying laminate on the "warm floor" system
You need to know that a laminate is laid on the "" system, which is suitable for this. This feature is determined by the manufacturer and indicated on the packaging of the material.
Before carrying out work, it is necessary to mount the system itself. You will have to choose from several options: an electric floor using mats, cable or film, in addition, there is a water system that involves the installation of special pipes where water circulates.
You can start laying the laminate with your own hands only when the screed is completely dry. You need to start work at a temperature not lower than 18-20 degrees. First you need to lay a plastic film, fixing it with tape. Then a substrate is laid around the entire perimeter of the room, and a laminate is laid on top.
When not to install laminate flooring
- laminated panels are not placed on a base covered with carpets;
- laminate does not spread in bathrooms, baths and other rooms with high humidity;
- for the kitchen and the corridor, only special types of laminate flooring are used.
Installation methods for laminate panels
How to install laminate flooring using the three laying methods: adhesive, click-lock and lock-lock?
The first option is used the least often, and it is similar to the parquet laying system. The process consists in the fact that the edges of the laminate board are covered with an adhesive solution and tightly connected to each other. This method is rarely used due to some of its disadvantages: installation is quite laborious; not a long period of service (adhesive mixtures quickly dry out); there is no possibility of repairing a separate part of the coating.
The most popular option is to lay the laminate yourself with the "Click" locking system. This is due to the simple installation procedure. The boards are inserted one into the other with an angle of 30 degrees and pressed against each other. After that, using a bar and a hammer, one panel is slowly driven into the previous one.
With the help of the “Lok” locking system, the boards are laid horizontally. Leave a small gap between the panels. The spike is combined with the groove, continuing the fastening until the lock is activated.
To make everything look aesthetically pleasing, you need to know how to properly lay the laminate. It is worth adhering to the following rules:

Having studied the features of the choice of material and the procedure for laying the laminate with your own hands, you can get a high-quality floor covering that will last you for more than one year, remaining beautiful and durable.
Video instructions for laying laminate
Laminate floors are considered one of the most practical, cheap, beautiful and easy to install. And this is true - you can cope with the task of laying them yourself, without even resorting to the help of specialists. The main thing is to have a desire and set aside time for work. But how to lay laminate? Let's analyze this issue in practice.
Laminate is a finishing floor covering, although it is considered easy to install and maintain, it is quite delicate. It is demanding on operating conditions, on the laying process. If you neglect some of the features and rules for working with it, then the coating will not last long.


In the photo - the process of laying the laminate
Therefore, before starting work, it is worthwhile to ensure the following conditions in the room:
- temperature range - 15-30 degrees above zero;
- air humidity - about 40-70%;
- smooth, cleared of debris and dried base;
- the room must be dry. If the humidity is high, then you will have to buy a more expensive moisture-resistant material;
- heaters and other heating devices cannot be switched on while working with laminate;
- windows should be closed to avoid drafts.

Attention! Laying laminate cannot be done on sagging floors, cracked screed. Otherwise, the material will not last long. The locks connecting the coating elements will break when the material deflects, due to which the integrity of the base will eventually be violated.

It is also important to remember that the laying of the laminate can only be done 2 days after the material was brought to the place of work. This time is necessary for him to "get used" to the new operating conditions - the laminate will gain the necessary humidity, adapt to the temperature, so that during operation it will not change its dimensions excessively. It reacts sharply to changes in conditions in the room - the effect of thermal expansion may appear.

It is necessary to leave the purchased laminate in the room where the installation of the floor is planned. This is necessary for acclimatization. This process takes about 48 hours.

Choosing a laminate, you should focus not only on the color, but also on the quality of the material. It is not worth buying low-grade products that are too thin or not suitable for the operating conditions. Such a coating will serve too little, quickly lose its appearance. Laminate packages must be sealed, and before installation, it is important to inspect all boards for damage, chips. Damaged laying elements must not be used.

Prices for laminate "Tarkett"
tarkett laminate
The process of laying the material may differ depending on which type of lamella is used. For example, there are three installation methods, each using a different type of material: laminate with joints Click or lock, as well as the type of coating that is mounted using glue.


Installation of laminate flooring with a click-type lock
In the case of using the adhesive method, the laminate is glued to the rough base using special compounds. The technology resembles parquet laying. Also, glue can be applied to the joints between individual planks, which are then tightly joined to each other. But this method is now practically not used, with the exception of the design of rooms with very high traffic or high humidity. It is impossible to disassemble the laminate if necessary.
Installation of cover with type locks lock involves the connection of individual strips by the shock method. That is, during operation, the spike on one side of the lamella is driven into the groove on the other lamella. Such a coating is already losing popularity due to its shortcomings - the laboriousness of work and complex analysis if necessary.

Important! If material with this type of locks is used, then work should be done carefully - control the force of impact and use a special rubber or wooden block, placing it at the site of impact.

Now most often for laying this type of floor, a laminate with joints is used. Click. Here, docking occurs due to a spike and a groove, but of a special shape, in which the elements are securely joined and connected to each other without the use of shock technology. Docking of panels occurs at a certain angle, after which the lamella falls to the floor - at this moment, snapping occurs. This connection allows, if necessary, to easily disassemble the finish and re-lay it.


Ways of locating lamellas
You can lay the laminate in different patterns, according to the schemes. Here you can choose any option that you like, the main thing at the same time is to follow the pattern. There are some of the most popular layout options. The material consumption will also depend on the choice of method.
Table. Laminate layout options.
| Layout option | Description |
|---|---|
| This is the most economical option, since the amount of scrap and waste here will be minimal. The first row is laid first, and the remaining trimmings of the last plank can be used to start the second. The main thing is that they are at least 30 cm long. The amount of waste in this case usually does not exceed 5% of the material. |
| If you look at the laminate laid in this way, then the joints will form a special pattern that resembles a chessboard. In this case, a new row always starts with a cut length so that the panel is offset to the side by 1/2 from the previously laid one. The amount of waste in this case increases to 15%. |
| Reminiscent of the classic version of laying, only performed at an angle of 45 degrees relative to the walls of the room. It looks impressive, but the amount of waste becomes even greater - more than 15%. |


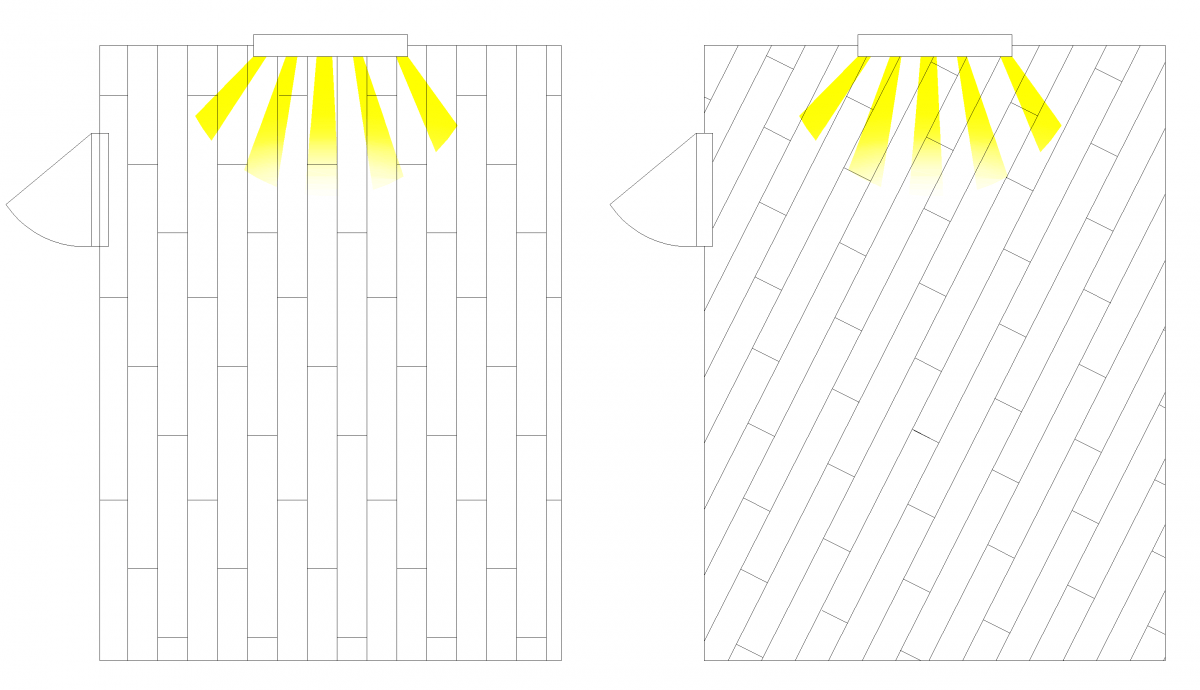

![]()
To avoid possible mistakes during the creation of a drawing, it is better to design the entire work in advance by sketching a laying pattern on a piece of paper. And keep in mind that the minimum offset of the joints should be 20 cm relative to the lamellas laid in the previously mounted row.

Important! Regardless of which laminate is laid and according to which scheme, there should always be a compensation gap of about 1.5 cm between it and the wall. Otherwise, the material will deform. The area of 1 m 2 of laminate under the influence of humidity and temperature can increase by about 1.5 mm.
When installing a laminate floor, it is important to take light sources into account so that the gaps between the planks are less noticeable. That is, the laying is done so that they are perpendicular to the light source (for example, a window).

Also, pre-laying planning will make sure that the planks in the last row will have sufficient width (100 mm). If it turns out that they will be smaller, then it is better to narrow the first row a little.
So, the choice in favor of a laminated floor is made, the material is purchased in the right amount and delivered to the installation site.
It remains to invite a team of craftsmen and wait for the work to be done. And is it necessary to pay extra money for the installation of the coating?
A good owner is quite capable of coping with such a task, of course, with certain basic skills, the proper level of accuracy and care.
Laminate laying technology is not in a hurry. So that the laying of the coating itself does not cause difficulties, and so that the resulting floor lasts a long time without losing its operational and decorative qualities, it is necessary to carefully prepare for work.
Assessing the condition of the floor
 Usually, even before making a decision to purchase a laminate, the condition of the “subfloor” is assessed, and appropriate repair and restoration work is carried out.
By and large, a laminated floor can be laid on any surface subject to the main condition - it must be smooth, durable, without areas of dynamic deformation.
Otherwise, "weak" places will inevitably appear on the new coating, where violations of the integrity of the surface, divergence of joints, and the appearance of squeaks are possible.
Ideally, the floor should be strictly horizontal, with allowable differences of no more than 1-2 mm per linear meter.
- should not have significant cracks, gouges, delaminations or crumbling areas. If it is impossible to correct the existing defects, it is impossible to lay on an uneven floor. You will have to update the screed - or. It is possible to start laying the laminate only after the coating has completely hardened, in accordance with the terms established by the concrete work technology.
- If it is supposed, its entire surface must be carefully checked. In the case when areas of “playing” or creaking boards are identified, they are subject to repair or replacement. Possible irregularities can be processed with a planer, grinder, fill existing cavities with wood putty.
- It is possible to lay laminate, provided that there are no holes or bumps on it, delamination of joints, through abrasions, areas of destruction of the concrete base. Such a coating cannot be repaired; it will be easier to remove the linoleum and carefully prepare the base for the laminate.
If funds allow, the ideal option would be to cover the entire floor surface of 10-12 mm, after laying them from below with a plastic film for waterproofing. The process of laying laminate flooring will be greatly simplified, and the sound and thermal insulation qualities of the floor will increase significantly.
We prepare the necessary materials and tools
Good advice to all novice masters - before laying the laminate, after it is delivered from the store, it is worth unpacking the panels and letting them rest for 2-3 days in the room where the flooring will be carried out.
Aligning the temperature and humidity indicators of the material and the room will facilitate the installation process and eliminate the risk of warping of the laid coating.
This time can be devoted to preparing the necessary tools and materials.
First of all, you need to have the required amount available, regardless of the type of base.
The substrate not only has a good insulating effect - it has a shock-absorbing effect, does not allow friction of the laminate board with a rigid base, which ensures the durability of the floor covering.
 The substrate can be polystyrene or polyurethane foam, with or without a heat-reflecting foil coating, produced in rolls or in the form of rectangular panels.
A more expensive, but very high-quality option -.
- The lining material is laid end-to-end, without overlaps, so double-sided tape is required to securely fix it on the floor. You can get by with ordinary adhesive tape, fixing the rows of the substrate at the seams.
- It is worth immediately preparing a set of wooden wedges, 10-12 mm thick, for laying the laminate at the required distance from the walls of the room.
- You can cut laminated panels to the required size with a regular hacksaw or electric jigsaw.
- For high-quality joining of the seams, you will need a hammer, preferably a rubber or wooden one (mallet). You can also use metal, but only necessarily through wooden spacers (bars).
- To mount the coating sections located near the walls, you need to have a small mount, or you can make a lever from a steel strip with a hook and a shoulder protruding upward, through which the hammer force can be transmitted.
In principle, the materials and tools for laying are ready. However, before starting work, there are a few more points to consider.
How to Avoid Unwanted Mistakes
It is best to precede the laying by drawing up a plan carefully drawn on a scale - the required visibility and clarity in further actions will appear.
What is important to consider:

- When answering the question: how to lay the laminate along or across, the following is important: the direction of the longitudinal joints should be parallel to the direction of the rays from the main source of natural light (windows) - in this case, the seams will practically not be noticeable.
- The laying direction, as a rule, from the far left corner, is orderly. For the panels of the first row adjacent to the wall, the groove should be outward, and the spike should be cut so that a flat end is obtained. Longitudinal sawing of panels is best done with a circular or vertical hand-held electric saw.
- On the plan, be sure to take into account that the last, final laying strip must have a width of at least 100 mm. If not, you will have to reduce the width of the first row. The same should be taken into account if there are any internal corners in the room.
- The thickness of the laid coating should not interfere with the free opening of the doors. Sometimes you have to remove and cut the door leaf from below in advance.
- When planning, do not forget about the pipes passing through the thickness of the floor. To cut curly grooves, they will definitely need a jigsaw.
After thinking through all the theoretical issues, you can proceed directly to the installation.
Laminate installation process
Laminated floor panels are available in a lock or adhesive version. In turn, locks can be one of several systems - "Click", "Lock", "5G".
How to properly install laminate?
Each type of laminate has its own installation features.
Features of laying laminate with the "Click" system
 Currently, this is the most common locking system among laminate manufacturers and a popular locking system among craftsmen.
Its main difference from others is that you can insert a figured spike into a complex groove only at a certain angle - for different manufacturers - from 25 to 45 degrees.
When the two panels are rotated into the same plane, the lock locks securely.
Convenience also lies in the fact that disassembling the coating will also not be difficult when the panel is turned, the lock will “open”.
- Work begins with the assembly of the first row of panels. It is laid along the wall and wedged on both sides with 10-12 mm dies. This gap is necessary to compensate for the thermal expansion of the laminated coating. The assembly process is simple - insert the spike at the right angle, aligning the edges exactly, lower the panel down until it clicks into place.
- The assembly of the second row takes place with the provision of displacement of the transverse seams by half the length of the panels (it is allowed - by 30-40 cm). The strip along the entire length is assembled completely, and only then does the connection with the first row follow. This will most likely require an assistant. After fixing the second row, it is also wedged from the walls with blocks from both ends.
- Further work continues in the same order until the room is completely covered.
Be sure to control the cleanliness of the grooves so that there are no sawdust or other debris left.
In the case of a good material fit, a hammer is most likely not even needed.
Features of laying laminate with the "Lock" system
 Such a lock system is gradually falling into disuse, although inexpensive laminate models can be produced with it.
The connection of the thorn and the groove occurs strictly in one plane, and the engagement occurs due to special protrusions and grooves.
The joint turns out to be much less durable, although disassembly, if necessary, is not easy to carry out - the spike may be damaged.
- When assembling the first row, after connecting the end sides of the panels, for the full entry of the spike into the groove, tapping with a hammer through a wooden gasket is carried out. The wedging of the row from the wall is carried out in the same way as in the case of the "Click" system.
- The second row is assembled gradually, one panel at a time (also taking into account the displacement of the transverse seam by half the length of the board). The first panel is inserted into the groove of the first row, tapped with a hammer until it is fully connected, and then wedged from the wall.
- The second panel is tapped on both the long and short sides for reliable fastening of the longitudinal and transverse locks. Further work continues in the same order.
- The most difficult thing is the installation of the last, adjacent to the wall, panel of the row. Here you will need either a mount or a curved lever.
Work is carried out in order or "ladder", to the end of the room. The last row is also carefully mounted with the transfer of force through the lever.
It is very important to correctly measure the force of the hammer blow or the force on the lever so as not to damage the surface of the laminate and not to break the spikes of the lock.
Features of laying adhesive laminate
Such laminated panels, although equipped with a tongue and groove system, do not have a locking connection. Thus, the strength of the joint is provided only by gluing.
Such floors are distinguished by good solidity, moisture resistance, but it will not be possible to dismantle or repair a separate section of the coating.
The installation process is more laborious, in addition, you will need to purchase special glue. It is not recommended to use PVA familiar to everyone.
- Laminate laying technology is generally similar to the "Lock" system - the sequence is the same. The difference is that each groove is abundantly smeared with glue (in accordance with the instructions attached to it). Excess adhesive that has come out after joining the panels is immediately removed with a clean, damp cloth.
- After laying the first three rows, a break of at least 2 hours must be taken so that the glue has time to grab. The same rule applies in the future, until the entire laying of the laminate.
Master class on laying laminate in video format
Video on how to properly lay laminate flooring, shows the laying technology, and preparatory work.
Finishing work
After the entire surface of the floor is covered with laminate, the expansion wedges are removed from the walls. The final step will be the installation of skirting boards that will hide the expansion slots.
It is important to remember that in no case are the skirting boards screwed to the laminate flooring - only to the wall.
The transition to another coating at the junction of adjacent rooms can be closed with a decorative overlay or use.
In fact, the installation work is completed - you can proceed to cleaning the premises and decorating the interior of the room. As you can see, there is nothing prohibitively complicated. The main thing is maximum attention, thoughtfulness of each of your actions and the highest accuracy. Everything should work!
Laying a laminate with your own hands is probably within the power of every person, even the one who does it for the first time. Thanks to step-by-step instructions and the simplest tongue-and-groove design, you can confidently lay the boards on the base and the quality of work will be the same if all the work was done by a specialist.
If we draw an analogy with the rest of the most popular flooring, it should be noted that the laminate is the most popular and modern material. A variety of textures, beauty - these are not its only positive qualities.
Useful information:
Laminate structure
By its structure, the laminate is a four-layer material, where each layer plays an important function. The topmost layer is aimed at protecting against all kinds of mechanical influences and damage. Improves lightfastness and heat resistance, resists electrification of the laminate.
The decorative layer consists of a special impregnated paper, on which a pattern is applied that imitates the structure of wood or other materials.
The middle layer is the main one, since it will be the carrier base of the laminate. This layer is made of wood dust, which is impregnated with resins at high pressures. This procedure makes this layer extremely durable. The layer can be either HDF - high density board or MDF - medium density board. Also, the main carrier layer can be made of plastic - this makes the laminate moisture resistant.
Stabilizing layer - does not allow the plate to deform, increases sound insulation, slightly protects against moisture.
Conditions for laying laminate flooring


Before you consider installing laminate flooring, please make sure it is suitable for the environment in which it will be used. . This will directly increase its service life.
Of course, laminate is a very beautiful flooring and it looks great throughout the apartment. But you should not put it in the bathroom, installation on the balcony is not desirable. If you plan to put underfloor heating under the laminate, then it is best suited, since it will not deform from them. In general, it is forbidden to lay laminate in places where there is high humidity.
It is necessary to lay the laminate in rooms that are heated or do not have a sharp temperature fluctuation. The floor will serve for a long time at a room temperature of 15 to 30 degrees and a humidity of 50 to 70 percent.
Laminate is a great flooring option. It is relatively cheap and easy to do by hand. Below I will tell you step by step how to do it right.
Methods for joining laminate boards
At the moment, several methods have been developed for installing laminate flooring. Each of them is unique and has a certain right to exist.

"Click" - this mounting method is the most popular, as it is easy and convenient. Having laid the entire first row completely, we insert the spike of the next row into its groove at a slight angle. After inserting, we align the row horizontally and snap the parts into the lock. You can use a mallet or hammer. We splice adjacent parts until a characteristic click, and until the seam becomes almost invisible.


"Lok" - differs from the "Click" method in that we place the next board strictly horizontally and drive it into the lock to the previous one using a hammer or mallet. Don't use the hammer too hard, as you can damage the joining edges. Do everything strictly carefully.


The adhesive method is less common. All works are identical to the first "Click" method, but all joining edges are additionally smeared with glue. This will make the seams more durable and moisture resistant. But this method will not allow you to disassemble the flooring if necessary, and the adhesive may also dry out over time.
Room preparation
First of all, it should be noted that competent and correct preparation of the base for laying laminate flooring is 50 percent of its high-quality installation. Carry out this stage of work most carefully and responsibly, since the durability of your flooring will depend on this.
Considering all the little things for styling, you will need the following materials:
- primer;
- glue;
- laminate;
- plinth;
- fasteners designed for plinth;
- foamed polyethylene or film;
- wedges for technological gaps.
Glue is used only to glue the boards in the place where the edge and hooks are provided.
The laminate is purchased with a small margin. After all, with a simple laying technique, few people will be insured against mistakes, as a result of which a couple of boards can be damaged, when cutting or sawing out the bend of the wall or the exit of the pipes.

The styling tool is quite simple:
- roulette;
- corner;
- pencil;
- wooden block;
- a hammer;
- electric jigsaw or hacksaw.
Step 1 Allow the laminate to acclimate

Place undamaged packages of laminate flooring in the rooms where it will be installed. This should be done at least 48 hours before laying, this time will be enough to adjust to the temperature in which it will be operated. This will minimize the deformation that occurs from heating or cooling the wood.
Step 2 Clean the floor


You will need to remove dust from the screed or other surface on which you will lay the laminate. You can sweep the floor or vacuum. We prime the surface so that the primer fills all the cavities imperceptible to the eye and irregularities.
Any basis for laying is suitable, it can be an ordinary wooden flat floor or a concrete screed, which do not have height differences of up to two millimeters per square meter. If the floor, nevertheless, has irregularities, then it should be leveled. Seal all cracks, cavities with putty or special mixtures. If the base is a concrete screed, which has many cracks, then it is necessary. In the event that you do not do this, the floor covering will quickly deteriorate.
If the room where you are going to lay the laminate has a plank floor, then first of all check if there is any fungus and dampness under the boards. If there are irregularities on the boards, this is eliminated by scraping. If your boards creak, then you need to additionally walk and. Wooden floors in addition.
Step 3 Install waterproofing

Lay waterproofing material on the floor, you can use plastic wrap.
Before laying on the concrete floor, cover the base with polyethylene film, the thickness of which must be at least 200 microns. Lay the strips of film on top of each other with an overlap of about 15 cm and glue the joints with adhesive tape. It is recommended to run the film a little on the wall, about 4 cm, it will be closed with a plinth.
Step 4 Laminate Underlay

A substrate is laid on top of the waterproofing, which will significantly increase heat and sound insulation. The most commonly used underlay is polyethylene foam 3 mm thick, it removes minor floor irregularities, such as small pebbles or dimples, and makes the floor perfectly even. This type of underlayment can help soften impacts on the laminate, which significantly extends the life of the decorative coating. The substrate is laid butt-to-joint and fastened with adhesive tape.
IMPORTANT! There is a laminate in which the base already has a soundproof substrate. In this case, the polyethylene lining does not fit under any circumstances. If laying is done on a concrete base, then we only form a waterproofing.
Step 5 Lay the first board


Laying the laminate starts from the left corner, in this case the locks are correctly located for further fastening of the boards.
Step 6 Place spacers


A wedge is inserted between the laminate boards and the wall. You can buy wedges, but it's easier to make your own. The width should be about 1 cm. You can saw off from a laminate or saw a piece of plywood. 5-6 things should be enough for you.
For wedges, you can also use pieces of drywall, pieces of laminate - anything, as long as the size is the same in thickness. But you can also buy them - they cost a penny.
Wedges are a must! Wood is used as part of the laminate, it plays with changes in temperature and humidity, and if you put it close to the wall, the floor can warp and stand on end.
Step 7 Lay the next board

Insert the next board into the lock of the previous one at a 45 degree angle and lower. We begin to mount all the boards in a row, then rest against the wall. At the same time, check the correct connection of the laminate. If the whole board does not fit at the end, then we cut it off, taking into account the gap to the wall of 15 millimeters and the remaining piece will go to the beginning of a new row.
Step 8 Laying the second row

Cut the laminate board and use this piece on the second row so that the boards are staggered against the first row. It is necessary to lay a new row from the remaining pieces from the previous row. This will greatly enhance the adhesion of the boards to each other.
We lay all the elements in the second row near the first row, touching only the edge of its end, without snapping into the groove. Only after you have completely mounted the second row, carefully lift it and insert it into the groove, snapping the lock.


If the row is in the groove, but there are still some inaccuracies, then we apply a bar to the edge and carefully drive the entire row into the lock with a hammer. And so we continue until we close all the necessary space. The most careful attention is required in places where there are protrusions or multiple bends of the walls, where there are outlets for heating pipes and communications.
Step 9 Continue laying boards


One by one until the whole floor is finished. Be sure to make sure that there are no gaps or gaps between the rows.
Step 10 Trimming boards at the end of the room

When you have filled the entire area in the room, and it remains to lay one row along the wall, then here it will be necessary to saw off every detail. When sawing, be sure to keep in mind that the walls can be uneven, and make all calculations, including one and a half centimeters for a defragmentation seam.
Step 11 Don't Forget to Remove Your Spacers


We remove the pegs around the perimeter when the entire floor is ready. Let the laminate dry overnight. It is not necessary to carry out wet cleaning immediately after laying. If you decide to continue further work on the improvement of the room, then be sure to put the rest of the substrate under the legs of a chair or table so as not to scratch the laminate.
Step 12 Installing skirting boards

To complete your floor you will need to nail the baseboards, install thresholds and other small details. Small holes or rough spots can be covered with special construction crayons, which are available in any color at hardware stores.
Skirting boards can be mounted both on glue and on screws. All fasteners are made directly to the wall. If you start screwing the baseboard to the floor through the laminate with screws, this can lead to swelling during thermal expansion.


Therefore, regardless of the installation methods, the plinth is fixed to the walls - this is very important. Also, this method of fastening will allow you to easily remove the entire structure of the skirting boards and, if necessary, easily disassemble the necessary floor area for partial repairs.
The adhesive fastening method is used if you are not going to change the flooring in the future and do not make any repairs.
Given that the plinth follows the contour of the wall along the perimeter and often the walls are uneven, it is better to use plastic plinths. When laying the wires, do not allow the wire to lie between the laminate and the wall.
Several laying patterns
When laying laminate boards, be sure to follow the method of orienting the pieces towards the light. This is required by designers and aesthetic considerations. There are several installation schemes for light orientation: diagonally to the light, perpendicular to the light and parallel to the light flux:
- Classic styling scheme;
- Diagonal scheme;
- Chess or brick laying scheme;

Is more popular. In this scheme, you will be able to economically use all the material. Details must be placed parallel to the light fluxes and it is necessary to start laying the laminate from the wall, which is closer to the windows. The next row starts with the cut board of the previous row. This way you will reduce the number of scraps and increase material savings.
Diagonal pattern


The most refined and whimsical. Designers use it to create spaciousness, airiness and lightness in the room. Consumption increases with this laying scheme by 15 percent. The consumption may increase even more if the laying of the laminate takes place in long and narrow rooms.
Many flooring professionals install laminate only diagonally. This gives the effect of a visual increase in the room, which is later used for non-standard implementation of the design solution. The main disadvantage is the increase in board consumption and labor intensity.
The whole preparatory process has no differences. The angle from the window is selected, we stretch the fishing line from the corner to the opposite wall at an angle of 45 degrees. The line will be your guide when laying.
On the first strip, we cut off the edge at 45 degrees and lead it into a corner, setting the wedges for the gap. Next, we take several laminate boards and measure them so that the joints fall to the middle in the first row, and the cut edges lie against the wall with a small gap under the wedges. We fill in this way the entire space, while focusing on the fishing line and on the joints of the already laid out rows. And only after that we cut and fill the areas near the walls. This will save you from the situation when the apartment has uneven walls. If you start laying from the walls, then you will constantly have a run-up along the joints in adjacent rows.
Chess layout


Named due to the fact that all the laid details according to the drawing will resemble a chessboard. The whole principle is quite simple: each new row is placed offset by half of the previous board. Here, the consumption of material will also be increased to 15 percent, but at the same time, the strength of the structure will be the highest.
Proper care of laminate flooring
Of course, every owner wants the floor in the house to look like new and therefore it needs some care. Laminate is no exception.
- Before entering, be sure to put a dirt-catching mat that will reduce sand on the floor by 80 percent, which will scratch it inexorably.
- Felt pads should be placed on all legs of standing furniture to prevent scratching.
- Do not allow water to accumulate on the surface. Wet cleaning should be done with a well wrung out cloth.
- You can use special cleaners for laminate, but do not exceed the concentration. Do everything according to the instructions of the detergent. After using special products, it is necessary to wipe the floor dry so that no traces of them remain.
Cut out the pipes
It happens that there are problems with laying in hard-to-reach places: protrusions and recesses of walls, heating pipes, radiators. Do all pipe cutouts correctly and slowly, otherwise you will spoil the whole look of your floor. The pictures show in detail how it is possible to bypass the pipes when laying the laminate and how to do it all correctly.
We lay the board inverted diagonally, resting it on the pipes. With the help of a corner, we mark the location of the pipes (s) along their width. Next, we rest the board against the construction peg and mark the distance on the side of the pipe. And we see the locations of the pipes, which we carefully drill out first.
This is done with the help of drills, which are called ballerinas. You can make two options here: in the first, we just cut it, put the part and the piece near the walls and coat it with glue and glue the part or buy plastic lining, which are also common in all stores; the second option - we make holes strictly according to the size of the inserts.
Decorative contours for heating pipes also look nice and will hide all your misses and irregularities when drilling or cutting holes. I think you understood everything here, because in fact it is not difficult to bypass the pipes.
We go around the ledges on the walls
When laying laminate boards, it may happen that the edge will rest against the bumps on the wall or its turn. In such a situation, we cut the desired shape directly onto the details with an electric jigsaw.
There are situations when elements sheathed with plastic or drywall become an obstacle. Here is an option for solving this problem - we carefully cut the bottom of the skin and drive the part along it to the wall, taking into account a gap of about two centimeters. To do all this correctly, correct the lock at the adjacent part and you don’t have to lift half of the flooring to snap the lock, but the strength of the connection suffers. In this case, before connecting, coat all joints with glue and press firmly.
Laying laminate in multiple rooms
If you are going to lay laminate flooring over a large area, be sure to form expansion joints between rooms. Thresholds are used here, which are fixed to the floor between two sections of the laid laminate that are not interconnected.
This is all done to allow the floor to "breathe" as temperature changes in the room cause the laminate to expand or contract. Although the coefficient is small, but from the increase in the scale of the floor, the laminate may diverge or swell.
In conclusion, I want to say that the whole process of laying laminate flooring is not difficult. This can be done by everyone with their own hands. The main thing is not to make mistakes in the laying process and your floor will delight you with its beauty for many years.
tweet
Pin it
Like