How to make a hipped roof. Hip roof truss system: an overview of hip and hip structures Pitched roof crate 4
A four-pitched hip roof is considered a rather complex and material-intensive structure, which few homeowners undertake to build with their own hands. But if you decide on independent construction, first go through the preparatory path - study the theoretical materials, including those presented in this publication. Then assemble a layout of a small rafter system in order to deal with the nodes, the nuances of their manufacture and the calculation of the amount of timber. So, let’s take the first step and consider…
Design features
This type of roofing structure, shown in the photo, is an ordinary ridge roof, but without vertical gables. Instead, 2 additional slopes are made on the sides of the building - hips with a different slope angle.
Reference. If all 4 planes are tilted at the same angle, then another type of roof will be obtained - hipped roof. Since its slopes converge at one point in the form of a dome, there is no ridge as such.
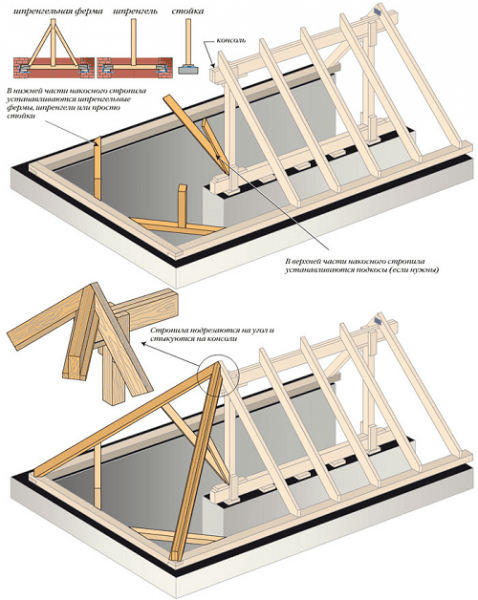
The hip roof truss system consists of the following elements (shown in the diagram):
- mauerlat, bed - a powerful strapping beam mounted on the upper plane of the walls along the perimeter of the building and internal partitions;
- roofing slopes are formed due to inclined beams installed with a calculated interval - rafter legs;
- together with stiffening elements - puffs, racks and braces - the rafters form roof trusses;
- ridge run - a beam connecting the upper points of the trusses;
- in some designs, the lower part of the rafter legs is lengthened due to an additional detail - a filly.

Along the line of convergence of the planes, hip rafters are installed, resting on the corners of the building. Their slope coincides with the angle of the main slopes. But the end rafter legs, called sprigs, form steeper or gentler slopes on the sides of the house.
In the construction of 4-pitched roofs, 2 types of trusses are used - hanging and layered. In the first, the lower belt (puff) relies only on the external fences of a private house, so putting them on too long spans is irrational due to the increased consumption of materials for stiffeners. Hanging truss device, see the drawing:

The advantage of layered structures is the ability to rely on a capital interior partition and overlap large spans without increasing material consumption. Roofing beginners should pay attention to these trusses, as they are more reliable and easier to install.

If it is planned to arrange a residential attic on the attic floor, then the slope of the main slopes increases, and the farm receives 2 supports in the form of racks that form the walls of the room. It is customary to put these details on the beds or floor beams of a wooden house. The ceilings of the attic room are formed thanks to horizontal puffs connecting the rafters on top, as done in the diagram:

Hip roof device step by step
Like any serious structure, a hip roof is built by hand in several stages:
- Creation of a project with the calculation of load-bearing structures.
- Logging and other roofing materials.
- Installation of the truss system.
- Laying a coating with insulation (if necessary).
Design advice. So that you do not have to worry about the reliability of the building, it is strongly recommended to entrust the design work to engineers, regardless of financial costs. They will calculate all the parameters - the installation step of the rafters, their cross section, the number of struts and puffs in accordance with the weather conditions in your area.

Above, as an example, a drawing of a hipped roof with layered trusses covering 2 spans of 4.5 m is shown. The length of the main rafter legs is 6 m, the height of the ridge is 4 m, the angle of inclination is 41 °. This design can be taken as a basis if the width of the building does not exceed that indicated on the drawing (9 meters). Consider an important point: the more the hips are tilted, the greater the load experienced by the sprigs and the central ridge knot, where they rest. In this example, the hips are best placed at an angle of 45-50 °.
The most difficult thing in the construction of hip roofs is the correct installation of the splicing units of the corner rafters with the Mauerlat and the upper belt of the trusses in different designs. This is another reason to consult with designers who design individual junctions. So that you understand what we are talking about, we present drawings of the upper support node, where the hip rafter leg adjoins the ridge.

Some designs do not provide for the manufacture and installation of a ridge run between trusses. Then the hip ribs are attached to the puff and additional struts, as the drawing prescribes:

The lower support node of the leg on the Mauerlat and the splicing of the rafters looks somewhat simpler, although in reality it requires careful sawing of the boards at various angles, which is reflected in the diagram.

For a visual acquaintance with a more complex system, where the hip is combined with a bay window, we suggest watching a training video:
Lumber selection
Before you make a hip roof truss system, you should choose high-quality and dried wood. In terms of price-quality ratio, the most suitable option is coniferous wood - spruce, larch or pine. Pronounced knotiness, rot and traces of vital activity of insect pests are unacceptable.
We present the most "running" sizes of lumber used for the phased construction of hip roofs:
- main rafter - single board 50 x 200 mm or double 40 x 150 mm;
- mauerlat: minimum section - 100 x 150 mm, optimal - 20 x 20 cm;
- narozhniki - board 5 x 15 cm;
- runs - timber 50 x 150 or 50 x 200 mm;
- struts, crossbars - a board with a thickness of 25 to 50 mm;
- racks - a bar 5 x 10 cm.

A set of mounting plates and corners will also not be superfluous
Note. If roofing structures are calculated for you by design engineers, then they will also draw up a specification of all materials with dimensions.
On the crate for laying corrugated board or metal tiles, boards with a thickness of 25-32 mm are traditionally used, and bars 5 x 5 cm are used on the counter-lattice.
Mounting the strapping beam on the walls
Unlike gable roofs, where the Mauerlat is installed on the side walls, under the hips, the strapping is done around the entire perimeter. An exception is frame, log and lumber houses, where the upper wall crossbar or the last tier of logs acts as a Mauerlat. Then grooves are made in it, where the rafter legs are inserted, as shown in the photo.

On the walls of light cellular stone - aerated concrete and foam block - before laying the strapping, a reinforcing reinforced concrete belt is arranged. Mounting studs are embedded in it, on which a strapping beam is subsequently put on. Step by step the order of work looks like this:
- Installation of panel formwork, knitting of the reinforcing cage with embedded parts and pouring the belt with M200 concrete mix.
- Waterproofing the concrete surface with roofing felt or bituminous primer.
- Installation of the beam and its fixation on the studs.

Mauerlat corner connections are made by cutting into half a tree. In the same way, the timber is increased in length if the standard size of 6 m is not enough. Also, horizontal struts are made in the corners or iron brackets are driven in, which do not allow the beams to move apart under the load of the main and hip rafters.
Advice. Be sure to treat all wooden parts with an antiseptic and flame retardant. One protects the wood from decay, and the second increases its fire resistance.

Assembling the truss system
Roof trusses of large sizes are usually mounted on site, because it will take twice as many workers to lift them from the ground. In wooden houses, first of all, all ceiling beams are installed, and temporary flooring is arranged on them. For the installation of a high ridge, scaffolding will also be needed.

The phased assembly of the hip roof structure is carried out in the following order:
- As with the construction of a gable roof, the first step is to place the central supports, where the ridge run is attached.
- The installation of the main rafters is carried out, which are cut from above and below at the desired angle. On the ridge, the oncoming rafter legs are brought out into one plane and fastened with steel plates on self-tapping screws (yellow, not black). Beams are fixed to the Mauerlat with corners.
- After installing the main trusses, tighten them with crossbars and struts according to the drawings, using bolts for fastening.
- Install the ribs - the extreme hip rafters. Their connection with the ridge and strapping timber is carried out according to one of the schemes proposed above.
- Saw off and nail the sprigs to the frame. Each of them is cut at different angles, determined by measuring at 4 points (along each edge of the board).
- If necessary, fix the fillies to provide an overhang of 0.5 m, and hem the eaves with boards.

Advice. Since the hip ribs are very long, they must be increased and additional supports should be placed. Make the joint near the ridge, where the load on the roof is less, and mount the supports closer to the Mauerlat.
How the elements of the hip structure are attached in reality, see the following video:
Laying the finish coat
This final operation is carried out according to the traditional technology, which provides for ventilation of the under-roof space and the installation of a waterproofing layer from a diffusion membrane. The latter does not allow moisture to penetrate from the street into the attic, at the same time, the film freely passes water vapor out. There is only one difference from covering ordinary gable roofs: additional flashings are placed along the fracture lines (on the hip ribs).
The coating material is laid in the following order:
- The rafter system is completely covered with a diffusion membrane. The canvases are rolled out horizontally with an overlap of at least 100 mm, starting from the bottom. Joints must be sealed with adhesive tape.
- The film is nailed to the outer edges of the rafters through the bars of the counter-lattice with a section of 5 x 5 cm, providing ventilation under the metal tile or other material.
- Perpendicular to the direction of the rafter legs, the boards of the crate are nailed. The installation interval depends on the selected coating, and for soft tiles, the packing is continuous.
- Roofing material and all fittings are mounted on the ends of the roof, as well as around ventilation and chimneys.

Note. The bars of the counter-lattice, nailed to the rafters, should not become an obstacle to the ventilation air. Therefore, they are specially shortened to a length of 2-3 m and nailed with a gap of 5-10 cm between adjacent elements.
The insulation of the hip roof is done both during the installation of the coating and after it, the main thing is to assemble the correct “pie” shown in the diagram. In the first case, the mineral wool is laid from above, under the waterproofing, and in the second - from the inside.
Conclusion
It must be understood that the advantages of a hip roof over a gable roof are few. Firstly, it is a beautiful architectural solution, and secondly, it reduces the wind load on the side facades of a private house. But for this, the homeowner will have to pay for the increased consumption of timber and the complication of construction, and hence the time costs. Hence the advice: do not rush into a decision and think carefully about the pros and cons. But if you have already taken it, then do the roofing with high quality, for yourself, without saving money on consultations with civil engineers.
Related posts:

The hipped or hipped roof is one of the most popular roofing options in the construction of individual housing around the world.
Unlike the gable roof of the house, on the sides of which gables are mounted, the hipped one has additional slopes in the shape of a triangle.
A four-pitched roof with your own hands is very difficult to perform, and if you are interested in how to make a four-pitched roof, you should definitely familiarize yourself with the theoretical part first.
Before starting work, you should carefully calculate everything, draw up drawings and a project in which you need to indicate the placement of various elements and other design features.
The calculation of the hipped roof and the project must take into account all the loads that will affect the building.
The design must be very strong, withstand strong winds, snowfall and other weather conditions. The service life of the roof depends on how correctly the roof material is selected.
That is why, when creating a project and drawings, it is very important to calculate everything correctly. Project of a hipped roof in the photo:

Before creating a project and a drawing of a four-pitched roof of a house, you must first find out the angle of inclination of the slopes, which depends on many factors, such as the purpose of the attic, the choice of roof material, and the features of atmospheric influences.
Most often, the angle of inclination of the roof of individual houses is from 5 to 60 degrees.
If in your region precipitation and winds are not very strong, then the angle of inclination of the structure may be insignificant.
If in your area it often rains heavily, and in winter it snows, then the angle of inclination of the hipped roof of houses should be from 40-45 to 60 degrees.
The finishing material, as well as installation features, also depend on the option, what angle of inclination the structure will have:
- if the angle of inclination is less than 18 degrees, wavy and flat slates are used for the roof, as well as rolled roofing materials;
- when the angle of inclination is up to 30 degrees, varieties of tiles are usually used;
- for a roof whose slope angle is at least 30 degrees, piece material is usually used.
Calculation of the slope of the roof in the photo.

The design and calculation of the structure must take into account where all the elements of the roofing system will be located. When you have determined the slope of the hipped roof, you must also calculate the height of the ridge.
Roof truss system
The device of the roof of this type of private houses involves the calculation of the desired section of the rafters. The calculation is made based on the loads that your hipped roof will receive.
The calculations, as well as the design of the structure, should include the wind load, the maximum possible mass of snow in winter, the angle of the roof.
When calculating the distance between the rafters, it is necessary to evaluate their ability to withstand loads, as well as their margin of safety, which should be 1.4 or more.
The type of device of the truss system depends on the features of the building, and therefore may be different.
If the house has a load-bearing wall or supports from pillars, then layered rafters are usually used, but if the support device is not possible, then hanging rafters are made.
In some buildings, both types of rafters are used simultaneously.
When carrying out a drawing and a project for a future building, it is important not only to determine the type of rafter system, but also to take into account additional fasteners that will give the structure strength and reduce the load on the beams.
Calculation of roof loads
When developing a drawing and a roof project for individual houses, it is important to correctly calculate the loads.
Loads are of the following types:
- constants - the weight of the insulating material, various finishing and insulation materials, the weight of the materials
- for roofing and lathing weight;
- temporary - the weight of snow in winter, the negative impact of the wind;
- additional - various structures that are attached to the roof.
When creating a project and a drawing of the roof of your house, you should adhere to the average snow load, which is 180 kg per square meter.
But if the angle of inclination is 60 degrees or more, then the snow load is not taken into account.
As for wind loads, their average value is usually 35 kg per square meter, but if the roof slope is less than 30 degrees, this amendment is not taken into account.
After making all the calculations, you can proceed to the choice of material for the roofing device.
The photo below shows a diagram of the structure of a hipped roof and the name of all structural elements.

The choice of materials for the construction of the roof
When the hipped roof area is covered with roofing material, a lot of waste remains.
Therefore, in order to cover the area of \u200b\u200ba hipped roof, roofing materials are usually chosen, the elements of which are small.
The most common materials for covering the roof area are flexible or ordinary tiles, slate sheets, ondulin, metal tiles.
To build a roof that will last for several decades, special attention must be paid to the selection of materials for the construction of the truss system.
Usually, softwood lumber is used to build a hipped roof.
Do not neglect the quality of wood, choose a material without defects, which can further reduce the quality and durability of the structure.
An important criterion for choosing lumber is its moisture content, which should be no more than 15 - 20%.
If this indicator is exceeded, the beam should be dried before use, so that during the service the hipped roof does not distort or deform.
The construction of rafters for the roof of a house is usually carried out using a rectangular beam, the cross section of which should be calculated for each individual case.
To build such a structure, boards with a rectangular section measuring 50 by 100, 50 by 200, 100 by 150 and others are usually used.
If necessary, then in the process of work, you can double the boards to obtain the desired diameter.
To build a four-pitched roof, special steel elements are often used that hold the rafters firmly in one position for many years.
In addition, supports for ridge runs are also often made of metal.
Construction of a pitched roof
All wooden parts for the roof frame are treated with a special compound that will protect the tree from fire. In places where the beam will be adjacent to brick or stone, it must be wrapped in waterproofing.
The construction of a hipped roof begins with laying the Mauerlat building around the perimeter of the roof area.
Fasten it with wire loops or studs, which are embedded in the wall or in the floor slabs. Next, install the central beam, which is located on the central axis of the house.
It should rest on a floor slab or interior wall.
In order for the structure to be absolutely symmetrical, it is important to correctly calculate and mark the location of the diagonal rafters, as well as the ridge support.
The height of the ridge must also be marked with maximum accuracy.
A clear symmetrical marking of the structure will make the load distribution uniform and prevent the roof from distorting in the future.
After the Mauerlat has been installed along the perimeter of the roof area, the beams are placed under the ridge run. The height of the ridge must strictly comply with the design drawings.
Diagonal beams withstand high loads during service, so they must be installed very well.
If the length of the beam or board is not enough, diagonal supports are made of two parts. In order for the junction not to experience the maximum load, a support bar is installed under it.
The structure can be made the most rigid if the joint with the support is located at such a distance that is equal to a quarter of the length of the rafter beam from its upper edge, which is attached to the ridge.
It is best to implement diagonal rafters with the help of prefabricated rafter legs, which are convenient to mount. You can see the process of installing diagonal rafters in the video.
The device of this roof involves the installation of not only full-length rafters that are connected to the ridge, but also those that are attached to diagonal beams - sprigs.
The closer to the corner of the house, the shorter the jumpers.
The distance between the rafters is determined during the development of the roof project, but it should be borne in mind that each slope must have at least three central rafters.
To give the structure maximum rigidity, supports, braces and puffs are attached in the necessary places. The scheme for attaching the rafters can be seen in the photo.

The final stage of the roof device is the installation of the rafter sheathing. Usually, a beam measuring 50 by 50 mm is used for the crate. The step of the crate depends on what roofing material you have chosen.
If the attic area will be used as a living room, then ventilation should also be installed.
To date, all manufacturers of roofing materials also offer ridge parts of the same textures and colors.
The main ridge is installed on the hipped roof, and skates that cover the gaps between the main slopes and hips.
Complete the installation of a hipped roof by installing cornices and gutters. The whole process is shown in the video.
The laboriousness of work in the construction of a hipped roof is not much higher than a conventional gable roof, but this does not mean that a hipped roof is built with your own hands as simply as a regular one, with two symmetrical slopes. The main difficulty is that a pitched roof requires very precise engineering and knowledge of technology, especially if you do not have good practice in building this kind of roof.
Why is a house with a four-pitched roof better than a two-pitched version
Why is an ordinary gable roof arranged mainly on simple outbuildings, and for residential premises a four-slope roof is chosen:
- The appearance of the four-pitched roof option looks much prettier and sleeker than the double structure;
- Even a simple hipped roof resists the elements much better due to smoother contours and aerodynamics. Even in the strongest wind, the frame rafters remain almost evenly loaded, due to the correct balancing of the diagonal rafters;
- Two additional slopes better shed water, dry under the influence of the wind and thereby protect the roof of the house from leaking, as is the case with straight gables. Thus, for a hipped roof, significantly higher thermal insulation and frost resistance are achieved.
Important! The roof structure in four slopes, in contrast to the "kopeck piece", has a high degree of adaptation.
For a climate with a lot of precipitation, the Danish version with steep main slopes and two hips is perfect; for a steppe zone with strong winds, a low tent frame with large overhangs and an average angle of inclination.
The most convenient will be the use of a hipped roof in houses where the attic space is not allocated as a residential area, but is used for household purposes. Due to the appearance of two additional slopes, the space and usable area of the attic is reduced by about 25%. But if you wish and the size of the attic room is sufficient, instead of an attic, you can equip a small room, even with windows and a balcony, as in the photo.

But in this case, instead of a simple system of vertical posts on which the ridge run rests, in the construction of a hipped roof, you will need to install additional horizontal beams - crossbars, which will play the role of a ceiling for the attic room.

How to make a pitched roof
First of all, it is worth figuring out how a 4-pitched roof differs in detail from a double-pitched option.

The main difference between a 4-slope truss system and a double symmetrical roof
Differences in design will be most evident in the diagram with a simple rectangular version of the hipped roof shown in the photo:
Important! Most of the elements of the additional slopes require a very careful fit, so often the diagonal rafters and rafters are assembled with a preliminary “tack” on self-tapping screws, and only after the final adjustment they are replaced with a bolted connection or knocked down with nails.
Do-it-yourself hipped roof, sequence of work
The most difficult part in the construction of the truss roof system is the stage of hanging the diagonal rafters. Firstly, the angle of inclination of the diagonal rafters and the pressure with which they rest on the ridge run must be equal to the parameters of the pair of slant beams on the other side. The areas of the slopes and the angles of inclination in the hipped roof must be absolutely equal.

Secondly, an imaginary line drawn between the junction points or the vertices of the triangles formed by the diagonal rafters on both sides must pass exactly along the axis of the ridge run beam, both horizontally and vertically. Correctly aligning and adjusting the position of the diagonal rafters is the main difficulty in assembling a pitched roof.
At the stage of preparing the assembly of a hipped roof, a board or Mauerlat beam is laid, while it is important to carefully align the plane of the board with the horizon. A preliminary marking of places for the installation of side rafters, trussed supports and puffs is applied to the Mauerlat. The installation of a hipped roof is greatly simplified if a reinforced concrete slab is used as a ceiling.

After laying out and fastening the puffs, a ridge frame or “bench” is assembled. In fact, this is a ridge beam mounted on vertical racks. Longitudinal and transverse struts are sewn to the racks, which ensure the stability of the frame until the rafters of the hip slopes are assembled.
Before laying out the diagonal rafters, the ridge frame must be supported with a pair of temporary beams, which are attached to the Mauerlat and to the extreme rack of the "bench". This will prevent the ridge frame from tipping over under the pressure of the diagonal rafters on the other side.
Next is the hardest part. First, the real length of each of the sloping beams is determined, for this, a nail is hammered at the fulcrum at the end of the ridge beam and the length from the nail to the fulcrum on the Mauerlat is measured with a cord. Before installing the diagonals, each of the rafters is measured and cut along its length of the cord.

Having installed the braided elements on the Mauerlat, they determine the line of contact and washed down the contact surface. Having cut the plane of the support of the sloping beams, they are laid on the end of the ridge run.
The lower ends of the diagonal beams are installed in the corner joint of the Mauerlat beam with undercutting of the supporting surface of the beam according to the above scheme. Sometimes the shape of the undercut is made according to the template, but it is more reliable to mark the line washed down manually.
Ideally, an imaginary vertical plane drawn through any sloping rafter should be parallel to the plane of the sloping beam located on the opposite side of the pitched roof.
If everything is done correctly, the two diagonal rafters of the hipped roof will be exactly in the axis of the ridge beam. To avoid deflection, sufficiently long windrows, it is necessary to install struts and trussed supports with the installation of temporary fasteners from self-tapping screws. Similarly, rafters are installed from the opposite slope and the elements are aligned with maximum accuracy. To increase the rigidity of the hip slopes, several sprigs are cut out and installed at the edges of the diagonal beams.

After they proceed to the laying of ordinary truss beams. Mounting on the Mauerlat is carried out with a standard bolt-nut connection or using steel corners. In the upper part, the rafter board is usually cut down according to the pattern and laid on the ridge beam.

Usually, after hanging the rows on the ridge run and the Mauerlat, additional crossbars are installed in the upper part, which reduce the bursting effect of the hipped roof frame. After installing all the rafters and aligning the main power elements of the four-slope frame, they proceed to the main fastening of all rafters on the Mauerlat and ridge run.
At the next stage, struts are installed and fastened under ordinary rafters, triangular slopes are “driven” with outdoor beams. Each of the sprigs is cut to its length according to the scheme below and installed in a checkerboard pattern, this avoids weakening the beam due to the coincidence of the cuts on opposite sides.

All elements are fastened with nails, self-tapping screws and bolted connections with overhead steel plates and corners.
Final operations
After assembling the main frame of the hipped roof, fillies are stuffed into the ends of the rafters - short boards that form a row of roof overhangs along the wall. At the ends of the filly, the cut line is measured, cut so that the ends are in the same plane, and the cornice board is sewn on. The lower part of the filly is lined with a clapboard or an ordinary board.
After processing the wood of the beams with an antiseptic composition, they proceed to stuffing the boards of the crate. The thickness of the boards, the amount of material and the nailing points are chosen based on what kind of roof they plan to lay on a given hipped roof.
Conclusion
The four-pitched roof is deservedly considered one of the most convenient and practical roof structures. If you are going to build a four-slope version with your own hands, in addition to the correct calculation of the structure, you will need experience in leveling and adjusting the position of each of the beams. Therefore, it would be right to get the necessary experience and skill in working with hipped roofs from more experienced craftsmen.
Building a frame for a roof with four slopes is a difficult process with characteristic technological features. During the construction, their own structural components are used, the sequence of work is different. But the result will amaze with its spectacular shape and durability when repelling atmospheric attacks. And the home master will be able to be proud of his personal achievements in the field of the roofer.
However, before deciding on a device of a similar design, it is worth familiarizing yourself with the algorithm according to which the truss system of a hipped roof is being built and with the specifics of its device.
The hipped roof class combines two types of structures that resemble a square and rectangular envelope in plan. The first variety is called tent, the second - hip. Against the background of their pitched counterparts, they are distinguished by the absence of gables, called tongs in roofing. In the construction of both variants of four-pitched structures, layered and hanging rafters are used, the installation of which is carried out in accordance with standard technologies for the construction of pitched truss systems.
Characteristic differences within the four-slope class:
- At the hipped roof, all four slopes are in the form of isosceles triangles, the tops of which converge at one highest point. There is no ridge as such in the tent construction; its function is performed by the central support in layered systems or the top of the hanging truss.
- At the hip roof, a pair of main slopes has a trapezoidal configuration, and the second pair is triangular. The hip design differs from the tented counterpart in the obligatory presence of a ridge, to which the trapezoid adjoins the upper bases. Triangular slopes, they are also hips, adjoin the ridge top, and their sides are docked with the inclined sides of the trapezoid.
Based on the configuration of the roofs in the plan, it is clear that it is customary to erect tent structures over square buildings, and hip structures over rectangular houses. Both soft and soft are suitable as a coating. The characteristic square or rectangular shape is repeated by the drawings of the hipped roof truss system with a clearly marked arrangement of elements in the plan and vertical projections of the slopes.
Often, hip and hip systems are used together in the construction of one object or effectively complement gable, single-pitched, broken and other roofs.

Structures with four slopes can be based directly on the upper crown of a wooden house or on a mauerlat, which serves as the upper strapping of brick or concrete walls. If you can find upper and lower supports for each rafter, the roof frame is constructed using layered technology.
Installing rafter legs is easier and more affordable for the inexperienced home roofer who needs to consider that:
- With a rigid fastening of the upper and lower heels of the rafters with metal corners or with the help of a wooden support plate, a reinforced Mauerlat fastening will be required, because the spacer will be transferred to it.
- With a rigid fixation of the upper heel and a hinged fastening of the bottom of the rafter, it is not necessary to strengthen the fastening of the Mauerlate, because. when the load on the roof is exceeded, the hinged mount, for example, on sliders, will allow the rafter to move slightly without creating pressure on the Mauerlat.
- With a hinged fastening of the top of the rafters and a rigid fixation of the bottom, the spacer and pressure on the Mauerlat are also excluded.
The issues of fastening the Mauerlat and the method of installing the rafter legs, which are closely related to it, according to the rules, are resolved at the design stage of the house. If the building does not have an internal load-bearing wall or it is not possible to build reliable supports under the central part of the roof, nothing will do except for the hanging assembly scheme of the truss system. True, in most cases, a layered method of construction is used, for the implementation of which it is necessary to foresee the bearing support inside the building in advance.


In the construction of truss systems for tent and hip hipped roofs, specific structural elements are used, these are:
- Diagonal rafter legs forming the ridge joints of the slopes. In hip structures, diagonals, they are also rafters, connect the consoles of the ridge run to the corners of the roof. In tent systems, slanted legs connect the top to the corners.
- Narozhniki, or truss semi-legs, installed perpendicular to the cornices. They rely on diagonal rafters, are located parallel to each other, therefore they differ in different lengths. Narozhniki form the planes of tent and hip slopes.
Diagonal rafters and joists are also used for the construction of valleys, only then concave roof corners are arranged, and not convex like hip ones.

The whole complexity of building frames for roofs with four slopes lies in the installation of diagonal rafters, which determine the result of the formation of the structure. In addition, the slopes are required to steadfastly hold a load one and a half times greater than ordinary truss legs of pitched roofs. Because they work part-time as a hobby, i.e. support for the upper heel of the sprigs.
If you briefly describe the procedure for building a layered frame for a hipped roof, then you can meet the following steps:
- Mauerlat device on brick or concrete walls. The process of installing a Mauerlat on walls made of logs or timber can be abolished, because. it can be successfully replaced by the upper crown.
- Installation of a central support for a hipped structure or a supporting frame for the main part of a hip roof.
- Installation of ordinary layered rafters: a pair for a hipped roof and a row defined by the design solution for a hip structure.
- Installation of diagonal rafter legs connecting the corners of the systems with the top of the support or the extreme points of the ridge.
- Production by size and fastening of sprigs.
In the case of using a hanging frame scheme, the start of the construction of the hipped frame will be the installation of a triangular truss truss in the center. The installation of a series of truss trusses will be the beginning of the installation of a four-pitched hip truss system.


Construction of a hip truss system
Let's take a look at one of the common examples of a hip roof device with layered rafter legs. They will have to rely on floor beams laid on top of the Mauerlat. Rigid fastening with a notch will only be used to fix the top of the rafter legs on the ridge run, so there is no need to strengthen the Mauerlat fasteners. The dimensions of the box of the house shown in the example are 8.4 × 10.8 m. The actual dimensions of the roof in the plan will increase on each side by the amount of the cornice overhang, by 40-50 cm.

Mauerlat base device
Mauerlat is a purely individual element, the method of its installation depends on the material of the walls and the architectural features of the building. The method of laying the Mauerlat is planned according to the rules during the design period, because for reliable fixation of the Mauerlat it is recommended:
- Lightweight foam concrete, gas silicate and similar walls should be equipped with a reinforced reinforced concrete belt, poured along the perimeter, with anchors installed during the pouring period for attaching the Mauerlat.
- Brick walls should be edged with a side in one or two bricks along the outer edge so that a ledge is formed along the inner edge for laying a wooden frame. During masonry, wooden plugs are laid between the bricks for attaching the mauerlat with brackets to the wall.
A Mauerlat is made from a bar measuring 150 × 150 or 100 × 150 mm. If the operation of the under-roof space is supposed, it is advisable to take the bars thicker. The timber is connected into a single frame with oblique cuts. Then the joints are reinforced with self-tapping screws, ordinary nails or capercaillie, and the corners are reinforced with brackets.
On top of the Mauerlat aligned to the horizon, constructed in the best way for a particular building, floor beams are laid. A bar with a section of 100 × 200 mm is used. First of all, a beam is laid, passing exactly along the central axis of the building. In the example, the length of the beam for the construction of solid beams is not enough, because they are assembled from two beams. The docking point should be located above a reliable support. In the example, the support is an internal load-bearing wall.
The step between the floor beams is 60 cm. If the equipped box does not have ideal parameters, as it happens in most situations, the distance between the beams can be slightly changed. Such an adjustment allows you to slightly "make up" the flaws in the construction. Between the extreme beams on both sides and the walls of the house there should be a gap of 90 cm wide, necessary for the installation of extensions.

Because floor beams can independently form only two cornice overhangs, short half-beams of floor - extension are attached to their ends. They are first installed only in the area of \u200b\u200bthe main part of the hip roof, exactly where the rafter legs are to be mounted. They are nailed to the mauerlat with nails, fastened to the beam with screws, large-caliber nails, dowels, reinforce the fasteners with corners.
The construction of the ridge
The central part of the hip roof is an ordinary gable structure. The rafter system for her is arranged according to the rules that dictate. In the example, there are some deviations from the classical interpretation of the pitched principle: the bed is not used, on which, traditionally, supports for the ridge run are installed. The work of the bed will have to be performed by the central floor beam.
In order to build the ridge part of the hip roof truss system, you need:
- Build a support frame for the rafter legs, the top of which will rest on the ridge run. The run will be based on three supports, the central of which is installed directly on the central floor beam. To install the two extreme supports, first two transverse bars are laid, overlapping at least five floor beams. Stability is enhanced with two struts. For the manufacture of horizontal and vertical parts of the support frame, a bar with a section of 100 × 150 mm was used, the struts were made from a board of 50 × 150 mm.
- Make rafter legs, for which you must first make a template. A board of suitable dimensions is applied to the installation site, lines of future cuts are drawn on it. She will be the template for the in-line production of rafters.
- Install the rafter legs, resting them with a notch on the ridge run, and with the lower heel on the take-out located opposite.
If the floor beams were laid across the box, then the rafters of the main part of the roof would rest on the floor beams, which is much more reliable. However, in the example, they rely on the removal, therefore, additional mini-supports must be arranged under them. These supports should be positioned so that the load from them and the rafters located above is transferred to the walls.

Then three rows of extensions are mounted on each of the four sides. For the convenience of implementing further actions, the contour of the roof is drawn up with a cornice board. It must be nailed to the floor beams and extensions strictly horizontally.
Installation of corner offsets
In the space limited by the cornice board, there were corner sections left unfilled with details of the truss system. Here you will need corner offsets, for the installation of which is carried out as follows:
- In order to indicate the direction of installation, we pull the cord. We stretch from the point of conditional intersection of the extreme support of the frame with the floor beam to the corner.
- From above, along the lace, we apply a bar to its place. Holding the bar, from below we outline the lines of saw cuts at the point where the bar intersects the floor beam and the corner connection of the cornice boards.
- We attach the finished takeaway with sawn off excess to the Mauerlat and to the floor beam with corners.
The remaining three corner extensions are manufactured and mounted in the same way.

Installation of diagonal rafters
Diagonal, they are also slanting, rafter legs are made of two boards sewn together with a cross section equal to the size of ordinary rafters. In the example, one of the boards will be slightly higher than the second due to the difference in the angles of the hips and trapezoidal slopes.
The sequence of works for the manufacture and installation of the braids:
- From the highest point of the ridge, we stretch the lace to the corners and to the central point of the slope. These are auxiliary lines along which we will mark the upcoming cuts.
- With a carpenter's goniometer - we measure the angle between the lace and the upper side of the angular offset with a small one. This determines the angle of the lower cut. Suppose it is equal to α. The angle of the upper cut is calculated by the formula β = 90º - α.
- At an angle β, we cut down one edge of an arbitrary trimming of the board. We apply it to the place of the upper attachment, aligning the edge of this blank with the cord. We outline the excess that interferes with a tight installation. You need to cut again along the marked lines.
- At an angle α, we saw off the lower heel on another piece of board.
- We make the first half of the diagonal rafter using the patterns of the upper and lower support. If a solid board is not enough in length, two pieces can be spliced. You can splice them with a meter-long piece of an inch planted on self-tapping screws; it should be placed on the outside of the oblique leg being constructed. We install the finished first part.
- We do the second part of the rafter in the same way, but we take into account that it should be slightly lower than its first half. The area where the boards are connected into one element should not coincide with the area where the boards are joined in the first half of the sloping.
- We sew two boards with nails in a run-up with a step of 40-50 cm.
- On a lace stretched to the center of the slope, we draw a line along which it will be necessary to adjust the cut to join it with the adjacent rafter.
Following the described algorithm, it is necessary to install three more diagonal legs. Under each of them, supports should be installed at the point of attachment of the corner offsets to the beams. If the span is more than 7.5 m, another support is installed diagonally closer to the ridge.


Manufacturing and installation of hip rafters
The lace between the top of the skate and the center of the slope is already stretched. It served as an axis for outlining the cuts, and now you need to measure the angle γ along it and calculate the angle δ \u003d 90º - γ. Without deviating from the proven path, we prepare templates for the upper and lower support. We apply the upper trim to the place intended for it and mark the cut lines on it for a tight fit between the diagonal rafters. According to the blanks, we make the central leg of the hip and fix it where it is supposed to.
In the space between the corner outriggers and the cornice board, we install short extensions to stiffen the structure and to ensure a strong fixation of the shortest, shortest outriggers. Next, you should start making templates for the sparrows themselves:
- We cut the board cut at an angle δ and attach it to the place of attachment to the diagonal rafter.
- In fact, we outline the surplus that needs to be cut down again. The resulting template is used in the manufacture of all sprigs, for example, the right side of the hip. For the left side, the upper template will be filed from the opposite side.
- As a template for the lower heel of the sprigs, we use a piece of board sawn off at an angle γ. If all the previous steps were performed correctly, then this template is used to make the lower attachment points for all other sprigs.
In accordance with the actual length and "indications" of the templates, the sprigs are made, which are necessary for the formation of the hip planes and the parts of the main slopes that are not filled with ordinary rafter legs. They are installed so that the upper attachment points of the sprigs to the diagonal rafters are located in a run, i.e. the upper connecting nodes of adjacent slopes should not converge in one place. The sprigs are attached to the sloping rafter leg with corners, to floor beams and extensions in the way that is more reasonable and convenient: corners or metal gear plates.

The hipped roof technology is based on already familiar hip principles. True, there is no ridge part of the truss system in their design. The construction begins with the installation of a central support, to which the sloping rafters are attached, and then the slats. If hanging technology is used in the construction of the roof with an envelope, then the finished truss truss is installed first.
We suggest you use our free online calculator for calculating building materials when installing a hip roof - and follow the instructions.
Helpful Video Instructions
Briefly with the sequence and rules for installing the truss system of a hipped roof of hip and hip categories, the video will acquaint you:
Having familiarized yourself with the specifics of the device and having mastered the intricacies of installing roofs with four slopes, you can safely proceed to the implementation of plans for its construction.
The choice of the type of roof for the project of the future structure is a very important stage of construction. A mistake in this matter is costly: the integrity of the image is destroyed, harmony and respectability are lost. To cover a large private house with their own hands, architects and designers often recommend a hipped roof. Its device successfully combines a recognizable appearance, reliability and practicality, which no homeowner can resist.

Appearance and design
The four-pitched type roof consists of four intersecting planes, slopes. Two of them, triangular in shape, are called end, they replace the pediments. The remaining two are trapezoidal, known as facade. The slope angle of the slopes lies within 15-60 degrees, and the choice of roofing material is limited only by the imagination.
The design of the hipped roof consists of the following mandatory elements:

- The ridge, located at the very top of the roof, at the intersection of the planes of the slopes.
- Slopes, four surfaces located at an angle to the base of the roof and covered with roofing material.
- Overhangs, parts of the roof protruding beyond the perimeter of the base, necessary to protect the walls of the structure from water ingress. Overhangs are formed by lengthening the rafter legs or special parts - filly.
- The truss system, which is not visible from the outside, but it is a frame, a support for a hipped roof that forms its geometry.
- Drainage system, which ensures the removal of excess liquid from the surface of the hipped roof. Usually, an external drain is installed, consisting of a gutter, a water intake funnel and a vertical pipe.
- Snow retainers, small sides located along the edges of the slopes, preventing the sudden collapse of the snow mass accumulated after a snowfall.
Varieties of forms
The term "four-pitched" hides several types of roofs, consisting of such a number of slopes, but having a different device:


Design
A hipped roof is a complex structure that requires precise calculations and project preparation. If earlier these tasks were only possible for experienced craftsmen and designers, now everyone can solve them with the help of a computer and special software. In the course of calculations, a scheme is drawn up and determined:

The result of the design process is a diagram that reflects the actual dimensions and relative position of the parts of the hipped roof.

truss system
The hipped roof rests on a frame called a truss system. Almost all of its elements are made of coniferous wood. Since wood is a material of natural origin, moisture and bacteria have a destructive effect on it. To reduce it, an antiseptic treatment of deep penetration and a fire retardant are carried out to protect against fire. Includes:


Do-it-yourself installation of a four-pitched roof is a great way to complement the architectural design of a private house. By making an effort and building it yourself or by hiring professional craftsmen, the homeowner will become the owner of a comfortable, beautiful home!
Video instruction