How to assemble machine guns in a panel. Electrical wiring distribution board diagrams. Drawing up an electrical diagram
The presence of an electrical panel in a residential building or in a country house allows you to solve two problems at once: distribute the load throughout the room and protect devices in case of accidents. It is advisable that competent organizations deal with this issue, but if you have some skills in handling electricity, then installing an electrical panel and connecting it will not be difficult. As a rule, the main machine and the meter are connected by the electricity supply organization, but after the meter you can do the wiring yourself, only before starting up you will have to invite representatives of this organization so that they check everything and measure everything. Naturally, this will cost some money, but still, it will be much cheaper than if the wiring and installation of the electrical panel were carried out by people from the appropriate company.
The only condition is knowledge of the norms and rules for carrying out such work. After all, the panel, sockets and switches are installed at a certain height.

Depending on whether it is an apartment or a private house, electrical panels can be installed differently, depending on where the meter and input machine are installed. Nowadays, the meter and the input machine, if you take a private house, are installed outside, in a place convenient for control. The panel is installed inside the house, where it is convenient to control electric lighting and operating electrical appliances. Several decades ago, both the meter and protective plugs were installed in the house, which was extremely inconvenient for regulatory organizations. They had to enter private houses, which the owners did not really like. Now that the meter is located on the street, it is convenient to both control and reduce readings.
Unfortunately, this option is not always and everywhere possible. In this case, the meter is installed in the apartment in the panel where the circuit breakers are located. Therefore, when installing the panel, it is necessary to take into account the dimensions of the meter and the number of switches.

In apartment buildings, as a rule, meters and input machines are located on staircase landings, in special electrical panels, where several meters are placed at once, serving several apartments. At the same time, no shields are provided in the apartment, especially if the apartment is not of a modern layout. In case of renovation in an apartment, an electrical panel is simply necessary, as this will allow you to share the power supply to almost all rooms, which makes them independent. This is especially true in the event of an accident, when it is possible to provide this line with a separate automatic machine and carry out repair work. At the same time, in the remaining rooms all electrical appliances will function as before.
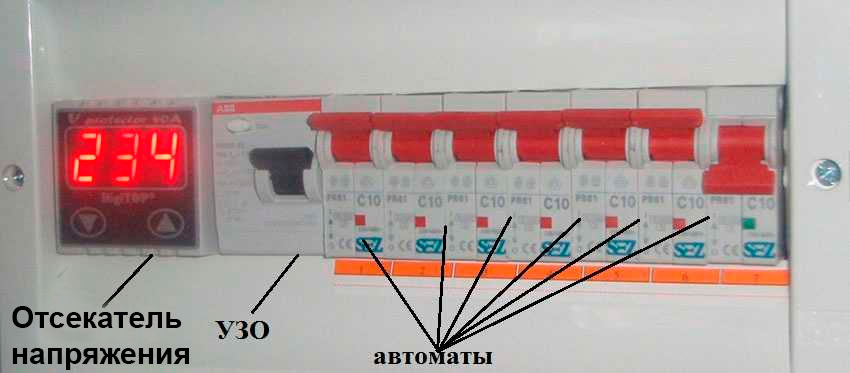
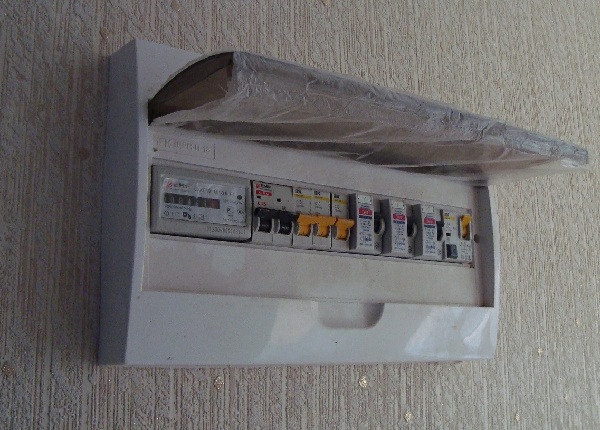
Jokes with electricity always end in failure, therefore, the issue of safety should come first. There is such a device as an RCD - a residual current device (photo above No. 3), which must be installed in front of the machines that distribute the load in the apartment. This device protects the line even if such leaks are minimal, thereby minimizing electric shock. The RCD is turned on as follows: the phase is connected to the inputs of the machines, and the neutral wire is connected to the neutral common wire. The machines also have built-in protection against overload and short circuits.
Another interesting device that you sometimes cannot do without is a stabilizer. It's no secret that the quality of our power supply is disgusting: the voltage constantly “jumps” from 160 V to 280 V, which negatively affects the operation of some electrical appliances, the operation of which is controlled by microprocessors. In this regard, equipment such as computers, washing machines, refrigerators, audio and video systems require stable voltage. If something happens, their repair can be expensive, therefore, it is better to play it safe and purchase a stabilizer not for the entire apartment, but only for critical household appliances. Naturally, you should think about this in advance and combine critical power outlets into one group.
The stabilizer can be installed on one or several groups if you turn it on in front of the machines. At the same time, you need to carefully calculate the required power and take care of a power reserve of at least 20% so that the stabilizer does not overheat. At the same time, you should take into account the fact that the dimensions of the stabilizer will not allow it to be placed in the shield, which means that the stabilizer will have to be installed separately and this must be taken care of in advance.
There are 2 buses in the electrical panel: a grounding bus and a grounding bus. All wires connected to the grounding of instruments and devices are connected to the grounding bus. The wire from the RCD (zero) is connected to the grounding bus. The neutral line is always designated by the letter “N” and when wiring, all white or green-yellow wires are connected to it, and the phase wire is always red or brown. That is why it is advisable to use multi-colored wires for wiring, so that later you do not have to call out each wire. This is especially true for those who are doing this for the first time: you can screw things up that then specialists will have to figure out for several days.
All machines in the panel are connected in parallel, or rather, the upper terminals where the phase is supplied. The lower terminals are each connected to a separate line, which feeds separate rooms.
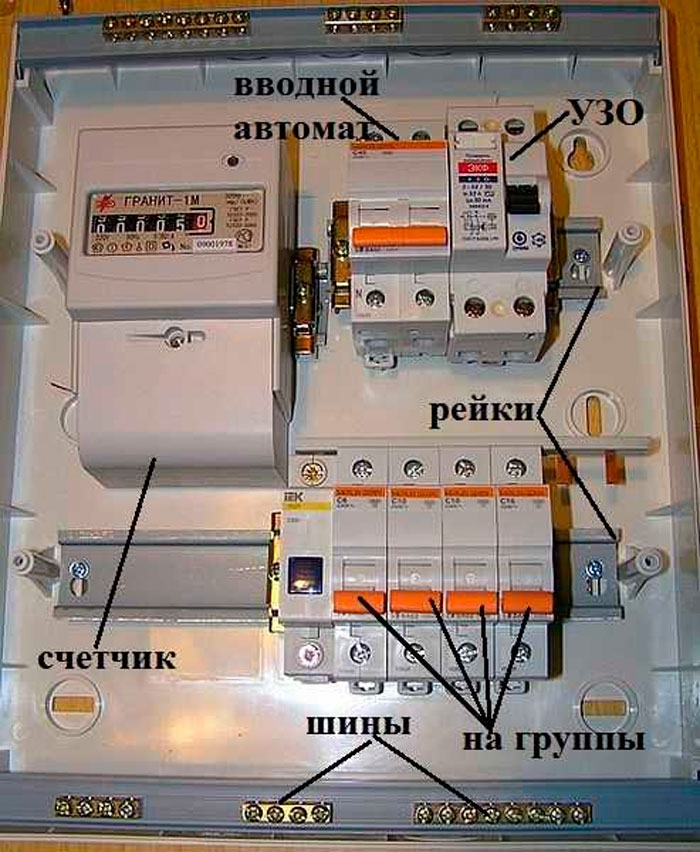
 Option of DIN rails in the panel housing
 RCDs and automatic devices are mounted on a special DIN rail using latches, so there should be no problems with installing such devices.
 Connecting comb for machines in electrical panels
Schemes for several consumers
Power supply schemes depend on the categories of electrical consumers and their significance. Groups of electrical consumers are distributed by floor, by purpose of the building, by the number of rooms, etc. Usually they separate living rooms and outbuildings, basements and garages, as well as street lighting. If there are many consumers, then not on each individual line, in addition to the main RCD, separate RCDs of lower power should be installed. The kitchen and bathroom must be protected with protective devices according to a separate scheme.

If it is planned to install consumers with a power of up to 2.5 kW, then it is desirable to install separate protection. Household appliances such as a microwave, electric kettle and hair dryer have similar power.
At the stage of developing a power supply scheme for electrical consumers, first of all you should think not about savings, but about safety. All electrical appliances are purchased only from well-known companies, and they cost a lot of money.
The manufacturer produces various types of shields, both for indoor and outdoor installation. Panels for outdoor installation are attached with dowels directly to the wall of the building. If the surface is made of wood (fire hazardous), then a non-combustible material, for example, asbestos, is placed between the surface and the shield. Such shields are installed in places where they do not interfere with normal human life. However, the location must be accessible and convenient to use. The outer shield rises 12-18 cm above the wall surface and this factor must be taken into account when determining the installation location.

The panel for internal installation is designed for installation in a specially prepared niche. This type of shield is always at the same level with the surface, therefore, it does not pose any danger to normal life.
The body of the shield is made of either metal or plastic. The size can be selected to suit any specific conditions.
As a rule, choose a shield of the appropriate size. It must freely fit all circuit breakers, all RCDs and at the same time there must be enough space for placing wires. Apart from this, nothing should interfere with the connection.

It is very important to decide in advance on the number of machines and select an electrical panel of appropriate dimensions. At the same time, we should not forget that it is possible to expand the electrical network. In this case, there should be room in the shield for at least two machines.
Installation and connection of electrical devices
All modern automatic machines and RCDs have a special unified mounting location, which is absolutely compatible with the mounting DIN rail located inside the panel, no matter what its design. A special latch is mounted on the back of the machine or RCD, which can be bent using a screwdriver. Everything is very simple: take a screwdriver and insert it into the hole, after which you need to forcefully pull the latch. The device is installed on the bar and the latch is released. As a result, the machine or RCD is securely held on the DIN rail. At the same time, you can hear a characteristic click.
After installing all electrical devices in their place, proceed directly to the connection. First, connect all the wires that supply power to the corresponding groups of objects. Each wire should have a mark. For example, when laying out wires, you should write on the wires: kitchen, bath, toilet, hallway, bedroom, hall, balcony, etc. If the inscriptions are made in a timely manner, immediately after wiring, then there should be no problems with the connection. After the wires are connected to the lower terminals of each machine, they begin to connect protective devices and supply voltage to all machines. In this case, all machines must be in the off position (“off”).

The phase wire is connected to the upper terminals of all machines through a protective device, and the neutral wire is connected to a separate neutral terminal. Modern requirements predetermine the installation of a two-pole input circuit breaker.
The RCD connection diagram looks like this, as shown in the photo.

How to install an RCD on a DIN rail is shown in the video.
After everything is connected, you need to check everything and only then, one by one, the machines begin to turn on. If you have certain skills, then it is better to check all the wiring using the device for short circuits. After turning on the machine, it is advisable to check the presence of voltage in the room it protects, if there is no short circuit. If the RCD trips after switching on, it means there is a leak or an indirect short circuit somewhere. In the event of an obvious short circuit, the circuit breaker that was turned on should be triggered. As a rule, group circuit breakers are designed for a lower operating current, which means a lower short-circuit current. This approach ensures selectivity of protection.
How to properly connect an RCD: video.
In the process of independently connecting all the elements located in the panel, you should know that the meter and the input machine are subject to sealing. Modern electrical panels have everything covered. Unfortunately, not every model is equipped with a separate box where an introductory machine is installed. If this is not provided for, then the organization will either refuse to seal and write an order, or seal the entire shield, without the right to access it in the future.
In the following video you can see what types of machines there are and how they differ from one another, except for the manufacturer.
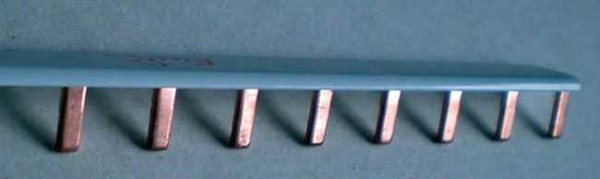
Electrical appliances installed inside the panel are connected to each other using jumpers made of ordinary insulating wire or using a factory-made comb. What it is like to connect circuit breakers with wires can be found in the photo.

Jumpers are manufactured:
- From conductors of the appropriate length, in which the insulation is removed at both ends, and the ends of the conductors are bent with an arc. Two conductors are inserted into each terminal and only one into the outermost circuit breaker, after which they are securely tightened with screws.
- From one long conductor, from which the insulation is removed after a certain distance. After this, using pliers and pliers, the conductor is bent in arcs. The bare ends of the arcs are inserted into the terminals and tightened with screws.
Almost all electricians do this, and if you show care and diligence, the contacts will turn out good. At the same time, there is an alternative option when special tires (combs) are used instead of conductors. How to connect all the machines using a bus can be seen in the video.
The phase wire is connected to one of the machines, to the top terminal, where they are connected using a wire or comb. If a wire was used for connection, then power is supplied either to the far right or to the far left machine, where only one conductor is pressed. If you connect the power to other machines, the connection will not be as reliable, since the terminals of these machines already have two conductors and the third conductor is simply superfluous.
The right choice of machines
Three types of electrical devices can be installed in the electrical panel:
- Automatic switches (automatic machines). Switching on and off is done manually, and if there is a short circuit, the machine is triggered automatically.
- RCD (residual current device). These devices respond to increased leakage currents and shut down the line under such conditions.
- Dif-automatic (differential automatic). This device is capable of protecting the line both from short circuits and from increased leakage currents.
So-called differential circuit breakers can replace RCDs and circuit breakers. This is especially true when there is a lack of space.

Due to the fact that differential circuit breakers are much more expensive than a simple circuit breaker and an RCD combined, two devices are installed - a circuit breaker and an RCD. In addition, in emergency modes it is possible to determine what exactly is causing the problem. If it is a short circuit, then the machine is triggered, and if there is a leak somewhere, then the RCD is triggered. If the automatic differential works, it is unlikely that the true cause will be established. In this case, you will have to look for the cause, armed with instruments.
How do machine guns protect?
Automatic switches (circuit breakers) are selected according to their operating current, which is determined by the total current consumption of devices of the corresponding group. To determine the current, you need to add up all the powers of electrical household appliances connected to a given line and divide by 220V. The circuit breaker is selected with some margin so that it does not turn off due to overload. For example, with a total power of 6.6 kW (6600W), if divided by 220V, you get 30A.
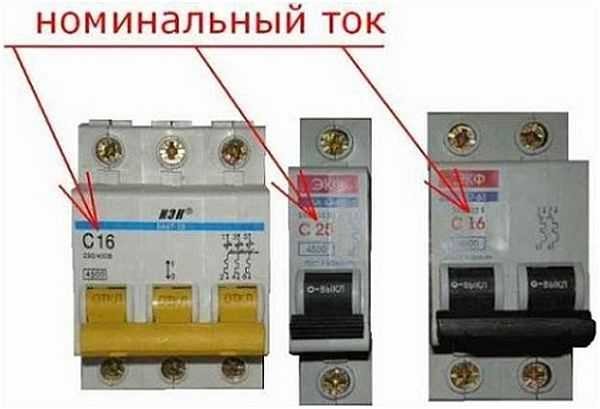
Machines are produced with the following current ratings: 6A, 10A, 16A, 20A, 25A, 32A, 40A, 50A and 63A. Based on the calculations, a machine with an operating current of 32A is more suitable, and that is what needs to be installed.
Types and types of RCD
The industry produces RCDs of 2 types: electronic-mechanical and electronic. They differ in some parameters; in addition, electronic-mechanical ones are somewhat more expensive. Those that are more expensive are suitable for a house or apartment. The fact is that they are still more reliable and operate regardless of the presence of power.
If you turn off the input circuit breaker and do something, then, having damaged the insulation, the electronic-mechanical RCD will trip and the reason will immediately become clear. In order for the electronic RCD to work, voltage is required, and it will work only after the input circuit breaker is turned on. As a result, you will have to look for the cause of the emergency shutdown.
To determine which device it is, it is enough to have a battery with wires that connect to any pair of contacts. If it is an electronic RCD, then it will not work, but an electronic-mechanical one will work. You can learn more about this by watching the video.
In this case, RCDs are distinguished according to the nature of the current on which they act:
- AC type – variable, sinusoidal;
- Type A – variable plus pulsating constant;
- Type B – alternating plus pulsating, plus pulsating direct, plus direct current;
Based on the characteristics, type B is the most versatile device, but they are much more expensive. For a home, type A is sufficient, although RCDs of type AC are also sold as the cheapest. Although many argue that the AC type is not suitable. In fact, an AC type RCD is sufficient for a home, considering that few people install them at all. The fact is that although they provide full protection, the percentage of false alarms not associated with emergency modes is quite high, and not everyone will like this. This is due to interference appearing in the electrical network from the operation of various household appliances. Fighting them is very difficult, quite expensive, and sometimes pointless.
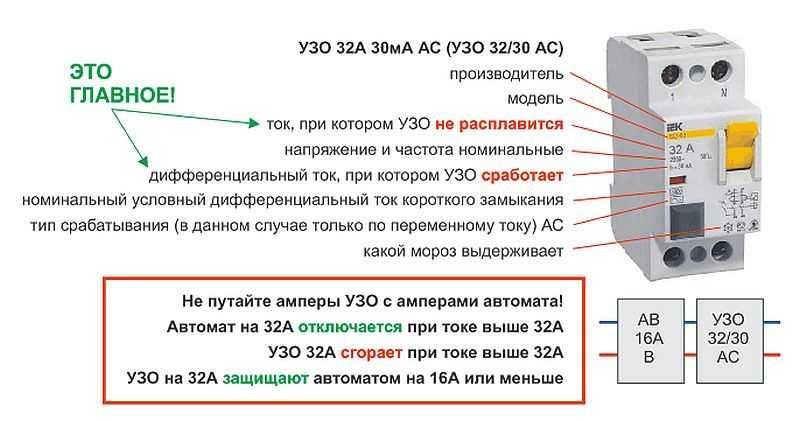
RCDs are selected based on rated current and leakage current. Rated or operating current is the current that passes through the contacts without overheating or damaging them. The operating current of the RCD is always selected to be greater than the operating current of the machine operating in tandem with the RCD. If the machine is designed for an operating current of 25 A, then the operating current of the RCD can be 32 A or even 40 A. As for the leakage current, everything is not at all complicated. For apartments and houses, RCDs with leakage currents of 10 mA and 30 mA will be used. A 10 mA RCD is installed on a line designed for one device, such as a gas boiler, washing machine, electric oven, etc.
In addition, they are installed in premises where a high degree of protection is required. This could be a bathroom, children's room, kitchen, etc. A 30 mA RCD is installed on a line that supplies several electrical consumers. These can be groups of outlets located in separate rooms. As a rule, an RCD is not installed on the lines that control the lighting. The only place where it may be needed is a garage, as a very important building.
In addition, RCDs are distinguished by their response time delay. In accordance with this, RCDs are:
- S - selective, which operate after a certain time interval after the appearance of leakage current. As a rule, they are installed at the entrance, which eliminates the possibility of turning off all machines. In this case, the machine connected to the damaged line will turn off first.
- J - although they also operate after a certain period, but this period is much shorter than that of previous types of RCDs. Similar RCDs are installed on entire groups of consumers.
Differential circuit breakers are selected in the same way as RCDs. The only thing is that they are selected according to the calculated rated current. To do this, it is enough to calculate the total power of consumers and divide by 220V. A differential circuit breaker is the same circuit breaker, but with a built-in leakage current protection function.
How to install a built-in panel, as well as the procedure for connecting it, can be found in the video, where a generalist will clearly explain and show everything.
As a rule, RCDs and differential circuit breakers are regularly checked for functionality. To do this, there is a “Test” button on the body of these devices, after pressing which the device should turn off. It is enough to carry out such a check once a month. It is very important.
Electricity is not an area where you can easily save money. Savings can have serious consequences in the future, since electric current poses a certain danger to others if safety measures are ignored. Therefore, you should always install electrical appliances that have protective functions.
The same can be said about the installation of wiring, as well as its connection. Without certain skills, it is difficult to do something well the first time. The task is further complicated by the fact that you will have to select wires both by type and cross-section, especially since different consumers have different power.
Modern circuit breakers are very reliable in operation and have a number of advantages over other devices designed to protect electrical circuits.
They are devices with two contacts and a switching mechanism in a dielectric housing. This is an indispensable element of the electrical panel.
There are several parameters that you need to pay attention to when choosing:
Installation and connection in the distribution board
At the installation stage, it is assumed that the housing has already been assembled and installed, and brought inside. This is followed by the stage of instruments according to the previously developed connection diagram.
The connection of differential circuit breakers in the distribution board is carried out according to the following scheme:

The following diagram shows how to connect circuit breakers in an electrical panel:

At this stage, it is necessary to install two buses - for grounding and neutral wire, an input machine, and the required amount. All installation operations must be carried out only with the power supply turned off.
To start, it is necessary to install DIN rails inside the shield, they need to be screwed with self-tapping screws using the perforations of the metal profile. DIN rails are metal strips designed to mount devices and busbars.
Automatic devices, RCDs and grounding bars are equipped with spring latches for installation on a rail. After installation, they allow the devices to be moved freely along the rail.On the rail you need to install a zero (in the upper part of the shield) and a grounding bus (in the lower part). They are copper plates on a plastic base with clamps for conductors. Only one conductor can be connected to each terminal.
After this, it is necessary to install an input switch, which will power the entire electrical panel. His should be installed in the upper left corner of the case, the input cable should be located nearby if possible. To connect a two-pole input circuit breaker in the electrical panel, you need to connect, for a single-pole circuit breaker - only the phase.
Then you need to do the installation automatic machines for monitoring the power supply of individual premises and large consumers of electricity. Automatic devices are installed on a DIN rail, and the main wiring connected to the panel is connected to them.
Power is connected to the top terminal. The lower terminals are used to connect the phase wires of the power supply of the groups according to the developed diagram. To connect devices to each other, “comb” type busbars should be used.All neutral wires are connected to the neutral bus, except for those connected using an RCD. has the same connection as a circuit breaker.
The ground is connected to the ground bus using a yellow-green wire. The metal body and door of the electrical panel must also be connected to it. After this, you can apply voltage to the electrical panel and check its functionality using voltage.
Useful video on how to install an electrical panel in an apartment:
To prevent mistakes
Points that you need to pay attention to when installing machines in an electrical panel with your own hands:

To independently select and install circuit breakers in an electrical panel, you need to follow a simple sequence of actions. The main thing in this process is this is compliance with safety measures, as well as all the requirements of GOST and PUE.
You can learn how to properly install an electrical panel and circuit breakers with your own hands by watching this video:
An electrical panel is a serious device that distributes electricity throughout the house. It performs many safety functions, protecting wiring from overloads, and distributing energy to all consumers.
Installation and assembly of electrical panel
The electrical panel includes complex modular equipment. If necessary, you can carry out the installation yourself, but first you need to learn how to properly assemble the shield.

To separate the work of electrical components and housing installation, you should purchase a panel that has a removable frame and DIN rails.
There are several types of electrical panel installation:
- wall mounting;
- installation in the wall.


Let's consider the second option, since the first one is installed simply on holders. Before you hollow out an opening in the wall, you need to make sure that it is not “load-bearing” in the house. According to the rules, installation work cannot be done in it.


The electrical panel must be visible. Doors should not impede his access. For safety reasons, the shield should not be placed near gas pipes or other flammable substances. To place it on the wall, it is necessary to take into account the height from the floor to its lower edge of at least 1.4 m, and the distance of the upper edge from the floor is no more than 1.8 m.

A building level will help mark out the future area. To maintain all dimensions, you can attach the body to the wall and outline it with chalk. A slot is made using a grinder along the marked lines.

A chisel and a hammer drill will help to hollow out the inside. You need to check the depth of the resulting niche by inserting the electrical panel housing into it.

First, the mount included in the kit is mounted there. Then the electrical panel. For fastenings, holes are made and dowels are inserted. The remaining cavities are sealed with polyurethane foam.
DIN rails are unscrewed from the electrical panel in order to install modular equipment on them. If the kit does not include special fasteners, then you need to drill holes in the back wall of the shield for future fastenings. This is done carefully; excessive force may cause the housing to burst.
How to insert cables correctly
An electrical panel with a removable cover will help you insert the wires inside correctly and conveniently. Conventional enclosures have holes for cables that are slightly cut or pressed out. They are located at the top or bottom of the body. They may also be in its back wall.


In electrical panels of poor quality, there may not even be a hint of any holes. Then you will have to mark and drill them yourself; not everyone has the patience for this. Therefore, it is better to buy a housing that is more expensive and will take less time to install.

Modern housings for core planting have plugs. They are removed after the shield is installed in the wall. Cables are inserted into the resulting holes. Instead of plugs there may be stuffing box plates.
The first step is to start the input core. It should be located near the input machine. There are comb-type fastenings on the shield; the lead-in conductor should be attached to it. A plastic clamp is used as a tie. Its excess ends are cut off.

The cable is marked with markings, which are indicated on the diagram. This is done with all veins. After their installation, a removable cover is applied and marks are made on it. Cutouts are made along them, and the lid falls into place.


How to cut cables inside a switchboard
The insulation must be removed from the inserted cores. This process is done carefully; conductive wires must not be damaged. Immediately a second mark is made on it. This is important because there can be a lot of confusion after cutting all the wires.

Paper tape is suitable for labels. Do not forget the main rule: marks must be applied as indicated on the diagram.
In order for the cable to be sufficient for the entire length of the wiring, you need to insert it into the electrical panel and run it to its entire height. Then measure the same distance in height again. The result will be a length twice the height of the shield. This supply of cable will allow you to confidently guide it to the desired point according to all wiring rules, and excess pieces can always be cut off.


Modern modular protection devices
The quality of electricity in modern networks is not always satisfactory. To protect the line from overloads, modular type protective devices began to be used. The electrical panel with automatic circuit breakers will be protected from short circuits. It will immediately react to the appearance of overcurrents. When connecting the machine, you must adhere to the general rule for power supply - it is connected only from the top.

The insulation is removed from the wires. The machines have clamping terminals, insert the core into them and tighten with a screw. Be careful not to let insulating materials come into contact with the terminal. If this happens, then the apartment may suddenly lose electricity, or the protection device may fail. This may cause a fire.

There is one more important rule: do not connect wires of different cross-sections to one AB terminal. A wire with a larger cross-section will receive good contact when tightened, while a wire with a smaller cross-section will receive poor contact. The insulation on it will melt, which will lead to a fire.


If the connected core is monolithic, then for good contact its end should be bent in the shape of a U. The connection area increases, and the contact is reliable.

Stranded wires in the terminals of the machine cannot be tightened without special lugs. The contact will be poor and unreliable. To switch them use:
- NShVI tip (2);
- NShV tip.

Assembly of modular panel elements
For those who have never come into contact with such a task, you can provide instructions for assembling an electrical panel. We prepare the workplace; nothing should interfere with the assembly of the modules. We make good lighting.

The following modules will be required:
- circuit breaker (load switch);
- voltage relay;
- residual current device (RCD);
- differential automatic machines;
- circuit breakers;
- cross module.


You can assemble a single-phase panel with your own hands, provided that you have some knowledge of an electrician.


All modules are mounted on a previously removed DIN rail. They are arranged in the same order strictly according to the list. The modules are secured using special clamps. Having checked the correct distribution, we proceed to the terminals. You need to loosen the screws on them.

You will need different types of combs. Input clamps (terminals) will help you more conveniently connect the combs to the power wires. They must be placed between the terminal of the module and the comb.

The input load switch has a phase output (lower contact) from which a phase is distributed to the RCD, circuit breakers and other switches. The RCD has zero terminals; they receive a working zero, which is taken from the lower output terminal of the input circuit breaker.

For further assembly of the electrical panel, one end of the neutral wire must be free. It is connected to the main bus of the working zero. Zero buses and zero outputs of all RCDs are switched with a blue wire.

All unused connections are tightened with a screwdriver. After this, the entire installation is checked. After applying voltage to the input circuit breaker, press the test button.

Circuit breaker terminals are checked for voltage. When they are turned on, the same measurements are taken at the output. To prevent household appliances from burning out due to voltage surges, a voltage control relay is installed. The method for assembling a three-phase panel is the same as for a single-phase one. They differ only in the number of conductive wires.

Final installation
When all modular devices have been adjusted and tested, all that remains is to transfer them to the electrical panel housing. For safety, turn off the power. A niche in the wall is being prepared. The assembled devices are mounted on a DIN frame inside the housing.

The main and protective zero buses are mounted. When distributing wires among bundles, it is not recommended to allow them to intersect. The protective zero wires are attached to the PE bus. The connection sequence is observed as in the electrical panel diagram. The protective zero before commutation with the bus terminal is marked.

When all devices are connected, a check begins for compliance with the connection diagram. On the Internet you can see a photo of the assembled electrical panel.

To check the assembled electrical panel, you need to install all switches and sockets in the apartment. Connect the load to sockets on all lines of powerful consumers. After applying voltage, phases and zeros are checked for compliance.


When the adjustment is completed, do not rush to close the electrical panel. It should work for a couple of hours, and then it will become clear whether the assembly was carried out efficiently. Installing and connecting the shield is a labor-intensive process that requires certain knowledge and experience. You should start by studying the theoretical part and follow the step-by-step assembly instructions.


First of all, if you start electrical installations or any work with electricity and electrical installation products, follow.
About the electrical panel of a private house
An electrical panel or otherwise a power panel is the basis for the entire electrical supply of a private home. The power cable to the house is supplied to the electrical panel; all electrical circuits (groups) of the house are brought into the panel. It installs protective devices (RCDs) to protect people, and circuit breakers to protect electrical wiring and the house from overload and short circuit.
In addition, in the house panel it is necessary to provide for the installation of circuit breakers for the power equipment of the house, for example, a heating boiler, ventilation system, automatic water supply.
It is better to buy equipment for the house panel, as well as for the whole house, in stores with quality suppliers. For example, we have water heaters on the website https://grostal.ru/vodonagrevateli/ Online store of radiators, batteries, water heaters, ventilation grilles and everything you need for effective heating and ventilation of rooms.
Assembling an electrical panel in a private home - general concepts you need to know
To assemble a shield with your own hands, you will have to familiarize yourself with some general concepts.
In the previous paragraph, I said that an input cable is supplied to the switchboard and electricity is distributed into groups in it. That's right, such boards are called ASU (input distribution devices). They are placed in a dedicated room of the house (panel room), they are quite convenient, although they are cumbersome.
But not everything is so rosy. District energy organizations that will accept the electrical wiring of the house require, and this is by law, to separate the input panel and the distribution panel in order to connect it to the general electrical network.
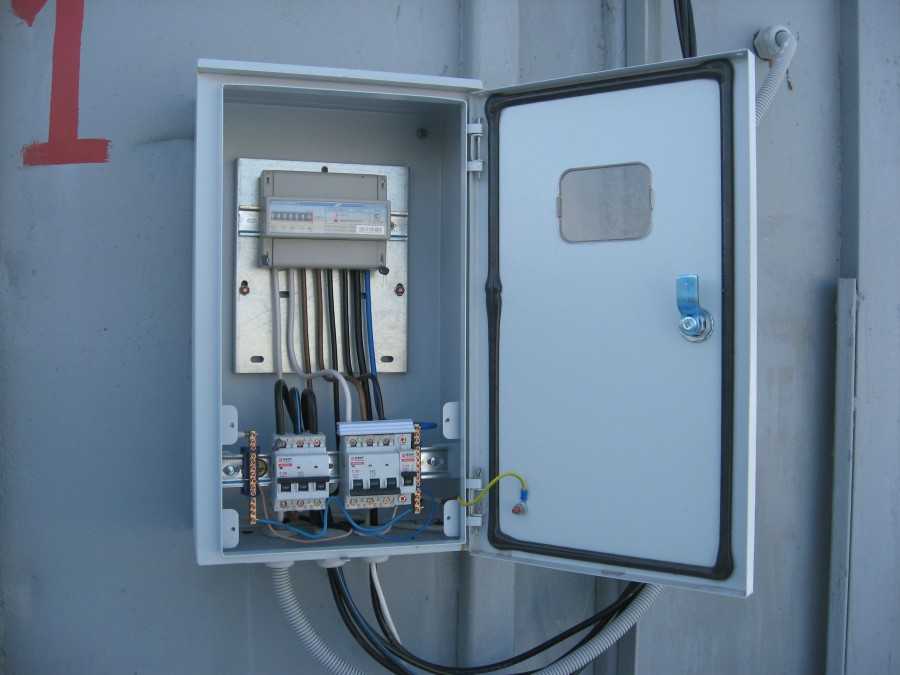
Introductory shield
Input board or input device (ID) placed on the street or VLI pole, from which a branch is made to the house. It installs a metering meter, an input circuit breaker, a general RCD of the house, lightning arresters and surge suppressors. Many people do not install the last two devices.
The input device (ID) must be closed, and for control, behind the metering meter, a window must be provided in the door. I'll say more. Many people introduce power into the house as follows.

Before installation, sign with a marker which group belongs to which equipment. Sign both the machine and the platforms under (above) the modules. Don’t forget to attach the panel assembly diagram to the switchboard door.
To connect circuit breakers on the power side, they are connected with special combs. They reduce the number of wires in the panel and simplify installation. By the way, single-core copper wire PV3 is used to disconnect the shield. In the water shield - 6 or 10 mm 2. In the distribution board PV3 4 mm. The PV3 wire is multi-core and therefore requires the installation of crimp cables. Without tips, contact may deteriorate over time.
Conclusion
Assembling an electrical panel in a private house with your own hands is not an easy or responsible job. But with a consistent approach, careful preparation and careful execution of the work, you will be able to assemble and install the shield yourself.