Materials and tools for a birdhouse. Preparations for spring are in full swing: learning how to make birdhouses. Bottle houses
So that the forest rings with songs,
We'll hang each one in a hollow.
We will provide birds with housing:
Every couple gets a new home!
People build birdhouses for a variety of reasons. Someone who wants to help birds does it free of charge by placing birdhouses in public gardens and parks.
And this is great, because every year birds have fewer places for nesting.
Hanging bird houses is an old and very useful tradition. With the help of birdhouses, you can restore and sometimes even increase the number of birds living in hollows - starlings, wagtails, tits.
Many people attract birds to their gardens so that the birds protect the plantings from attacks by insect pests.
It is known that a tit is capable of eating insects weighing equal to its body weight in a day, and a brood of starlings destroys a thousand cockchafers and their larvae and other pests in a week!
Birds are quite picky and careful when choosing a place for their nesting, so it is very important to know how to properly design and hang an artificial house (birdhouse or titmouse) so that the birds like it and not be left hanging empty.
 The first bird houses in Rus' appeared during the reign of Tsar Peter I, who observed how Europeans fed birds and decided to introduce this tradition in Rus'.
Moreover, at first people were forced to make birdhouses on an orderly basis, but this innovation quickly fell in love and took root, since people liked the chirping of birds near their houses and it was a pleasure to watch how the birds fed their offspring.
The sight of birds with caterpillars and beetles in their beaks quickly convinced people that this was useful for the farm, and not just fun.
It is known that redstarts, wagtails, starlings, nuthatches and tits are leaders in the destruction of garden pests. For example, only one pair of starlings can protect up to 50 fruit trees from insect damage. You just need to make sure that the birds remain your good neighbors for a long time.
1.How to make a birdhouse correctly
You need to understand that a bird house should appeal primarily to birds, not people. The best home for them is an unpainted box made of unplaned boards with the smallest possible entrance and a deep bottom.
(so that cats or birds of prey don’t get there).
Even if all these requirements are met, there is no complete guarantee that wary birds will colonize it in the first year. Sometimes birds take over the house for the second season. If the house remains empty further, it needs to be removed, cleaned and moved to a more suitable place.
The occupancy of a house is influenced by many factors, not all of which have been sufficiently studied. Therefore, if you want to attract feathered friends to your home or garden, you should make several copies of birdhouses or titmouses and hang them in different places.
It is best to take birch to make a birdhouse, however, others are also possible well dried boards, not even necessarily new. The thickness of the board is approximately 1.5-2 cm. This will be enough for the birdhouse to retain heat well inside.
Also, you cannot use any processed compressed wood (such as fiberboard or chipboard), because the glue can be toxic and very harmful for birds, and changes in wetting and drying will lead to deformation of the structure.
You should not make a birdhouse from plastic (harmful for birds, it gets hot in the heat and does not warm in the cold), porcelain, ceramics and iron and plywood (gets wet and deformed).
The outside of the birdhouse is most often sanded (for beauty), but inside it must remain rough and untreated, so that the chicks can cling with their claws and approach the entrance for food, and then get out of the house.
It is very important to choose the right size for the birdhouse and don't make it too big. In this case, the female lays more eggs, but the parents are not able to feed many chicks. As a result, they grow up frail and unviable. And birds will never inhabit a birdhouse that is too small.
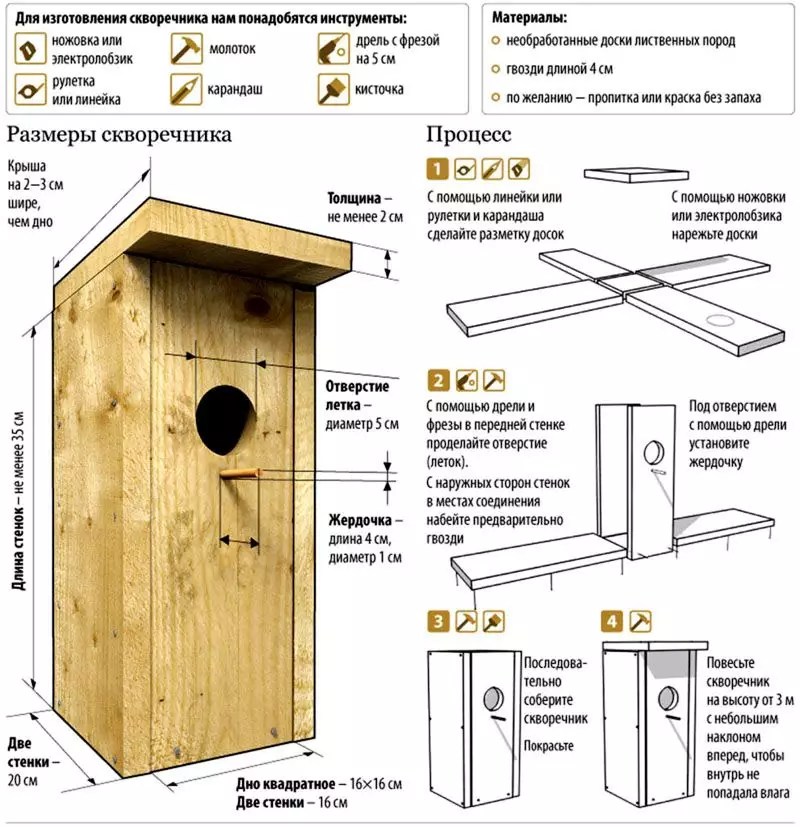
The approximate dimensions of a proper birdhouse are shown in the figure.
Classic birdhouse has dimensions of 25-30 x 13-15 x 13-15 cm and a round entrance of 4.7-5 cm. Such a dwelling can take not only the starling, but also the great tit, woodpecker, sparrow or swift.
Among smaller birds, including songbirds, it is very popular titmouse Its dimensions: 22-28 x 10-11 x 10-11 cm with a tap hole of smaller diameter: 3.2-3.5 cm. You will like such housing pied flycatcher, nuthatch, garden redstart, tits, sparrows and some other birds.
It is better to make the roof of the bird house pitched. It should fit snugly against the walls of the house, but at the same time be easily removable. This is necessary to clean the bird’s home in the fall after the birds fly to warmer regions for the winter.
To make the lid easy to remove, a thick board is nailed to it from the inside, the size and shape matching the size and shape of the hole between the walls. Such a board should fit into the house quite tightly, like a cork in a bottle,
Birds do not need any decorations or bright details at all; they get along just fine without them.
You can build a birdhouse from a piece of round dry log with a diameter of 30 cm. Its core must be carefully hollowed out with a chisel, leaving walls 2 cm thick. Then drill a tap hole with a diameter of 5-6 cm, fit a lid and nail a thin stick below the tap hole. That's it, the round house is ready!

Often a perch is fixed under the entrance on which the bird can sit, but it should not be made very long and thick, since it will become a support for the cat’s paws and for crows and jackdaws.

Sometimes houses are made without a perch at all - the birds cling to the edge of the entrance while feeding the chicks.

But it’s best to do the middle option - it’s more comfortable for the birds and the predator won’t get caught.

 It should also be said that it is better immediately paint the birdhouse to protect the boards from wearing out faster. You can only paint the outside of the house; there must be unpainted boards inside.
There is a lot of debate about what colors bird houses can be painted.
Many insist that the color for a bird house should be dim and calm. It is better to choose natural shades. Green and brown colors, which are very familiar to birds in nature, work well. Or cover the product with stain, as well as any antiseptic composition for wood.
Paints must be non-toxic to birds.
True, I read about experiments when birdhouses were painted gray and red colors and the best inhabited red houses (???)
 By the way, the vision of birds is much more perfect than that of humans. They perceive a wider range of waves, including ultraviolet. The world plays for them with brighter colors and has many shades unknown to us.
Birds are tetrachromats. The retina of their eyes contains four types of cones with opsins that are sensitive to red, green, blue and another color in the ultraviolet range.
And below I have selected examples of birdhouses that are very beautiful from the point of view of people, but birds will avoid them.


 And the next story will tell in detail when and how to hang a birdhouse correctly - “Birdhouse - when and how to hang it correctly.”
One of the conditions for a rich harvest in the garden or garden is the fight against numerous arthropod pests. Using insecticides for these purposes means harming the health of the surrounding environment. It is better to “entrust” this task to birds - they become indispensable helpers in this matter.
But hoping that the birds will fly to your site on their own is short-sighted. A more reasonable solution would be to organize conditions for birds to settle directly next to humans. And for this it is necessary to attract them to the site with ready-made “comfortable housing”. A do-it-yourself birdhouse for birds, equipped according to all the rules, will be a good prerequisite for birds to choose a site for permanent residence. And the family that has settled in it will do an excellent job of controlling garden pests, collecting them from plants and even removing them from the soil.
And simply such proximity to living nature cannot but be beneficial, and it especially brings a lot of joy to children. So it makes sense to roll up your sleeves.
What material to choose for a birdhouse?
When planning to build a bird house, you need to take into account some nuances when choosing material for these purposes. Therefore, first you should consider various options, weigh their advantages and disadvantages.
- Natural wood- This is an ideal material for a birdhouse. It is easy to work with, it is environmentally friendly, has natural warmth, and most importantly, it is natural for the habitat of the vast majority of birds. However, there are also important nuances. So, for the construction of bird housing, you should choose a board made of hardwood.
 The ideal material for a birdhouse is a hardwood board, preferably linden or aspen. Softwood lumber is not welcome
 The trouble is that coniferous boards can begin to release resinous substances over time, especially in the spring, with the onset of heat. And this is not only a pungent smell that sometimes scares away some birds. Resin may well stick to the plumage, and sometimes this even causes the death of birds.
- , chipboard and plywood- this is a bad choice. Such wood-based composite materials have a layered structure and therefore do not have adequate resistance to the combined effects of moisture, direct sunlight and temperature changes. Thus, the glue used when joining shavings, chips or veneer sheets may not withstand winter frosts, so microcracks quickly appear at the ends of the material. Over time, for example, during a thaw, water will penetrate into them, which, upon subsequent freezing, increases in volume, which leads to further delamination of the material. This design will not last long in outdoor conditions, even if the birdhouse is painted.
 Wood composite materials are easy to use, but short-lived and unsafe for birds. Not in the picture are the delaminated walls of a birdhouse made of chipboard and plywood. It is unlikely that such a house will attract birds
 In addition, all these materials contain formaldehyde resins, which act as binding components during manufacturing. Such substances, firstly, have a very noticeable specific odor, and secondly, they emit toxic fumes. Both of these can scare birds away from such a dwelling. Although, despite the recommendations, some craftsmen still choose these materials for making birdhouses.
- Cardboard, even a durable one is still a short-lived material, and a birdhouse made from it will soon fall apart when wet. The roof of a cardboard house may sag or the bottom may fall off, on which the birds build a nest for laying eggs. This means that the clutch or brood will simply die. Therefore, it is better to abandon the idea of using this material immediately.
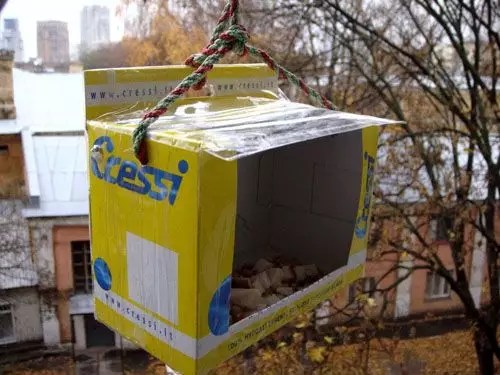
- Plastic bottle is also not the best option, since it has thin and transparent walls that are unlikely to attract birds. Some craftsmen paint the outside of the bottle, but the paint may peel off under the influence of temperature and moisture. Thin walls in winter or, conversely, with strong heating, will deform, shrink or expand, making clicking sounds that frighten birds. It’s funny to talk about at least some insulation of such a birdhouse.
 A birdhouse made from a plastic bottle is unlikely to become a cozy home for a feathered family. But it’s worth making feeders out of bottles for the winter
 In addition, plastic bottles are lightweight, so when suspended they will be swayed by strong winds. If you fasten the product to a tree with brackets, then the same wind can simply tear off and carry away the bottle along with all its contents.
So, you can't think of anything better than wood. And then we will consider various options for birdhouses made only from this material.
Varieties of houses for different birds
To attract certain birds or even several species of birds to the site, it is necessary to create comfortable, familiar conditions for them. Due to the fact that birds have different sizes, differ in flight speed and peculiarities of movement on a hard surface, the parameters of the “living space” intended for them will also vary.

Birdhouses according to their design can be divided into two types - prefabricated and “nesthouses”.
- Prefabricated bird houses, of course, are assembled from parts cut to specific sizes from boards.
 “Duplyanka” made from birch logs
 - A “duplyanka” is a piece of log (log) from which the inner layers of wood have been removed. Walls with a thickness of 15–20 mm are left, depending on the diameter of the log.
When choosing the size and type of birdhouse, it is also necessary to take into account the fact that some birds prefer a certain shape of “house”.
Birdhouse prices
birdhouse

For example, if you plan to attract and house wagtails on your property, then you will have to make a house for them, which will be significantly different from the birdhouse that is familiar to everyone. The height of such a dwelling will be 140÷150 mm, width 150 mm, depth 350÷400 mm including the landing area. In this design it is made in the form of a rather large board measuring 150x100 mm. Thanks to this entrance and narrow entrance, the bird can enter the house on foot.
 Some birds prefer to live in semi-open homes
 For redstarts, flycatchers, and white wagtails, a house that resembles a feeder is suitable, since they are reluctant to settle in closed birdhouses. Due to the fact that such dwellings become weakly protected from predators, for safety reasons they must be raised to a height of 2–6 meters, positioned so that there are no thick branches nearby that a cat can use to get to the nest.
The width of the house is 120÷140 mm, the height of the rear wall is 140÷150 mm, the front wall is 80÷90 mm, the depth is 120÷140 mm. The roof of such a house has dimensions of 160x200 mm. Since the entrance clearance is large, the roof must reliably cover it from rain and snow.

The pied flycatcher is a small bird belonging to the tit family. She prefers a more secure home, so it is recommended to make a hole for entering it on the side of the front panel. The depth of the house can vary from 150 to 200 mm, the width - 150 mm, the height of the structure is from 150 to 25 mm, the entrance hole, as a rule, has a square shape and its size can be 35x35 or 40x40 mm.
 Swifts and a house for them
 Another species of bird that is an excellent fighter against garden pests is swifts. These birds prefer to live in boxes fixed under the eaves of the house; sometimes they do not have a front wall at all, sometimes they resemble an ordinary birdhouse, but turned to a horizontal position. The entrance holes - tapholes - are also different; they are not round, but elliptical in shape. Other birds do not settle in such nests, since everything is designed for swift nesting. The height of the house is 180, width 550, length 225 mm, entrance hole size 32x60 mm.
 Open shearers
 Another housing option for swifts is a box divided into several compartments and reliably protected from precipitation. Having chosen one of the compartments, swifts arrange a nest in it, bringing various natural materials for this. This version of the shearer can be called “multi-apartment”. And living in entire “colonies” for swifts is a common thing.
 A traditional birdhouse of simple shape - this design is perhaps the most popular
 The traditional birdhouse is loved not only by starlings, but also by many other birds. This design can have different dimensional parameters.
The house shown in the illustration above has the following dimensions - width 180 mm, depth 200 mm, height 350÷400 mm. The dimensions of the bottom are 160×180, and the roof is 200×200 mm, the diameter of the inlet is 50÷60 mm, the perch (sixth) has a length of 50 mm and a diameter of 10 mm.
 Multi-story birdhouse
 Starlings, and sparrows too, get along well in “multi-apartment” birdhouses, which are installed on a metal stand embedded in the ground. The height of such a house must be at least 1500÷2000 mm. Next to the photograph is a drawing of a two-story birdhouse with five compartments, that is, five feathered families can live in it at once. The only thing that would not hurt to add to this design is landing areas on each floor of the building, such as shown in the illustration.
To make such a birdhouse, first internal compartments-apartments are created from prepared parts, which will become a reliable frame for the external façade cladding. In the external panel for each of the “apartments” there is one round taphole with a diameter of 50 mm.
 Houses are a favorite place for many birds to live.
 Hollows are a natural habitat for birds in the wild; most bird species live in them, from sparrows to owls and even ducks. Therefore, a birdhouse made from logs will appeal to many feathered inhabitants, as it is made without the use of paints, glues and varnishes. You can always select a log with the required parameters and create comfortable, close to natural living conditions inside it.
Having decided to equip a house for birds, it is necessary not only to choose the correct design, but also to think about the place and method of its installation on the site. Not only the attractiveness of the home for potential residents, but also their safety, as well as comfortable conditions for raising chicks, will depend on this decision. By taking some protective measures, you can protect the birdhouse both from weather influences and from various predators.

- First you need to determine how to install the birdhouse. Some people advise securing the bird house so that the entrance faces the south side. However, this decision cannot be called correct, since a birdhouse turned to the sunny side will overheat, which can lead to the death of the chicks. You can turn the entrance to the south only if the birdhouse is shaded by tree branches.
- Another important factor that must be taken into account when choosing the location of the birdhouse is the wind rose in the region, that is, from which direction the wind blows more often and more intensely. The fact is that along with the wind, water will enter the birdhouse through the entrance during rain and snow in winter.
That is why the bird house entrance should be turned to the leeward side or, at least, to the side parallel to the predominant direction of the winds.
Prices for edged boards
edged board
- To install birdhouses, tree trunks, house walls, masts made of metal pipes or durable wood can be used.
 Birdhouse installation options
 - Birdhouses are installed at a height of 2÷3.5 meters above the ground, in a place where there are no factors that can cause disturbance to birds. For example, if there are railway tracks, recreation areas or public buildings nearby, then it is recommended to raise birdhouses to a height of 4.5–5 meters.
- It is also necessary to maintain the distance between individual birdhouses. By the way, it depends on the type of birds that have settled. For example, a tit does not tolerate “competitors” within a radius of about 50–60 meters around its habitat. The flycatcher requires about 20 meters of its “own range”. True, many birds are not so picky, and as we have already seen, they get along quite well in entire colonies in “multi-apartment” birdhouses.
 A birdhouse on a pole can be attached to a tree trunk using nylon twines or plastic wire
 - The fastening of birdhouses to one of the supports depends on their design. If the fastening is provided using a pole attached to the back wall of the birdhouse, then it is nailed or screwed with long screws to the base - the pole. Nailing to a living tree trunk - sometimes some people don’t understand the hand. This means that you can secure the birdhouse by tying it with flexible wire or even a strong cord. In other options, birdhouses are hung by special brackets, also attached to the rear wall or roof of the structure.
 Birdhouses need to be protected from predators
 - In addition, we must not forget that predatory animals pose a great danger to birdhouses. It sounds scary, but in fact the main threat is our beloved cats, whose call of nature draws them to robber adventures, even if they are well supplied with food. If the entrance is too large, the cat can reach the chicks or hidden birds with its paw.
To prevent the cat from reaching the bottom of the birdhouse with its paw, it is necessary to make a sufficiently large canopy. If the drawings show parameters from 40 to 50 mm, then it is worth increasing them even to 80 ÷ 100 mm. Wood consumption will increase slightly, but effective protection for the nest will be provided. Another way to protect birds from cats is to make a gable roof on the birdhouse, with the slopes placed at an acute angle. Even the most dexterous “bandit” will not last long on such a structure.
 Safety measures against woodpeckers and cats
 If the birdhouse is fixed to a tree, then to make it difficult for the cat to lift or descend from above to the birdhouse, the trunk is covered with metal belts 600–800 mm wide. The distance between the bottom of the birdhouse and the protection should be 350÷400 mm, and between the roof and the metal 1300÷1400 mm. When choosing this method of protection, you must remember that the metal belt around the trunk should not prevent the tree from increasing in diameter. That is, either a certain gap must be set between the tree and the belt, or some kind of sliding structure must be made that can increase in diameter.
Another option that can be chosen instead of installing metal is to attach a bundle of branches lowered down to the trunk. The branches must be securely fixed to the surface. A cat will never overcome such an obstacle.
 The woodpecker expands its entrance to reach the masonry
 Another danger to the nests of small birds is, oddly enough, woodpeckers. These birds are considered very useful; they are called “forest orderlies.” But along with actively eating tree pests, woodpeckers do not refuse to destroy the nests of small fry.
The entrance in bird houses is traditionally made small; the woodpecker cannot climb into it and is not even able to stick its head in to break an egg with its beak. But often this does not stop him. To get to the masonry, these “beauties” know how to expand the entrance, hammering it with their sharp beak.
To protect the masonry from woodpeckers, other methods are used, which are also shown in the above figure in its first line:
The area around the taphole is lined with metal;
Several nails are driven in a circle around the hole;
It would be nice to hang up a kind of “store” for material that is perfect for building a nest. If the birds find everything they need in one area, they will stay there forever. Chicks raised in a comfortable birdhouse will definitely return to it next year.
Making birdhouses with your own hands
In this section of the publication, four options for making birdhouses will be considered, from the simplest to the more complex. After studying this information, each master will be able to choose an acceptable solution for himself.
The first option is to assemble a kit from ready-made parts
If it is not possible to find a suitable material or there is no ability to prepare from it all the elements necessary to create a birdhouse, then a ready-made set of wooden parts is purchased. You can quickly and easily assemble a bird house from them.
Prices for popular models of screwdrivers
screwdriver
 A complete set of wooden parts for building a birdhouse - can be purchased in the store
 The parts are made of well-dried and treated wood. The manufacturer even provided holes for screwing in self-tapping screws. The kit comes with an assembly diagram, so the job can be completed in just a couple of hours, having only a regular Phillips screwdriver or . This is the simplest option for making a bird house. By the way, a good option for introducing a child to creative work.
The second option is the simplest “classic” model with a pitched roof
This option is more complicated. But only because you will have to find a suitable material and make parts of the required size from it.
 Simple design of a bird house
 | Illustration | |
|---|---|
 | Before proceeding directly to the work, you need to select a ready-made one or create your own project-drawing of a product suitable for the parameters. In this case, an easy-to-make model is presented, which can be manufactured even for a novice craftsman. |
 | From the finished drawing, all dimensions of the parts are transferred to well-processed boards. The thickness of the board can vary and range from 15 to 25 mm. For marking you will need a tape measure, a metal ruler and a simple pencil. After all the structural parts are marked, they are cut out using an electric jigsaw. You can, of course, use a regular hand hacksaw for wood, but burrs will remain on the ends of the parts. And it’s much more convenient to work with power tools. |
 | On the finished front panel of the birdhouse structure, the location of the entrance hole is marked. Then, it is drilled out using a core drill of the required diameter - in this case it is 50 mm. |
 | For comfortable movement of birds along the inner surface when climbing to the entrance, it is made “embossed” and rough. To do this, it is scratched and drilled, making blind holes to a depth of 2–3 mm. Scratches and holes are made below the tap hole. |
 | To prevent the ends of the boards from splitting when screws are screwed into them, first the front panel is placed against the side panel, and small diameter holes are drilled in the right places. Then, using a screwdriver, screws are screwed into the resulting holes, which will create a reliable connection. |
 | Next, the second wall is fixed to the facade in the same way as the first. The last operation at this stage of work is to fix the back panel. The parts are fastened in such a way that the right angles of the birdhouse are maintained. It is enough to use three self-tapping screws on each side. In some structures, to more securely fasten the walls together, craftsmen install bars with a cross-section of 25×25 mm inside the structure in the corners, to which the walls are fixed. True, this somewhat reduces the spaciousness of the birdhouse. |
 | The next step is to mark the bottom of the birdhouse and determine the line along which the screws will be screwed in. They should be at a distance from the edge equal to ½ the thickness of the bottom panel. Holes are drilled along the edges of the drawn line. After this, the square bottom part is installed in place - it should fit tightly between the walls already fixed to each other. Next, self-tapping screws are screwed into the prepared through holes, which finally secures the bottom of the birdhouse. In other designs, the bottom element can be placed on the end sides of the walls and fixed to them with the same screws. |
 | Next, markings are made on the inside of the roof for mounting a wooden square-liner, which will fit tightly between the walls of the birdhouse when the lid is closed. First, the square is fixed to the roof with one self-tapping screw, which is screwed into its center. Then, after the final adjustment of the roof, the part is additionally secured with four self-tapping screws installed in the corners. |
 | To preserve the possibility of carrying out internal treatment of the bird's home, it is recommended to fasten the roof not permanently, but hingedly, on one wide or two narrow hinges. At the same stage, a pole-bar is installed and fixed in the middle part of the rear wall, with the help of which the birdhouse will be secured to a tree or other base. |
 | If you plan to fix the roof permanently, then after installing it in place, through its panel, through holes are drilled into the walls. After this, you can safely screw the screws into them, being sure that they will not split the side panels. Finally, a blind hole is drilled under the tap hole into which the pole is inserted and fixed. Or - a small “take-off platform” or a piece of board or block. |
The third option is a birdhouse with a gable roof
This birdhouse model differs from the previous one in the shape of the roof, size and some manufacturing nuances.
| Illustration | Brief description of the operation performed |
|---|---|
 | For this version of the birdhouse, it is necessary to prepare parts having the following dimensions: A1 and A2 – 300 × 160 mm - front and rear walls; B – 2 pcs. – 220 × 120 mm - side walls; C – 1 piece – 120 × 120 birdhouse bottom; K1 – 1 pc. 200 × 160 mm - one side of the roof; K2 – 1 pc. 200 × 180 mm - second side of the roof. |
 | The above dimensions are carefully transferred to the boards. Then the parts are cut out using an electric jigsaw, which will make the edges smooth and without burrs. |
 | The finished parts are checked against each other so that when assembling the structure it does not happen that unwanted gaps arise between the individual parts. If this happens, you will have to disassemble the birdhouse and adjust its elements to each other. If necessary, minor adjustments are made to complete congruence. |
 | Now all parts and their edges must be sanded. It is especially important to sand the outer sides of the walls well so that they absorb moisture as little as possible. |
 | The taphole can be marked and drilled before the structure is assembled or after it is assembled. But it is necessary to work on the inner surface of the facade before the walls are fastened together. Using a knife, drill or other sharp tool, the part of the inner wall under the tap hole is made rough. |
 | The finished parts in the example under consideration are first glued together with wood glue. The first step is to glue the side panels to the back wall. |
 | They are pressed tightly and tightened with clamps until the glue dries completely. Then, without removing the clamps, holes for the fasteners are drilled with a thin drill. |
 | Nails are driven into the resulting holes or self-tapping screws are screwed in. To attach the back and front walls to the side panels, two nails or screws are enough for each side. |
 | After the walls are fastened together, markings are made on the facade panel for drilling the taphole hole. |
 | Then, using a core drill with a diameter of 45 or 50 mm, the tap hole is drilled. It is advisable to immediately treat the finished hole with sandpaper. |
 | The next operation is to install the roof slopes of the birdhouse. First, one, shorter roof part is glued exactly from the ridge line. Then - the second, with an overthrust on the first. After this, you need to wait until the glue sets, and then small holes for fasteners are drilled in the roof slopes. |
 | In this case, nails 25÷30 mm long are used for fastening. |
 | The next step is to install the bottom of the birdhouse. If the marking and cutting of parts are carried out correctly, then the bottom should fit very tightly between the walls - sometimes you even have to knock it slightly with a hammer. |
 | Holes for mounting are drilled at the bottom of the side, rear and front panels. Then nails are driven into them. |
 | Under the taphole, 20 mm away from its bottom point, drill a hole for the pole. |
 | The pole is glued into the resulting hole using wood glue. |
 | The result is a neat birdhouse with a gable roof, which will not allow the cat to lie in a long “ambush” waiting for the birds to appear. |
Fourth option– making a nesting birdhouse
This section will discuss the process of making a nest box, which is favored by many species of birds.
| Illustration | Brief description of the operation performed |
|---|---|
 | In order to make a nest box, you do not need to make calculations or draw up drawings. The only thing that needs to be observed is the approximate dimensional parameters of “classic” birdhouses, taking into account the diameter of the entrance. To implement this idea, you need to find a log that is suitable in size and type of wood. An aspen or birch log that has been lying outside for about a year is perfect for a nest. After lying in outdoor conditions, the core of these tree species becomes soft, and the outer layers retain their rigidity and strength, which is what we need. |
 | If the bark of the wood has become unusable, it should be removed from the log. If it is dry and has an aesthetic appearance, it can become a camouflage and decorative element of the nest. The top side of the log can be cut at an angle to secure a pitched roof, or cuts can be made on both sides of the log for a gable structure. When choosing a single-slope option, it is necessary to provide such a slope so that water flows freely from the roof during rain. |
 | The next step is to gradually remove the inner part of the wood from the log. It should be noted here that the fibers can be removed along the entire length, or a bottom 40÷50 mm thick is left in the lower part of the workpiece. The second option is more difficult to implement, but you won’t have to fix the bottom panel, and the birds will have more natural living conditions. If such a bottom is left in the log, then it must be made as even as possible. It is easier, of course, to clear the core of the log along its entire length. To select wood, a chisel with a hammer and an electric drill with a long drill are used, which drills several holes that weaken the array of fibers. |
 | The core is removed from the log so that the remaining walls have a uniform thickness of 20÷30 mm. It is necessary to remove protruding chips and large burrs from the side walls. Next, you need to mark the outer wall of the log where you plan to build a tap hole. It should be located at a distance of 70÷80 mm from the top edge of the workpiece. A hole is drilled using a core drill of the required diameter. |
 | As a bottom, you can use a piece of log (die) 30÷35 mm thick, with a diameter corresponding to the size of the internal hole of the nest. The bottom should fit tightly into the hole. Then, it must be secured in several places with self-tapping screws, for which small holes are pre-drilled. Instead of a piece of log, a round bottom piece can be cut from a board of the same thickness. To determine the exact shape of the circle with minimal errors, you need to place a blank on top of the board and draw the inner diameter of the circle on the board from the inside. The bottom is cut along this line. If, after installing the bottom, small gaps remain between it and the walls of the hollow log, you can simply caulk them with flax fibers. |
 | The final stage of work is securing the roof. The blank for it is usually made from slab. The roof must be attached very carefully, as the walls of the log can be split. Therefore, first small holes are drilled into which self-tapping screws are screwed. The roof is mounted so that the canopy protrudes above the entrance by approximately 100 mm. To secure the birdhouse to the tree, a pole is mounted on its outer rear wall. If desired, a landing pad or pole can be secured under the taphole. At this point, in essence, the work is completed and the nesting box can be installed in its intended place. |
* * * * * * *
Now, having familiarized yourself with the basics of the process of making birdhouses, as well as what models of bird houses there are, and for which birds they are mostly intended, you can choose a certain option.
Of course, the proposed options are among the simplest. But in fact, craftsmen sometimes create genuine masterpieces, which become not only a convenient place for birds to live, but also a decoration for the site. An example is shown in the video below - a birdhouse using prefabricated log house technology.
We have made a birdhouse, now you can start making a doghouse, and you can find the instructions in our new article on our portal -
Video: Original birdhouse - miniature log house
Every gardener knows that birds are not only living “decorations” of our garden, delighting us with their sonorous trills from spring to autumn. These cute feathered creatures help us all summer, protecting our crops from insect pests and even small rodents. To lure birds to you, you need to provide them with a place to live. Therefore, it is worth training our skillful hands and learning how to make birdhouses from wood.
What you need to know before you get started
It's good if you already have experience in carpentry and carpentry. In this case, making such a simple structure as a birdhouse will not be difficult for you. But even if you are completely new to this business, it’s okay: we will tell you in detail how to make models of varying complexity. In any case, to work you will need the following tools:
- ruler;
- a simple pencil with a soft lead;
- hacksaw;
- nails or screws;
- hammer or drill (screwdriver);
- a drill of the required diameter to make holes;
- screwdriver;
- steel wire with a diameter of 1 mm;
- tow or clay;
- plane;
- sandpaper;
- glue;
- if necessary or desired - drying oil.
All these tools and materials should be at your fingertips while working, regardless of the level of complexity of the birdhouse being made.
We should also talk about the wood from which you will build the birdhouse. We strongly do not recommend using:
- coniferous wood (pine boards, etc.);
- plywood and any other similar glued compressed material.
Even after careful processing, softwood boards continue to release resin. This will make the walls of the birdhouse sticky, which is very harmful and even destructive for both adult birds and chicks. Fiberboard and chipboard are known for releasing toxins during operation that will not bring any benefit to birds. Plywood, seemingly the most convenient and inexpensive material, is also not suitable: it does not transmit sounds well, which is very important for ensuring safety.
Plywood does not retain heat well, which is so necessary when nursing chicks.
The best wood for a birdhouse is deciduous, for example, birch, aspen, oak, linden.
The optimal thickness of the board should be 20 mm - this is enough to maintain a suitable temperature inside the structure.
Note! The boards for the birdhouse do not need to be sanded; they must be rough at least on the inside of the product. This will make it much easier for birds to get out of their homes, clinging to uneven surfaces with their claws. It would be useful to make several notches on the board with a chisel.
Now let's talk about the size of the future birdhouse. Ornithologists argue that the structure should be compact to accommodate, in addition to adults, only 3-4 chicks. In this case, all offspring will have enough warmth, attention and food to grow healthy and strong. Otherwise, all the chicks from the brood will be weak, sickly and incapable of long flights.
The standard, optimal sizes of a birdhouse (house for small birds) are as follows:
- height - 30 cm;
- bottom width - 13–15 cm;
- taphole diameter - from 3.5 to 5 cm.
Important! Birds are different, and they need different houses. It's all about the shape, the size, and the design itself. There are many varieties of man-made bird houses, for example, there are titmice, sheep houses, nesting boxes, and triangular (wedge-shaped) dwellings. Therefore, if you know what kind of residents are on your site, do not be lazy and do exactly what they need.
So, the tools and materials are prepared, it’s time to get down to business.
Video: what to consider when making a birdhouse
Safety precautions
Working with wood requires following safety rules. When making even the simplest birdhouse, you can injure yourself with the tool or get a splinter in your finger. To prevent this from happening, remember the simple rules for carpentry and carpentry:
Instructions for making wooden bird houses with drawings and photos
Making bird houses can be quite a fun activity. It would seem like an ordinary birdhouse of a simple shape, what could be unusual about it? It turns out that bird houses can be made in several ways from different materials.
The simplest option with a pitched roof
Perhaps after renovation or construction you still have rectangular cuttings of suitable boards. They are ideal for building a birdhouse, and you don't have to look for materials.
We suggest you use a simple drawing of a birdhouse.
- Take the prepared boards and use a pencil to mark all the elements: bottom, lid, walls, according to their sizes in the drawing. In our case, the bottom is a square with sides of 13 cm; the back wall of the product is 4 cm lower than the front to provide the roof with a slope for rainwater drainage; There are cuts along the top of the side walls for slope.
Attention! For a removable roof you will need 2 parts: one of the same size as the bottom, the second of a larger size for the canopy.
- Saw off each element sequentially so that all paired parts have the same dimensions. At this stage, you can plan the outer surfaces of the boards with a plane..
- Make a round entry hole in the front wall. You can make it rectangular, but a circle shape is preferable.
The hole should be located at least 5 cm from the top edge; this distance will protect the chicks from encroachment by cats.
- Now you need to assemble the birdhouse. Fasten the facade and side walls with wood glue, and while it dries, secure the parts with nails or self-tapping screws. Next, connect the bottom to the side and front walls in the same way. The back wall is glued and fixed last..
Try to do so that there are no gaps left.
By attaching rubber layers to the ends or attaching the roof to hinges, you can protect the birds as much as possible from invading cats.
A simple, but at the same time convenient and reliable birdhouse is ready. All that remains is to secure it in the chosen place. But we’ll talk about this separately: there are a lot of options for installing and fastening birdhouses.
Video tutorial on how to make a simple birdhouse with a flat roof
Birdhouse with a gable roof
Now, using the same principle as in the previous paragraph, we will make the birdhouse a little more complicated. Its gable roof not only looks more beautiful, but also keeps rainwater and snow out even more effectively.
The drawing below shows all the dimensions of the parts.

If desired, you can paint the birdhouse with drying oil. This will help protect the wood from mold and pests. Painting with non-toxic water-based compounds is also allowed.
A house made of logs that can be made without a diagram - a hollow house
You can build a birdhouse not only from flat boards. There is a Russian folk version of a bird's house, which is hollowed out from a piece of log and is called a duplyanka. When preparing firewood, you can easily cut off a piece of round log of suitable diameter, which will make a good bird house.

Video tutorial: original do-it-yourself birdhouse made from a log
A bit of design: decorating a house with wine corks
It turns out that corks are good for more than just closing wine bottles or using them for decoration. They are great for decorating the sides of a birdhouse. The advantages of the material are undeniable:

So, you will need:
- wine corks in the required quantity;
- prepared frame for a birdhouse;
- sharp knife;
- hot glue gun;
- wooden twigs.
It is not recommended to use a screwdriver when working with such material. The sharp tips of the screws can extend beyond the cork and injure birds. Therefore, we will use hot melt glue.
Progress:
- First of all, you need to make the walls. Apply glue to whole corks or cut edges of corks cut in half and glue them. For 1 row, depending on the width of the wall, you will need 2–3 plugs.
- Place the plugs on the glue against the walls of the birdhouse up to its roof. Where the frame structure narrows, use corks cut in half or even smaller. On the facade of the birdhouse, where the entrance is located, lay out the central row vertically.
- To decorate the roof, cut rounds of cork up to 5 mm thick and lay them like tiles.
- All that remains is to decorate the sides of the roof and the joints of its doors with moss, twigs or pieces of cork. Wait until the glue is completely dry and hang the birdhouse in the garden.
Photo gallery: how else can you design the finished product?
 A smiling birdhouse warmly welcomes future residents
  Let your children decorate birdhouses using decoupage technique
  You can design a birdhouse like a real house, with a window, door and fence
  You can decorate the birdhouse with Khokhloma painting
  You can build a birdhouse hut from small blocks of wood, as they say, without a single nail
  A simple birdhouse, the frame of which is covered with corks, looks like a beehive from afar
  Painting with waterproof acrylic paints is a real art
  Such a branded entrance
  You can completely paint the birdhouse on all sides
  Roof tiles can also be made of thin boards
  House for the Angry Bird
  European design that your child can easily handle
  Simple painting is one of the win-win options if it is done efficiently and accurately
The nuances of securing a birdhouse
When securing a birdhouse, it is important to adhere to two rules:
- It should be convenient for birds to approach the birdhouse and climb inside.
- Natural barriers must be maintained for cats and other predators.
The best place to install a birdhouse is a tall tree, the roof of a house or a pole. When securing the house, tilt it slightly forward: this will provide additional protection for the chicks.
So, attachment methods:
- Drive a medium-sized nail, hang a wire loop on it, bend it and hammer it into the trunk so that the loop does not fly off. Place the birdhouse in this loop and align it.
- You can nail the birdhouse at the ends.
- You can drive 4 nails into a post: 2 from below and 2 from above. Between the lower and upper ones, maintain a distance equal to the height of the birdhouse. Carefully place the house in the gap and press it against the post.
- It is better to simply screw the birdhouse onto a living tree with iron wire or rope. This can be done by nailing a wooden plank to the back wall of the house in advance, which will be attached with wire to the trunk.
Do not forget that your manipulations can harm the trees. It may be better to use nails if you are attaching the birdhouse to a wooden post.
And the location of the birdhouse has its own nuances:
- Firstly, the structure must be located at a height of at least 3–4 meters.
- Secondly, the tap hole should be directed in the direction opposite to the direction of the winds that prevail in the area.
- And thirdly, do not mount the birdhouse in an area exposed to the sun: the rays will quickly heat the wood, and the birds inside the house will feel uncomfortable.
Bird safety is also an important factor. The more branches there are on a tree, the easier it is for small predatory animals to get to the birdhouse.
If you are installing several bird houses, keep a distance between them of 50 cm or more. The fact is that starlings do not tolerate close proximity, especially with birds of other species.
Finally, we suggest watching a few more inspiring videos.
Video: how birdhouses are made in a carpentry workshop
Video: the simplest birdhouse made by a schoolchild
Building birdhouses is not only a useful activity for your garden, but also a pleasant pastime for the whole family. As you can see, making a bird house is not at all difficult, and even children can take part in this work with you. Please tell us in the comments which birdhouses you consider to be the best for birds, and what are the features of their manufacture. Good luck and easy work!
If you have your own plot, then attracting birds that destroy harmful insects is a great solution. For these purposes, a birdhouse will be very useful to you. It can even be made from various available materials. To do this you will need the dimensions of the birdhouse and a drawing. For starlings and other birds, the dimensions of the product will be different. And it is important to take this into account in your construction work. Let's look at design options for such products, and also select the right materials.
You can make a beautiful birdhouse with your own hands from various available materials. But the best option, of course, is wood. But only deciduous trees will do, because conifers are too resinous. In this case, the resin can stain the feathers of birds, which will provoke their death. It is not the best solution to use plywood, OSB or. Birds rarely live in such structures. It is better to assemble blanks using screws and nails. Adhesives should not be used.

You can make the structure from boards or from logs. The photo shows what such products look like. It is important to take into account the dimensions of the birdhouse and the drawings and model of the product.
Manufactured from boards with a thickness of at least 20 mm. Such parameters are important for maintaining the required temperature for breeding. It is recommended to use unplaned boards. In this case, the inner surface should be rough. It is recommended to specifically scratch the front part under the tap hole. This will make it easier to lift the birds up.

birdhouse
You can build a structure from scrap materials, but it is important to follow certain rules.
The birdhouse device must have an elongated cavity, with a solid bottom and a removable lid. Under the roof there is an entrance, a special hole for birds.

The cover should be removable for easy inspection and cleaning of the product. In addition, unwanted animals can get inside.
The bird house must meet the following requirements:
- be opaque and durable;
- the walls must be rough so that the chicks can move for food brought by their parents;
- the material should retain heat well, be moderately sound-permeable and there should be no cracks in it.

The table shows standard and original materials for making a bird house.
| Image | Material | Peculiarities |
 | Plastic bottles | It looks original, but not the best solution. Birds do not like such smooth, transparent and unnatural material. You can only make a feeder out of bottles. |
 | Pumpkin | An unusual option is a pumpkin house. It is hung from branches or placed on special stands. This option will not last more than 1 season. |
 | Branches | From thin shoots you can weave a small basket with a lid. You need to leave a hole in it. Thick and massive branches can be connected using self-tapping screws. |
 | Log | Not a bad option. The structure can be made from a single log or from separate parts. |
 | Box or cardboard | This option is very unreliable. It is intended rather for decorative purposes. Before use, such a product is treated with special impregnations. |
 | Plywood and chipboard | Such materials can be harmful to birds and also do not retain heat well. It is better to make decorative structures from plywood. |
 | Tree | An ideal solution, but only hardwood. Coniferous varieties cannot be used. |
Birdhouse made of wood: naturalness and reliability
In nature, many birds settle in hollows made by woodpeckers, so artificial dwellings should not be large.
When deciding how to make a structure with your own hands, first of all, you need to choose the right material. Hardwood boards are most often used. The best option: alder, birch or aspen.

Other materials have different disadvantages. For example, fiberboard and chipboard can emit toxic substances, and plywood does not hold heat well.

In the photo you can see how to make a simple design. Before work, make a drawing with dimensions. You can find high-quality and simple diagrams and drawings on the Internet. This will reduce the consumption of materials, as well as perform correct cutting.

The diagram can be transferred to wooden blanks. Then prepare the following materials:
- untreated hardwood boards;
- long and thin nails;
- special impregnations and safe paints;
- The tools you will need are a hacksaw, a tape measure, a pencil and a brush.

All blanks are cut according to drawings. The boards should only be planed on the outside, leaving the inside rough. A hole is drilled in the front wall. A plank is mounted to the rear wall, onto which the house is secured in a suitable place.

For your information! The roof needs to be made protruding so that it protects the entrance from rainwater.
birdhouse
Birdhouse made of cardboard: ease of manufacture
This option is often used as a decorative house. This is more of a toy for children. A cardboard house is good for one season. It is better to choose thick corrugated cardboard to create it.
So, let's find out how to make such a design with your own hands. In addition to corrugated, you will need twine, starch and laminated paper. A pre-made template with dimensions will greatly facilitate the work.

The order of assembly of the product has its own characteristics:
- The blanks are marked, and then the parts are cut out in double quantities;
- made from starch;
- All parts are glued together in pairs. A hole is made in the front part. And holes are cut in the back wall for twine;
- all walls are glued end to end;
- the roof is made of two elements.

Birdhouse made of paper: decorative functions
Many people are interested in how to make a simple birdhouse out of paper with their own hands. This material is only suitable for decorative ideas. There are different schemes of unusual models.
Such houses are decorated with acrylic paints. You can make a whole composition, for example “seasons”. In addition to drawing, you can use techniques or applications. All this beauty can be varnished.
The Christmas theme is suitable for the January holidays. This can be a wonderful garden decoration. You can make feeders this way, but not housing for birds.

Birdhouse from a bottle: an option for temporary housing
To make any birdhouse, the drawing and dimensions must be learned and prepared in advance. A handmade product made from a plastic bottle is considered the most affordable.
This option is best used as a feeder or as a decorative garden decoration. The choice of options for how to make such a device is not varied. Two holes are made in the lid for the wire. The outside of the plastic surface can be pasted over or painted.
You can see the designs of models made from plastic bottles in the photo.


Birdhouse made of plywood: is it a good option?
You can make a bird house with your own hands from plywood. This option is suitable as a temporary home or as garden decor. When deciding how to make such a structure, first think about the drawings and size of the product. All elements are transferred from the diagram to plywood. In this case, the upper part should act as a visor. All cuts need to be sanded. The elements are connected using self-tapping screws and glue. In this case, it is necessary to glue the side walls and the facade, and then additionally fasten the product with self-tapping screws. The roof must be removable, since the internal cavities must be cleaned periodically.
The product can then be decorated to your liking.

Birdhouse out of the box: convenience and simplicity
How to make a structure out of a box with your own hands will be interesting to learn for those who do not want to spend a lot of time on work. This is a simple option, but it doesn’t last long and it’s better to use it as a... You can buy materials or just take a small box.
First you need to secure a strong roof and then cut the required hole. Its edges can be covered with tape. You can use plywood as the back wall, as it should be especially durable. The product should be painted with moisture-proof paint, but odorless. Then the product is attached to the base.

Choosing the right birdhouse sizes
If you don’t know how to properly make a bird house, then first you need to find out what the dimensions of the structure should be according to GOST. We make the product taking into account the fact that the dimensions of the structure will differ for different birds.

When deciding how to build a product with your own hands, first choose a simple design that has standard dimensions for a birdhouse.
Before making drawings and dimensions, consider a number of certain conditions:
- the diameter of the hole in the birdhouse should be about 50 mm;
- the height of the structure varies between 30-35 cm;
- the length from the hole to the bottom must be at least 20 cm;
- the bottom must be at least 15*15 cm.

Using these parameters, you can build strong birdhouses for birds with your own hands. The drawings assume the designation of all elements. The sizes given are more suitable for birds such as sparrows and starlings. It is also necessary to indicate the dimensions of the tap hole on the drawing. In the photo you can see what similar structures look like.
Dimensions of a birdhouse for starlings
When making a birdhouse with your own hands for starlings, you need to take into account that this is a fairly large bird. This design should be deeper and larger than other options. To correctly complete the drawing, you need to find out the main dimensions of the product.
The size of the hole in the birdhouse is of great importance. It should be about 5 cm. The height of the feeder or birdhouse should be 35-40 cm. The bottom dimensions should be about 15*15cm. It is better to make the entrance round in shape. In this case, the diameter of the hole in the birdhouse for a starling depends on the overall dimensions of the structure.

Titmouse: drawing and dimensions, some features
How to make the design of a titmouse depends on the selected materials and its size. There are standard birdhouse sizes for tits. The bottom should have dimensions of 10*12 cm, the height of the structure should be 25-35 cm, and the dimensions of the taphole should be about 30-35 mm. The depth of the product should be about 50 cm. Using this data, drawings are made.


For your information! Such a house must be mounted on deciduous trees with a dense crown. This should be done at a height of 3-4 meters.
House for a wagtail: drawing and dimensions
When making a house for wagtail birds with your own hands, you will also need to know the recommended dimensions. The bottom must be made with dimensions of 10*8 cm, and the height of such a structure is within 20 cm. The taphole has dimensions of about 35-40 mm. When deciding how to make such a design, it is worth considering that the taphole should have the form of a slot, the width of which is no more than 40 mm.
The kids make similar products during labor lessons. In this case, special drawings are used. A special feature of this design is the presence of a platform at the entrance, the width of which is about 10 cm.

For your information! You can place such buildings not only on a tree, but also on the roof of a house or on the top of a fence.
How to make a birdhouse yourself
You can see how to make the simplest version for birds in the video below.
You can try making a simple, beautiful DIY birdhouse with a flat roof.
For this you will need unplaned boards. We make this design only with gloves. This will prevent splinters from appearing. The cuts must be smooth and there should be no gaps. Remember that hatched chicks do not have feathers, so they can die from a draft. To prevent the manufacturing process from taking much time, it is recommended to make a drawing of the birdhouse with dimensions in advance. A flat roof does not require much effort. It just needs to fit tightly.
At home, you can make a nest box or bird house from a log. This option is more like regular housing for birds. This can be seen in the photo. In addition, such structures are practically invisible on the tree, which makes them safer for living. Such a product can also be made according to the scheme. To do this, you can use a piece of dead wood. In this case, the core will have to be picked out by hand. It’s good if you come across a log with intact edges and a rotten middle. This will speed up the work.

Such wood has rotten bark that needs to be cleaned. The log is then sawn into suitable logs. For a bird house, the internal diameter should be 25-30 cm, and the external one 30-36 cm. For a titmouse, the internal size of the hollow should be 15-25 cm, and the external one – 20-30 cm. When sawing, the bevel at the bottom should be made even, and at the top parts at a slight angle. This will allow precipitation to drain from the roof. For the roof, use scraps from the boards. The middle of the log can be picked out with a chisel. To make the job easier, drill a few holes and then pick out the jumpers. The walls should remain 1.5-3 cm thick. The insides should be smooth without large chips. The bottom consists of pieces 2.5 cm thick. It is screwed on. Finally, the lid is nailed on.

For your information! Perches are not always a good solution for poultry houses, as cats can lean on them to reach the chicks with their paws.
How to build a birdhouse with your own hands
Let's find out how to make a birdhouse correctly. You can watch the working process in the video below.
How to make a birdhouse yourself and its design depends on where it will be hung. If the mounting will be carried out on a pole, under the roof of a house or, then it is worth planning special perches. If the structure is attached to a tree, then birds can walk along the branches.
To build a wooden house with your own hands, you will need certain materials. By the way, you can buy a birdhouse set with your own hands in a specialized store.
Here are the tools and materials you will need:
- boards and bars;
- carpentry glue, screws and nails;
- hammer, chisel, drill, hacksaw and drill;
- pencil and ruler.

You can see how to make a simple design in the photo. Drawings and diagrams will also help you make beautiful bird houses.
Before making such a design, you need to complete the blanks. To do this, markings are made on the boards according to the drawings. The correct house involves marking the dimensions of the roof, walls, bottom and holes. The following recommendations will help you when making preparations:
- since the roof is made with a slope, the front wall is made 4 cm longer than the others, and the side walls are cut with a bevel;
- the bottom is made in the form of a square with sides of 13 cm;
- the roof is made of two different elements. One part is made like the bottom, and with the help of the second a canopy is created.

Sawing is done carefully. All paired parts must be the same size. The outside of the house had a decorative appearance; the boards needed to be planed. It is better to make the hole round so that it resembles a hollow.
Then the structure is assembled. To do this, you need to fasten the side walls and the front facade. This is done using wood glue. Nails and screws are used as additional reinforcement. Then the bottom of the birdhouse is attached. Finally, the back wall is attached. It is important to ensure that there are no gaps between the elements. If the roof is removable, then the parts are fixed only to each other. In this case, the roof is mounted using rubber or special hinges.
The finished product can be nailed to a suitable surface or tied with wire. To make it easier for the chicks to exit, it is recommended to attach the structure with a slight forward tilt.

There are also unusual types of birdhouses. Decorative options can be used to decorate the garden, and even taken to kindergarten.
Here are some original solutions:
- An unusual bird house can be made from an old barrel. In this case, you can make a hole and then decorate the structure;

- You can weave beautiful products from willow growth. The weaving technique is identical to the method of weaving baskets. But the house at the top should narrow. The roof should protrude 3-5 cm at the edges;

- For an unusual-looking nest, you can use plugs. They are dense, fit perfectly and retain heat. They can be used to finish the finished frame. You can glue the elements using hot glue;

- a decorative house can be made from a pumpkin. In this case, it is necessary to pull out the pulp, cut the necessary hole, and attach a canopy on top;

- a beautiful and decorative option is obtained from a flowerpot. To do this, you need to braid it with a strong rope;

- Among the most unusual options, we can mention a product made from old shoes;

- used vessels with necks. In this case, the neck turns down;
- It's a good idea to use tubes.

How to decorate a birdhouse with your own hands
A birdhouse can become not only a useful item, but also a wonderful one. Let's look at how you can decorate a bird's house.
Photos show how unusual birdhouses look. You can make similar products with your whole family. For children you can make a product with a picture. For example, beautiful flowers, ornaments will do, or you can depict how a starling looks out in a birdhouse.

Using original ideas, you must remember that such a product should not attract the attention of various predators. You should also not overuse with various shiny and rustling parts that can frighten your feathered friends.

Unusual decor can be made using wine corks. This material has a porous but durable structure, which protects the structure well from moisture. In addition, such a coating allows you to retain heat. Cork is also easy and simple to process.
To make this option, you will need corks, a finished frame, a device with hot melt glue and twigs. You should not nail or screw such elements. Because the tips of the screws can penetrate the walls and injure the birds.
The work is carried out like this:
- the adhesive composition is applied to the plugs, which are glued in rows to the wall;
- the plugs are glued all the way to the roof. In narrow places you can use parts of plugs;
- on the front side, the central row can be laid out vertically;
- for the roof, you can cut the corks in half and lay them on the surface like tiles.
The sides of the structure and joints can be decorated with twigs, moss or pieces of cork. You can see in the photo how beautiful the birdhouses are.

Not everyone knows whether such structures can be painted. It is better to use odorless, moisture-resistant compounds. You can see in the photo how to paint surfaces with acrylic paints.
Article
To combat insects and their larvae, it is absolutely not necessary to use powerful chemicals; it is enough to simply attract birds, which will destroy the pests much faster and more efficiently. This is easy to do by building a birdhouse with your own hands and installing it on your summer cottage. From this publication you will learn about the varieties and design features of houses for birds, get acquainted with the drawings and various technologies for creating birdhouses yourself.
Design features and materials
 In the classic version, a homemade house for feathered inhabitants is a rectangular structure (box) with a single or gable removable roof, a solid bottom, a hole (entrance) and a perch in the front part of the house.
There are more original types of birdhouses:
- hollowed out from a single log (hollow);
- wicker;
- assembled from bars in the form of a log house.
Old shoes or an ordinary cardboard box can be a good place for hatching and raising chicks. As practice has shown, for birds the appearance of their home is completely unimportant. The main thing for birds is convenience and safety. Based on this, the important parameters of such a dwelling are: dimensions of the structure, diameter of the entrance, length of the pole.
 Natural enemies of birds and their nests in suburban conditions are cats and woodpeckers. The main protection against predators is the roof overhang, the length of which varies from 5 to 10 cm. An effective protection against woodpeckers is a metal cover on the entrance, which will prevent access to the eggs.
What to make a birdhouse from at home? To create a proper bird house, almost all available materials that any summer resident or home craftsman has on his farm are suitable.
Wood and any of its derivatives are suitable:
- Chipboard (chipboard);
- MDF and fiberboard (fibreboards of various densities);
- OSB (oriented strand board);
- plywood.
Even corrugated cardboard and foam are suitable for making seasonal nesting boxes. There are quite a lot of bird house designs made from plastic bottled water containers.
Some adhesives, plywood, chipboards and OSB contain phenol-formaldehyde resins, which have a sharp and unpleasant odor that repels birds. That is why birds are very reluctant to settle in birdhouses made of these materials.
The ideal option is a birdhouse made of untreated hardwood boards, 20 mm thick, assembled using metal fasteners (nails and self-tapping screws).
Correct size of birdhouse

Despite the variety of designs, there are four main types of birdhouses:

Each type of bird needs to create a house of certain dimensions. For clarity, we publish a table of birdhouse sizes for different types of birds.
As practice has shown, it is precisely this size of houses that stimulate birds to lay the required number of eggs to raise strong and healthy offspring.
DIY birdhouses for birds
 Assembling a bird house is not difficult at all. Many men, in their youth, learned to make various structures directly at school during labor training classes.
Before making a birdhouse out of wood, you need to prepare the following tools:
- wood hacksaw;
- with a set of drills;
- hammer;
- chisel;
- pencil;
- roulette (ruler);
- nails 40 mm long, 2 mm thick.
Depending on the material used, you may need: scissors, paste ingredients (water, starch), wire, twine.
Goggles and gloves must be provided to protect eyes and hands.
Classic birdhouse made of wood: drawing with dimensions

The simplest design is a birdhouse with a flat roof. To create it you need to prepare: raw boards 20 mm thick, nails, hammer, drill:
- We cut the blanks according to the dimensions indicated in the drawing.
- We drill a tap hole in the front part element.
- We fasten the sidewalls to the front part with nails. To fasten each element, 3-4 nails are used.
- We install and fasten the bottom into the workpiece.
- We attach the back wall to the side ones.
- We fix the thrust element (square) on the roof.
The roof is inserted with a thrust element inside and does not require additional fixation with fasteners. A plywood house is made in a similar way.
Birdhouse made of plywood
We publish drawings of a birdhouse made of plywood below.

1 - front part blank; 2 - bottom of the structure; 3 — right side wall; 4 — rear wall element; 5 and 6 - roof elements; 7 — left side wall.
To create the structure you will need moisture-resistant plywood with a thickness of 10 - 16 mm. The bird house is assembled using self-tapping screws.
Birdhouse made of foam plastic
 From the leftover material after insulating the walls, you can quickly make a budget birdhouse from polystyrene foam.
This material has many advantages:
- low thermal conductivity coefficient;
- lack of moisture absorption;
- resistance to biological effects;
- light weight.
The main disadvantage is low resistance to mechanical stress.
To make a decorative birdhouse from polystyrene foam, use the drawings of a classic plywood birdhouse:
- Using a knife, cut out the necessary structural elements.
- To fasten elements, use “liquid nails”.
- All that remains is to paint the structure with water-based façade paint.
Making your own birdhouse from a log
 A nest box is a bird house made of logs. This design is more familiar to birds, since a solid log is much warmer and less noticeable on the tree. In order to make a birdhouse from a log you need to find a suitable one. Aspen is best suited for such purposes. A fallen tree rots from the inside, so hollowing out the necessary hole in a log will not be difficult.
The process of making a nest box:

All that remains is to nail the roof. A fragment of a slab is best suited for this. Thanks to its shape, precipitation will not linger on the structure.
Wagtail house
 Many summer residents want to attract wagtails to their plot. And this is not surprising, because wagtails feed exclusively on insect pests and dragonflies, which they catch in flight. The peculiarity of the structure of the legs of this small bird does not allow it to climb the wall of the birdhouse into the entrance. That is why the correct house for a wagtail is a rectangular structure oriented horizontally. We publish drawings and dimensions of a wagtail house.
Box dimensions:
- height - 150 mm;
- depth - 350 - 400 mm;
- width - 150 mm.
The design includes a rectangular entrance located near the side wall of the front part of the house. The dimensions of the tap hole are 50 x 50 mm.
Drawing of a titmouse with dimensions
 The titmouse differs from the classic birdhouse only in size. There are two types of titmouse: large and small. We publish a table of optimal sizes for each design.
When making your own house for little tits, flycatchers, and redstarts, you can use the drawings of a little tit with a gable roof.
To make the elements you will need a raw board 20-25 mm thick. The elements are assembled using nails or self-tapping screws. In this design, the roof is rigidly fixed to the body of the birdhouse.
Rules for installing a birdhouse

In order for the birds to happily master their new “home”, it is necessary to install the structure in compliance with certain rules:
- Install the “dwelling” away from paths, places of human activity and recreation.
- When choosing a place to install the house, take into account the prevailing wind direction in your region. Rain should not fall into the entrance.
- There should be no large branches at the installation site that would prevent access.
- You cannot attach a bird house to a tree trunk using nails.
And lastly, at what height should I hang the birdhouse? The distance from the ground to the structure should not be less than 2 meters. Following these simple rules will significantly increase the chances that feathered residents will take up residence in your birdhouse.
Making a birdhouse with your own hands - video