What you need to repair the walls in the apartment. Where to start apartment renovation and finish it as soon as possible. How to start renovation in a new building
This is how it looked before the repair... Wooden rotten frames, closed from the outside with a double film, from cold and wind... To the left is an old veranda with a sagging porch canopy...
For those who have to do repairs in their home, it seems ...
These were the windows and window sills.

We began to put the house in order from the foundation.

We open the corners of the house one by one, remove the rotten logs of the crowns with a chainsaw, put up the formwork, lay large stones and rubble, lay the reinforcement so that its ends remain open (for subsequent fastening it with the flood foundation), wrap the crown log with roofing felt and fill it with concrete. finished cabinet.

And so all four corners of the house and its middle, along the perimeter. Total - 8 pedestals. The process is time-consuming, difficult, but the result is worth it ... When the pedestals were finished, we made a mound around the entire perimeter. The continuation of the outdoor work was postponed to the next summer. We've been renovating our home...
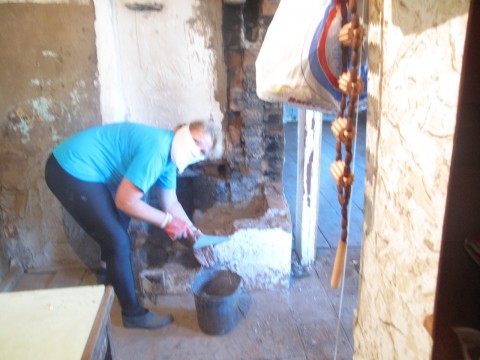
It's a big room and let's start there. It looked like this before the renovation:

This is her right corner ... and this, in the photo below, is the left corner. In the process of writing the topic, I will stick to these two angles...


First, all layers of old wallpaper were completely torn off. The windows were still old, but we were already waiting for the masters to install plastic windows.
The old stove was dismantled ... and the stove maker folded a new one.


AND THE RESULT DID NOT KEEP IT LONG TO WAIT ... I decided to close one window completely and make one big one - there will be a dining room.


After installing the windows, the men began to dismantle the old floor, level the logs and put brick pedestals under them...

Then they laid the floors with old boards (they will serve for a very long time, as they are thick and dry), and in places where they were rotten, they were replaced with new boards.

I installed a metal-profile frame for the walls and ceiling ... my mistake was that you first need to make the ceiling, and then the walls, and not vice versa. I found the technique for performing these works on the Internet, I will not dwell on it in detail. If you have If you have any questions, I'll be happy to answer what I know...

Mounting the frame on the ceiling is much more difficult, the neck hurts ...

When the metal frame is completely ready, you can sew plasterboard to it, preferably in a checkerboard pattern, starting from the ceiling! Do not forget to scatter the electrical wiring and hide it in the corrugated channel, behind the profile, and install the distribution boxes in a place convenient for you.

When all the walls and ceiling are sheathed with plasterboard, we putty with a spatula and level all the joints between the sheets and the places where the screws are screwed in with this composition ...

We lay a reinforced mesh at the corners and seams for the strength of the joints, and after everything is dry, we sand it, apply a primer on the walls and ceiling.
And now the most interesting moment - wallpapering. I took white vinyl for the ceiling and with delicate roses for the walls...

invited a team of craftsmen to finish their work in this room on the windows (slopes and window sills).

After that, I glued the ceiling plinth, hung the shelves on the wall, put my flowers on the window sills, which the guys from the company had already installed for us ...


The carpenter helped put the interior door in place, only then I found out that it was upside down ... (what's the difference!) If only it functioned normally ...

I pasted the doorways with a white corner on a liquid nail.

I put a substrate on the subfloor, then fiberboard and linoleum. Then I screwed the floor plinths with self-tapping screws and voila-beauty !!!

As for this big room...
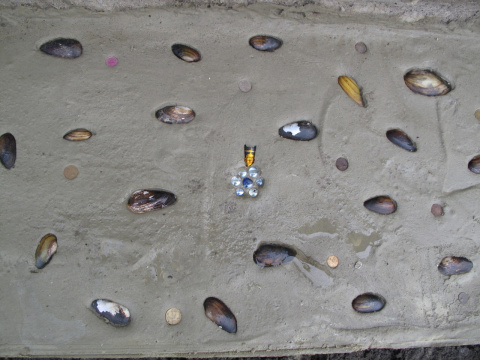
Some of you wanted to see in more detail about the concrete bollards, so I added details ... So, the layer of windows was inserted, the house was sheathed with flat slate from the outside and a blockage was made around the house, until next summer ...
Now let's move on to outdoor work, after the cold winter and spring...next summer.
When all the cabinets are ready, gradually, opening each side of the house from the blockage, we remove the rotten logs of the lower crown, dry, wrap it with waterproofing,

we install the formwork, lay the reinforcement, connecting it with the ends of the reinforcement of the corner bollards and pour concrete ...


On the finished foundation we make brickwork ...

We all work!!!

And as expected, a blind area was made ... not quite ordinary ...


This is all about outdoor work, home renovation. If you have any questions, feel free to ask, I'll be happy to answer. And everyone who is interested is waiting for the continuation of the internal repair-dining room!
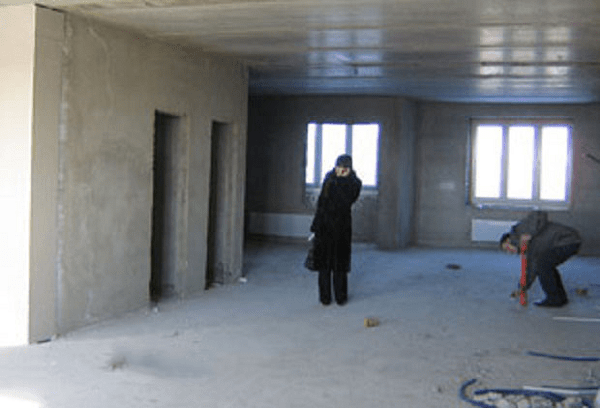
Almost always, new housing is purchased by a happy newcomer from a developer company without interior decoration and repairs, but with communications brought into the apartment. Firstly, such housing in a new building will cost less, and secondly, almost always the repair and arrangement of the apartment by the developer is carried out extremely carelessly, using cheap materials. Thirdly, there is a desire to perform some stages of apartment renovation with your own hands or the hands of good craftsmen.
How to start repairing an apartment in a new building
First you need to make an audit and inspection of the apartment, identify problem areas of walls, ceilings and floors. We proceed in the following order. We determine what needs repair and finishing in the first place. If there is not enough time and money for a complete apartment renovation, it is necessary to put in order first of all:
- Entrance door and windows, apartment ventilation;
- Perform a full and highest quality electrical wiring and wiring sockets in the apartment. This stage needs to be thought out as detailed as possible, to draw up a connection diagram and a circuit for laying wires into the walls;
- Connect water and collect sewage in the bathroom and toilet, install a toilet, washbasin and shower;
- If the time of the beginning of the repair of an apartment in a new building coincided with the heating season, be sure to check the degree of heating of the aluminum registers using a remote thermometer.
Advice! Before starting the repair, a list of claims for the presence of defects or defects must be presented to the representative of the seller. You may be able to get compensation for repairs in a new building. Do not settle for rework by the company.
In the process of carrying out the above preparatory work, it is possible to calculate the sequence of repairs in a new building.
What affects the sequence of repairs in an apartment in a new building
Much in the repair of housing in a new building depends on the availability of resources of time and money. Having bought a “bare” apartment and having issued the necessary documents for the right of ownership, you automatically begin to pay rent and brownies, for the use of the adjacent territory, for the removal of household waste and construction waste. After connecting electricity and water, a new apartment in a new building began to bring you a loss in the form of costs for its maintenance and decoration. The longer the repair time for an apartment in a new building, the more expensive it will cost you.
There are two main options for approaching the issue of finishing a new apartment in a new building:
- Planned renovation and finishing of the apartment. In this case, the owners draw up a detailed map and a schedule for the completion of finishing work, in which all the main types of finishing and installation of appliances are prescribed in stages. Such repairs, as a rule, are carried out from scratch to its completion by one team of craftsmen. The turnaround time for a repaired facility can take several weeks or months. The disadvantages of this approach include the ever-increasing price and cost of the work, sometimes exceeding the estimated costs by more than two times. As a result, if due to unforeseen circumstances there are not enough funds, the repair may be delayed for an indefinite period.
- Quick repair from scratch. In this case, all of the above stages of repair in a new building are carried out by hired craftsmen with direct quality control on your part. The apartment in a new building will be prepared for further finishing of the rooms within a week. In addition to communications, they finish and equip the smallest room of the apartment with laying temporary linoleum and wallpapering. There are no amenities in such a room yet, but it can be used as housing - a temporary hut and a warehouse for building materials. All other work is carried out as free funds and time become available.
The first option is well suited if the family has small children or elderly people who need to provide some comfort and convenience. The second option is considered more economical and faster, especially if, after finishing the kitchen, bathroom, toilet and one room, housing is rented out, with the remaining rooms of the new building being consistently brought to condition.
We carry out apartment renovations with our own hands and head
Among the most popular horror stories for new buildings are considered to be stories about the shrinkage of the walls of the house and its foundation. In reality, a similar process for a multi-storey building should be finally completed by the time the building is put into operation. This period averages no more than 18 months. If after 1.5 years cracks form in the corners, ceiling or at the joints and in the masonry of the walls, the tiles in the bathroom fall off, the doors are deformed with skewed doors, this means that the new building has certain problems with the stability of the foundation. It is worth waiting with repairs until the main thing is clarified - what is happening with the new building.
How to start renovation in a new building
Before starting work, first of all inspect the lock on the front door. The model and standard equipment of the door can be subject to separate agreement. Specify in the addendum to the contract which model of door and lock you need to install. If there is a need to take additional security measures, first of all change the lock supplied when the new building was handed over.

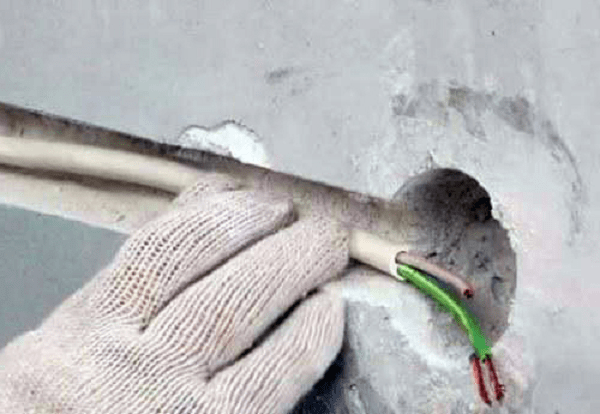
At the next stage, it is necessary to resolve the issue of installing a distribution electrical panel, connecting an electric meter. This will make it possible to start using power tools when repairing an apartment. To get rid of the need to use a large number of carriers and extension cords, plan the layout of the electrical wiring in the apartment. In doing so, the following should be taken into account:
- For the kitchen and bathroom, the wiring must be laid in sealed hoses, sleeves;
- Lay a separate residential wire in the bathroom to connect the boiler or washing machine. The cross section of the cable must be designed for a current of at least 25 A;
- An additional wire must be laid to the installation site of the air conditioner;
- In the bathroom, in the kitchen, in the hall, it is necessary to conduct a wire, which will be connected and used in the future when organizing additional grounding.
Advice! When laying wiring, use only copper cable without twists and soldering.
In addition to electricity, in order to create more or less normal conditions, it is necessary to connect hot and cold water meters and collect sewage in the bathroom and toilet. It is necessary to start work with the installation of a toilet bowl and a washbasin.

Given that good plumbing is expensive, for the first time you can install an inexpensive version of the toilet, assemble and connect plastic sewer pipes, a bellows and a washbasin. During the renovation of the apartment plumbing can be replaced at any time. Installing expensive plumbing increases the risk of damage to it during repairs; it must be installed at the final stage of repairing a new building.
For laying a plastic water pipe, using a perforator, we drill channels in the walls of the bathroom, toilet, kitchen with a depth of 2.5-3 cm. Next, you need to solder the water pipes and connect the leads to the drain tank and washbasin. Lastly, we will install and connect water meters for cold and hot water to the home plumbing.


Rough operations
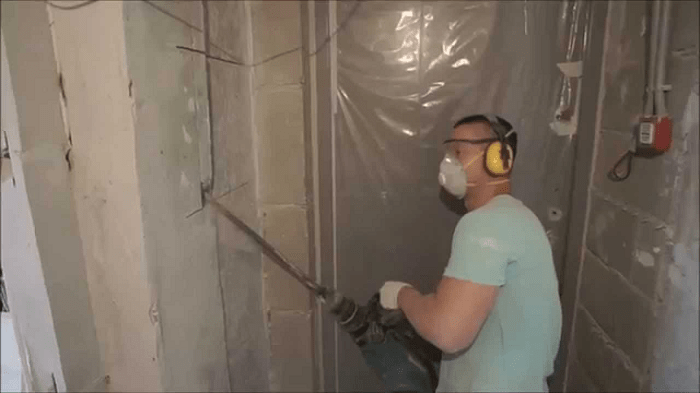
Before starting work, it will be necessary to perform a large amount of cleaning up the remains of concrete, mortar. The main part will be for rough cleaning of walls, floors, ceilings, their chasing, leveling and cutting seams. Such work gives a large amount of dirt and dust, so it will be necessary to organize good ventilation and wet cleaning inside the new building.
A separate point is to highlight the preparation of floors in each of the rooms for fine finishing. During the repair in the apartment, it will be necessary to close up all the cracks, holes in the seams between the plates, in the floor, in the interior walls of the new building. The most difficult will be leveling the floor with a cement mortar screed and a reinforcing mesh. This procedure will need to be performed upon completion of the preparation of the walls and ceiling for fine finishing.

We will perform similar work in the kitchen, bathroom and toilet.
Carrying out finishing work
After rough cleaning, it will be necessary to prepare the walls in the kitchen and toilet for laying tiles on the walls and floor. Facing tiles can be laid with your own hands, but this is a troublesome business and requires a lot of time. Therefore, it is better to entrust the laying of tiles to craftsmen who specialize in this kind of finish. While the tiling work is underway, you can do the repairs yourself in one of the rooms of the apartment. The best option would be to lay decorative plaster or liquid wallpaper on the walls. If at the time of the start of the repair in the apartment of the new building, the double-glazed windows in the windows were in a satisfactory condition, then you can start applying plaster on the walls of the room immediately.

Upon completion of laying tiles on the floor and walls in the kitchen, bathroom and toilet, you need to lay inexpensive linoleum in the corridor connecting these three rooms and the room that has been renovated using decorative plaster. This will reduce the amount of dust raised and make it easier to clean the apartment.
The most important stages of the renovation of a new building
Before finishing the walls in the apartment, it is necessary to align, and in case of a defect, repair the interior doors. If your future plans include wallpapering, normally closing doors are simply necessary for high-quality wallpapering work. After the wall decoration is completed, we proceed to laying linoleum, laminate or carpet on the floor of the apartment. The most practical is considered to be a laminate for living rooms, for the corridor an office version of linoleum with increased abrasion resistance. This type of work does not require special qualifications and is easily done by hand during the renovation of a new building apartment.
Conclusion
The final stage of the repair is the connection of lamps and the installation of furniture in the apartment. Approximately 70% of the amount of work during repairs in a new building is quite affordable for do-it-yourself work. And only when performing special types of finishes - laying parquet, installing stretch ceilings, installing double-glazed windows or entrance doors in a new building, you will need the services of specialists.
Any private house, since the construction of which 20 or more years have passed, needs a major overhaul. Repairing a private house with your own hands, in addition to impressive financial investments in building materials, involves a lot of labor. We asked the masters how to save money and get a quality repair.
Where to begin
You need to start by drawing up a detailed plan for the sequence of actions, after which it can be considered completed. The more detailed its points are, the easier it will be to imagine the scope of work, the time required for repairs and the amount of financial costs.
For each individual case, the plan will look different.
Work plan
- drawing up a design project;
- calculation of the necessary materials and tools, budgeting;
- repair of communications (replacement of sewerage, water supply, heating and ventilation systems, electrical wiring, gas pipeline system);
- replacement of windows and doors;
- replacement or, insulation and soundproofing of the attic;
- facade repair (dismantling of the old finish and installation of a new one);
- repair of bathrooms (replacement of plumbing and decoration);
- repair or ;
- room renovation.
Tools
To implement the plan, you will need a minimum set of tools:
- construction manual puncher (with the functions of impact and drilling);
- Bulgarian;
- jigsaw;
- construction stapler;
- Screwdriver Set;
- hammer;
- chisel;
- pliers;
- wire cutters;
- metal scissors;
- hacksaws for wood and metal;
- building level;
- roulette;
- construction rope;
- plumb lines;
- joiner's square;
- chalk and pencil for marking;
- Master OK;
- spatula large, small and ribbed (for tiling);
- extension;
- stairs;
- possibly a shovel and a trough (for mixing plaster);
- scaffolding.
The price of the listed tool is quite high, so we recommend renting it.
Drawing up a design project
 Before that, you need to understand what result after its completion should be obtained. To do this, you can use a computer 3D visualization program, with which you can easily choose a pleasing view both inside and outside the house, having previously entered the plan and dimensions of the structure into the program.
In it, you can choose the texture and color of finishing materials, give the necessary shape to the facade, roof and stairs, provide for the presence of accessories and even reproduce the courtyard.
Based on the most liked colors and textures of each element of the exterior and interior, you should select the appropriate materials.
Calculation of the necessary materials and tools, budgeting
The total number of materials needed will be equal to the sum of the materials required for the repair of each individual component: rooms, bathrooms, roof and attic, facade, communication systems.
It is necessary to clearly measure the surface area (separately of the floor, walls and ceiling) of each room, and then calculate the required amount of finishing and auxiliary materials. It is also necessary to measure the length of pipes and wires that will be used for laying communications.
Advice! To the amount of materials obtained during the calculations, 5-10% should be added, laid down for repair waste.
Repair of communications
Repair of home communications systems is perhaps one of the few components of a global home renovation that requires the intervention of professionals. The period of further operation of each of the systems will depend on how well the sewerage system, plumbing system, electrical wiring, heating and ventilation will be repaired.
Moreover, the masters will help to equip, for example, a heating system with minimal expected heat losses, which in the end will not only recoup the costs of calling them, but also subsequently save on the use of energy. Properly installed wiring can prevent short circuits and avoid failure of household appliances.
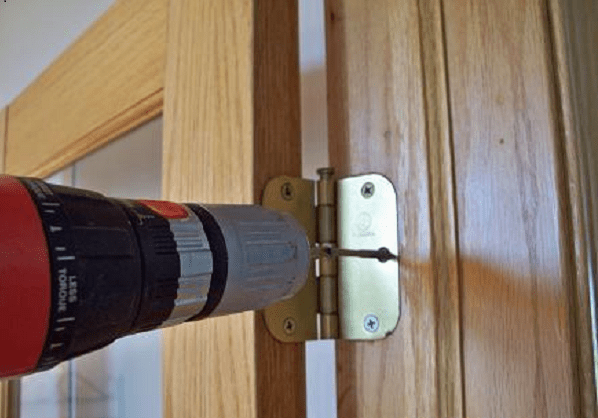
Replacement of windows and doors

If self-installation of doors seems to be quite feasible, then the installation of PVC windows instead of old ones, if possible, should be entrusted to specialists.
Both the measurement and the process of installing metal-plastic windows require experience and skill, because improper performance of any of the listed works can lead to the fact that the window simply does not fit or its installation will require expansion (narrowing) of the window niche.
Proper window installation can not only extend its life, but will also meet all modern requirements for sound and heat insulation.
Do-it-yourself door installation:
- the old door is dismantled along with the frame;
- a new door frame is installed in the doorway (wooden with long dowels and self-tapping screws, metal - with wide metal pins driven into the walls and screwed or welded to the frame);
- then the gaps between the frame and the opening are blown with mounting foam and plastered after drying;
- the door is put on the hinges pre-lubricated with machine grease.
Roof replacement or repair, insulation and soundproofing of the attic
Overhaul of a private house is unthinkable without the modernization or repair of the roof and attic.
This material has durability, and the color and structural range of siding is ready to boast of a wide variety (including it can be made in the form of a wooden, natural stone, brick coating). Such a variety will help to realize the most original design idea.
In addition, additional insulation can be placed under the siding, for example, mineral wool, thereby constructing the so-called ventilated facade.
Siding installation:
- special metal brackets are mounted on the entire sheathed surface;
- a wooden bar with a section of 50x80 mm or a metal aluminum profile is attached to the brackets, thereby creating a crate;
- sheets of mineral wool are attached to the walls with long nails with a wide hat, treating the joints with mounting foam;
- from above, the insulation is covered with a special retaining membrane fabric that prevents the insulation from blowing out of the cells and allows it to “breathe”;
- siding panels are attached to the crate from the bottom up.
Advice! For the most effective system, the gap between the inside of the siding and the insulation layer should be about 4 cm.
Renovation of bathrooms and kitchens
After the completion of outdoor work, you can proceed to the interior decoration..
Here, the first things to deal with are more complex rooms, such as a bath, toilet and kitchen. Due to the increased humidity in these rooms, the floor is more often covered with ceramic tiles, having previously (if desired and possible) installed the “warm floor” system under the coating and covered it with a thin screed. As for the walls, there are slight differences:
- almost entirely made of tiles or more budgetary plastic panels;
- the toilet is sheathed in almost the same way or, with rare exceptions, the upper part (about 2/5 of the height of the wall) can be covered with wallpaper;
- in the kitchen, tiles are usually laid on the walls, optionally near work surfaces, the rest of the walls are covered with wallpaper.
With sufficient funds, it is possible to order a suspended ceiling in each of these rooms, which is a very practical and visually aesthetic option, however, you can cover it with PVC panels or simply paint the ceiling area.
The next step is the installation of plumbing, washbasin, furniture and other accessories.
Room renovation
After removing the old wallpaper in the rooms, the uneven walls should be covered with putty and allowed to dry, after which you can glue the new wallpaper. On the ceiling, you can order a suspension system or paste over it with wallpaper.
Depending on preferences, parquet, laminate, linoleum, carpet are laid on the floor in the rooms. If the parquet has already been installed, it is sanded and varnished again. For the purpose of warming in the rooms, you can also install a "warm floor".
If you want to change the interior in your apartment, or you have received a new housing that requires finishing, then before buying building materials and hiring workers, you need to take care of the main components of any repair in advance:
- project - i.e. development of a new interior design;
- estimate - you should roughly imagine how much money will be needed for repairs;
- the correct sequence of work performed - it is important to adhere to the professional scheme of the repair process.
To make it easier to navigate in such a complex matter as apartment renovation, we advise you to familiarize yourself with the recommendations below.
Depending on the scope of work, repairs can be divided into cosmetic and major.
Capital
Overhaul means the beginning of repair work in a new apartment or a complete replacement and reconstruction in an old dwelling.
The scope of work includes the following items.
- Layout of the size of the rooms (if necessary, you can connect or divide the territory).
- Replacing or updating plumbing, relocating and adding sockets, laying out new lighting. If necessary, strobes are made for laying hidden wiring,.
- Windows and doorways are changed, the most modern built-in furniture is selected.
Major repairs require a lot of time, so in order not to sleep on newspapers among paint and plaster, you should take care of the place to sleep in advance. They say that nothing spoils a relationship like repairing an apartment. At this time, it is better to move to relatives or rent an apartment.
Cosmetic
Cosmetic or surface repairs will help create a new design, get rid of minor damage and update the interior. 
Repair work will affect the coverage of the room without changing communications. This process can include wall finishing (puttying, painting, wallpapering), laying new flooring and finishing ceilings.
Start of repair
The first thing to start with is a clear plan of what you want to end up with. Next, they draw up an estimate and determine the sequence of work.
 Repair plan
 Of course, it will not be possible to plan everything to the smallest detail, but this will save residents from typical mistakes, for example:
- incorrect location of communications;
- damage to finishing materials due to violation of the correct sequence of work;
- completion during the repair process: as a result, this results in an additional purchase of building materials, lost time and high costs.
To avoid the troubles listed above, it is useful at the stage of drawing up the sequence and schedule of work to invite specialists from the technical services responsible for communications. Their advice will help to correctly position the communication system in the apartment and avoid alterations.
Many ideas come up in the process. When a certain stage has already been completed, it is often impossible to return to the previous one. It is better to think over your dream a hundred times on paper, and only then get down to business in practice.
If you are not proficient in 3D modeling applications, then a simple and accessible to everyone large-scale plan on a piece of paper will do. We draw the shape and size of the room, which requires changes, observing all the proportions of the walls, the distance from windows and doors. Each plan has a unique purpose: for the planned application of lighting fixtures and sockets, room areas, furniture and wall and floor markings. So it will be convenient to measure and calculate everything. Below is a sample step-by-step planning guide.
Room zoning
When wondering where to start repairing a room, you need to start from its direct purpose and divide the space into zones. If it is, allocate zones for games, recreation and activities of the child. Making repairs in the kitchen, they determine the workplace for cooking and space for a family meal. 
The division of zones is done in different ways, it can be unusual decorative curtains made of threads, a rack with open shelves, a small step, LED lighting, a place to change one floor covering to another.
Options are shown in the video:
To fully show the designer's imagination is in the color scheme. Combine pleasant shades, do not be afraid to experiment. Whatever picture of the interior is born in your mind - everything is real and you can do it.
 Color combination table in the interior
 In the background, in accordance with the zones, they indicate where it is better to put suitable furniture, place a TV and other necessary items at home. It is important to take into account the estimated dimensions of the sofa, refrigerator, tables and other things in order to draw them with scale accuracy. 
The remaining space can be filled with light or multifunctional furniture.
Placement of outlets and lighting
Now it is approximately clear how the space should look like, what and where it will be located. It's time to figure out where to place the sockets and run hidden cable channels. For the sake of fire safety, sockets should be located in easily accessible places so that, if necessary, it is possible to quickly disconnect electrical equipment from the network.
Another important issue is lighting. The visual perception of space, the feeling of comfort in the room depends on the lighting. Therefore, even at the design stage, it is necessary to determine the location of the light sources.
 Multi-level lighting in the kitchen
 Coating selection

Each room has its own priority wall and floor covering. At the planning stage of the style in the rooms, you need to analyze which coating will be better and more practical for a particular room.
When choosing flooring for your entryway, think about abrasion-resistant flooring. You can combine laying in different directions or different types of material to separate the area around the front door.
To repair the nursery, the age of the children, their activity in an effort to draw on the walls are taken into account. Accordingly, it is better to choose washable wallpaper and a durable floor.
Budget
The scope of the repair depends on the budget. Approximate costs for materials and payment for services to workers are calculated in advance. Even if you plan to do the finishing yourself, you will need to hire specialists for plumbing, electrics or stretch ceilings. You should not do these jobs without experience, remember the familiar saying: "The miser pays twice."
Do not be too lazy to travel around more building stores, get acquainted with the prices on the sites. The cost in different outlets can vary greatly.
If specialists are hired for finishing work, it is necessary to conclude a written agreement with them on the scope, quality and prices. Otherwise, there is a risk of getting an unpleasant surprise in the form of expensive and poor-quality repairs.
Repair stages

Adhere to the following order of work.
For some, the need to make repairs in their apartment causes a reaction far from positive. The financial side of the issue comes first. A painstaking calculation of funds begins, with a distinction between the purchase of materials and payment for the services of specialized construction teams.
Repairs can be cosmetic and are limited to painting, wrapping and updating the appearance. And it can be capital with the replacement of electrical wiring, plumbing and the installation of a modern acrylic baths.
The process of repairing an apartment is perceived as a long period of time with many inconveniences. The result eventually turns from the desired to the suffered, and instead of a sense of satisfaction, there is a feeling of fatigue and detachment.

The situation is quite different for people with imaginative thinking. Having visualized how the apartment will look after finishing, they part with money more easily, hoping to quickly see everything with their own eyes.

People from the same category, who are not burdened with funds, often resort to the services of designers. A master home interior designer using computer programs can develop a view of an apartment in 3D format. In many ways, this method is considered a strong incentive to action, since it allows you to see the results of the work in advance.

However, purposeful people with high internal enthusiasm never give up even in a situation where there is a strong limitation of funds. For such people, the way out is to carry out partial or complete repairs on their own.

At the same time, someone chooses a thorough capital design of housing with redevelopment, and for someone it is enough to carry out inexpensive repairs in an apartment, which is often called cosmetic.

Stages in the repair
When deciding where to start repairing an apartment, some believe that it is necessary to purchase materials and tools first. In general, this is correct, but in order to spend money correctly and not to acquire too much, you need to make preliminary calculations. Calculate the basic geometric parameters of each room: height, length and width. Determine the dimensions of window and door openings.

The data obtained will help determine the exact amount of work and calculate the amount of each type of building material.

When deciding to carry out a global change in the internal appearance of the apartment on your own, you must first draw up a phased plan. It is a properly developed plan, including a phased apartment renovation, that becomes the key to successful work processes.

The first item will be dismantling work:
- demolition of the enclosing internal walls and partitions to expand the space;
- dismantling of wooden windows to replace them with plastic double-glazed windows;
- removal of door panels or complete dismantling of door frames.
- removal of old floor coverings;
- dismantling of wall coverings or clearing walls from painting compositions;
- clearing or blurring ceilings.


Categories of complexity of work processes
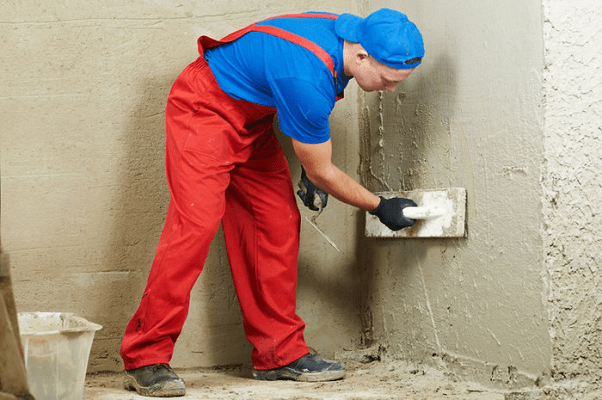
The most time-consuming work is considered to be the installation of screeds on the floors and the plastering of the walls. It is especially difficult to deal with surfaces endowed with a large number of differences. Some of them are eliminated by knocking down with a hammer, but only a leveling screed or similar plaster layer can really save the day.

To carry out high-quality straightening of wall surfaces, plaster beacons are used. To do this, buy aluminum rails or metal pipes of a small square or rectangular section.

In the first case, the material is inexpensive, but when buying, you should know that when you remove the rails from the joints after the plaster has dried, they can no longer be reused in work.


Metal pipes are more expensive, but the percentage of their preservation after dismantling is much higher. In addition, some people prefer to leave them in solution for greater layer strength.

The most economical way to achieve evenness of the screed is the installation of mortar beacons on the floors. But this process is very painstaking and only those who have the appropriate skills can decide on it.

The simplest type of work is painting. At least that's what most people think. The opinion is both right and wrong. The truth of the statement lies in the conduct of the final process, that is, the painting itself, using quality tools.

Paint rollers and brushes, plastic pans with nets for rolling rollers. Working with quality tools, you can avoid smudges on the walls and the selection of vertical paint stripes.

Capturing an impression
For the sake of interest and to confirm their personal participation, a large number of people take photos of apartment renovation before and after. Sometimes this results in a whole series of shots with separate initial and final views of each room.

Some amateurs post photos on the Internet, because today it is considered a fashionable activity, and someone simply uses them to view with friends and acquaintances. In any case, a photo of a do-it-yourself apartment renovation is not only a memory, but also a confirmation of personal skill.


DIY apartment renovation photo