DIY cat pillow patterns. Touching DIY gifts: sewing a pillow in the shape of a cat. Pillow with applique “Cat in Love”
Quite often, parents are faced with the problem that their child does not want to fall asleep. And when a bedtime story and a switched-on night light don’t help, a hand-sewn toy pillow comes to the rescue. With such a pillow, a child can play in bed, getting ready for bed. And at the same time, soft and safe, she can easily stay with him at night.
So what is a toy pillow? As the name suggests, this is a pillow that is shaped like a toy. In most cases, some animal is chosen as the character. Of course, you can buy any toy pillow in the store, but only if you sew it yourself, it will give your child good and happy dreams.
How to make a toy pillow with your own hands
To make a toy-shaped pillow with your own hands, you will need a minimum of materials: a pattern, filling and fabric. You can find the pattern on the Internet or draw it yourself. It is better to choose a natural material that is soft to the touch. Flannel, chintz, calico are perfect.

You should approach the choice of filler for a toy responsibly. It must be hypoallergenic and wear-resistant. You can take a special filler for soft toys or polyester balls for stuffing pillows.
An important point when making a toy pillow with your own hands is the choice of decor. Since this toy is intended primarily for sleeping, it is not recommended to use buttons, beads or seed beads. For decoration, braid or soft lace is suitable, which will need to be secured well.
Funny soft cat with your own hands. Master Class

If you decide to make such a pillow with your own hands for the first time, then it is best to sew it in the shape of a cat. Thanks to a very simple pattern, this toy pillow is very easy to sew. Moreover, the whole process will take you at most two hours.
So, we will need:
- cotton fabric;
- filler;
- floss threads;
- pattern.
Operating procedure

- We enlarge the cat pattern to the size we need and print it on a printer (or transfer the pattern onto paper directly from the screen). Then we transfer the pattern to the fabric folded into two flaps. Sew along the contour and cut out.
- In the places where the head and body will be future attached, we make crosswise cuts on both workpieces. Through the slots we fill the blanks with filler (there is no need to stuff it very tightly, the cat should remain as soft as possible). After which we sew up the holes, even mend them.
- We will embroider the cat's face with floss threads. First we embroider the triangle of the nose using satin stitch, then we form a mustache. We embroider the cat's eyes with French knots. We sew the head and body together with a hidden seam.

Agree, making such a soft toy pillow in the shape of a cat with your own hands is more than simple. Or this:

 |
 |
The face of our sleeping cat can be drawn or embroidered.
To give it a more festive look, you can tie a bright ribbon around your neck.
Materials used:
Fabric 45 cm wide (chintz, corduroy, satin, velvet)
ribbon
silk thread for sewing
fabric glue
pins.
Description of work:
1. Print out the pattern (pattern at the end of the article).
2. Lay out the finished patterns on the fabric.

3. On one side of the head pattern, embroider or draw a cat’s face.
4. Sew all the main parts of the body together, leaving a small hole for the filling.
Do the same with the hind and front legs and tail.
5. Fill each part with the available filler.
6. Sew all the parts together using a neat hand stitch.
7. Tie a beautiful ribbon around your neck.
Our holiday pillow "sleeping cat" is ready!
Pattern:
Here's a better pattern
ear http://www.craftandfabriclinks.com/...at_bean_ear.pdf
body http://www.craftandfabriclinks.com/...anbag_bodyA.pdf
http://www.craftandfabriclinks.com/...anbag_bodyB.pdf
http://www.craftandfabriclinks.com/...n_pat_bodyC.pdf
Unusual, original, unique pillow toys in the form of animals or dolls become favorite things for both children and adults. A hand-made cat pillow will not be an exception. It can be sewn according ready-made patterns or according to sketches drawn by yourself.
If your baby has trouble falling asleep and needs company, offer him this toy pillow. With it, the child will calm down faster. Adults will also need a small thought pillow, with which it is easier to relax the cervical vertebrae, you can lie down comfortably, and fall asleep faster and more soundly. Of course, you can buy a model of any size and shape in stores, but sewn or knitted yourself, these products become an indispensable element of decor, created only for your closest and dearest people.
How to cut correctly
A DIY cat pillow is a gift for both yourself and your child, a decoration and addition to stylish design rooms. In order for such an accessory to be truly one and only, you will have to make your own pattern for the future cat. It would seem, what could be simpler? But no. After all, cats and cats are so different, and everyone wants their pet to be the cutest.
They cannot be similar to one another, and therefore you will need to find a special drawing or make a sketch yourself. When preparing to work on creating a pattern, it is important to consider the purpose of the future product. If this is just to decorate a new sofa, then it is important to make sure that the color and shape of the cat is in harmony with the surrounding furniture.
But most often it is a real pillow with which you can comfortably fall asleep. In this case, you need to carefully consider:
- its size;
- the quality of the fabric that an adult or child will touch with their face;
- Availability decorative elements, safe for kids;
- quality and quantity of filler.
Of course, it is very important to choose the character who is sure to become everyone’s favorite, and the pillow should be an exact copy of him. The well-known cat Simon has long become such a hero.
This funny soft toy was loved by children many years ago. different countries, and to make it yourself, just find a detailed image and prepare the components. White, fluffy, with huge bulging eyes and erect ears, the cat will take root in any home. He can really decorate the interior and become a friend to the baby.
Preparation
When starting to make a pattern for a soft pillow toy, you should think in advance what size the cat will be and who will use it. Usually such a handsome man is made of faux white fur, and if desired, it can be replaced with plush, terry or flannel. To work you will need:
- material for the body, folded in half;
- floss threads to highlight the mustache and the desired outline;
- pins to secure the pattern to the material;
- colored crayons;
- threads whose color differs from the main one;
- scissors;
- filler;
- sewing needles.
You can make an accurate pattern by watching a video or photo where real masters of their craft give a master class on cutting and sewing.
You will need several sheets of A4 format, but it is better if you prepare graph paper, which will make it easier and more convenient to recreate an accurate image of every detail of the component of the future pillow, and you can get to work:
- Having decided on the size, it is important to decide whether the pillow toy will be one-piece or whether some parts will need to be sewn on. The image drawing must contain all parts in exact size. More small parts draw on the same sheet.
- Having cut out each component, lay out the parts on the material so that there is a distance of at least 1.5-2 cm between them. This will be the seam allowance.
- Secure all parts of the pattern with pins and circle with chalk, marking the places of future connection.
- Carefully cut out each detail, not forgetting about the allowances.
- To ensure that all components match in size, along the line drawn in chalk, make a running stitch with air loops, push the edges of the fabric apart and carefully cut the threads between the layers of fabric. All the necessary lines and outlines have been transferred to the second part.
Assembly of parts
Having laid out and swept away all the component parts, you can begin assembling the toy itself.
- Attach all the required small parts to one of the resulting components. These are the pads on the paws, eyes and tongue. Embroider the mustache and outline of the mouth with floss threads.
- Having folded the resulting parts with the right side of the fabric inward, fasten them with pins or baste them and carefully stitch them on a machine, leaving a hole for filling.
- Carefully overcast all edges so that the fabric does not fray.
- If the cat has a tail, then it needs to be stitched and stuffed with stuffing. Then insert between the two halves of the body so that the body can be sewn together, leaving a hole next to the tail for filling.
- Unscrew the resulting cover through the hole left, paying attention to all available corners.
- Fill the toy pillow with filling and carefully sew the edges of the remaining hole by hand or stitch it on a machine.
When filling the pillow, it is important to remember that it should be soft, but keep its shape. You cannot use too much filling, otherwise the pillow will be very uncomfortable.
Design details

Decorating a toy is also a rather important moment. When getting started, it is important to consider the future use and age of the owner of the pillow. You should not use glued toy eyes or small buttons if such a cat becomes a pillow for your baby. The child may tear them off and inadvertently harm himself.
To get bright, beautiful eyes, the pads on the paws to be visible, and a bright tongue to stand out, all you need to do is use pieces of fabric and sew them in the appropriate places. Individual details can be simply embroidered using floss.
Features of the pillow toy
If for the first time in your life you decide to make a pillow in the form of a soft toy with your own hands, let it be a cat. Such a pillow is easier to sew; it does not require special knowledge, experience and skills. All you need is imagination and the desire to achieve results, bringing pleasure to your family and friends.
Home decorations are in fashion now self made. All kinds of textile accessories help to create an atmosphere of harmony and comfort very well. This very simple product will look fun and unusual. Even a novice needlewoman can handle making a soft sofa guest.
What do you need for sewing?
Use the list below to help you get started beautiful pillow-cat:
- pattern;
- fabric of several natural shades for the animal or bright variegated decorative colors;
- pins, chalk, scissors;
- threads with a needle;
- filler (sintepon, holofiber);
- sewing machine, although you can make a pillow manually, for example, from felt, which does not require processing of the edges and is connected along the front side, and details such as eyes and nose can be easily glued to the base.
So, you don’t need anything special to make a cute souvenir. You probably have some small scraps at home. Any workpiece can be made even from several parts, it will just require more seams.

Which sample to choose?
In order for you to get an original cat pillow, the pattern must be appropriate. First of all, you need to choose what your product will look like and find the appropriate template. If you want to take the blank you like, simply print it on a printer at the desired scale. If the element does not fit completely on the sheet, divide it into two or more, and then glue it with tape.
Consider your experience, if you are a beginner, try it simple circuits. Below are templates designed for beginner craftswomen, so you can safely choose any option.
What is the sequence of actions)?
To make a simple accessory, you need to do the following:
- Make paper blanks for the parts.
- Lay out the elements on the fabric, trace around the seam allowances and cut out.
- The parts are usually sewn down along the wrong side, followed by turning them inside out and filling them with padding polyester or holofiber. Don't forget to leave a small hole for this, which is sewn up by hand at the very end.
- If the ears and tail were cut out as separate parts, they should be sewn to the finished product or into a seam.
- The eyes, nose, mouth and mustache are embroidered (don't forget to use a hoop) or the blank parts are attached using a needle and thread. This must be done before sewing the base seams. You can glue the parts last.
Work always follows this pattern, regardless of the complexity of the product. The technology differs in the number of seams that need to be made. The simplest thing is to connect two identical parts in the form of a cat's silhouette.

In this case, you will actually only make one seam unless the tail is made as a separate piece. In the picture below, the pattern also suggests the presence of a side part in the pillow. For this purpose, two additional stripes are made. So, the product can be given more volume.

Although it is enough to simply sew two parts.
The simplest product
If you don't like to stitch along arched lines, you can choose a very easy way. You can quickly and effortlessly create a cat pillow with your own hands. There is no need to make patterns here at all. The base is made in the form of a regular rectangle or square, and ears, tail and muzzle details are sewn to it.

If you choose a material with cat themes and patterns, you will get an original, eye-catching bright accessory.
Flat product of complex shape
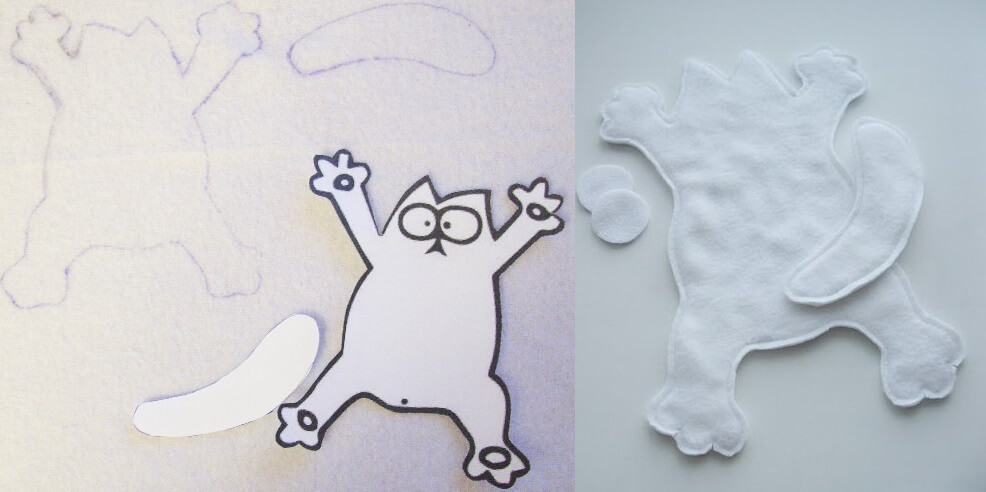
If you have no problem stitching along a rounded line and want your DIY cat pillow to be more realistic rather than looking like a square “bag,” use the following templates.
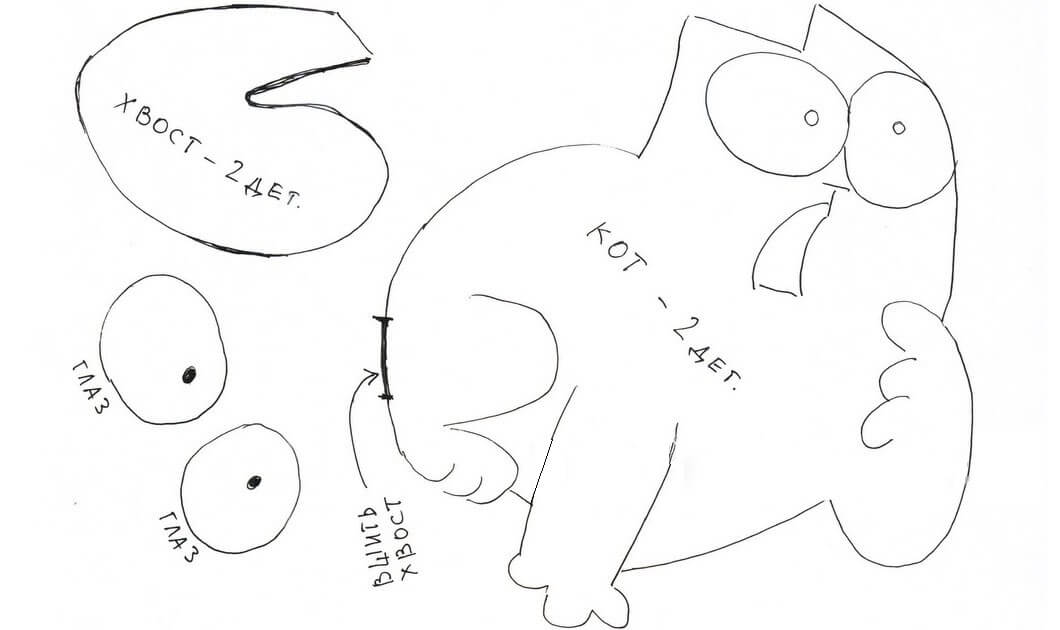
The first option is performed as one piece with the tail and ears. In the diagram, the arrow indicates the direction of the grain thread, although if the size of the fabric does not allow the part to be positioned exactly this way, do it as best as possible. This is not a dress, but just a small accessory. The seam allowances and the line where the stitching is performed are also indicated. An opening for turning and filling is left on the side.

Second option - great idea The outline of the product is very reminiscent of a heart, and additional decorative stripes of the same shape can be used in any quantity and size.

In the third sample the tail is made separate part and sewn to the base. You will need to cut out two parts of each element.

Pillow in the shape of a cat's face
Another cheerful option is the head of an animal with an emotional one, which can be either cheerful, happy, or sad, causing tenderness.

Using such a blank, you can make only the base itself voluminous, and sew or glue the remaining parts flat. But it’s even better to make all the parts slightly voluminous. When sewing on a nose or muzzle part, simply place a little filler under it and attach the element to the end.
Pillow toy
If you have some experience in needlework or have already practiced simple samples, you can move on to creating a voluminous souvenir. Below is a cat toy pillow. The pattern in the same picture allows you to create a cute three-dimensional creature for your sofa. If you choose terry or fluffy fabric that imitates wool, you will get a very natural animal.

Pillows "Offended cats"
The pattern for creating such a cute accessory is suitable for any of the above, since these creatures can be of any shape, as in flat version, and in the form of a 3D toy. The most important thing is to make a “facial expression” that matches the emotions.

All parts can be easily made from felt or fleece. You can draw the template yourself or use the muzzle pattern that has already been discussed. To make different "Offended Cats" pillows, the pattern doesn't really matter. The main thing is the arched mouth, and it is usually embroidered, although it can also be cut out of pink material. The details of the muzzle are easy to stitch or even glue, for example, from felt.

You saw how a cat pillow is made. The pattern (any of the options) given in the article will help you create this cute accessory,
There is nothing easier than sewing cat pillows with your own hands. Pillows in the house perform several functions: they make the house more comfortable, decorate it and serve as armrests and headrests. Nowadays you won’t surprise anyone with store-bought ones, but with hand-sewn cat pillows it’s quite possible. Sew or knit to your taste interesting pillows and stencils, you are quite capable.

It’s very nice to lie on the sofa, relax, and soak up some love with your pet. And when he’s not around (someone needs to hunt), a beautiful pillow with cat symbols will be a pleasant reminder. Probably the easiest way is to draw a cat on fabric.
Although, there are other ways to make a bright pillow, for example, deliberately choose a fabric of variegated colors and cut out details from it.

Or choose a material and take it to a workshop that specializes in thermal transfer printing - they will “draw” what you want, and you will also cut out details from this canvas and make something unusual and creative.

Still, it's nice to do something yourself. Stencils are perfect for this type of pillow. The drawing can be done with acrylic paints or special ones for textiles.


You can also make stencils yourself from scratch, or a complex design with some details on thick paper, or take a ready-made drawing. For cutting, you should use a stationery knife; carry out the process itself by placing the sheet with the pattern on a wooden cutting board or, specially designated for this purpose, a sheet of plywood.


To get the desired drawing, you can do without printing it. Just transfer it onto paper or tracing paper directly from the monitor.


Made from fleece

We will need: a small piece of fleece of the desired color, a piece of light beige or milky felt, sewing threads to match the main fabric, holofiber, brown iris (or floss) threads, a fabric marker, needles, pins, scissors, lace, ribbons, buttons, beads to decorate your cat. Pattern with centimeter scale: 
We are sewing two cats at once, so we have more details in the photo. We fold the fleece in half and transfer the pattern onto the fabric; this is very convenient to do with a disappearing fabric marker.

We sew our details on sewing machine along the contour, cut with an allowance of 0.5 cm.

We make an incision on one layer in the area and turn the body inside out. We also cut one layer of the tail at the top and turn it inside out.

We stuff the body and tail with holofiber.

We sew up the holes through which the cat and tail were stuffed with matching threads.


We mark it with a disappearing marker and embroider the face with iris or floss threads.

We try our muzzle on the cat’s body, closing the stitched cut, and fix it with pins. Using a seam over the edge, we sew the muzzle with threads to match the felt.

We try on and sew the tail with a hidden seam so that the cat can lean on it and stand on its own.

That's all, the cat is ready.

All that remains is to decorate it as you wish - with bows, braid, flowers, skirts, buttons - whatever your imagination suggests! Look, here's how different cats can be:

Sleeping cat

A cat in the house can most often be found on the sofa or in an armchair. She's a sleeper. Let's try to sew decorative pillow with the sleeping face of a cat. This looks so much like her.
For work we will need:
- A piece of fabric (color as desired).
- Threads, scissors.
- Pattern.
- Disappearing fabric marker.
- Non-woven fabric.

We select fabric for the future pillow, the choice of which is unlimited. It all depends on what exactly you have on hand this moment at hand. Any type of fabric is suitable for living rooms; for a children's room, a pillow can be made from old children's things with a funny pattern.
We transfer the pattern of the main part onto the fabric using a disappearing marker.
We cut out the part, leaving approximately one centimeter for allowances. Now we transfer the pattern of the main part to the non-woven fabric, trace it and cut it along the contour. We do the same with the second part of the part, we make it from fleece. We make a pattern for the legs, tail and ears and cut them out. It is also necessary to duplicate parts.

Using an iron, we glue one part of the main part with the interlining. Now we take all the small parts: paws, tail and ears, fold them in pairs with the front side. After this, we grind each part down on a machine along the edge, leaving a small hole for stuffing. We process all the edges of each part with zigzag scissors or do it with regular scissors. After this, turn it right side out and stuff it with any filling, and sew up the holes using a zigzag stitch.
All the parts are ready, which means we need to sew them to the main part. To do this, we use pins and fix each part in the right place. Using a disappearing marker, draw a face on the pillow. We turn it over and put the fleece piece on top, sew it together, leaving room for filling. Turn it right side out, straighten and smooth all the seams well. The pillow can now be stuffed to the desired density with any stuffing; we sew up the hole. Now we sew on the paws, for this we use buttons. We embroider the muzzle with floss threads dark color. The cat pillow is ready; if desired, you can decorate it with a bow, heart and other applique. On such things the drawing made acrylic paint.

Give your cat a gift - a “Sleeping Cat” pillow. It looks just great on the sofa, but guests also like this one, so it can be a great handmade gift.

You can decorate the neck with a bow or hang a medallion on it - there will be a cat with decoration. The pillow will look great on your sofa!


Description of the work process:


Knitted

cute sofa cushions You can knit it with your own hands. All over the world, things made by hand are valued. Things keep the warmth of the hands of the person who made them.
These are the original sofa pillows in the form of knitting needles.
For work we will need:
- Knitting needles of medium thickness.
- Any threads, leftover threads (you can take threads of two colors and combine them).
- White threads for paws.
- Synthetic padding for stuffing pillows, hands and feet.
- Two buttons for the eyes, a piece of fabric for the nose.
We knit either two squares, or a rectangle, which, when we fold it, will turn into a square. The size of the pillow can be any, the smallest is 35/35 centimeters, you can make it larger. The paws are approximately 28 centimeters. How many loops to cast on: knit a little on the knitting needles and look at the number of loops in 1 cm. Multiply by 35 cm.

Knitting pattern
Option 1: stockinette stitch.
- Row 1 - knit only,
- Row 2 - purl only.
Option 2: confusion.
- Row 1 - knit - purl - knit - purl, etc.
- Row 2 - purl - knit - purl - knit, so that the knit is always above the purl, and vice versa.


The front and back paws and tail are knitted using stockinette stitch. Knitting desired length, first we make decreases (we knit two loops together and tighten the rest with thread).
On the other side, we knit the paws: we knit three from each loop with white threads to make a white paw. You don’t have to stuff the length, but stuff the hand and foot with synthetic padding and embroider the fingers. We decorate the face with applique. We sew the pillow, leaving a slot for the padding polyester. We stitch the ears and stuff them with padding polyester. The cat is ready.


Children's

You can even sleep with such a toy, which is what children love so much. The cat pillow is very easy to sew. The pattern is elementary. You can make this craft together with your child.
Necessary materials:
- Fabric in two colors (you can use more if you want to make the cat-pillow even more original).
- Threads.
- Needles.
- Sintepon, cotton wool or granules for stuffing.
- Pieces for eyes, nose and mustache.
Pattern

Those elements that are cut out in duplicate are made by folding the fabric in half, face to face. Cut out, making seam allowances. We sew the parts together, leaving small holes for stuffing. First of all, we sew the body, the head, then we sew the paws, tail, and ears to it. Using colored scraps, we make eyes, nose and mustache using the appliqué method.
In the video you will learn how to use a cat pillow.
Cat face

The materials we will need are:
- Textile different colors, select them by looking at our photographs, but you can also improvise.
- Threads.
- Scissors.
- Filler.
The eyes and nose can be embroidered, or you can make an applique.

- We cut out two parts each for the head, a heart for a smile, eyelids, an eye, and one part each for the lower part of the muzzle and nose.
- Let's draw a smile.
- Let's stitch it.
- Stitching top part faces from the bottom.
- We sew on the nose, eyes, cheeks, eyelids in the form of an applique - we decorate the face.
- You can also do this in the form of embroidery.
- Draw the pupils with white paint or corrector.
- We do the same with the spout.
- Sew the two parts of the head together, leaving a hole for the filling.
- We fill the cat with padding polyester or other filler.
- Our unusual DIY gift is ready! We think it will bring a lot of joy!