How to quickly save an image without background in PNG format in Photoshop. How to create a PNG with transparency in Adobe Photoshop (CC and higher versions)
Good day, dear readers. The ability to make pictures with transparent backgrounds is incredibly necessary for every novice website developer, designer, and even an ordinary person.
This is the most popular function in Photoshop, and therefore I decided to tell you in as much detail as possible not only about the process itself, but also how to save a picture in Photoshop without a background.
It turns out that many have difficulties with this, but there are no publications on the Internet on this topic on the Internet at all. Only a few topics on the forums. But, I take on the mission to correct this injustice ...

So, now I will put on knightly armor and dispel all fears, doubts, misunderstandings and turn the difficulties of the art of Photoshop into an artless routine. I will also tell you about all the intricacies of the craft. Get ready. I will “know” in a very simple language, so that it becomes clear to everyone, so I apologize to the readers who are embarrassed by such meticulousness and they themselves know everything very well.
I thank the more patient for your understanding. Let's get started.
What you need to achieve for a photo to be truly transparent
The transparency in the picture is usually displayed with such a checker. If you see it on Google, then the image can be downloaded without problems and when this object is superimposed on another background, the color will not change.
As you can see, such a checker is not displayed if the image in the search is reflected through a thumbnail. You need to click on the picture and additional information will open.

Look, I copied this drawing and pasted it on the photo of the field. I won't go into exactly how I did it, it doesn't matter now. The most important thing is that you can see all parts of the field, the cubes seem to have been cut and superimposed on the picture.

If I had not found a photograph with a checker in the search, the illustration would have looked completely different. The background would be white and rectangular.

Why is that? This checker is a generally accepted sign, if you see it, then there is no color at all in this part of the illustration, and when superimposed, you will see the lower part of the picture. Likewise, transparency is displayed and. If you need to remove the background from the photo, then you need to ensure that instead of color, you can see this cherished pattern. Checker.

How to store transparent images correctly
We are all accustomed to such a photo format as jpeg. Some people are not even aware of the existence of others. However, he does not understand what transparency is. In order to download and store the "correct" photos on your computer, you will need to understand and remember the new format - png.
You see, in addition to checkers, in Google, you can almost always see this combination of letters along with the necessary pictures.


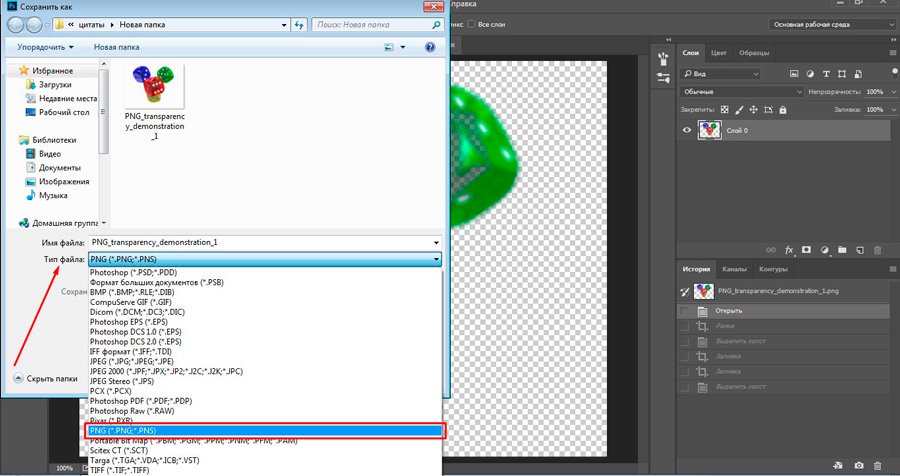
Then choose the type of file you want, png, and you're done. It is available in any version. If you don't see - look more carefully. You can't do without it. Trust me.
Why was it necessary to come up with a different format? The thing is that the popular jpeg does not understand what transparency is. He changes it to the usual white.
How to get rid of the background: a simple and fairly quick way without unnecessary hassles
On my blog you can find an article in which I show 4 tools and give a video in which you can find 3 ways to get rid of the background in the picture (). You can read it if you are interested. Now I would like to show you one more technique, because I believe that without this the article would not be complete. You never know, someone doesn't want to climb my blog. And here everything is in one place.
So, let's open the picture.

Find the Background Eraser tool. If you cannot find it, then hold the mouse with the left button pressed on the key of a regular eraser for a few seconds. The required tool will open. You can add it by clicking on it.

You can increase the diameter of the eraser to make it easier to wash.

Now tinker over the unnecessary elements in the picture. You will see how the checker begins to appear, and the color disappears!

I hope that after you finish, you will not have a question in what format to save the processed drawing. Of course PNG.
This erasing method is neither the best nor the most convenient. Therefore, I recommend that you still pay attention to my previous article, completely devoted to this topic.
And if you are interested in working in Photoshop, then I advise you to start making money on it! There is a demand. You can easily try, process pictures, and do a lot of interesting things. Believe me, this is really necessary. You can verify by opening several freelance sites.
Think you won't succeed or are you too old for this shit? Not enough time? Believe me, these are all ridiculous excuses. I am a lawyer and I earn enough money, but ... do you have a hobby, favorite hobby? Are you living life to the fullest? Are you really bored?
Whatever you know and whatever you are interested in. The Internet opens up a lot of new possibilities. Bring change into your life. If money doesn't interest you, that's even better. This gives your project a better chance of becoming expensive, cool, and successful. All famous people do not work for profit, they work because they love what they do. Few of them call it "work."
The time has passed when a person spent most of his time at a computer or TV. Now everyone is developing, improving some of their skills and sharing with people what they know. In fact, this has always been the case, only the scale has increased.

By the way, not so long ago I read the secrets of longevity of the Caucasian highlanders. One of the principles is that the younger generation constantly comes to them to consult on some important issue. Old people feel needed, and therefore do not experience any negative emotions about old age. In the Caucasus, do not be afraid to become old.
By the way, a positive attitude is another secret. Elders argue that no one wants to communicate with angry, irritated and boring people who have no interesting hobbies, and therefore, such a lifestyle is extremely unprofitable, especially in old age.
Do something new. If you like photoshop - pay attention to the course of Zinaida Lukyanova - “ Photoshop from scratch And master it perfectly. Very quickly, you will have a profitable hobby. Not so passionate about design? Pay attention to that, and create your projects.

If you liked this article, and I am at least a little interested in you - subscribe to the newsletter. Let not now, but give yourself a chance to do something new. I will send you my publications on how you can make money on the Internet.
Perhaps one of them will inspire you to something new and still unknown. You will understand that it is interesting and want to try it yourself, and then ... who knows what will happen next?
Will the hobby turn into something more, or will you just show the result of your labors to your friends in order to get their praise and admiration? Unlike many, you will get off the couch and do something that will take you out of the ordinary. You will try to change your life. This is very commendable.
I sincerely wish you success in your endeavors and hope that this meeting will not be our last.
Greetings, dear readers of my blog!
I recently needed remove background from the picture, I'm not particularly friends with photoshop. And I'll tell you that I don't even have it on my computer. (Well, it’s right, in general, why do I need something with which I don’t know how to work).
But the background from the picture had to be removed somehow, I began to surf the Internet in search of a solution to my problem. There are a lot of options, in fact, but I was looking for something easier)). I found a very easy and simple way to remove the background from the picture.
And so, let's get started. We'll need photoshop, but the way I don't have it. I am using online photoshop. A very handy thing, I'll tell you. And of course the background image we want to make transparent.
I will show you with an example, here is such a picture, we will remove the white background

We go into online photoshop. I used this one PIXLR
We choose: Load an image from a computer.


Now on the right in the window "LAYERS" need to open the lock

Click on it 2 times with the left button mouse, a check mark should appear in the box.

Now go to the panel on the left, select the tool "Magic wand" and set the tolerance to 21.


That seems to be all, but I am not completely satisfied with the picture, there are still remnants of the background, I again click on the place that I want to remove. Then "edit" ---- "clear". And so on until you remove everything you need.
Good day!
Ever wondered how PNG files work? No? I'll tell you anyway.
The PNG (Portable Network Graphics) format was invented in 1995 to replace GIF, and in 1996, with the release of version 1.0, it was recommended by the W3C as a fully-fledged network format. PNG is one of the main web graphics formats today.
Under the cut you will find a general description of the structure of the PNG file, a number of schematic pictures, preparation in a hex editor, and, of course, a link to the specification.
General structure
The PNG structure in its most general form is shown in the following figure.
That is, the file consists of a signature and a number of blocks (chunks, chunks), each of which carries some information (thanks to KO!). But why can't the signature be considered one of the chunks? Let's take a closer look.
File signature
The PNG file signature is always the same, consists of 8 bytes, and is (in hex)What does this mean?
- 89 is a non-ASCII character. Prevents PNG from being recognized as a text file and vice versa.
- 50 4E 47 - PNG to ASCII notation.
- 0D 0A - CRLF (Carriage-return, Line-feed), DOS-style line feed.
- 1A - stops the output of a file in DOS mode (end-of-file) so that you do not get a multi-kilobyte image in text form.
- 0A - LF, Unix-style line feed.
Chunks
Chunks are blocks of data that make up a file. Each chunk consists of 4 sections.
Let's take a look at these sections in order.
Length
Well, everything seems to be clear with the length. Just a numeric value for the length of the data block.Type (name)
The type is a little more interesting. The type is 4 case-sensitive ASCII characters. The registers of the characters (the fifth bit in the numerical notation of the character) in the chunk name differ for a reason - these are flags that tell the decoder some additional information.- The case of the first character determines whether this chunk is critical (upper case) or auxiliary (lower case). Critical chunks must be recognized by every decoder. If the decoder encounters a critical chunk whose type it cannot recognize, it must terminate with an error.
- The case of the second character sets the "public" (upper case) or "privacy" (lower case) of the chunk. "Public" chunks are official, documented, recognized by most decoders. But if suddenly you need to encode specific information for some of your needs, then just make the second character small in the chunk name.
- The register of the third character is reserved for future achievements. It is intended to be used to differentiate the different versions of the standard. For versions 1.0 and 1.1, the third character must be large. If it (suddenly!) Turns out to be small, all current decoders should act with a chunk, just like with any other unrecognized one (that is, exit with an error if the chunk is critical, or skip otherwise).
- The register of the fourth character means the ability to copy this chunk by editors who cannot recognize it. If the case is lower case, the chunk can be copied, regardless of the degree of modification of the file, otherwise (upper case) it is copied only if no critical chunks were affected during the modification.

Below is a list of chunk types with brief explanations.
Critical chunks
- IHDR- file header, contains basic information about the image. Must be the first chunk.
- PLTE- palette, list of colors.
- IDAT- contains, in fact, the image. The picture can be split into several IDAT chunks for streaming. Each file must have at least one IDAT chunk.
- IEND- the final chunk, must be the last one in the file.
Auxiliary chunks
- bKGD- this chunk sets the main background color.
- cHRM used to define the CIE 1931 color space.
- gAMA- defines the gamut.
- hIST- this chunk can store a histogram or the total content of each color in the image.
- iCCP- ICC color profile
- iTXt- contains text in UTF-8, possibly compressed, with an optional language tag. The iTXt chunk with the "XML: com.adobe.xmp" keyword can contain the Extensible Metadata Platform (XMP).
- pHYs- contains the estimated pixel size and / or aspect ratio of the image.
- sBIT(significant bits) - defines the color-accuracy of the image (black and white, full color, black and white with transparency, etc.), for easier decoding.
- sPLT- offers a palette to use if the full range of colors is not available.
- sRGB- indicates the use of the standard sRGB scheme.
- sTER- indicator of stereoscopic images.
- tEXt- can contain text in ISO / IEC 8859-1 format, with one name = value pair for each chunk.
- time- stores the date of the last change of the image.
- tRNS- contains information about transparency.
- zTXt- compressed text, with the same restrictions as tEXt.
CRC
Checksum CRC-32. By the way, the other day there was a topic about counting it in Windows.Minimal PNG
We figured out the general structure. Now let's look at the content of the required chunks. But which of them are mandatory (not critical, critical must be recognized by the decoder, and not present in every file), and what does the minimal PNG file look like? That's how:
IHDR
The data block in the IHDR contains the following fields:- Width, 4 bytes
- Height, 4 bytes
- Bit depth, determines the number of bits per sample (not pixel), 1 byte
- Color type, consists of 3 flags 1 (palette is used), 2 (color is used, not monochrome), and 4 (alpha channel is present), 1 byte
- Compression method. At the moment, only the value 0 is available - compression using the deflate algorithm. If the value is different from 0, the chunk is considered unrecognized, and the decoder will report an error. 1 byte
- Filtration method. Just like in the case of compression, at the moment it can only be zero. 1 byte
- Interlace method. Determines the order in which data is transmitted. At the moment there are 2 values available: 0 (no interlace) and 1 (Adam7 interlace). 1 byte

IEND
Signals about the end of the file, the data block of this chunk does not contain anything.IDAT
Contains data encoded according to the header compression method field. The decoding algorithm is beyond the scope of this article (however, if there are those who wish, it may appear in the next one), but it is described quite well (and in Russian).Thus, the simplest PNG file (for example) looks like this. 
Conclusion
When writing this article, I set myself the task of giving the reader a general knowledge of the structure of a PNG file; for a deeper understanding, it is recommended to read the specifications.A topic on Habré about the structure of JPEG: habrahabr.ru/blogs/algorithm/102521
A topic on Habré about the structure of GIF: habrahabr.ru/blogs/algorithm/127083
Thank you for your attention, I will be glad to any criticism!
06/05/16 27.2KSometimes you need to load an image containing transparent elements through which the original background will show through. In these cases, it would be convenient to load PNG images as they are capable of preserving transparency.
In this article we will tell you, how to make transparency in Photoshop.
File creation
The first step is to create a file. To do this, open Adobe Photoshop and in the File menu ( File) at the top of the page, select Create ( New).
Then, in the "New Document" window that appears ( New Document) create the file you want, and make sure your document is at 72 pixels per inch ( since the file is for web use). And also that you have selected the value "Transparent" ( Transparent) in the drop-down list "Background content" ( Background Contents).
* Before making a PNG with transparency in Photoshop, you need to clarify that in this example we are creating an image to upload as a background for the site, so the document size is set as follows: width 3000 pixels, height 1730 pixels, which are the recommended sizes for HD image uploads:
Once you have specified the parameter values, click OK to open a new document.
Then in the "Layers" panel ( Layers) make sure you are working on a transparent layer and not on the background:
Once you've finished creating and are ready to save the transparent image, depending on which version of Photoshop you are using, go to the File menu ( File) you can use one of the possible options:
Photoshop versions earlier than CC 2015:
Now we will tell how to make a picture transparent in Photoshop which came out earlier than CC 2015. These versions use the Save For Web ( Save for Web & Devices) to save and optimize PNG images for use on the web. To use this method, simply go to the File menu ( File), and then - "Save for Web" ( Save for Web & Devices):
Then, in the window that appears, select PNG-24 from the drop-down menu of possible values, and then make sure the "Transparency" ( Transparency) and " Convert to sRGB» ( Convert to sRGB). This confirms that the image will contain a transparent background and its color mode will be converted to sRGB, the recommended color space for the web.
The fields " Image size» ( Image Size) are automatically populated with the values you specified when you created the file. But if you want to resize the file before saving, you can do so now.
Photoshop CC 2015 version:
Before, how to make a photo transparent in Photoshop, you need to know that as of CC 2015, the "Save for Web" ( Save for Web & Devices) in the File menu ( File) is marked as Legacy. And replaced with a new option "Export" ( Export), which offers identical functionality with faster saving in a smaller file size and better quality. To use the Export option, click the File menu ( File), and then - " Export as» ( Export As).
Note: Adobe still offers a Save For Web ( Save for Web & Devices) in Photoshop CC 2015, and it's available through the File> Export ( File> Export) or using the keyboard shortcut Command + Option + Shift + S (for Mac) or Ctrl + Alt + Shift + S (for PC):
Then, in the window that appears, select PNG from the Format drop-down menu ( Format) and make sure Transparency ( Transparency) and " Convert to sRGB» ( Convert to sRGB).
The fields " Image size» ( Image Size) and Canvas Size ( Canvas Size) should automatically populate with the values you specified when you created the file. But if you wish, you can change these parameters before how to make a transparency effect in Photoshop.