We make a garden table with our own hands. Self-production of a wooden outdoor table for a summer residence: the simplest and most interesting options DIY outdoor table
The dacha is, of course, the place where you want to take a break from the bustle of the city, breathe in fresh air and just drink fragrant herbal tea on the veranda at a table made for a summer residence with your own hands. Such a table will not only add special charm to such a simple ceremony, but will also become a source of pride for you and your loved ones.
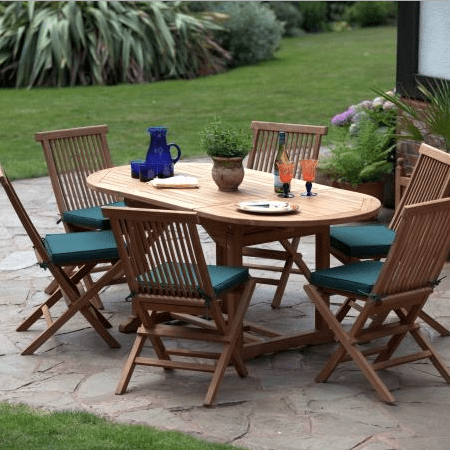
Option 1. Table with legs
When choosing materials for the table, first of all, you should pay attention to the quality of the wood - not all wood is suitable for use. Conifers such as spruce and pine are malleable and easy to work with, but without proper treatment, such material is more flammable, and the resin emitted can ruin the tablecloth.


Hardwoods (aspen, oak, ash) are more advantageous, products made from them are strong, durable and have an attractive appearance.
| Wood species | Brinell hardness) | Density (kg / m3) | Stability | Color change trends |
|---|---|---|---|---|
| Birch | 3,0 | 600 | average | the color gets deeper |
| Larch | 2,6 | 500 | good | takes on shades of gray |
| European oak | 3,7 | 700 | good | the color gets deeper |
| 4,0 | 700 | average | light to straw, yellowish brown | |
| Pear | 3,3 | 680 | average | blushes |
| Cherry | 3,0 | 580 | good | from light pink to deep reddish shade |

Materials and tools
For the interior arrangement of summer cottages and country houses, long narrow ones are more acceptable, allowing you to freely move around the room. This should be taken into account when preparing everything you need for work and designing the table itself.
For the table, it is preferable to use a board with a thickness of at least 30 mm. This thickness will ensure the strength of the table and the ability to withstand heavy loads. The optimal length ranges from 150-200 cm. You can purchase two ready-made wooden boards measuring 30-2000 mm.

Balusters or wooden legs for the legs. Curly balusters will give a homemade table a production chic and luxurious look. And for the manufacture of legs from a bar, you need to choose boards with a minimum section of 50x50 mm. A comfortable table height is ensured with a leg height of approximately 73-75 cm.

Other materials and tools.
- Boards 20 mm thick and 8-10 cm wide for the tabletop frame.
- Wood putty.
- Screwdriver and self-tapping screws for 30 and 50 mm.
- Various grit sandpaper and holder.
- Clamps for fixing legs and table top.
- Electric drill.
- Sander.
- Building level.
- Square.
- Roulette or centimeter.
- Marker.
- Glue.
Prices for various types of construction timber
Construction beam
Manufacturing steps

When preparing materials, all boards and beams are processed with a plane, grinder or coarse sandpaper to remove irregularities, remnants of cut knots, and clean up cracks. Boards must be flat and smooth, so they are sanded from all sides, including ends, edges and corners.
If it is supposed to be manufactured with a solid shield without gaps, then it is better to purchase tongue-and-groove materials - this will create a more durable adhesion of a single sheet and save time for adjusting the elements. Chamfers are cut from the edges of the legs for the legs.

Assembling the frame for the countertop
The frame enhances the strength and stability of the table, its dimensions completely depend on the parameters of the table top, but there are several general rules: both in length and in width, the frame should be 30-25 cm less than the table top.
Video - DIY garden table


The frame itself is assembled from 4 boards that form the outer frame, and 6 inner transverse slats. The boards are installed on the edge at a right angle using a square and tightened with self-tapping screws 50 mm. The joints are pre-coated with glue (PVA or woodwork). To prevent the boards from splitting, pilot holes can be drilled into them and only then the screws can be screwed in.


Along the length of the frame, markings are made for the transverse strips, and guides are drilled. It is very important that the cross members are strictly perpendicular to both sides of the frame frame. The ends of the transverse strips are coated with glue, and the entire structure is fixed with self-tapping screws. Make sure that the heads of the screws do not protrude, but are completely "sunk" in the wood.

 Table frame (manufacturing option)
 The boards of the table top are connected, leveled with a tape measure and laid on the floor face down, the frame is placed on top so that the cross bars lie tightly on the table top. Guides for self-tapping screws are drilled in the strips, and all elements are tightened with screws by 30 mm. There are 5-6 self-tapping screws for each transverse board.
Assembling the table legs


The table top is laid on a workbench or several stools for subsequent installation of the legs. The table leg is fixed in the corner of the frame with clamps, and guides for self-tapping screws are drilled in the frame.


Before attaching the legs, glue is applied to the end of the bar - this will protect the table from loosening and will contribute to greater strength. It is recommended to fix the leg on each side with four screws, but if you wish, you can additionally use metal corners. Round balusters are fixed with long self-tapping screws from the front side of the table, and square ones - with corner fasteners.
Prices for popular models of screwdrivers
Screwdrivers
Finishing
After mounting the legs, the table is turned over and placed on the floor. Depending on the design of the table, the corners are sawn off along the radius with a jigsaw or the butt is completely rounded off. Chamfers can be cut from the edges of the tabletop and everything can be carefully sanded.

If necessary, scratches and cracks resulting from work are repaired with wood. It is better not to touch the screw heads in order to be able to tighten the structure.

After the final grinding, all dust and shavings are removed from the table, and the product itself is covered with stain or several layers of varnish.


Tables with elements of decoupage decor or single painting look beautiful and unusual. But hiding the beauty of natural wood under a layer of paint is not worth it, modern varnishes and impregnations will do all the necessary work to protect the product from moisture.

Video - Table on legs for a summer residence
Option 2. Stump table
An unusual and non-standard way to equip a backyard space is to create interior items from natural materials. When ennobling the territory, old trees or trees that threaten buildings are often cut down. If at your dacha there is or was just such a tree, then definitely there will be no problems with finding a suitable stump. If the idea came spontaneously, then you can look for the desired stump in clearings, in the nearest forest, or ask the owners of neighboring plots.

Materials and tools
To make such a fantasy table from a stump, you need very little:
- wood for the countertop, the recommended thickness of the countertop is from 20 mm, when choosing boards you need to adhere to the rule "the larger the countertop, the larger the cut of the board";
- stump. For work, you will need a dried stump of any type of wood, the main thing is that the wood is whole, not damp or rotten. If the tree has been cut recently, then the stump must be properly dried. And it's best to do this by placing the stump in a warm, dry place or outdoors in sunny weather. It must be remembered that a few weeks is not enough time for high-quality drying. Typically, the entire process takes at least two months. You can determine the state of the wood by the ease of separation of the bark - if the bark leaves without effort, then you can start working;
- water-based varnish for wood, natural shade or transparent. It is this composition that will best emphasize the texture and dignity of natural wood;
- sandpaper of various grit and holder;
- planer or sander;
- chisel;
- building level;
- roulette;
- hammer and nails;
- screwdriver and self-tapping screws;
- abrasive fiber.
Manufacturing steps

Stage 1.
The dried workpiece of the future table must be cleaned of the bark. A chisel or chisel is useful for this step. It is necessary to remove the bark very carefully and carefully so as not to damage the wood and prevent the appearance of cracks and splits. Any soft and rotten areas should be removed as well.


Stage 2.
After the bark has been removed, the stump needs to be aligned with the horizontal plane. For this, a level surface is prepared using a level, and the base of the future table is installed on it.
If curvature is observed, then the flaws are eliminated using a planer. At the same stage of work, unnecessarily large rhizomes of the stump and all unnecessary parts are sawn off with a hacksaw, the sections from which are then sanded.

Stage 3.
A leveled stump is sanded with a disc sander, especially its horizontal parts. The sides of the stump are also sanded, and hard-to-reach places are processed with coarse-grained sandpaper. This is a rather laborious process that requires a significant investment in time.

Stage 4.
Cracks and grooves in the barrel must be cleaned of dirt and debris with a chisel, after which sandpaper folded in half (working layer outward) with sandpaper should be carefully processed from the inside. The remains of wood dust are cleaned with a brush or a construction vacuum cleaner.
Stage 5.


To prevent the stump from rotting and to ensure air circulation between the table and the floor, furniture legs can be attached to the base from below. The presence of the legs will make it more convenient to move the table.
You can choose any legs: metal, furniture wheels or special rubberized supports. It is best to fasten them with self-tapping screws to the base of the stump, the number is chosen arbitrarily, based on the size of the table.

Stage 6.
After installing the legs, proceed to the sheathing of the upper part of the stump. To do this, we fill two parallel strips perpendicularly on the sidewalls, and on top there are two more rows of holders - a total of 6 strips fastened together with nails. This will be the frame for the countertop.
Stage 7.

We fasten the prepared tabletop boards from below with transverse strips. The shape of the table top can be very diverse: round, rectangular, with rounded corners. The option of a table with a round or oval table top looks more advantageous.

To give such a shape, you can use a homemade device made of thread, pencil and nail: the end of the thread is tied around a pencil, and the tip of the nail is placed in the middle of the tabletop, outlining a circle with a selected radius, after which all unnecessary is sawn off, and the edges and surface of the tabletop are processed with a grinding machine.


Stage 8.
Holes and imperfections in the boards can be decorated with finely chopped shiny stones, filling them with varnish and processing them again after drying with a grinder to smooth the surface.
The finished worktop is fixed from below on the crate with nail holders or self-tapping screws.

The finished table is varnished in several layers. After applying the first layer, the product is thoroughly dried and processed with fine-grained sandpaper. This will prevent the varnish from peeling off, and subsequent layers will lay down more evenly.


After removing the dust, the second and subsequent layers of varnish are applied without grouting. If desired, after drying, the last layer can be treated with an abrasive fiber - this will remove excess shine and give the surface a matte finish.

Such a creative table will decorate any veranda, especially in a pleasant frame of green bushes or flower beds.


Prices for paints and varnishes
paints and varnishes
Video - Do-it-yourself table for a summer residence from a stump
Beech is quite often used by furniture manufacturers, as it is a hard breed that is quite plastic and durable. In terms of strength, beech is not inferior to oak. Compared to oak, beech is cheaper. The color of such wood can be from reddish-brown to pinkish-yellow.

- has high decorative qualities;
- dries quickly;
- easy to handle.
- afraid of moisture;
- poorly polished.
Oak is a hard species with high strength values. The natural color of oak stretches from yellowish white to yellowish brown with a slight shade of gray or green. Oak has a number of other advantages - it is very easy to use, easily glued, practically does not rot and has a beautiful appearance.

- despite the high viscosity of wood, it is processed quite well;
- bends easily;
- resistant to decay;
- lends itself well to methods of artificial aging.
- price;
Ash wood is harder than oak. The color of the wood is light and soft golden. Most often it is used in the manufacture of bent and carved furniture or as veneer.

- bends well after steaming;
- little cracking during drying;
- when discolored, it acquires an unusual shade of gray hair.
- in humid conditions, wood is quickly damaged by a wormhole;
- poorly polished.
Aspen is a deciduous tree. It belongs to the Poplar family. This is a very large tree, it grows up to 30 meters in height and may well reach a thickness of 1 meter. Since it grows very quickly, a lot of wood is obtained from it.

- very high moisture resistance;
- the ability to retain heat, but not give it away;
- bactericidal (you can put such furniture in the children's room without fear that it will harm).
- not very presentable appearance;
- the possibility of darkening, both partially and completely;
- it is worth fearing that the product may begin to rot from the inside.
Pine is a soft wood that is most often used in the manufacture of frames for upholstered or cabinet furniture. The main advantage of this type of wood is its high resistance to decay, humidity and temperature extremes. In addition, pine is one of the most common and affordable materials.

- ease of handling;
- easy to stick together;
- a pleasant medicinal smell that produces phytoncides.
- easily scratched and damaged.
What could be better than a summer vacation at your own dacha? Indeed, the popularity of this kind of vacation from year to year not only does not decrease, but also attracts more and more people with its availability. The dacha for many of the personal plot with beds and greenhouses has turned into a full-fledged resting place, a full-fledged culture of dacha rest is being formed in society. And, you see, what kind of rest is there without comfortable and comfortable furniture? The dacha has already ceased to be a place where all the junk is taken from the apartment, and the arrangement of the dacha requires full-fledged functional furniture, created specifically for the dacha.
Pros of making country furniture

The choice of furniture for a summer residence, of course, will not be difficult, given the variety of furniture that manufacturers offer. But besides the trivial purchase of the items of the country interior that you like, there is another way out - the independent production of country furniture.
This approach to the arrangement of a country house will not only save you money, but also bring a lot of positive emotions. If you like to do something "with your own hands", then making furniture yourself will help you realize your creative inclinations, enjoy working with wood, and the result of the work done will be a useful and necessary thing in the household. You can rightfully be proud of the result of the work done, because there is nothing better than seeing a thing created by you personally. If you have already fired up the idea of making your own country furniture and firmly decided to try yourself in this business, then, for sure, you are now tormented by many technical questions. But first things first. Let's try to conditionally divide all your questions into 2 large groups: "what to do?" and "how to do?"

The answer to the first question is actually the most important one. This is the area of strategic planning. You should not take on work that you cannot do, otherwise instead of the pleasure of work and an excellent result, you will get another headache. If you do not have special work skills and a special tool, you should not take on a very difficult job.
An indispensable attribute of a country house is a large wooden table with a set of chairs attached to it. A large comfortable table at which all family and friends could gather will never be superfluous - this, one might say, is the basis of a set of country furniture. It is his creation that can be dealt with in the first place.
Material selection

Now it is the turn to answer our second question. And first of all, you should decide on the choice of material for the future table. Naturally, a person comes to the dacha to take a break from the bustle of the city, to be in nature for a while, so in our table you will refuse all artificial materials that are used in modern furniture. Our table will be comfortable, beautiful and environmentally friendly, and the most environmentally friendly material is, of course, wood. It is from wood that it is best to make a table for a summer residence with your own hands, because in addition to environmental friendliness, wood is also very convenient for processing. After choosing the material, you should focus on creating the table design. To create a table, you can use ready-made design solutions or devote a few hours of time to creating your own original design project. Alternatively, you can use a simple table design shown in the diagram.

Materials and tools for work

After choosing a table model, you should calculate in detail the need for materials to create a table: the number of boards, timber, fasteners and paint. The required materials, of course, are best purchased with a small margin. Before starting work, you need to acquire all the necessary tools, preferably electrical. Your tool list should look something like this:
- Electric planer. For primary surface treatment of boards.
- Electric grinder. For "finishing" surface treatment of boards, sanding boards.
- Drill screwdriver. It is used for installing fasteners, drilling holes.
- Electric jigsaw. For making curved surfaces, cross-cutting boards.
- Paint roller and brushes, hammer, chisel set.

The assembly order will look something like the following. First of all, the boards of the table top are cut and prepared. They can be installed close to each other or leave a distance of 3-4 mm, which is somewhat easier. We fasten the processed boards to two bars with self-tapping screws or special furniture bolts, while the heads of the self-tapping screws must be sunk into the wood. For the manufacture of cross-shaped racks, we cut the ends of the boards at the desired angle, the joining of the boards is performed in half of the board. To select the joining grooves, we perform the limiting groove cuts, and we select the excess wood with a chisel or a milling cutter with a "barrel" cutter. The assembled supports are securely fixed to the table top, after which we measure the required length of the longitudinal stiffener. It is advisable to fix the finished and processed stiffener on furniture screws, which will allow it to be adjusted in the future, if necessary. It is advisable to cover the finished product with a natural water or oil-based stain.
How nice on a fine summer day to sit with family and friends in the garden, have some tea and just to talk about this and that, enjoying the voices of birds, the smell of herbs and clean air.
And so that the gatherings are as much as possible comfortable both for the owners and for guests, in the garden you need a reliable and comfortable table.
What are country tables and what you can use as material for their manufacturing, consider in this article.
In contact with
classmates
Types of garden tables
Options garden there are a lot of tables. It could be a small table for picnic and a large outdoor dining table, table- brazier(he is a fire table) and a gazebo table.

An excellent solution for a summer residence - table-bench. It can be either a stationary table combined with benches into a single structure, or transformer. In the latter case, an ordinary-looking bench with back if necessary, folds out into a table and one or two benches.
![]()
Another version of the transformer is a bench with a folding a table for two

What can you make a table for a summer residence

- Tree
Country tables are mainly made from solid array,, MDF or plywood. Very spectacularly worktops made of cuts wood.
Tree - aesthetic, strong, malleable material, but less durable than metal, glass and plastic. - Metal
Less popular, but no less beautiful are products made from metal. The disadvantage of the material is that options the decor of the countertop is much smaller than wood or plastic. - Glass
Tempered glass looks beautiful, enough durable. Yet glass products are not popular as outdoor furniture. In addition, with self-production, problems may arise with cutting material and subsequent fastening glass parts of the table. There are also much fewer glass table decor options. - Plastic
In order for the plastic table to hold shape, it is necessary to use a metal frame. - Scrap materials and unnecessary items
It is easy to build a table from a tree stump, old planks, pallets, logs and remaining unnecessary things. If there is a desire and perseverance, then the table can be woven even from newspaper tubules.

Bench table

Materials and tools
To create a country table with benches, you will need the following materials:
Needed also tools:
- pencil, ruler, marker;
- hacksaw or an electric saw;
- chisel;
- sander or medium grit;
- brushes for impregnation and varnish;
- manual milling cutter(can be used for additional finishing of edges).
Manufacturing steps

Step 2. Sand them by hand or grinding machine.
Step 3. All the top boards that hold benches(4 pcs. For each) and a table (4 pcs.), file at an angle of 45 degrees in the form of trapezoids. To do this, you need to draw rectangle, fold two boards crosswise (from corner to corner), and file them along bottom the long side of the rectangle. There is no need to file the upper parts!
Next you need turn over boards with uncut sides and do the same so that they take the shape trapezoid. There should be a total of 4 trapezoidal boards for table(2 pieces on one side and 2 pieces on the other) and 4 pieces for each benches(2 pcs for each side of the bench).
Step 4. We put 7 long boards in a row with gap 3-4 mm and fasten them with beams (2 pieces on both sides) using self-tapping screws(80 mm).
Step 5. We put in a row of three boards the same length as the table and hold them together with smaller ones beams. The gap between the boards is 5-10 mm. Self-tapping screws 80 mm.
Step 6. We drive two bench legs on each side between the fastening trapezoidal boards. We fasten self-tapping screws 100 mm.

Step 7. Between the legs fix the board perpendicular to the bench seat. And long boards fasten both benches between each other (2 boards on each side of the bench). It turns out rectangular dining area with benches on the sides.

Step 8. The legs of our table will be crossed. To do this, mark the sampling site, saw off with a hacksaw and knock out half of the board with a chisel so that the second leg fits perfectly into the first. We make both supports and fasten them with countertop(between trapezoidal boards).

Step 9. Supports of the finished table insert between long boards (inside the dining area).
Step 10. All joints strengthening furniture bolts and tighten.
Step 12. 8-12 hours after application the last the impregnation layer can be applied transparent varnish. We took a colorless protective coating in order to emphasize natural the beauty of the tree and focus on naturalness products.

It is possible after impregnation paint a table with ordinary waterproof paint or decorate in other ways (carving, mosaic, painting contrasting paint through a stencil, etc.). After decorating, it is necessary to apply 1-2 layers of transparent varnish.
Note! Instead of ordinary boards on the bench and tabletop, a more aesthetic option would be an edging made of boards, the edges of which are cut strictly at 45 degrees.
You can build the same table, but a little lengthen him, putting in the middle one more support and mounts on legs supports and benches. Make a table-bench with another option supports (A-shaped).
You can put or make it right away with canopy:

Stump table

The stump should be dried, without cracks, strong chips, rot and damp wood(especially the middle). Term drying freshly sawn or a freshly uprooted stump - not less 70 days.
When bark the stump will become easy move away from the inner surface, proceed to processing.
Note! The wood materials used to make the countertop must be at least 20 mm thick.
Another version of the table from the stump is a stable, medium-sized stump with roots, to which a table top made of various materials is attached. In this case bark it is not necessary to remove from the stump.

Materials and tools

- countertop;
- level, pencil, ruler or tape measure;
- impregnation and transparent varnish;
- sandpaper medium grain size;
- sander or manual plane;
- hacksaw(saw);
- chisel(chisel);
- screwdriver;
- hammer;
- screws, nails, screws.
Manufacturing steps
Step 1. Freeing the dried stump from bark using a chisel (chisel). If soft, spoiled, rotten or damp places are found in the stump, they should also be careful. delete.
Step 2. With the help of construction level trim the bottom and top of our hemp so that the table top is positioned clearly horizontally... Irregularities are removed with plane, hacksaws or saws. All new slices we grind sandpaper and a sander. Necessary thoroughly work through all parts of the stump, all folds and bulges.
Note! In hard-to-reach places, it is recommended to walk first with medium-grain sandpaper, and then with fine-grained paper.
Step 3. We make a tabletop. The simplest option would be to cut it is made of laminated chipboard or MDF. Simple rectangular or a square shape and a matching shade of varnish for hemp processing will make the table more attractive. You can also make a tabletop from edged boards fastened together. The most common form of such countertops is round.

Very cute option may be small slice thick tree trunk, glass countertop or countertop of some kind bizarre forms.

Step 4. The worktop can be attach thick long nails or using additional fasteners on its inner side. For this, boards are nailed (sideways) or bars on both sides, boards are attached slightly on the other two sides longer.
Step 5. On the inside of the tabletop, two small boards are stuffed opposite each other so that they fall between mountings on a hemp.
Step 6. The table is processed with a special impregnation 3-5 layers (each layer dries well). After complete drying, it processed transparent or translucent varnish.

Self-production garden tables significantly saves money and time on finding the right table for you.
Do you want to offer photos on a topic for publication?
Please help us make the site better! Leave a message and your contacts in the comments - we will contact you and together we will make the publication better!
A garden table is an integral part of any country interior. On the modern market, this product is presented in a wide range - these are products made of metal, plastic, natural stone and, of course, the classic version, tables for a garden made of wood. In this article, we will talk about the positive qualities of common options and give accessible instructions on how to assemble a table with your own hands.
The tree is always relevant
Most garden furniture has always been made of wood. Almost everyone can make a table for the garden with their own hands, at least superficially owning a hacksaw and a plane. The whole process comes down to connecting a small number of curved planks and giving the furniture a presentation.
A few words about the choice of material
If you want your product to serve you faithfully for many years, then it is better to make a table for a garden from strong hardwood. Of course, the best option is oak, but the price here, even at cost, will be considerable. Therefore, as a rule, more affordable wood of larch, aspen, birch, linden or acacia is used.

Tip: conifers can be used for manufacturing, but they should be well prepared and covered with protective compounds beforehand. Otherwise, the excess resin can negatively affect the quality of the coating and your clothing.
For the countertop, the quality and type of wood is especially important, therefore experts recommend not to save money and buy a good grooved board, the increase in costs will be minimal, but the appearance will please you pleasantly. It is advisable to collect a wooden garden table from a well-dried forest, so that later the details do not lead.
In addition, the table top and some individual parts can be made of thick waterproof plywood or YUSB board. Chipboard is less suitable, since this material is afraid of high humidity and will not last long in the garden.

Self assembly
Assembly instructions can be very diverse, everyone chooses what he likes best.
Several interesting and accessible technologies are presented in the photo and video in this article, but we will tell you about the simplest, in our opinion, installation option.
- As mentioned earlier, it is better to assemble the tabletop from a grooved board, so it will be completely monolithic... In this case, the joints should be glued with ordinary furniture glue for wood. In this case, we will talk about a solid product designed for a family of 6 - 8 people.
- Comfortable construction height for a standard dining table is 700 - 750 mm... We will make the dimensions of the top plate 930x1450 mm. For a table top, a board thickness of 20 mm is sufficient, but a table top with a thickness of 40 mm will look more solid and solid.
- The boards are joined on a flat, horizontal surface and knocked down with nails or self-tapping screws, two or three perpendicularly spaced bars of 50x50 mm... The bars are fixed at a distance of 300 mm from the edge.

Advice: since the wood is quite dense and thick, it is better to lubricate the self-tapping screws with soap before screwing in. Then they will enter the array much easier.
- Next, we move on to arranging the legs. Boards with a section of 50x150 mm and a length of 650 mm will be used as legs. They will dock at the ends, therefore, in order to reduce the length of the fixing bolts or self-tapping screws, 1 sample is made in the middle on each leg with a depth of about 70 mm and a length of about 150-200 mm.
- The legs are joined by their ends, and the selected grooves should be on the same level from the outside. A stiffener is inserted between two pairs of legs, the function of which is performed by a board 50x150 mm, about 1 m long.
- From above, the legs are attached to the strips that fix the tabletop boards... In the lower part, to increase the support area, two boards are knocked to the legs, all of the same section 50x150 mm. Long, slightly less than the width of the table top.

Important: the entire structure, with the exception of the tabletop, can be made collapsible; for this, furniture bolts with a diameter of 6 mm are used. Or collect everything on long self-tapping screws, but then the table will not be disassembled.
Do not forget that wooden garden tables will be used outdoors, so all wood must be covered with protective compounds. Often one coat of stain is used to bring out the beauty of the texture and two coats of waterproof varnish.

Important: all wood, even before assembly, needs to be scraped and cleaned with a grinder or using sandpaper. Bevels should be removed from sharp corners, so as not to drive a splinter later.
Alternative constructions
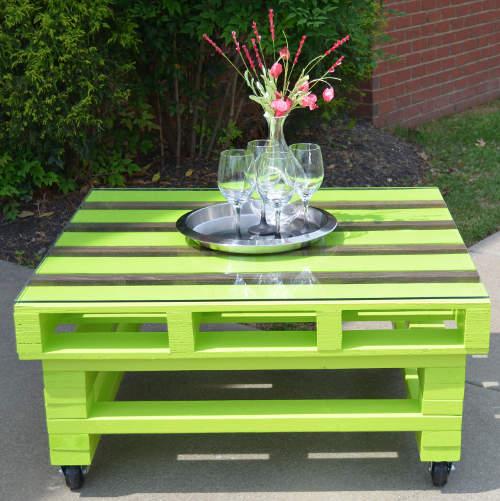
A light coffee table is quite possible to assemble from wooden pallets. For this you need 2 pallets. The top row of boards should be ripped off, complemented by the missing ones and knocked back butt, more tightly.
Thus, you get a monolithic tabletop. To increase the height, 4 bars from the same pallets are inserted between the pallets. It is advisable to install furniture castors from below.


Plastic garden tables are used everywhere, their price is quite affordable. They are durable, have a neat appearance and can usually be disassembled quickly. But plastic rarely fits into the natural interior of a country cottage. Artificial materials, for the most part, have already become boring in the city, in addition, such products cannot boast of durability.

Garden wrought-iron tables are quite another matter; they are often true masterpieces of furniture art. Of course, only a narrow circle of real specialists can make such beauty with their own hands, therefore, the price of such products, frankly speaking, bites.
It is quite problematic to make tables for a garden made of stone with your own hands. Alternatively, you can fold the brick cabinets and install a countertop purchased in advance on top. A large piece of slate can also be used as a tabletop, but such an installation will require remarkable physical effort.

Table making option.
Conclusion

It is often not so important that you have a wooden, stone or metal garden table installed. Any design can be successfully entered into the landscape design of the summer cottage, the main thing is to do it with love, because you are doing for yourself.


For those who live in big cities, a summer cottage is a kind of paradise. Fragrant herbs, clean air, the smell of a fire and always a wonderful home, which is comfortable and homely. A special coziness to a country house and an outdoor area is given by furniture made with your own hands according to your taste, which can revive the space. In this article, we will tell you how to make a table for a summer residence with your own hands.
Agree, it's still easier than making a sofa or wardrobe. To implement your plans, you do not need to specially study or invite specialists. To work, you need inspiration, and prepare the necessary materials.
Preliminary stage
The appearance of the finished product is important. When making a table for the dacha with your own hands, do not neglect it.
It will be nice to observe the admiration and surprise of the guests to whom you declare that you made it yourself.

- Its main base is a wooden tabletop. As a rule, ready-made boards or wide boards are used for this.
- An important factor is also the selected type of wood, from which you decide to make the table:
| Conifers |
|
| Deciduous |
|
- In addition to the table top, the table should have legs. You can make them from a wooden panel or buy ready-made ones.
Tip: if you did not find them in the store, look at the counters that sell auxiliary materials for making stairs - 4 pieces of metal or wood balusters can be quite useful to you.
Factory blanks will add some gloss and chic to your table.

Training
First you need to determine where you will install the furniture, whether you plan to take it out of the house. For example, a narrow and long table that will provide freedom of movement of people around the room would be a good solution for a country house.

Materials and tools
- Grooved boards. They will create a tight connection and will protect the table from liquid entering the crevices. You can also use a pair of ready-made wood boards, 2000x300 mm in size.
Tip: To ensure the stability of the table against loads, select the thickness of the boards approximately 30 mm.
When choosing a material, make sure that the boards or boards are even, they must absolutely fit each other exactly, this will save time for individual measurements and trimming.
- Rails for fasteners - 3 pieces. They are needed for the stability of the structure. The most suitable size is 2000x100 mm with a thickness of 28 mm.
- Table legs (ready-made) or balusters, their price depends on the quality of the material.
- Hacksaw.
- Self-tapping screws.
- Electric drill. Please note that this tool must be in stock. You will definitely need it, so if you do not have your own, then rent it or ask for temporary use.
Advice: if there are interruptions with electricity in your area, renting a diesel generator for a summer cottage will help solve the problem.
- Polyurethane varnish. You can choose from both glossy and matte. The second one shows the structure of the tree well. Instead, you can use natural oils to protect the wood from external factors.

In the photo - a suburban diesel generator
- Good quality brushes.
- Grinding machine. Its absence will significantly complicate the work.
- Sandpaper with fine and coarse fractions. This will make it possible to provide the table with the desired smoothness.
Process
Below is a step-by-step instruction:
- Connect the boards or boards and lay them upside down... At this stage, it is necessary to monitor the docking so that the country table is level.
- Secure shields or planks... Place the slats along the long sides. This will allow them to be reinforced and fixed along short boards. To ensure the stability of the table, additionally fix the boards (or shields) with rails in the center in one or two places.
- Be careful when locking the rails.... Screw the self-tapping screws slowly, without changing the degree of pressure, angle and intensity. Otherwise, the shield or rail will split, affecting the quality of the product.
- Fix the table legs at a distance of 50-70mm from the edge... Using an additional rail, strengthen the attachment point so that the support does not deform after a while. This will enable the table to look perfect for a long time. Fix the legs also slowly.
- Turn the table over and remove debris and sawdust, sand all the roughness with sandpaper and a sander... Dry the table thoroughly with a dry cloth.
Decorating
Build a country table yourself is not all.
Now you need to start finishing, and, if you like, decorating.
- Cover the entire surface of the table with polyurethane varnish. (See also the article.)
- Then you need to let it dry for a day.
- Carefully examine the surface of the table, sand it again with sandpaper and varnish it a second time.
- If you wish, then you can paint the table, for example, with acrylic paint.
- As soon as the surface is completely dry, the product can be used for its intended purpose.
Conclusion
In this article, it was described in detail about one of the methods for making a country table out of wood on your own. Although at first glance the work seems difficult, in fact, the process is quite exciting, which will make it possible to make good solid furniture for little money. The video in this article will help you find additional information on this topic.

OLYMPUS DIGITAL CAMERA