DIY wire puppets. Flexible doll. Materials for making a frame doll
How to make a doll with your own hands? How to avoid embarrassing mistakes? What to make the head, arms, legs, torso from? These and countless other questions may come to the mind of a person who is just about to make a doll. It often happens that the simplicity of technology is confusing. In my master class, I would like to offer a fairly detailed sequence of actions that is convenient when creating a frame doll. Here are well-known truths, and some know-how. It is possible that while working on your doll, you will find other, simpler and more convenient techniques and methods. All in your hands! Create!
First of all, you need an idea. It will not necessarily be fully realized, but it is necessary to make a few sketches. Sometimes just to remember the details.

From a wire (steel is better: copper and aluminum are quite fragile), it is necessary to twist the doll's frame, its "skeleton" with the following additions: +8 cm to the length of the neck, +5 cm to the length of the arms to the hands. Mark on it the location of the elbows, knees. From plasticine, fashion a simple shape for the head.

Using the papier-mâché technique, make a blank for the head. It should have at least 5 layers, each of which must be dried.

Using the same technique, make those parts of the doll's body that you want to see as solid (in this doll, these are the legs to the knees).

You can also make papier-mâché pens. But for this doll I make other handles.

Prepare fine sanding paper (“skin”), Prepare the legs and head blanks: carefully cut off the excess layers of paper from the legs with a breadboard knife, cut the head blank in half, remove the plasticine, glue the halves of the “skull” and dry.

Firmly pressing the pieces of sanding paper to the surface, sand the details.

Details should be smooth and pleasant to the touch.

Prepare stacks and other sculpting tools. In addition, we need toilet paper and paste.

From toilet paper and paste, knead the mass for modeling to the consistency of a stiff dough. From this mass we form small facial features.

We paste over the resulting relief with thin strips of newspaper, dry it, grind it.

With the help of any fillers (cotton wool, synthetic winterizer, batting) we form the volumes of the body.

We wrap the wire frame with filler, fixing it with turns of thread.

From thick copper wire (0.7 - 1.5 mm, depending on the scale of the doll), we cut pieces for the fingers and palms with a small margin.

We sheathe the wire segments with a thin cloth and collect the segments in the palm of your hand.

With the help of the allowance laid at the beginning in the length of the arms, we fasten the bundle of wires assembled in the palm to the arm.

We prepare the material for lining the filler and smoothing the relief (coarse calico, knitwear, in this doll - felt).

We sew parts of the doll's body with pieces of felt.

We prime the legs and head with acrylic paints, prepare them for painting.

With a thin fabric for the "skin" we sheathe the areas that will be visible. These are thighs.

As well as the neck, shoulders and palms.

We select fabrics and accessories for a doll dress.

If the dress is planned to be non-removable, then its elements are sewn in layers, overlapping each other.

The sleeves are also made.

And the bodice of the dress.

From pieces of fur, taffeta and cord we make a boa and a muff.

Finally, you can paint the face. This could have been done earlier, but more often I finish the outfit so that I can already make a beautiful make-up according to the general color scheme. For painting I use tempera and acrylic paints.

You can paint with anything, but it is better to add an acrylic base or a drop of matte acrylic varnish to make the paints waterproof. In addition to the head, we also paint the legs.

Paint the face with thin brushes to make the work more accurate.

We dry the painted parts and cover with acrylic matte varnish. This will keep the painting from damage and give additional moisture resistance.

Then on shiny surfaces (eyes, lips) we apply transparent nail polish or glossy acrylic varnish. But for some reason, nail polish shines brighter.

We dress the doll with haberdashery - stockings, tights.

We will make hair from segments of a satin ribbon.

We dissolve each segment, equal in length to the intended length of the hair (for a short haircut, be sure to give an allowance of 1 - 2 cm) without reaching 5 mm to the edge. It is for this unraveled area that you need to glue the hair, row by row.

The result is a beautiful hairstyle in the style of "early morning".

Human eyelashes are also suitable for doll eyelashes if you want to achieve a theatrical effect. For a more natural look, you need to purchase special doll cilia. They are sold in the form of ribbons and one such ribbon is enough for several dolls.

In the case of human false eyelashes, take one and cut it in half. Glue these eyelashes on the upper eyelid of the doll.

The doll is almost ready, only the shoes remain.

Velvet cardboard, leather, taffeta, polyurethane heels and lace

You can make these simple sandals.

And you can go for a walk!

For a more detailed master class on making a frame doll, see
We take 70 cm of wire (Leroy Merlin, department of fastening materials), semi-woolen threads (better than skin tones) for winding the wire, threads for wrapping the body, thread for hair, a ball for the head with a hole (you can use a cork), glue moment, better Crystal transparent and let's get started. 
We bend the ends of the wire half a centimeter, tie a thread and begin to wind the wire, coil to coil. 
It is better to bend the already wrapped part so that it does not get confused with the thread. 
We wrap the entire wire, leaving small loops at the ends. 
We pass one end through the hole in the ball. 
We align the ends and the position of the head. 
We assemble the body structure. Hands should converge above the head. 
We choose the proportions to our taste, I made the body shorter and the legs longer.
We begin to wrap according to the scheme from the body to the arms and legs and back.
Such a ball should be enough for volume. The twine for such a doll is rough and thick, but you can work with it, just wrap it once. In what sequence - it does not matter, it is important to finish on the head. 
We leave one end on the body without fastening and begin to wrap the body, leg to foot and back. Let's move on to the second leg. 
Similarly, we wrap the hands, and the body to the desired volume and go to the head. 
We coat the head with glue and wrap the coil to the coil, follow the front side. 
We do not fix the thread on the head, we just cut it off, it will later be fixed with glue with hair. 
We select hair (threads of any texture to your taste).
We make the winding of the desired length, sew the parting (or bandage it).
Apply glue to the scalp and glue the hair. 
Is everyone ready? 
Then to the sea! 
Dolls are different: collectible, children's for playing, souvenir, created by one's own hands. The latter, in turn, are also divided into many groups. These are textile Tildas, articulated beauties made of polymer clay, which are difficult to manufacture, frame dolls with a rag body and limbs made of paperclay. The latter - paperclay dolls - combine the simplicity of a textile doll and the elegance of a hinged one.
Drawing a sketch of a future doll
 Any do-it-yourself doll master class recommends starting the creative process with making a sketch. And no wonder! After all, if you leave the idea in your head, be too lazy to transfer it to paper, then you can inevitably face the problem of either a mismatch in the size of the body and head, or asymmetry.
And in general, most likely, it will turn out not what was expected at the beginning of the work.
Therefore, drawing the future creation on paper is one of the most important parts of the work..
So, if you don’t have special drawing skills and don’t really want to deal with the anatomy and proportions of a person (or any other creature - after all, a doll can be at least a cat, at least a half-man-half-horse), you need to find a suitable drawing on the Internet and print it in the required sizes.
It is not necessary to cut out the details, they will only serve as a base to which it is necessary to attach parts of the body of the future doll. As you can see in the figure, the proportions of a person differ depending on his age. Therefore, when creating a doll, it is necessary to think in advance whether it will be an adult, a teenager, or even a baby.
Making a Wire Skeleton
 Next, you need to make a wire frame for the doll in such a way that it performs its main function - the function of the musculoskeletal system, and in no case spoils the appearance of the product.
For the manufacture of the frame will need a thick wire. It is necessary to cut off the required amount of wire (attach to the sketch), twist the skeleton out of it.
If a toy with plastic limbs is planned, then the length of the skeletal arms and legs should be half as long (to the elbows and knees).
Further, the volume (muscle mass) is increased on the wire skeleton. To do this, you can use thick jute threads, it's easier, but then the craft will be tough. Or you can use a synthetic winterizer, which is a little more difficult, because you have to tinker with it, but then it will be nice to crumple the doll in your hands. In any case, it all depends on the idea and imagination of the creator. You can also use foil or toilet paper.
 The muscle volume is wound so that the body of the doll looks like a real one. To do this, it is important not to forget about the waist, hips, chest and, of course, about the sketch, to which you periodically need to apply crafts.
When the figure of the product has received the proper form, you can proceed to covering it with knitwear. It is better to take a flesh-colored fabric so that it resembles real human skin. The doll must be put on the fabric, traced around the silhouette, cut out and sewn right on the figure.
In order for it to turn out to be the most accurate, you can use a hidden seam. But in any case, the parts with seams are likely to be hidden by clothing, so you can not overdo it much. If there is a lot of fabric, the excess can be cut off. The main thing is not to forget to stretch the material on the frame so that the skin does not turn out sagging or wrinkled.
If the idea and skills allow, the skin of the doll can be crocheted from flesh-colored threads.
Shaping the doll's head
 Since the head is the most visible part of the doll, it is very important to approach the process, as they say, with the mind. The first step is to choose what material, in fact, the head will be made of.. And the choice here is rather big.
It can be textiles with synthetic padding (preferably the same color as the body), while the face can be painted with acrylic paints or embroidered with threads. It can be polymer plastic (self-hardening or baked in the oven), mixed papier-mâché and plastic media. In this case, you need to take one that does not need to be baked, otherwise the paper layer may catch fire.
Art stores sell a great variety of different baked and self-responding plastics of various brands, volumes and price ranges. It is better for novice craftswomen to opt for a wonderful material - paperclay. First of all, because you can do it yourself. After all, starting from scratch, you can make a lot of mistakes, and the materials are expensive, and it’s generally difficult for those living in small towns to get them. And so - and cheaper, and it will not be a pity to spoil something. According to its properties, papekley is similar to self-hardening clay, it can be painted with acrylic paints, sanded with fine sandpaper.
So, in order to make paperclay at home, you will need:

First of all, you need to take 20 grams of toilet paper of the desired color (the color of the future product depends on it) - this is about a third of the roll, put it in a bowl and pour hot water. Next, squeeze out the water, and tear the paper into small pieces.
Then pour in 75 grams of PVA glue, stir until smooth, carefully removing lumps and pieces of paper not soaked in glue. After 125 grams of putty, pour into a container and mix with paper and glue. Then add 50 grams of flour, gradually mixing. The mass is loose, so you need to dilute it with oil - 20 grams will be enough.
 The last component is starch (50 grams). Gently fold it into the mixture. If it starts to crumble, add a little water. Store the resulting paperglue in a hermetically sealed container.
This can be cling film, a plastic bag, or a lunch box with a tight-fitting lid.
When the self-hardening clay is ready, you can begin the process of sculpting the head.. For work you will need:
- paperclay or other self-hardening clay;
- foil;
- knife or stack;
- skin;
- acrylic paints, brushes.
From the foil you need to make the shape of the future head, it should be slightly smaller than the sketch. Next, roll out a thin layer of paperglue and cover it with foil, carefully crushing it with your fingers. In order not to be mistaken with symmetry, you can mentally draw lines along and across on the future head, or dry it a little and draw lines with a real pencil.
In order to work more conveniently, you can put your head on a pencil or chopstick.
 In places of future eyes, you need to make symmetrical indentations with your fingers. Roll a ball from a separate piece of clay and stick it in place of the nose, smear it with wet fingers, form a nose. Blind lips from a small cylinder of clay, carefully smear using water. It is most convenient to stick the upper lip first, then the lower one, separate them with a knife or a stack. Do the same for the chin.
With the help of additional pieces of clay, make the jaw, enlarge the cheeks, brow ridges and forehead. For the eyes, make small cakes, place them in the extruded holes, cut out arcs using a stack. Separately attach the upper eyelid. All parts are well smeared with wet fingers. Now you can dry your head.
When the head is dry enough (about a day), it needs to be sanded, and then it can be tinted with paints or cosmetics, painted with acrylic paints.
To make the doll a chic hairstyle, you need to make a hole on the top of the head. For hair, you can buy ready-made wefts or make them yourself from mohair or wool.. Wefts are folded into a tube and glued into the hole. This is how the crown of the hairstyle turns out. The rest of the hair is neatly glued around the perimeter of the head.
Assembly of the finished product
Connect the body of the doll made during the second step to the head with glue. While the joint dries, you can fix it with a plaster. Now the beauty can be dressed. The doll will look like a living thing if you give it a human pose.
Attention, only TODAY!
A skeleton doll is a doll with a soft fabric body on a flexible wire frame with a molded head, arms and legs. It's not that hard to make it. In this master class, I will show and explain in detail how and from what to make a good wire frame, what fabric is best to cover it, what can be used as a filler, how to correctly and securely attach the molded head, arms, legs.
Materials for making a frame doll
To create your own flexible wire frame doll, you will need the following materials:
- wire for the frame (preferably copper, but you can take any other);
- synthetic winterizer for giving volume to the body;
- knitted fabric for covering the body of the doll;
- threads, needles and pins - as we will have to sew;
- already molded, dried and painted head, arms and legs of the doll;
- tools: wire cutters, pliers, round nose pliers.
The basis of the frame doll is a flexible wire frame. For its manufacture, it is better to take a strong wire. I took a copper wire with a thickness of 4 mm in a braid. If it is not possible to get copper wire, then aluminum will do, and even steel. The thickness of the wire used depends on the size of the doll being created. The larger the doll, the thicker and stronger the frame should be for her. My doll will be 35cm high so I use 4mm diameter wire. This will be enough for her. In some places, for additional strength of the frame, the wire is used in two (or more) additions and intertwined. When working with wire, it is better to use wire cutters, pliers and round nose pliers. Save your fingers! The winding of the frame must be tight and strong, the frame must be stable. The wire should not "spread". The better the frame is twisted, the stronger the doll will turn out. My dolls on wire frames can even stand on their own.
I wrap the doll's body with a well-stretched jersey. Advice for beginner puppeteers: it is better to take a knitted fabric that, when pulled, does not let the "shooter" from the cut edge. It is much more convenient to work with such a fabric, you do not have to patch numerous "arrows". How to check it? Pull harder on the cut edge in different directions. If the edge went with arrows, such a fabric will not work.
So, let's start creating a doll.
I broke the whole process of working on the doll into several stages:
The process of creating a frame doll
Creating a drawing and wire frame of a doll
| First, we draw a diagram-drawing. This is necessary in order to make the frame exactly under the intended figure. Indeed, in the case of a skeleton doll, a wire frame performs the same role as a human spine. At the same time, we determine the proportions of the future doll. Will it look like a person, or will it be some kind of creature unknown to science with its own characteristics. | |
 |
Then, according to the resulting scheme, we lay out a piece of wire as shown in the photo and cut it off. This is our sample. We straighten the resulting sample and cut off three more of the same piece of wire. We should get 4 equal pieces of wire. Now we begin to fold and twist the frame. |
 |
We take two pieces of previously cut wire, and begin to twist them together. Twist the wire tightly and tight enough. It is desirable to make the frame stronger, it depends on how long it will please you in the future. |
 |
Photos of the stages of creating a puppet wire frame. |
 |
This will be the doll's body. |
 |
|
 |
We outline the arms and legs. It is better to braid the intended hips with wire two or three times so that they are stronger and thicker. |
 |
It is also better to wrap the torso with wire several times. It will be stronger. |
 |
The same applies to the arms from the shoulder to the elbow. |
 |
An additional braid will strengthen the junction of the arms with the torso. |
 |
We form the basis of the "chest". So it will be easier for us to model the figure of the doll later. |
 |
The wire frame for our doll is ready. Now we need to give it the necessary volume and thickness. This is done with the help of a synthetic winterizer. |
Formation of a puppet "figure" on a wire frame
 |
Before you start to form a puppet figure, you need to cut the existing synthetic winterizer with long strips of ribbons. The width of the stripes depends on the size of the doll. The larger the doll, the wider the stripes can be. For my doll 35 cm high, I made stripes 2-3 cm wide. Before cutting ribbons from synthetic winterizer, you need to check in which direction it stretches better and breaks faster. Ribbons should be cut across this weak side. So they will turn out stronger and it will be possible to wind more tightly. Wrapping the wire frame, we hold the padding tape with tension. The puppet "body" should be dense. How thick should the winding be? It depends on what figure your doll should have. A slender woman will need less synthetic winterizer, a plump fat woman, respectively, more. At the beginning of the winding, we fix the tip of the synthetic winterizer with a booth, which can then be pulled out. It is best to start wrapping the puppet frame from the limbs, from the arms or legs. On the "body" we fix the remaining "tails". We wrap the body itself with the latest. |
 |
When wrapping the arms and legs of the frame, do not forget to leave wire "tails". We will attach stucco details to them! |
 |
Wrapping the frame with padding polyester, we form the figure of the future doll. It can be made curvy or thin. If you are making a humanoid doll, then when forming her figure, you can peep into the anatomical atlas (or on photos of models in bathing suits). If this is an "animal unknown to science", then it all depends on your imagination. |
 |
I got this body. Or rather, almost succeeded. Because now it needs to be sheathed with knitwear. |
The final stage of the formation of the body of the doll on the frame - sheathing with knitwear
 |
What knitwear is better to take for a doll? The color depends on your idea. And I already mentioned the ability to "shoot arrows". My doll is a person, but her body will not be visible under clothes, so I didn’t find fault with the color of the fabric and just took what came to hand. I got a light jersey. Before you start cutting out a flap for covering the doll body from knitwear, you need to check in which direction the fabric stretches better. Regarding the wire frame, the fabric should stretch well from top to bottom, and poorly stretch in breadth. This is necessary in order to make the puppet body as tight as possible. We put the "body" on the knitwear, with a wire "neck" we very carefully pierce a hole in the fabric, but not tearing, but pushing the fibers apart. If the fibers are allowed to break, you can get "arrows" in abundance, which will then be very problematic to sew up. |
 |
We measure the required size piece, cut off all unnecessary. Vertically, the cut should reach the middle of the doll's hips. |
 |
Since the knitwear stretches perfectly “from top to bottom” along the “growth” of the carcass, we will diligently pull it when sheathing the doll body and we will reach it just to the end of the legs. The length of the fabric for covering the doll body also depends on which part of the legs you are going to sculpt. Only the feet, or almost to the knee. |
 |
Before you start sewing, we stretch the fabric and cut the figure with pins along the silhouette, indenting from the edge. We cut off the excess and sew it with a seam "over the edge", gradually getting rid of the pins. |
 |
We make the seam neat, as small and dense as possible. And now we have a puppet body. |
How to attach the arms, legs and head of a skeleton doll?
 |
Now let's talk about the stucco parts. I decided to sculpt doll legs almost to the knee, and arms to the elbow. Here is a photo of the legs. Take a closer look: in the center of each part there is a hole for the wire. |
 |
And along the edge of each stucco detail that will be in contact with the "calf", a rather deep hollow is made. We will attach the tissue of the body along this hollow. The deeper the hollow, the better it will be possible to sheathe the joint with a cloth and hide the "fastening". |
 |
Most often, for frame dolls, masters make a head immediately on the neck, rigidly fastening them. Sometimes shoulders are "added" to the neck, if, for example, it will be a lady in an evening dress with a decollete. In this case, the head is fixed on the frame in the same way as the arms and legs. I decided to complicate my task a little and mold a part of the torso so that I could dress the doll in a shirt that swings open on the chest. I made the chest with the neck in the form of a voluminous overlay on the frame, to which I tried to give some anatomical human features. In order for the doll to turn its head, I blinded the head separately from the neck, and I arranged the fastening of the head to the body like fastenings for articulated dolls. I made a neat hole in the neck, through which I connected the head with the torso with a strong rubber band. |
 |
The head of my doll is hollow, the eyes can be inserted from the inside and periodically changed (by analogy with the BJD). The cranium is made with a lid. The head is connected to the chest and wire frame with an elastic band. Under the chest, the elastic band firmly covers the frame and is attached to it, and in the head it is fixed with a metal hook. |
 |
We insert the wire tails of the frame into the finished parts of the arms and legs, into the same holes in the center of each part. You can add glue inside these holes for greater strength in order to glue the frame wire with stucco details. We stretch the fabric from above and sew along the edge several times with strong threads, we melt the fabric into the hollows made. Thus, we will more firmly attach the stucco parts to the frame and close the joints, arrange them neatly. My doll has molded parts made of LaDoll plastic. When fixing the wire in the stucco part, I added a little raw LaDoll, diluted with PVA glue, into the holes of the handles and legs of the doll. The mixture is very strong and has good adhesive properties. If your doll's handles and legs are made of baked plastic, then a few drops of Moment glue (acetyl acrylate in small tubes) can be added to the holes for the wire. This will allow you to glue the frame with the stucco parts almost tightly. You can read about baked plastics and how to work with them on my website. |
 |
We dress our doll in suitable clothes. Our frame doll is ready! The arms and legs are bent, the head is spinning. However, it is not recommended to play too actively with such skeleton dolls and partly change their poses. The wire may not withstand, and it will be difficult to fix it. |
I hope this master class will be useful to you and help you create your own skeleton doll. Believe me, it's very interesting!
Thank you for your attention and good luck in your work!
Creative people do not stop at the development of already known types of needlework - they constantly have new creative ideas. Many needlewomen already know how to sew a tilde doll with their own hands, and from the moment products made from thin nylon became cheap and affordable for everyone, ideas appeared on how to create a doll from nylon tights.
Pantyhose dolls: main varieties
Since master classes describing how to make a doll from nylon tights have appeared relatively recently, there is no clear classification of toys for this type of creativity.
Nevertheless, soft dolls made of nylon and synthetic winterizer can conditionally be divided into several types - depending on the appearance and manufacturing methods.
Tumbler dolls
In creating a doll, not only nylon tights are used - stockings and socks are also great for this. At the end of the working process, the master receives small soft toys of a round or oval shape with conventionally marked limbs.
Simple master classes on creating this type of dolls are great for teaching beginner needleworkers.
Do-it-yourself butts
Another easy way to create a doll from nylon tights. From the name you can understand the peculiarity of the doll - in the workflow, the face and buttocks are especially distinguished. Masters jokingly call this toy a fortune teller - which side it will turn to you in the morning, such a day awaits you.

The doll needs to be made in parts: first make all parts of the body (head, hands, feet, ass), and then sew them to the clothes.
Skeleton doll
Frame toys take longer to make than previous types, they become taller and take on an appearance close to human.

The main material for the frame is a rigid wire wrapped with filler, but plastic bottles can also be used.
Nylon dolls - a master class for beginners
If for the first time you decide to make a nylon soft toy, take note of the method of creating a product from stockings. Such a master class will not take you much time - after practicing several times, you will learn how to make a cute tumbler doll in just an hour!
- Take a medium-length nylon sock and stuff it tightly with white filler, like a padding polyester. Pull the edges of the product with a thread.
- Mark the neck as follows - in the right place, sew the sock with a seam forward with a needle in a circle and tighten. Wrap the thread several times and tie to secure.
- Do the legs in a similar way - select two small circles at the bottom of the product from different sides with an overcast seam and pull it off.
- From below, in the area of \u200b\u200bthe seam of the sock, stick a needle, take it out on your stomach and stick it in again. Slightly tightening a small seam. You will receive a navel. Return the needle to the bottom seam and secure the thread with it.

After the preparatory work with the body is over, the doll from nylon tights must be endowed with emotions, giving conditional facial features.
- Form the nose in the same way as the legs, but grab a circle with a smaller radius.
- Ears can be made as follows - pinch a small area on the side of the head with your fingers and pull it with a thread once.
- In the right place, make three black stitches - eyelashes.
- Insert a needle with a threaded bead-eye under the cilia and bring it out in the place where one of the corners of the mouth should be, and pull it off slightly. Repeat the same action on the other side. So you get both eyes and cheeks at once.
With a single ply of red thread or a permanent marker, mark the smiling mouth.

- Cut off the tight tail on the head of the baby doll - the extra matter will come in handy for sewing hands. Cut it in half and sew it up so that you get two fabric “sausages”. Stuff them with soft material and sew to the body.

If desired, sew long hair from yarn to the head so that the baby doll turns into a girl. To finish the doll from nylon tights, you need to make her toy clothes at your discretion.
Control the tension force of the working thread and capron yourself: for example, the cheeks need to be tightened more in order to better highlight, and the navel can be barely marked. But do not overdo it, otherwise you may tear the working material.
Do-it-yourself nylon frame dolls: step by step instructions
If the previous master class seemed too simple to you, try making a doll from nylon tights on a wire frame. Thanks to the rigid wire, the limbs of the toys can take different positions.
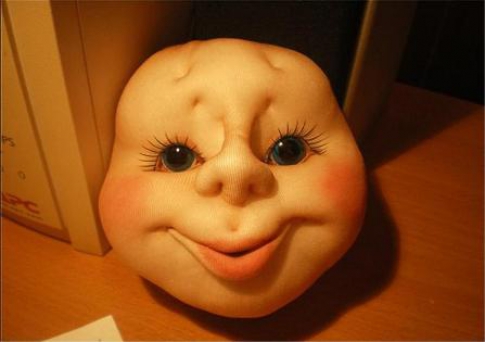
Head
As a rule, most of the time is spent on creating the head and shaping the facial features.
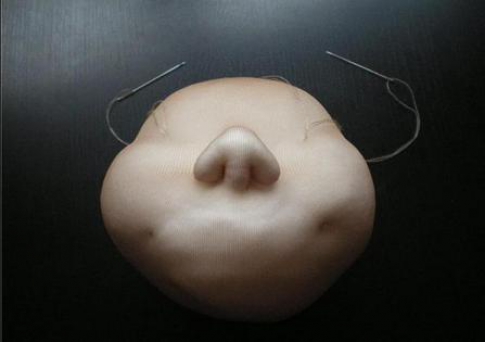
- Take a piece of synthetic winterizer and squeeze it into a tight ball the size of a fist. Put the soft ball into the nylon tightening bag. Form another smaller lump and stick it on the side - this is the future nose. Tie the opening of the nylon bag, but not tightly.

- Insert the needle from the side in the upper part of the nose, pull it out on the other side and pull it off a little, forming the bridge of the nose.
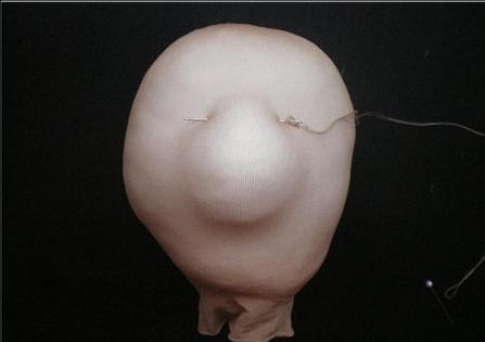
- From below, form the nostrils in a similar way.
- Make thread loops around the nostrils.

- Pull off the loops, clearly outlining the nose.

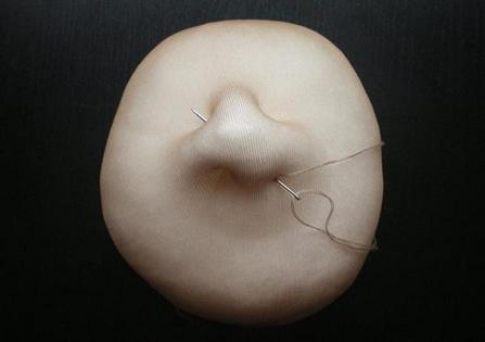
- Through the hole at the bottom of the head, add 2 more identical small soft lumps in the places where the cheeks should be, and an oblong piece in place of the future mouth.

- Insert the needle in the place where the left corner of the mouth should be, and bring it out in the place of the left eye - tighten until the cheek is formed. Repeat the same on the right side.
- Between the corners of the lips, stretch a tight thread - a smile.
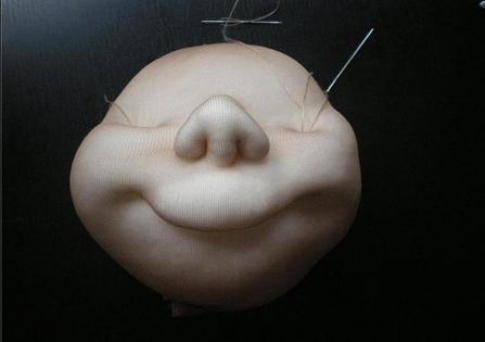
- Tighten another thread under the first, forming the lower lip. During each action with the lips, bring the needle into the eye sockets to gradually form the hollows for the eyes.

- Insert the needle in the middle of the smile and bring it out in the center of the upper lip.

- Tighten the thread, forming sponges with a bow.
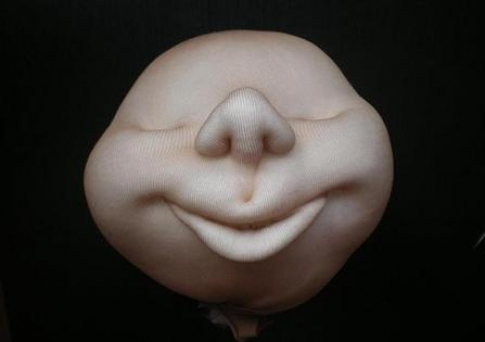
- Extend the bridge of your nose with a few back and forth movements of the needle.
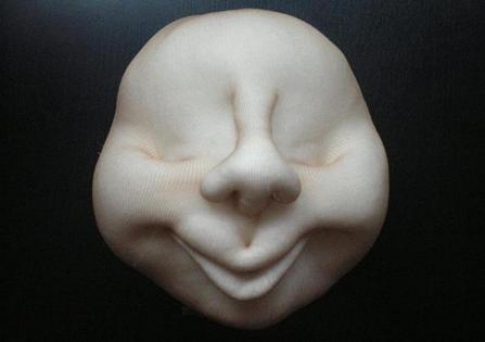
- Glue the eyes in the right place - you can buy them in a special needlework store or borrow them from an old unwanted doll. Paint cheeks, lips and eyebrows with acrylics.
For hair, put an old toy wig on the doll or buy a new one from a specialty store.

Hair can be made from yarn, floss threads in the same way as on a waldorf doll.
torso
After working on the toy head, the doll must be provided with a wire frame. Take as a basis a ready-made scheme with approximate limb sizes.
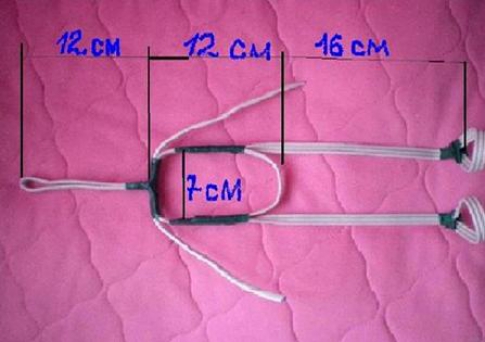
Even a beginner needleworker can easily make a wire base, but it will take patience to calculate the length of the limbs and bend proportional sections.
- Make the frame of the palms - connect together 5 short pieces of wire proportional to human fingers. Wrap the wire tightly with filler.
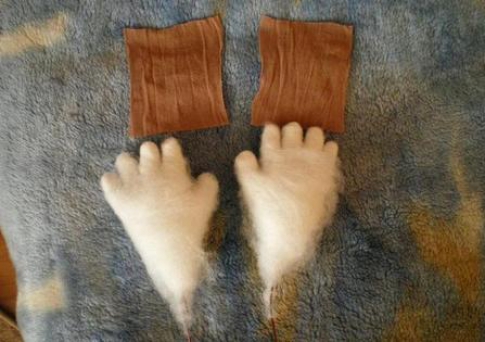
- Cut out small square pieces of nylon and wrap them around your palms.

- Treat the hands in the same way as the face, giving the fingers relief.
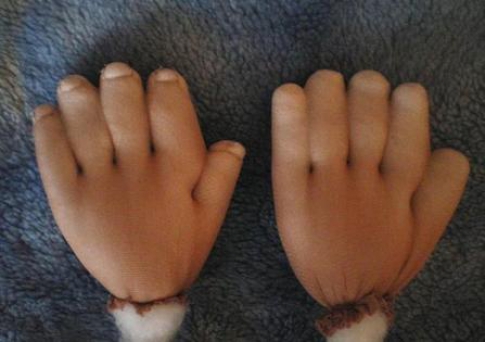
- Wrap the torso frame tightly with stuffing. Screw the head and hands in the right place.

- Finish processing the frame by wrapping it with nylon.

Such a doll made of nylon tights can be dressed up in any doll clothes that fit her in size, or you can sew a costume yourself. Due to the fact that the toy is suitable for many different outfits, you have the opportunity to complement her image in any way - braid her hair, decorate with beaded bracelets or a hairpin with cold porcelain flowers.

In conclusion, watch a video tutorial that will tell you how to make a cute brownie doll from nylon tights.
Widget from SocialMart
Take it, tell your friends!
Read also on our website:
show more