Drawings for the children's room with their own hands. We do wall painting in the nursery: tips and tricks for decorating the room. Optimal colors for a girl's nursery
Parents strive to arrange the personal space of the baby with maximum comfort. The theme of the design sets the character of the room, accessories add comfort to the interior. Painting the walls in the nursery will help bring a touch of individuality to the child's room.
Such a design element means the application of drawings or paintings directly to the surface. In a room for children, most often the walls are painted. There are quite a few ways to paint them. Can be used:
- wallpaper with ready-made traced contours, which can be painted with paints or felt-tip pens;
- stencils;
- airbrushing;
- wall paintings on wet or dried plaster;
- frescoes;
- artistic painting.
Drawings on the walls can be both complex and very simple. They can be entrusted to professionals or done by hand. Undoubtedly, a beginner cannot master airbrushing or the grisaille technique, but, armed with an idea and some technological basics, everyone can do a wall painting.


Stencil painting
The easiest way to paint walls in a nursery is to use stencils. You can buy ready-made blanks at any construction supermarket, or you can make them yourself. For self-production, it is enough:
- prepare cardboard or thick PVC film;
- find the desired image on the Internet and print it;
- cut out the drawing and attach it with tape to the prepared cardboard or film;
- outline the contours of the image and cut with a clerical knife.
The finished stencil is attached to the wall and, depending on what was conceived, is outlined for subsequent painting, or it is covered with a single-color paint using a sponge or a spray gun.


When choosing a drawing, it is important to take into account the general interior of the room and the interests of its occupant. For example, you can make ornaments with butterflies at the head of a girl's bed, or nautical or pirate attributes in a boy's room.
Children's drawings of plant themes will perfectly complement any interior. It will not be difficult to make your own tree stencil. By adding a few decorative gizmos to the wall, it can be turned into:
- blooming sakura in the girl's bedroom;
- family tree in the boy's room.
DIY drawing
There is no word for "professionalism" for young children. It is more important for them that the images are kind and cheerful. And if they themselves take part in their embodiment, then the positive charge from each look at their creations is guaranteed!
An original way to decorate the walls and diversify the interior is to let the kids paint with their palms. Here, parents will have to turn on their imagination and make the wishes of their children come true, armed with paints that are safe for contact with their skin. By immersing your palms in the desired color and leaving prints on the wall at different angles of inclination, you can draw real masterpieces.
Girls will be delighted with the opportunity to depict a bright butterfly or flower on the lawn, and boys will not refuse to create a fabulous tree and a hedgehog under it. Older children can be helped to depict more complex compositions: waves, wings, intricate ornaments.
The technique of drawing "with your own hands" will require some skill, which is easy to acquire with a little practice on whatman paper. Drawings created this way are never repeated. The main secret of their implementation is not to apply too much paint on the surface of the palms or fingers, otherwise the clarity of the image will be disturbed by drips.


Art painting
Parents with basic drawing skills can do wall painting on their own. You can depict not only cute animals or your favorite fairy-tale heroes, but create a whole plot. Such a drawing can safely serve as the basis for the future interior of the room and the theme of its design.
Beginners in art will certainly love the idea of depicting a tree. Firstly: it is not difficult to draw, and secondly: how many interesting details you can come up with based on it!
Birds, fairies, butterflies, flowers painted on a tree will decorate the girl's room. With its help, you can select a recreation area in the nursery by placing a play mat, a soft sofa next to the wall painting, or placing your favorite toys.
In the boy's bedroom, a tree can be depicted near the sports corner - it will be much more interesting to climb the wall bars or practice on the rings.
If you depict him in the working area of a student's room, then it would be appropriate to place "tips" on his leaves:
- multiplication table or formulas;
- favorite sayings or wise proverbs.
You can resort to functionality and place small shelves or pockets for books and cute knick-knacks in the crown of the tree.


Image selection
When choosing a drawing, it is important to take into account the age category of the child. So, a preschool boy will certainly love the wall painting with the characters of his favorite cartoon or LEGO game. Girls will appreciate the drawings with a Teddy bear, fairies, princesses. In the baby's room, you can create the atmosphere of a fairy forest with numerous forest dwellers.
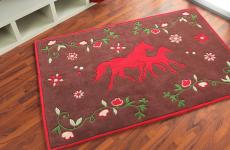
Jungle and savannah are favorite themes for young schoolchildren. Such a theme does not require changing the interior; it is enough to add a few bright thematic touches: a bedspread, a small rug, a pencil holder.
In second place in popularity is the marine theme. Here, the preferences of boys and girls coincide and images of palm trees, sandy shores, ships, inhabitants of the underwater world are welcome.
The situation is more complicated with the choice of painting in a teenager's room. It is important here to listen to the opinion and hobbies of the child. Perhaps it will be relevant for the boy to portray the drum kit of his favorite rock band or football attributes.
A teenage girl will appreciate the romantic theme that complements any design. And again, the image of a tree will be appropriate, on the branches of which you can place a photo collage.

The idea of using a painted tree for a collage

The idea to decorate the wall with notes using a stencil

Color palette
Ideas for painting walls in a nursery involve the use of bright colors. But here it is important not to overdo it, because the child will be in this room for a long time. The colors of the wall paintings in the baby's bedroom should be dominated by soft pastel colors, so as not to overly excite the fragile psyche.
If a wall image is planned in a playroom, then there are no obstacles to the use of bright colors.
Young rebellious teenagers cannot do without bright elements in wall painting, but do not overdo it, because the overall design concept can be lost from the abundance of colors.
When choosing an image and color palette, it is important to take into account the temperament of the child. Tikhon will benefit from a little brightness for daring. A plot with sea spaces or cosmic distances, based on shades of blue, gray and blue, will allow the dreamer to dream up to his heart, and soothing green shades will suit the young fidget.


When doing a wall painting on your own, the most difficult thing will be transferring the sketch to the surface. But here you can resort to a little trick and use the projector. It is enough to direct the image you like with it on the wall and outline the contours.
Decorate the resulting sketch taking into account the color scheme of the interior. This technique will allow even a beginner to create a masterpiece with a minimum investment of time and effort.
When painting, it is better to give preference to acrylic paints. They are non-toxic, dry quickly and are odorless.
Do-it-yourself drawing on the wall should be covered with matte varnish. This will allow you to perform wet cleaning without the risk of damaging the image and will save it from exposure to ultraviolet radiation.
This gallery differs from others in that this selection is not of some blogger who simply wrote an article on the design of a nursery and at the same time choosing pictures he liked, but the work performed one artist, namely me, according to the real wishes of people.
What to draw in the nursery
The wishes should come primarily from the child. In this matter, you do not need to completely rely on the designer or the style of the entire apartment or children's room. Bloggers love to write what needs to be drawn, what is not needed, but I think the child should be happy with the drawing, if, for example, a child likes skeletons, why not, like black, why not? No need to impose Winnie the Pooh or Kolobok.
Tree

The most common subject in the nursery, as you can see from the photographs, is a tree.
Such a plot is universal, the tree can be drawn in different ways, as you can see in my examples:
- abstractly - a silhouette of a tree, and inside a colored applique
- decorative as an ornament
- realistic with volume and shadows
- around the tree there can be any plot and any heroes
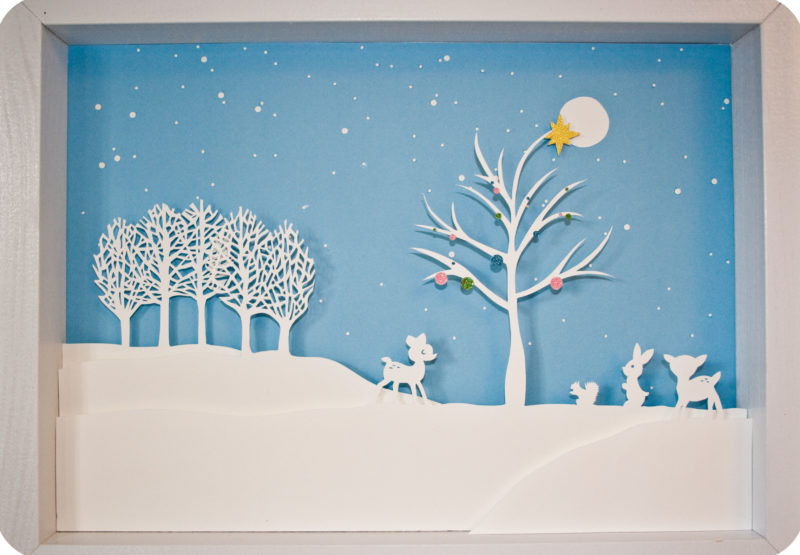
Sky and space

- The sky is one of the universal ideas. They will look fun in the sky birds, clouds, planes, balloons, angels, fairies, tree branches ...
- Space, in my opinion, is a great theme for a nursery. Often they are afraid to portray him because of the black color, but in vain. Space has one good advantage - it can be made glowing and viewed in the dark. Space, like a tree, can be depicted in different ways, it is not necessary to draw stars and planets, you can also do it abstractly, as in my work.
And here is a video with the process of drawing space together with the owner of the room)

Animals and butterflies

Children love animals, especially bears, cats and dogs. Some bears can be drawn in different ways. I drew Teddy bears twice. There were also cats on the whole wall, around which butterflies fly. Butterflies are one of the symbols of a children's room; they can be harmonious in color with any room.
Cities and nature

Urban views and landscapes are the most frequent order from kindergartens. This plot serves as a kind of background against which children play with their toys.
For anyone interested, you can see how the drawing was created on the wall in the shopping center for the "Solar Kingdom".

Cartoon characters

This is a popular topic, but I would recommend it if the child chose it and not the parents. The main task of drawing is to bring joy... Yes, and my main task is the same - to bring joy, it will not be fun for me to do what the child will be indifferent to. I even want children to take part in drawing a little. It will be a pleasant memory for them. Below I have attached photos where children "help" draw).

DIY drawing in the nursery
I recorded a short video on how you can make a simple drawing in the children's room (in my case, over the baby's bed) with your own hands and what materials are needed for this.

For a more detailed acquaintance with the master class, go to the page DO-HAND WALL PAINTING.
What walls are suitable for drawings
Walls should be painted with acrylic paint (also called water-dispersion or water-based paint). This paint is always used to paint walls and "paintable wallpaper". I paint with exactly the same paint, so there will be no problem. If anyone wants to know more about preparing the walls, see my article. preparation of walls for painting.
Cost of drawings
You can get acquainted with the price of drawings in the nursery in the section PRICES FOR PAINTING... I do my work with brushes and rollers, I do not use stickers, stencils, airbrush.
Hello everybody! There is never a lot of money. I'm not an exception. All the more so during the economic crisis. But a crisis is a crisis, but life goes on. Soon I will need to arrange a room for my daughter and I was looking for budget ideas for the nursery that I can implement on my own.
My requirements for the nursery:
- safe;
- bright;
- funny;
- functional;
- budget.
After some thought, I settled on the idea of painting the walls. I’ll say right away that I am not an artist. At least in my ability to execute wall painting, I'm not sure. Most of the examples look very nice, but they are done by professional artists. I almost gave up on the idea, but, as always, I found a way out.
And I have prepared a selection of drawings on the wall that almost anyone can repeat. You will say that this does not happen? Let's get a look.
7 simple do-it-yourself wall drawings
You can't imagine a more budgetary one. All you need: masking tape, roller, paint can, patience, and a good mood. Talent requirements are minimal 🙂
As you can see, the costs are minimal, and you will now estimate the effect yourself!
- If you are not confident in your abilities, then just draw dots. It's not boring, is it?

 3. Triangles. The result is a very fashionable interior in the spirit of Kelly Whistler. You will have to tinker with the markup decently, but how impressive!
 4. Complicating. Draw lines at an angle. You can paint the inside in other colors. Wide scope for imagination. Graphics do not give up their positions.

 5. Draw zigzags on the walls. Paint the top and bottom in different colors to create a mountainous landscape. Bright contrasting colors and calm grays look beautiful, blacks are very graphic and expressive. Mountains can be of any color, the most fabulous: blue, pink and turquoise. You can add the sun in the form of a circle. Great idea in my opinion.


 6. You can draw simple houses in the same way. A little imagination and whole streets will appear in the room.


I hope you got some inspiration and, perhaps, were able to find something suitable for you. As you can see, to paint the walls it is not always necessary to hire an artist, you can often do it on your own. Of course, these are not all budget ideas for the nursery, there are many others, but I will talk about them later.
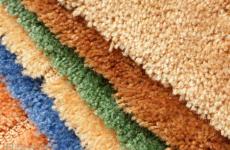
I also wanted to add, pay attention to the fact that the drawings on the walls I proposed are very graphic and it is advisable to use something else with a geometric pattern in the interior of the room: cells, stripes, squares, rectangles, rhombuses, triangles, points. It can be curtains, bedspread, carpet, pillows. Be guided by the situation.
Personally, I like mountains most of all, they are what I use in a design project for a nursery for my daughter.
Decorating the interior with handmade paintings has become popular. Placing them on the walls in the apartment will add coziness, individuality and breathe a piece of your soul into the room.
Where to start drawing
First, you should decide what you want to see as a result. You should not imitate other people's ideas, it is better to find your own. Think about what is missing in your home, feel the mood of the room in which it will hang. Any, at first glance, not even real fantasies, take place. Abstract images will add irresistibility to the interior, and posters in black and white will perfectly fit into modern designs.
Having defined the style of work, you can start creating a masterpiece.

Fabrication of canvas
Before drawing, you need to prepare the canvas. To do this, you will need cardboard and directly the fabric on which the image will be. A square or rectangle is cut out of cardboard, the size of the intended work. For this blank, a fabric is cut out with allowances of 5 cm. Then, the fabric is glued to the cardboard, while it should be well pulled. The corners are cut and carefully glued so that the fabric does not creep.
You can use a simpler version of the base - cardboard painted with a roller with white acrylic paint. It must dry well before drawing on it. This will be the background of the painting.

Drawing a picture
Before drawing on the canvas, you should make a sketch on plain paper. It is cut out, applied to the canvas and outlined with a simple pencil. The contour of the picture must be outlined with black paint.
Now you can start decorating the conceived picture. The methods can be different:
- paint is the most common, the drawing is painted with multi-colored paints;
- cereals, coffee, cloth - the elements are located in the picture and fixed with glue.

Choice of paint
Any paint can be used: acrylic, watercolor, oil. The main thing is to correctly combine the color shades of paints, then the picture will look spectacular.

Stencils
A stencil is ideal for capturing an image with paint or spray paint. You can also apply a drawing using a stencil using the graffiti technique, which is at the peak of its popularity today. The best basis for this painting will be cardboard or plywood, which is painted in a contrasting color. Similar ornaments look original on a gold or silver background.
The use of herbarium elements instead of a stencil or openwork napkins looks spectacular.

Photo printing
A modern and stylish interior can be created using paintings ordered from a print shop. These workshops produce high quality prints on all surfaces.
Family photos in covers or frames fit perfectly into any interior; they can be colored or black and white, placed in a chaotic manner or in the same plane. It is possible to arrange photos as modular elements, which gives the impression of a single image.

Textile
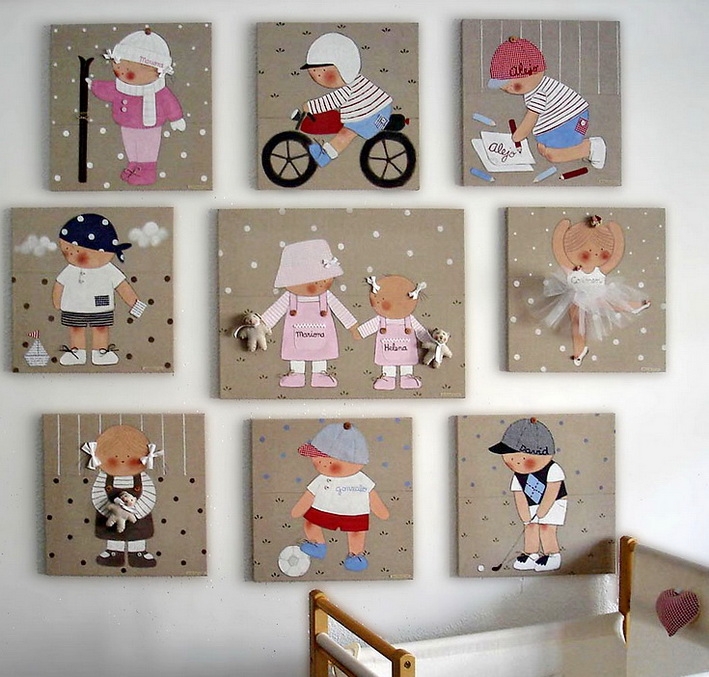
Patchwork masterpieces are easy to get using scraps of fabric, braid, ribbon. Such paintings are made according to the application principle. The basis is textiles, dense in quality and not flashy ornamentation (polka dots, stripes). The elements of the picture, on the other hand, are cut out of bright fabric. Using different colors of patches, you can get an original picture. And if you place it under glass, it will look stylish and impressive.
The combination of fabrics of different textures in one picture looks great. And from the material that holds its shape (felt, corduroy, flannel), you can cut out the elements of the picture: a house, an animal, fruits.
Such products are ideal for the kitchen or children's room. A silk picture will be a decoration for the hall.

Modular pictures
Modular are several paintings with a similar plot or one drawing divided into separate elements that can be of different sizes. Nowadays, they are popular, as they fit perfectly into the interior of any room. You can make them yourself and arrange at your own discretion.
You should start by choosing a picture: a landscape, an abstract image or a photo. Blanks can be printed on paper or canvas in a photo salon, and then cut into separate parts. The paper version is glued to plywood or chipboard, and the fabric version is fixed on the back of the frame using a stapler. On a fabric basis, it is good to work with the batik technique.

If you create a drawing yourself, then it is better to immediately do it on separate elements. To make such a picture you will need:
- colored acrylic paint or waterproof marker - when applying the image on paper;
- hacksaw;
- ruler;
- simple pencil;
- foam sponge;
- sandpaper;
- brushes;
- expanded polystyrene sheet (1 cm thick).
You should get started with dividing the expanded polystyrene sheet into the intended number of parts. To do this, measure it with a ruler and cut it with a hacksaw into modules of the required size. Then sand the edges.
Now, all the parts are folded into a single canvas and you can begin the process of applying the image itself. First, the background of the picture is made, the sponge is wetted in the paint of the intended shade. When the paint dries, you can proceed to the drawing itself using paint brushes, a marker, an applique.

Creating a three-dimensional picture for the living room
Volumetric paintings look spectacular in the living room, they can be made for any room design. There are options: leather, paper, and even coffee and pasta. The following technique is perfect for making such paintings:
- decoupage - decorating objects;
- quilling - create a pattern from curled paper.
A picture made of textiles or foam rubber will look creative in the living room; it is easy to make an original multilayer image from this material. The frame for the picture should be taken simple and decorated according to the interior of the hall.

The easiest way is where plain paper is taken as a basis, on which elements (butterflies, animals, flowers) made of various materials are glued.
If the hall is large, then the image from plaster will fit perfectly - a bas-relief. It is done immediately on the wall and goes well with the overall interior. However, it is rather difficult to make such a picture. Skill in drawing and working with plaster is required. There is no general recommendation for making a bas-relief, some masters create it immediately on the wall, others separately make elements of plaster, which are then inserted into the overall image. In the absence of experience, it is better to use a stencil.

Master class: Paintings for the interior
An unusual and modern solution is to decorate the interior with a 3d picture. They are fun to make and look impressive. There are different ways to make such items.

3d paper paintings
One of the easy ways is paper applique. For work you need:
- knife, scissors;
- pencils;
- not thick cardboard or white paper;
- PVA glue;
- frame with large sides, a candy box will do.
Step-by-step actions, using the example of the image - butterflies:
- A rectangle the size of a frame is cut out of paper.
- A butterfly is drawn or printed on a printer and cut out.
- The resulting model of the butterfly is placed on prepared white paper and outlined with a pencil.
- The hardest part is cutting out the butterfly's wings without touching the torso.
- The wings bend to the top and to the middle, thereby giving volume.
- The blank with the butterfly is glued onto colored cardboard, which will be visible through the bent wings of the butterfly.
- At the end, the picture is placed in a frame and fixed with glue, or with a stapler.
In this way, you can add volume to any picture.

3d leather paintings
To create a 3d picture, expensive leather is not needed; pieces from old boots, bags, gloves, raincoats are suitable, but it is important that it is natural. You can use acrylic paint to get the color you want.
The technology for creating paintings from leather is similar to the technology from paper. Leather is a material that is easily influenced and you can create whole bouquets of ornaments from it. The tools at hand are the same as when working with paper. Operating principle:
- a sketch is made on paper;
- transferred to the skin and cut;
- so that the leather elements become rounded and voluminous they must be held over the candle;
- the basis of the picture is made of fabric;
- elements of the pattern made of leather are located on it and are fixed with glue.
As an additional decoration, you can use buttons, dried plants, beads.

Multilayer 3d paper painting
Multilayer 3d pictures from paper look beautiful, it is not difficult to make them. You should prepare:
- deep frame;
- cardboard box;
- album sheets - for copies;
- a printer;
- glue;
- acrylic paint;
- scissors,
- acrylic lacquer;
- laminate backing.
Having chosen a drawing, let's get to work. It's good if the picture is made of several elements that can be cut out. You must make at least 10 copies on album pages. If an inkjet printer is used, then varnish must be applied to the pictures, otherwise the image will flow, when using a laser one, varnish can be dispensed with.
The next stage - the base is cut out of cardboard, the size corresponding to the frame, one drawing is glued to it. The remaining images are cropped out, but in different ways. Several copies (let's say a flower) are cut out completely: flower, leaves, stem. Others are just a flower and leaves, and only a flower.
Now the base is cut out for the laminate parts, and the elements are glued to it. Then, these blanks are glued to a common base. The sides of the substrates should be painted with a color matching the image so that they do not stand out.
The final stage is to cover the picture with varnish in several layers.

DIY paintings for the kitchen from scrap materials
In the kitchen, homemade paintings look like nowhere else. They add even more to the atmosphere of warmth and comfort. There are different options for making them and any items that can be found at home are suitable here: buttons, seeds, cereals, coffee.

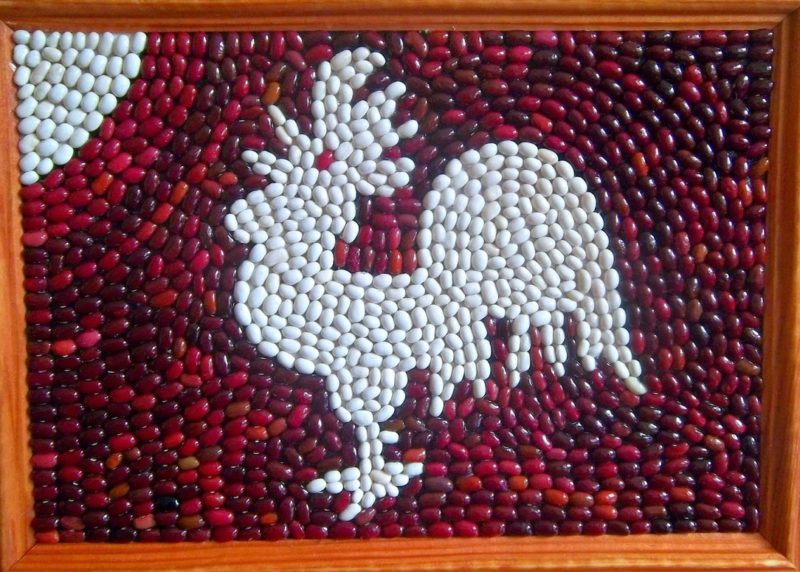
Pictures of cereals and seeds
This type of interior decoration is more and more popular, it is environmentally friendly and inexpensive. These pictures look especially good in a rustic kitchen. It is not difficult to make a picture out of cereals. You will need several types of cereals, glue, cardboard and thick material.
First, prepare the base. For this, the shape of the future picture is cut out of cardboard, and along it there is already fabric, with an allowance of a few centimeters for bending. The fabric is glued to the cardboard.
A conceived drawing is applied to the resulting canvas. Now you need to lay out the grain or cereal, if necessary, you can paint it in the desired color. After drawing up the picture, you should glue all the elements to the canvas. This can be done with regular glue, but it is more convenient with a silicone gun.
Crafts from cutlery for the kitchen
Spoons and forks made of metal covered with enamel are sewn onto the prepared base. Such a still life will perfectly fit into the interior of any kitchen.
If you take forks and spoons made of plastic, you can create a more original picture. Plastic items adhere easily to any surface and paint well.
The decoration with cupronickel appliances will ideally fit into the French-style kitchen.
A canvas with glued porcelain dishes will look aristocratic.
You can arrange objects arbitrarily or following a certain idea.

Button and plate paintings
Buttons can be used not only for their intended purpose, but also to create original paintings. They can be glued or sewn on. It is easy to make different patterns, animal figures, flowers from buttons. And you can use them as a background for the image, they are sewn onto the fabric and all kinds of plates and saucers are hung on top. Painted with acrylic paint if necessary.

Do-it-yourself paintings for the nursery
Do-it-yourself works will wonderfully decorate the children's room and it is not necessary to make them very complicated. When choosing a painting option, one should take into account the design of the room, its color, gender and age of the child, and his hobbies. Anything will do: a hand-drawn picture, applique, panel, photo, maybe a large painting or a modular version, the main thing is that it fits into the overall interior. Children's works decorated with a frame will look original.
An excellent solution is a fabric version based on foam. To do this, you will need: a piece of polystyrene, shreds, a pencil, glue, a carbon copy, a sharp object to push through the drawing.
Styrofoam of the required size is cut out, a drawing is transferred to it using a carbon copy. The picture is pressed through with a sharp tool. The part on which the fabric will be is coated with glue, and matter is applied to it. It is pressed into the previously squeezed contour, the excess tissue is cut off with scissors, and the threads of the shred are hidden inside with the help of a ripper. Using this technique, it is easy to create different fairy-tale pictures.
DIY paintings - photo
There are many ways to create paintings; you can use any materials and objects for this. It all depends on your imagination and creativity. The photo shows possible ideas.
There is nothing better for giving comfort in the house than things made with your own hands, because your love and warmth are invested in them. Do not be afraid to experiment and then you will create a unique painting that will decorate your home.
Fast navigation through the article
Painting the walls in a children's room is a great way to "animate" your child's personal space and make it more interesting. Wall paintings can be both really complex and very simple to perform. It is better to entrust large-scale work to a professional, and the images are not too large, detailed and multicolored, it is quite possible to draw with your own hands. The main thing here is to choose the right drawing, materials and observe some rules of technology.
For those who are in the process of looking for ideas or tips on how to paint the walls of a nursery with their own hands, we have prepared a selection of inspiring photo examples and a small master class.
Ideas for beginners
If drawing is not your strong point, then here are some options for painting a children's room you might like:
- A drawing that can be drawn using a ready-made or homemade stencil. Using a stencil, you can accurately draw a sketch or apply an image to the wall by painting the cutouts of the stencil.
This method is very simple, but with it you can come up with so many different ideas, both for boys 'and girls' rooms. Here are a few of them.


Decorating a wall using stencil techniques involves the following steps:
Step 1. We mark the wall with a pencil and highlight the location of the stencil using a building or laser level.
Step 2. We fix the stencil with masking tape or glue the ready-made template, if it is self-adhesive.
- How to make a stencil: we find it on the Internet and print a picture, transfer its contours to polyester film or thick paper and cut out the corresponding holes with a clerical knife.

Step 3. First apply one coat of paint and let it dry, then the second. You can apply the paint immediately tightly, but the drawing will turn out more accurately if you work in stages. If you paint with a brush, apply the paint in a circular motion. From time to time, excess paint should be wiped off with a foam sponge. If desired, the resulting drawing can be complicated - add volume to it or draw details.
Step 4. We give our drawing 24 hours to dry. As soon as the paint dries, we cover the picture with a protective varnish, which will make it moisture resistant.

- Simple freehand drawing
Graphic or slightly colored, small and not too detailed drawing can be drawn by hand. We will tell you how to do this with your own hands just below in the master class. In the meantime, we suggest taking a look at the following photos of painted walls in the interiors of children's boys and girls - maybe you and the owner of the room will like some ideas.


Ideas for lovers
It's great if you have some drawing skills, then you can draw with your own hands not only cute characters and animals, but also a whole plot, for example, as in this photo-selection of interiors with painted walls.


Especially it is worth highlighting the theme of trees, fertile for creativity - they are easy to draw, but you can think of so many interesting details! For example, it can be birds or fairies sitting on branches, beautiful leaves or flowers, squirrels or butterflies.


Ideas for the pros
If you have conceived the design of a wall on a grandiose scale, which only a real artist can implement, or you yourself are such a professional, then we offer you examples of more complex works.
Here is a photo of artistic painting in the interiors of girls' children's rooms.


Photo of wall painting in the interiors of boys' rooms


DIY master class on painting walls in a children's room
Stage 1. Preparation - choose a drawing, buy paints, prepare a wall
So, first you need to choose a wall for painting, come up with a drawing or composition, taking into account the arrangement of furniture, sockets, lamps, etc., and also based, of course, on the wishes of the child, your drawing skills and interior color design. It is better to think over several options for painting at once and draw several sketches. The picture that you and the owner of the room like should be printed in color, then it will become clear to you what colors you need to buy.
Shopping list:
- Water-based acrylic paints are best suited for painting walls in a children's room, and matte varnish, also water-based, to fix and protect the picture.
- You also need to buy and prepare: synthetic brushes, roller, palette, masking tape, pencil, ruler, laser or building level, as well as a step-ladder, if necessary.
It is important at this stage to make sure the wall is dry and clean.
- To make it easier to paint, the colors were bright and the drawing lasted longer, before starting to paint, the wall can be treated with an acrylic primer.
Stage 2. Transferring the sketch to the wall
Now it's time to draw a sketch of the future drawing on the wall. This stage is not very difficult, but important. This can be done by hand, using stencils (purchased or homemade) or using a projector as shown in the photo below.

Here's another way to transfer a sketch to the wall: on a Whatman paper, a piece of wallpaper or craft paper, draw a sketch with a pencil or chalk, then place a cardboard or carpet under it and use a pin or a copying wheel to draw all the outlines of the drawing. Next, glue the paper on the wall and draw your sketch with a pencil so that all its lines remain on the "canvas".
Stage 3. Coloring and painting
- Practice applying loose strokes on the paper first. This should be done in a relaxed manner, holding the brush at a certain angle.
- Long lines, like the stem of a flower, need to be applied in one smooth and sweeping motion.
- To make the line thicker, you just need to press a little harder on the brush.
- To draw round and rounded details, just gently press and rotate the brush, and then paint over the resulting path.
- Painting is more correct to lead "from the general to the particular."
As soon as all the local spots are painted over, you can start drawing the details. And one more tip - do not be afraid to make a mistake, because most of the flaw can be corrected, and hand-made wall painting does not require such perfect lines from the artist.

Stage 4. Cover the drawing with varnish
Hurray, almost done. We give the paint a couple of hours to dry (sometimes it takes longer, depending on what paint you used) and cover the entire composition with matte varnish so that in the future you can wipe the walls with a damp cloth and the paint does not fade from the sun's rays.
In this video you can watch a small story about painting a children's room in the program "Housing Problem".