How many meters of a profile pipe are needed for a greenhouse. Construction of a greenhouse with a frame from a profile pipe. Selecting a profile pipe
All summer residents dream of having a reliable greenhouse in their garden that would last for many years. Therefore, I would like to offer a worthy alternative to factory greenhouses, which will have a much better frame.
After all, you must admit that at the expense of it you take a good harvest from the beds. It also perfectly protects your plants from adverse environmental factors, of which there are a lot. So, the summer season begins soon and it will be necessary to plant seedlings. But in order to do this, many are wondering: what material is best for a greenhouse and how to make it yourself? Yes, there are many ways to do it on the internet. But still, I think the best option, if you want to make it yourself, is a profile pipe and polycarbonate.
Today, cellular polycarbonate is considered the most popular. It has excellent sunlight throughput, retains heat amazingly, and is very light for its size. And most importantly - not very expensive price, like other materials with the same results.
There are different types of greenhouses (two-slope, single-slope). In this chapter, I want to tell you how to make an arched type of greenhouse. Therefore, whoever of you has an idea about the manufacture, he will easily assemble it.

1. First you need to decide on the place. It is placed in such a way that one long side looks south.
2. We begin to bend the arcs, having previously outlined a meter from each edge of the profile. This is necessary in order to start bending the pipe from this line with the help of a pipe bending tool. But do not forget to cut off 10 cm from it for a small allowance and adjustment of the polycarbonate. We need them for a 6 meter greenhouse 7 pcs, and for a 4 meter greenhouse 5 pcs.
By the way, in order to save money, I take metal for a 20x20 mm construction. You can use such cross-sections for jumpers, and already bend 40x20 for a greenhouse.

3. Now we expose the plane where we will cook the end parts. It must be level so that it does not turn out to be a screw.
4. We take two 6 meter profiles and cut them into 2 parts so that they turn out 3 meters each and weld them to two end arcs from the bottom. And we cook the remaining two sticks, like racks on the bottom and top of the curved arch, but from the middle of the base, 40 cm should be noted in different directions. To make it clearer, I drew an approximate drawing of the front end of the greenhouse.

5. The next step is to cut and weld the jumpers.

Do not forget to clean the seams so that when screwing the polycarbonate, do not damage it.
6. It remains to weld only the door and the front end will be ready. We measure our opening, in this case we have it 80 x 1.85 and make it 1 cm smaller. That is, 79 x 1.84 cm, cut off from the profile first 3 short, and then two long sticks.
The seams need to be welded on a tack so that the door does not lead much during welding. And also try to use a square to set up racks and jumpers.

After setting and tacking the loop, you can look at the opening.

8. Your front is ready, but so that the door does not turn out the other way, you need to weld the scarves in the corners at the top and bottom.

9. We do the back of the end in the same way, putting it on the front and pressing them together with clamps.
The most important thing is not to confuse the sides of the arcs that you bent, otherwise after the pipe bending tool, they may be different. It is best to outline and make all the arches on one side.

10. Also, instead of a door, you can do it with a window, but this is up to you.

11. When everything is prepared and done, we go to the place where we will install the greenhouse. We make markings so that the diagonals coincide and drive in the corners at the corners, by about 2.5–3 meters, while not forgetting to set them on a level or laser level. We weld the front and back of the greenhouse to the corners, and already weld the profile 5.96 to it along the entire length. Then the length of the greenhouse will be exactly 6 meters.
The corner should be inside the greenhouse so that later it does not interfere with polycarbonate.

12. Now, below, where the welded metal is, we stretch the cord along the entire length and drive in the reinforcement, in the place where we will put the arcs. With the same action we drive in where the door pillars are.


14. Accordingly, so that the end threads do not bend during tension and stand in level, we also temporarily support them until we weld all the jumpers.

15. We weld the jumpers on both sides, moving the arcs to the welded jumpers, then they will all be level.

16. This is the design you should get.

By the way, arches and lintels are best placed one at a time. If you install everything at once, they will bend and interfere with the stretched lace.
17. Well, the last step is to cover it with polycarbonate. First, cut the sheet in half and cover the ends, cut off the excess with a knife.

18. Then we lay the sheets along the edges and at the end we close the middle.

In this way, a homemade greenhouse was made.
Production of a double-slope greenhouse according to the drawing
This version of the greenhouse is a little more complicated, and the profile pipe will take more. This design allows you to grow taller plants.
By the way, for the walls and roof of the greenhouse, it is better to buy a 40x20 profile, and for jumpers you can use 20x20.

1. The first thing you need to start doing it with is from an approximate drawing.

Before welding the racks to the 6 m profile, do not forget to measure the diagonal.

3. In the same way we make the end walls, which are with doors and windows. In this case, the gap between the uprights and the doors should be 1 cm.

4. We install the structure on bricks leveled (with a level) and weld all the walls together.

6. We cook the roof. If desired, a couple of windows can also be welded in it, for better ventilation.

By the way, it is better to make jumpers after 50 cm, so that the carbonate stands longer and does not burst under the influence of snowfall.
7. And gradually install it on the walls of the greenhouse.

8. We sew our design with polycarbonate. Just don't forget to clean and paint the greenhouse pipes. We pass all the ends with adhesive tape for sealing.

As you can see, there is no difficulty in manufacturing. It turns out to be more expensive than a trade one, but it is more reliable.
Do-it-yourself polycarbonate greenhouse video
In this video, I propose to see how to make a homemade greenhouse? What is its advantage and the correct location on the ground, taking into account easy watering.
As you can see, everything is easy and simple. And, as you understand, the planting season is coming soon and there is no better option for a greenhouse than from a profile pipe and polycarbonate.
How to make an arched greenhouse yourself?
I want to offer another way to make an arched greenhouse, but it is perhaps the most difficult to manufacture. The price is also not cheap. In this design, you can plant many plants for sale.

1. To begin with, we drill and fill in columns 50x25 with a depth of 1 m along the perimeter. We do this with the help of laces stretched at the corners. We weld overhead plates on them. Align the level with the same height.
Since the polycarbonate sheet is 2.10 wide, we fill the columns at the same distance. On the end walls, you can pour it arbitrarily, since there is a different design because of the doors.
2. On top of the invoices, also along the perimeter, we lay pipes 40x20 and weld them to them. Just remember to check the diagonal of the base of the greenhouse.

3. Next, we prepare arches from a 6-meter profile with stiffness from jumpers and a base. To save money, it is allowed to make arcs in such a way that later the polycarbonate joints are attached to the metal 40x60, and the middle 20x20.

4. We install vertical posts on the base of the greenhouse, about 2 meters high with a distance of 700 mm between them. On them we weld the manufactured arch.

5. For rigidity, we weld the jumpers. But we do this not only along the entire length of the vertical racks, but also along all our trusses. Connecting them together.

6. We also cook jumpers between the corners of the base of the arch and the rack.

7. So that the structure is not shaky, you need to weld the braces in the corners and pour the foundation around the entire perimeter. Also, for reliability in the middle of the building, you can fill in the pillars with mortgages.

8. Now, on one side of the end, we cook and install doors, and on the other, windows for ventilation. We paint the entire structure in any color you like.

9. Finally, we got to polycarbonate. We begin to mount from the roof. We connect the sheets to each other with a docking profile. To make it easier to twist them, we use two boards on which you can put a stepladder and calmly walk along it.

10. After the arches, we sew up the ends and sides of the greenhouse.

11. Well, in conclusion, I would like to provide a drawing of this miracle of the greenhouse.

I hope everything is clear with greenhouses, choose any and build. Have a good harvest.
A profile pipe as a material for making a greenhouse is the best solution, as the result is a structure that is highly reliable and durable compared to other similar shelters.
If you choose wood as a material for making a greenhouse, then this will lead to some unpleasant moments. For example, wood is prone to decay, and it also deforms with a lack or excess of moisture.
Most often, when assembling greenhouses from a profile pipe, products that have a rectangular cross section are preferred. This design is much easier to assemble, which equally applies to the process of attaching polycarbonate. At the same time, the profile pipe does not exclude the use of a polyethylene film during the installation of the greenhouse. The only thing is that it is unstable to sunlight, wind and frost, so it will have to be changed every year.
Greenhouses with a tube frame are distinguished by the variability of execution:
- Rectangular, characterized by the presence of a gable roof. The appearance of such greenhouses correlates with the shape of an ordinary country house. Their advantage is a large internal space, which makes it possible to grow tall plants anywhere in the greenhouse, and not just in its center.
- Rectangular, defined as tunnel. They have a flat roof, thus, on the one hand, saving profile pipes, which are quite expensive, and on the other hand, determining the occurrence of a number of problems. For example, a horizontal roof creates conditions where snow cannot roll off it. As a result, the heat of the greenhouse causes the snow to melt, ice forms and there is a risk of damage to the polycarbonate due to the increase in pressure force.
- Arched, which are the most optimal in terms of the consumption of building materials. At the same time, the design features require the presence of special pipe benders, with the help of which the profile pipe is shaped into an arc.
The most widespread in terms of assembling greenhouses are materials with a cross section of 20 by 20 mm and 20 by 40 mm. The latter, in this case, have a fair margin of safety, but are distinguished by their greater mass and higher price.
In this regard, it is unwise to build a greenhouse only from larger pipes. It is much more efficient to use them only for installation as wall supports and installation of rafters. All other elements of the greenhouse can be assembled from a pipe 20 by 20 mm.

Structural elements
Greenhouse structures differ from each other in forms, materials and technologies used. Mostly popular are greenhouses with one or two slopes, the shape of a tent or arch. From a structural point of view, greenhouse structures can be built in stationary form, when there is no possibility of their dismantling, and in the so-called mobile, allowing disassembly of the greenhouse in order to store it in any room in the winter.
As for the structural elements, their set is as follows:
- Foundation- a part of the structure that serves as its foundation, which is necessary to impart stability due to the distribution of the resulting loads. Various materials are suitable for making the foundation, for example, wood or brick. The best option for building a base for a greenhouse is to build a strip foundation in the form of a single monolith, which must be embedded to a depth of at least 80 cm, but subject to the fact that the freezing point of the soil will be above this mark.
- frame- a part of the structure, defined as a load-bearing, which is assembled using wooden elements and made of PVC or steel. The strength of the frame is the stability of the entire structure. Depending on the material chosen, the pros and cons of this part of the structure manifest themselves. The choice of wood for the manufacture of the frame significantly reduces the complexity of installation, but is due to such a disadvantage as a short service life. Even the treatment of wood with water-repellent compositions contributes little to the durability of the frame against the background of a similar structure made of steel. At the same time, the steel frame, although it has a long service life and the ability to withstand severe loads, is subject to corrosion.
- PVC frame– strength, flexibility, tightness and safety. This material has a higher price compared to those already mentioned. It is very reliable, which is provided by stiffening ribs in the form of arches, which are installed every 2 meters. The result is a streamlined shape that eliminates the retention of precipitation on the surface. Assembling a frame from a profile pipe is a low-cost activity in terms of labor that does not require the use of special equipment.
- profile pipe- a durable structural element that provides additional convenience, which manifests itself in the fact that lighting, an irrigation system, etc. can be attached to its inside.
- Coating- protection from the negative effects of the environment, the material of which is usually glass, polycarbonate and film. Fastening is made on the frame of the greenhouse. The optimal coating is polycarbonate, which is a reliable barrier to cold air, but does not prevent the passage of sunlight. The covering from this material gives to the greenhouse an attractive appearance and provides durability of use at rather small expenses for its acquisition.
- accessories- everything that is part of the mounting system. Its selection depends on the design of the greenhouse and the coating material. If polycarbonate is supposed to be used, then it will need thermal washers, connecting profiles and self-tapping screws necessary for attaching this material to metal. A special profile is used to fasten polycarbonate sheets. And if it is aluminum, then this is an ideal option, but quite expensive. It is equipped with rubber seals that provide the required level of waterproofing.
Instructions for collecting a greenhouse
The first stage of installation involves the preparation of the foundation. To do this, you can use brick, concrete or other similar materials. Due to the fact that the structure to be installed is light in weight, the sufficient depth of pouring the foundation is from 20 to 30 cm. To make it convenient to fix the frame in the future, at the stage of preparing the foundation, you need to lay the details for such fasteners.
The assembly steps for the greenhouse are as follows:
- The profile is cut for vertical racks.
- Racks are welded in accordance with the drawing, observing the verticality of their location.
- The upper stroke is fixed, which is a pipe that runs along the tops of the installed racks.
- Mounting parts are being prepared, installed between the risers.
- Further, they are connected by installing transverse rails.
- Beams are welded on the roof and fastened by means of crossbeams.
- The door is assembled and hung.
The above option for installing a greenhouse is not the only acceptable one, since there are many other solutions. For example, this process can be approached from the point of view of a separate assembly of large parts of the greenhouse, which are then installed in place. To do this, you need to collect on the ground whole sections ranging in size from 2 to 3 meters.

Attention! Assembling parts of the greenhouse on the ground involves choosing the most even surface to eliminate the possibility of skew. At the same time, it is desirable to periodically apply the assembled section to the future installation site, which is necessary to maintain dimensional accuracy.
The installation of slopes can be approached in the same way, that is, they can be assembled separately, and fixed together during direct installation. The choice of a specific installation method largely depends on how many people are involved in the assembly of the greenhouse. It is advisable to weld on the prepared parts of the vents and doors immediately.
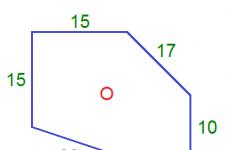
Advice! To prepare a pentagonal part, which is a construction of racks with a roof, you can take a long pipe and make several cuts on one side, and then bend it accordingly.

Arch type greenhouse
To assemble an arched greenhouse, you need a device such as a pipe bender, which makes it possible to bend the metal at the desired angle. The presence of this device is desirable, but not necessary, since there are a sufficient number of ways to do without this type of equipment, for example:
- take the blank from the pipe;
- make shallow cuts on one side;
- bend the profile to the desired angle.
Advice! To make it easier to bend the pipe and to get a smoother bend, cut more often.
A method is also available that involves calcining the workpiece with sand. This technique is considered popular, but effective. Calcined sand is placed inside the workpiece, on both sides of which plugs are installed. After that, the pipe bends relatively easily due solely to the strength of the hands, that is, in this case, additional devices are not provided.
Prepared arcs are attached in compliance with the following procedure:
- On the base, the frontal arc is fixed strictly vertically.
- Two racks are installed on the pediment, forming a box for the door.
- The next arch is also mounted.
- The sides of the arches are fastened with the appropriate details.
- Arcs are installed.
- A pipe is mounted in the upper part, which is welded to each arc.
- To give greater stability to the assembled structure, additional fasteners are installed.
Attention! It is optimal when the assembly of the arched greenhouse starts from two sides, as this ensures greater stability of the structure.
Polycarbonate fasteners
This will be the last step. To reduce the amount of excess of this material, it is necessary to match the dimensions of the blanks to what was drawn on the diagram. When installing polycarbonate, the following points must be considered:
- sheets should be stacked so that the side on which the film is applied looks up, since only such a position provides protection from ultraviolet radiation;
- in order to exclude the possibility of moisture getting inside the greenhouse, the sheets should be fastened using self-tapping screws equipped with a rubberized hat;
- the connection of sheets is carried out using metal plates having a small thickness;
- sheet joints require sealing through the use of sealant or adhesive tape;
- after installing the polycarbonate, the film must be removed.

Strengthening the frame from a profile pipe
Today the market offers square profile pipes, on the surface of which a polymer is applied. Such powder coating provides additional protection, but the cost of the finished product increases by about 20%. Meanwhile, no such coating is able to give the greenhouse additional strength, which is necessary in situations where heavy loads occur, for example, as a result of snowfall.
To strengthen the frame of the greenhouse, the presence of supports installed under the ridge and side walls is required. Installation of such elements is carried out both inside the greenhouse and outside. If the covering material is not dismantled for a period of cold weather, then wooden supports can be dispensed with to prevent the destruction of the greenhouse structure.
Price
A greenhouse based on a profile pipe with a height of 2.1 m and a width of 3 m is determined by a fairly wide range of prices, which depends on the length of the frame:
- 9000–20000 rubles – without polycarbonate;
- 15000 -30000 rub. - with polycarbonate.
Drawings of greenhouses from a profile pipe


Failed designs


A greenhouse is a wonderful help in the household of any summer resident. The ability to grow greens and vegetables a month or two earlier than outdoors, grow seedlings, harvest two crops a season, and even grow flowers for sale are all definitely worth the effort spent on building a greenhouse. And taking into account the development of the building materials market, it will not be difficult to assemble it with your own hands. Easy to assemble and easy to use greenhouses, the frame of which is made of a metal profile pipe.
Profile pipes are usually made from low-alloy carbon steel. They can be of any shape except round, but in construction for the construction of various types of frames, rectangular and square are most in demand. Multi-stage heat treatment of the profile pipe guarantees the reliability of the butt joints and the absence of mechanical stress inside. Thus, the main advantage of a profile pipe is the high strength and durability of the material.
Such structures are not subject to rust and corrosion, are light in weight, but are able to withstand a serious load during operation. They are easy to work with - cut or weld, and are inexpensive. This type of material has practically no drawbacks. The only difficulty in the work is difficult bending. Profile pipes are the most common material for building the frames of greenhouses and even houses with your own hands.
Pipe size selection
On sale there are pipes of almost any size. The manufacturers themselves recommend using a profile with a cross section of 25 mm or more for the construction of greenhouses and greenhouses, depending on the type of polycarbonate that the frame will be sheathed with. For the base of the greenhouse, it is advisable to use pipes of a larger diameter. For wind resistance and, especially, snow resistance, the thickness of the metal must be at least one and a half millimeters.
Drawings of improvised structures (types)
The first step in assembling a greenhouse is a detailed diagram or drawing. You can take drawings from the Internet as a basis, but adapt them to your site. Each type of greenhouse has its own drawings and manufacturing features. The most common type is a gable greenhouse or a house. In second place in terms of prevalence is the arched form. 
The dimensions of buildings are usually calculated based on the length and width of the polycarbonate sheets that will be used for sheathing, so that large pieces do not have to be cut off and thrown away. If you do not grow vegetables for sale, then a greenhouse up to three meters wide and about six meters long is enough. The optimal angle of the roof is about 30 degrees. Making a greenhouse can take about two to three days.
We are building a frame
The basic set of tools for assembling a frame with your own hands is a tape measure, a level, a grinder (or metal shears) and an electric screwdriver. For end walls, it is recommended to use profiles 40 by 20 mm. To speed up the work, and if you are confident in your drawing and know how to handle metal profiles, you can immediately cut all the details of the frame.
 If not, then the first step is to assemble the frame of the rear wall of the greenhouse. Given the drawing, cut the profile to the desired length. The segments are fastened with screws, self-tapping screws or rivets. Further, it is necessary to measure the resulting frame element in all parameters - length, width, diagonals. The last measurement is fundamentally important - the size of the diagonals must match. Similarly, you need to assemble the front end wall and fix both walls to the base, adjusting the correct installation with a plumb line.
Then you can cut the guides for the side walls. Here it is enough to use a pipe 20 by 20 millimeters. The guides must be fixed to the base every 50 centimeters. The frame of the side walls is completed by a profile fixed on top parallel to the bottom profile. Side rails and roof rails are attached to it. Another guide is attached under the roof ridge.
Video "How to build a frame"
In this video you can see the algorithm of actions during the erection of the frame for the greenhouse.
Foundation
A gable greenhouse is the easiest to assemble with your own hands, but the first thing to do for it is to prepare the foundation. It can be wood, brick or concrete. The concrete foundation is the simplest, but quite reliable. Along the perimeter of the future greenhouse, you need to dig a ditch up to thirty centimeters deep and about 20 centimeters wide.
It is necessary to drive reinforcement into the ground (you can cut a profile pipe), on which cuts of a profile pipe will be welded under the base of the greenhouse. It is enough to do this after a meter and a half. In the corners, it is better to drive in not one piece of reinforcement, but two - at a minimum distance to the corner itself. The bottom layer of the foundation is fine gravel.

Before laying the concrete, it must be compacted with your own hands and the final height of the gravel layer should be no more than 5 centimeters. Concrete is poured over this layer. After the concrete has dried, a 40x20 mm profile pipe must be welded to the reinforcement.
How to bend pipes
One of the main issues when assembling a gable greenhouse is to cut or bend the profile pipe at the transition point between the walls and the roof.
Before bending the pipe, you need to double-check the drawing and make sure that the bend angle is chosen correctly. In order to bend the pipe with your own hands, you need to cut it with a grinder at the place of the intended bend.
After such processing, the pipe bends quite easily. Next, the fold point needs to be welded. Also on the net you can find tips on bending profile pipes with sand or water. And the third option is to use a pipe bender, but these are additional costs.

Welding a greenhouse from metal pipes
As mentioned above, welding is needed to fix the frame to the foundation or pipe bends. This is the simplest reason why a welding machine may be needed to build a greenhouse. In the event that it is planned to manufacture a year-round capital greenhouse, it is better to connect parts of the profile not with self-tapping screws, but also by welding. The assembled frame of the greenhouse is ready to be sheathed with polycarbonate sheets or film.
Video "What the finished frame for the greenhouse looks like"
This video shows what a finished frame for a greenhouse from a profile pipe looks like.
We build a house - we start with a drawing, we build a garage - first a project and a drawing. And why is the greenhouse worse, is it the same structure as any other? Therefore, the drawing in this case is mandatory, in addition, we want to tell you one secret - profile pipes are used specifically for the construction of stationary greenhouses.
That is why it is better to think over everything once, graphically and build according to the proposed drawings, than then remake, adjust, in general, pay extra for your own mistakes and blunders.
What do we consider when designing

The scheme of a greenhouse from a profile pipe should take into account the following points:
- The material from which the skeleton of the structure will be erected. Here you can also add material that will go to the shelter of the greenhouse itself;
Information!
Looking ahead, I would like to say that the profile product involves coating with polycarbonate sheets or glass, cover is extremely rare.
Firstly, the pipe is a serious structure, and the frame from it turns out to be powerful and non-separable.
The frame remains at its post for the winter, but the film must be removed; secondly, the film coating is short-lived and it is more reasonable to use it with lighter materials, for example, with PVC pipes or reinforcing bars, (the price of which will be clearly lower than the price of basic products).
But if you use the film in the summer, it is better to close the metal base, either with newspapers or with a cloth base in order to avoid the temperature effect of the heated metal on a rather thin film sheet.

- Frame type. Greenhouse projects from a profile pipe offer at least five types of frames;
- Foundation type. There are three basic types, although it is for frames made of profiled material that a tape or piles with a grillage will be preferable.
Interesting to know!
Of course, we will analyze the foundations, but I want to say that the base in the form of a wooden box for metal frames in the form of profile products is practically not used, a wooden independent box is rarely used for a frame made of a 20x20 mm pipe, but this is more an exception than a rule.
If everything is clear with the materials, let's start designing
 Arched design is the most popular.
But the drawings of greenhouses from a profile pipe are of five types:
- Arched structures. Semicircular roof slopes are good, but it’s quite problematic to bend a 20x40 product with an arc, most likely, this service will have to be ordered and paid separately.
- Gable skeletons - a hut with a transparent roof and walls, that's the whole project of a greenhouse from a profile pipe.
- Building with a polygonal roof. Drawings of a greenhouse from a profile pipe suggest bringing the roof structure as close as possible to a hemisphere, and without bending the material. In this case, the roof slope consists of five fragments.
- Wall frame. This design involves the installation of stationary greenhouses and winter gardens. And although the frame itself is quite simple in relation to its counterparts, the labor costs for the construction of such a greenhouse will be much greater, since most often it is a stationary greenhouse for year-round use with everything that follows from this.
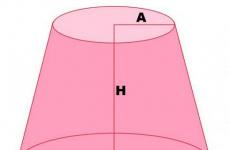
- Pyramidal shape. A drawing of a greenhouse frame from a profile pipe suggests the shape of two pyramids interconnected at the bases, while the lower pyramid is cut off by 2/3. This is quite an interesting, but still experimental form of the greenhouse.
We will install the frame on the base, it is important on which

To install the skeleton, supports are needed, and the more serious the frame, the stronger the foundation.
For a heavier frame skeleton made from a 20x40 mm pipe, two types of foundation are applicable:
- Monolithic tape. This is a fairly solid foundation, capable of holding deadly and more powerful structures than a pipe skeleton. When erecting it, it is necessary to remember the following rules: the foundation for year-round use must be at least 20 cm wide and deep to the depth of soil freezing, must be insulated.
The tape for the fortress itself is reinforced, while the reinforcement in the corners is reinforced with additional metal pins or elements, the entire reinforcement team is fastened to each other, forming a three-dimensional skeleton. The tape comes out of the ground, forming a base, at least 30 cm;
- Piles. There can be reinforced concrete monolithic, and prefabricated brick, as well as metal, which are installed using special equipment. Each element is erected according to the principle one at a time in the corners and then every 1.5-2 meters.
All piles are interconnected by a grillage, which can be made in the form of a shallow foundation tape, or can be in the form of a metal channel. Docking of the metal frame and the concrete base occurs with the help of anchors, metal to metal can be fixed by welding, or by bolts.

Advice!
Regardless of the basis on which you install the frame, waterproofing must be installed between the base and the structure.
You can use roofing material and bitumen, heated to a wet state, for a strip foundation assembled from a brick or reinforced concrete surface.
A metal channel or a wide square pipe must be additionally coated with an anti-corrosion compound, and then simply lay the roofing material.
- For lightweight structures, you can use a wooden beam frame, or you can use the products themselves as bases, extending 50 cm and being a continuation of the main vertical frame ribs that are dug in the ground.
Finally

Any design is assembled with your own hands and quickly enough, you may have to tinker with the foundation, but it all depends on how you are going to operate your building, that's the whole instruction. (see also the article). The video in this article also prepared its own view on the topic.
There are many varieties of greenhouses. Some are made from wood, others from polycarbonate, and so on. Particularly noteworthy are structures created from a metal profile (pipes). It is this material that can last for a long time, withstanding strong destructive effects.


Features and types


Homemade greenhouses are usually performed in one of three options:
- attached to houses (the roof can be shed or oval, without pronounced symmetry);
- detached arched buildings;
- greenhouses "house", equipped with a gable roof.
The typical size of the components determines the most common dimensions of buildings: 3, 4, 6 or 12 m in length, from 2 to 6 m in width. The most convenient dimensions for a pair of parallel beds are 3x6 m, for three beds - 3-12x4-6 m.


Advantages and disadvantages
A greenhouse from a professional pipe has five strengths:
- the design lasts a long time;
- blocks are fixed quite simply;
- assembly is easy and convenient;
- the construction can be done in any configuration you like;
- applied coatings are very diverse.


As for the shortcomings, it is quite difficult to bend the profile. The solution to the problem is this: bend one of the pipes filled with sand, trying to give it the most accurate shape, and use it as a template.
The choice of profile and shape of the structure
In the manufacture of a square or rectangular pipe, the following can be used:
- hot deformation;
- cold deformation;
- electric welding;
- electric welding combined with cold deformation.


To make arches, you will need a profile pipe 20x40 (10 pieces each), with an approximate length of 580 cm. There are two options: either immediately request cutting to the desired size, or buy regular models 6 m in size. For arched structures, it is worth taking material with a section of 4x2. Jumpers are built of metal 2x2 (67 cm long).
Official requirements for a profile pipe are established by GOST 8639-82 and 8645-68. There are options based on various metals, most often builders prefer steel with an external anti-corrosion layer. Optimum reinforcement is achieved by four stiffening ribs that take the maximum part of the load.
A galvanized profile pipe must have a special layer both inside and outside. Distinguishing quality material is easy - it should be fairly light. The frame made of it is not difficult to move to another place or transport by car. Due to the solid protective coating, the risk of corrosion is minimal.
If you need a guarantee of increased mechanical stability of the structure, take a profiled galvanized pipe with additional reinforcement. Such material calmly transfers pressure up to 90 kg per 1 sq. m. According to the provisions of GOST, such structures can serve up to 20 or even up to 30 years. Even if the galvanized layer is bent, it will develop dents and other defects, but the coating will almost certainly remain intact for a long time.


To make a frame from an unprotected pipe, welding is used. Galvanized elements are connected with bolts, special connecting parts or corners. It is not very practical to use metal elements of large diameter, because they are excessively heavy and inconvenient.


Project and preparation
Drawings in most cases are drawn up in standard sizes - from 300 to 1200 cm. It is recommended to find out this indicator from manufacturers or sellers so as not to overpay for extra material and not leave scraps.
Plans should clearly show:
- base;
- vertically directed racks;
- roofing;
- top harness;
- Door;
- windows and vents;
- spacers.


When drawing up a project, you should pay attention to the level of illumination. Any greenhouse should be directed strictly to the south. The permissible surface difference is a maximum of 100 mm. In accordance with the scheme, the markup of the building being created is carried out. For this, stakes and rope are used. If you check the outlined lines diagonally, you can do everything quite evenly.
It is not at all necessary to use all profiles with a section of 40 by 20, 20x20 or 40x40 mm. Due to the relatively thick body (from 0.2 cm), such elements are quite strong. Horizontal screeds can be made from a profile with a cross section of 1 to 1.5 mm, because exceptional performance is not required.
When calculating the height of a building, they are primarily guided by the growth of the owner of a summer house or a country house. It is usually assumed that the ceiling should be made 0.3 - 0.4 m higher than those using the greenhouse, because the values \u200b\u200bcan range from 190 to 250 cm.


Size calculation has another subtlety - adaptation to the finishing material. When the frame is covered with a film, this does not matter much, but when using polycarbonate, it is important to ensure that the dimensions of the material are enough to cover the entire height without cutting or adding. A typical sheet of cellular polycarbonate has a length of 6 m. In the case of an arched greenhouse, a formula must be used to calculate the circumference. It is worth considering that a height of 2 m is usually excessive, but 190 cm fits almost perfectly.


When preparing for the construction of a double-slope prefabricated greenhouse, it is recommended to take into account the properties of the soil. The best results are achieved when installing in dry areas, since, with all the protection of the supporting structures, it is better not to subject them to severe tests. Sandy soil is superior to clay soil because it does not swamp so much.
They try to direct the longest side of the structure to the south, so maximum sunlight will penetrate inside. Keeping the heat inside the greenhouse and facilitating movement around it helps to place the door at the end.


As the practice of thousands of gardeners shows, the door should be made at least 0.7 - 0.8 m wide. As for the height, it is determined by the overall dimensions of the structure. If it is planned to build a major greenhouse, a kind of vestibule or corridor is beneficial for two reasons: it forms an additional layer of air (thermal barrier) and can be used as a place to store inventory. When opening doors, this gateway will reduce heat loss.


Foundation construction
Greenhouses made of profile pipes are lightweight, but this advantage often turns into a serious problem, because it is not difficult for intruders or gusts of wind to break such a structure. The output is the manufacture of a foundation of a tape or pillar type (its choice is determined by the structure of the soil). In any case, before the start of construction, the site is thoroughly cleaned of contamination, the upper layers of the earth are removed. Then they make markings, stuffing wooden stakes around the perimeter of the structure being created, which serve to hold the rope.


Then you can build the foundation itself. If special anti-vandal characteristics are not important, and there is also no threat of strong wind, you can limit yourself to a columnar structure based on asbestos-cement pipes.
The work process includes several stages.
- The earth is drilled with a strictly defined step. The diameter of each hole should allow the pipe to freely go inside without adjustment.
- After placing the supports in the holes, the outer gaps are filled with any suitable soil to be compacted.
- The inside of the pipe is filled with cement, ensuring the absence of cavities.
- A metal plate or a pre-cut piece of reinforcement is introduced from above (this will be the coupling of the foundation and the frame of a home-made greenhouse).


Frame assembly and sheathing
Arcs are best created by a pipe bender. Manual work in this case is not only difficult, it also does not allow obtaining the necessary accuracy. The assembly of the body begins with the ends of the structure. Pipe sections are usually connected by welding using tees and angles, if you want to achieve the highest strength. But when the task is set to make a collapsible greenhouse with your own hands, you need to use couplings. The final step is to cover the greenhouse body with polycarbonate.
To fix the sheets, self-tapping screws with thermal washers are used., which prevent the penetration of water into the cells of the substance. The cells themselves should be placed at an angle or vertically, since moisture will begin to stagnate in the horizontal plane and spoil the material.


A greenhouse in the form of a "house" with a full-length gable roof should be equipped with both an entrance door and vents. Experts make a miniature greenhouse of an arched configuration with only one door, without ventilation products.
The advantage of the arch shape is that such a greenhouse is very stable and practical. The aerodynamic quality of the design allows it to effectively endure powerful gusts of wind, avoid the accumulation of snow and ice. The problem may lie only in correctly bending the profile pipes. In addition to using a pipe bender and turning to professionals, you can also use simpler tools, including a radius template.


It is possible to bend the profile without heating with the addition of filler, although this is not necessary for elements thinner than 1 cm. If, nevertheless, relatively thick components are used, the addition of sand or rosin greatly facilitates the work, so it becomes easier and faster to bend a thick pipe ourselves. Some home craftsmen use large-diameter springs that can be inserted into the cavity of the professional pipe. The mechanical properties of such an "assistant" provide a bend without changing the section of the profiles throughout the pipe.


Another way to give the workpiece the desired shape is a bending plate with holes made in it. The notches serve to arrange the rods, which will serve as a stop. Having placed the pipe between a pair of rods inserted into the plate at the required distance from each other, the profile begins to be bent, gradually moving the force from the middle of the piece of metal to its periphery. It is quite possible to do the work in this way, but it will be very difficult, and the result will depend on the efforts made.


Very thick pipes are best bent after preheating. Filling the profile with carefully sifted sand helps to ensure a uniform bend. Since you have to work with heated metal, you must wear protective gloves. It is also important to take care of the safety of the fire source.
The sequence of actions is as follows:
- create pyramidal wooden plugs (their length is 10 times the width of the sole, two pipes should freely enter at the widest point);
- grooves are made in the plugs designed to bring hot gases out;
- burn the desired section of the profile;


- the filler is freed from very large particles (imprinted on the surface) and from very small ones (they can fuse into the metal);
- sand is calcined at a temperature of 150 degrees;
- on one side of the pipe put a sealed plug that does not have recesses;


- from the opposite direction, a funnel must be inserted into the profile pipe, with the help of which calcined sand can be dosed into the cavity;
- the walls are tapping (the echo should be muffled);
- after filling the pipe with sand, use the second plug;


- the fold point is marked with chalk, the segment is thoroughly fixed in a vice after being applied to the template;
- the welded pipe must be bent with the joints placed on the side (do not bend in the direction of the welds);
- warming up along the marking line should occur red-hot;
- giving the metal softness, it is bent in one measured movement.