How to repair roof rafters. Do-it-yourself roof repair. Complete roof replacement
The truss frame sets the geometric and operational parameters of the pitched roof. Due to violations in the installation technology, due to flaws in the manufacture of its elements, distortions of the system, traditional leaks, holes in the coating appear, threatening emergency situations.
In order to build a reliable and stable roof structure, you need to clearly know how the sawing and installation of rafters is performed, followed by fixation to the supporting elements.
Rafters, or rafter legs, are wooden or metal beams installed on the house box at a given angle. They determine the configuration of the roof structure, take on and steadfastly resist the sum of permanent and temporary loads acting on the upper enclosing system of the building.
The structural simplicity of the rafter legs is extremely deceptive. In fact, these are quite complex elements that require careful marking and accurate cutting. Inconsistencies in the connections of the rafter legs with the Mauerlat, with each other and other components of the system lead to a change in the shape of the slopes, a violation of the integrity of the coating and the destruction of nodes.
On the other hand, competent installation of rafter legs can correct some errors in the construction of the house box, and not aggravate the situation by clearly repeating and increasing wall height differences. True, in such situations, the frame elements are made individually and scrupulously adjusted in fact directly at the facility.

However, before dealing with the specifics of installation, you need to find out what their design differences are, according to which the rafter legs are divided into two groups, these are:
- Hanging. Type of rafters that do not have an upper support. At the top of the roof, the rafter legs rest against each other with their ends. So that under the weight of the components of the roofing cake and snow, such a design does not burst the Mauerlat beam, the hanging rafters are connected with a horizontally installed puff.
- Layered. A kind of rafter legs, stacked on two supports of different heights. At the top, they most often rely on a ridge run installed in the cross to the rafters, less often they rest against each other, cut down at an angle. The bottom rests on the Mauerlat beam or rests against it.
The scope of their application and installation technology depend on which group the rafter legs belong to. The hanging variety is collected on the ground, and the trusses, made in the form of peculiar triangles, are raised to the roof and mounted in a form completely prepared for installation.

The advantage of building a truss frame using hanging technology lies in the safety of work and the ability to perform nodal connections as accurately as possible. If the simplest version of a hanging truss with a puff at the bottom is used in the construction of the roof, you can abandon the Mauerlat device, in place of which a narrow leveling board is quite suitable.
The disadvantages of hanging technology are accompanied by advantages. For example, a truss assembled on the ground is much more difficult to transport to the installation site than boards and timber for layered rafters. There are restrictions on the spans to be covered: the limit is 14 m, above which it is unreasonable to install wooden beams prone to sagging without intermediate supports.
The rafter legs of the layered group both top and bottom are based on independent structures. The top of them is laid on a purlin structure, which is mounted on the floor beams or on the bed, replacing the Mauerlat on the inner wall. The bottom is either installed on the Mauerlat, or rests against it, catching on the bar with a tooth or a support bar sewn instead of a tooth.

The advantage of layered systems is rightfully recognized as the possibility of overlapping almost any span in size. It’s just that with an increase in the overlapped space, the design becomes more complicated: it is supplemented with struts for a couple with racks, additional runs, coupled with beds, fights.
The layered structure is assembled and mounted longer, because. it is built not from farms, but from individual elements. However, just this scheme has more opportunities to correct the shortcomings of a box or an unevenly settled log house. Because layered rafters are stacked individually, it is possible to slightly change the position and size of the node, in order to eventually form a perfectly aligned slope plane.

The specifics of the manufacture and installation of rafters
It is clear that for the construction of the truss system, lumber will be needed - long-length products of timber processing enterprises with clear geometric parameters. You will need a board or timber, on which, of course, there are no mounting cuts and cuts for installation.
Why are cuts and cuts needed? The fact is that when placed on an edge, boards and beams have too little support area. They are in contact with the Mauerlat with only one vestma in a thin line, because of which, at the slightest load from above, they can tritely “move out” from their position and drag the entire structure with them.
In order to increase the area of \u200b\u200bsupport in the junction of the rafter and Mauerlat, or it and an additional run, a corner cut is selected in a beam or board, a tooth is cut out or a support bar is sewn on. If the top of the rafter is paired with a mirror-opposite counterpart, then for a reliable stop, you will need a gash, the plane of which must be clearly perpendicular to the horizon.

The basic rule in the construction of truss frames is that the support sites selected in the lumber are strictly horizontal and vertical. At the slightest violation of horizontality with verticality, stability is lost, structural parts are displaced under their own weight and load, up to the complete destruction of the system.
Note that the nodes of the truss systems are entrusted with the obligation to ensure the possibility of a slight displacement and rotation when the load is exceeded. These movements are necessary in order for the structure to bend slightly, move slightly, but not collapse and maintain stability.
These subtleties should be known both to the master who decided to do the manufacture and installation of rafters with his own hands, and to the owner of the house under construction, who does not want to pay for the poor-quality labor efforts of the builders team. Let's analyze the common options to understand the essence of the process.

Hanging roof frame construction
Consider an example of the construction of a truss system over a log cabin of a bath. The span between the walls is small, it is easier and more reasonable to block it with a hanging structure, the installation of which will be carried out on the bypasses of the ceiling beams - matrices.
The log base is an almost ideal option for installing hanging systems, because. it is easiest to cut it into the horizon, eliminating the need to adjust the rafters in case of a violation of the geometry of the foot. There is no need for a Mauerlat device. However, the puff will have to be moved up in order to bypass the upper crown of the log house and form a useful attic space.

Before performing the installation of the rafters, a phased preparation of the log house is carried out. On both sides of the foot, we align the bypasses according to the lace tied to the nails hammered into the two extreme beams. On top of the bypasses, we cut off the slab so that the edge of each beam ends with a flat horizontal platform.
The surface formed after squeezing the upper bulge of the log along the edges of the beams is aligned to the horizon according to the level. We apply the specified control tool to three or more beams at the same time. If the level is not long enough to carry out such a check, use a long rail or board instead.

After squeezing all the excess, we mark the nests for the rafter tooth. To do this, we again use nails and lace. Note that it is possible to draw nest sampling sites on the bypasses both before the construction of hanging trusses and after. However, it is much more convenient to make nests before making rafters. They will help to carry out the fitting with higher accuracy.
To facilitate your work, it is advisable to find the center of the log house from the side of future tongs. At these points, it is recommended to nail along the control rail, one of the edges of which will indicate the axis of symmetry. You can do without rails if you already have some experience in the construction of roofs.

- We sew two inch boards 10–15 cm longer than the designed length of the rafters at the top with a nail or bolt so that they can rotate around this connecting point.
- On the rail installed in the center of the future tongs, we mark the design height of the truss system. We put one more mark above it - this is the height of the tooth, more precisely, the length of the vertical laid off from the base of the tooth to its top.
- We set the boards sewn at one point to the extreme bypasses so that the corner of each board rests against the future socket under the tooth.
- We combine the connection point of the boards with the upper mark on the rail, which determines the length of the rafters with the tooth.
- From the lower corner of both rafters, we set aside the height of the tooth, return with the template blank to the ground and cut out the tooth according to the markup.
- We return the template blank to its place, install it by inserting the teeth into the sockets intended for them. It may happen that after installation, the top of the workpiece does not match the directions of the rail. Then you need to pull out the nail and adjust the position of the top, be sure to mark a new point.
- After fitting the top, we draw a vertical line of their upcoming joint on both boards, measure the size of the crossbar and mark on the trimmings of the board the shape of the overlays for the upper joint of the rafters.
If everything turned out exactly and no more adjustments are required, the template is ready. We return with him to the ground. We disassemble the workpiece and make cuts along the marked lines. The parts obtained as a result of fitting and fitting will serve as a standard for the practically in-line production of roof trusses in the required quantity.

We will assemble hanging farms on the ground. Their installation, as well as fitting, should be carried out by at least two people. One master simply can not cope with such work. The performer at the top will install the truss, and the second one will change its position according to the plumb line. The position of each leveled and installed truss should be fixed with temporary struts.

To increase the stability of the system, we will install racks under the rafters:
- Let's mark the matrices under the place of installation of additional supports in an already proven way: we will hammer in a nail from opposite sides and pull the cord.
- We will hollow out nests in the logs according to the markings.
- Let's try a piece of a bar to the installation site. We mark on it the line washed down, taking into account the height of the spike.
- We will make a rack and two linings for attaching it to the rafter.
- Install the support made and fix the position of the truss truss on the other side in the same way. According to the verified scheme, we continue to work until we equip each rafter with an additional support.
To ensure the rigidity of the hanging system, the truss trusses are connected by wind ties - boards, poles or slats nailed from the inside of the structure. On the outside of the truss frame, rigidity will increase due to the construction of the crate.

The rafter legs are attached to the matrices with 200 mm nails or angle brackets. In this regard, metal corners and plates with perforation for fasteners significantly lose to traditional methods. To the sidewalls of the rafters we nail fillies made of a board, the width of which is half the material used in the manufacture of the rafters.
The length of the filly should be 70 - 80 cm more than the designed width of the overhang. This distance is necessary for their reliable connection with the rafter legs. Fillies can be cut in advance, or without preliminary cuts, you can nail the trimmings of a narrow board to the rafters, and then draw up the cornice line. However, the first option is more convenient and economical.
In most cases, as in the example above, fillies must be partially buried in the mats bypass, for this:
- We note in fact the width of the filly at the bypass.
- We make two cuts with a saw according to the markup for 2/3 of the thickness of the filly. We also saw the log between the extreme cuts with a saw. We refine the recess with a chisel, accompanied by a hammer.
- We install the fillies in the formed recesses, sew them with rafters with nails 100 mm long.
Upon completion of the installation of all fillies in the last ones, we hammer in a nail. We pull the control cord and mark where to saw off the excess.

The device of the layered roof frame
In the construction of a truss frame using layered technology, there is much in common with the installation of a hanging structure. The fitting is carried out in almost the same sequence, so it makes no sense to describe the actions twice. The main difference is in the methods of forming the upper node, because the tops of the layered rafters have a support - a ridge run.
If at the top the layered rafters are tritely based on a ridge run, they are laid either with a run, i.e. parallel to each other, or with a strictly vertical joint, similar to the docking of hanging legs. However, in most cases, they try to fix the upper part with a notch or a vertical cut with a tight fit to the ridge beam.
There are schemes according to which the layered rafters are based not on the ridge, but on the side run. In such situations, the top is formed according to the hanging principle, and the point of support on the girder is made out with a corner cut.
Let us analyze the most popular option in private construction for the construction of rafter legs with support on the lower corner cut and on the ridge run through a vertical gash. Note that the maximum depth of the cut should not exceed 1/3 of the width of the board.

Option for marking with a construction square:
- On the square, we mark the height of the roof and half the span on a scale. These values reflect the slope of the slopes and set the main angles. The proportions must be exactly maintained.
- If further use of the square is not planned, then the delayed points can be marked with screwed bosses or short screws with screws, if planned, then it is better with paint that is removed with a solvent.
- We apply a square to the board laid flat with the side on which the height of the roof is marked. We draw a line according to the indications of the square - this is the line of the upper cut of the rafter - the section of its interface with the ridge run.
- Cut along the marked line with a circular saw. Lay the board for sawing flat, as it should be when cutting in width. Longitudinal cuts are made with setting on the edge.
- From the top of the formed angle, we set aside the length of the so-called diagonal. This is the distance from the junction point with the run to the outer edge of the Mauerlat or the upper trim, if a frame house is being equipped.
- We move the square to this point. We draw a line parallel to the first.
- We turn the square over, move it along the workpiece so that 2/3 of the total distance is on the left, and 1/3 on the right. In the picture, these are 8ʺ and 4ʺ.
- The line of a smaller segment will just designate a cut for us.
At the end, we draw the outline of the cornice overhang on the board, cut it along the outlined lines and use the rafter blank made by ourselves to saw the rest of the roof elements.

You can apply the described method without a building square and marking the parameters of the roof on it. It is enough to imagine the process in order to set aside the necessary distances with a conventional drawing tool. However, without experience, you can get confused in the calculations of angles and segments.
To help novice builders, a template has been developed with options for forming corner cuts. It will help you navigate the manufacture of rafter legs from the most common lumber in this area.

In cases of laying rafter legs with notches in the upper and lower parts, it should be remembered that the depth of both notches must be the same so that the roof slope does not change during construction work. Usually, for the device of two equal cuts, an auxiliary bar is used, the thickness of which is not more than 1/3 of the thickness of the board.
The rafter blank is then installed with an edge on the Mauerlat and on the run. The bar is applied on the side in the area of the lower and upper nodes to outline the cut.
If the cut is needed only in the lower part of the rafter, and the top will be based on the run with a cut, the board is installed at the bottom on the Mauerlat, and at the top on the run and the bar, so that as a result of cutting, the slope of the slope does not change. At the bottom, a second bar of the same size is applied to the future node and the outline of the future cutting is outlined with it.

The same methods are used to form cuts with a tooth. The difference is only in the form washed down.
The installation of layered rafters begins with the installation of two extreme trusses. The elements are mounted one at a time, their position is carefully checked using a plumb line. Most often, extreme farms are arranged from paired boards, because. they carry more load. They are fixed with temporary spacers, then connected with a cord or rail to indicate the plane of the slope.
Ordinary rafters located between the extreme load-bearing trusses are installed according to the instructions of the laces. If necessary, correct the position of the legs according to the actual situation.

Video about installing rafter legs
Installation of rafters with fastening with metal corners:
How to make rafter legs with cuts for landing on a Mauerlat:
The device of the truss frame under the roof of the garage:
We have given and described only a part of the methods for constructing truss frames. In reality, there are much more manufacturing and installation methods. However, an analysis of the basic options allows you to perfectly understand how to properly make rafters and truss trusses for the roof, how to saw them down before installation.
Roof integrity is the #1 task of any homeowner. The thermal insulation of a residential building, as well as dryness and comfort inside it, directly depend on this. And if the integrity of the roof is broken, repairs are required, and repairs are urgent.
- emergency;
- capital;
- and planned.
The first is performed in emergency situations. The second involves the complete replacement of the roofing material and even the lag (all or some). And the third solves the problem of eliminating minor problems with the roof and extending its overall service life.
Let's try to figure out: how and when to carry out this or that type of repair? What materials and tools will be required? And is it possible to manage on our own, without the involvement of specialists?
Roofing materials
All currently existing roofing materials can be divided into 2 large groups:
- Soft, which include non-rotting canvases and cardboard. Both that, and another on special bituminous or bituminous and polymeric impregnation.
- Rigid. This is roofing iron, slate, as well as tiles of various types.
Soft roofing is more cost-effective because it is cheaper and easy to install. However, it has a number of disadvantages:
- short service life, from 3 to 7 years, no longer;
- exposure to the negative effects of climatic conditions (destroyed by rain, snow);
- exactingness to the flooring in several layers.
That is why, when it comes to roofing, homeowners today increasingly opt for rigid materials, despite the difficulty of laying some of them.
Repair or replacement of slate roof
 Slate is a special finishing plate made of asbestos cement. It can be of different shades and different configurations: flat, wavy, embossed. Its only drawback is the tendency to crack due to brittleness. Therefore, the first sign of the need for roofing repairs is cracked slate slabs. To assess the condition of the slate, you need to go upstairs and determine the extent of damage, complexity, volume and sequence of repair work.
If there is a lot of defective slate, it makes sense to replace the coating completely. If the damage is small and in a modest area, you can not change anything, but fix the roof using an adhesive prepared on your own, according to a special recipe.
Bonding activities should be performed correctly on a dry, non-hot day. Then the composition will dry faster.
To repair minor defects on the slate, follow the following step-by-step instructions:
- First, the roof must be swept and rinsed with a hose in the most thorough way.
- Then primed with a composition of water (3/4) and PVA glue (1/4).
- Next, you will need to prepare the same special adhesive composition: mix E-AK-111 frost-resistant water-based paint (1 part), M300 cement (1 part) and loose asbestos (3 parts). After mixing the ingredients, you should get a mixture that resembles thick sour cream in consistency. But it should not be cooked a lot at once, because it tends to dry out rather quickly.
- With a freshly prepared solution, it is necessary to smear all the damaged areas found, as well as the places where the slate is attached to the roof frame and at the joints.
- After applying and drying the first adhesive layer, it will be necessary to spread the composition a second time. And then the third and even the fourth. Each layer is applied thickly with a paint brush. And completely dry. Such repairs can extend the life of slate blood by another 9-10 years.
It is more convenient to cover the roof with an adhesive composition using a ladder with parallel overlays.
Replacement of slate sheets
If the slate roof is badly damaged, it will need to be redone. This should be done in stages:

Soft Roof Repair
If a partial replacement of the soft roof covering is required, it is necessary to cut down the defective area before the screed. And lay new material on this place using liquid bitumen and using a gas burner. And all seams, joints and junctions will need to be tarred.
When repairing a soft roof, the main thing to remember is the danger with which such work is associated. You need to protect yourself with special clothing and special protective equipment. And if you do not have the skills to conduct such events, it is better to entrust them to experienced professionals.
Replacing or repairing a metal roof
Today, many owners of country houses prefer to change existing roofing for new ones - high-quality, technologically more modern, beautiful and durable. These, of course, include metal roofing. True, it is used only for sloping roofs, and if the angle of inclination is less than 15 °, it will be necessary to additionally process the adjoining sheets with a moisture-resistant sealant.
The sequence of work for the complete replacement of the roofing with metal tiles is as follows:

At the very end, it is necessary to paint the places of damage to the upper layer of the metal tile (and this is possible with self-coating) with paint color to color.
Roll roof repair
Soft roll roofing should be inspected annually for defects. If this is not done, very soon the complete destruction of the sheet base will follow, and then the roof structure itself will begin to become unusable.
If defects in a soft roll roof are detected during a visual inspection, the following should be done:

Membrane roofs: basic principles of repair work
Features of the membrane coating
Separately, it is worth mentioning the membrane roof. This material is new in construction, but it is already conquering the market, and quite actively. It has a lot of positive properties, including:
- high strength;
- excellent indicators of moisture insulation;
- durability (service life up to 50 years);
- the possibility of installation on any grounds (shape, coating), up to green roofs;
- maintainability.
Basic principles of repair work
 Membrane roof coverings are indestructible. They have only one weak point - the seams. And here, in some places, the PVC or TPO membrane can disperse along them. Therefore, the repair of such a roof is reduced to restoring the tightness of the seams between the pieces of the film web. However, chemical and mechanical damage to roofing membranes is also possible. And then, too, will have to impose patches.
A leaky roof with signs of leaks is not a reason for discouragement and counting the upcoming costs for capital reconstruction. You should not relax either, because the consequences of even a minor defect can result in impressive damage to the decoration of the house and property. Dampness is the enemy of the wooden truss system and the electrical wiring passing through the attic, the proximity of moisture to which is really dangerous.
Therefore, at the first manifestations of wetting the walls and ceiling, you must immediately take measures to eliminate them. In a number of "current" cases, the owner of the house can successfully carry out roof repairs with his own hands.
Leaks are a clear sign of a malfunction in the roofing system. This is a characteristic indicator of an emergency, regardless of the degree of wetting of building structures.
It is impossible to leave even a minor leak without the owner's attention, which will certainly increase over time. It is necessary to deal with roof defects in a timely manner.
Prerequisites for a major overhaul
The list of reasons for a leaky roof is quite extensive. There are prerequisites in it for major alterations, and for cosmetic repairs that are quite accessible to the home master. Capital restoration is desirable to entrust the construction organization. It will be required if design errors and defects in the roof structure are revealed, such as:
- Incorrectly selected roofing that does not match the type of roof and the steepness of the slopes.
- Errors in the arrangement of the layers of the roofing cake and in the selection of materials for its construction.
- Incorrect calculation of the step of the rafter legs, misses in the device of the crate.
- Lack of cornice wind vanes, cornice air vents, insufficient ventilation in the ridge area.
- Violations of the roofing fastening technology, which cannot be corrected during the current repair.
- Notable oversights in the arrangement of junctions and intersections of the roof with pipes and other communications.
- Illiterately designed drainage system that does not provide a full flow of water.
The factors signaling the need for capital intervention also include the use of low-quality materials and fasteners, most often caused by a banal desire to save money.

The cause of roof leaks can be flaws not only in the design of the roof, but also in the house as a whole. Unaccounted for movements in the foundation or natural instability of wooden walls, for example, can cause the roof structure to skew. As a result, a violation of the tightness of the joints, displacement of nodes, the appearance of cracks, rupture and destruction of the roofing material.
Scope of current repair operations
In addition to serious design errors, there are standard causes of leaks that can be eliminated by redecorating the roof: after all, roofs must be constantly maintained, by analogy with all building structures. To do this, it is not necessary to contact the builders or be a roofer "from birth". You can handle it yourself if you just have to:
- Replacing a damaged area or roofing detail.
- Restoration of the tightness of the connection of the elements of the roof structure.
- Applying patches to leaky spots in the coating or waterproofing.
- Replacing worn or defective fasteners.
- Gutter repair.
The home master can eliminate minor defects in bitumen and polymer roll roofing materials. The simplest operations for the restoration of roofs covered with sheet metal and metal tiles are quite affordable. The repair of tiled and slate roofs with your own hands will not cause any particular difficulties, if you know the technological subtleties of working with the listed types of coatings. An important circumstance is the exact determination of the cause and location of the leak.

Roof leak classification
Focusing on the time and frequency of the appearance of leaks, roofing theorists divide them into three categories, these are:
- Leaks associated with liquid atmospheric precipitation. Traces of wetting or frank "dripping" appears directly during the rain or a little later after it. It usually flows with them along the lines of junctions that have lost their sealing, in areas of poorly arranged roof penetrations, in places where water accumulates. On a flat roof, such a defect is easily determined: it is located directly under the hole in the roof. With pitched structures, everything is much more complicated, because water can flow in one place and get wet in another.
- Leaks that appear during the melting of solid precipitation. Signals about their appearance are located in valleys, along overhangs, around drain funnels and near gutters. Those. in places of accumulation of melt water, the flow of which was prevented by ice.
- Leaks associated with wetting of the insulation. Most often they happen in the summer heat. Due to the significant difference between the outside temperature and the same parameter, condensate accumulates in the thickness of the insulation, the excess of which is able to “dump” the vapor barrier membrane. The second reason for their appearance is damage or errors in the waterproofing device.
The first type of leaks is most often encountered by owners who decide to repair their own roof with their own hands. In most cases, their actions are to restore the roofing. The second type requires a thorough cleaning or repair of the drainage system, the third - recalculation of the thickness of the thermal insulation with major alterations.

Accurate diagnosis is the key to success
The first step to completing a successful repair will be a detailed audit of the condition of the roofing system. Visual inspection in most of the simplest cases allows you to identify a leak and find damaged areas. True, it is only suitable for determining defects in the outer layers of the roofing pie. Violations inside the multilayer filling can only be found by an experienced craftsman.
Diagnostics should be carried out in two stages:
- Inspection of the roofing system from the attic. You need to check the condition of the skin, if any, of the rafters, floor, Mauerlat, if it is not behind the skin. Damp, swollen areas do not need to be meticulously looked for, they are immediately visible. The presence of a leak is also easily determined by the characteristic changes in the color of the wood: by discoloration or the appearance of dark spots. If the first visual inspection did not bring results, it is worth waiting for the rain and climbing into the attic while it is coming. Wet places will tell you in which direction to look for a hole in the roofing system.
- Inspection of the outer side of the roof. You need to thoroughly prepare for it, especially if you have to explore a roof with high slopes. You need to stock up on comfortable clothes, shoes with non-slip soles, a reliable ladder with a strong hook for fixing it on the skate. External examination begins with a ridge, gradually moving down the overhang. They study the condition of roof penetrations, junctions, inspect valleys, gutters and points of internal drainage.
It is great if, as a result of research, it turns out that the roof was leaking due to the banal stagnation of water due to clogging of drainage channels and funnels. This happens because none of the finishing roofings yet has 100% waterproofing properties. All the work then consists in cleaning the water drainage routes and repairing their leaky parts.
It may be necessary to install a tin gutter in soft roof valleys, for example, if the waterproofing carpet used to equip them does not cope with its duties. It is possible that a slight modification of the drainage and ventilation system will be required by installing protective nets on gutters, vents, funnels.

If mosses are found on the roof, they must be carefully removed from the coating. It is possible to clean bituminous and polymeric roofs only with a broom. With similar care, they treat corrugated board and polymer-coated metal tiles, because it is easy to scratch and render unusable. But a steel, copper or aluminum roof without a protective and decorative outer shell can be cleaned with a wooden shovel, but without fanaticism.

Optimal time to work
The most favorable period for carrying out repair operations on the roof is recognized as early spring or autumn. They are favorable because of the working temperature in the range from + 5ºС to + 15-18ºС. In general, it is not recommended to engage in major or current repairs of any type of soft roof if the temperature on the thermometer is below the specified lower limit. Both bituminous and polymeric material then loses elasticity, cracks, it is almost impossible to evenly attach it to the base.
Metal, asbestos-cement and ceramic coatings are not so demanding on the temperature regime, but it is much more difficult to work with them when the thermometer is negative.
Naturally, from the point of view of optimal operating conditions, liquid precipitation is undesirable. The awning will be able to protect the craftsmen from their impact, but the excess of air humidity in some cases negatively affects the repair procedures. It is difficult to achieve the ideal result of the adhesive operation, it is impossible to predict the outcome of applying the solution to cracks, etc.

Because some restrictions on repair work on the roof still exist, it is advisable to have "improvised" material in stock all year round. To apply a temporary patch on the roof, regardless of the type of coating, it would be good to replenish the household with a piece of roofing felt, roofing felt, polymer membrane or similar insulating material.
And at the same time with glue or bituminous mastic, no matter cold or hot, necessary for gluing a temporary repair device. It does not hurt to stock up on a piece of roofing tin.

Simple roof repair options
Based on the results of the preliminary survey, it can be concluded whether self-repair is available to the home master or it is better to hire roofers. For those who decide to make their own efforts, we offer an analysis of elementary repair operations. I want to immediately warn against the stubborn desire to restore a steep roof with a cold attic from the outside.
It is not always advisable for owners of buildings with a similar design to take risks by climbing onto slopes. If it is possible to replace the piece cover element from the attic, it would be wiser to take advantage of this significant plus.
Replacement shingle bituminous shingles
The indisputable advantage of flexible tiles is the ability to change only damaged tiles without dismantling the vertical or horizontal row to the damaged area. Cracks, holes and notches appear on it most often when cleaning snow in cold weather with a hard shovel or from falling heavy objects in the heat.
If the topping just crumbled from the surface, you should contact the manufacturer to replace it. It is rather difficult to present cracks in a piece element as a warranty case. After a long debate, you still have to change the damaged shingles yourself.

The sequence of work on the replacement of shingles:
- The edges of the top and side tiles adjacent to the element to be replaced are carefully lifted with a small crowbar.
- Having exposed the place of attachment, carefully remove the fasteners with a nail puller.
- We apply mastic on the back of the new shingle. The thickness of the mastic layer should be exactly the same as the manufacturer indicated in the instructions. No need to "overdo it", this reduces the quality of gluing.
- We bring a new tile under the upper element and arrange it in place of the old one.
- The edge of the upper shingle is slightly bent, we nail the tile with brushed nails. We try not to fall into the previous mounting point, moving closer to the upper edge by 3-5mm.
- Lubricate the edges of adjacent tiles with mastic and fix them in place.
If bituminous tiles are laid on low, almost flat slopes, it will not flow due to mechanical damage. In such situations, a complete replacement of the roof finish is recommended because it is not compatible with the type of construction.

How to repair a rolled roof
Repair of bitumen, bitumen-polymer and polymer roofing is carried out by installing patches from a similar material or from a fiberglass mesh, followed by the application of mastic. On holes in polymeric membranes, patches are applied only from above.
The patch to be repaired must overlap the damage by at least 5 cm in all directions. The edges of the patch are rounded. In order to create a strong connection, it is better to weld a piece of the membrane, but it can also be glued to a composition with a compatible formula.
The method of repairing a rolled bitumen and bitumen-polymer roof depends on the type of base:
- To seal a hole in the coating, laid on a solid wooden crate, put an internal patch. It should be 5-7 cm larger than the hole in all directions. The damaged area is cut crosswise. The edges of the incision, like petals, are bent outward. The back side of the patch is treated with mastic, carefully inserted into the hole formed and carefully straightened its edges under the coating. Then the petals of the cut are returned to their original position, and the lines of their connection are filled with mastic, hot bitumen or bituminous suspension.
- To repair a hole in a coating laid on a concrete base, a patch is placed on top. A piece of material with dimensions similar to the previous ones is treated with mastic, bitumen or suspension from the rear, then simply glued.
A soft roof that is broken or bubbling in many places should not be repaired with patches, it is better to completely block the strip or the entire carpet.


Seam roof repair
A roof covered with sheet metal can leak for three reasons, these are:
- Corroded material corrosion.
- Holes from heavy and sharp objects that have fallen on the roof.
- Violation of the tightness of the seams.
With the flow of standing seams, they fight either with the help of a hemming machine, or handicraft with a hammer and an auxiliary bar. The recumbent fold is easier to seal with fiberglass and cover the repaired area with polymer mastic.
Small holes and rusty holes can be patched like this:
- The repaired area is carefully cleaned with a brush with metal bristles.
- We cut out a patch from the roofing sheet metal, the edges of which will be 7-10 cm larger than the damaged area in all directions.
- The leaky place and the back side of the patch around the perimeter are first covered with flux, then soldered.
- After cooling, remove the excess solder with a file.
- We paint the repaired area or the entire roof.
If there are more than two or three holes on a metal roof with significant damage over the entire area of a sheet or a pair of sheets connected to a card, they are completely changed. A single perceptible hole in the metal is closed up by duplicating part of the sheet. This can be done if the edges of the repair patch can be inserted into the standing folds. Jewelry work, without experience it is better not to take it.


Repairing a metal roof
There are three common causes of metal roof leaks, these are:
- The result of installation errors.
- Use of poor quality fasteners.
- Holes due to improper cleaning.
The first point is related to capital alterations. You can fix the situation on the second point yourself. If the sealing washers of poor-quality fasteners are destroyed due to temperature fluctuations, it is necessary to act according to the following algorithm:
- Loosen the fasteners of adjacent sheets.
- We insert wooden wedges into the hole above the repaired area, placing pieces of roofing paper or glassine under them.
- We turn out the screws, remove the damaged seals.
- We change fasteners.
- We tighten the loose fastenings of adjacent sheets.
Single small holes are patched according to the standard scheme for repairing a metal roof. Sheets with multiple holes are best changed completely, proceeding in the same way as when replacing fasteners.

Slate repair without dismantling
Flat and corrugated sheets of asbestos-cement coating are extremely sensitive to mechanical damage. A hole in a fragile material can be made by a stone, a fallen tree, a bayonet of a shovel when cleaning, a carelessly stepping foot. The method of removing defects in the slate coating depends on the degree of damage. It is better to change a sheet with a significant hole by disassembling the roof to the damaged element vertically or horizontally.

For cosmetic repairs to repair small cracks and holes, a wide range of products is available:
- An oil paint used to repair a section of a roof with a grid of fine cracks. The surface is first painted, then a piece or strip of fabric is applied to it, then painted again.
- Silicone sealant combined with a thick fabric patch.
- Asbestos paste used to seal serious cracks. A composition is prepared from three parts of asbestos and one part of a binder solution. The solution is closed with equal parts of water with polyvinyl acetate glue. The solution is gradually introduced into asbestos. Stir, trying not to get lumps. In order not to swallow asbestos dust, all work is carried out in a respirator. The paste is applied in layers, the total thickness of the restoring layer must be at least 2 mm.
- A patch made of ordinary aluminum foil, planted with universal glue on the wrong side of the slate. To repair with foil, the sheet is dismantled if it is not possible to repair it from a cold attic. If the crack crosses the mounting hole, then it is sealed completely, and the hole for the fastener is drilled higher.
- Adhesive tape with butyl rubber backing.
- Bitumen-polymer mastic applied in layers interspersed with fiberglass.
- Epoxy resin used for bonding sheets split along the entire length. From the inside, the slate is first sealed with fiberglass, then resin is poured into the crack from the outside.

The original method of temporary roof repair will demonstrate the video:
We have proposed the simplest ways of repairing coatings that are actively in demand in the dacha economy. In fact, the topic of repair is quite extensive, and more complex problems can be fixed on your own. However, it is better to go through the school of a repairman from the basics.
Cracks, holes, punctures and other damage to roofing are serious problems that need to be addressed before they become more serious. Dampness and stains on the ceiling are only a small part of what leaks in the roof can lead to.
House roof repair
Problems relating to the construction of the roof and roofing are quite regular situations that can be solved without resorting to the help of specialists. To find out what technical condition the roof of the building is in, it is necessary to conduct a visual inspection of its structure.
To do this, you need to go up to the attic and carefully examine the space around, the truss system, the crate and other structural elements. As a rule, if the roof leaks, then already during the inspection you can feel the persistent smell of dampness. In turn, due to constant dampness and moisture, the supporting elements of the roof will be affected by mold.
It is better to carry out a roof revision in rainy weather - this will allow you to more accurately determine the places where the roof is leaking. If there are no signs of damage to the roof, and the walls and ceiling in the house are still damp, then the cause should be looked for among possible problems in the water supply and central heating system.
Roof repair must begin with an inspection of the inter-attic space and the existing roof structure.
The most common reasons why it is necessary to carry out current or major repairs of the roof include:
- violation of the integrity of the roofing - cracks, ruptures, dents and other mechanical damage received during snow removal, cleaning of the roofing, etc. As a rule, leaks and damage to the heat-insulating cake occur due to mechanical damage;
- depressurization of the joints of the roofing carpet - loss of tightness of the joints of the roofing with adjacent elements: chimney, walls, parapet, antennas. If the laying technology is violated, depressurization of the seams between the roofing sheets is possible;
- damage to the drainage system - partial or complete failure of the roof drainage system. Usually, drainage problems are observed on flat roofs, when water simply stagnates on the roof surface. As a result, both damage to the roofing and moisture to the load-bearing walls of the building can occur.
When inspecting the roof, remember that the leak may not be where water seeps through the roofing cake and drips onto the attic floor. This is due to the design features of pitched roofs, due to which water can freely flow through the rafter system.
Current roof repair
The current roof repair is the restoration of the structure and the elimination of local damage to the roof. Usually needed when the area of damage is small compared to the total area of the roof. All maintenance work can be done independently. This allows you to significantly save on labor costs. Instead, you can choose better materials.
The current repair of the roof is aimed at eliminating local damage to the roofing
Roof maintenance includes the following types of work:
- replacement of the damaged section of the roofing carpet;
- restoration of the tightness of the connecting seam between the various elements of the roof structure;
- patch repair aimed at covering leaky areas of the coating;
- single replacement of elements of the truss system;
- roof drainage system repair.
To perform current repairs, various materials are used, the choice of which directly depends on the design of the roof. For example, for the repair of pitched bituminous roofs, bitumen-rolled coatings are used. When repairing roofs, coverings with metal tiles, galvanized sheet metal or tile elements similar in color are used.
Overhaul is carried out in cases where more than 40% of the roof surface has damage of a different nature. If the roof structure is a rafter system, a heat-insulating cake, vapor barrier and roofing, then a complete replacement of one of the roof elements is carried out only after a scheduled inspection.
It is better to entrust major repairs to qualified workers who can not only carry out repair work, but also eliminate the cause of damage or errors made in the design of the roof structure.
Major repairs of the roof are carried out in the case when more than 40% of the roofing surface is damaged
Major repairs are necessary in the following cases:
- inconsistency of roofing material with the type of roof;
- mistakes made when laying the roofing cake;
- step discrepancy between rafter supports;
- the presence of problems with the installation of the crate;
- partial or complete lack of roof ventilation;
- violation of the technology of laying and fixing roofing;
- oversights made during the adjoining of the roofing to various communications;
- errors in the design of the drainage system.
It should be noted that major repairs are carried out only in cases where the implementation of local repairs is impossible or will not bring results. For example, if there is damage to the gable roof truss system, coupled with damage to the roofing pie, then current repairs are impossible. In this case, a complete enumeration of the heat-insulating layer, replacement of leaky rafter legs, as well as a complete replacement of the roofing on one of the roof slopes will be required.
When performing a major overhaul, it should be borne in mind that roof damage is not always associated with a violation of the technology for working with roofing materials or errors in calculations. Sometimes roof damage is caused by increased soil mobility. Because of this, the bearing elements of the structure are displaced and the rafter legs are skewed, as a result of which there is a depressurization of the connecting seams and damage to the coating.
Rafter system repair
The rafter system is used to create pitched roofs. It includes vertical racks, inclined rafter legs and struts. All elements of the system are responsible for the bearing capacity of the pitched roof. With the help of the truss system, the roof structure is able to withstand the load exerted by the roofing material, the volume of snow lying on it, as well as the flows of flowing water and gusts of strong wind.
Moisture on the rafters, racks and struts leads to the formation of mold and rot
Therefore, it is important to carry out a scheduled inspection of the truss system and, even if there are minor damages, carry out local repairs. Otherwise, not only the roof itself, but also the supporting elements of the structure may suffer.
The general technology for repairing the truss system is as follows:

During work, it is recommended to substitute temporary supports under the repaired rafter legs or racks - for this, it is better to work with a partner. After replacing the damaged elements, the insulating materials are laid back, the battens and roofing are installed. If these elements of the cake were also damaged, then they are partially or completely replaced.
Roof deck repair
The roof sheathing consists of edged boards or sheets of moisture-resistant material laid perpendicular to the rafter legs. Sheathing boards are laid with a certain step, which is calculated in advance based on the expected load of the roofing material and snow masses.
Solid roof sheathing is made of OSB-boards or moisture-resistant plywood
The main problem affecting the integrity of the lathing elements is moisture entering through damage to the roofing material. Therefore, the repair of the lathing is carried out in conjunction with the restoration or complete replacement of the roofing.
To repair the crate, you will need to do the following:

As mentioned above, the sheathing boards must be laid at intervals, the size of which depends on the angle of the roof. For example, for pitched roofs with a slope of 5–10 degrees, the lathing must be solid and can be made of moisture-resistant plywood or OSB. When laying roofing, the overlap between adjacent sheets must be at least 300 mm.
Roof eaves repair
Roof eaves or overhangs prevent running water from getting under the roof covering, onto load-bearing walls, windows and other building elements. Additionally, cornices provide ventilation of the under-roof space.
Structurally, the roof cornices are formed by protruding the rafter legs at a certain distance. On the front side of the building, cornices are formed due to the protrusion of the truss system beyond the bearing wall.
For filing roof eaves, it is better to use vinyl or steel siding.
Repair of cornices, as a rule, is associated with the replacement of sheathing material. Basically, either elements of vinyl and metal siding, or an ordinary edged board treated with an antiseptic are used for this.
Replacing the skin is carried out according to the reverse technology. First, the finishing bar is dismantled, and only then the plastic or metal soffit. In the case of a board, it is enough to dismantle the damaged boards and replace them with new ones. When working with wood, remember that any structural element must be treated with two layers of water-repellent impregnation.
Roof Repair Materials
Various materials are used for roof repairs, from bituminous mastic to create a seamless roofing carpet and ending with high-strength sealant used to seal metal roofs.
Adhesives for sealing
Adhesive compositions for sealing are used in the construction of both flat and pitched roofs. Used for sealing joints between sheets, canvases and various elements of roofing. Additionally, they can be used to eliminate gaps when laying materials near chimneys, drains, ventilation openings and other communications.
Sealing tape or tape sealant is used to repair minor damage on bituminous rolled roofing.
Conventionally, adhesive compositions for sealing joints can be divided into the following types:

Roof Repair Mastic
Bitumen mastic is a viscous plastic mass consisting of finely dispersed fillers and special additives, rubber, various resins and plasticizers. It is used both for waterproofing various surfaces, and for the installation of full-fledged roofs. For example, in order to seal a flat roof for technical and storage rooms.
One-component bituminous mastic is used to repair localized damage on a flat rolled or soft roof.
Bituminous mastic is characterized by increased elasticity, resistance to low and high temperatures, good adhesion to concrete and metal, as well as resistance to vibrations and weak mechanical stress.
Depending on the composition, bituminous mastic is divided into the following types:

Any bituminous mastic allows you to create a seamless monolithic roofing sheet that reliably protects the roof structure and interior from dampness and moisture. In addition, mastics are ideal for local repairs of bituminous flat roofs.
Among the disadvantages of these compositions, it can be noted that repair work is possible only on a sunny day, when the likelihood of precipitation is minimal. In addition, in the absence of work experience, it will be quite difficult to control the thickness of the bitumen layer, which may affect the final result.
metal roof sealant
For the repair of metal roofs, a sealant based on bitumen or silicone is used. It is a water resistant compound based on bituminous elastomers that can be used even in high humidity conditions. The composition is resistant to UV rays and can be applied both at low temperatures up to -35 ° C, and at high heating to temperatures above 100 ° C.
Bituminous sealant eliminates minor damage to metal tiles and other metal roofing
Other benefits of this sealant include:
- excellent adhesion to most materials used for roofing;
- ease of application - the composition does not spread, does not drip and easily penetrates even into small cracks;
- environmental friendliness - bituminous sealant does not contain asbestos and other highly toxic substances.
When working with this type of sealant, there are several restrictions that are usually indicated on the packaging. For example, once applied, the sealant must not be painted over with organic solvent based paint. It is also not recommended to use it in conjunction with foam insulation, which is often used for thermal insulation of roofs.
Metal Roof Paint
The use of metal as a roof covering is a very good choice, especially when you want to get a durable coating that does not require seasonal repairs. But the metal itself is susceptible to moisture and corrosion.
Therefore, to protect metal roofing, special paints are used, which can increase the service life of the product by 2-3 times. This also applies to galvanized steel roofs. By itself, galvanizing copes well with corrosion, but even a slight damage to the front layer can lead to damage to the entire sheet of material.
To protect the metal roof, it is painted with special enamels that protect the surface from mechanical damage and prevent the development of corrosion.
For painting metal roofs, a variety of paints and varnishes are used. The most common enamels marked EP-1236, EP-1333 and EP-140 M. These compositions are suitable for painting aluminum, copper, galvanized and other surfaces. They are characterized by high UV resistance, resistance to mechanical stress and a wide choice of colors.
If it is necessary to use compositions with high adhesion, it is recommended to purchase enamels marked AK-06, AK-070M and XC-5146. To obtain the required consistency, you can use the P-5A solvent.
Roof Repair Methods
Roof repair work can be done independently. Especially if the owner of the house already has experience with roofing materials, bituminous mastic or sealant. In other cases, it is better not to take risks and entrust the repair of the roof to professionals.
Roof repair with liquid rubber
Liquid rubber is a water-based bitumen-polymer composition, which is applied using special equipment and a spray gun. With its help, you can create a seamless roofing carpet. It is mainly used in cases where the use of rolled or metal roofing materials is not possible due to their higher weight.
Liquid rubber can be applied both with hand tools and special high-pressure units
Among domestic manufacturers, liquid rubber under the Technoprok trademark can be noted. The composition is a two-component mixture and is widely used for flat roofing in the industrial sector.
Roof repair technology using liquid rubber consists of the following steps:

Video: spraying liquid rubber on the roof
Roof repair with roofing bitumen
Building bitumen is used for flat roofs, as well as their waterproofing after the arrangement of a concrete screed. Currently, it is rarely used for roof repairs, as there are simpler and more economical materials. Despite this, it is widely used for the production of roofing materials, including bituminous mastic and bitumen roll coatings.
Roofing bitumen is available in ingots of various sizes, which are melted before being applied to the work surface.
The technology of work with roofing bitumen is as follows:
- The damaged area of the roofing must be cleaned of dirt and dust. If the area of damage is extensive (more than 40%), then it will be necessary to completely dismantle the upper waterproofing layer.
- After dismantling and garbage collection, it is required to determine the technical condition of the concrete screed. If the concrete layer does not have pronounced damage in the form of cracks and chips, then the surface is additionally cleaned and prepared for further work.
- If the concrete screed is severely damaged, it must be dismantled with a construction tool. For this, a jackhammer, a puncher and a grinder with a disc for concrete are used.
The damaged screed is broken with a perforator
- After dismantling the screed, the work surface is cleaned again. Further, a heat-insulating material up to 10 cm thick is laid on the roof surface. For this, extruded polystyrene foam or polystyrene is used.
Under the new screed, insulation from modern composite materials is laid.
- Linear guides are installed on top of the insulation in increments of 60–70 cm. After that, the concrete mixture is mixed based on M300 cement. To improve the strength properties of concrete, fiber is used, which is added to the mixture during mixing.
- A concrete screed up to 8–10 cm thick is poured. A wooden or metal rule is used to distribute concrete. After pouring, the screed is covered with a tarpaulin or polyethylene. In the process of drying, it must be moistened 2-3 times a day.
A new concrete screed is poured onto the insulation layer
- After 25-28 days, you can start waterproofing the roof with bitumen. To do this, you need to make a small fire near the place of repair work and melt the bitumen. For the preparation of the bituminous mixture, bitumen with the BNK 90/30 marking is used.
It is convenient to distribute bitumen over the roof surface using wooden trowels and metal scrapers.
- Bitumen is applied after its complete melting. Bitumen is applied evenly. For spreading, a hard-haired roller and a metal scraper with a long handle are used.
If possible, it is better to use liquid modified bitumen for repairs.
Video: melting bitumen to make mastic
Roof repair technology with mastic
The process of repairing a roof using bituminous mastic is in many ways similar to the technology for applying liquid rubber. Bitumen mastic, depending on the type, is one- or two-component.
One-component compositions, as a rule, are used in conjunction with bituminous roll and metal roofing. Two-component compositions are used for the device of flat mastic roofs.
To apply bituminous mastic, paint brushes and rollers with a hard bristle are used.
The general technology for repairing a roof with mastic is as follows:
- The surface of the roof, on which there are damages of a different nature, must be cleaned of dust, sand and other abrasive particles. To dry the damp roof, a building hair dryer or heat guns are used, which are located under a special canopy.
- Prepare bituminous mastic according to package instructions. As a rule, an electric drill with a mixer attachment is used for this. If required, the mastic is carefully heated to operating temperatures.
- Apply bituminous mastic to the cleaned roof surface. To do this, it must either be carefully poured onto the surface and spread with a scraper and roller, or applied as a paintwork with a brush and roller.
If the area of work is quite large, then it is possible to apply the mastic by airless spraying using a special spray gun. During the repair work, safety precautions must be observed. Mixing and distribution of mastic occurs only in gloves and goggles.
Video: repairing a metal roof with bituminous mastic
Roof repair is a long and labor-intensive process that requires an integrated approach. Major repairs can be avoided if you perform a routine inspection of the roof structure and fix the problems found in time. This is especially true for pitched roofs, when for revision it is enough just to go up to the attic and carefully examine the truss system for dampness and rot.
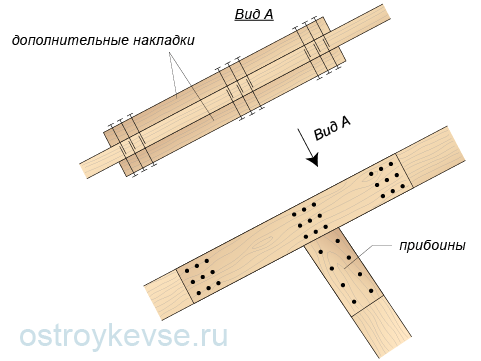
To increase the bearing capacity of the rafter legs (Fig. 68), both in layered and hanging truss systems, the installation of unloading beams (supports), double-sided overlays and struts is used.
Rice. 68. Strengthening the rafter legs with help
As the calculations according to the old SNiP “Loads and Impacts” showed, the rafters in the span between the Mauerlat beam and the rafter leg with cross-sectional dimensions selected according to strength characteristics often did not pass the deflection calculation and it was necessary to increase their height. It is possible to make a rafter leg of variable section by including an additional wooden beam in it - help. The help is fixed in the span between the Mauerlat and the rafter leg, the height of the rafter section is reached with its height so that it passes according to the deflection calculation. The support is fastened with bolt clamps or metal toothed plates.
Another dangerous knot in a continuous rafter leg is leaning on a strut. Ever broken a stick over your knee? So, in this design scheme, the brace is the very knee, here the largest bending moment arises, due to which it is necessary to increase the cross section of the entire rafter leg. There is no deflection in this node, therefore, it is possible to increase not the height of the rafter, but its width, by fixing the double-sided board plates (Fig. 69). The width of the overlays is selected when calculating the cross section of the rafter for the maximum bending moment. The pads are fastened with a nail fight, bolts or, as in the previous case, with bolt clamps. If the rafter is already reinforced with help, then it needs to be made longer and the edge be moved beyond the mowing support node. In this case, two problems are solved at once: strengthening the support node and deflection in the span.
 rice. 69. Strengthening the support node by increasing the width of the rafter
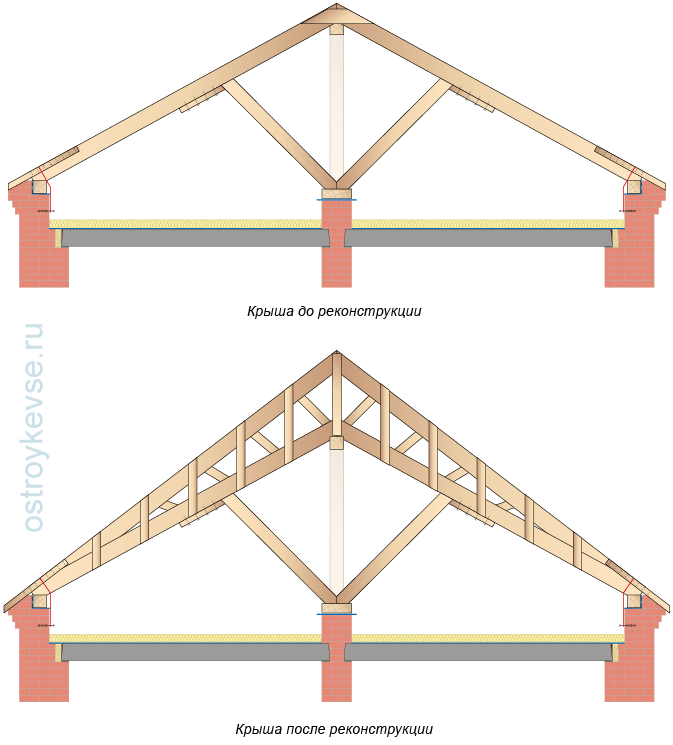
 When reconstructing the roof, new rafters are installed under a steeper slope, splicing them with the old (if they have not rotted) wooden-nail cross wall. New rafters can be inserted either on top of the old rafters or below them. The resulting farm provides not only a new slope, but also increased rigidity of the truss structure (Fig. 70). This method allows you not to dismantle the old roof and speeds up work, but it does not increase the under-roof space. If the purpose of changing the slope of the slopes was the construction of the attic, then the volume of the attic will remain the same.
 rice. 70. Strengthening the rafters with a plank and nail truss device
 Sometimes it happens that the end of the rafter leg rots, the support on the Mauerlat turns out to be unreliable, in this case additional struts can be attached to the lower end of the rafter leg, which rest against the same Mauerlat beam or an additional bed (Fig. 71). It is recommended to expand the lower ends of the additional struts - they provide better stability for the rafters. And the struts, supported on an additional bed, can partially reduce the deflection of the rafters in the span between the rafter leg and the Mauerlat. Additional struts are fixed with a nail fight with support in the surfs on the rafters.
 rice. 71. Strengthening the bottom of the rafter leg by installing additional struts
 When raw wood is used in roof construction (with a moisture content of more than 25%) and insufficient ventilation of a cold attic, with highly located dormers, their small area, or in the absence of attic ventilation, the lower end of the rafter legs or Mauerlat may rot.
Also, decay can occur in the absence or damage of the vapor barrier and air vents in the structure of the insulated mansard roof or clogging of their ends. Either when moistening the wood of the rafter legs and the mauerlat in roofs of any type during a roof leak, or when there is no waterproofing layer between the wood and the masonry of the wall and moistening the wood from the masonry.
There are several ways to restore and strengthen damaged structures.
1. Application of wooden slips. They are used for single damage to the rafter legs. Reinforcement is carried out by installing reinforcing wooden plates with bolting or nailing. The support of the overlays on the Mauerlat should be the entire end, followed by the installation of a wire twist (Fig. 72).
 rice. 72. Repair of the rafter support unit on the Mauerlat with overlays and prostheses
 2. Use of bar prostheses. They are used for massive damage to the rafter legs. Before starting work, the damaged rafter leg is strengthened on temporary supports, the coating is dismantled and the rotten part of the rafter leg is cut out. The prosthesis is put on the rafter leg and placed on the Mauerlat. The sawn end of the rafter leg rests against the support pad of the prosthesis, which prevents it from slipping. The rigidity of the upper compressed belt of the prosthesis is provided by a strut lattice.
3. The use of overlays based on the beam. This option is used if it is necessary to replace the rotten section of the Mauerlat and the end of the rafter leg (Fig. 73). Before starting work, the rafter leg is strengthened with temporary supports, the rotten sections of the leg and the Mauerlat are cut out, crutches are hammered into the masonry and a 1 m long beam is laid on them. a piece of bed. Two struts rest against this beam, fixed on nails on both sides of the rafter leg. The crate is supported by a new elongated filly.
 rice. 73. Repair of the rafter support unit in case of damage to the Mauerlat
 With insufficient air exchange in the attic, and as a result of this, the development of fungal spores and the decay of wood of wooden roof structures, a number of measures are taken to restore ventilation (Fig. 74). In the attic, you should study the nature of the movement of air, determine the air temperature at the upper boundary of the insulation (it should not exceed 2 ° C at any negative outside temperature) and arrange additional ventilation and dormer windows. The cross-sectional area of dormer windows and air vents should be 1/300–1/500 of the area of the attic floor. The width of the ducts should be within 2–2.5 cm. It is necessary to measure and, if necessary, increase to the calculated thickness of the insulation. The caked insulation must be loosened approximately once every five years. For external walls with a width of up to 1 m, its thickness can be increased up to 50% higher than the calculated one. It is necessary to check and, if necessary, restore the vapor barrier under the insulation layer.
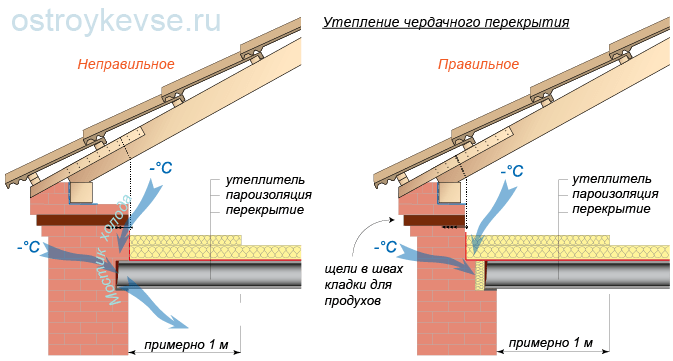 rice. 74. The device of the normal process of air exchange in the attic roof
 Strengthening of other wooden structures, walls, ceilings and foundations can be viewed in a special section of the site.