What can you make a lampshade for a lamp. DIY lampshade: how to decorate the interior by creating an unusual thing. An interesting idea for a chandelier made of plastic spoons
Every housewife wants to make her house extraordinarily beautiful. Some decorate it in some unusual style, for example, Provence, country or minimalism. Someone is trying to decorate with decorative elements. Others focus on one element, for example, a lampshade or a ceiling.
Consider the options for how to make a do-it-yourself ceiling lamp for a chandelier. To do this, you will need not some rare, but ordinary improvised means.
Option number 1: paper
The easiest way is to make an original paper lampshade. Such a decor element can have any shape. It will harmoniously fit almost any interior - in the kitchen, in the living room, in the nursery. It is worth remembering that the life of a paper lampshade for a lamp depends on the quality of the paper. It should not be too thin, but at the same time light-transmitting.
The easiest way is to consider how to make a lampshade with your own hands from the wallpaper left over from the repair. Consider how to make a product in the form of an accordion. The workflow does not take much time and does not require any special skills, abilities or schemes. From the wallpaper you can make a lampshade for a floor lamp with your own hands, for a table lamp or sconce:
- First you need to prepare the material - a piece of wallpaper 1.5 m long and approximately 30 cm wide.
- Mark the ribs with a pencil or pen.
- Carefully form an accordion. The width of each rib should not exceed 3 cm.
- Using a hole punch, make holes in the accordion.
- Pass a decorative cord through the holes and glue the lampshade along the side seam.
Even a child can make such a product on their own.
In the process, instead of wallpaper, you can use rice paper. With it, you can update the old lampshade. Wrapped with such paper, it will look stylish and modern. You can decorate the product with the help of such decorative elements as special stamps, stickers, etc.
Do-it-yourself paper lampshades will decorate any interior in style. The main thing is to choose the right color scheme and shape.
Option number 2: rope
A do-it-yourself lampshade made of rope will look original. It can be used to decorate any lamp: sconces, floor lamps and others.
First you need to prepare the necessary tools and materials:
- 20 meters of rope;
- 1 balloon for the base;
- PVA glue;
- white paint (preferably in a spray can);
- duct tape;
- gloves (ordinary household or medical);
- weaving device (special board or perfume box).
It is quite easy to make such a lampshade with your own hands:
- Using a weaving board, make a decorative ribbon out of the rope. Its lines can be smooth or curved - as your fantasy tells you.
- Now you need to glue the balloon filled with air with tape.
- Taking the top of the ball as a reference point, lay the rope in smooth turns. At the same time lubricate it with glue.
- Remove the cover from the lamp. Paint it white. Put on a finished lampshade from above.
- Paste the ball completely and grease with glue again.
- Poke the ball with a needle and pull it out. After that, a form woven from a rope will remain.
A do-it-yourself twine, twine or rope lampshade is suitable for a table lamp, sconce or floor lamp. Under it, it is recommended to use an LED lamp, which will not heat up such a ceiling very much.
Option number 3: threads
Another option is a do-it-yourself lampshade made of threads. Self-made chandeliers from threads look very original. They attract attention and fit perfectly into any interior.
You will need:
- balloon;
- cotton threads of one or more colors;
- 250 ml of PVA glue;
- suspension cord;
- energy saving lamp;
- scissors;
- large needle;
- oilcloth or plastic the size of an A3 sheet;
- petrolatum;
- tassel;
- cotton pad and stick.
The process of making a lampshade for a table lamp, sconce, chandelier or floor lamp from threads with your own hands consists of several stages:
- Blow up the ball. It is desirable that its size be from 25 cm.
- Lubricate its surface with Vaseline.
- Cover the work surface with paper or oilcloth.
- Closer to the bottom of the tube with glue, pierce a hole.
- Wrap the ball with threads in any order.
- Lubricate the threads with glue. Leave to dry completely overnight.
- Using a cotton swab, separate the balloon, deflate and pull it out.
- In the upper part of the finished product, make a hole for the lamp and cartridge.
- Insert the lamp inside. Fix the holder for the cartridge in the hole.
Now just hang the finished lampshade in the place intended for it.
Option number 4: lace
You can try to make a lampshade out of lace with your own hands. From this material you can make a lampshade for an old table lamp with your own hands, for a wall lamp or a floor lamp.
Work begins with the preparation of the things necessary for work. This is actually lace, PVA glue with a brush, a balloon and electrical elements for the lamp.
Stages of work:
- The first stage is the preparation of lace. It is necessary to cut several circles of different sizes.
- Blow up the ball. Lubricate its surface with glue.
- Attach lace circles to the ball. It needs to be done with a twist.
- Leave the product until completely dry. This will take about a day.
- Pop the balloon and pull it out.
- Fasten the socket, lamp and wires. It is recommended to use low power lamps that will not heat up the lace.
Option number 5: macrame
Fans of original decorative elements will undoubtedly pay attention to the macramé lampshade.
To make macrame lampshades with your own hands, you need to prepare:
- 172 m of 3 mm thick cord;
- metal tubes and rings for the frame;
- 8 rings with a diameter of 7.5 cm;
- 1 ring with a diameter of 17 cm;
- 1 ring with a diameter of 36 cm.
How to make a frame for a lampshade with your own hands? We connect together two rings (17 and 36 cm in diameter) and 8 metal tubes 27 cm long.
The workflow for making the plafond itself looks something like this:
- It is necessary to cut 40 threads of 3.5 m each from the cord. Attach them to the top ring.
- Using patterns for macrame, weave an openwork mesh.
- Insert 8 rings along the bottom edge, braiding them with a thread.
- Also braid all the vertical tubes of the frame.
- Decorate the bottom edge with decorative elements.
Before you make lampshades with your own hands, you can watch master classes. They will help you master the basic elements of macrame weaving and avoid mistakes in the workflow.
Option number 6: fabric
A fabric lampshade will also look great. With the help of fabric, you can update or restore an old product. It is enough just to cover it with prepared material and decorate it with any suitable decor elements. A fabric lampshade based on cardboard is suitable for a table lamp, wall lamp, infrared lamp, night light and even a chandelier.
To make the product neat, it is necessary, before being fitted, sheathed on a sewing machine. In addition to it, you need to prepare:
- iron;
- pencil;
- ruler;
- the cloth;
- pins;
- matching color threads;
- thick paper (thin cardboard or whatman paper);
- universal glue.
The workflow consists of several steps:
- Make a template of the desired shape out of paper. It is important that it fits the frame.
- Connect the template to the fabric using pins. Circle it with a pencil. Draw another line 2 cm from the template line.
- Wrap the allowances inward, gradually detaching the pins. Mark the fold line with them.
- Remove template.
- Sew the fabric on the machine.
- Iron the fabric well.
- In a well-ventilated area, lay out the workpiece and grease it with glue. Let dry a little.
- Glue the fabric to the frame. All seams and cuts must be hidden.
- Let the lampshade dry. You can use it after a day.
A fabric lampshade, decorated, for example, with flowers, buttons, bows, will look good. Instead of regular fabric, you can use organza.
Option number 7: tree
Separately, it is worth mentioning the lampshade in the steam room, sauna or bath with your own hands, because there is high humidity, and the glue may no longer hold the shape of the product. For making with your own hands from improvised materials, wooden materials are most popular.
To make a wooden lampshade for a steam room with your own hands, you need to take:
- paper;
- pencil;
- wood;
- sandpaper for grinding;
- self-tapping screws.
With this set of tools and materials, you can make a corner lampshade:
- On paper, draw a template for the bottom of the frame. It should be in the shape of a trapezoid. It is important that its sides fit the walls of the bath.
- Using a pencil, transfer the drawing to the prepared wood. To cut.
- Sand with sandpaper.
- Cut out 3 strips with a width of 1 cm and a thickness of 0.5 cm. The height should be equal to the height of the lamp.
- These strips will connect the top and bottom of the frame. They need to be nailed on the sides and in the center.
- After measuring the distance from the center to the edges, cut out a few more strips of the same size.
- Fasten the strips with self-tapping screws from the inside of the lamp. You can fix them in any position.
As you can see, there are many options for making lampshades with your own hands. In addition to those listed, there are also products made of wire, knitted, lampshade made of beads and many others. In the process of work, almost any material that is at hand is used. If necessary, you can make a new product, or you can update the old one (do restoration). Almost always, a scheme or template is required to work. It is important that the workpiece exactly matches them. Only in this case, the finished product will become a real decoration of a house or apartment.
Handmade products always attract attention and cause admiration of most people. Creating a unique interior is always based on the fantasies and wishes of the owner. Table lamps play an important role. For their manufacture, various materials are used that can be used to create your own unique decorative lampshade.
Making a frame
To create a reliable and strong frame, it is recommended to use steel, aluminum or copper wire, since these materials have good flexibility and attractive appearance. Combination of different materials is allowed. The tools required for the job are:
- pliers;
- round nose pliers;
- glue "Moment";
- hacksaw for metal;
- wire cutters.
To take into account all the nuances, it is recommended to draw a diagram of the lamp on paper in advance and determine the size of the future frame. From the thickest and most flexible wire with a diameter of about 4 mm. a frame of any shape is made. The simplest is the hemispherical shape of the frame. Auxiliary items in the performance of work can be anything that has a shape suitable for a lampshade. This will help create the correct frame shape, since it is recommended to use an auxiliary object as a template when making parts. At the initial stage, the required number of rings and ribs of the future frame are made, which are fixed with a thin wire and fixed with glue.

The holder for the lampshade is made in the same way. The lamp socket is attached to the ring with thick wire and glue. The frame pattern is made from a wire of a smaller diameter - 1 mm. An arbitrary pattern of different types of wire of different thicknesses will create even more attractiveness than a pattern of one type of wire.
wire mesh
Tools:
- pliers;
- hacksaw for metal;
- wire cutters.
- as additional materials, a metal rod or wire is used.
The construction grid significantly saves time in the manufacture of the frame. From the finished weaving, it is necessary to cut out the details along the contour of the pattern using a hacksaw. As a rule, wire mesh lampshades are cubic in shape. It is necessary to make a frame from a metal rod. To do this, you need to bend the rod with pliers, creating the desired shape of the future frame. From the finished parts, a lampshade of the desired shape is assembled by stitching them together with a thin metal wire. The cartridge is fixed in the lampshade with a wire. The finished metal frame can be painted with enamel.
From a five-liter plastic bottle
The neck and bottom are cut off from the plastic bottle. The resulting product is the basis for the future lampshade. For the correct installation of this frame, it is necessary to place the bottle upside down on the rack. The cartridge is attached to the lamp stand.

Attention! Certain types of plastic become toxic when heated. Before making a lampshade, make sure the materials used are safe.
We make lampshades on the frame
From tapes
When creating a sophisticated tape lampshade, hot glue or sewing threads are used. The frame is wrapped with ribbons of different materials in an arbitrary manner. For reliability, the ends of the tapes are sewn to the frame. It is allowed to weave multi-colored ribbons with their subsequent fixing with hot-melt adhesive, the use of beads, lace and other decorations.

Other interesting options
Fabric lampshade. The principle of decorating the frame with fabric is to sheathe it or glue it with parts pre-cut from the existing material. This method is great for metal frames. To create a beautiful lampshade, you need to cover the frame with a cloth and secure it with sewing threads.
Paper lampshade. The method is suitable for all types of frame. Details are cut out of paper and glued to the frame. Multi-colored paper creates beautiful lighting of the room, and cut-out silhouettes or arbitrary shapes will create a unique atmosphere of the room. This approach is most common in Japan, where paper products are in great demand.

Homemade ceiling lamps without a frame
From knitted lace doilies
Knitted napkins and ordinary PVA glue can help create a real work of art. To work, you will need a spherical template, PVA glue and knitted lace napkins. As a template, you can use a regular pelvis of the shape you like. The template must be smeared with glue and put lace napkins on it. Thickly covering the entire product with glue, leave it to dry for a while, then carefully remove it from the template. To consolidate the result, it is recommended to cover the finished product with decoupage varnish. Don't forget to cut a hole for the shade before applying the napkins to the template.

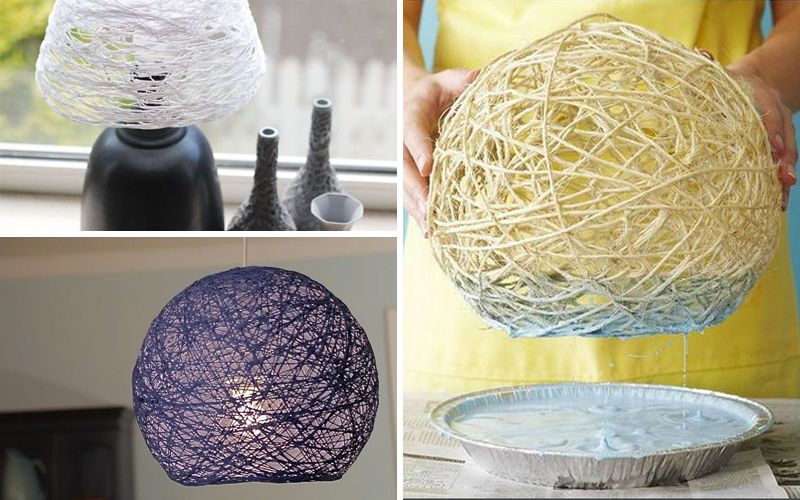
Round plafonds made of threads
A round ceiling made of threads is created in a similar way, but a balloon is used as a template, and ordinary yarn comes into play instead of ready-made knitted napkins. Having coated the inflated balloon with PVA glue, wrap it with threads. Apply the rest of the glue thickly on the cocoon and let dry well. At the end of drying, pierce the ball with a needle and carefully pull it out through the hole left around the ball. Decoupage varnish will fix the final result, and spray paint will create a unique and unique design for your ceiling.
Important! Do not wind the yarn around the ball in layers. The gaps left will create a cozy atmosphere and allow the light to diffuse.
Creative homemade ceiling lamps
Paper cups glued together will create a voluminous and creative ceiling. Beautiful disposable paper cups are glued to each other with hot glue, forming a hemisphere. With the help of multi-colored glasses, you can create a unique color for the future ceiling.
A similar method can be used to make a ceiling lamp from plastic cups and the bottoms of plastic bottles, however, heating this material can be toxic. It is recommended to use a plastic cover only with LED lamps that do not heat up during operation.
Principles of room lighting
Bedroom lamp
To illuminate the bedroom, it is recommended to use several spotlights. Soft diffused light without glare will provide the right balance of light in the room. For reading, it is recommended to add a local lighting fixture to the interior, giving a directional light flux. When installing decorative lighting fixtures, it should be borne in mind that their meaning is to unobtrusively illuminate the room and create a calm atmosphere in the bedroom.

Office lighting fixture
Cabinet lighting should be effective in the location of the table and work area. Floor lamps and table lamps do a good job of lighting the workplace. The main requirements for lighting devices in the office are the possibility of their free movement and regulation of the monitor's luminous flux: the brightness of the lamp must be higher than the brightness of the monitor, to ensure concentration and maintain the health of the human visual organs.
A few words about security
In the manufacture of shades and lampshades, it is necessary to take into account the location of the lamp holder and its effect on the material of the product. Plastic products should be used with caution due to their toxicity and fusibility. Flammable materials must be treated with a protective coating to eliminate the possibility of a fire. When creating a frame, pay attention to its balance, since inaccurate impact on the device can lead to its destruction and subsequent negative consequences for the premises and human health.
Lampshades and shades made by hand can complement and diversify the interior of your home. Unique and high-quality products become the pride of their creator. Compliance with safety regulations, a responsible approach to the creation of a decorative lamp and the choice of high-quality materials will ensure the long-term service of the lighting device and give positive emotions to guests and residents of your home.
Taking on the arrangement of the interior space, it is important to think through every little thing. After all, we all subconsciously strive for comfort and it is the smallest details that can create a special atmosphere, convey the general idea, mood and character of the room. Professional designers say, and the interiors clearly prove that the right choice of a chandelier can not only decorate the interior of a room, but also make life brighter and more fun. Beautiful chandelier shades with an original design give a special grace and gloss to the lamps. About how to make them with your own hands and what materials it is better to use for this, you can find in this article. A detailed, step-by-step master class, as well as a visual photo, will be a great help to you in this exciting process.
Material selection
In the manufacture of a chandelier, it is difficult to single out any one material that would meet all the requirements. Each of them has its own individual characteristics and features. For example, paper, which is the most simple and affordable material, lends itself well to transformation.
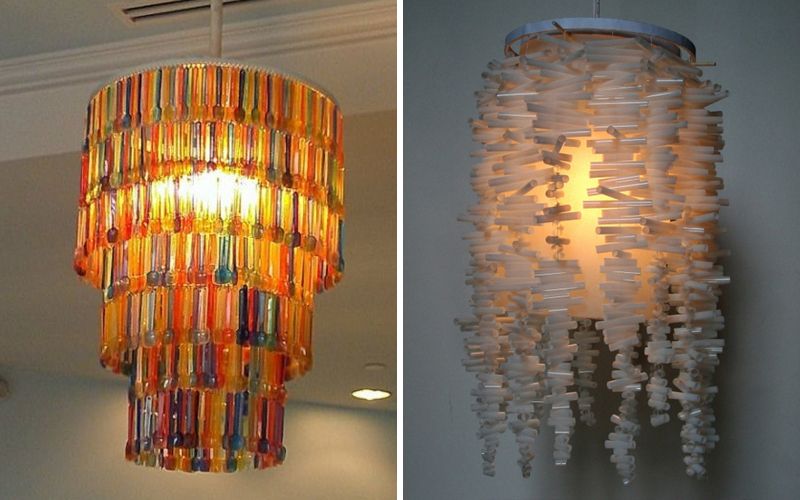
Lamps made of glass fragments and strips of metal have a dazzling brilliance and a beautiful appearance. Wood and fabric add warmth and comfort to the interior. Lace lampshades are distinguished by their special beauty, captivating everyone at first sight.
In a word, you can make a chandelier with your own hands from anything, the main thing is to be smart in time and turn on your imagination.


A paper napkin chandelier is a bold enough but justified experiment.
We will describe in detail in this article how in an ordinary object you can see its creative potential for creating an exclusive decor element.
Step-by-step instructions, with a description of each action, will help you make improvised, incredibly beautiful and unique lamps that will be a great addition to your favorite interior.
What you need to pay attention to before making a chandelier
Many are interested in how to properly make a chandelier in, and other rooms. After all, I want this element of the interior to be not only beautiful, but also functional.
On the one hand, a chandelier is a lighting fixture that can provide the proper level of lighting in an apartment. After all, a lot depends on the choice of light in the room, including the safety of the eyes. On the other hand, I want the ceiling structure to complement the interior design, creating a special atmosphere of warmth and comfort.
When making a chandelier, the first thing to consider is the height of the ceiling. For example, a chandelier with a bar mount is suitable for low ones. So, the ceiling will look visually higher. If the ceilings are high - 3 m and above, then it is better to make your choice in favor of a pendant lamp with a hook mount.


Lamp selection
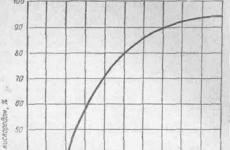
For any room you need to individually approach the intensity of its lighting.
For a small bathroom, 80-100 watts will be required.
Kitchens need a lamp power of at least 120-150 watts.
The living room and the hall cannot do without light bulbs in the range of 150-300 watts.
The number and power of lamps is calculated based on established standards - 20 watts are required per 1 m². electricity. It is also necessary to take into account the parameters of the room, its dimensions and reflective properties.

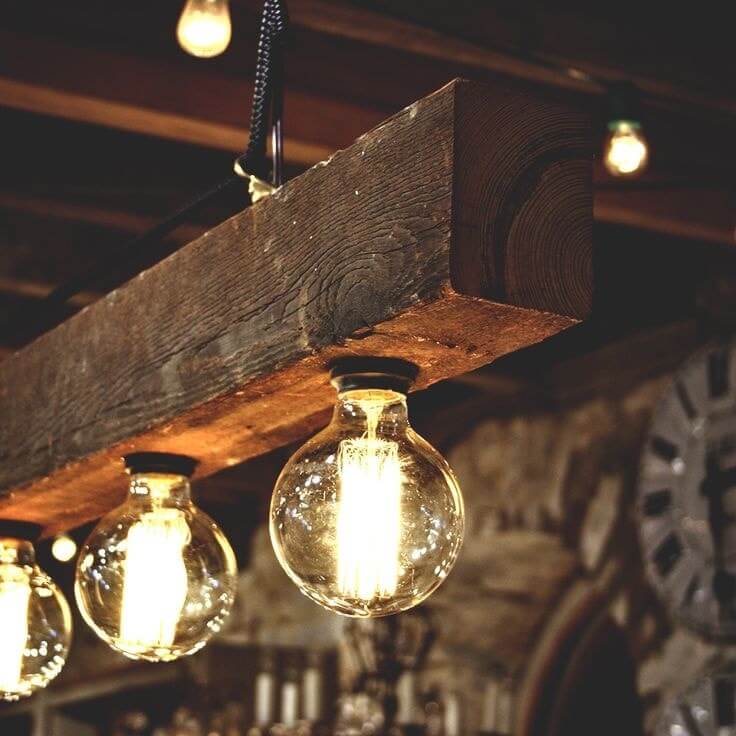
Edison designer lamps - look beautiful and unusual
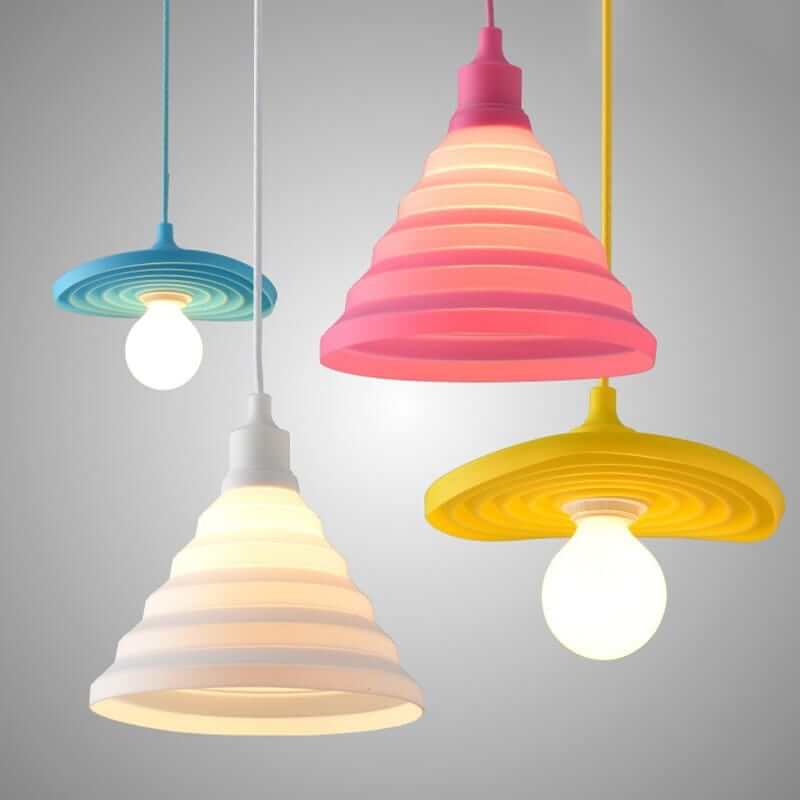
Plafond design
The appearance, decor and design of the ceiling occupies an important place in the design of the chandelier. It is selected for the interior of the room, depending on the style. Crystal for classics, metal and glass for, wood will fit perfectly into country or chalet style, fabric and silk will perfectly suit Provence style.
To illuminate a room on several levels, you can additionally make wall sconces or floor lamps.


Step-by-step master class on making
To make a beautiful ceiling decoration, it is not necessary to start everything from scratch. Take a look around, you probably have something in your house that you have not used for a long time. And who knows, maybe it will become the main subject in the manufacture of the original lamp. Moreover, there are more than enough ideas and inspiration for creativity on the Internet.
Important! It is best to start searching for the necessary things from the kitchen or balcony. It is there that we store all sorts of rubbish that was once so necessary for us and which, as often happens, is so difficult to part with later.
Spectacular chandelier from mugs
No matter how strange it may sound, it is from dishes and other kitchen utensils that the most unusual and interesting models of lamps are obtained. For example, tea mugs are an ideal material for making a spectacular lamp.
For work we need:
- Mugs
- Saucer
- Drill
- Porcelain drill with special hole

Mastering quickly and easily
- At the bottom of the mug, with a drill, we make a small hole for the wire, fasten the electric chuck and bring the wire out. It is desirable to seal the hole with a gypsum mixture.
- Next, the mug must be glued to the saucer, where there should also be a hole, insert a light bulb and hang the newly made lamp in the right place.
As you can see, original and fashionable design can be obtained from completely ordinary items.


Fascinating yarn chandelier
Since this is a fairly simple product, for its manufacture we need a minimum of things, namely:
- Wire with a section of 4-5 mm.
- wire cutters
- Fine thread
- colorful yarn
Manufacturing instructions:
- A ring is made of wire, the diameter of which will correspond to the future size of our chandelier. To get a perfectly even circle, it can be wound on some object that has a cylindrical shape.
- We bite off the excess wire with wire cutters, leaving 2-3 cm in reserve on each side. We tie the ends with a thin thread.
- It remains to decorate our chandelier beautifully and brightly. To do this, we cut the threads of yarn in such a way that the length of each segment is twice the height of the ceiling.
- Alternately, on a knot, we tie the resulting threads until we hang the whole ring with them. From the same yarn, we make a hook mount.
You can use such a lampshade both in the form of a chandelier and as a decorative element that adorns the interior of the room.


By combining the skills of macrame and papier-mâché, you can get a stylish chandelier for the bedroom
Important! To make such a lamp, instead of woolen yarn, you can use any other thread. The main thing is that it harmoniously fits your interior.
Unusual teapot lamp
You will learn how to make a chandelier from an ordinary teapot yourself from this master class. Here's what we need for this man-made masterpiece:
- Kettle
- The wire
- Electrochuck
- metal chain
Step by step guide to making
- First of all, the bottom of the teapot is cut out. This is done in such a way that the resulting cutting edge is not sharp, otherwise you can get hurt on it.
- Next, an electric cartridge is fixed to the lid of the kettle, the wire of which is led out through a small hole drilled at the top.
- A chain is attached to the handle of the kettle, through the links of which a wire is threaded. The lamp is ready.


Breathe new life into bottles
Glass bottles, especially if they have beautiful shapes, can be used to make a wonderful chandelier. Required material:
- thin rope
- Flammable liquid (alcohol or gasoline)
- Glass bottles (preferably colored)
- Edison lamps (having a beautiful spiral)
- Wire and electric cartridge
Do it yourself
- We wind the rope on the bottom of the bottle, after wetting it in a flammable liquid. Then we set fire to it and let it break, and we begin to slowly rotate the bottle around its axis until the rope burns to the end. After that, we lower the bottle into a container with cold water, wrap it with a towel and, with a little effort, break off the bottom.
- So that the cut edge is not sharp, it must be sanded. To do this, it will be enough to twist the bottle in sand or small gravel for a couple of minutes.
- It remains to properly mount the electric cartridge, stick the wire through the neck, screw in the light bulb. From the remaining bottles, the rest of the shades are made in a similar way.
This chandelier will perfectly fit into the interior made in any, especially if you hang it over the bar counter.


Can decor
No less beautiful are lamps made from cans. They are made in the same way as from bottles. The only difference is that the bottom of the jar does not need to be cut off, as clear glass is usually used for shades.
We need:
- Beautiful thick-walled jars (preferably with a relief pattern)
- Hammer and nails
- Wire, electric chuck
- Paint can
- Edison lamp
How to do it right
- To begin with, using a nail and a hammer, holes are stuffed in a circle in the lid, after which the inside is gently squeezed out. The diameter of the circle must match the diameter of the socket in the chuck.
- We insert the cartridge into the cover, mount the wire.
- Next, paint the lid along with the cartridge in the color we have chosen. Metallic paint with a golden tint will look best.
- It remains to screw the light bulb, close the lid and install the lamp in its place.


We all know what a globe is, but not everyone knows what amazing things can be done from it. For example - a nice lampshade for a chandelier that will perfectly fit into the interior of a children's room.
Here is everything we need:
- the globe
- Bulb
- Electric chuck with holding element
Step by step master class
- Usually the design of the globe is not solid, so in order for us to get the desired element, we need to divide it into equal two parts (hemispheres).
- Next, at the top of the hemisphere, you need to make a hole for the cartridge. For this, it is best to use a drill with a crown.
- The electric chuck is put into place and securely fixed by the retaining element. Congratulations, your chandelier is ready!


Suspended antler structure
Making a unique lighting device from deer antlers is quite simple, the main thing is to have the necessary material at hand.
Such designs are famous for their special sophisticated look and are best suited for rooms with high. Such chandeliers are used in many interiors, but they look especially attractive in country, chalet or rustic style.
As a rule, the shades of such chandeliers have various shapes, and only natural material is used for their manufacture.
We will need:
- Antler
- Rope
- Copper wire
- Electric chuck and wire
- Bulb
Make a chandelier like this
- Observing the precautionary rules, according to the diagram, we connect the wire to the electric cartridge.
- Next, the wire must be beautifully wrapped with a decorative rope. For better fixation, you can use a universal transparent glue.
- With the help of copper wire, horns are attached to the lower part of the resulting rope, placing them 2 cm above the cartridge.
- We repeat a similar procedure with the rest of the shades, then combining them into a single composition.


Ideas for making beautiful lamps (photo, video)

We hope that the useful tips and photos presented in the article will help you not only make beautiful ceiling lamps for chandeliers with your own hands, but also save the family budget.
Any decor in the room begins with small things. So, by changing a few details, you can create a completely different interior. Try to change the lamp or lampshade on it, and you will see how the whole interior design will change. Depending on the chosen room, the lampshade can be classic, made of fabric and lace, modern made of plastic, buttons or paper, abstract, made of feathers or other improvised means.

With some effort, you can get a truly unique thing, the analogues of which you will not find anywhere else. It is known that handmade designer items are not cheap, as they take a lot of time to make, but the result is something unique and unrepeatable.

To make a lampshade yourself with your own hands, you will need cheap improvised materials:
- plastic spoons, forks and glasses;
- wooden sticks for ice cream;
- fabric scraps;
- ribbons and lace;
- buttons;
- tubes from magazines;
- beads and beads;
- cardboard and paper;
- shells and pebbles;
- clothespins;
- plastic straws for drinks;
- thread and twine;
- metal wire for the frame.
Typically, a lampshade consists of two metal rings interconnected by jumpers (from 3 pcs). The shape of the frame can be trapezoidal, cylindrical or curly.
Any metal wire is suitable for the frame: copper, aluminum, steel. With the help of wire cutters, it is necessary to cut off two pieces of wire and make two circles out of them - one larger, the other smaller.

It should be noted that the design for the lampshade of a pendant chandelier is slightly different from the design of the lampshade of a table lamp, but in any case there is always one more inner ring through which either a cartridge or a cord from the chandelier is threaded.

To work with wire, you will need wire cutters and round nose pliers (in order to make a neat loop for clutching the wire together.

But, nevertheless, it would be most correct to buy a ready-made frame for a lampshade - fortunately, there are a lot of them in building hypermarkets.
You can make a pattern for a lampshade like this:

So, the frame for the future lamp is ready and you have to choose the most important thing - the decor of the lamp and the material with which to work. We offer several options for making a lampshade with your own hands.
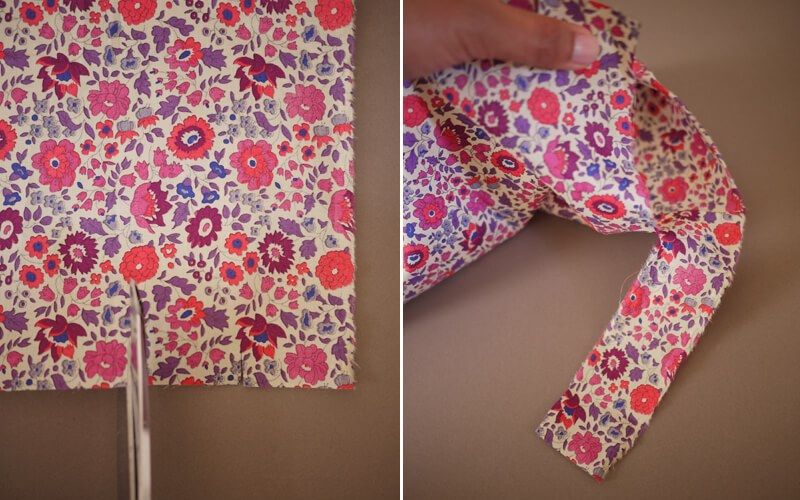
Lampshade from patches of fabric

To make such a lampshade, you will need the following materials and tools:
- two pieces of fabric of different colors;
- lampshade frame (purchased or made by yourself);
- thread with a needle;
- scissors.


And more options for inspiration: fabric lampshades:


Ribbons and lace, buttons and beads, cuts of other fabrics and bows are suitable for decoration. Even old trousers or other clothing can give life to a designer piece.
Most often, such lampshades are sewn according to a pattern: for this, a pattern is cut out of paper or newspaper, and then transferred to fabric:

The lower and upper parts of the product can be decorated by gluing or sheathing with a fabric of a different color or lace, braid.


Paper lampshade - options and ideas
No less interesting can be a lampshade made of paper or cardboard.
Suitable for work:
- pages of glossy magazines;
- old newspapers;
- old unnecessary book;
- notebook (can be written out);
- paper napkins with patterns.
Remember: paper is flammable, so you will have to use either energy-saving or LED bulbs - they heat up less than incandescent bulbs.

To make a simple paper plafond, you will need the following materials:
- base - a ceiling-ball made of paper of any diameter;
- paper for records in the form of squares;
- scissors and glue.
First, cut out circles from note paper (you can replace it with plain colored paper).

You need to stick decorative elements from below, row by row, until the entire surface of the ceiling is covered.

Instead of ordinary colored paper, you can use corrugated or velvet paper, or you can replace them with lace fabric - in this case, the lamp will look lighter and more airy.
More options for lampshades made of paper or cardboard, photo:


In order to change the look of the room, just a little is enough: change the pillows or bedspread on the sofa, throw a bright rug or make a lamp with your own hands.
Decorating interior items can be interesting and addictive! Vases, napkins, panels, lampshades - these are the little things that change the face of the interior!
In order not to buy a designer lamp, make a lampshade from plates with your own hands. For this you will need:
- the basis for the lamp is a cylinder made of paper or cardboard;
- several sets of paper disposable plates;
- glue gun;
- scissors.
How to work: fold each plate in half and glue to the base along the fold line:

A similar lampshade can be used for a wall lamp, a pendant lamp, and a floor lamp. If desired, you can use different colored plates or paint the whites in different shades.(42)
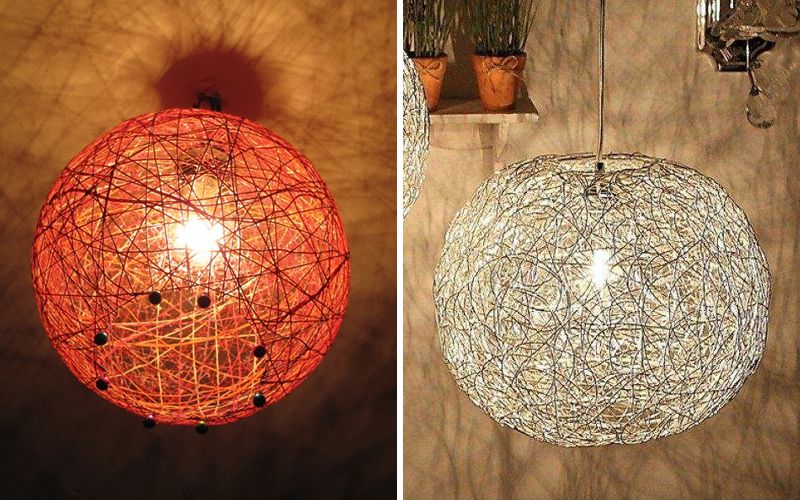
Such gizmos became popular a few years ago. Light and weightless balls of thread, depending on the diameter, can become either a Christmas tree toy, or a decor item, or a lampshade. Threads can be used in any color, or you can dye them when the craft is ready. From above, you can also decorate with ribbons and lace, beads or buttons - this way the craft will look more elegant.
How to make a lampshade from threads? For work, materials and tools are needed:
- a balloon (or an inflatable ball that can be blown away);
- a skein of threads (the thicker the threads, the more reliable the lampshade will be);
- PVA glue;


Depending on how often you wind the threads, you can get either an airy and light lamp, or a denser lampshade.
Attention! Before winding the threads, the ball must be lubricated with petroleum jelly - this will allow it to be easily separated from the dried lampshade.
Operating procedure:
- To begin with, the ball must be inflated - what diameter the ball will be, this will turn out to be a lamp. Mark a hole at the bottom that will need to be left open.
- Wind the thread around the ball in random order. Between layers, as well as on top, coat the entire ball with PVA glue and let the glue dry for about 4-5 hours.
- Now the ball can burst and pull out. It remains only to thread the cartridge with the lamp and hang the lamp.

With the help of threads and glue, you can make a lamp in a different way: instead of a ball, use a plastic bottle, and take thicker threads. Previously, the bottle must be pasted over with adhesive tape so that the dried lampshade is easier to remove. The shape of the lamp will also be different:


More lampshades made of threads, photo ideas:


Using simple tricks and a few packs of disposable spoons or forks? you can create a great original lamp that will decorate your interior. Such lampshades can be used in almost any room - in the kitchen, in the hallway, on the balcony, and even in the bedroom.

To make such a lamp, you will need the following materials and tools:
- several sets of disposable spoons (table or tea - it all depends on the desired size of the product);
- plastic 5-liter bottle;
- scissors;
- glue gun or mounting universal glue for plastic products.
Operating procedure:
- At the cylinder, cut off the lower part (bottom) and degrease the surface.
- At plastic spoons, carefully break off (or cut off) the tips.
- Using a glue gun, glue the spoons to the balloon in rows, starting from the bottom.
- Then make a bezel and glue it on top.
- Pass the cord with the cartridge through the hole on top and screw in the light bulb.


If desired, spoons can be painted in any color. In this way, you can make a ceiling lamp for a floor lamp, wall or pendant lamp.
In addition to spoons, you can also use disposable forks or knives for the lampshade - the lamp will be a little different, lighter and more elegant:

Or from plastic cups:

Original do-it-yourself lampshades, photo
If desired, and with good imagination and skillful hands, you can make a lamp from other improvised means - wood, cocktail tubes, clothespins, burlap, packaging cardboard, even plastic bottle caps.
We have selected original ideas for DIY lampshades, we hope our ideas will help you choose what will suit your interior. So, a photo of lamps and lampshades made and decorated with your own hands:


We create our own home. And how comfortable it will be depends on us. Even if you are temporary owners of a home, you can make it cozy without global costs. The main thing in this business is to put your soul into it. But having ennobled the walls and windows of the apartment, one cannot leave a lonely light bulb hanging from the ceiling bare. Let's think about how you can make lamps with your own hands.


Advantages of homemade shades
The need for hand made lamps is dictated by various circumstances: someone could not find a chandelier for an updated interior, someone has a difficult financial situation, and someone feels the need to decorate their home with their own hands.
Advantages of homemade ceiling lamps:
- independence from the store assortment;
- low budget;
- self-realization;
- uniqueness (exclusivity);
- originality;
- availability of material for work.

materials
The selected concept should help you decide on the choice of material for the lamp. What is your room like, what kind of lamps are suitable here, where will they be located (on the wall, ceiling, floor)? At the same time, absolutely different things can act as material for the ceiling: threads and veneer, bottles and branches, paper and a basin, a cup and lace, wire and disposable spoons, fabric and beads. From the frame and improvised materials you can make real beauty.

Lace shade
To make it, you will need about 10 knitted identical or different napkins of one or more colors (optional), a balloon, wallpaper paste and a container for it, a brush, threads, a light bulb socket, a light bulb, oilcloth or newspapers for bedding. The exact number of napkins depends on their size and the size of the ball.
The sequence of our actions:
- Dilute the wallpaper paste (one pack should be enough).
- Inflate the balloon, tie it up.
- Tie it in such a way that it is approximately in front of your eyes or below. For example, on a clothesline or stepladder.
- Spread one napkin on the bedding and coat it liberally with glue.
- Gently glue the napkin onto the ball.
- Spread the next napkin and glue it so that one napkin lies slightly on top of the other.


- Glue all the napkins, slightly connecting with each other.
- Leave a small hole at the bottom without a napkin so that you can later install the cartridge and light bulb.
- Your ball should dry for about a day.
- After a day, making sure that the glue has dried completely, pierce the ball and remove it from the ceiling.
- If you want to give the lamp a different color, before piercing the ball, paint the napkins with acrylic paints and leave to dry again.
- Pull the electrical wire through the center of the napkin at the top of the ceiling, to which the cartridge will later be attached. Attention! Do not forget to disconnect the power supply from the wires!
- Install cartridge.
- Screw in the light bulb.


If you install such a ceiling on an already hanging cartridge, then you can do the following:
- at the top of the ceiling, leave a circle with a diameter of about 10 cm;
- hang a cardboard circle on the cartridge to match the napkins with a diameter of about 15 cm;
- carefully pass the cardboard inside the ceiling and fasten them together with a stapler or double-sided tape.
Plafond from plastic bottles
Most likely, no one will name how many options for ceiling lamps from plastic bottles exist. But there are two principles of use: the bottle is decorated with other materials, or elements for decoration are cut out of the bottle.
To implement the first principle, we need a three- or five-liter bottle. Its neck will be put on the cartridge, and the bottom must be cut off. If the bottle is made of colored plastic, then the simplest chandelier for a simple country house is already ready. But plastic can be painted with drawings, small elements such as buttons, pieces of a mirror, shells can be glued with liquid nails. Or cover with acrylic paint of one color, and apply an uneven layer of paint of another color with a comb on top. In a more complex version, plastic disposable spoons without cuttings in the form of scales are glued throughout the bottle.

Such a ceiling will be harmonious for retro style.
To implement the idea of the second principle, you need bottles of any size, but in different colors. Cut out any figures from them: leaves, flowers, geometry. The main thing is that there are a lot of them. The ceiling will need a frame in the form of wire rings. Connect the different levels of the frame with a vertically located wire. With the help of a fishing line or thin wire, put a huge number of cut out figures on the frame. They can fit snugly to the frame or hang freely from it.


Paper ceiling
Cardboard, rice paper, self-adhesive, corrugated - what kind of paper is not used for homemade ceiling lamps. For the Art Nouveau style, we suggest you make a lampshade from multi-colored cardboard ribbons. Pick your colors. Prepare strips 2-4 cm wide, stapler or good glue. Arbitrarily, threading the strips into each other, fasten them in such a way as if you had a lump of the remnants of different threads in your hands. It should not be tight so as not to interfere with the light bulb.
The size is up to you. Slightly spreading the strips, you can easily hang the ball on the cartridge.


Use an energy-saving lamp - it heats up less and is safer.
Plafond from the vine
To make a ceiling lamp out of wood, you need to pick up a suitable snag or branches and process them properly. In the case of a vine, almost any will do, with stepchildren and even dry leaves. Such a ceiling can be wall, and floor, and ceiling. It needs a metal frame of any shape, through which the branches will be passed. When the ceiling is ready, cover it with furniture varnish - it will be very beautiful.


How to make from threads and a ball?
One of the simplest, but original ideas is a ceiling made of threads wound around a balloon. We need threads (woolen, twine, thick cotton), PVA glue, brush, balloon, petroleum jelly.
- Blow up the balloon. The larger it is, the larger your ceiling will be. A more familiar option is a round ball, but who said that this is a must? Perhaps your chandelier will be of three oblong shades.
- If your ceiling lamp has an open lower part, then draw a border on the ball for further winding.
- In order to subsequently easily detach the ball from the threads, brush it with Vaseline with a brush.
- As you wrap the threads around the ball, coat them with glue, layer by layer. Don't feel sorry for Clay.
- The more layers, the stronger the structure. Try using threads of different textures, wind them in different directions.
- Leave your chandelier to dry.
- After about 24 hours, pierce the ball and remove its remains from the lampshade.
- Carefully cut out a hole for the cartridge.
- Insert a light bulb - the ceiling is ready.
- If it is monophonic, then it can be decorated with artificial flowers, airy butterflies or other medium-sized elements.

photos
Plafond for a standing lamp: a master class
Such a lamp is not only in the field of view, but also in the field of touch.
To create a pleasant atmosphere, make the floor lamp soft:
- Choose a boa or fringe with fluffy threads in one or more colors.
- On the old ceiling, glue the boa or fringe strictly around the circumference, wrapping around the ceiling several times.
- Colored material can be decorated not only in a circle, but also randomly, with spots.
- Optionally, you can decorate the leg of the lamp and the base itself.

The design itself will be voluminous, not requiring additional elements.
Making for a wall model
Looks great on the wall lamp-house. It can be completely different model. But if you install such a lamp in a child’s room, put the baby’s favorite toy on the door of the house where the light comes from (for safety reasons, not fabric and away from the light bulb).
No less interesting are figures made of dense materials (a cat, a flower, a month), planted on a frame. The light does not go through the figure, but from under it, scattering the beam. As a rule, sconces are used specifically to dim the light, which means that any opaque models will be appropriate here.

photos
Handmade options for street lighting
Speaking of street lighting, we mean the area in front of a private house or cottage. Although, if you live in a high-rise building where people take care of what is in the yard, then these ideas may suit you.
Lighting the area in front of the house can be:
- facade, when the lamps are mounted on the walls of the house and the veranda;
- landscape, which is able to emphasize the beauty of your site, emphasizing paths, plants, figures;
- street, represented by lanterns that create diffused light on the territory.


The types of light source are also different:
- from the mains;
- from batteries;
- from solar panels.

Facade lamps can look different: LED strip around the perimeter of the house, sconces made of snags and branches. The power supply will be the source of light.
Much more imagination can be applied in landscape lighting. Mount multi-colored lamps from batteries into several figurines of animals and fairy-tale heroes made of plaster, wood or polystone and place them around the territory - the effect will be stunningly beautiful. But turning it on and off is inconvenient. Try installing solar powered lights. In the evening they will light up on their own.


Throw on the trees and shrubs LED strips powered by the mains, in the evening you will find yourself in a fairy tale. Shops and the Internet sell lamps that work on the principle of solar panels, with a stand that you just need to stick into the ground in an arbitrary place. In this way, you can decorate a pond, gazebo. The glass of the luminaire can be pre-coated with a pattern or plain paint.
If there is no electricity and solar panels, then in the evening you will be painted with candle lamps hidden in glass jars and suspended from a gazebo, fence, trees. Banks can be decorated with thread, paint, colored self-adhesive paper, corrugated paper. But be careful with such illumination - open fire loves the careless.