How to make gorgeous doll furniture with your own hands. Puppet Furniture with your own hands - choose branded materials and create a unique toy for your child How to make dolls
About how it is possible to make the furniture for dolls with your own hands, the parents are conceived, who have already been able to make a puppet house independently or bought it in the store, while spending a significant amount. Toy furniture is not cheap, so why not save a family budget. You can easily make it easily make it with your own hands.


Types of materials that often use
To arrange a doll house of your daughter, you can use those materials that we most often throw out:
- trimming plywood sheets;
- match boxes:
- plastic jars and cosmetics boxes;
- shoe boxes;
- colored sponges for dishes;
- viscose napkins;
- plastic bottles;
- tablets from eggs;
- textile;
- foil
- wire and many more different little things, the place of which we often determine in the garbage bucket.


When choosing materials, everything will depend only on your imagination.
Plywood
Plywood and tree are the most popular and durable materials for making doll furniture. However, the process of creating interior items of them is time consuming, the skills of working with them will be required. But if you still make such furniture, it will serve the dolls for a very long time and will also give your daughter for a long time.

In order to make a miniature furniture from plywood you will need:
- plywood sheets;
- electrolovik;
- sandpaper;
- small carnations or screws;
- glue;
- cardboard sheets;
- pencil;
- line;
- varnish or acrylic paint;
- scissors;
- attributes that you will use to decorate each type of furniture: fabric, beads, skin pieces, and much more ...

Common for all types of furniture Stages of work:
- Think up or find on the Internet suitable for printing furniture design schemes.
- Draw on cardboard or use the finished prints of furniture parts, cut them out.
- The resulting patterns attach to the sheets of plywood and circle.
- Lobzik cut out the details from plywood.
- Treat all parts by sandpaper, surface will become smooth.
- We collect the design. Details of glue or fasten with self-draws.
- We cover the finished item with paint or varnish and let dry.
- If necessary, we are wearing textile elements and decorate.
Here is one piece of doll furniture.


Cardboard
Cardboard furniture for a puppet house is very simple. A child can be attracted to the manufacturing process. Cardboard is the most affordable material for work. You can use both cardboard sheets and as the basis to take small cardboard boxes.


Need:
- cardboard or cardboard boxes;
- white sheets of paper;
- pencil;
- line;
- scissors;
- glue (as needed);
- details for decorations.

Stages of work:
- Thunderstand the details of the future furniture object and make templates on paper.
- Transfer patterns to cardboard.
- Cut the details.
- We make the necessary slots in the locations of the details.
- Collect the piece of furniture. We glue where it is necessary.
- Draw a finished look, decorating the design.
You can decorate the doll house with a new interior item.


Match boxes
From match boxes, you can construct almost any subject of the interior. The advantage of such furniture will be drawers. It is enough to show your fantasy and think in detail the image of future furniture.


We will need:
- matchboxes, the quantity depends on what piece of furniture you will do;
- glue;
- decorations for future furniture.

Stages of work:
- We prepare the required number of match boxes.
- We glue them between themselves in the sequence that is necessary for the interior detail.
- Decorate the resulting piece of furniture. For staining, acrylic paint and varnish are suitable.
Your daughter's dolls will be happy with a new clothes.

You can make a rack for dolls from match boxes yourself, looking at the next video.
Plastic jars
Plastic jars can perfectly play the role of furniture in your doll house. Sometimes, it is not even necessary to do with them. In the finished form, they can be used, for example, as a bath. A child will be able to truly redeem his dolls, water from them will not fall anywhere. You can construct from plastic jars, covers from toothpaste tubes, and other little things more complex interior items. They can be simply glued together in the required sequence.


Wizard for the manufacture of a toilet bowl for dolls from a capacitance from under shampoo, see the following video.
Wire
From the wire that is easily lightning can be issued an interior in the style of Provence. Very gracefully look the beds, the frame of which will resemble a forged product. You can add a wroughtted candlestick, an unusual wrought iron. Virtually any detail of the interior can be done using a wire frame. Your fantasy will tell you the right direction.


Tablets from Yaitz
Using the plates from eggs, you can finely equip the dollhouse rooms. Plastic plastic tablets, and cardboard. All that will be needed is to thoroughly think over the composition and cut the necessary parts of the tablets.

The paper may require:
- tablets from eggs;
- scissors;
- glue;
- acrylic paint;
- double sided tape;
- rods from helium handles
and much more. Everything will depend on how your imagination is played.

Master classes
In this section, you are offered some ideas of creating furniture for dolls with your own hands.
Bed with drawers for dolls made of match boxes
We will need:
- match boxes;
- glue;
- pencil;
- scissors;
- white cardboard sheet;
- white paper sheets;
- paints;
- beads;
- thin wire;
- decor items to your taste.

Step-by-step instruction:
- Measure the height of the doll for which the bed is intended. It depends on the number of matchboxes that will be required.
- We glue the required number of boxes by the side walls to each other. It will be the foundation of our bed.
- If you want to make a bed higher, you can immediately glue a kind of legs in the form of additional boxes to extreme boxes.
- We glue with white paper base bed so that the retractable items remain open.
- On the cardboard we draw the desired shape of the back of the bed and cut out.
- We glue the back to the sides of the base.
- Coloring bed to the desired color.
- To the retractable elements of the boxes at a base of secrets using wire beads. These are the handles of our bed.
- We decorate, lay bedding and you can lay a doll to sleep.

In the following videos, you will see a master class for making a bed doll.
In the same style you can make a bedside table.
We will need:
- 2-3 match box;
- glue;
- white list;
- the same paint and decor elements with which the bed was decorated;

Step-by-step instruction:
- We glue the boxes among themselves, putting them on top of each other.
- Purchase white paper, leaving the retractable items open.
- Color in the style of the bed already made.
- Fresh beads to the drawers.
- Decorating.

Master class on making bedside tables Look in the following video.
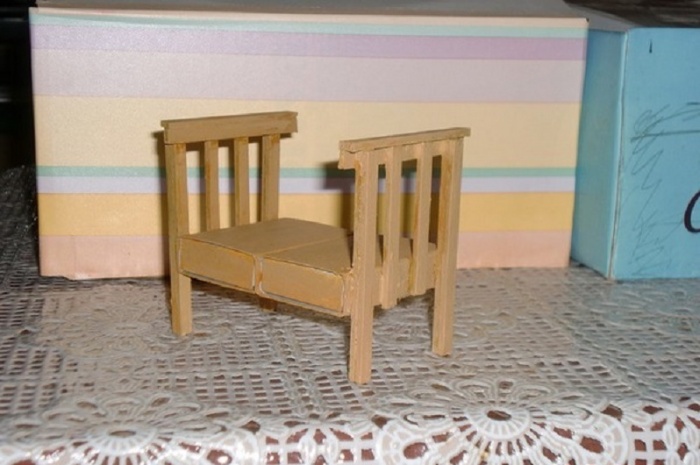
Sofa for plywood dolls
We will need:
- plywood;
- electrolovik;
- glue or small carnations;
- sandpaper;
- cardboard;
- pencil;
- line;
- varnish or acrylic paint;
- pieces of fabric;
- wool.

Step-by-step instruction:
- We are determined with the design and size of the future sofa. We make drawings for the back, seats, side backs on the cardboard. We take into account that with the help of the rear and side backs, the sofa will acquire stability.
- Cut.
- The resulting patterns we apply plywood and supply.
- With the help of the electrol bias, drink the sofa details.
- If you want to make upholstered furniture, then at this stage you turn around every detail of the sofa with a thin layer of watts and we are wearing a cloth. If the sofa is not trimmed, it is necessary to handle the details of the sandpaper.
- Krepim sofa parts to each other with glue. If you have a soft sofa, it is necessary to mount with small carnations.
- We are covered with non-cloth details of varnish or paint.
- We sew small pillows for the sofa.
- We decorate to your liking and give a doll to use.
In the same way, you can make a chair.

How to make a sofa for doll with your own hands, you can see in the next video - master class.
Floor lamp
For the manufacture you will need:
- dense cardboard;
- glue;
- pencil;
- lace strips;
- empty rod from helium handle;
- thin wire;
- a small diameter of the cap (covers from jackets with drugs, from ketchup)

Draw a cone blank on the cardboard. Cut and glue it. Top cone cut off. It turned out the basis of the lampsher. Put it with lace. Wire bend in half and skip through the rod. From above to the wire, the lamp is a lampshade, from below to the cover - to give the stability to Torsh. The lid can be reappeted by a lace skirt. As a rack, instead of a rod, you can use beads, passing the wire through them. In this case, the lampshade will also decorate beads.

Master class on the manufacture of puppet furniture from old boxes See in the video.
Chandelier
For the manufacture of the chandelier, we need a small capacity. You can use measuring cups from drugs, disposable plastic stacks, the simplest candles in the metal case.

For decoration chandeliers, you will need lace strips, thin strips of satin ribbon. They need to attach the plastic base of the chandelier. Metal case can not even decorate, it turns out the original chandelier. In the base of the capacitance that was used, the LED was used if you thought about a lodge with real lighting. Hang to the ceiling. The method of fastening to the ceiling will depend on the materials from which the house is made.
In this way, you can make lamps to any room of your puppet house.

Kitchen for puppet house
For the manufacture of the kitchen will be convenient to use small boxes. If there are no such boxes, you will need to make them from cardboard. Make it quite easily. It will be convenient to use if the boxes glue with each other by making a single design.

If the kitchens are planned hinged cabinets, then you glue a sheet of cardboard to the back wall of the lockers, to which these lockers are stuck. You can strengthen the design, if you stick to the sheet of cardboard from the back of the long flat wands. In boxes it is necessary to cut the door of lockers.
For our kitchen, we use self-adhesive paper, or any other beautiful paper. Put the lockers, with the help of wire and beads, make handles from them. The crane can be made of wire, the handles of the mixer from small beads. For the sink, a deep lid is suitable. Her fastened to the countertop. Plate burners can be made of buttons. Emboss the space between the cabinets can be in the form of a tiled apron. To do this, find the appropriate image on the Internet and print it. Shoot it on a cardboard sheet on which the lockers are fixed.

We put the dishes and products. The kitchen is ready, you can send the hostess!
Master class for the manufacture of cuisine you can see in the next video.
Dress Table
We will need:
- cardboard box;
- cardboard sheet;
- foil;
- little trimming ceiling plinth;
- glue;
- pencil;
- color, packaging or self-adhesive paper.

Stages of work:
- Measure the necessary height of the table on the box so that the doll is convenient to sit behind him.
- Cut up too much.
- The base of the table is the bottom of the box. From the part, which is located below, cut out the legs.
- Cut the self-adhesive paper
- On the cardboard we draw the desired shape of the mirror and cut it out. We glue foil as a mirror surface.
- We draw up the mirror frame with thin strains of the ceiling plinth.
- We glue the mirror to the table.
Chair for the toilet table is made in the same way. We change the only height. Instead of a mirror surface, we make a back chal.

Almost any piece of furniture can be made from undergraded means. For this you need free time, your fantasy and desire. Your girl will be very glad to new clothes a doll house!


The process of making a dressing table for dolls from matchboxes and cardboard See next video.
On how to make a dinner table for dolls, see the next video.
Child's desire to play with dolls need to be encouraged and maintained. Doll furniture with their own hands will become an excellent tool for rapprochement between the elder and the younger generation. A variety of furnishings that copy an adult interior contribute to the development of fantasy and logical thinking. Dare, create, and the puppet house will turn into a small masterpiece.
Diffreation of puppet furniture
Kits of puppet furniture are affected by their diversity and grace. Buy the finished set is the easiest way, but much more interesting to make miniature doll furniture with your own hands. In addition to the standard elements of the interior in the form of bed, armchairs and tables, you can make almost any item from the girlfriend. The main thing is to show the smelting and allocate some free time. The kitchen and sleeping set meets in the doll set most often. But the child will be delighted with the parties, lamps and baths.
The complexity of the manufacture of doll furniture is determined by the material selected as the basis. Dimensions must correspond to the growth of the doll. For small fuzzies, it is very easy to make furniture based on matchboxes. The hostess of dolls often attract the process. For instances, you choose the cardboard and Phaneru.

Screw materials that often use in the manufacture of their own hands of doll furniture, are presented in the following list:
- Plywood sheets. The most durable version of the drawing of doll furniture. The processing of plywood sheets is not for all, and often requires the ownership of the electroller. But the puppet furniture, who came out of the hands of the master, is striking by his sophistication.
- Dense cardboard. It is much easier to process, work with him a child school age can independently without adults. Often, ready-made cardboard boxes are often selected as the basis for doll furniture.
- Match boxes. Optimally suitable for a miniature puppet house where the main resident of small sizes.
- Plastic containers from under cosmetic agents. Do not rush to throw out an elegant jar after the cream and a container from under shampoo. Perhaps they will be transformed into an elegant otfik or a comfortable puppet chair. Even a small plastic bottle can be the basis for the chair. The following video demonstrates how to make a comfortable toilet.
- Viscose wipes and sponges for dishes. Used to design a soft piece of doll furniture.
- Tara for eggs, wire, beads, skewers. This list can be continued infinitely. The choice of additional elements depends on the complexity of the puppet design and the desired decor.
Exclusive sets of furniture for dolls, designed by wood masters, are presented in the photo:


Charm manufacture options
There are several ways to make a comfortable puppet chair. The choice of material depends on the dimensions of the doll, do you have a desire to use the child or everything will be drawn up with your own hands. The presented options differ in difficulty, so everyone can pick up the most suitable copy of the furniture.
Model 1.
For work it will be necessary:
- cardboard with a thickness of 1.0-1.5 mm;
- penocarton with a thickness of about 5 mm, it can replace 3 millimeter corrugated cardboard;
- dense white paper;
- tube Ø 15-25 mm, for puppet furniture suitable tube from under thread or marker case;
- thin foam or fleece;
- upholstery fabric;
- glue, scissors, pencil, line.
The algorithm of manufacture with your hands of a puppet chair:


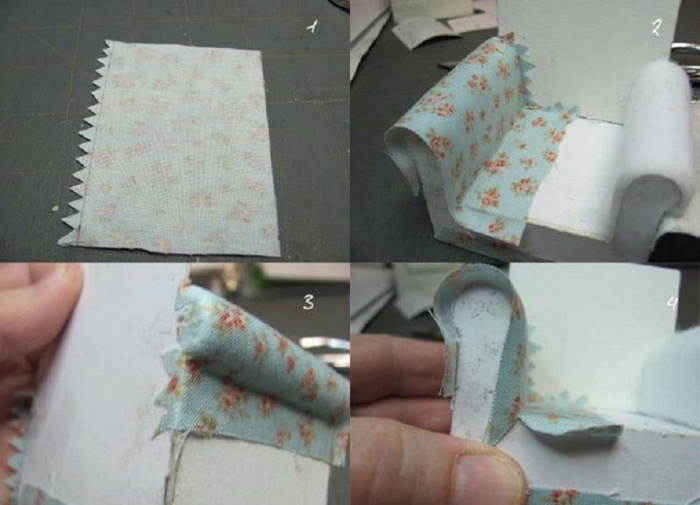
Comment! The outer aesthetics of the puppet chair and any other furniture depends on the finish. Therefore, take care of a beautiful upholstery material.
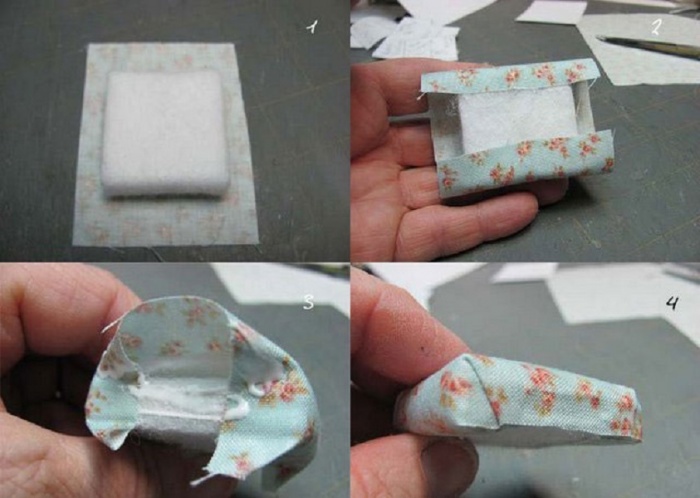
The upholstery elements are cut out according to the previously prepared drawing, only make an allowance of 15 mm. Before drawing up the back, it is originally closed on one side with foam rubber. This element can be made removable or stationary. Make your own hands the pillow on the puppet furniture is even easier, the steps repeat the algorithm with the back.

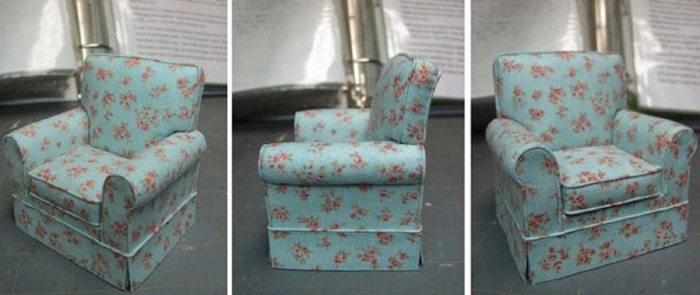
Labor, of course, is painstaking, but the result deserves admiration.
Model 2.
Make a chair for a doll can be easier. The basis is a small cardboard box. Based on the size of the base, the billet from the foam rubber is cut, which will simultaneously be the back and armrests. Fix it on the seat will help the tape. The chair decorates the upholstery cloth, complement the miniature pad. If the box is not square, but an oblong shape, a chic puppet sofa will be released.

Model 3.
A plastic bottle can be a frame for furniture. Cutting the workpiece, it is trimmed with a cloth. For stability, the inner part is filled with something heavy. In order for the furniture to fit the ideas about the chair, prepare the pad and soft seat. You can make a small chair from a bottle of 0.5 liters or take a larger tank, then it will be something like a throne.

If there is a desire to make a puppet rocking chair, we offer to explore the scheme of an interesting design. The experience of handling the jigsaw, reliable and durable furniture is made of plywood.


Methods of bed design
Games with dolls often turn into a real performance, when the beloved Barbie is already the mother herself, and her small child requires a cot. Matchboxes with cardboard - affordable and complimentary stuff to make a puppet bed. The whole process consists of three steps:
- glue 2 box;
- the backs cut out of the cardboard;
- for beauty, puppet furniture is covered with colored paper.
Instead of cardboard, the legs can be made of chopsticks from under ice cream.
Not much harder to make a bed with drawers. For this, matchboxes glue in 2 layers. From the side, which will be used as a box, glue beads or fasten them with wire. After connecting to the backs, the furniture is made up with paper. Additionally, it is desirable to sew bedding.


A small bed can be made of cardboard sheets:
- Initially print off the proposed drawing or draw yourself.
- Details are cut out of the paper, then transferred to cardboard or fane.
- Collect the interesting design of puppet furniture.
Comment! If the work is used in the work, the edges of the blanks are carefully grinding so that the child does not hurt during the game.
Sofa, chest of drawers and part
Plywood is the most suitable material to make doll furniture. Similarly, the beds, from plywood you can make an exclusive doll sofa.
Master class of manufacture:
- We make a drawing of the future sofa, the scheme includes the seat, armrests, the back. It is important to consider that the side elements and the back determine the stability of the furniture.
- The drawing on paper is transferred to Phaneur.
- The electrolls are plugged by the details.
- A puppet sofa is a soft part of the furniture, so the blanks are wrapped with a thin foam rubber and decorated with a rough cloth.
- Connect individual elements of doll furniture with carnations.
The procedure can be changed a bit. First, the elements of a puppet sofa from plywood fixed with each other with the "moment" glue. The finished sofa is covered with varnish and sew on it small soft pads.

You can make the sofa according to the principle of the chair, model 1. If you try to try, then the masterpiece is close to the sample in the photo:

It is somewhat easier to make a chest of drawers of match boxes. The main stages of the creative process:
- Matchboxes are covered outside and inside the paint.
- When the workpieces dried, they glue them in a vertical order.
- The contour of doll furniture is trimmed. It will be beautiful and give the chest of strength.
- Beads, fixed on the bottom, perform the function of the legs.
- Each box is also preferably equipped with beads for the convenience of using doll furniture.
Photo collage demonstrates the process of manufacturing with their own hands of doll furniture and result.

Matchboxes are a kind of designer, an extremely accessible and unlimited handicap. Writing table or part - the next sample of puppet furniture, which just make a child yourself.
Key points of creativity:
- three matchbox are fixed vertically together;
- pre-future drawers are equipped with wire beads;
- the function of the second leg of the table can perform a matchbox without induction;
- both elements of puppet furniture (bonded boxes and leg) are connected by cardboard with glue;
- the workpiece is painted or covered with colored paper.
The approximate result of the work is presented in the photo:
Easy way to make kitchen furniture
First, consider a simple option how to make cabinets for a kitchen made of match boxes. The lower part is formed from 9 elements on the principle of the chest. The function of the handles can perform brackets from the stapler. For mounted lockers 3, the box is fixed on the cardboard wall and cut in the middle so that the doors come out. Of course, the box is better to salary paper or paint. Naturally, entouge plays a big role:
- Finish the doll kitchen mini lamps.
- Decorate the lace curtain window.
- From foil you can make sink.
Puppet furniture will play new paints. You can add a kitchen set by a table and chairs from cardboard.


Sophisticated options, how to make puppet furniture for kitchen, we will not describe. We represent only the result of painstaking masters:


Tesser and chandelier
To make a pretty puppet stick, it takes quite a bit:
- the basis of the lampshar can serve a dense cardboard or suitable caps from under perfumery.
- rod from handle;
- lace;
- wire.
If there are no caps, we prepare the basis under the lamp shade from dense cardboard. The workpiece is covered with lace. Wire is passed through the rod. At the top edge of the rod, the lamp is fixed, at the bottom edge - the stand.

Comment! So that the flooring is gained stability, the stand must be wider than lampshar and heavy.
An interesting and easy way to make a lamp in addition to the doll furniture is presented in the video:
Similarly, you can make a chandelier for a doll house. The basis of the lamp by the lamp is a small container. Molds from under decorative candles are fit perfectly. The chandelier will be attached on the wire. Abazhur is designed lace. If you attract dad to creativity, you can make a glowing chandelier. For this, the lamp is fixed inside the lamp.


The furniture with your own hands for dolls may be simple and intricate designs. When choosing a material for crafts, they are guided by their own experience and the presence of free time. DIY can be done by adult or in tandem with children, it will be much more interesting. The child's child is able to cope with the task of making puppet furniture from matchboxes or cardboard on their own.
Having bought a puppet house in a store or making it yourself, many parents think about how to furnish it. You can, of course, get ready-made items, but you can make furniture for dolls with your own hands that will be only at your child in a single copy. An additional bonus will be the economy of the family budget, because the toy furniture is not so cheap. And how much pleasure it will deliver to your child, because it can help you in this creative process.
Main materials
Doll furniture with your own hands can be made of any submitted means:
- Plywood sheets and wood are the most common materials used for the manufacture of toy furniture. Working with them is a time-consuming and requires experience, however, products made of them will serve for a long time.
- With cardboard it is easy to work, so even a child can be attracted to the process. In the work you can use both sheets and boxes.
- Matchboxes allow you to construct any piece of furniture with drawers.
- Mars of plastic and cosmetics box can sometimes be used even in the finished form, for example, as a bath. Showing a fantasy, you can make masterpieces from the lids from the toothpaste and other little things.
- Plastic and cardboard plates from eggs can also go into business and will exceed the space of a children's house. You need to think out in detail the composition and cut the desired parts.
- The advantage of the wire is that it is easily lightning. This, for example, will make it possible to arrange a bed in the style of Provence, making a frame of beds similar to a wrought product. Adjust the interior can be forged chandelier or candlestick.
Important! It can also be colored sponges for washing dishes, viscose napkins, plastic bottles, foil, various textiles. Most things we define the place in the trash can help make food furniture with their own hands from girlfriend.
Chest and sofa for dolls
For the manufacture of comed knit boxes, it is enough to glue their plane, laying 3-4 layers, and paint bright colors. The upper surface can be decorated in one stylistry, and the inner one.
Consider how to make a sofa for dolls with your hands from cardboard. It will take, actually, the cardboard itself, the synthetic filler, for example, foam rubber, and tissue with threads.
Stages of work:
- Take the tight material, cut it on the pattern of a small box of rectangular shape, sizes 6x15 cm.
- Make a similar figure, but with dimensions of 2.5x15 cm.
- In the larger box, you patch the foam rubber, leaving the unclosed hole above. The filler does not need to be seal.
- For the assembly, there is a small product on the end (this will be the back), get a back to the resulting soft seat.
- We take a beautiful fabric and make upholstery, tosing her furniture and making the size of the future cover.
- Cut the fabric on these markups and susht it, leaving at the bottom of the seam.
- To additionally fix, you can do small holes on the surface of the cardboard to produce the strings, or just to kill fabric stapler.
- You can add accessories, sewing small pads or rollers.
Pants bedside table
To make a bedside table or chest of dolls with your own hands, you will need:
- thin plywood;
- lobzik;
- sandpaper;
- drawing tools (pencil, ruler, eraser);
- pVA glue;
- putty acrylic;
- acrylic paint white
- kickers;
- tree branch.
Important! In the presented master class, the size of the finished product will be 14.5x16x6, 5 cm. Knowing how to make a table for dolls of such a parameter, you can choose the dimensions at your discretion.

Algorithm of actions:
- We apply the drawings of the details (rear wall, 2 side walls, 3 shelves and lid) on the plywood.
- We drink the parts and cleaned the sandpaper.
- With the help of sewing, we make holes on the back wall, which then placed the Pill fixed on the jigsaw, and the propyl is done.
- We connect to the rear wall side, sizing the connection location. As a result, it turned out a box in which the shelves must be placed.
- On the top of the product we glue the lid.
- We disassemble the entire design and applied PVA glue.
- After waiting until it serves a little, collect the chest of drawers.
- For drawers, drink rectangles.
- We glue boxes and handle their sandpaper.
- We put these boxes in the chest, and make the front side.
- We make knobs from a tree twig for them, sawing it into pieces and sticking in the right place.
Important! If the boxes do badly slide, lubricate them with wax.
Furniture in a puppet lodge with your own hands is ready, you can add it to accessories, for example, a sink mirror.
Furniture for a house
How to make Furniture for dolls with your hands from cardboard Consider on the example of a miniature toilet table made of cardboard packaging. For work you will need:
- cardboard packaging, such as paint for hair;
- scissors;
- line;
- pencil;
- foil;
- stationery glue;
- color or decorated paper.
To understand how to make furniture for dolls, follow the instructions:
- Cut the box at the required height.
- Make the mirror scheme on the cut part, which in width coincide with the table.
- Cut and glue the workpiece to the base.
Important! The top edge of the mirror can be issued with patterns or rounded it.
- Pun the future table paper.
- On the product you can draw drawers and doors.
- Mirror and handles cut out foil.
- Stick elements on a table.
Now you know how to make furniture for dolls with your own hands, and you can decorate the interior of the toy house to your taste - it all depends on your imagination and free time.
House is built. It all unimportant, he is big or small, from a brick or from cardboard, Barbie or Snow White with Dwarves will live in it. In any case, he needs interior, in furniture and necessary accessories. In stores toys today you can buy everything. But as you know, the most fashionable things are considered exclusive, made in a single copy, handmade things. Therefore, we drown the sleeves and begin work on the manufacture of doll furniture with your own hands.
We make a present chair for Barbie
In the market for toys, the current miniature layouts of real objects of the human life are most appreciated: cars, airplanes, clothes, etc. The smaller the model, the more difficult to do them. Let's try to create a similar exclusive piece of furniture.
To make dolls upholstered furniture, you need to cook:
- dense cardboard with a thickness of 1-1.5 mm;
- ordinary paper;
- penocarton (thickness 0.5 cm) or corrugated cardboard (thickness 0.3 cm);
- a tube with a diameter of 1.5-2.5 cm from any material. You can use the old marker or cardboard tube from under the thread;
- fleece or thin foam thickness 0.3-0.8 cm;
- fabric for upholstery. It is better to choose a sieve or staple, so that it is better impregnated with glue;
- pVA glue and "moment";
- scissors, knife;
- line, pencil.
Production of the present chair in stages
- Make drawings of parts on paper and cut them out.
- Cut the details of the chair in the drawings. Four rectangles from foamarton or six corrugated cardboard glue together. It will be the base of the chair, seat. Then glue the back and facade of the chair cut from dense cardboard. Fasten the armrest tubes. Next, they will keep them after the salary of their paper, but while they can be slightly "sampled" by pieces of scotch.

- Cut from corrugated cardboard several strips of 1 cm wide and a length equal to the length of the tubes, and put them with a stack under the roller, losing the layer glue. Number of layers determine the place. Puck the armrest first with thin paper, and then a fleece or foam rubber.

- Puck the chair with a cloth. To do this, cut out the pieces of material according to the same drawings, but slightly (1-1.5 cm) adds in length and width for the sovereign.

- The back (removable) for the chair is covered first with foam on one side, and then, with a cloth from all sides.

- Install the back in the chair. It can be glued to the stationary back, and you can leave collapsible.

- Pillow on the chair do the same as the back.

- Here it turned out the royal chair for the favorite doll.

The technique of making this upholstered furniture is similar to the scheme described above, only this chair is not a model of the present, and therefore the basis for it is easier to execute. It consists of a piece of foam rubber cut through the patterns, a thickness of 1-2 cm and a small box. These details also need to be saved with a beautiful cloth, and then join.
From the rectangular piece of foam rubber coinciding in size with the size of the box, cut out the pillow and dramatize the cloth. If there is a sufficiently long and narrow box, it may be a chic sofa for the doll.

The desire to make furniture for very often stops the absence of materials. Of course, few people in the apartment will find furniture boards, wooden bars and springs. However, miniature furniture and does not require such real details. The floor-liter plastic bottles are in any house and can be used not only as container ..
If they are cut in a certain way, they may turn out over the original chairs. In order to give them a presentable species, you can shelter or puncture plastic edges with a beautiful braid. Next, you need to sew your two pads and fill them with any filler. One of them will be the seat, and the other back.

To fulfill this work, we will need a cardboard tube that remains from the roll of toilet paper. The manufacturer's scheme is the same as in the previous version, only in this case we will not be able to make armrests. Therefore, miniature furniture will be rapidly with a backup.
Cut from the tube the desired shape and take it with a cloth. Make a bag, gain it with filler and put inside the tube to get a seat.

Cot for a puppet child
Barbie or Monster High adult girls, so it is quite logical that they can have a little baby. For him, some kind of furniture is also needed. For example, a cot.
There is a very simple version of the manufacturer of the cradle for a small baby - a crib of match boxes. For the backs, you can use sticks from ice cream-pops. Shill two box to the ends and take the color paper. Stick sticks and paint them. Cot is ready.

Matchboxes are excellent building material for puppet furniture. These are ready-made pull-out drawers. Of these, you can make a whole kitchen set.
- Take 9 boxes and fold them in three rows, gluing among themselves.
- Plue around the perimeter with colored paper ribbon.
- Make a stapler brackets on the ends of the "boxes". It will be handles.
- Hinged lockers make out of three boxes.
- Shill in each box two parts.
- Color or cross them with colored paper.
- Cut the top box in the middle. It will be doors. The handles on them can be drawn with a felt-tip pen or glue along the rice grain.

From match boxes can be constructed a wonderful chest. For this we need:
- 4 matches;
- 4 beads for legs and 4 for handles;
- thin fabric or colored paper;
- beautiful braid;
- glue, paint.
Color all the boxes inside and outside of a monochrome paint. Glue them between themselves and wrap with cloth or paper. Stick on the contour braid, on the bottom 4 legs-beads, and on each box of beads-handles.

Give or make a home for her dolls for her daughter - it's just the beginning. Next, this house will have to furnish. It is a bunch of toy furniture, techniques, accessories. On how to make furniture for dolls will be told in this article.
How to determine the size
Dolls, their houses and furnishings are reduced copies of us and our dwellings. And the most reliable way to make doll furniture with your own hands and not mistaken - measure the real items, reduce them several times, and then work with the obtained values.
Furniture for dolls - copies of our furniture
How much to reduce real sizes depends on how small or a great doll is, because they are from 7 cm to 60 cm or even higher. Accordingly, the furniture for them needs different sizes. To determine the number to which real dimensions should be divided, the average human growth in centimeters (170 cm) is divided to the height of the doll. We get some kind of number. Here on it and it will be necessary to divide the size of real furniture.
For example, the height of the doll is 15 cm. Calculate: 170 cm / 15 cm \u003d 11.3. That is the number and divide all the parameters of "human" furniture. It is still worth saying that it is 14-15 cm that is the most popular size among the doll population. Therefore, most of the finished furniture is made in a ratio of 1:12. It is possible for us to use existing dimensions at least in order to be oriented with the scale of the required parts and the number of materials.

So, the most common sizes of dolls:
- doll-man 150 mm;
- doll-Woman - 140 mm;
- doll-child - 75-100 mm;
- toy baby - 65-75 mm.
If you need furniture for dolls of such sizes, its parameters will be such:

If you have more toys more / less, you can not adjust the dimensions. With a great difference, you will have to increase or decrease (and you can count on your own).
Doll Furniture made of match boxes
The easiest way to do furniture for dolls do it yourself from ordinary match boxes. They are glued with the help of PVA glue, creating certain structures, then glued with paper or cloth, self-adhesive film, etc. You can use wooden beads as legs, drawers for drawers from small butt on legs or from long beads.

From match boxes you can make chairs, table, chest of drawers, bed, bedside table. Another thing is that the furniture is obtained for very small dolls, no more than 10 cm high. Although, you can use a larger number of boxes, gluing them into blocks, and from these blocks to create furniture for dolls with a height of about 15 cm. Also, but to work with others Materials are not much more complicated, and they are more plastic and allow you to create products of more elegant forms.
This may be your first experience in making doll furniture. Later it will be possible to take on something more serious.
Furniture for a doll house of cardboard
You can try your hand in the manufacture of furniture for dolls using cardboard. The material is inexpensive, affordable, it will be possible to try and mistake, redo. Cardboard usually connect with the help of PVA glue, you can use a glue gun or any universal glue that can glue cardboard, fabric, wood. Just making furniture for dolls with your hands from cardboard, you will also use these materials. If we talk about convenience, it is preferable to the adhesive gun - glitter quickly, it is convenient to work comfortably, the connection is reliable.

To make furniture for dolls, you can use the usual packing cardboard. He is cheap, but the furniture from it turns out very tender. It is unlikely that the child is enough for a long time. But, as a "first experience", this is a good option. More reliable obtained products from cardboard for scrapbooking. It is a tight, uniform, has a different thickness (from 2 mm and more), may be with a textured surface, extruded by one-photon patterns, a pattern with one or both of both sides. The lack of such cardboard is to buy it, and some types of such cardboard are not too cheap.
Cardboard Bed for Dolls
This bed for dolls from cardboard is designed for a large doll - up to 50 cm of height. If necessary, all specified dimensions can be reduced.

This option can be made literally for 10-20 minutes. It does not need glue or other clamps. Details are kept due to grooves cut in cardboard. The width of the groove is equal to the thickness of the cardboard, the length of the slots and the size of the blanks are listed on the diagram.

Green and yellow dots indicate the combined cuts. They are inserted alone in another, on what the assembly ends. If you like this model, it can be done from plywood.
Schemes for the manufacture of cardboard doll furniture
Basically, furniture for dolls from cardboard is glued. To make something openwork from this material or very complicated is unlikely to succeed, but the manufacture of simple models does not take much time. Having a diagram with dimensions, you can even do without explanation. Everything is so clear.
Such models can be done on the eye. Without a "upholstery", they look unsightly, but after quite decent bedside table with doors and an open regiment - a scheme alone, different execution
Furniture schemes for dolls can be used not only for making cardboard. They can be transferred to the paneur and cut with a jigsaw.
Cabinet for dolls of girlfriend
The toy cabinet can be made of plywood, paint or envelop wrapping paper or self-adhesive film. There, probably, the questions will not arise - everything is clear, and if there are questions, you can look at their solution in the "natural" closet. But you can make it from all inexpensive materials. Furniture for dolls with your own hands and good that the cost of it is very small.
From a cardboard box
The main task is to find a box of dense cardboard suitable size. Moreover, it will be easier to work if it is packaging - with rejuvenable edges. Such a bending part is the finished door. It will only be necessary to finish it - hang the mirror, attach the handle, etc.

One of the options for homemade furniture la dolls - wardrobe
What is needed for work
It will take good tape for work, better - on a paper basis, as it is then easier to glue the finish. If there is a glue gun or construction (a large stationery fit) stapler with brackets is also not bad. If, in addition to cardboard and paper, you will also use other materials, the glue is better to find the universal, which glue paper, cardboard, fabric, plastic. We still need scissors and a stationery knife, a ruler.

If the box found is too big, it can be reduced, cutting off unnecessary. So that the bends were smooth, take a ruler. We apply to the place of the future fold, several times we go along the lineup of a stupid solid object (with a snap or fork). After that, the cardboard bend will be easy.
Filling for a toy cabinet
From trimming or from another box, cut the shelves. They should be a little - by 5-8 mm - longer and wider inner cabinet space. Surplus bend so that sides are formed from all sides. In the corners, folds are formed, they are gently cut off. One of the parts bending 180 ° and glue to the shelf itself. This side of the shelf will "look into the world." Three other parts bend at an angle of 90 °, we wash the glue and the shelves insert into the closet. In the photo on the right you can see how the shelves are glued. But that the places of attachments do not get into the eyes, the sides are better to wrap down.

Make furniture for dolls with your own hands - it's no less pleasure than playing with her
In addition to the shelves, you can still make a crossbar for hangers. It can be made from bamboo speakers, for example, you can try to use a tube for juices, a wire, etc. The hangers can also be twisted from the colored wire or cut out of pieces from juice, from plastic bottles, etc.
Finish - creative process
Next, it's a finish. You can paint the cardboard with watercolor or acrylic (better) paints, shove the wrapping paper, cloth, felt. You can simulate a mirror surface - to attach foil (food, for example). If you want to make a "plastic" surface, look for bottles from under the water of the desired color, cut off the neck and bottom, and the "body" use as a finishing material.

Finishing - the process is creative, but, first, use the materials simpler, softer, feel easier to work with them
Handles can be made of wire, from beads, long beads. For toy larger cabinets, you can find buttons or buttons. All this "beauty" adhesive after "washing" the cabinet.
Warding Doll Cabinet Newspapers
We need old newspapers, PVA glue with a tassel, a glue gun, a couple of wires or threads, wrapping paper for trim and paint.
From the newspapers twist the dense tubes, we wash them along the edge of the PVA and leave up to dry. Then the tubes can be glued together. For this operation, the adhesive gun is suitable. There are two ways: first collect large blocks, then chop them into fragments of the desired length or immediately cut the tubes of the desired length and glue immediately blanks in size. The second path is more painting, but the waste is less.

The finished walls of the cabinet should be copped with each other. To rigidly fix the angle of 90 ° better to use a thin wire. First, wash the joints with glue, then put the walls one to another. If the wires interfere, they can be removed after drying the glue.

For the same technology, the bottom, the top, shelves are glued. Doors will need to do a little differently. So that they open up, two strips of about 1.5 cm wide from the scotch. On the edge of the door, the tape is sampled so that a little more than half hung in the air. With this free tape, we glue the door to the wall, but so that between the wall and the door there was a clearance of 2-3 mm (just tape). This will give the opportunity to close the doors. The glued door is fixed on the other side of the second scotch band.

The second way to fasten the doors - on wire. Only this time it should be tough and thick enough. Cut a piece that is 2 cm longer than the height of the cabinet. Immediately on the wire on the one hand, we make a loop using 1 cm. The loop is bending at an angle of 90 ° to the wire. Make a hole in the bottom and roof, we skip the wire through the bottom, the loop remains downstairs. We wear the door on the wire using the extreme tube instead of hinges. Slightly flexing the wire, we produce it into the hole in the roof of the cabinet, bending the surplus, fixing the door. We repeat the same operation with another door. Please note the door to the tape is needed to finish the cabinet, and on the wire - it is possible after.

There are some little things that need to say a few words. The legs and handles for the cabinet can also be made of paper tubes. Just twisted them from the paper that you finish the toy. Cutting it into a dense roller, the edge is glued with glue, then cut on the segments of the desired length and stick to the right places. Instead of the tubes there may be wooden sticks, beads, etc.
Puppet Bookcase or Lines Shelf
You can make furniture for dolls with your own hands from school wooden lines. They are good for those already processed, have the same width and thickness. In the stationery store you can find the desired size - more / less, wider / already - at will. For example, for the manufacture of a puppet bookcase, you need 6 lines of 15 cm long.

Still, you will need a jigsaw. If there is an electric - excellent, if not, is suitable and manual, as it is not too much work. We also need emery paper with small grain, glue (PVA or carpentry) and paint (acrylic or gouache).
From the line, cut segments: 4 pieces of 6 cm, one - 8 cm. The edges sand up to an even state, remove the markup and bar codes. Between the two line, we have the shelves (which are 6 cm), we leave the same distance from above the same distance - under the cover (segment of 8 cm). The joints are missing the PVA liner or carpentry, we connect and tighten with a painting tape, we leave for a day. When the glue is dry, we glue the latest item - the lid on top. Actually, the shelf itself is ready, it remains to paint it.

To obtain a smooth and bright color, the design is better covered with white, after drying it is already painted with the desired tint. Also made with your own hands, doll furniture can be decorated in.
Furniture for dolls: photo ideas
You can make furniture for dolls with your own hands from the most unexpected materials. How to use newspapers and wooden rules you have already seen. But you can make tables, chairs, chairs, sofas, beds, shelves, cabinets, etc. From sticks for ice cream.
Garden bench or sofa - depending on the finish
What is good for this material, you probably have already understood - it has rounded treated edges, the same in size and well-processed. If the sticks seem too rough, milk them to smoothness with the help of sandpaper with small grain.
From the clothespins, quite good chairs and chairs are obtained. They are disassembled on halves and are connected using joinery glue. Figure products are obtained by almost several dozen minutes.
Armchair, table - also you can make clothespins
Almost always for the manufacture of doll furniture use wooden clothespins. But no one forbids to take plastic. It is also difficult to work with them just the difficulty in the fact that the wooden is easier to refine, changing the thickness of the form, etc. If the product is simple, refinement does not require, you can also take plastic. They are more diverse in shape and sizes, already painted, so there is less than one with them.
With an increase in skill, you can go to a more complex material - a fane or wood. The complexity is that the outtage and cutting of miniature parts requires filigree accuracy, perfection and takes away the mass of time. But you can do everything you wish.


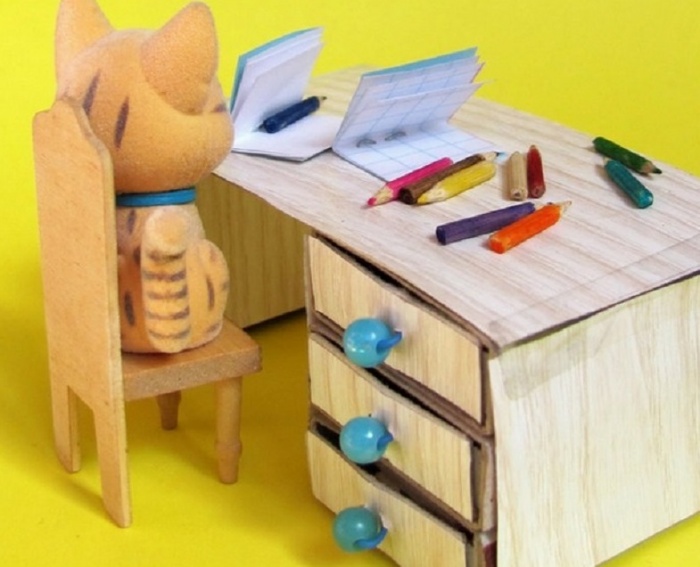
Corner writing desk for doll ....


Plywood Wardrobe Cabinet - Play Accuracy Very High