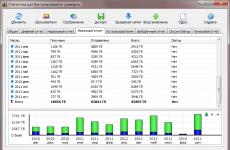
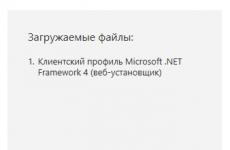
The program for checking the USB port. Five programs for creating a boot flash drive
USB (Universal Serial Bus or Universal Serial Tire) - The most multifunctional port today. Using this connector to a computer, you can connect not only a flash drive, keyboard or mouse, but also a lot of other devices. For example, there are portable mini refrigerators with a USB connection, lamps, columns, microphones, headphones, mobile phones, camcorders, office equipment, etc. The list is actually huge. But in order for all this peripherals to work properly and the data was transmitted quickly through this port, you need to install drivers for USB. In this article we will deal with the example, how to do it correctly.
By default, the USB drivers are installed along with the motherboard, as they relate directly to it. Therefore, if for some reason you do not have the USB drivers, we will apply primarily to the parents of the motherboard manufacturers. But first things first.
In the case of USB, as with any other computer components, there are several ways to find and download the necessary drivers. We will analyze them in detail in order.
Method 1: From the manufacturer's website of the motherboard
At first, we need to learn the manufacturer and model of the motherboard. To do this, you need to perform a few simple actions.
- On the button "Start" You must click right-click and select item. "Command line" or "Command Line (Administrator)".
- If you have the Windows 7 operating system installed or below, you need to press the key combination "Win + R". As a result, the window will open in which you need to enter the command "CMD" And click the button "OK".
- And in the first and in the second case the window will appear on the screen "Command line". Next, we need to enter the following commands in this window in order to find out the manufacturer and model of the motherboard.
- Now, knowing the brand and model of the motherboard, you need to go to the official website of the manufacturer. You can easily find it through any search engine. For example, in our case, this is ASUS. Go to.
- The site needs to find a search string. In it we introduce the model of the motherboard. Please note that in laptops most often the motherboard model coincides with the model of the laptop itself.
- Press the button "ENTER"You will get to the search results page. Find your motherboard or laptop list. Click on the link by clicking on the name.
- In most cases, on top, you will see several subparagraphs to the maternal card or laptop. We need string "Support". Click on her.
- On the next page, we need to find item .
- As a result, we will fall on the page with the choice of the operating system and the corresponding drivers. Please note that not always by selecting your operating system, you can see the desired driver in the list. In our case, the USB driver can be found in the section "Windows 7 64bit".
- Opening a tree "USB"You will see one or more download download links. In our case, choose the first and press the button "Global".
- Instantly start downloading the archive with installation files. After the download process is completed, you must unpack all the contents of the archive. In this case, it contains 3 files. Run file. "SETUP".
- The process of unpacking the installation files will begin, after which the installer itself will start. In the first window to continue, you must click "Next".
- The next point will be familiarized with the license agreement. We do it at will, after which we put the mark in front of the string "I Accept the Terms in the License Agreement" and press the button "Next".
- The process of installing the driver will begin. Progress you can see in the next window.
- Upon completion of the installation, you will see a message about the successful end of the operation. To complete, you only need to press the button. "FINISH".


wMIC Baseboard Get Manufacturer - Find out the board manufacturer
WMIC Baseboard Get Product - Motherboard Model


This is completed from the manufacturer's driver for the USB driver from the manufacturer's website.
Method 2: Using automatic driver update programs
If you do not want to mess around with the search for the manufacturer and model of the motherboard, downloading archives, etc., you should then use this way. To do this, you need any utility to automatically scan the system and download the necessary drivers.
For example, you can use or. In any case, you will be from what to choose. Similar programs on the network today large amounts. Take for example the same. You can learn about the detailed installation of drivers with this program from our special lesson.
Method 2: Through Device Manager
Go to the Device Manager. To do this, you need to do the following.

Please note that this method is the most ineffective of all three. But in some cases it really helps the system at least identify USB ports. After such a set, you need to search for drivers one of the two methods listed in order for the data transfer rate through the port as possible.
As we have previously advised, for any force majeure situations, keep the most important and necessary drivers and utilities for a separate medium. If necessary, it can save you a lot of time that will be spent on the re-search for software. In addition, there may be situations when you simply have no access to the Internet, and you will need to install the drivers.
Hello, friends! Today we will talk about creating a bootable flash drive.
How to create a boot USB device? In what purpose to use it and what program to write?
A brief overview of the five most popular and free software for creating a bootable flash drive.
Modern developments do not stand still, and yesterday's technologies slowly, but correctly lose their relevance. This is the once popular CD and DVDs no longer seem to be such a definitive solution for storing, transferring information and work with it. The high speed of reading data, the versatility and the ability to reusable is only a small part of all the benefits of the flash drive as the bootable media in front of the disks. Already today, almost all personal computers and laptops, if they are not more than ten years, support the possibility of downloading from USB devices. And in some cases (for example, a netbook), the flash drive may be the only loading device from the external drive.
By the way, the new Windows 10 operating system will be the first axis, which will be officially distributed to the USB drive. And if you suddenly need to restore files from the flash drive, read about it. I recommend also to pay attention to, which will help you to distract from labor everyday life and will raise the mood.
Using an additional software, the USB flash drive can not be used not only as a boot device for installation, reinstallation and restoring the operating system, but also to create an alarm device (MULTIBOOT). This is a kind of resuscator, the tool from which you can boot and cure a computer from viruses at any time, restore system files or save important data. How to create a USB flash drive, I described in the article "Creating a loading Live CD / DVD / USB device and its application." You can get acquainted with this article.
Despite all the obvious advantages and the growing popularity of the flash drive as a bootable device, programs for its creation are not so much. Nevertheless, they are, and today I will introduce you to detail with them, but at first a few words about the preparatory stage.
Preparation of flash drive
We need a flash drive itself, plus the knowledge of some important aspects. First you need to make sure that the computer supports download from USB devices. There is an erroneous view that if there is no possibility of selecting a USB loading with USB (only FLOPPI, HDD and DVD-ROM parameters are present, then the USB boot is not supported. This is not true!
More precisely, not always so. The only right solution is to contact the manual (user manual) of your motherboard or using specialized software (as an option - AIDA64) to get a detailed report on the hardware used.
The second point is the size of the flash drive. Here everything will depend on what we write to it. For example, to create a Live-USB, the Linux or Windows 7 installation disk is enough for a 4 GB flash drive. To create a boot device with the latest versions of Windows, it is desirable to have a flash drive at hand at least 8 GB.
The third time is the transfer of files from the flash drive. As a rule, the process of creating a boot device implies its full formatting. If there are important files on the flash drive, transfer them in advance to another device. To create a boot flash drive and subsequent work with it, as with a boot device, use the USB-2.0 port (Windows 7 does not support USB 3.0).
How to create a bootable flash drive
Consider five different ways on the example of five free Windows programs.
A small but fairly functional utility with the speaking name WinsetupFromusB. It is equally well suited for recording a boot and / or multi-load flash drive (up to 10 operating systems) and creating Live devices. Official site .
Of the disadvantages - the lack of support for the Russian language. Among the advantages, as I said, its versatility. The utility can work not only with the Windows distribution, but also suitable for recording the installation disk with Linux.
The usual option for creating a bootable flash drive, for example, with a Windows distribution, provides a choice in the corresponding columns of the flash drive itself, the options for automatic formatting of the media and ISO-image of the operating system. The recording process starts after pressing the "GO" button. You can read more detail about the operation of this program.
To create a multi-load flash drive (several OS), you need to specify the path to ISO images of operating systems. The Windows 10 selection item at the time of writing this article is missing by default, but in reality everything is written and works, just to select the corresponding graph with the available versions - Vista, 7, 8.
2. RUFUS.
Perhaps the easiest solution for creating boot USB disks. Everything is simple and intuitive. Suitable for working on systems that do not have an installed OS. Official site rUFUS.AKEO.IE.
From the main advantages - speed, simple interface, Russian. An excellent solution if you need to create a Windows 10 boot flash drive with UEFI support. By the way, about how to do it, I wrote in detail in.
It spreads in the format of the usual installer and portable version. To create a boot flash drive in the utility window, you must specify the path to the ISO image recorded and click the Start button.
On new systems where UEFI is used instead of BIOS, in the section "Section and System Interface Type" menu, set the value "GPT for computers with UEFI".
In other cases, the default settings will be enough. The formatting option is assigned by default.
3. Windows 7 USB / DVD DOWNLOAD TOOL
This utility is the official application from Microsoft. The interface is minimalist, simple and understandable, work easily with it. Download from the official site wudt.codeplex.com.
Perhaps the name of the utility (Windows 7 USB) of many will be misled that it is possible to write only the Windows 7 distribution to the removable medium. However, this is not the case. In addition to the seventh version, you can record Windows 8.1 and 10 distributions on the USB flash drive.
Of the minuses, the utility is not Russified, but the simple and intuitive interface is called up to level this flaw.
All that is required by the user is to insert a USB carrier in advance, select the ISO image with the operating system and specify the path to the carrier (flash drive) to which this image should be deployed.
The principle of operation of this program is based on the standard Windows operating system tools - this is "diskpart", "BootSect / NT60", Unpacking ISO on a USB flash drive. The program acts only as a graphical interface.
Ultraiso is one of the best and most functional programs to work with disk images. Universal "Combine", which supports work with almost any famous formats. Able to work in a pair with Nero Burning ROM and integrates with virtual emulators. It will help if the image of the boot disk is not in ISO format.
The program can convert other image formats to ISO files - NRG, MDF, MDS, IMG, CCD, etc. With Ultraiso, you can edit ISO files without unpacking them. Ultraiso interface is translated into many languages, including Russian. To download you, you can choose from several Ultraiso editions adapted to separate versions of Windows, as well as a portable version of the program. Download link www.ezbsystems.com.
By and large, the program is indifferent to which boot devices will be created with it, with which operating system, what software and from which manufacturer. The recordable ISO image must be opened in the program window or using the Open command in the File menu, or using the Review button on the toolbar. It can also be done using the Ctrl + O key combination.
Then in the appeared window, if the desired flash drive is automatically selected by the program, click the "Write" button.
Daemon Tools Ultra is a professional tool for working with images. The program itself is familiar to many users on the free version of Lite, which allows you to mount virtual drives for reading disk images. Its more functional version - Daemon Tools Ultra - Among other features offers creating boot devices.
It is worth noting from the disadvantages that it is paid, but to create a boot flash drive on the official website of the program you can download a free trial 20-day version. The official website of the program.
Go to the official website and download the program. During installation (installation) you need to select a trial type of license.
The program works with a huge number of disk image formats and can be used both to create a boot device with a subsequent installation of the operating system and to restore it (Live disk).
To create a boot flash drive in the main window of Daemon Tools Ultra, select the "Tools" menu item, and among its commands - "write a boot image to USB". Or a combination of hot keys Ctrl + B.
In the recording parameters window, specify the path to the image, we make an active MBR overwriting option and click "Start".
When the flash drive is ready, it remains only to boot from it. The easiest way is to use the boot menu call keys. The table below shows a visual example of such keys.
Of course, this is not the entire list of programs designed to create boot devices, but the overwhelming majority of users of the capabilities and the functional of the listed software will be enough.
For example, the RUFUS program can be used as the easiest and most quick tool for creating a USB disk with one Windows distribution or for the BIOS firmware from DOS.
Program Interface: Russian
Platform: XP / 7 / Vista
Manufacturer: MakeSoft.
Site: www.imakesoft.ru.
USB Manager. It is a freely distributed software product that is designed to control and complete control of various kinds of USB devices, whether, for example, printers, or any removable media.
Main features of the USB Manager program
The first thing to pay attention to is complete compatibility with all versions of Windows family operating systems, including even outdated Windows 98. The program distribution does not occupy a lot of space, and the installation process does not cause difficulties. So, the user will cope with this by the user of any level of preparation. The second, which pleases, is that the program has multi-language support, therefore, by setting the necessary interface language, the application can be understood without much difficulty.
In general, the program, apparently, is intended for users who work on personal computers are not alone, but using different accounts. It is clear that many simply do not want in their absence, someone uses any USB device. That is why the program, first of all, allows you to enable or completely disable all available USB ports. With full disabling, no one can take advantage of them. For example, someone inserts the usual flash drive, and here the most interesting thing begins. The operating system simply does not see him. So, to use information from it will not work. By the way, very many viruses and malicious codes are distributed precisely from such devices. Therefore, turning off the USB ports to some extent, you can guarantee the safety of the computer. Turn on ports is not a new way. In this case, you can use the password system you need.
Turning off and re-enable ports can be configured based on the types of connected devices. For example, it can be separate printers, scanners, flash drives or various kinds of peripheral audio devices.
In general, it should be noted that the program has a rather pleasant intuitive interface. Yes, and it works quite correctly. By the way, the protection system has been quite strongly finalized in the latest version and several updated the disconnection function from the client.
Thus, to prevent unauthorized use of USB ports of your computer, the program is simply suitable for the program, especially since it is distributed completely free and has no restrictions on the timing and objectives of use.
Most users do not even suspect that there are very useful and, to some extent, the necessary programs for USB flash drives. Such utilities are designed to facilitate work with these information carriers, to prevent the occurrence of frequent errors, as well as secure from penetrating viruses to a computer or to the memory card itself. , In addition, their size is very small.
One of the most popular free software for USB is called USB Safely Remove. This is a very useful utility that expands the capabilities of users when working with various devices, including card readers, portable hard drives and, of course, flash drives. The functions of the free utility are very diverse, because it can return the back disabled devices, remove the discs of empty slots of card readers, convenient and just extract USB flash drives.

Any user came across a problem when an error occurs when extracting a USB device. Some users try to wait for the completion of all operations, although it is quite possible that one of the processes just blocked, so you will have to wait for a very long time. Other people do not want to wait, and immediately remove the memory card, but here there may be unpleasant consequences - perhaps the system really performed certain actions by canceling which the flash drive lost part of the information. But if you download a free USB Safely Remove utility, then it will show which processes block your device, and will also allow you to turn them off. This is a beautiful, convenient and useful program, download which everyone often uses similar information carriers.
Quickly download free USB Disk Security
You can also advise you to download another excellent free program whose utility is difficult to overestimate. We are talking about USB Disk Security. It is no secret that flash cards are variable viruses, since there is no special program to write data, malware can freely move from the computer to the USB flash drive and from the flash drive to the computer. Therefore, it is necessary to protect yourself from possible problems, what is recommended to download USB Disk Security for free.One of the advantages of the application is that it automatically blocks the autorun of any interchangeable media, that is, the virus will not be able to get to the hard drive when the flash card is first connected. The user can safely start scanning with antivirus to identify and remove viruses. After all, the utility boasts a good embedded antivirus, which is not even needed to update.

If you download this utility for free, then users will be able to use another regime - Safe Open. It opens access to USB information, however, no malicious program can get to your computer.