Beautiful painting of a tree. Painting of wooden products: choice of composition and methods of work. Wood painting: the final result depends on the surface preparation
Today we will find out how to paint a tree or a wooden surface with our own hands so that the results of our labor are pleasing to the eye, and the product retains its attractive appearance for a long time.
What do you need to paint a tree with your own hands?
Primer- you can use an acrylic primer
Dye- alkyd, oil or acrylic, aerosol or ordinary
Brushes and roller if you will be using regular, not spray paint
Acrylic clear varnish- it will protect the painted wooden surface from damage, as well as add depth to the color and shine of the new coating
Respirator and gloves for protection during work
Solvent for degreasing the surface before painting (you can use white spirit, kerosene or special degreasing compounds)
Cloth napkins or just dry clean cotton rags
Masking tape and paper or cover film
Very fine sandpaper
Spatula and putty, best automotive, you will need it if you plan to remove deep scratches or chips
How to paint a wooden surface at home?
Choice of paint
Today the market of paints and varnishes for working with objects and structures made of wood offers many different materials: from alkyd and oil enamels to modern spray paints.
|
Acrylic enamel dries quickly, has water-repellent properties and is versatile - it is suitable for almost any type of wood, with the exception of wood with increased resin content. Oil enamels are suitable for working even with resinous rocks, but they dry for a very long time. Alkyd paints are often chosen for their cheapness and ease of use, but they have certain durability issues, especially when used for outdoor use. Alkyd paint is water-repellent, used on all types of wood products, dries quickly and does not absorb deeply. |
 |
However, if you plan to work with wood at home - painting furniture, interior doors, wood products or decor items, then spray acrylic paints are the best choice. Working with them at home is surprisingly simple and convenient, the paint does not have toxicity (unlike oil and alkyd enamels), it lays perfectly evenly, creating a smooth coating, and dries very quickly. Aerosol paint is suitable both for renovating old or damaged surfaces, and for full painting / repainting of wood. Aerosol acrylic paints by their composition are excellent for applying to wooden surfaces, while the spray from a can is evenly applied even on difficult terrain. Aerosols will help you quickly and easily refresh an old table, chair, wardrobe, bookcase, wooden items and interior elements. The wooden surface, painted with spray paint, is completely protected from moisture, corrosion and dirt. Acrylic paint is environmentally friendly and non-toxic, does not contain fluorine and chlorine. Also, when working with a clean (unpainted) wooden surface, we recommend that you pay attention to modern tinting varnishes, which allow you to tint wood for valuable species - oak, pine, walnut and others - while protecting the wooden surface from damage and abrasion.
When choosing a material for painting wood, also take into account the following points:
Step-by-step instructions for painting wood
Step_1 Preparation of the workplace. If you are painting wood at home, take care to protect floors, walls, and home furnishings from accidental paint splashes, using newspapers or cover film.
Step_2 Preparation of the product for staining. Before painting a wood or wooden surface with your own hands, it is recommended to remove the old paintwork, as well as dirt and dust. Old paint can be removed with the help of special washes, or using a building hair dryer, which "steams off" the old paintwork. Such a total removal of the old paintwork coating is necessary if the paint peels off and lags behind, but if the old coating holds well and does not bother you, then it is not necessary to remove it. In any case, even sand the surface with fine sandpaper. After removing the old paint and sanding, it is necessary to thoroughly wipe the surface with damp rags and dry it.
Step_5 Before painting the tree at home, glue the places that cannot be painted over with construction tape and remove it immediately after the end of the work. If you paint wooden furniture - protect or remove fittings, glass
Step_7 Now you can start painting the wood. If you have chosen aerosol paint, then before painting, shake the can properly for at least 30 seconds, spray the spray paint from a distance of 20-30 cm from the surface. You need to apply the paint with smooth, uniform movements (brush or balloon). After the first coat has dried, which will take 15-20 minutes, apply further coats of paint. When painting wood, it is recommended to apply at least 2 - 3 coats of paint.
Competent painting of a tree is a painstaking and not in a hurry business. Attention to detail, smooth movements, even distribution of paint over the surface are the main things that are required of you. Pay particular attention to the ends of the boards, holes for fittings and screws, joints, etc. - all this must be carefully painted over.
Step_8 After the paint has dried, apply acrylic varnish in the same way and wait until it dries. Complete (final) drying occurs for at least 2 - 2.5 hours, after which The product is ready to use!
Painting wooden decor items, furniture, etc. - this is a great way to give new life to your favorite things, the opportunity to stylishly decorate the interior, harmoniously fit old furniture into a new renovation. As you can see, painting at home is not a difficult task even for a beginner; it does not take much time and does not require special equipment. Choose a sunny day, arm yourself with bright colors and start creating - now you know that painting a tree or wooden surface with your own hands is not as difficult as it seems. This interesting process will certainly push you to new ones in the design of your home and will give you real pleasure!
If this article was useful to you, please rate it (at the top of the page). Thanks!
Visitors to this page most often choose in the online store:
When it comes time to finish oak, cherry or maple furniture, the word paint sounds blasphemous. But for inexpensive and less showy woods like pine, poplar or alder, paint can make a fabulous transformation. Colorful coatings provide great opportunities for home decoration. They are easy to restore and repair, and they are better than clear coatings in protecting the wood from the effects of sunlight. However, to give the furniture a beautiful look, you will have to work more carefully than painting walls, ceilings or paneling. Let's demonstrate a simple method, which includes painting itself and applying an antique decorative coating.
The main thing is surface preparation
This old rule of painters has not become obsolete in our days. The paint reveals all the defects in the wood surface, so get ready to spend a fair amount of time fixing the defects and preparing the surface for painting.
To make the wood smooth, sand it with 150 grit using different sanding pads for flat and embossed surfaces. The primer you then apply will fill in the small scratches from the sandpaper. After sanding flat surfaces, lightly sandpaper (150 grit) around the edges to soften the sharp edges. (The paint does not stick to sharp edges and they wear out quickly.) Fill any grooves and cracks with acrylic filler, sand smooth after drying, and then carefully remove all dust with a vacuum cleaner or a cloth swab lightly dampened with a mixture of linseed oil and white spirit ( the tampon should be almost dry and slightly sticky to the touch).
Grinding tools must match the surfaces.
Priming before painting
We choose a primer depending on the type of surface to be painted. For the kitchen cabinet, a pigmented shellac-based primer was used, which reliably clogs the resinous pine knots. Using a synthetic or natural bristle brush, first apply one coat of primer to all surfaces and edges of the garment, and then a couple more coats at intervals of 5-10 minutes on areas with exposed end fibers.

The nail board supports the primed kitchen cabinet door, allowing you to process both sides and all four edges in one go. Sharp nail tips provide firm and even support, leaving almost invisible marks
To save time, when painting the doors, we put a board with sharp tips of nails sticking out of it, on which the door rests with the already processed side during priming of the second side and edges. After 24 hours, when the primer is completely dry, sand large flat surfaces with 220 grit abrasive using an orbital (eccentric) sander or sanding pad. Sand small areas by hand using an abrasive sponge or profile sanding pads.
To reveal all the imperfections of the primed surface, use a backlight. Unlike surfaces primed for clearcoats, nothing irreparable will happen if you remove the primer coat to clean wood. Just apply the primer again, let it dry and sand smoothly. Then carefully clean the surface from dust.

By directing the light from the lamp parallel to the primed surface, shadows can be seen, signaling defects in the coating. Sand these areas and re-primer
Fill any grooves that need to be hidden with acrylic filler and smooth the surface with sanding. Apply another coat of primer and sand with 220 grit. Sanding the putty surface generates a lot of dust, so vacuum the product before wiping it with a damp cloth (for latex paint) or sticky swab (for oil based paints).
|
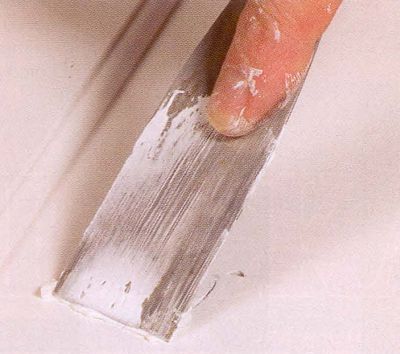
Rough areas and knots show through the primer so they can be easily identified and smoothed out with a latex putty |
On profile areas, we use the simplest and most affordable tool for applying putty - our own finger |
You can restore the clarity of the profile parts using a small block with sandpaper on two edges. |


How to choose the right primer
| Compound | Recommended application | Note | Drying time |
| Acrylic primer(water based) | Suitable for all clean woods, except pine and other knotty and resinous woods. It is used before painting with water-based acrylic paints. | Advantages: low odor, dries quickly and is easy to grind without clogging the abrasive. Due to the water content, it raises pile on wood more strongly than other primers. May adhere poorly to impregnated or previously painted surfaces. Use a synthetic bristle brush to apply. | Drying time - no more than 1 hour; the paint can be applied after 4 hours. |
| Alkyd primer(oil based) | Suitable for fresh and slightly weathered wood. Deeper than latex primer, it penetrates the surface. Topically applied to isolate resinous pine knots. | It is used before painting with oil compositions. Check label directions to see if the primer is suitable for blocking contamination from seeping through the paint. Applied with a natural bristle brush. | Drying time "to touch" - 45 minutes; staining after 8 hours (or more at low temperature and high humidity). |
| Shellac primer(with added pigment) | Blocks resinous substances that can penetrate latex and oily primers. When renewing coatings, shellac promotes good adhesion of the new paint to old coatings and weathered wood. | Alcoholic shellac dries in minutes and the odor can be less offensive than some oily primers. Shellac can be used before painting with both oil and water paints. It is applied with natural bristle brushes or all-purpose brushes. | Dries up in 15 minutes; the next layer is applied after 45 minutes. |
Paint like the pros
Latex paint requires two synthetic bristle brushes: a 65mm flat (flute) brush for large flat areas and a small, angled 40mm brush for narrow profile areas. Practice applying paint to scraps or an inconspicuous spot on your project to get a feel for the paint dripping off the brush bristles.

If the brush seems too stiff, immerse its bristles in water and, twisting, knead them against the walls of the vessel. This will make the brush more manageable and easier to clean after work. Finally, dip the brush into the paint up to half the length of the bristles and gently squeeze the edge of the can to remove excess paint. Hold the brush at an angle of about 75 ° to the surface to help the paint run off. Before it starts to dry, smooth (blend) it over the surface, lightly touching it with the tip of the brush. In this case, brush marks almost completely disappear.
Sand the surfaces with 320 or 400 grit between the first and second coats. Then remove the dust with a vacuum cleaner and a damp cloth. Let the second coat dry overnight. You can stop at this if you want the product to look new and fresh. And if you want to give it the look of noble antiquity, then this can be done with the help of patina.
1. After filling up a new portion of paint, never start applying it in the corner, otherwise there will inevitably form puddles or drips. When painting a plane, first apply paint a few centimeters from the edge and move the brush towards the edge to avoid dripping and sagging. Then go back to the beginning and continue with long strokes.
2. If paint has formed puddles in corners or depressions, remove excess paint with a wringing brush.
3. Work with long strokes with even pressure. Then, lightly brush the tip of your brush over the freshly applied layer to smooth it out.
4. Divide the area to be treated into separate parts to always maintain the wet border of the painted surface, avoiding the formation of a film.
5. It is better to work on a horizontal surface, even if you have to lay the product on its side to do this.
6. Two thin coats of paint are better than one thick paint, which may drip or wrinkle when dry.
How to choose paint
If you paint furniture with the usual latex paint that we use to paint the walls, delamination may occur. This usually happens when an item sticks to a painted surface, such as a shelf, because the paint remains soft and supple even after it dries. Therefore, it is better to use furniture acrylic enamel. To keep the paint smooth and flow well, add modifiers to slow down drying and help fade brush marks.
Usually one part of the modifier is added to 10 parts of the paint. Mix it with paint in a separate container, rather than adding it to the paint can.
How to age paint with patina
Apply a water-based patina to the painted surface to give the kitchen cabinet the look of antique furniture. First, lightly sand the dry paint with 600 grit sandpaper, and on embossed surfaces, use a gray abrasive pad to remove even the smallest roughness.
Apply the patina at room temperature and avoid drafts to prevent the composition from drying out too quickly. If you've never used patinating compounds, practice applying it to your trimmings. Start working on the back wall and inside the cabinet to roughly determine how long it will take to apply and level the compound. After applying the patinating compound, let it dry for 24-48 hours. Then protect it with a coat of water-based clear acrylic lacquer.
|
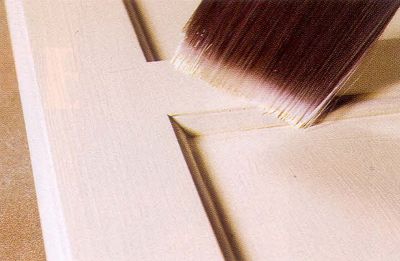
Apply the patina with the same narrow brush as the paint. Rub the compound into all grooves and corners |
Brush on flat surfaces where it will reveal brush marks and minor paint imperfections |
|
Wipe off excess composition and evenly, without strong pressure, blend the stripes with a clean, soft cloth. Avoid completely removing patina from flat areas |
In raised areas, emphasize the outlines of details by lightly tapping on the surface with a dry bristle brush. |
|
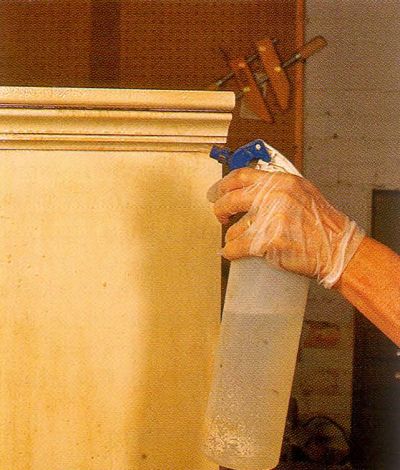
If you make a mistake or the composition begins to dry out, slightly moisten it with water from a spray bottle or remove with a wet cloth |
|


The range of paints and varnishes today, more than ever, is large, which cannot but complicate the choice in the eyes of an inexperienced user. Even for wood-based coatings, manufacturers produce several categories of compositions, each of which is also modified with special additives and pigments. But the question of how to paint a wooden house is only part of the way to getting the expected result. Based on the criteria presented below, it will be possible to make the right choice of paint for a particular case. But even the right choice will not give the desired effect if you ignore the advice from experts regarding the direct process of applying the product.
What paints are suitable for a wooden house?
Since Soviet times, the first thing that painters have tried to paint wooden buildings and structures is oil paint. It remains relevant to this day, being presented on the market in new, improved versions. But by this time, other options appeared, which were fundamentally different in composition. For example, what paint to paint a wooden house so that over time dark spots do not form on it (a common sign of poor-quality oil composition)? Use a weather-resistant product. A solvent-based alkyd compound is the best fit. The created coating can hardly be called optimal in terms of environmental and aesthetic properties, but it will cope with protective functions.
One of the most popular indoor applications is acrylic paint. Its basis is water, therefore it is allowed for use in living rooms. But with what paint to paint a wooden house in order to preserve the widest possible set of positive properties? There are no specific compositions with certain solvents and fillers for universal use, but manufacturers offer many combined and modified products. So, in the lines of the premium class, you can find paints with enhanced protective properties, which form a dense film that resists even mechanical stress. The composition of such a coating will contain a UV filter, antiseptics and biological additives against fungus and mold. The presence of natural oils will tell about environmental friendliness. Now it is worthwhile to familiarize yourself in more detail with the mentioned types of formulations that are in greatest demand on the market.
Oil paint for wood
As already mentioned, this composition continues the classic line of products intended for wood. But even today, such paints have a number of disadvantages that should be borne in mind before buying. These include the following:
- Acrid odor.
- Long drying period (about 24 hours).
- Leakage susceptibility.
- It is not recommended to combine with other paints and varnishes.
- Low resistance to mechanical stress.
- Some mixtures are harmful to the environment.
But are there any advantages to such paints? If the question is about how to paint an old wooden house in a complex way and with a minimum consumption of material, then oil compositions can help out. Such mixtures have the highest absorption coefficient precisely because of the long drying time, but on the other hand, you can count on saving money when buying. The advantages include protection from rust, so you don't have to separately paint over metal parts and structures with anti-corrosion agents.

Alkyd paints
In many ways, this is the opposite of oil paint. For example, alkyd mixtures are characterized by a high drying time (on average 10 hours) and a shallow penetration into the wood structure. But in terms of economy, the effect will be the same, since the paint itself is inexpensive and it is quite possible to count on a high consumption. What paint to paint an old wooden house - oil or alkyd? If we take into account external factors of influence, in which the process of destruction of the structure will only intensify, then the second option is better. Alkyd compounds are not only resistant to weathering, but also tolerate long-term contact with moisture, which is very important from the point of view of wood preservation. This composition is also suitable for residents of cold regions - the coating can withstand temperatures of the order of -30 ° C. In the process of work, experts recommend applying such paint only to well-dried surfaces. This will eliminate the risk of blistering and also prevent the paint from peeling off.
for wood
The most modern paint product, but also the most expensive. The advantages of this paint include environmental friendliness, elasticity and the absence of pungent odors, since water is used as a solvent. But do these benefits justify themselves given the increased cost of the product? If you plan to use the composition for facade decoration, then it will justify. The fact is that acrylic provides a whole range of protective qualities, including resistance to wind, frost, moisture, high temperature and UV radiation. Moreover, outwardly dense insulation does not at all create the effect of complete tightness - the wood base retains the ability to "breathe". But it must be borne in mind that this material cannot be kept at negative temperatures.

Another question is also important - what paint is better to paint a wooden house, if the focus is on the decorative component? In this regard, it is the acrylic composition that also shows itself well, leaving juicy shades of the coating for many years. According to various estimates, we can talk about 5-8 years of use of painted wood. Moreover, experienced painters also note the convenience of working with such paint. Layers are easy to lay, dry quickly and deeply enter the structure of the material. The composition mixes well, which also makes it possible to create a variety of shades.
How to paint a wooden house for its restoration?
Renovation and restoration effects often become mandatory when painting especially old wooden houses. The effect of the restoration includes not only increasing the expressiveness of the textured qualities of the surface, but also stopping or preventing biological destruction processes. How to paint a wooden house beautifully and at the same time extend the life of its surfaces? To do this, you should use the following tools:
- Enamels and water-dispersible compositions for wood. The effect is to paint over the woody texture. Such compositions, as a rule, do not contain antiseptics, therefore, to prevent further destruction of the material, biological additives should be used in a separate order.
- Whitening products. Also, the main emphasis is on preserving external beauty, but with supporting the structure of the fibers.
- Textural compositions. It is possible to preserve the surface for a long time, but the coating will have a dark tone.
- Ground antiseptics. Usually, alkyd-based formulations with natural oils, but the main place in them is occupied by active opaque and glazing resins. You can refresh the color of the wood, strengthen the surface layers, and also preserve the natural texture.

For the interior space in a wooden house, constant air exchange is especially important, so the paint should not clog the natural circulation channels. At the same time, it is important to preserve the natural texture of wood. For such purposes, it is recommended to use glaze colors with varying degrees of shading. They look good in rooms that turn a little yellow, but this is even a plus. And again, do not forget about the protective properties. Log, panel and plank surfaces should receive a water and dirt-repellent film, which will also protect the material from mold and other factors of destruction.
Now you can move on to the question of how to paint a wooden house beautifully from the inside? First of all, the surface is prepared for work. In addition to stripping the substrate, leveling may be required. This operation can be done with a special wood primer. It is more convenient to paint directly with a compact spray gun. Its tank should be filled with the prepared composition, then set the necessary settings and start the workflow. When spraying, the delivery nozzle is held at a distance of 25-30 cm from the target surface. In this case, the layers are applied thin to eliminate the likelihood of smudges. The lack of thickness can be compensated for in the next pass, but you should not strive to give the surface a complete look at once.
Features of painting a wooden floor

The most demanding surface for mechanical protection. The floor of a wooden house is not always painted, but in any case, it will need a special coating with a water-repellent effect, otherwise the structure will collapse or become moldy. Than this part? A win-win option would be water-based parquet varnish. It will act as the basic base of the coating as a primer. Behind it can be applied several coats of acrylate polyurethane varnish. On the market you can find glossy and semi-gloss models of this tool. Parquet flooring does not exclude the use of conventional polyurethane varnishes for wooden flooring. For example, white spirit urethane alkyd compounds perform well as hardwearing and cleanable coatings. These compounds can be used to paint a new wooden house and in part of the facade, if the operation involves strong physical impact. If the task is to preserve the most pronounced wood texture, then it makes sense to turn to enamels, also intended for wooden surfaces. It is desirable to choose from rulers for industrial or commercial purposes - garages, salesrooms, warehouses, etc. Such enamels are resistant to chemical and mechanical stress, which is optimal for a wooden floor.
How and with what to paint the facade of a wooden house?
The process of decorating external surfaces with paint is also divided into two parts: preparation and application of the decorative coating itself. If the building is new, surface cleaning of dirt and dust will be sufficient. This can be done with improvised abrasive products. The old walls will have to be removed from the old paint layer, and then the base preparatory layer of primer should be applied. How to paint an old wooden house outside in the first layer? Universal products include deep penetration acrylic paints and two-component polyurethane formulations. In this choice, it is important to consider that serious damage may require the use of a putty. The top coat must provide sufficient adhesion to the leveling coat and match its chemical properties.

Next, they begin to apply decorative paint. The topcoat is laid after the base is dry. New layers are impregnated with antiseptics, the enzymes of which are present in primers for old wood. What paint to paint a wooden house outside as a final decoration? You should focus mainly on the protective properties. Alkyd-acrylic materials with molecules that penetrate deeply into the fiber structure are ideal. As for the application method, it is better to use a roller with large-format brushes, which will make it possible to lay layers of sufficient thickness.
When the type of composition is determined, you can start buying a specific product. How to paint a wooden house, choosing from a wide range of manufacturers? For facades, experts recommend the firms Tikkurila and Alpina. Quality universal mixes can be found in the Dufa, Beckers and Dulux families. Further in the course of work, it is advisable to adhere to the following rules:
- The composition is thoroughly mixed using an electric construction mixer.
- Apply paint only in warm, calm and dry weather. But the bright sun should also be avoided.
- Before applying, it is better to test the color on an unnecessary wooden blank, close to the texture to the house.
- The topcoat must be applied in at least 2 coats.
- Particular attention is paid to difficult areas of the facade. How to paint a wooden log house correctly? More paint should flow to the lower rims. In the same part, reliable biological protection of wood must be ensured. The ends of the boards must be covered with a primer.
- Acrylic copolymers supplemented with non-washable biocidal components are produced especially for freshly sawn logs. They should be used pointwise on the cut to prevent cracking and decay.
Conclusion

Wood is a very capricious material in decoration and subsequent care. Each stage of preparation and painting involves a high proportion of the responsibility of the master, since the slightest miscalculation can cause a slow destruction of the structure of the material in the future. The hardest part is the facade. How to paint a wooden house beautifully from the outside so that it retains both its appearance and structure for as long as possible? Much depends on the preparation of the surfaces. It will not be superfluous to first carry out a comprehensive troubleshooting with the identification of weak parts of the structure. Only then can you start priming and laying the topcoat. There are also some nuances in painting the interior walls. In the premises, the emphasis is on creating a favorable ecological and microclimatic background. The selection of textured performance will be especially important. But even after the completion of work activities, the coatings must not be left without proper supervision. There are special mixtures and impregnations that will maintain the condition of the applied paint and varnish layer during its further operation.
The wood painted white looks very simple, stylish and cozy at the same time. This type of staining while preserving the texture of the wood has become one of the most popular styles of interior and exterior!
In this article, we will look at 3 easy methods for painting wood with worn or worn effects as well as beautiful and inspiring examples of painted floors, walls, doors and furniture.

Traditionally, whitewashing has been used as a cheap and easy way to protect wood (lime has antibacterial properties) and to give it a neat look. Now, when we recreate the whitewash, this is usually done using any white water-based or acrylic-based paint for interior or exterior use(this is exactly what we will do in the methods described here).

Odorless water or acrylic paints !! and can be used indoors
Wood and required materials:
Different painting methods will show how much the appearance of the wood can change, be it a smooth pine board or an unpolished pallet... All three methods are very easy, fast and with great results!
- White water-based paint for interior and exterior use
- Container for mixing paint
- Rag
- Brush
- Scraper or a piece of hard plastic for method # 2
- Candle for method number 3

# 1: Painting with a rag
Many types of wood that are sold in hardware stores are already sanded and have a smooth surface. (such as boards or plywood sheets), but there are also rough boards.
This whitewashing method suitable for both smooth and rough wood... It creates a neat and refreshing look, perfect for a modern, farmhouse or Scandinavian style.

White paint makes the wood more refined, while leaving the opportunity to see the structure of the boards, their natural pattern.
How to do:
- First dilute the white paint with a special solvent.
- After that, dip a rag into the resulting paint mixture and wipe the wooden surface with it, making an even layer.
Apply 1-2 more coats of paint if you want the color to appear more saturated white. Let the paint dry after each new coat.
Of course, you can also use a brush, but it leaves strokes, and the surface is perfectly flat from the rag.

No. 2 Paint filling method
This method works best on unpolished wood with a slightly rough surface (for example, a wooden fence). With its help, the tree can be given a rustic look and the effect of antiquity.
Step by step:
- Clean the wood with soapy water and a brush and let dry.
- If your paint is too saturated, thin it with solvent.
- After that, pour some paint onto the wooden surface, and then take a scraper and spread the paint over the wood.

On an unpolished, that is, not entirely flat wooden surface, the paint layer will not be the same everywhere. A little more paint will flow over the depressions and less on the bulges, that is, in some places the white color will be more saturated, and in some places it will be more transparent, which will create the effect of antiquity.
You can evaluate the result of painting the wall with this method at the top.
No. 3 Candle painting method
Shabby white paint, through which in places you can see the wood itself in its natural color, is wonderful for restoring old furniture or creating new ones, but in the same style.
In the photo below you can see an example of such a painting of a tree with wonderful designer handles laid out on it.

Instructions:
- Take a clean wood plank (no matter if polished or not) and a candle. Rub the candles over the surface of the wood in several places. You need to press on the candle quite hard so that a clear trace of wax or paraffin remains on the tree.
- Then paint the wood with white paint and let it dry completely.
- Wipe dry painted surface with a cloth, and with some pressure. In those places where there was a candle mark, the paint will lag behind the surface.

Below is an example of a white wood floor painted this way. It is worth noting that with this use it is better to apply a layer of protective varnish on top of the paint for a more durable use.


How and what to paint a tree at home
Wood painting: the final result depends on the surface preparation
Probably, many of you think that the solution to the question of how to paint a tree is not serious, and almost everyone can cope with it. Yes, this is true when it comes to clumsy work with a brush, the result of which can be seen on almost everyone. If you want to get a really high-quality result, distinguished by the smoothness of the surface and the depth of color, then you will have to try very, very hard. A significant role in the process of obtaining such surfaces is assigned precisely to preparatory work, which is a cycle of grinding, priming and painting.
At the first stage, the acquired lath of the required size had to be thoroughly cleaned with the help of a coarse abrasive mesh with a grain size of 80. The task of such a rough processing was to eliminate the flaws that were made in the workshop in the process of sawing the lath. After the large emery did its job and gave the surface of the future platbands an even plane, the abrasive had to be replaced with a smaller one (240) and brought the matter to the end, giving the surface the necessary roughness with its help. Now you can apply the coloring composition!

Preparatory work before painting a tree photo
How and how to paint wood: paint or stain
There are two main compositions with which you can give the wood the desired color - these are paints and. The use of this or that material is completely conditioned by the required end result. Stains tend to accentuate the texture of the wood. This is due to the ability of wood to absorb it into itself in different ways, and paints, for the most part, hide the structure of the wood. There are, however, transparent paints that form a thin colored film on the surface of the wood, but I nevertheless decided to go the old way and use wood stain for painting the wood. It is now produced in a wide variety and can have any color - it is quite easy to purchase on the market red, black, blue, and even white stain.
The question, the best way to paint a tree, I decided for myself. The only thing left to do is to apply a stain on the surface of the future platbands. It turned out to be easy. To begin with, I had to remove fine dust from the surface of the wood that remained after the sanding process and apply the stain with a brush. It dries quickly enough, especially if it's sunny outside. With an interval of half an hour, the painting process, or rather the impregnation of the wood with wood stain, had to be repeated, since the surface turned out to be uneven. After the second etching, everything fell into place, and the wood acquired a rich color.

How to paint a tree photo
The question of what paint and how to paint the wood has been resolved, now the time has come for the most difficult - varnishing and giving the product gloss and depth of color.
Painting wood with varnish: the secrets of a deep mirror surface
In order to subsequently suffer less with polishing the varnish, it is better to apply it with a spray gun, but in the absence of one, you can do with a brush or roller. I preferred a brush, and with its help I covered the platbands with a thick layer of varnish, so that it dripped from the rail and could independently take a flat surface. I covered it and forgot about it for four days - after all, the varnish layer is thick, and for further work it must dry completely.

How to varnish a tree photo
Four days later, I armed myself with a sander again and bought sandpaper with grit 400, 800, 1000 and 2000. To begin with, I used the first one and made sure that the lacquered surface was completely matte - not a single glossy dot remained, indicating pits on the surface ... Then, replacing the emery with a finer grain (800), he repeated the treatment, thereby reducing the surface roughness. I had to do the same with all other abrasive skins - in turn, the processing was carried out, first with the thousandth, and then with the two thousandth paper. As I read on one forum, this sanding is necessary in order to get rid of small scratches left by any abrasive material.

Sanding after painting wood photo
The next step in solving the question of how to varnish a tree is to apply a second layer of varnish. Here I no longer varnished the product with a thick layer, but covered it with a thin layer using the same brush. But he first cleaned the sanded surface of fine dust - first he brushed it off with a damp cloth, and then additionally treated it with a solvent. Why I did this, I cannot say, but it seemed to me that with its help you can remove much more dust and dirt from the product. And again a break in work until the finish varnish has completely dried. Two days later, sanding the surface with 800, 1000 and 2000 grit sandpaper was repeated.
Finishing: surface polishing
Without a special tool, or rather, it is indispensable - I had to purchase a polishing sponge and a felt wheel. In addition, you needed a car polish kit, which includes a scratch remover and a finishing polish. Polishing is carried out in stages - first, a felt wheel and a composition for removing scratches are used, and then a polishing sponge and finishing polish.

Wood varnish painting and photo processing
In general, I even liked the final finishing of the platbands, and after a few hours I was sitting and admiring the result.

Painting a tree with your own hands photo
Anyway, painting a tree turned out to be quite a difficult process in practice - despite the fact that the end result was fine with me, any professional will find flaws in my work. Why is there a professional, I myself can see them very well - either due to a lack of experience, or as a result of the use of non-professional equipment, small defects are visible in the depths of the varnish layer. Most likely, these are specks of dust and small debris, which I could not completely get rid of in the conditions of street production.