Sheathing and insulation of the attic. How to properly insulate the attic with your own hands - step by step instructions. Thermal insulation of complex structures
Specialization: Capital construction works (foundation laying, wall erection, roof construction, etc.). Internal construction work (laying of internal communications, rough and final finishing). Hobbies: mobile communications, high technologies, computer technology, programming.
Some time ago, I finished the execution of an order for insulation of the attic for winter living. While doing the work, I thought that the technology I used is quite simple and even an unprepared person can make thermal insulation from the inside with his own hands.
In today's article I will tell you the better and how to properly insulate the attic from the inside with your own hands. This guide will help you avoid the mistakes that I faced at the beginning of my construction career.
I assure you, at the end of the work, the attic floor of a wooden house will turn from an unnecessary storage of rubbish into a cozy and comfortable room, for living in which all your household members will fight.
Features and methods of insulation of the attic room
Before talking about the ways to insulate the under-roof space from the inside, I want to note that this is a must, even if you are not going to live in a house in winter. The fact is that the attic, due to the peculiarities of its location, is strongly warmed up by the sun in the summer, therefore, without a reliable insulating layer, the temperature inside will be uncomfortable (or you will have to install a very powerful air conditioner).

If you have already insulated ordinary living quarters and think you know how to insulate an attic, I have to disappoint you. The thermal insulation of the room under the roof (not the usual room on the second floor, namely the attic) has some features that I just have to mention:
- The geometry of the attic space follows the contours of the pitched roof, therefore it is far from a standard cube or parallelepiped. The insulation will have to be installed on inclined surfaces, so the choice of heat-insulating material will have to be approached with special care. For example, the use of products that are too soft and flexible is completely excluded.
- The roof rafter system and roof covering are always made of lightweight materials so as not to put a lot of stress on the load-bearing walls of the house. Consequently, the heat-insulating cake must also weigh so much as to make the structure only slightly heavier, otherwise the roof may collapse under a significant snow load.
- In addition to the roof slopes, the attic has two more pediments and a floor (it is also an attic floor). If you do not perform thermal insulation of these surfaces, all efforts to install insulation in the rafters will not lead to any significant result.

- Roofing material, no matter how reliable it is, can allow atmospheric moisture to pass through, which, in turn, can damage the insulation layer or significantly reduce its technical characteristics. Therefore, during installation, it is necessary to reliably protect the thermal insulation from moisture.
- When buildings are on fire, the fire usually moves to the top of the dwelling, where the attic is located. Therefore, in order to ensure the possibility of evacuating people from this room for thermal insulation, I personally recommend using non-combustible or poorly flammable heaters. After all, the matter is further aggravated by the fact that the roof truss system is made of wood, which cannot be attributed to the NG category.
- Well, the last point is environmental friendliness. It is necessary to make sure that the insulation does not pose a danger to people living in the attic, regardless of the conditions of its operation - heating, humidification, freezing, and so on.

First, let's decide on the method of thermal insulation. There are two options:
- Insulation of the attic walls. This method is used when the roof slopes are not attic walls. The role of the latter is played by additional partitions made of wood, drywall, plywood, and so on, which should be insulated.
The advantage of this method is the presence of additional ventilated space under the roof. The downside is a decrease in the usable area of the room.

- Insulation of roof slopes. In this case, the heat insulator is installed in the rafter system, after which you can divide the spacious attic using thin partitions, without worrying about the cold or heat. The plus is that the entire under-roof space will be insulated. And with the help of partitions, you can divide it into several separate rooms, arranging an additional storage room in the attic room.
I prefer the second method of insulation, therefore, it will be discussed further.

Selection of materials and tools
It's time to decide how to insulate the attic from the inside. To do this, you can use expanded polystyrene, expanded clay, polyurethane foam, ecowool and many other heat insulators, which the domestic and foreign industry offers to purchase.
But I am insulating the attic with basalt wool. This material, in my opinion, best meets the requirements for the thermal insulation layer of such a room.

I will briefly list the most important advantages of basalt mats:
| Characteristic | Description |
| Low thermal conductivity | The material retains heat so well inside the room that for effective thermal insulation it is enough to install a layer 10 cm thick. |
| Hygroscopicity | Basalt fibers do not absorb water and have hydrophobic properties, so moisture that gets inside is quickly removed through the gaps without reducing the performance properties of the material. |
| Vapor permeability | The material does not interfere with air infiltration, normalizing the humidity in the attic and extending the life of the wooden parts. |
| Incombustibility | Basalt wool does not ignite in a fire and contributes to the extinction of the flame, giving time for the evacuation of people or the elimination of the fire source. |
I could talk for a long time about the advantages of mineral wool, but this is not the topic of today's article. Therefore, he simply noted the better to perform thermal insulation of the attic from the inside.
I prefer to use TechnoNICOL Technolight Extra basalt mats, 10 cm thick, 120 by 60 cm in size. It is impractical to buy a denser material, since it will not experience a load between the rafters.
It is very important to pay attention to the dimensions of the material... I chose TechnoNicol mats because their width is 60 cm, and this is exactly the distance between adjacent rafters in the case I am describing.

In addition to the thermal insulation itself, other materials are also needed:
- Wooden bars with a cross section of 30 by 50 mm, with the help of which a counter-lattice will be formed for ventilation gaps, which will help remove moisture.
- Superdiffuse vapor-permeable hydro- and windproof membrane. These films are especially high quality from Strotex and Juta, so I recommend buying them.
- Penofol. Thermal reflective material that I am going to use instead of the standard vapor barrier film that protects the mineral wool from moisture from inside the room.

- Antiseptic primer. It is necessary to process the roof rafters with it in order to avoid the appearance of mold and mildew. You can buy a composition with fire retardants, thereby increasing the fire safety of the building.
- OSB boards. They will be needed to design the lathing on which flexible tiles are laid on one side and eurolining on the other. If you are going to use other materials, you may not need a solid sheathing.
- Polyurethane foam. Suitable for sealing joints between mineral mats.
- U-shaped perforated brackets for mounting galvanized battens. With me, they will hold the installed mineral mats in place until they are sewn up with decorative material.

Well, now you can safely move on to how to insulate the attic from the inside with your own hands.
Arrangement of insulation
The whole process of warming can be conditionally divided into several steps:

So, I will explain how to correctly do the work with your own hands in each of the mentioned stages.
Step 1 - Laying waterproofing and roofing material
Let's start with the installation of the waterproofing membrane, as it is installed outside the room before the roof covering is fixed. This is the only way to reliably protect the insulating layer from atmospheric moisture.
I must say right away that the entire roof truss system in the case I am describing was installed. However, the roofing material and the lathing on it have not yet been installed.
The process consists of the following steps:
- I roll out the first layer of waterproof and windproof membrane. You need to start work from the bottom of the roof slope, gradually moving upward. The membrane is secured with staples and a construction stapler or wide-headed nails. It is necessary to install the film not in tension, but with a slight sagging (about 2 cm per meter), so that when the air temperature decreases, it does not break.

- I put the second and subsequent sheets of waterproofing film. You need to act in the same way as in the previous paragraph. But there is one point here. The edge of the upper membrane should overlap the edge of the lower one by a distance of 10 cm to ensure complete impermeability to moisture.

- I seal the seams of the membrane. For this, sticky tape is used. It just needs to be glued to the joints of adjacent waterproofing membranes.
- I install the counter batten. Its role is played by wooden bars, which are fixed with self-tapping screws on top of the waterproofing membrane on the rafter supports. Beforehand, I recommend impregnating them with an antiseptic and a fire retardant in order to extend the life of the roofing structure.
- I fix the boards of the additional sheathing. They are installed perpendicular to the rafters and fastened with self-tapping screws to the counter-lattice. The step between adjacent parts is about 40 cm.

- I install OSB base plates. They are attached to the boards with self-tapping screws. Here you need to monitor the length of the fastening hardware so that too long screws do not break the waterproof and windproof membrane located below.

- I am assembling a flexible roof. To do this, a lining carpet is glued to the slabs, after which the shingles of the flexible shingles are fixed on it.

If you are insulating an attic with a finished roof, then the waterproofing membrane will have to be installed from the inside. This method has two drawbacks:
- the labor intensity of the work being carried out increases;
- the waterproofing film will not protect the wooden roof rafters.
It is necessary to fix and seal the film so that it wraps around the rafters and adjoins the roof sheathing. Thus, a kind of baths are formed, in which the insulating material will be invested.

But before that, it is necessary to prepare the under-roof space for the installation of mineral mats.
Step 2 - Preparing the rafter system
I prepare the space under the roof, namely the rafter system for thermal insulation:
- I clean wooden parts of dust and debris, remove objects that interfere with the installation of mineral mats. It is best to clean the rafters with a vacuum cleaner, which will remove dust, sawdust and shavings left after installing the roofing material. You should also check if the sharp ends of screws, nails, and so on are sticking out from anywhere. They can cause injury or damage insulation materials.

- I install engineering communications and insulate them. Ventilation and stove pipes can be installed on the roof, as well as the electrical wiring necessary to connect household appliances in the attic room:
- Ventilation pipes, if they are laid in a non-insulated part of the attic, must be thermally insulated with mineral wool or foam shells.
- For the chimney, a duct should be designed for passage through the attic floor and roof. They must be covered with heat-insulating material (most often perlite or expanded clay), which will increase the fire safety of the room.
- Electrical wiring should be placed in plastic flexible or rigid cable ducts, which will prevent the rafters and insulation from igniting in the event of a short circuit.

- A primed wooden surface. For work, it is better to use a universal composition that has both antiseptic and fire-fighting properties. For example, the composition for wood BS-13 or Firebiozashchita Strazh-2. It should be applied to wooden parts using a roller or spray, after processing in two layers with intermediate drying for 3 or 4 hours.

- I install U-shaped brackets on the side surfaces of the rafters. It is not necessary to use them, since with the correct installation of the rafters, the mineral mats become tightly spongy anyway. But I'm used to being reinsured, and their purchase does not hit the budget planned for insulation much. But if you use cotton wool in rolls, you can't do without it.

Step 3 - Installation of thermal insulation
Warming of the attic from the inside continues. Moving on to the main part:
- I cut mats. The mineral wool is cut into the required pieces using a sharp knife or a file with very fine teeth. If the distance between the rafters corresponds to the width of the insulation, you will practically not have to trim.

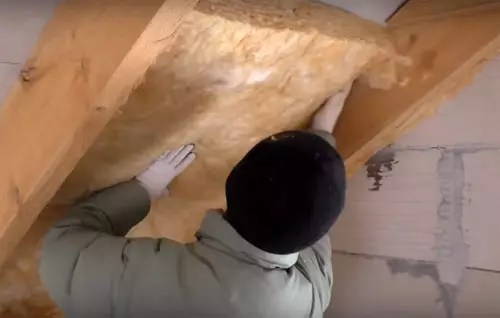
- I install mats between the rafters. To do this, you need to bend the material a little in the middle, and then insert the insulation in the right place. Having straightened out, the basalt mat will take its intended place and will not fall out of the inclined surface.

- I fix the mats with brackets. You just need to bend part of the bracket so that its edge is on the surface of the mat and holds it in place. Instead of brackets, galvanized perforated strips can be used, which are attached directly to the lower edges of the rafters.
- I seal the seams of the material with polyurethane foam. Fill the gaps with a pistol. Moreover, to act so that the composition is inside the entire gap, and not only on its surface. If you make a mistake at this stage, cold bridges may form at the joints, which will reduce the effectiveness of insulation.

To increase the reliability of the heat-insulating layer, you can install not one, but two layers of insulation. Just take mineral mats not 10, but 5 cm thick. Then the individual layers are installed so that the joints are at random. And there is no need to be afraid of cold bridges, although it is still worth sealing the seams.
Step 4 - finishing coat
Decorative finishing of the enclosing structures of the attic is as follows:
- I install a heat-reflecting and vapor barrier layer. As you understand, for this I will use penofol - polyethylene foam with a reflective layer of polished aluminum foil. It is mounted as follows:
- The first sheet of foam foil is installed with a foil layer towards the living quarters, after which it is aimed at the rafters using a construction stapler.
- A second and subsequent sheets of material are installed so that there is an overlap of 10 cm between the individual elements.
- Penofol joints are glued with double-sided adhesive tape (inside the joint) or metallized tape (which is glued on top of the joint). It is necessary to make sure that a completely homogeneous and sealed layer is formed.
- If the thickness of the rafters is such that the edge of the insulation does not reach the cut of the tree, then penofol must be laid over the surface of the mineral wool, fixing it on the side surface of the supporting beams of the roof. Otherwise, it may rustle when air passes through the ventilation gap.

- I mount the counter-lathing beams for arranging the ventilation gap. It is necessary to fasten the strips with self-tapping screws to the rafters on top of the foam foam. Thanks to these details, a gap is created between the finish and the heat-reflecting surface, which is necessary to remove condensed moisture.

- Install OSB plates... They are attached to the counter grill with self-tapping screws. Everything is standard here, with the exception of some small nuances:
- It is necessary to install the sheets so that at the edges (at the gables and the floor) there is a gap of 1-2 cm thick. It is necessary to remove excess moisture and compensate for possible changes in the size of the material.
- The seams between adjacent slabs should run randomly (staggered) and be 2-3 mm thick in order to avoid surface warping during thermal expansion of the base.
- It is necessary to fix the plates so that their edges are located on the bars of the counter-lattice. The distance between the screws is no more than 20 cm.

Later, you can install euro lining or other decorative material on the plates. And we have ahead of us the warming of the gables, which form two of the four walls of the attic room.
Step 5 - Warming the gables
I strongly advise these parts of the attic to be insulated from the outside using dense mineral wool, which can be covered with cement plaster on top. The scheme of work is as follows:
- Preparing the surface for work. To do this, you need to clean the surface of the walls from the remnants of mortars, debris, dirt and dust. After that, the following operations are performed:
- Damage repair. If cracks and cracks are found in the masonry, they must be sealed with cement mortar or blown out with polyurethane foam.
- Surface priming. To do this, you need to take a primer for brick or (not the one with which you processed the rafters), and then cover the gables with it in two layers with intermediate drying.

- I'm editing the start profile. This is a perforated galvanized part on which the insulating layer will rest. It is fixed at the bottom of the wall strictly horizontally. If several of these parts are needed, install them with a small clearance to compensate for the thermal expansion of the metal.

- I glue the first row of mineral mats.
Let me remind you that you need to use dense mineral wool, which is intended for subsequent finishing with cement mortar. The sequence of actions is as follows:
- The surface of the mineral wool is pre-reinforced with cement glue, which is evenly spread over the slab using a spatula.

- A bead of cement glue is applied to the mineral wool at a distance of 5 cm from the edge. A few lumps of glue are also placed in the middle of the mat so that at least 40% of the sheet surface is covered.
- The part is attached to the wall. at the same time, its lower end must be supported by a pre-installed starting profile. Using the water level, it is necessary to check that the basalt mat is installed strictly vertically in all planes.
- Behind the first layer, other mats are glued to the wall in the same way. It is necessary to monitor the verticals, and that the seams between adjacent parts are minimal.
- I glue the second and subsequent rows of mineral mats. There are no differences in comparison with the procedure described in the previous paragraph. You just need to make sure that the vertical run at a run. That is, the seam of the upper row fell in the middle of the insulation sheet of the lower row (as in brickwork).
- After the solution hardens, I fix the insulating layer with dowels - "fungi". They are installed as follows:
- A hole is drilled directly through the mineral mats in the wall using a punch, the depth of which in the brick or concrete must exceed 2 cm.
- A dowel is inserted into the resulting hole, after which the core is installed inside.
- Using a hammer, the core is hammered into the dowel so that its head is slightly recessed into the surface of the insulation.
- It is not only mineral mats that need to be fixed. "Fungi" should be installed in the seams of the insulating material so that the insulating layer does not come off under load.

- I seal the seams of the material. To insulate the seams, polyurethane foam is used, which glues the fibers of the insulation together, preventing the formation of cold bridges at the joints of neighboring mineral plates. It is necessary to fill the seam with a gun as tightly as possible.
- I reinforce the surface of the insulation with an alkali-resistant fiberglass mesh. For this, mineral mats are covered with a reinforcing compound, after which a mesh is placed on it and pressed into the solution with a plaster float. Then a little more solution is applied on top so as to completely hide the mesh inside.
- I perform plastering of the surface. The reinforced insulated surface of the gables is plastered, after which it is decorated with the selected decorative material. In the simplest case, you can simply paint the pediment with facade paint.

That's all. Some still resort to thermal insulation of the interfloor overlap, but with such a powerful insulation, which I described, I consider this procedure unnecessary.
Summary
Now you know how to independently carry out the correct insulation of the walls in the attic and the floor with your own hands using mineral wool at the lowest cost. However, there are other options as well.
For example, sprayed polystyrene foam, with the help of which thermal insulation of complex areas, including the Mauerlat in the heated attic, is easily performed. You can learn how to spray PPU yourself from the video in this article.
If you have any questions, ask them in the comments!
September 7, 2016If you want to express gratitude, add clarification or objection, ask the author something - add a comment or say thank you!
Such a desire is natural, this is a wonderful opportunity to increase the area and living space of your home. In addition, it gives the building a special charm, brings a certain amount of romanticism to its appearance.
The mansards are located almost under the roof itself. What are the typical requirements for them? It is important that it is cool enough there in summer and dry and warm in winter. In order for the room to meet the aforementioned requirements, it is important to know what processes are taking place in it, to understand the essence of competent insulation.
It is not difficult to do all the necessary work with your own hands, their technology is quite simple. The main thing for this is a conscientious partner and the availability of the necessary tools. If everything is done technologically correctly, it will not get wet or rot, but will serve for a long time and reliably.
 Living under a roof is a special place. Its walls are close to the surface, while the gaps are only 10-15 cm in size. This is a characteristic feature of the room - it instantly gets cold in winter, and literally gets hot in the summer before our eyes. In winter, such a valuable heat for housing evaporates through the roof, while in summer it, on the contrary, heats up a lot, noticeably increasing the temperature of the room.
The processes that take place depend on the quality, as well as the thermal conductivity of the materials used for manufacturing.
In winter, the heat rising from the radiators spreads under the roof arch, and then evaporates due to the heat transfer of the roofing materials. The snow lying on the roof begins to melt and, turning into ice, destroys its cover.
 In the summer, it heats up, heating the entire structure, which is why the air in the room also heats up a lot. If the building has a familiar cold attic, then everything happens differently.
The function of a heat insulator in such housing is performed by the air in the attic room, and snow on its roof in winter.
The filling materials on, together with the air, trap the heat coming from the bottom, from the dwelling.
Thanks to this, even in very frosty winters, t in the attic is kept at about 0 degrees. Snow does not melt outside, being another, additional insulator. In summer, t is regulated by vents on the pediments, which play the role of a kind of system. How to insulate an attic?
The room must be properly insulated: carefully selected material, required parameters, and in full compliance with the technology.
Attic insulation: materials
The choice of the most suitable material is a very demanding task. After all, a lot depends on its type - the thickness of the insulation "cake" itself, the number of minimum layers in it.
Special requirements are imposed on it:
- Low thermal conductivity. A material with a coefficient of no higher than 0.05 W / m * K is best suited.
- Ease. The weight of the material matters; it should not overload the roof.
- Low moisture permeability. If the roof suddenly leaks, it should not get wet and lose its qualities. Or it should be well insulated to avoid getting wet.
- . It is imperative that the material is non-flammable and does not sustain combustion.
- Elasticity, shape retention. Because of their location, lightweight mineral-based materials tend to creep away, leaving voids. Therefore, it is so important that he can keep his shape.
- Resistant to sudden temperature changes.
- Strength and durability.
Of course, all these points are ideal, but this does not happen often.
In each case, the required thickness is calculated strictly individually. If you select this indicator approximately, then, most likely, 25 cm will be enough.
Glass wool
This is perhaps the most successful solution for insulating a roof from the inside. This is a plastic material that fits compactly between the rafters, covering all the free space. does not support combustion and does not burn itself. It is extremely lightweight and has excellent insulating properties.
 Basalt wool in slabs remarkably retains its shape. Its disadvantage is that it easily absorbs steam and water, and therefore needs additional. This is very important: if the mineral wool gets wet, then it will irrevocably lose more than half of its useful qualities. If this happens, you will have to change it.
Despite this drawback, it is one of the most suitable materials for roof insulation from the inside. It is easy to work with her, she has an affordable price. Strict adherence to technological instructions when working with it eliminates possible disadvantages.
Styrofoam
 This is a very popular and demanded material. But the use for warming the attic should be considered in more detail.
The material has individual characteristics that can be considered virtually unique.
This is its extremely low thermal conductivity, minimum weight, low moisture permeability, ideally rigid shape.
But along with these wonderful positive qualities, it also has obvious disadvantages. Different grades of material have different degrees of fire resistance. And for warming, its flammable varieties are often used. And this is extremely dangerous. When ignited, the fire rises, and if the insulation catches fire, it will be almost unrealistic to survive in such a blazing attic.
It is not very convenient for work, so when cutting, cutting and installing it crumbles quite a lot. When using it, gaps remain between the rafters, and they have to be somehow repaired. From time to time, it collapses, and begins to crumble even more. Based on all of the above, we can conclude that using foam in this case is not very reasonable.
Extruded expanded polystyrene
 This is a wonderful material for insulating the attic from the outside, for laying under the roof, on the rafters. It is quite durable, perfectly retains its shape, it is not afraid of high humidity and, which is very important, it does not burn. Special attention should be paid to the fact that insulation requires a not very thick layer - 5-10 cm.
Polyurethane foam
This is a new generation material. With the help of a special installation, it is blown into the voids of the material to be insulated, without leaving any gaps and holes. Such spraying prevents the formation of cold bridges.
This material is not afraid of fire and water, it is lightweight, durable, keeps its shape well. But he also has a minus - he has an extremely low vapor permeability index: he hardly breathes. Consequently, without the arrangement of forced ventilation, there will always be high humidity in the attic.
Ecowool
 Perhaps this is one of the most suitable materials for insulation from the inside, and its use is actually an ideal option.
He, like the previous one, penetrates into the smallest holes, filling all the gaps.
It is also extremely lightweight, is not afraid of moisture, does not support combustion at all and breathes perfectly.
In addition, its fundamental difference from other materials is that it is completely harmless to health and absolutely environmentally friendly. Neither the smallest particles, nor even the evaporation of ecowool can be applied, in contrast to the same mineral wool.
Attic roof: how to insulate from the inside
When choosing the best way to insulate the attic roof, you should pay attention not only to the performance characteristics of the insulating material, but also to the specific features of its application. It is most convenient to carry out the insulation of the room by the method from the inside: if there are no contraindications to such, and space allows.
Various types of insulation are used for this - both mineral wool and extruded foam, ecowool or polyurethane foam are blown out. The key to the reliability and durability of materials is the observance of a competent combination, or "pie" of roof insulation. This will also ensure the comfort of living under it, that is, in the attic room.
Warming cake - from the inside out

When using wadded materials for insulation, a vapor barrier film must be used. With its help, mineral wool will not be exposed to moisture coming from the living space with steam.
If the glass wool is replaced with polyurethane foam or ecowool, there is no need for a vapor barrier.
Regardless of the chosen insulation, it will be required in any case. Its purpose is to protect the wooden parts of the roof structure. The role of waterproofing is played by special superdiffuse membranes, which are distinguished by special qualities.
They can release steam to the outside, but do not allow moisture to pass through. A gap must be left between the roof and the waterproofing membrane. Its size can vary from 4 cm to 10 cm, depending on the material and type of roof. Through it, excess steam will be removed from the insulation.
Attic: roof insulation from the outside
It is more convenient to do this while construction is still underway.If it is already finished, you will have to remove the roofing material. The external method of roof insulation keeps all the available living space intact. The solutions of some designers also suggest playing on the roof rafters as decorative elements of the interior).
Moisture is not afraid of him, and he does not need a vapor barrier. "Pie" for external insulation with expanded polystyrene looks like this:
- Extruded polystyrene foam in slabs;
- Waterproofing membrane;
- Ventilation gap with crate;
- Roof material.
An obvious plus of such insulation- free access to the rafters, at any time, facilitating their inspection and even repair. The method of insulation by Penoplex over the rafters differs in that it allows you to equip a heat-insulating protective layer completely, preventing the creation of cold bridges.
It is customary to insulate the front part of the attic together with the facade of the building, that is, from the outside. How to choose the right material for this? It depends on what was used in the construction of the house and, of course, the preferences and desires of the owner.
If a special hinged system is used for insulation, glass wool with waterproofing and vapor barrier films can be taken as a heater. And under the planned wet facade, you can successfully put the usual one. The main thing for success is strict adherence to technology.
today is not uncommon. Increasing the useful square meters at the expense of the attic is the easiest way. But in order for the roof to be insulated throughout the year. Therefore, in this article, we will consider how the attic is insulated from the inside if the roof is already covered with roofing material. Let's figure out which thermal insulation materials can be used for this and what technologies to use for this.
And although many believe that the attic is a type of attic, in fact, it is a completely different room, which differs from the first in size. And the main one is the height. It must be at least 2.5 m.
In all other respects, this is an attic space, fenced off with a rafter system laid on it. If the roof is gable, then the attic is fenced on both sides by gables - vertical walls that support the rafter structure. It is in them that the doors with access to the adjoining balcony are made. But the main walls of the room are the roof of the house with a certain slope of the slopes.

The technology for assembling the rafter system and roofing material lies in the fact that between them it is necessary to fit, protecting the wooden structures from unexpected leaks from the side of the roofing. This is a kind of safety net. On roofs, a roll-type waterproofing material is mainly used, which is laid in strips from the cornice to the ridge with an overlap of 20-30 cm and fastened to the rafter legs. The film is laid with a slight slack in case of temperature tension or expansion, plus the edges of adjacent strips are necessarily fastened to the entire edges with adhesive tape or self-adhesive tape.
Then, along the rafters, wooden slats are packed along the rafters, which are called a counter-lattice, and transverse slats, called the lathing, are already mounted on them. On the latter, the roofing material with fastening is laid.
The view from the inside of the attic is the rafter legs covered with a waterproofing layer on top. It is this construction that will have to be done. The question of how to properly insulate the attic from the inside with our own hands, we emphasize - with our own hands - requires first of all the determination of the insulation, or rather, its choice. Because not all modern thermal insulation materials can be used independently. But we will deal with all of them, and be sure to designate the best of them.

Heaters for the attic roof
It should be noted that the slope of the slopes defining the walls of the attic is a cellular structure formed by rafter legs. It is between them that insulating material will need to be laid. Therefore, the main requirement for the latter is to be dense with clear shapes. This means that to insulate the attic roof of a private house, it will be necessary to choose a plate material. Such heaters include mineral wool in mats and expanded polystyrene plates, it is also high-density foam.
But, as mentioned above, today the market offers completely unique technologies for insulation that do not use dense materials. One of them, which showed itself from the most positive side, is liquid polyurethane foam. Let's start in order and consider each insulation separately.
Mineral wool
The definition of mineral wool includes several varieties of this building material: glass wool, slag wool, stone variety. When it comes to insulating the attic, then we must talk about the basalt variety, as the best for today. It is its technical characteristics that we will consider.

Basalt wool is mainly divided by density. There are four positions:
- P-75- used for insulation of pipes and horizontal surfaces;
- P-125- this is exactly the same material that is used to insulate the walls of the attic from the inside with your own hands;
- PZh-175- for thermal insulation of metal and structures;
- PPZh-200- a very dense material used for thermal insulation of rigid load-bearing structures.
Expanded polystyrene plates
This material is often called foam, which is true. Just from the variety that is used for packaging, polystyrene foam plates differ in density. Therefore, the material itself is very hard and durable, withstanding mechanical stress and moisture well.
Let's make a reservation right away that such material is not recommended for insulation due to its high flammability and the love of rodents. But if you still intend to use it, then it is better to take plates of expanded polystyrene with a density of at least 25 kg / m³ to insulate the attic roof.

Polyurethane foam (PPU)
It is a two-component thermal insulation material composed of polyol and polyisocyanate. The two components are supplied separately in different containers, but during application they are mixed in one container and under pressure are supplied to the thermal insulation areas through a hose and a spray gun. In fact, polyurethane foam is a liquid substance that quickly hardens in air, turning into a hard and sufficiently durable coating.
The quality of insulation is based on the characteristic of thermal conductivity. Comparing the three types, it can be noted that the weakest among them is mineral wool, the most ideal is polyurethane foam.

But this does not mean that everyone should use the PPU. This material is not the cheapest, and special equipment is required to apply it. However, it should be noted that equipment manufacturers today offer mini-stations, the weight of which is only 30 kg. It contains two containers with components, hoses and a nozzle. The compressor will need to be purchased separately, but it is better to take it from friends or rent it.
And a few more varieties of heat-insulating materials, which are less often used in the insulation of the roof from the inside with their own hands.
Glass wool

Ecowool

Penofol

How to insulate an attic for winter living - video and nuances of the process being carried out
So, we have decided on the thermal insulation materials. Now let's look at how to properly insulate the attic roof with everyone.
Attention! When insulating the attic, it is necessary to adhere to two main nuances: the thickness of the layer to be laid should be equal to the width of the rafter legs, the width of the insulation should be equal to a little more than the distance between the rafters.
Do-it-yourself attic insulation with mineral wool from the inside: video and photo instructions
| Photo | Description of work |
 | Minvata is laid out on the attic floor. The required width is measured, which corresponds to the distance between the rafters, plus 2-3 cm. This is done so that the insulation enters between the elements of the rafter system without pulling it in. |
 | Now a piece of insulation cut to the required dimensions must be laid between the rafter legs. If the slope of the roof slope is sufficiently flat, then the thermal insulation material under its own weight can fall out of the cell. |
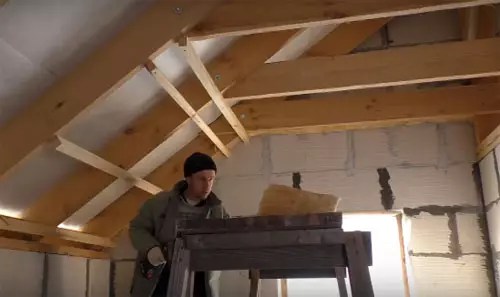 | Therefore, transverse slats are stuffed along the rafters from the inside, which are temporarily attached to the rafter legs. |
 | Instead of slats, you can use a strong thread, which is pulled along the studs driven in a checkerboard pattern along the inner planes of the rafter legs. |
 | Insulation is laid under the stuffed slats. |
 | It remains only to close the thermal insulation cake with a waterproofing film. Its purpose is to keep moist air vapors from penetrating into the insulating layer. Because mineral wool is a hygroscopic material, and under the influence of moisture it begins to lose its properties. |
 | The waterproofing membrane is nailed to the rafter legs with nails or metal staples. Laying is carried out in overlapping strips, starting from the bottom up. |
Attention! If one layer of mineral wool for insulating the attic roof from the inside with your own hands is not enough to cover the width of the rafter legs, then a two-layer installation is performed. In this case, the slabs of material must be laid with an offset relative to each other. The joints between the slabs in one layer must not be allowed to coincide with the joints in the second layer.
Insulation of the attic with foam
As mentioned above, it is not recommended to use polystyrene foam plates for insulating the attic. One of their main advantages is low, practically zero, water absorption. Therefore, there is no need to arrange protective layers for this insulation. That is, if in the process of constructing the roof under the roofing material, a waterproof or vapor barrier membrane was not used, then PP slabs are the very cheapest option for thermal insulation.
| Photo | Description of work |
 | As in the case of mineral wool, the expanded polystyrene plates are trimmed to the size of the distance between the rafter legs. |
 | The slabs cut to size are placed in the rafter system. It is necessary to indicate that there should be a space between the insulation and the roofing material, which will be used in the future, as it removes not only moist air vapors, but also some harmful components of the insulation material itself. Without the formation of this gap, the PCB cannot be laid. |
 | Above, one more layer is laid along the rafters. Its main task is to cover the entire surface with itself and prevent cold air from passing between the first layer and the rafters, because it is very difficult to lay the PP slabs tightly to the rafter structure. The second layer is fastened to the rafters with self-tapping screws with a wide metal washer. |

Insulation of roofs of different geometries
Above, methods for thermal insulation of a pitched roof were described, in which the slope is one plane. But attics are also formed under broken roofs, so the question of insulating a broken roof from the inside is no less relevant today. In principle, there are no major differences in the technology itself, especially when it comes to the use of polyurethane foam. It is simply sprayed on in one layer, without joints.
A sloping roof has a junction of two types of rafters, which form a hall. It is this area that is the most dangerous in terms of the penetration of cold air from the outside. Therefore, at the site of the connection of the two systems, it is necessary to carry out without butt laying of heaters. This works best if rock wool is used. It is flexible so that it can be shaped like a bend, that is, a transition from one slope to another.
With a sloping roof, the attic is rarely left without a ceiling. It is built exactly at the level of the transition. Therefore, two slopes are insulated, located in one rolling plane, then the ceiling itself is also insulated. In some cases, if there is a difficulty in carrying out the thermal insulation of the upper slope or the task is to save money, then the thermal insulation of the upper slope is not carried out, being limited to the insulation of the ceiling.

What mistakes can occur when insulating the attic from the inside
Answering the question of how to properly insulate the roof of a house from the inside of the attic with your own hands, you need to understand that this process itself is simple (not counting the use of polyurethane foam). But in order for the final result to correspond to a high degree of quality, it is necessary to take into account all the nuances of the technology and strictly follow the recommendations of specialists and manufacturers of thermal insulation materials. So, what to look for:
- Mineral wool should only be installed if there is a vapor barrier under the roofing material. Its main purpose is to remove air vapors that are located in the insulation itself.
- There must be a gap between the thermal insulation cake and the roof covering, which is used for ventilation of the roof. Therefore, the roofing material is laid on a batten, which is mounted on a counter batten.
- If the angle of inclination of the slopes is less than 13 °, then it is better not to organize an attic under such a roof. it comes off weakly at this angle, so there is a high probability of leaks.
- If skylights are installed on the roof slopes, then you need to take care of their sealed installation. It is better not to do this with your own hands, call specialists.
- If the thickness of the acquired insulation is greater than the width of the rafter legs, then slats can be punched along the lower edges of the latter.

So, we examined how to properly insulate the roof of a private house from the side of the attic. If you have any questions, you can leave them in the comments. The editors of our site will definitely answer them.
The attic is not just a place to store unnecessary things. If you arrange it correctly, you will get a separate living room. Therefore, the repair of the attic and especially its insulation are of interest to many homeowners.
Insulation of the space under the roof is the main condition for a comfortable stay, and it is with it that the arrangement of this territory should be started. Before proceeding with the repair work, you need to figure out which material is better to choose in order to insulate the attic, what to pay close attention to.
Insulation of the attic from the inside, if the roof is already covered: preparation of the room
Insulation of the attic from the insideNot every attic can be called an attic. This type of attic space is distinguished by a sloped roof. In such a room, the height to the ceiling should in no way be less than 2.5 meters.
Important! When carrying out installation work, special attention should be paid to the insulation of windows.
Making an attic and equipping it for a full-fledged living space is a very tempting idea, for the implementation of which the owners of buildings are actively accepted.
Before buying a material, you should know what properties the insulation should have:
- low coefficient of thermal conductivity;
- the minimum level of water absorption;
- safety;
- incombustibility;
- no shrinkage.
All these points are important to consider when choosing a heater for your attic. But the most significant are insulation from heat loss and waterproofing.
The attic is located under the roof and therefore is a rather cold room. A large temperature difference outside the building and in the attic space itself often leads to the accumulation of condensation. Moisture negatively affects construction and finishing materials, leads to their deterioration, destruction.
The better to insulate the attic floor in a private house
There are a lot of building materials, including for the internal use of any premises. In order to know what kind of insulation is best to insulate the attic, one should take into account the design features of a particular building, as well as the climatic conditions in the region of residence.
Styrofoam
 Foam insulation
 It is one of the most popular insulation materials, which won the love of builders and repairmen due to its low price.
The cost of foam is its main advantage, but far from the only one:
- This material is highly moisture resistant, it does not absorb water. If it is additionally covered with a special impregnation, then the drops will simply flow down it.
- Lightness is another advantage of foam. It is easy to transport, convenient to work with. They do not create any additional load on the roof, supporting structures.
- Another "plus" of the material in its excellent thermal insulation properties, so it is suitable as insulation for the attic.
- Simply cut the material in any direction with any means at hand. It will not be difficult to fasten its sheets. A person without construction skills can handle styrofoam laying. This is not whimsical material at all.
But before you opt for this material, you should know what density of canvases is needed to complete the task. After all, the comfort of the room depends on this.
Minvata
 Mineral wool insulation
 Another type of popular and decent thermal insulation product is mineral wool. It looks a bit like medical wool due to the presence of fibers in the fabric structure. Mineral wool is sold in rolls, so it will not be difficult to transport it and work with the material.
This is an excellent insulation for the attic. It does not allow heat to pass through and practically does not absorb moisture. This combination of characteristics makes it popular in construction. Even if the mineral wool gets wet, it dries very quickly, without spoiling at all.
This material belongs to the class of environmentally friendly, it is safe. It doesn't matter what the roof is covered with or how hot it gets in the summer, there will be no problem with mineral wool. Moreover, it is not gnawed by mice, bugs do not start in it. This is how mineral wool compares favorably with foam. Fibrous material also blocks sound.
Quite convenient. The material has elasticity, although it seems fibrous, soft. It will stick well between the rafters if the sheets are fixed correctly.
Ecowool
 Thermal insulation with ecowool
 Ecowool is not a layer, but a crushed substance. All cracks, small holes, as well as the space between the ceiling and the rafters are blown out tightly with it. It will hardly be possible to do this on your own, because a special technique is needed to blow out. Insulating a roof with ecowool is an expensive pleasure. But this type of insulation has its advantages: the insulation effect is high and there is not a single draft in the room.
Ecowool is based on natural components: paper, which is close to wood in characteristics, takes up 80% of its composition. Despite this, the material saves heat well and is in no way inferior in efficiency to synthetic insulation.
Also ecowool includes borax. It is an antiseptic that fights various fungi and microorganisms, moreover, of natural origin. Therefore, when insulating with such a means, you should not worry about the possible appearance of fungus or mold, it will not allow this with brown in the composition of ecowool.
Thermal insulation with ecowool requires a rather thin layer, but this is enough to provide high thermal insulation and blocking of noise exposure. The material will last a good ten years without deteriorating its characteristics. Taking all this into account, the high price of ecowool is fully justified by its properties and durability.
Polyurethane foam
 Insulation with polyurethane foam
 The most progressive and reliable substance for insulating a cold attic and other premises is polyurethane foam. It surpasses in its properties all of the above insulation materials. It compares favorably with the fact that during installation it does not give any gaps, joints, cracks through which cold air flows into the living space. This is one of the most durable materials, with proper installation, it will last at least 30 years in the house.
This material does not shrink, even if there is a wooden roof near the house, which deforms over time. Polyurethane foam has a solid structure, which ensures its complete moisture resistance. Therefore, when insulating with this material, there is no need to additionally mount a layer for insulation from steam and moisture.
With all these advantages, polyurethane foam has one significant disadvantage, because of which it is not always used for insulating living quarters from the inside. To apply this substance, a special rather expensive technique is required. It makes no sense to buy it yourself for construction work, it is easier and cheaper to rent.
The application of the polyurethane foam insulation layer should be entrusted to a person who has experience with this material. After all, it is not very simple and requires some skill. It is impossible to insulate the attic with the highest quality.
Expanded polystyrene
 Extruded polystyrene foam for insulation
 The use of expanded polystyrene is no less popular. This is a unique material that has a number of positive aspects. Insulation of any attic with extruded polystyrene foam can be done independently. The material is quite lightweight and fits perfectly on any surface.
With proper installation, the product will reliably protect the room from the cold and will serve for more than a dozen years. In order for the insulation of the attic of a private house with expanded polystyrene to be at the highest level, you just need to follow the basic rules of installation and preparation.
How to carry out insulation work?
 Effective insulation of the attic
 Each insulation has its own nuances, features and installation rules. It should be mounted following the manufacturer's recommendations. But there are also general rules for the process of warming, which do not depend on the substance chosen for the insulation. Several mandatory stages are always present in them.
The first layer is the waterproofing material. It provides protection against damage caused by moisture penetration. A special film must be laid with an overlap, and with a good overlap of one layer on another at least 10-15 cm. A construction stapler will reliably help to fix the material. At the joints of the film, it can be additionally strengthened with adhesive tape.
If the project is provided for and there is a need for this, then the crate is stuffed. Ordinary wooden slats are suitable, their width can be from 8 to 10 cm. The slats are fixed to the rafters in strictly parallel rows. The distance between the slats is left on the order of half a meter. Each component of the lathing must be checked using the building level, otherwise it will not be possible to avoid the appearance of defects and flaws in the roof during its further operation.
Next comes the turn of the actual heat-insulating substance. It is mounted on a crate or rafters, the method of fastening depends on the type and characteristics of the material. If it is presented in the form of rolls (for example, mineral wool), then it is simply cut into strips of the required size so that it is distributed between the rafters.
Important! The thickness of the insulation used for the attic floor should be suitable for the width of the log.
The ratio of the thickness of the material and the space must be taken into account, first of all, when insulating the attic with mineral wool, followed by the installation of drywall. In this case, the entire space must be filled with insulating material.
This cake-like multilayer construction is completed by a layer of protective film against steam. In its role, a plastic wrap is perfect, you can also use glassine or roofing felt. When laying a vapor barrier, in the same way as when installing a film for waterproofing, the film is overlapped. But they do not fasten it with a stapler, but due to wooden slats of small thickness. The distance between them is 40-50 cm. The joints are insulated by gluing with tape.
Now it remains to complete the topcoat. It is attached directly to the bars or to the crate. At this stage, you should consider the weight of the decorative elements. If rather weighty materials are selected, then for their reliable fastening, you will have to install an additional frame, for example, from a metal profile.
Isospan FS, FD, FX for the attic floor is an excellent option as additional thermal insulation for the attic floor. All types have not only the functions of a vapor barrier, but also combine the effect of reflecting thermal infrared radiation.
The main mistakes made in the process of warming the attic
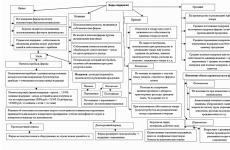
 Attic insulation scheme
 In order for the insulation work carried out on our own to really please, it is necessary to follow the basic rules for their implementation. The key point is laying the waterproofing layer, because without it, all materials that can get wet and dry lead to the penetration of cold into the room.
To avoid negative consequences, or at least minimize them, you should heed the advice of experts:
- Before starting work on the insulation of the attic, you need to check the angle of inclination of the roof. If it is less than 13 degrees, then precipitation will begin to accumulate on such a roof - snow and rainwater. Stagnation of moisture will provoke the appearance of rusty spots, cracks, cracks, moisture seepage. These phenomena will spoil the insulation.
- Insulating the walls of the attic and the roof itself with special insulating compounds is an important part of the work, but one should not be limited only to this. It is equally important to insulate the windows, preferably according to the Swedish scheme. The ideal option is to entrust it to specialists, then there will be no leaks. And you certainly should not do the insulation of windows yourself if they are not strictly vertical, but tilted.
- Do not forget that any material for thermal insulation requires ventilation. It is also important to ensure that it can dry out in the event of moisture ingress. In order for the air to circulate, you will need to leave a gap of a couple of centimeters between the insulation layer and the roof.
- It is required to observe the sequence and number of layers for insulation from steam and water, none of them must be skipped.
- If the height of the rafters is not enough due to an impressive layer of heat-insulating material, it is necessary to increase it by mounting special slats. It is quite possible to do it yourself.
Such simple, but important tips can help with insulation work, ensure their high quality, the absence of errors and miscalculations that will have to be corrected and redone. If you are not confident in your own abilities, in the presence of sufficient experience in repair work, it is best to invite a professional to arrange the attic. His services are not cheap, but the result will be excellent.
Competently executed insulation of the attic roof is a guarantee of a comfortable atmosphere in this room, and a long service of the attic room interior decoration. So that in winter it is warm and comfortable, and in summer you are not disturbed by the heat and stuffy air, it is very important not only to choose the right insulation materials, but also to mount them in compliance with the technology. Today we will tell you how to insulate an attic roof with your own hands, which heaters are best suited for this purpose, and most importantly - how to avoid common mistakes during installation, which reduce all efforts to almost zero result. You will learn all the most important about insulating the attic roof - the video clips attached to the article will clearly demonstrate all the subtleties of this work.
Insulation of the attic roof has its own characteristics, due to the fact that the walls of the dwelling are directly adjacent to the roof, or rather, they actually form a single whole with it. That is why it is customary to pay close attention to the insulation of the attic roof from the inside, which allows you to ensure a normal microclimate in the room. Before starting a conversation about how to insulate the attic roof from the inside, let's figure out what layers the so-called "roofing cake" consists of, and why it is so important to arrange these layers in the right sequence:
The diagram shows the correct order of arrangement of the elements of the thermal insulation system of the attic roof
What is the reason for this arrangement of layers? Elementary laws of physics. Let's imagine that a decent layer of snow fell in winter, which, by the way, is a natural heat insulator. As a result of the vital activity of people living in an attic house, warm air will rise from the inside to the surface of the roof. The snow covering it will melt. And as soon as the outside temperature drops below zero, a crust of ice forms, which no longer possesses any heat-insulating properties. The essence of proper insulation of the attic roof is to prevent snow from melting in winter and the penetration of scorching heat in summer.

Scheme of air movement in the under-roof space, and the work of the vapor barrier when insulating the attic roof
In more detail about the structure of the "roofing pie" and the principles of the correct operation of all its components, you will learn from this informative video:
The better to insulate the attic roof: the choice of insulation
There are four most important criteria, based on which it is necessary to choose a high-quality insulation for the attic roof:
- Thermal conductivity;
- Moisture resistance;
- Fire safety;
- Ecological cleanliness.
The first parameter can be called decisive, since it is on how low the thermal conductivity of the material you have chosen that its thickness, the number of layers, and, most importantly, efficiency depend.
Important Insulation for an attic roof with a thermal conductivity coefficient of no more than 0.05 W / m * K can be considered sufficiently high-quality and reliable.
The second indicator is also important, especially for a mansard rafter system made of wood. The resistance of the insulation to moisture will allow you to worry less about the possibility of damage and decay of wood. Why the fire safety of insulating materials is important is probably unnecessary to say. And, finally, the ecological purity of the insulation in the case of attic rooms is also of great importance, especially if it is a bedroom or a children's room in the attic.

Comparative table of building and finishing materials, indicating the coefficient of their thermal conductivity
As follows from the picture above, insulating an attic roof with ecowool is an excellent solution, since this mineral insulation meets all four criteria for choosing a material. However, it cannot be called the most affordable, so many craftsmen refuse to use ecowool in favor of cheaper, but no less effective insulation. For example, insulating the attic roof with polyurethane foam allows you to achieve the same excellent effect, while saving money. Among the effective mineral and polymer insulation, you can also name:
- Basalt wool;
- Glass wool;
- Extruded polystyrene foam;
- Styrofoam.
By the way, it is the foam insulation of the attic roof that can be called the most economical and simple method. But it is worth remembering that the foam does not allow steam to pass through, moreover, rodents often settle in it. Expanded polystyrene can be called a more modern and technically advanced alternative to conventional foam. This video will help you choose the best insulation option for the attic roof:
How to properly insulate the roof of the attic with your own hands
It is not at all difficult to insulate the attic roof with your own hands, for this you do not need to have the skills of a professional builder. The specifics of the installation of thermal insulation entirely depends on the type of insulation material you choose. If the attic roof is insulated with mineral wool or glass wool, the process will take a little longer than in the case of foam or polystyrene. The fact is that to achieve a good effect, cotton wool is laid in several layers, and requires additional vapor barrier, because it strongly absorbs moisture.

The technology of insulating an attic roof from the inside with mineral wool on the example of a sloping gable roof
The thickness of the mansard roof insulation is directly proportional to the value of its thermal conductivity, that is, the denser and more reliable the material, the less it will be needed. Usually, during the installation of thermal insulation, an additional layer is made of cotton wool, covering the rafters. But many owners of residential attics are categorically not satisfied with this, since the rafter beams can act as an important decorative element of the future interior of the attic room. If you consider yourself one of such owners, extruded polystyrene foam is preferable for you, a small layer of which is laid between the rafters.
Advice Before starting work on the insulation of the roof, consider the future design of the attic room, and select the type and method of installation of thermal insulation that is best suited for your option of interior decoration.
For everyone who wants to know in detail how to insulate a mansard roof - the video below. This short film tells about the insulation of the roof of a wooden country house made of laminated veneer lumber with a gable roof just with the help of the most modern and high-quality thermal insulation material - extruded polystyrene foam.
1.Method for calculating the distance between the rafters
2. Roof structure for corrugated board
3. Roof structure for ceramic tiles
4. Rafter structure for metal tiles
5. Rafter structure for ondulin
6. Roof structure for slate covering
7. Rafters for single-pitch and double-pitch roofs
The roof frame must be reliable and durable.
But without competently carried out calculations, this is difficult to achieve. In the process of carrying out the calculations, it is determined at what distance to put the rafters on the roof.
What can an incorrect or inaccurate calculation of the loads that the rafter structure will undergo? The most negative consequences, ranging from the deformation of the rafter legs and damage to the roof covering and ending with the collapse of the base of the roof frame. Therefore, when designing buildings, the list of mandatory calculations contains data on what the distance between the roof rafters should be.
There is a certain methodology that allows you to calculate this value.
Method for calculating the distance between the rafters
The distance between the rafters on the roof is called the rafter pitch. As a rule, the pitch of the rafter legs in the roof structure usually exceeds one meter, and the minimum gap ranges from 60 centimeters.
The calculation of the required number of rafters for a roof of a certain length and the pitch of the rafters is made as follows:
- before calculating the length of the rafters, measure the length of the slope along the eaves of the roof;
- the resulting value is divided by the selected distance between the rafters.
For example, the step is one meter, so it must be divided by one, and if it is 60 centimeters, then the divisor will be 0.6;
- then one is added to the result, and the total is rounded up.

Thus, by simple calculations, the number of rafters that must be installed to equip one roof slope is determined.
After that, the length of the slope is divided by the received number of rafters, as a result of which the value of the center distance between the rafters, called the pitch, is obtained.
For example, with the length of the roof slope equal to 25.5 meters and a step length of 0.6 meters, the calculation is performed as follows:
25.5: 0.6 = 42.5 + 1 = 43.5, after rounding to the nearest integer, the result is 44 - this is how many rafters are required for the roof slope.
This simple technique, which allows you to determine through what distance the rafters for the roof are placed, does not take into account the peculiarities of the roofing material used.
Roof structure for corrugated board
The step of the rafter system when creating a roof from this material should be at least 600 millimeters, and the maximum step of the rafters under the corrugated board should be no more than 900 millimeters.
When the gap is larger, then it is necessary to install transverse boards with a large section. In this case, the section of the rafters themselves is selected in size
50x100 millimeters or 50x150 millimeters (read: "Installation and dimensions of roof rafters").

For laying the corrugated board, a lathing of boards of 30x100 millimeters is required, it is mounted with a 500-millimeter pitch or more, depending on the thickness of the roofing material and the height of the trapezoid.
When a crate for corrugated board is created, the board overlooking the cornice should be 10-15 millimeters thicker than the rest. The structure of the battens must provide the possibility of a passage for fastening such vertical elements as ventilation pipes, chimney, etc.
Roof structure for ceramic tiles
The design features of the rafters for laying ceramic tiles are associated with the fact that the raw material for its manufacture is clay - the material is quite heavy, its weight is 10 times more than that of metal tiles.
Thus, the load on the supporting roofing system per square meter of area is 40 to 60 kilograms.
Rafters for such a frame system must be made of well-dried wood, the moisture content of which does not exceed 15%. For their production, a bar with a section of 50x150 millimeters or 60x180 millimeters (for reliability) is used.
In this case, the step of the rafter system is 80 - 130 centimeters, depending on the steepness of the roof slope. So at an angle of inclination equal to 15 degrees, the distance between the rafters is 80 centimeters, and at 75 degrees - 130 centimeters.
When the step between the rafters is calculated, experts take into account their length.
At the maximum value of the length of the elements, when performing work, the minimum distance between them is observed. With short rafters, it should be as large as possible.
Safe movement on a roof with a slope of less than 45 degrees can be done if the rafter step does not exceed 80-85 centimeters.
 When arranging a ceramic roof, there is one more feature - this is a certain step size of the sheathing with which it is stuffed onto the rafters. It depends on the type of shingles purchased.
The easiest way to calculate the pitch of the lathing is if you take into account that most of the tiles have a length of 400 millimeters, and the overlap during laying is from 55 to 90 millimeters.
Therefore, in this case, the pitch of the lathing is equal to the length of the tiles minus the overlap, which is 310-345 millimeters (read: "Roof lathing for metal tiles: installation and fastening").
When the roof has several slopes as in the photo, the pitch of the sheathing and the number of rows of tiles are calculated for each step of the rafters separately.
Insulation of the attic roof: video instruction
The rows are marked with a cord attached to a counter-lattice, which is located on opposite sides of the roof slope (see also the article: "Step of the lathing under the corrugated board").
Roof structure for metal tiles
In the construction of suburban private real estate, metal roofing can be found most often.
This roofing material is similar to decking made of clay tiles, but has a number of advantages over it. Sheet metal shingles are easy to install, so the roof can be erected in a shorter time, the rafter system for metal shingles is also not difficult.
Metal tiles are lighter than ceramic products, the difference in weight sometimes reaches 35 kilograms per square meter, depending on the thickness of the products (read also: "Arrangement of the rafter system for metal tiles - design options, rafter pitch").
Due to a significant reduction in the weight of the roofing, it becomes possible to reduce the thickness of the elements of the rafter structure and the dimensions of the cross-section of the sheathing bars, to increase the pitch of the rafters.
Under the metal roofing, the rafter legs are mounted with a distance of 600 to 950 millimeters, while the cross-section of the construction material is 150 by 50 millimeters.
According to experts, in this case, if you place a 150 mm thick insulation between the rafters, then such thermal insulation will create comfortable conditions for staying in the attic room. At the same time, for greater reliability, it is advisable to choose a 200 mm insulation.

When installing the rafters, to ensure ventilation of the space that is filled with insulation, holes are drilled in the rafters near the upper roof with a diameter of 10-12 millimeters.
The technology of creating a rafter system for metal tiles does not differ significantly from structures for other types of roofing materials.
The only peculiarity is that for the rafters, the upper support is mounted on the ridge girder from above, and not on the side of the ridge beam. The presence of a free zone between the rafters ensures air circulation under the roof deck, and this, due to the use of metal material, reduces the risk of condensation.
When installing a roof in a wooden house, when it is planned to replace the Mauerlat with the upper crown, if it is incorrect to calculate at what distance the rafters are placed, it will be difficult to correct the error (read also: "How to calculate the rafters on the roof").
Roof structure for ondulin
When creating a roof from ondulin, the pitch of the rafter system should be at least 600 millimeters, and the maximum distance between the rafters should be no more than 900 millimeters.
For the rafter system, boards of 50x200 millimeters are selected and thereby provide an insignificant margin of safety, taking into account the rafter runs.
On top of the counter-lattice and the rafter structure, a crate is laid from a bar of 40x50 millimeters and an axial pitch of 60 centimeters (read the article: "Ondulin or metal tiles - which is better").
Roof structure for slate covering
Slate is one of the most popular roofing materials. For its installation, rafters with a cross section of 50x100 or 50x150 millimeters are chosen. When deciding through what distance to put the rafters, one must proceed from the fact that the minimum value cannot be less than 600 millimeters, and the maximum - 800 millimeters (for more details: "How to put the rafters on the house").

For the manufacture of the lathing, a wooden bar with a section of 50x50 millimeters or a board of 25x100 millimeters is used.
The step of the lathing is selected depending on the slope angle of the roof slope. If it is insignificant, then it is enough that the sheet of material rests on 4 bars with a step of 45 centimeters, and with a large slope, 3 bars with a step from 630 to 650 millimeters are enough.
How to do the installation of a roof from corrugated board with your own hands, detailed video instructions:
Rafters for shed and gable roofs
When creating a rafter structure, you should remember the need to provide the system with an additional margin of safety, while taking into account the step of the rafters.
The distance between the rafters of a pitched roof is chosen depending on the thickness of the tree and the material of the roof - it can be from 60 to 140 centimeters. The thickness of the timber elements depends on the area and the load on the roof (read: "The rafter system of a pitched roof, the main advantages and characteristics").
The distance between the rafters of the gable roof is made taking into account the size of the heat insulator, which is laid between them. The approximate step between the rafter legs is 1-1.2 meters (read: "The rafter system of a gable roof and its components"). Rafters regulate the size of the roof overhang.
Insulation of the attic from the inside, if the roof is already covered
The desire of many owners of country houses to make the most of the area of the house makes them pay attention to the attic. It often happens that it is easier to equip an attic than to expand a house by attaching a residential building to it. Since the attic is part of the roof of the house, it is with the thermal insulation of the roof that the arrangement of the attic floor should begin. Consider how to properly insulate the attic with mineral wool and show a detailed video instruction on the topic.
It is necessary to insulate the attic with mineral wool and equip the attic for the room if the roof of the house allows the ceiling in this room to be of sufficient height and it will be possible to strengthen the interfloor floors in order to walk safely in the attic.
If these two conditions are feasible, then you can safely proceed with the independent thermal insulation of the attic with basalt mineral wool for living in winter.
The better to insulate the attic
First, we will consider the most important question - what is the best way to insulate the attic with foam or mineral wool. We will determine which thermal insulation material is suitable for the correct insulation of the roof of the attic floor.
To do this, the following parameters should be taken into account: thermal conductivity coefficient, resistance to high temperatures and moisture, fire safety, environmental friendliness and low weight.
Most of the listed requirements are met by fiberglass or rock wool. Unlike basalt insulation, Technoplex expanded polystyrene does not withstand high temperatures and is a very flammable material.
Knauf glass wool and Rocklite basalt wool is a fire-resistant and fireproof material, and with high-quality vapor barrier, the mineral wool will not be afraid of moisture.

Comparison of building materials for thermal conductivity
Mineral wool is made from natural material - basalt. The material has a density of 18 to 45 kg / m³, has good thermal insulation and sound-absorbing properties.
Insulation of mansard roofs from the inside, instructions and video
We examined various brands of mineral wool, their purpose and characteristics in the section "Inorganic thermal insulation". Therefore, we will not dwell on this topic separately.
Methods for insulating the attic of the house with mineral wool
The attic is insulated in two ways: under the rafters and between them. The easiest way is to place mineral wool between the rafters. This method is used to insulate the roof even at the stage of building a house, but you can use the technology even after the construction is completed.
You can do the work on thermal insulation of the attic with your own hands, if you have sufficient competence.
In addition to this method, there is also a technology for placing basalt insulation under the rafters.
This technology provides for the construction of an additional frame for the installation of mineral wool, which entails an increase in costs. However, this method has an important advantage - the absence of cold bridges between the insulation and the rafters, which will save the wood from possible wetting and decay.
Warming the attic with the location of the thermal insulation under the rafters will be easier and more correct to perform, but the area of the room is lost.
In both cases, the use of a vapor barrier in order to cut off the humid air of a warm room, from penetration into the basalt fiber and its humidification. You should also take care of ventilation in the attic of the space between the roof and the insulation.
We insulate the attic with mineral wool with our own hands
1. Construction of the frame of the attic room
Mineral wool should be located between the frame guides; for this, the timber is installed at a width of 1-1.5 cm less than the width of the insulation.
The thickness of the timber should be equal to or greater than the thickness of the insulation in the attic. To do this, you should use a heat engineering calculator to calculate the thickness of mineral fiber insulation for the roof and attic of a private house.
Condensation often forms on a metal roof, so treating wood with an antiseptic is necessary to protect it from moisture.
2.
Laying mineral wool in the frame
Rocklight mineral wool or another brand is placed in the frame, the plates should be placed in a spacer, without gaps. It is better to lay the plates in two rows so that the second layer of mineral wool overlaps the joints of the first row. Do not forget that when working with mineral wool, you should protect yourself from microparticles of mineral wool floating in the air by wearing gloves, a respirator and other personal protective equipment.

Insulation of the attic with mineral wool from the inside and outside
3.
Installation of a vapor barrier membrane
To protect glass wool or mineral wool from moisture, cover the entire structure with a superdiffuse membrane. The material is able to pass air, preventing the penetration of moisture particles and wetting of mineral wool.
To do this, you should find out which side to lay the vapor barrier to the insulation, otherwise you may face serious problems when operating the attic.
4. Sheathing of the frame with plasterboard
Before sheathing the frame, you should fill wooden slats with a thickness of 20-30 mm to create a gap between the false wall and the vapor barrier film.
This air will allow moisture to evaporate from the film surface more efficiently. Many instead of vapor barrier use foil foam, the material provides additional insulation, reflects heat and protects the mineral wool from moisture.

Photo. Sheathing the attic with plasterboard with your own hands
5. Plasterboard wall decoration
Seams between drywall sheets are glued with masking tape and putty.
After the rough layer has dried, the putty is sanded and the entire surface of the wall is primed. At the last stage, all the walls in the attic are covered with a finishing putty, pasted over with wallpaper or painted. Watch the video at the end of the article all the stages of insulating the attic with mineral wool from the inside.
6. Laying the attic floor
After insulating the ceiling and walls, you should start laying the finishing floor covering. On the subfloor, a substrate for a laminate or parquet board is spread, and the floor covering is laid on top.
Self-insulation of the attic with mineral wool is not a super difficult task, and if you have experience in working with construction tools, then the work can be done on your own.