Wooden frames for windows with their hands drawings. Home windows made of wood with their own hands. How to make a window wooden frame from bars do it yourself
Recently, plastic eurowindows almost completely displaced wooden counterparts. However, the latter are still in demand, as they "breathe", besides, wood is inexpensive. Make a window for a cottage or country house will not be difficult, you only need to follow the instructions. The product can be made to your taste: sliding, with shutters, with an unusual windowsill.
Required tools
The following tools and materials are needed:

- A hammer.
- Drill.
- Screwdriver.
- Chisel.
- Glass cutter.
- Carpentry glue.
- Grinding machine.
- Hacksaw.
- Milling machine.
With the help of these tools, the main works can be carried out, and calculate the amount of material. Next, you can proceed to the construction of the box for the window.
Wooden box
For the manufacture of the box, pine is often used, which is distinguished by affordable, reliability and a small price.

Of course, this is not the only wood from which you can build a design, there are still oak. It is more reliable and serves longer than pine, however cost more. If the master is inexperienced, then it is better for not experimenting with expensive material.
It is worth remembering that the box should be most durable, because it is the main load on it. Pine boards must be cleaned and dried, they should not have cracks, scars and sticking bitch. It is worth considering the tree only the first grade, the rest are definitely fit.
For the manufacture of the block, follow the instructions:

- Take a board with a cross section of 15x5 centimeters.
- Select the groove in the workpiece in the form of the letter G, the depth of the groove is 1.5 centimeters.
- All parts are connected using joinery glue.
- Then, in all angles you need to drill holes, the depth of which should not exceed 3 centimeters. They need to insert wooden pins.
The box must be inserted into the wall in such a way that there are no cracks. First of all, you need to make holes where the anchor or dowels are then inserted and screwed the box. The slots can be pouring the mounting foam.
Window frame
Make a window frame that is not inferior to the quality of factory products, sometimes not at least good craftsmen. The thing is that the design should not have abnormalities, and even a small skew can disrupt thermal insulation. Despite this, you can create a window frame from the tree with your own hands, but easier.

Wooden frames manufactured on an industrial scale are not very different from plastic options. And there, and there is a complex design that allows you to open the sash and the window in several planes. Homemade window making includes the following steps:
- Preparation of materials and choosing a profile.
- Mounting frame.
- Glazing window block.
The choice of profile is reduced to the fact that it is necessary to choose which glass to install, ordinary or double-glazed windows. Each of the options has its own advantages: in the first case it is a low cost, in the second - low thermal conductivity.

An interesting feature of the glass packs is an inert gas, loaded by the manufacturer between sheets. Its concentration is slightly reduced over time, but it is not scary, since the differences in the preservation of heat will not be visible. There is both a hybrid option when conventional windows and double-glazed windows are installed. Such a homemade wooden window is called Finnish. It mostly holds heat as much as possible. Of course, the simplest option will be the installation of a pair of glasses, between which there is a layer with a width of several centimeters.
The main nuance in the manufacture of wooden frames is the preservation of shape and geometry during installation. Understand this will help pre-harvested drawings. The bar need to choose from the thickness of the glazing of the future window. The minimum allowed segment of the bar is 60x40 mm. The grooves in the bars are made with the help of electrolack or milling mill. Professionals advise newcomers to practice the creation of grooves on small pieces: make rugs in different directions. Drawing of a window of wood with their own hands:

Before starting all procedures, it is necessary to carefully make measurements. If you can entrust this work to a more experienced person, it is better to do so, because the deviation a couple of millimeters can lead to poor consequences. The ends follow the corner at 45 degrees.
Elements of a wooden frame are harvested on joinery glue. You can additionally give strength, drilled on the corners of the hole and inserting wooden rods there. They are also lubricated with glue. To give strength, you can knock the groove on the connecting elements and set the key. As a result, there should be almost a monolithic design.

There is another option to connect elements - spike-groove. However, this work is quite time-consuming, so the first option is most often used.
Installation of glasses
At this stage, it is important to carry out the accurate calculation of the size of the glass, as it should fit tightly to the frame. This will reduce the thermal conductivity of the window. You need to measure with an accuracy of a millimeter. Glass cut in glass cutter, after which sharp edges are treated with sandpaper.
When carrying out this procedure, it is important to take care of your safety:

- Works must be carried out in rubber gloves to protect their arms from the cuts.
- Eyes need to be protected with glasses, since there is a risk of chips or fragments.
- You can protect the face mask.
The implementation of glass-cutting actions also has its subtleties. So, the movement of the device must be smooth, with a moderate degree of presses. If the pressure on the glass is too small, the incision will be low and the chipsets may form. Excessive pressing is also harmful: you can sell glass and hurt by fragments. For a smooth section, it is best to use a ruler. The material from which it has no difference does not have. If it is not, you can simply apply a flat rack.

After the operation of the glass cutter is complete, the glass is moved to the edge of the table and are pretty. If everything was done correctly, it will break exactly along the trajectory of the movement of the glass cutter. Thus cut the glass for the entire frame. Then you can proceed to the glass measurement: it is simply placed in the frame and check if it is suitable.
The next step will be the installation of glass in the frame. For this, the sealant is applied to wooden parts. It is best to choose colorless so that the window looks perfect. Further, the glass is applied to the frame and the time is given to dry the sealant. After some time, the cloth is fixed by the stroke. Strapboard is a triangular rail that presses the glass. He not only fixes the glasses, but also hides the seam. Mount the rail is best fine nails.
Preparation of windowsill
One of the steps of the window installation is the mounting of the window sill. Material can pick up anyone. However, the best option will still be natural material - wood. Here is its main advantages:

- The material is environmentally friendly and absolutely safe.
- Heating devices practically do not harm him, which cannot be said about plastic.
- When using non-standard coating, you can achieve an exclusive coloring that will delight the eye.
Basic condition: The boards for the window sill must be a whole, without cracks and bitch. It must be predetermined, to make a sample of cailen, a tear. Tears - small grooves with a width of 8-10 mm, the sampling depth reaches 8 mm. Such a chute is made at the bottom of the board, at a distance of 2 cm from the front part.

After that you need to cut the board to the required length. Calculate everything is simple: the width of the window opening is taken plus 4 cm per side. You can add multiple centimeters if you need to give an additional gain.
Also worth paying attention to the protrusion inside the room. Of course, you can make the windowsill in the evening with the wall, but it is not very convenient. Too much protrusion is not worth doing either. The optimal distance is 6-8 centimeters. The exception serves, perhaps, the case of making the window for the kitchen, there is just a lot of protrusion.
Installation of the product
The next stage is the installation of the window sill. To do this, you will first have to clean the place of installation, hide it with dranco and felt. This will avoid heat loss. Mounting itself is conducted using a solution from lime and gypsum. Wood wedges are used for installation, then everything is poured with a solution.

After the solution dries, you can lay the board. It is mounted from the bottom of the opening. 4 cm for each end of the board will be enough. This is necessary for laying the design in the slope of the wall. If the wall is stone, then it is necessary to clean the grooves and then adjust the board. With the help of a building level, it is necessary to align the product, not allowing distortion. As soon as the board is installed, all the gaps must be pumped by a gypsum solution. All damaged sections of the wall should be gently placed according to the overall finish.
The final step is painting the product. Paint the window is completely simple. It is only necessary to remember next:

- If the window was not painted before the assembly, the binding should be treated with an antiseptic. Especially needed to follow the processing of the ends, because it is from there that the pest usually penetrates.
- The surface before painting is better progressing. First, the primer reduces paint consumption, secondly, it helps to increase the life of the window, playing the role of antiseptic.
- Painting is recommended in several layers.
- Outside the window is painted with special paint for outdoor work, but from the inside you can use any.
Wooden window with your own hands make sure. Its quality will not be like a factory model, but it will cost much cheaper.
The wooden window of the modern house - the product is quite complicated. But think of, complex, it means folded from several simple. It does not matter how many such simple steps will be ten or a hundred. If you move consistently, everything will turn out.
Let's imagine how future the window will look like. Suppose it takes a window that can be minced a little to carry out, but you can and disintegrate to let into the room more fresh air. Modern accessories allows you to combine both functions in one sash. However, it is in this part that will make the window "Older". There will be a small fortochka at the top, and the big sash below. In addition, the window will be vertically divided into two parts. The left part is deaf, right, where the sash and the fortochka is located, - opens. Look in the end the window should something like this:
Now remove the size of the future window:
 The dimensions of the window opening 112 by 136 cm. It will be necessary to leave 1.5 cm for marking on each side of the gaps. So, 1.5 on the right plus 1.5 left gives in the amount of 3 centimeters. Similarly, we consider the size vertical. Therefore, the size of the window frame will be 109 by 133 cm.
Making a window frame. Layer first.
The first thing should be collected by lumber. Use the trimming of the conifer board "fifty" sufficient length. They shut down two seasons and dried well.
 It is impossible to use a crude board. If you got a raw board, you can do the following. After you drink it on the workpiece, spread them on hot batteries. For two or three months they dried out.If you do not want to wait for this period, look for those who are engaged in carpentry work, makes wooden kitchens, furniture and the like. Often they have drying chambers in which the drying is at all takes no more than an hour. It will be inexpensive.
Failing boards 50 mm thick on segments in length. Our lengths 109 by 133 cm. When mounting the frame, one of these "lengths" will decrease by almost 10 cm. But about that later. While it is better to drink trimming with a margin of several centimeters. Make a length of 115 per 140 cm. A little later it will be clear why this stock is needed.
Next, you need to cut the segments in width, which will be 65 mm. The thickness of the blanks will remain 50 mm, that is, the thickness of the board. My disk saw has a special plank, which allows you to fix the width of the cut:
 Now write the blanks of the same width, and then additionally cut off another billet with a length of 140 cm, but already sewn - 7.5 cm.
 If you try to measure the valid thickness of the "fifty-thousand" boards, it will be found that exactly 50 millimeters among them are not one. Their thickness will "walk" from 45 and somewhere up to 52 mm:
 It is not scary. The boards of the same thickness in nature does not happen, and it should not confuse.
And one more thing. Of course, we try to choose billets without bitch. But, if you rebel all the boards with bitch, a lot of wood will be married. The frame will subsequently be glued, and "in sight" the blanks will remain no more than two sides. Therefore, in some cases, it is possible to use billets and with bitch. Here, for example, the board, which, it would seem, will not be divided into anything. But after sawing on the workpiece, it can be seen that only the middle bar will go marriage. Two extremes can be put into dealing.

Now we pass the billet on the plane at once. Planned "Exhibit" by almost the minimum:
 It will be enough to remove from the Bahrome board, which remains after sawing
 Now you can approximately lay out a future window frame from the blanks:
 Cut the workpiece to the calculated lengths. It's time to say, why initially these lengths were unpilled with a margin. The fact is that when we pass the billet on the plane, at the end of the plane, as it were, "competes", making the "wave".
 Thanks to the existing length of length, this "wave" is spawn. We place the place dug away at once on the two sides of the workpiece so that the cut does not "go in the side"
 First, we cut off the bars with a length of 133 cm. The first bar is measured by a tape measure, the second, using the already scrambled.
 The width of the frame, as we remember, is 109 cm, but the horizontal bars in length will be shorter than almost 10 cm. They are meant in this way, using those that have already dug with a length of 133 cm. 109 cm Mean with their accounting:
 Now we grind the blanks. On rough grinding to poll small "waves" left by the plane, you can use a ribbon grinder. There are models that attached to the workbench. By the way, very convenient:
 For thin finishes, it is better to take a small vibration grinder. She takes off the chamfer, that is, we curly the sharp verge of bars. Well, at the end, it is necessary to manually "null" manually.
 By the way, on all sides, carefully grind the blanks optionally. It can be limited to those faces that will be subsequently "facial". Grinding the edges, which then "go to the gluing" not necessarily.
Does it make sense to have grinding machines of two types of the ribbon machine more powerful and is suitable for "wing on the squares". She, of course, is far from the planer, but it can be considered as a certain intermediate stage between the sandpaper and the plane.
In contrast, from the tape, a small power of a vibration type and in the hand holds easier, and allows you to handle places inaccessible to the ribbon machine. It is also good to use it for the fine finishes because the stacker is attached to the velcro. The small stacker "sits" on this velcro is much better. Rough sandpaper is too easy to fall off. And by the way, the minus of this velcro is that since the possessed sandpaper will not adversely for the second time.
Now we start collecting the frame. A narrower 50 mm side will go "on the face." On the ends of the short blanks, we apply glue, and the "Sadim" of the workpiece on the self-tapping screw, not forgetting that we should make a straight angle of adjustment as carefully. To do this, use a metal square:
 After assembling the frame along the contour, we measure, we saw, shlifuy, and also on the glue and the SADIM Self-tapping screw and the median vertical workpiece:
 This is not the whole frame. We collected only her first "layer". It's time to take on the second "layer".
Upon completion of the assembly of the first layer of the frame, it may turn out that the elements adjacent to each other are not allowed in the "zero". And the point is not even that when sawing and processing it is very difficult to withstand perfectly accurate dimensions. Remember, the wood is part of the ever wedding. It has a certain internal tension, can retain an arc shape or be twisted in the "spiral". You will not see it on the eye, and you will not forget when the initial processing.
However, it is the flexibility of wood, it will help us later when you "attract" all the elements to each other. Therefore, simply eliminate irregularities by the Rubank:
 Making frame. Second layer.
We take the remaining blanks of 50 mm thick and 65 mm - width. We dissolve them in thickness on a paler 30 and 20 mm, the width is 65 mm remains the same.
 Bruks of fond, 20 mm thick, while set aside. We will now need bars of 30 mm thick and 65 mm width. Also we go through their ruble and grinding.
First, bring the last barcode related to the first layer of the frame. We establish a bar, which will be cutting into the window from the bottom sash. We make it from the plank of 30 mm wide. It is also attached to the glue and screws, not forgetting to withstand straight corners of the entire design.
 Well, now we start making the second layer of the frame. Its installation is starting from the former partition that we mounted the latter. So it will be easier to observe the order at which the elements of the second layer will fall down with the allen on the places of dusting elements of the first layer. It will give the whole structure strength. I turn over the frame with a penfected face down and the first part of the second layer. Carefully measure the jammed elements, it is necessary to mount strictly in the center, and we apply glue:

We press for a few seconds so that the glue grabbing and tighten the gripzina or testicle surfaces. Then, to keep the density of gluing Sadim elements on the self-tapping screw.
 Please note that the length of the glued plank is "taken with the reserve". She spends several centimeters for the middle vertical bar. It can be seen on the right photo from above. Further Fresh Details of the second layer of the frame. Screw the screws to the end is not necessary. After the glue dries, we will get them out.
If you remember, one vertical workpiece we did a little wider than the rest, 75 mm instead of the usual 65 mm. We also cut it in thickness, we need a part of the same width of 30 mm. This wide plank "will go" on the middle vertical bar. We need it to play for a bar on two sides.
 After the glue is dry, it's time to replace the screws on wooden tongs. Take the topunits of 8mm in diameter and 40mm long. Drill, respectively, also octimillimeter. Under the tongings drill the hole drill.
In order not to drill extra, the drill can be coated with a heating. Then the drilling will see a sufficient depth of the opening.
 The drilled holes fill with glue and clog the tongue with a hammer.
 Now, when all parts of the second layer are installed, you can cut the "forward" plank with which we started mounting the second layer:
 We are glad to filter tongs:
 Here is such a frame from us:

Now you can proceed to painting. If you are covering the frame without helpers, you first better paint the sidewalls, and then the front part. It is better to avoid inclusive.
 When you choose in the store coloring of the veil and varnish, make sure that the seller showed the painting of that manufacturer whose products you are going to acquire. Some "oak" or say "rosewood", from different manufacturers in color will be very different.
To say that the frame is fully ready, and you can move to the manufacture of sash, we have to be laid a rubber seal. We take the so-called "d" -d. It is called so because the Latin "D" resembles in the section. This seal already has a sticky layer, it is not necessary to apply adhesive.

Now Rama is ready. Go to sash.

Modern windows for the most part are double-glazed windows consisting of prefabricated panels. These windows are easy to use, but have some drawbacks. For example, if one of the glasses is accidentally broken, it will be completely difficult to replace it, especially if it has a non-standard size. In addition, companies that produce double-glazed windows are often closed, and many models when the glass replacement comes are removed from production.
Those who are interested in how to make windows from wood, photo and detailed instructions, posted on this page, will be very useful. The photograph shown below shows the most real homemade glass unit, for the manufacture of which neither special skills or substantial financial investments are required. If the glass breaks in such a glass, the replacement can be easily found in any construction store, and if condensate will be collected between the glasses, it will be enough to change the sealant and replenish the moisture maker.
Glazed windows having an air gap, not filled with any noble gas, due to circulation of air flows between glasses carry significant convective losses. Noble gases have a lot of mass, which significantly slows the diffusion. But but the gas as the glass package aging has a tendency to be lost, and in the package filled with air, you can add moisture-loader and change the sealant, without having special devices.
The most common material from which wooden frames for windows are manufactured is pine, which today is considered the most practical, inexpensive and affordable wood. A reasonable substitute for pine wood is oak wood, but masters, the first time in the life of wooden windows manufacturing, it is better to choose the less expensive species of trees. Wooden bars for wooden windows must necessarily be dried in all the rules, and in addition, they should not have any bombs or cracks or other damage. It is important to remember that the box when they are fixed in the opening windows, they take on the main mechanical load. If the glued bar is used for the manufacture of all elements, its strength will be enough to withstand deforming loads.
Tools for work that will be needed
If, for example, a 150x50 mm board will be used for the manufacture of the box, then in the blanks it will be necessary to make a groove in a depth of 15 mm in the form of the letter G. For the block, you will need to make four blanks, and then combine them with glue (best, alloyar) It is additionally drilled in the right places of the opening and insert a three-chamber rod from a tree, which will ensure the connection at the right angle, the fixability and the necessary rigidity.
The finished box is fixedly secured in the prepared window opening. To do this, drill holes in the wall, drive the dowels and self-pressing to secure the finished design. If intervals will remain between the finished block and walls, they must be sealed with construction foam. It should be remembered that when installing the box, the mobility is not taken into account that it can acquire at temperature drops.
Making a frame of wood.
The main feature of the project presented here is the window binding, driving glass and providing a free space for the seal and wooden staps holding the glass.
For those who are going to make windows with their own trees, drawings, presented on this page show how to make a frame for ten-minute meter staps that will reliably hold the four-millimeter glass. The gap between the glasses is about 1 cm, with the metal parts that cut them, not used. It should be borne in mind that the sealant for wooden windows whose width is equal to the width of the glass, it will not be the best option for such a design: better if the cross section of the seal will be equal to the cross section of the groove.

Making box for window
The best seal will be a material that does not suffer from exposure to sunlight. Often, the silicone seal is used for this, but it is impossible not to note that it is suitable for such purposes in the best way, since it is difficult to remove from the surface of the glass. You can make a frame of pine wood, and you can use white oak wood or other blanks. Before the cutting material for the window frame, a perimeter of the window opening should be thoroughly measured and increase the result obtained by another 10%.
Assembling frame parts.
To assemble the cover depicted here, you will need to cut the material at an angle. Compounds consisting of grooves and spikes keep the design tighter, but continuous grooves are better suited for the seal. For compounds of parts of the frame between them, it is best to use screws with a flat hat and a major thread. The screws with flat hats are best drown in special holes.

Build a window frame with your own hands
Cutting glasses.
The process of cutting glass is essentially difficult, but it is important to take into account some of its nuances. First of all, it is necessary to take care of the safety of safety: to reliably protect your eyes and hands from possible surprises. Glass should be durable and completely integer. Before cutting glass is thoroughly cleaned, and then lubricated with a small amount of fat.
Experienced masters advise always to cut the glass for one res. When the glass is pressed, the sound is heard, after which the glass is shifted to the very edge of the working surface and click on it. To make such a glass package, as is considered here, you need to make measurements with an accuracy of a millimeter.
The edges of the glass after cutting are treated for polishing with sandpaper.
Build window design.
First, the glass for fitting is inserted into the frame, and then removed and put the sealant in its place. The glass is placed back into the frame and set the strokes wooden for windows, and then paint the window and equip it with handles.
When joining the stroke screws need to tighten slowly, ranging from their middle. This is necessary in order for fragile angles of the frame, there was no too strong pressure.
Based on the fact that the window should be easily repaired in case of need, you should not paint the helns used, but many prefer them to be visible. The ideal way to hide the screws has not yet been found, so everyone chooses what the most suitable for him.

Install the window frame into the house from the bar
Between the glasses you need to place the dryer. To do this, at the top of the window sash add a hole, which is later standing with a wooden pin. If there is a compressor at hand, you can fill the gap between the glasses with dry air. Pins paint paint before mounting the window and repeat this procedure after it.
The window, which is said here, does not feel even a year later, and if you need to replace the glass, it will not cause too much difficulties. Such windows can be installed even in rooms with high humidity (that is, in the bathroom or in the kitchen).
Additional information.
Holes for screws can be closed with decorative handles. When using standard screws, you can also scroll paint from their grooves.
For reliable sealing, experienced masters are inserted glass, applying to the place of its joints with the design of the sealant. In order for the window to be more resistant to weather conditions, after drying the sealant, apply the window putty on top of it. It is important to know that some modern putty can hardly be removed from the glass, so it is much easier to work with traditional window putty.
Painting windows is best every few days after putty is applied.

Wooden windows options
How to make laminated plastic windows
Specialized technologies are used for the manufacture of laminated window blocks. A special film is applied to the plastic profile, which is attached to the surface with glue. The film is a few layers embossed on its surface, and to apply it to a plastic surface, it is necessary to use the laminating equipment.
Lamination is necessary not only so that the windows look more aesthetic: in this way they become more resistant to all sorts of atmospheric phenomena and durable and remain extremely simple in care. There is a film, the surface of which resembles natural wood. On such a decorative film, dust and dirt are practically not visible, so plastic windows laminated under a tree, which can be seen below, differ in incredible practicality.
In addition, the windows covered with film are resistant to temperature fluctuations and to weather conditions. The design covered with PVC film is not sensitive to atmospheric precipitation, and the film itself retains its color even under the prolonged exposure to sunlight.
Another indisputable advantage of the PVC film lamination is a wide range of its colors and textures, among which there is a suitable option for any occasion.
Window shutters from wood
After installation, the room becomes additionally protected from cold and atmospheric phenomena. Wooden shutters on the windows, the photos of which can be viewed at the end of the page, are made by outer or internal, and according to the structure - single or double, shield or panels. Make such shutters can anyone anyone.

Design option to windows
What will be required for the manufacture of
To make window shutters from wood, you will need boards width 100-200 mm and a thickness of more than 20 mm. The most appropriate are veneered wood boards from the wood of hardwood, but the smooth fugus is also quite suitable.
In addition, it will be necessary to take care of the presence of tools for wood processing: hacksaws, drills, screwdriver, planer, bits, etc. It will also require measuring instruments: level, roulette and carpentry. For the final stage of work, you need to purchase olive, brushes and paint, as well as an antiseptic.

Assembly is the stock for windows
Production of simple staven

How to make ordinary shutters from boards
- Measure the existing opening on the external and inner side, after which it makes a circuit of cutting boards and cut them out.
- For the preparation of boards to the end connection, their rallying is carried out. Smooth fugged boards can be placed on glue, but additionally need to strengthen it with a rack so that it overlaps the resulting gaps.
- It is easier to rafting the canvas for the staven by the lock method: select the groove in the end part, and from the opposite side to provide a spike. Experienced masters recommend buying ready-made spanned boards that are used for flooring.
- After rolling, the canvas must be additionally strengthened with transverse drives and overhead tie.
- The hidden splitting of the shields is carried out using threaded studs. For this, the holes in the end sidewalls of the boards drill a thin drill, and then drill them until the diameter of the heel is reached. After that, the boards are riveted on the studs and are tightened by bolts, and their ends are abundant with carpentry glue so that no cracks remain.
Manufacturing of the pililee staven
- Pilenka is called a thin board inserted into the frame frame. Such shutters not only look beautiful, but also have greater strength. Building stores selling prepared panels and profiled vessels with elected groove ducts, but you can order the necessary parts and directly at the carpenter.
- Pilenks make smooth or decorated them at their discretion. They may have layouts of tongueblands or selected calaivkes. Also fililers are floating, figarer and can have a decorated thread frame. If you wish, you can also make wooden platbands on the windows. Carved patterns whose photos can be seen slightly lower, allow you to decorate the window very beautifully.
- The tightening frame is made of binding bars, which should be thicker than chickens by 5 mm. Bruks are eaten and polished, and then combined with spikes with eyelashes.
- When the frame is assembled, the panels are wedged with glue and insert into it. The sash should be fixed to the plane until complete drying.
- On the sidewalls, it is necessary to join the chisel to mount the loops. After the insertion of the shut-off elements, you can mount the shutters on the slopes. Folds are exhibited by level, and then fixed in looped nests with screws.
- The final stage of the work is the impregnation of wooden structures with a olifa or other means that prevent rotting, and then coating them with varnish or paint.
Wooden windows We install the window frame into a bar
Making wooden frames with their own hands is quite difficult, because the profile must be prepared, strictly observing all the sizes. Elements of the window system must fit tightly to each other, only then the product will be sealed.
Salves are also complex in the manufacture. Correctly make them can people who have experience with wood. It is best to cut the elements on special machines, then the windows will serve for a long time. However, there are no machines from everyone, so at home it is better to stay at the simplest project. Of course, the homemade product will not be sealed, but for glazing cottages, balcony and summer kitchen it will suit.
How to make windows with your own hands, spending the minimum forces? The manufacturing process consists of the following steps:
- Choosing a suitable profile. Acquisition of building materials.
- Making box and frame.
- Installing window blocks. Glazing.
At the preparatory stage you will need to choose the glass. It can be a common leaf that is well suited for country windows. In addition, ready-made double-glazed windows can be installed in wooden frames.
Each of the selected options has its own advantages. For example, in the first case, there is an opportunity to choose and buy cheap material. But the use of double-glazed windows in wooden frames is characterized by the fact that such windows will significantly reduce heat losses.
Machining double-glazed windows, manufacturers pumped into the space between the sheets of the glass inert gas. Such windows can be used to glazing cottages and a country house.
Window frames can be made from larch. Oaks are also popular, but it is much more complicated to process it. A good option will be the manufacture of structures from the Angarsk pine. Even novice builders can work with a glued bar, products from this material will serve at least 50 years.
You should purchase drawings in advance. The easiest option that is suitable for novice builders can be called the manufacture of windows with a double frame and single glazing. For carpentry work, the following tools will be required:
- a hammer;
- saw;
- chisel.
The work will be performed faster if there will be electrobucks and cutter.
How to make a window, so so that it served for a long time? Much depends on the quality of the material. Only dry wood is suitable for work. It should be carefully examined at the construction base. It is important that there were no bitch, then the frame will not crawl. The glued material will be a good option. For self-making, the window will require drawing, glass, metal corners and carpentry glue.
The glued bar is good because it is practically no deformation. Frame made of this material will not change the shape even with high humidity. The window frame can be made from 50x150 mm boards and 50 × 50 mm bars. Also all wooden structures are treated with an antiseptic. This prevents rotting.
The factory window profile has a complex structure, it is very difficult to repeat it with beginners. Therefore, the easiest way to use the easiest project. For example, a plywood can be used to create a window profile. It is necessary to bore 4 bands in the form of a rectangle. Several rectangles are collecting for making profile. So you can make a deaf frame or window with 3 or 2 glasses.
For the manufacture of a frame with 1 glass, 8 strips of plywood will be required, they form 2 rectangles. Layer bands 2 make a smaller width. For the connection of parts, the vehicle screws are used. All parts of the design are drained with carpentry glue, then the frame will last for many years.
How to make a box of boards

The amount of material that you need depends on the size of the windows. First you need to make a box, the frame will be installed on it. The box protects it from the deformation when shrinking the building. All elements are made of dry boards, it must be without cracks. It is treated with sandpaper, it allows you to remove small burrs. Then they put markup and cut the parts of the structure.
In the process of performing work, it is important to pay attention to the external perimeter of the product. It must be about 3 cm less than the size of the window opening in the wall. Next, you should look at the inner perimeter, it must be about 3 mm more than the size of the frame.
All elements of the box are connected according to the principle of groove spike. You can make it with a cutter or hacksaw. To work, you will need a chisel and a cive. Spikes are made on the part that plan to be installed in a vertical position. The groove is cut on the element that will be installed in the window opening horizontally.
Next you need to take sandpaper and carefully clean all the elements. The box is collected on the floor or other smooth surface. Schip and groove are lubricated with joinery glue, it increases mounting strength. It is necessary to ensure that all parts of the windows are connected at an angle of 90 °. For this, a metal corner is used.
In order to give the design greater rigidity, 2 holes are drilled in the diagonal box. This needs to be done in those places where the fastening of the type of spike groove occurs. With the help of the Cyanka in them insert the pins of wood (the straight angle is fixed). All pins are pre-lubricated with joinery glue. He must dry, so the box must be left for a while. The next step is made of the window frame.

The window size determines its configuration. Deciding for the first time to make a window frame from the tree, it should be borne in mind that it is easiest to make standard products. In order for the product to be high quality and last for a long time, it is necessary to buy a glued bar of pine. It is less susceptible to cruel, which is an indisputable advantage of this material.
It is important to choose the type of glazing. It can be double or single. The first is most often used in areas with a harsh climate, such windows are installed in homes. For summer kitchen and balcony, it is enough to make windows with single glazing. Experienced masters make them for 1 day.
The work begins with the markup of the bars, they need to choose the grooves. The easiest way to make it cut, it is installed on an electric drill. The lower grooves are necessary in order to install the frame in the box profile, and the upper will need for the installation of glass. Connection locations should be punched with carpentry glue.
Collect the window frame should be in accordance with the drawing, the process is similar to the assembly of the box. When the work is completed, the window frame must be put on the floor until the glue is completely drying.
In order to correctly perform the installation of windows made with your own hands, it will be necessary to cut holes in the wall in advance. It is important to remove the construction trash and dirt.
In the walls, it is necessary to drill holes, subsequently will be placed dowels. The step between the holes should not exceed 80 mm.
The highest quality mount is achieved through the use of screws. When the box is installed, all the gaps should be "blew" by the mounting foam. You can use other heat insulating materials.
When installing windows, it is important to comply with geometry. The angles should be strictly 90 °, the deviation of no more than 1 mm at the rate of 1 m.
Cutting glass.
- The material is placed on a flat surface without tubercles. This is a very important point, because on an uneven surface, a fragile material can crack. The table is suitable for work.
- Placement is made. Then it is necessary to put a ruler on the glass.
- The glass cutter should be pressed to the material, and then spend it along the glass along the line. A solid scratch should remain on the material.
- The glass is shifted to the edge of the table, placing so that the cutting line coincides with the edge.
- A piece of glass that lies on the table should be carried out with one hand, and the other you need to push the part slightly on the floor. The pressure should be enhanced as long as the glass is spinning along the fiber-cutting line.
It is best to stretch in advance on the old piece of glass, and then cut a new one.
There are 1 more glazing option. It is necessary to remove the measurements, and then order cutting glass in the workshop. When the work is performed, the material should be taken, bring to the country area and insert into the frame.
Installing glass.
- The sheet is placed in the frame. Then removes the silicone sealant at its edges. Glass is installed in place.
- Stick fixation. Each element of the frame must be measured. The stroke is cut and the ends are cut at an angle of 45 °.
- Silicone sealant is applied to the glass in those places where the stroke will be installed, which is then nailed with small nails.
As a result of the use of silicone sealant and headquarters, glass will be securely fixed in the frame and there will be no cracks. Setting the windows, it is important to ensure that all the gaps will be blown by the mounting foam. If you are not removed, cold bridges are formed.
Working with glass and wood, should not forget about protection. The hands are closed with gloves, and the eyes with a cutting glass - special glasses.
By installing the finished glass in the frame, you do not need to forget about the mounting of the windowsill. It can be made of different materials. When the windows are securely fixed in the opening, they are covered with primer, and then color. From the side of the room, any paint can be used, and for staining the side facing the street, it is worth using a paint resistant to temperature drops.
Conclusion
You can make a window from wood with your own hands in a few days if you choose the simplest model. It is important to correctly remove the size. In order not to have errors, it is worth navigating the old frames. The frames make out of well-dried wood. Typically, the construction is used pine, but you can use oak and glued bar.
Four years ago I published an article "The drawings of the window block profile (wooden glass)," where the photo and drawings of the wooden window profiles were attached. Over the years, I received a few letters with a request to show the drawings of angular connections or send more detailed drawings. A week ago I received another such letter and now I will try to clarify the situation of this review article.
Letter from the reader Modelman.ru
Writes: Daniel
Hello Dmitry. I am from Sevastopol (Crimea, Ukraine). Very interested in drawings of a wooden window with a glass. (). Now I make repairs in the house and did not want to put plastic windows, and the wooden was very expensive came to make them yourself, began to search for drawings in the internet and many search engines indicate exactly yours. You write that the drawings developed themselves, so I wanted to ask you a question as a defrost. As far as the window should be less than the frame, that is, if you collect a frame, then how the frame should be calculated (the height of the width), so that they would definitely approach each other and did not create slots when closing (or not cling to each other). Is it possible to make such a window without a milling machine? How to connect angles (in the joint or under 45 degrees)? For what accessulus was calculated window? I promise that if you manage to make such a window, lay out photos of the phased creation of such a window. Thanks in advance. With donkey, Daniel.
= = = = = = = = = = = = = = = = = = = = = = = = = = = = = = = = = = = = = = = = = = =
So let's go!
Is it possible to make such a window without a milling machine?
Yes, perhaps! Moreover, such a window can be made by hand only a circuar saw. In my arsenal there is a modern saw blade on aluminum, although the sale was written that the saws and wood, naturally. My disc looks like this:
Specifications:
The diameter of the disk is 255 mm.
The number of teeth is 80 pcs.
The diameter of the planting opening is 30 mm.
At my truth, the seating hole for 32 mm and the diameter is more, but the essence is not in this, but in the amount of teeth! Due to the large number of teeth on the disk, it saws the tree is extremely clean. I often asked friends to compare the planed tree and shed by this disk, the seed always won in quality. Homemade fugovine machines often do not give a high-quality planed surface, it turns out wave-like, especially at the ends of the workpiece, and industrial equipment can afford not everyone.
To which I am everything, you can make a wooden window with a circular machine and a good saw blade with a large number of teeth (attack).
How to connect corners?
The most interesting question :) Because most makes a simple spike connection into one spike.

Such frames with one spike have already proven themselves as extremely short-lived. If you want the window to serve a long time and resist a large number of opening and closing cycles, make a spike connection in two spikes. You can of course do in three spikes, if the thickness of the frame allows. 
The more spikes, the more goodbye goodbye to the parts and appropriately such a spike connection several times more stronger.
How to make a spike connection?
It is not as difficult as it seems at first glance, first of the four blanks, two vertical and two horizontal, should be disconnected. It can be just a rectangular cross section of bars or already bars with a selected profile. The length of the blanks depends on the size of the window block box, is better to calculate it in the drawing.
You can even on the eye to cut off the blanks in length, putting them to the finished box, but considering that the frame must overlap the box. Of course, in this case, the profile has already been selected in the frame blanks.
Caution spikes and eyeles usually on the milling machine, but we have no circumstances, the machine is not, so the same can be done on a circular saw with simple devices or without them.
It should be immediately noted that the vertical parts of the wooden window or doors are always eyelashes, and horizontal parts must be spikes.
For example, I will show you a video like a uncle makes thorough connections on a circular with your device.
Here is an adaptation of the passage:
In both video, box spikes are made, they are small and without fixtures to make them hard. If you do one or two windows, you can do the simple adaptation as on the first video, but without a pin, then all the work will need to make a pencil markup on the workpiece.
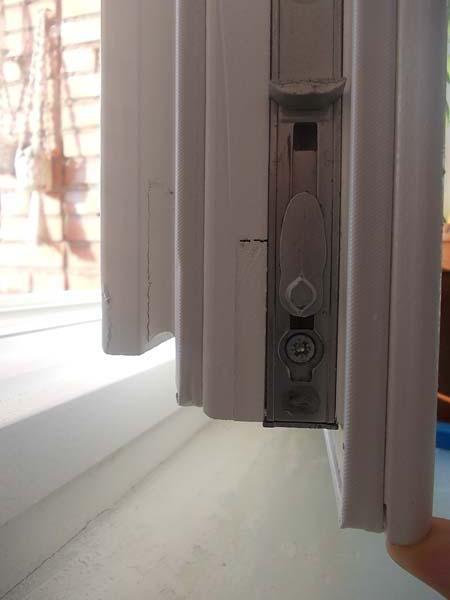
For what accessulus was calculated window?
Honestly, I took the fitness and profile of the plastic window. I do not know whether there are differences in accessories for wooden and for a plastic window, but I think that having any of them can be adapted.
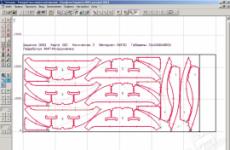
At the beginning of this winter, I installed a wooden window of factory-made in my kitchen. Below look a photo of the window, what items when developing a drawing can be taken from there.


To date, I would show my profile a little differently than four years ago: 
As you can see, I increased the sizes of bars up to 80 mm., All the same winter we have harsh, and I would like the heat remained in the house, moreover, a more massive frame will be stronger and better.
In this article, I again do not give you ready-made drawings and sizes of windows because it is necessary to develop, you need to have window accessories in your hands and understand how it is attached and works. Unfortunately, I have no experience with such accessories, so I still can not develop a finished drawing. Below I tried to visually portray how the angular spike connection should look like.


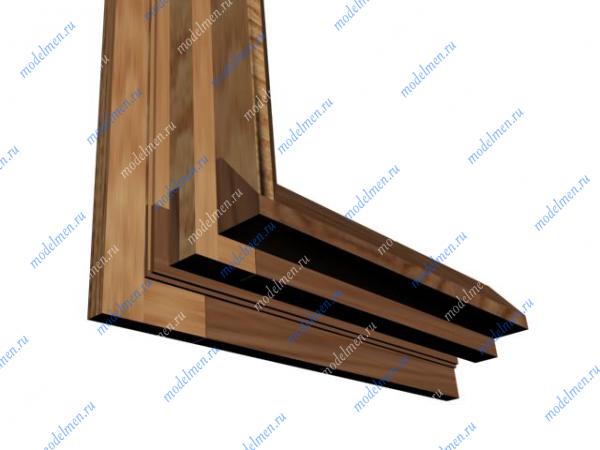

On the Internet, there have been several more photos on which the elements of the spike connections of a wooden window are visible. I hope my information will help you independently develop a drawing of a wooden glass package and embody it into life. Successes!