Devices for sharpening knives with your own hands: views and drawings. Sharpening knives: theory and rules, making sharpeners with your own hands for various purposes
materials
1. Plywood or plastic plate 10mm thick.
2. Screws, wing screws, washers and rod (0.5 m) with M6 or M8 thread.
3. Magnets from a used computer hard drive


4. Bearing from an old coffee grinder.

5. Emery (abrasive skins) sheets and bars of different grain sizes: 120, 320, 600, 1500.
Manufacturing
1. The fixed part of the machine is made of plywood (plastic). Strips with a length of 30 cm and 5 cm and a width of (10 ... 12) cm are fastened with the letter G from below with an aluminum corner. In the upper part we install 1 or 2 magnets (we fill them with epoxy). We drill a hole in the lower opposite part and install a threaded rod (height 12 ... 15 cm) with a bearing vertically.

On the surface (to stop the sharpened knife) we install a prepared aluminum (or stainless steel) plate (up to 2 mm thick) with a wing clamp with a slot in the middle.
2. Movable part two options:
Option A. For sharpening with bars.

Option B. For sharpening with abrasive skins.

The aluminum profile has 4 sides with a width of 25 mm.

A strip of abrasive skin of different grain sizes is glued on each side: 120, 320, 600, 1500. For the sticker, I use stationery glue stick. After the used strip of the skin is easily removed with a knife and a new strip is glued on.
Sharpening process
1. Install the knife to be sharpened as in the photo.

The knife is clearly fixed due to the magnet and there is no need to fix it mechanically.
With the help of a movable stop, we set the knife up to the required position and fix the stop with a wing screw.
We put the moving part of the machine on the knife.

Now we set the sharpening angle by lowering down or raising the bearing with the screws.

For the first sharpening, turn the side with the minimum grit number 120 (the coarsest) to the knife blade.
sharpen until a continuous strip is obtained on the edge of the blade (width 0.5 ... 1 mm.)
Flip the knife over and repeat.
We continue the process with sandpaper 320, 600, 1500.
Now you can shave with a knife.
The same order of sharpening with sharpening bars. But in this case, there are several disadvantages:
1. The middle part of the bar develops over time, then the sharpening angle "floats", which is not the case in the first version.
2. Bars with different granularity must be changed, and in the first variant, to change the granularity, it is only necessary to rotate the edge. The bar is removed by pressing the spring with two fingers.

Now all knives are sharpened by a full cycle. If some of the knives become dull during use. I only dress these knives with 600 or 1500 grit, two to three strokes on each side of the knife.
Thank you for your attention!
"Useful homemade products" from Gamir Khamitov.
We will send the material to you by e-mail
Regardless of what kind of guarantee the knife manufacturer gives that they will not require sharpening during use, sooner or later this question arises before the user. It doesn’t matter if it concerns kitchen utensils or camping supplies, because. a sharp knife is the key to success in fishing and hunting, while traveling and when cooking. Devices for sharpening knives - types and rules of use, as well as how to make it yourself - this is the topic of today's editorial review of the site.
The simplest device for sharpening a cutting tool is a bar, and the device for its use is a fixer for the angle of the surface to be sharpened.
Knives can be classified according to the following indicators:
Whetstones and whetstones
A whetstone (whetstone) is an abrasive tool used for sharpening the cutting edges of household appliances and kitchen utensils, carpentry and metalwork tools.
The industry produces four types of stones for sharpening knives:
- natural- novaculite and Japanese water stone, are distinguished by a high price and complexity of use;
- diamond- the most popular type of products, it is diverse both in geometric dimensions and in grain size. Differ in wear resistance and efficiency of use, and also low cost;
- ceramic- a modern type of sharpening tool, characterized by a combination of the positive qualities of natural and diamond analogues;
- artificial- well-known types of electrocorundum or carbide, are distinguished by low cost, but in the process of use they crumble and are not suitable for finishing cutting edges.

Hand tools
- Musat for sharpening knives.
Almost everyone knows what musat is, but many do not even suspect what exactly this product is called. The reason for this is that musat, as a rule, comes with sets of knives offered for sale through trade organizations.
Musat is a rod made of various materials, equipped with a handle and characterized by the roughness of the drawing of the working surface.

The roughness of the drawing is the size of the notch applied to the rod, and it is she who determines the degree of roughness of the cutting surface of the knife after it has been processed. Musat is equipped with a rod with a certain degree of magnetization, which ensures that metal particles generated during use get on food and kitchen utensils. Musats are classified by:
- rod shape– round and oval, flat and tetrahedral;
- materials used– ceramics and metal, diamond and mixed designs.
Each type has certain advantages and disadvantages that determine the possibility of using the device and its purpose.

- Manual machines.
Household manual sharpening machines for sharpening knives differ in their design, but in any of them a whetstone or whetstone acts as the main element. The impact of the abrasive tool on the cutting surface is carried out using the forces applied by the user. The main task that a manual machine performs is to create and maintain the optimal sharpening angle of the cutting edges for the entire period of work, which is achieved by rigidly fixing the knife in a given plane. The industry produces various models of such equipment, differing in size and methods of attaching abrasives and processed knives, as well as the materials used and cost.
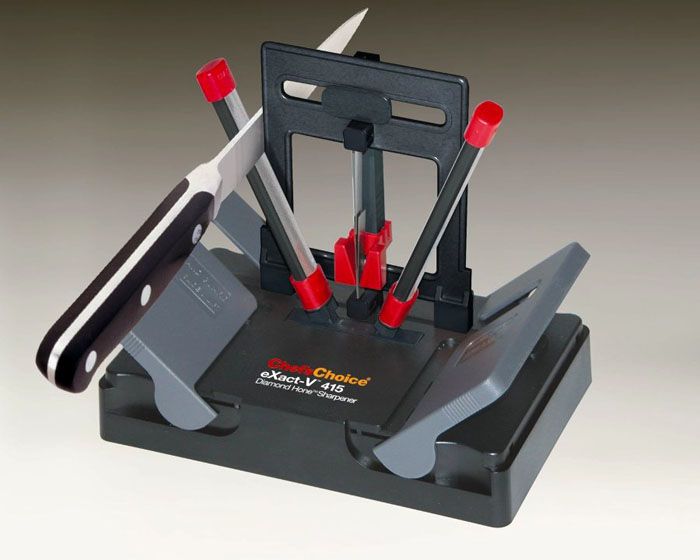

Household electric sharpeners do not take up much space and are very functional, because. their design, as a rule, provides for various fixed sharpening angles for different types of knives and other cutting tools (scissors, screwdrivers, etc.). The ability to quickly and accurately sharpen the cutting edges of knives is very important for catering establishments, where the speed and quality of cooking depends on sharpening. Professional knife sharpening machines are functional devices equipped with a high-quality abrasive tool that allows you to perform not only rough sharpening, but also fine-tuning the cutting edges of knives for various purposes.

Professional models, in addition, as a rule, have several operating modes that allow you to sharpen with different efficiencies, which is necessary for knives made from various metals or ceramics.
How to sharpen a knife at home
Everyone knows that the knife must be sharp, and for this it needs to be sharpened, but not every user often knows how to do it correctly. It should immediately be noted that for the correct execution of work it is necessary:
- Know the sharpening angles for each type of knife and other cutting tools.
- Be able to work on a variety of equipment or using available tools.
Angle of sharpening knives for various purposes
For knives used for various purposes, the sharpening angles of the cutting edges are different, due to their purpose and nature of use.

This value is for:
- table knives - 55–60˚, because ready-made dishes are soft enough and cut easily, moreover, with a smaller sharpening angle, there is a chance of damaging the dishes while eating;
- hunting and folding models - 40−45˚, which is explained by their versatility;
- kitchen knives - 30-35˚;
- used in the professional cutting of vegetables - 35˚;
- used in professional cutting and deboning of meat - 25-30˚;
- used in professional cutting of fish - 25˚.
Some types of knives are sharpened with other sharpening angles, such as those intended for cutting bread (the angle is 15˚), but this is a narrow use, in which sharpening must be done quite often, because. with a decrease in this indicator, the resistance of cutting edges decreases.

How to sharpen a knife at home with a bar
In order to properly sharpen a knife using a bar, you must follow a few rules for performing work:
- it is necessary to choose the optimal sharpening angle corresponding to the purpose of the knife;
- the blade must be located in relation to the plane of the bar strictly in the specified parameters of the sharpening angle for the entire period of work;
- sharp and jerky movements should not be allowed, they should be smooth and sliding;
- when performing work, the bar should be abundantly moistened with water diluted with soap or detergent.
How to sharpen with musat
The process of sharpening a knife using musat is shown in the following figure.

The work is done as follows:
- musat is installed on a flat surface strictly in a vertical plane;
- the upper part of the fixture is aligned with the edge of the knife being sharpened near its handle, after which, with an arcuate movement directed from top to bottom, the knife moves along the musat rod;
- movements are repeated several times on both edges of the knife.
I would like to note that experienced users can perform this operation on weight, without rigid fixation of the rod of the device used.
How to sharpen a knife on an electric grinder
When using models equipped with an electric drive, the basic requirements for performing work that allows you to perform the correct sharpening are the same as in the case of using a whetstone or whetstone.

But, besides this, there are additional requirements that can be formulated as follows:
- water should not be moistened with an abrasive, but with the surface of the knife being processed, which is explained by the fact that water is not stored on a rapidly rotating circle;
- overheating of the blade should not be allowed, which can lead to damage that occurs when the machined edges are pressed hard against the surface of the abrasive;
- for rigid fixation of the sharpening angle, additional devices can be used that are installed rigidly to the body of the grinding machine or are in the hands of the user;
- when working on grinding machines for industrial use, it is necessary to use personal protective equipment, which are gloves and goggles.
In the case of using small devices intended for home use, the main requirement for sharpening is the time of the operation, all the rest (fixing the sharpening angle, protection, etc.) are performed by the machine itself, according to its design.

Typical mistakes when doing do-it-yourself work
When sharpening knives on their own, many users make typical mistakes, which can be formulated as follows:
- Creating the wrong sharpening angle does not allow the knife to be used for its intended purpose or narrows its functionality.
- Excessive pressure when working on electric models or incorrect direction and nature of movements when using a whetstone or grindstone contribute to damage to the surface of the knife, destruction of its edge.
- Sharpening the cutting surface without first cleaning it from dirt and foreign matter leads to abrasive blurring and damage.
- The use of only one musat when sharpening cutting edges. This device is intended only for finishing or straightening the blades of a knife, it is not intended for basic sharpening.
- Not finishing the sharpening operation to the end leads again to the rapid blunting of the cutting edges.
- The use of an abrasive (bar or whetstone) of only one degree of grit.

Making a machine for sharpening knives with your own hands
Although it is now possible to easily buy the necessary tools and equipment for sharpening knives and other cutting tools, nevertheless, handicraft citizens continue to make knife sharpeners with their own hands in their free time. When making a knife sharpener with your own hands, you need to determine its type (manual or electric) and the type of abrasive materials used (bar, circle, sanding belt), as well as the available materials that will be used to make the body of the assembled device, its frame. Consider the option of a manual sharpener using an abrasive bar and plywood as a structure frame. The appearance of the assembled device is shown in the following figure.

Greetings, DIYers!
Today I want to show you how you can use the materials that are (or at least should be) in almost every workshop to make an excellent tool for sharpening knives evenly.
Initially, the master wanted to buy a ready-made knife sharpener in China (namely, in the Aliexpress online store), but he thought why not try to make such a sharpener with his own hands. Moreover, the prices for this product from Chinese friends are rather big.
For self-production, you will need the following materials and tools:
1. Ordinary board;
2. Sandpaper;
3. Screwdriver;
4. Hammer;
5. Thick electrode 1 pc;
6. Electric jigsaw;
7. A piece of laminate;
8. Bolts and nuts;
9. Wooden handle;
10. Hex key;
11. Fluoroplastic or textolite (glass fiber).

Let's get down to actually making the sharpener.
To begin with, take an ordinary board and cut a piece out of it. Then it is necessary to process the resulting wooden blank, namely, to grind it with sandpaper.


It will serve as the basis of our homemade grinding tool.
In terms of size, it turns out that we have 26 cm in length, the width of the blank turned out to be 6.5 cm, and the height of the wooden base is 2 cm.


Also in this board you need to make holes. In total, this part of the future product will have 6 through holes. We drill 2 holes for the rack itself (more on that later). Nearby we drill another hole of a smaller diameter, and also on the other side of the board we drill 3 more holes, which will serve to fasten the pressure plate.

We insert nuts into the holes made.

In the future, these nuts can be put on glue so that they do not fall out, but so far everything seems to be quite tight anyway.
Then we will be engaged in the manufacture of the guide rack itself. Her master made from an ordinary thick electrode. It needs to be folded in half. Further, with the help of a hammer, the author beat off the entire upper part from the welding electrode and polished it. By the way, you can grind with an ordinary screwdriver. To do this, simply insert the electrode into the chuck of the screwdriver and, holding the sandpaper in your hand, grind the product.


At this stage, the workpiece obtained from the electrode (guide post) is inserted into these two holes.
We insert not at a right angle, but at a slight slope. The guide angle is anywhere from 65 to 70 degrees.


Everything sits down quite tightly, but also for greater reliability of our design, in the future it will be possible to put the guide post on epoxy glue, or on some other glue, or on something else.


But perhaps the master is mistaken and this is not fluoroplast. Fluoroplast is most often white and some kind of slippery. Most likely it is textolite or fiberglass. But in fact, it's not that important. The main thing is that this material is quite hard and does not wear off.
From this piece (fluoroplast or not fluoroplast), the author sawed out a kind of pressure plate. He made holes in it, as well as small holes, so that the hats went a little deeper into the plate.


Then we put this plate on the previously made wooden base. Fasten with screws.


The author took the screws with a hex key. The craftsman also made a small hole in the base of the future knife sharpener so that this key would always be in this sharpener.


The whole thing is clamped and they (the screws) are actually not visible on the plate.
But here, the master did not do the secret, since the sharpening part of the tool will not touch this screw.

Further, the author made such a plate from the same fluoroplast.

In this plate, I made 2 holes for the same hex screw.
Further, the whole thing is put here and pressed with the help of a lamb.


Then the master made just such a guide for grinding stones.

The length of the guide is 57 cm. Its author made it from an ordinary steel bar. Also cleaned it up. And on one of the ends I put just such a handle (it seems to be from an old Soviet file).

You can also strengthen this connection by putting a wooden handle from a file on the glue, but here it itself is quite tight, nothing falls out.
Regarding the attachment of the sharpening stones themselves. The author took a small piece of the clamp, cut it off and made holes. As a result, we got these corners, two of the same.


And here I put a nut with threaded threads and a clamping screw.


The master also put a spring on the guide so that you can change the grinding stones without unscrewing the nut with the clamping screw.

The sharpening stones themselves, or rather the base for these stones, were made by the author from an ordinary piece of laminate. Just cut it into strips.


The width of the strips is 2.5 cm, and the length is about 20 cm.


There are already ready-made grooves on the pieces of laminate, in fact, where the corners of the guide part of the device will become.
Then the author pasted the sandpaper on the pieces of laminate with double-sided tape and signed which one where. And, in fact, this is how it all happened:


The whole thing is set up quite easily. With the groove of the laminate, we get into one corner of the guide, and with the second corner, with the help of a spring, we press the grindstone.


Everything. Nothing falls out. Everything is flat and pretty tight.
Let's continue to collect further our device. We insert the guide with the grinding stone fixed on it into the hole prepared in advance for it, and you can safely begin the process of sharpening the knife.


The move is quite large due to the fact that here the author removed a small chamfer on both sides.
The simplest variation of sharpening is a home-made device made of wooden and abrasive bars. To make it, you will need two bars of each type - they must be strictly the same size. Wooden products must first be treated with sandpaper to remove all burrs from their surface.
The manufacturing procedure itself will not cause difficulties. First, mark the wooden blocks: taking into account the required angle of sharpening the knives, draw lines for future fastenings of abrasive blanks. Then attach whetstones to the resulting lines and mark their width on the wood. The next step is cuts: according to the marking, make cuts of the required slope and depth of 1-1.5 cm on both wooden products. Insert abrasive bars into the recesses and fix them with bolts.
Advice. So that the resulting device does not slip on the surface during the maintenance of the knives, attach a rubber gasket to it from below - it will give the device the necessary stability.
Massive sharpener on a stand
A more complex variation of the knife sharpener is a stand with a separate support and a sharpening rod attachment. For its manufacture you will need:
- chipboard sheet;
- wood block 8 cm long and 2x4 cm in section;
- steel rod M6 or M8;
- plexiglass 6x12 cm;
- magnet with holes for fasteners;
- self-tapping screws, bolts, wing nuts;
- wooden clamps;
- rubber feet;
- saw and drill.

Sharpener construction scheme:
- Cut three blanks from a chipboard sheet: 7x8 cm, 8x30 cm and 12x37 cm.
- On the oblong side of the workpiece 8x30 cm, stepping back 6 cm from the edge, make a hole.
- In the corners of the workpiece 12x37 cm, drill holes for the legs.
- Drill two through perpendicular holes in a wooden block: the first - 3 cm from the edge, the second - 3 cm from the first. From the edge of the product to the first hole, cut out a recess 1 cm thick.
- Make a cut in the center of the plexiglass strip.
- On a workpiece 12x37 cm, stepping back 4 cm from the edge, fix the workpiece 7x8 cm perpendicularly with two screws. Fix the workpiece 8x30 cm from above with self-tapping screws.
- At the highest point of the installed workpiece 8x30 cm, drill a small recess and fix the magnet in it with self-tapping screws. Put plexiglass on the same workpiece - fasten the products with a bolt through the previously made hole and slot.
- On any edge of the 12x37 cm workpiece, drill a hole for a steel sharpening rod and fix it there with a wing nut.
- Put a bar on the rod, securing it with a bolt and nut.
- From the rod, nuts and two clips, assemble a knife holder.
- Screw the legs to the finished stand.
How to sharpen a knife?
For high-quality, it is still not enough to build one of the above devices - you also need to master the rules of manual sharpening, and figure out the order of work.

First, the required sharpening angle of the tool is calculated - it must be maintained throughout the entire sharpening process. Then, with smooth movements, alternately “away from you” and “towards you”, begin to drive the blade along the grinding element - an abrasive or a rod. In one movement, it should go along the sharpener from edge to edge. In this case, the movements are performed perpendicular to the edge of the blade.
Important! At the end of each pass, the blade should remain on the sharpener, and not fall off it, otherwise you can not only dull the knife even more, but also deform its side surface.
Drive the blade along the sharpener with one side until a barb appears on its back side - then turn the knife over and start sharpening the second side of the blade in the same way. Continue sharpening with alternating sides until the burrs are completely gone. Gradually reduce the pressure of the knife.
How to determine the angle of sharpening?
The most important parameter for sharpening a knife is the required angle of inclination of the blades. It depends on the scope of a particular tool and the range of tasks that are assigned to it:
- Razor of any type - an angle of 10-15 degrees.
- Fillet knife - 15 degrees.
- Knife for fruits, bread and vegetables - 15-20 degrees.
- Multifunctional tools for cutting food - 20-25 degrees.
- Hunting knives - 25 degrees. Such blades are designed for cutting not only soft products, but also wood, bones, and tissues.

- Utility knives for general use - 25-30 degrees.
- Tourist and camping knives - 30-35 degrees.
- Knives for cutting hard materials - 30-50 degrees. The larger the sharpening angle, the worse such a knife cuts food, but the better it copes with wood, trunks, and plastic.
Please note that there are also combined knives: they are divided into several zones with different sharpening angles. The advantage of such tools is versatility, the disadvantage is the complexity of maintenance.
So, assembling a knife sharpener with your own hands is an excellent way out of a situation where there is no desire to buy a professional device or regularly contact the craftsmen for tool maintenance. Here are two options for making sharpeners of different levels of complexity - choose which one is within your power and use it strictly according to the indicated rules, so that sharpening is not only of high quality, but also safe.
DIY knife sharpener: video
Reading time ≈ 10 minutes
To maintain the cutting properties of the knife, it is necessary to sharpen them regularly, and a do-it-yourself knife sharpener will help keep these tools in proper condition. With a good sharp knife, cooking is greatly accelerated, freeing up additional time for rest. In this material, we will consider the manufacture of special devices for quick and high-quality sharpening of knives.
When the knife is factory-made, it is given the necessary sharpness. However, with frequent use, it gradually loses its cutting properties. To make a knife sharp again, you need to sharpen it, but doing it right is not so easy. Improper sharpening will not give the desired result, and time and effort will be wasted.
Knife makers have responded to requests from their customers by providing a range of sharpeners. But factory fixtures may not suit knife owners for various reasons. For example, an inappropriate sharpening angle or the high cost of the device. In this case, it is easier to make a sharpener with your own hands.
What you need for proper sharpening
The most important condition for obtaining a sharp knife is the angle of its sharpening. It would seem that the smaller this parameter, the sharper our tool will be. This is partly true, since a cutting edge that is too thin will wear out and dull faster.

The sharpening angle depends on the functional use of the knife:
- Up to 15 degrees - shaving and surgical instruments.
- Up to 20 degrees - devices for cutting vegetables, fillets or bread
- Up to 25 degrees - knives of multidirectional functionality.
- Up to 30 degrees - hunting and tourist knives.
- Up to 40 degrees - cutting tools for special purposes. For example, axes or machetes.
Outcome! The whole process comes down to restoring the cutting ability of the tool, while maintaining the factory sharpening angle. Violation of the angle can lead to deterioration of the knife.
Sharpening devices
It is very difficult to sharpen a knife at a certain angle without special tools, and not every professional can do it. They can be purchased in specialized stores, or made by hand. Below we will look at a few simple and affordable devices that allow you to sharpen most household cutting tools.
A simple wooden block machine
This method is considered the easiest to manufacture and use. The grinding material is securely fixed at the desired angle, and sharpening is carried out by holding the knife blade strictly vertically.

To make a simple knife sharpening tool, you will need:
- Four identical wooden blocks.
- Bolts and nuts for connecting bars to each other.
- Sharpening bar.
- Protractor for determining the angle of sharpening.
- Drill or other tool for drilling holes in wooden blocks.
The bars are connected in pairs, and through holes are drilled through them for fastening with bolts. Pairs of bars are installed perpendicular to each other at an angle of 90 degrees. A grindstone is installed between the parts of the structure at the required angle, measured with a protractor. The nuts on the bolts are tightened, tightly fixing the abrasive.

The advantage of this device lies in the relative cheapness of materials and ease of manufacture. Everyone can cope with it, even without the appropriate experience. The main disadvantages include the impossibility of smoothly adjusting the desired angle.
Grinding machine from mounting brackets
This turning method is considered the most convenient, however, additional efforts will be required to create such a device. It is based on the technology of the well-known company Lansky Sharpeners. You can buy the original machine in company stores, but its cost will be quite high. Below we will look at how to make a similar mechanism yourself.

To assemble the structure, you will need the following materials and tools:
- Two metal corners with dimensions of 90 × 90 mm and a thickness of 6 mm. They are the basis of the mechanism that holds the knife blade.
- A metal hairpin with a thread with a total length of at least 16 cm. It will be the basis for holding the whetstone.
- Two metal bars needed to fix the abrasive.
- A thin long rod or knitting needle.
- Pliers. Required for bending.
- Saw for working with metal.
- Tool for processing metal surfaces.
- Nuts and bolts for fastening and fixing.
- Drill and a set of drill bits for metal.
Having bought the necessary materials in a specialized store, you can begin to assemble the structure. Without a drawing, it will be almost impossible to make the correct design, since all dimensions must be observed to obtain the correct sharpening angle. To do this, use the drawing below.

Holes are drilled in metal corners according to the drawing attached above. The edge of the corner that will hold the blade is thinned by grinding. This is necessary so that when sharpening the knife, it would not be a hindrance. All drilling sites are processed to remove all possible traumatic places.
In two metal bars, a thread is cut to the diameter of the connecting pin and grooves in which the abrasive will be attached. The clamp diagram below will help you quickly and without unnecessary difficulties to assemble it.

A metal rod or knitting needle on one side is bent with pliers. The bent end is inserted into the hole of one of the bars. Its purpose is to guide when turning to set the desired angle.
The principle of turning on this device:

The main advantages of this machine are compactness, simplicity and efficiency of sharpening, the ability to select and fix the angle. The device can be held in the hands, or installed using the holder in a vise. This allows you to take it with you on a hike and use it in the field.

Among the shortcomings, it is worth noting the limited set of angle parameters and the inability to set an arbitrary value.
This video details how to make a do-it-yourself knife sharpener using the Lansky system:
Blade locking machine
This method is a modified version of the previous method. The knife is fixed on the base of the machine, and its owner himself adjusts the turning angle. At the same time, the compactness and mobility of the machine are lost. It can only be used at home.

To make such a device you will need:
- Sheet plywood or chipboard. You can use parts from old furniture.
- Threaded pin. It will act as a tripod.
- Bar of solid wood.
- A metal plate for attaching and holding a knife blade to the base.
- Mounting consumables - nuts, bolts.
The assembly of the structure begins with the preparation of the base. We make the base and legs from wood. They are cut so that after their connection, the slope of the base is 20 degrees. A threaded stud is installed in the lower part forming a tripod. For additional strength, all places can be treated with a sealant or a special adhesive.
A metal plate is installed in the center of the base. First, you need to drill a hole in it corresponding to the hole in the base of the machine. Through it, the plate will be pressed against the plate, and thus the knife blade is held.

It is recommended to purchase an aluminum plate, as it will not damage the blade when squeezed hard. Rubber pads are also suitable for this purpose, reducing the negative effect of metal on metal and increasing the coefficient of friction, which prevents accidental displacement of the blade during the point.
The fastening mechanism for an emery stone is made from the rest of the hairpin and two wooden or metal bars. Holes are drilled in the bars to fit the size of the stud, fixed with nuts on both sides. The fixing of the stone will be carried out by tightening the nuts. This process can be simplified by improving the holder with a spring on the side of the handle.

To set the sharpening angle, you will need two wooden bars fastened together by a hinged mechanism. In one part, it is necessary to drill a vertical hole for the diameter of the stud. With this part, it will be put on a tripod, adjust the sharpening angle and at the same time be a rotary mechanism along the horizontal axis.

In the second part, a horizontal hole of a slightly larger diameter is drilled. A pin with an emery stone will move in this hole, so it is necessary to completely eliminate the possibility of getting stuck.

Sharpening order:

The main advantages of this method are the ability to set any angle of sharpening and the quick replacement of the abrasive element. Such a homemade machine will help bring any blade to perfect condition.
The disadvantages include relative bulkiness and increased manufacturing complexity. Some parts may require special tools to make.
If you still have any questions about the installation and use of this device, then this video will help you fully understand the essence of the process:
Choice of abrasive element
An important role in sharpening blades is played by a whetstone. Most often, to determine the roughness of the abrasive, a system of digital designation of grains per unit of measurement is used.

Depending on the functional need, the following gradation is distinguished:
- Up to 250 - rudeness is high. It is not used for sharpening knives and other cutting tools.
- Up to 350 - coarse abrasive. It is used to correct physical defects or very dull blades.
- Up to 500 - medium abrasive. Used for fitting instruments. It has little demand and is rarely used.
- Up to 700 - fine abrasive. The most used type of sharpening tool in everyday use. Allows you to sharpen the blade to an acceptable sharpness.
- Up to 1000 - ultra-fine abrasive. Suitable for grinding surfaces and bringing already sharpened tools to perfect sharpness. Not effective for sharpening dull knives.
Thus, if you want to sharpen your cutting tools with maximum efficiency, you need to combine different types of abrasives. For example, especially blunt knives are brought to an acceptable state with coarse stones, then sharpened with a fine abrasive. At the end of the process, grinding with ultra-fine stones is carried out.

Emery also differs in its origin:
- Natural. These include the Japanese water stone, which requires special skills and great patience to work with.
- Diamond. The most resistant to wear and varied in roughness. The most effective and relatively cheap.
- Ceramic. They are considered something in between, between stones of natural and diamond origin.
- Artificial. They differ in their cheapness, but with frequent use they quickly become unusable.