Diagram of swing gates with dimensions. Gates swinging with their own hands. Drawings, manufacturing and installation, installation of automation. The main types of gates for country and country houses
Classic swing gates can have symmetrical or asymmetrical leaves, as well as an additional gate for entry. Regardless of the type of construction, their manufacture is carried out according to the same principle.
Installation of supports
When the soil is heaving in winter, the load on the supporting pillars of the gate can reach up to 10 tons per 1 sq. m. In addition, they also experience a significant dynamic load of several hundred kilograms during their opening and closing. Therefore, to increase the service life of such a structure, a reliable support is required, deepened into the ground to a sufficient depth.How to install gate posts:
1. Pipes or profiles of 2.5 mm with a diameter of 60 mm and above can be used as support structures. The use of a corner is not recommended: it is not able to provide the structure with the necessary rigidity. For crossbeams, the profile can be slightly narrower: up to 30 mm.
Advice. Too massive frame to create too much load on the supporting pillars, so when choosing a thick-walled profile, they are also strengthened accordingly.
support poles
1. For their installation, a pit is being prepared to the depth of soil freezing (at the same time, its depth cannot be less than 1 m). For example, in the Moscow region, it will be equal to 1.4 m. You can dig a pit using an earthen drill or manually. At the same time, its diameter should be at least twice the cross section of the pipe.

Pit for pouring support pillars
2. Before pouring concrete, a sand and gravel cushion 20 cm high is arranged at the bottom of the pit.
3. The pillars are fixed in the pit, leveled with a level and filled with a sand-cement mixture. Installation of the gate is carried out not less than a week after its complete setting.
Advice. To prevent cracking of concrete before pouring, the ground around it should be spilled with water and compacted. To prevent premature drying, the top of the foundation should be covered with a film and periodically moistened with water.
The main stages in the manufacture of gate leaves
2. The metal profile is cut to the specified dimensions.3. Lines are drawn from each edge of the strip with a square at an angle of 45 °, and then a cut is made along them using a grinder. To improve the strength of welds, the cut points are carefully cleaned to bare metal.

Marking profile joints
4. Collar profiles are laid out on a flat surface and tightly joined at the corners. To fix the structure, you can use angle clamps (clamps for fixing). So that the collar does not “lead”, you should check before welding square the correct location of the profiles inside the structure, and then outside. The horizontality of the surface is verified using level.


Checking horizontal and angles
5. With the help of a tape measure the height and width of the collar are also controlled. In case of an error, the correctness of cutting corners and the location of each of the parts is checked.
Advice. If the channel or profile is slightly bent, it can be leveled with a hammer, after heating the metal over a gas burner.

Checking the height and width of the structure
6. After fitting all the knots, the seams in the corners are first tacked, and then welded with a continuous seam. All welding spots are cleaned with a grinder with a petal nozzle. In the future, before painting, small shells (voids) formed at the seams can be treated with automotive putty.
7. Next docked transverse crossbars at an angle of 90 °. So that the gate does not “twist”, except for the transverse ones, at least one diagonal jumper. It is possible to determine the angle of its conjugation with the profile of the collar only empirically: it depends only on the design of the gate.


Crossbars running across the collar and diagonally
8. To hang the gate, one of the sides must be reinforced with a small piece of a metal corner.

Reinforcement of a metal strip for welding loops
Gate hinge welding
The simplest device is a pin on which a cap is put on. To weld the hinges, the collar should be set in the same plane with the pole with a gap not less than 5 mm. 20 or 25 cm retreat from the top and bottom of the collar and a mark is made with a pencil or chalk. Then the lower part of the hinge is welded to the frame (gate leaf), and the lower part to the base.

Tacking loops
Usually the hinges are welded through plates (lugs): small strips of metal are attached to both parts of the hinge, and then these plates are welded to the gate and frame. This method allows you to weld both the loop and the plate on both sides, and then attach it at the top, side and bottom with three seams.

In order to prevent the loops from sintering together during welding, before starting work, all moving parts should be thoroughly lubricated with grease. The welding seam is laid from the bottom up.
Since the supports will always move at the slightest movement of the ground, it is also necessary to leave a small gap of a few millimeters between the leaves.
Frame sheathing
The sheathing of the gate can be any: wooden, made of profiled sheets or metal sheets, etc. It is attached to the gates with self-tapping screws. If you plan to weld sheet iron, you should choose a more even cold-rolled metal.
wood paneling
Below are a few swing gate drawings from which you can choose the most suitable. You can develop your own scheme yourself. The optimal width of the gate for the entrance of both a car and a truck is 3 m, the height is from 2 m and above. To save materials, you can combine the gate with the entrance gate.
Important! When creating your own drawing, you should take into account the gaps of a few millimeters between the leaves and the pillars, as well as between the collar and the ground.
If further automation of swing gates is envisaged, it should be taken into account that it should be installed only after the leaf travel has been perfectly adjusted. If it takes some effort to open them, the causes are identified and eliminated.

Scheme 1

Scheme 2

Scheme 3

Scheme 4

Scheme 5

Scheme 6
If you are planning to make a gate with your own hands, you will need step-by-step instructions that will help you calculate all the nuances of the work and facilitate the process of creating them.
Before buying the necessary materials, decide on the type of gate that is suitable for a particular case, and a convenient way to install it.

Types of structures
There are many types of gates, which can be made of different materials, equipped with special mechanisms. A wide selection allows you to create home-made gates based on the characteristics of the room or territory, your needs and the frequency of operation.


Before making a gate, you should study the main types of structures that are popular.
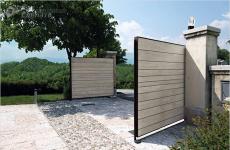
Sliding
Sliding canvases are divided into several categories. Depending on your preferences, you can choose the desired option. For each type of construction, it will be necessary to free up free space along the fence so that the sash can open freely.
There are cantilever sliding structures, suspended and retractable. The structure of such canvases involves moving along rails and other metal profiles.


Hanging options are not popular for operation on private territory, since the height of the check-in is limited by the upper profile, on which the canvas is fixed. The movement of the valves also occurs along this profile.
Some owners of country houses install fan structures, which received such a name due to their appearance.

Retractable canvases, which move along a rail located along the wall, are also not popular in snowy and northern cities.
In order for the sash of sliding structures to move freely along the rail, it will be necessary to constantly remove ice and other debris, which is not always comfortable in winter.

Cantilever leafs are considered the most optimal design of sliding gates. The canvas is rigidly attached to the beam, which moves along the cantilever unit and moves the sashes behind it. Despite the fact that the structure of products is complex, they work perfectly in the winter season, as the sash does not come into contact with the ground.

Tilt and turn
This design is ideal for garage conditions. They are not suitable for installation in the yard, as the gate limits the height of the ride. The canvas should function freely by raising and shifting the sash under the ceiling of the room.

Swing
Such designs with a door are often installed in the private sector on a fence. Swing gates are based on pillars, two of which are located at the width of the canvas, and the third pillar is located next to the gate, if it is next to the structure.


Rolled
These designs have recently appeared on the market. Gates are made of steel strips, which are combined into a flexible sheet. When it is necessary to open the gate, they begin to roll up and wind around the shaft. This solution allows you to drive close to the room.


folding
Folding gates are known to many under the name "accordion". The opening of the canvas can be carried out up and sideways. Gaskets are placed between the metal meshes. Widespread designs, the opening of which is made up.

Manufacturing features
Each type of gate has its own design features. Before proceeding with the manufacturing process, you should study the structure of the canvas and work out an action plan. Swing gates are not among the exceptions in this matter. Do-it-yourself swing-type gates from corrugated board can be done even by a beginner who has not previously worked with metal products.
To make products, you will need skills in working with a drill, welding, a screwdriver, a construction tape measure and a grinder. The design of products is created in such a way that the exploitation of free space should be accompanied by maximum functionality. For the reliability of the gate, roller blocks are responsible, which are located in the lower part of the profile beam and move by opening or closing the leaves.


There are several features of this type of gate that distinguish them from other designs:
- when assembling the leaf, push-button corner connectors are used, thanks to which it is possible to eliminate the sagging of the leaves during use;
- fasteners of the material are hidden, thereby preserving the decorative properties of the gate. Also, this solution does not allow foreign objects to enter the space between the profile;
- the sashes are fastened using three-section hinges. Details allow you to extend the life of the structure.


When studying the drawings of a standard sheet made of a profiled sheet, you will notice that a frame made of a square metal profile is used as the basis for the design. Alternatively, a thick-walled pipe with a diameter of 30 mm is used.
To strengthen the sash, a metal vein is used. It must be horizontal. This reinforcement allows you to keep the geometry of the web.

You can fix the sashes with the help of electric welding or self-tapping screws for metal. Since the profiled sheet is light, two strong loops with a diameter of 20 mm will be enough for it. Pipes made of metal with a diameter of 60-100 mm can act as a bearing support.
The gate sashes are fastened on the basis of the fence, which is present on the site. If you are planning to install a brick fence, consider in advance installation of embedded seams between bricks. Hanging supports will be welded to them.

The optimal width of the entrance gate in a private area is 3 m. These dimensions are enough for a truck or car to enter the yard. The height of the gate must not exceed 2 meters.
As a locking mechanism, you can use pins in the shape of the letter "G". They should be located at the bottom of the sashes. Special clamps are dug into the ground, which are metal tubes whose diameter exceeds the thickness of the locking mechanism.
In order for the new gate to harmoniously fit into the overall interior of the site, you can use corrugated board to finish the frame part. As a rule, the material is attached to the web frame.
Keep a distance from the ground, which should be 50-70 mm.

Material selection
The type of material from which the gate will be made is influenced by the dimensions of the structure, its weight and other factors. Usually, frames for sashes are made from a profile pipe with a cross section of 60x40 mm. Choose a metal whose thickness is 1.5-2 mm.
The size of the section is also dependent on the mass of the gate, but experts recommend making a choice based on the following indicators:
- if the total weight of the gate leaves does not exceed 150 kg, you can use a pipe with a cross section of 80x80 mm. The thickness of the metal should be 4 mm;
- with a weight of metal gates from 150-300 kg, it is necessary to use a pipe with a section of 100x100 mm and a thickness of 5 mm;
- if the weight of the structure exceeds 300 kg, iron pipes with a cross section of 140x140 mm with a material thickness of 5 mm are suitable for you.


To create racks, you can use brick, wood or concrete. When choosing a material, you should study the properties and its resistance in relation to the expected loads.
Loops can have adjustable or non-adjustable mechanisms. Make sure that the material of manufacture is of high quality, as the loops must support the weight of the web.
The lock may have a mechanical structure or function on the basis of electromechanics. The choice should be based on your preferences. You will also need paint for painting racks and sheathing from metal profiles.
Sheathing can be made from any material. Many people make profile sheathing, some owners of country houses choose combined options from wood and metal or PVC. For this purpose, any option that you like is suitable.


If you are planning to create an automatic gate, make the frame more durable. Automation can be installed immediately or later.
Dimensions
The best option is to build a gate at the same time as a fence. However, many people are faced with a situation where they need to expand the passage or replace an old product. In this case, you will need to make an accurate calculation of the future gate.
Taking measurements and calculating the required amount of material, take into account the coverage of access roads. If your area is equipped with an asphalt, concrete or tile surface, you can leave a gap of 5 cm. If there is grass on the road, increase the gap to 10 cm for comfortable opening of the gate.


Do not forget to leave a gap between the leaves so that in the future it will be possible to level the displacement of the supports.
Tools and accessories
Gates can have a variety of structures. Many people equip canvases with built-in gates for convenience. Before creating the gate, you will need to carefully consider how the finished canvas will look like, draw a diagram or design sketch. This decision will help you decide on the tools and materials that will be required to create the canvas.

The standard list of components for creating gates consists of the following items:
- sheathing for sashes, support pipes;
- reinforcement for creating stiffeners;
- a pipe from a profile or a square made of metal under the frame of the structure;
- soil, material for painting;
- latch, latches or shutter mechanisms;
- hinges for sashes, guide and closers if necessary.

You will also need the following tools:
- construction cord made of nylon;
- apparatus for welding;
- hammer;
- screwdriver or drill;
- electric grinder;
- special scissors for metal.


When planning a new gate, you will need to pay special attention to the dimensions of the structure, the presence of a gate. Due to the large sashes, the mass of the entire structure increases, so the frame should be made of reinforced material.
How to do it yourself?
Gates are made in stages. The process is divided into two steps:
- installation of racks for hanging canvas;
- building swing gates.

You can replace the stages, but the posts for the gate structure must stand for at least seven days, after which you can hang a frame on them. In order not to waste time in vain, you can start welding.
Installation of supports
Supports can be made from:
- profile pipe;
- concrete pillars. You can buy a finished product or fill it yourself;
- brick or natural stone.
- wooden beam.


Mounting supports can be carried out using the following methods:
- driving. The depth of driving should be about 1.5 meters. This method is considered the fastest and most economical. When choosing this method, you should carefully monitor the level so that the gate does not warp;
- reinforced concreting. You will need to strengthen the pillar with concrete.


Step-by-step instructions for installing supports:
- if you decide to do concreting, you will need to drill a pit with a minimum depth of 1 meter. Drilling must be done with a drill with a diameter of more than 200 mm.
- the depth of the pit will depend on the degree of soil freezing in your area. The width of the sides can be determined using the quality of the soil and the size of the support itself.
- create a cushion for concrete with a height of 150-200 mm. It should consist of sand and gravel. The pillow is used to exclude the deepening of the racks;
- then you need to mount the pole and level it with a building level. After leveling the support, you can start pouring;
- the concreted structure should withstand within a week. This is the minimum time required for concrete to harden. Do not forget to periodically wet the concrete with water to prevent cracks;
- to increase the reliability of the supports, it will be necessary to reinforce and bring out a pair of reinforcing mortgages under the hinges.


Creation of sashes
Before you start building a structure, you should decide on the location and appearance of the gate. The place where the products are installed can affect the appearance of all elements.
If you plan to install a gate in your backyard, at the entrance to a garden area, or create a fence for a future building site, you will need to choose simple materials. For the front gate, you should choose more expensive and presentable products..

Universal guide for making gates with your own hands:
- prepare a drawing of the future design. Using the scheme, you can make an accurate calculation of the necessary materials;
- the frame for the gate must match the dimensions of the finish. By observing this condition, you can simplify the entire process of work and will not encounter connecting seams on the front of the canvas;
- when making calculations, indicators of the working width of finishing materials should be used;
- to create components for the frame, you will need to cut the pipe to the desired length and grind it;
- sanding is required to remove rust from products. If oil is present on the metal, it can be removed with solvents.


Welding
When interacting with welding, do not forget about safety precautions. If you do not have enough experience, contact the experts. Using this method, you can improve the quality of work and get an attractive design.
Joints should be made in such a way that water does not flow into the pipe.. If the joints are not welded correctly, snow or water will get into the pipe, which in warm weather will begin to increase in volume. This will lead to the expansion of the walls of the product and the deformation of the entire structure.

If you cook the outer and inner frame, you will need to follow a checkerboard pattern. In this way, weld seam breaks due to thermal expansion can be avoided.
Stiffeners affect the resistance to wind loads. If you sew up the fence with a finishing material, weld the pipe in the middle part of the outer seam. In this way, you will mark the place of attachment of the sheathing material.
Welding loops should be made to the poles and to the frame. If you used bricks for the manufacture of pillars, and the reinforcement was not removed, you will need to fix the channel on the brick, and then proceed to welding the loops.

Primer
No matter what material you use to create the frame, it will require priming. The primer extends the life of the paint and makes the application process more comfortable. Welding points should be primed more carefully.

Frame coloring
Before painting, remove all dust from the frame. To paint the part, you can use any type of paint. Most people use a spray gun, as it guarantees a more even application of the layer. Using a brush delays the process, but reduces paint consumption..

With the help of this step-by-step guide, you can make your own gate and simplify the process as much as possible.
How to install the gate with your own hands, see the following video.
Beautiful examples and options
A beautifully designed gate will draw attention to the site and demonstrate the good taste of its owner. Openwork fabrics are popular. Decorative sashes look expensive and sophisticated. The inner side of the structure can be sheathed with polycarbonate sheets. Externally, such gates look like a real work of art.
Products can be installed in the country or in the suburban area. With patterned elements, you can show the individuality of your territory.

Stained-glass inserts at the entrance gate give the whole territory a spectacular and unusual look. Designs demonstrate their brightness and originality, attracting the attention of others. You can choose any design according to your imagination. The style of the idea should be combined with the rest of the design components.

If you want to give the site a more austere look, pay attention to the blind metal gates with forging elements. They will harmoniously combine metal with decorative ornaments. The chosen design will show the good taste of its owner and hide the territory from prying eyes.

On a site that borders on landings, you can install gates made of natural materials. Stone can be used for support. Such canvases look beautiful against the backdrop of nature. Natural ingredients will last a long time if you treat the surface with protective agents..
The strength of the gate is guaranteed by stone pillars. This design is convenient, since when replacing the main leaf, it will not be necessary to dismantle the entire gate.

Compact white doors always attract attention. The white color scheme gives products lightness and weightlessness. Although the gates have a catchy color, they will be organically combined with the general style of the territory.
The design will attract the eyes of passers-by, as there is an opinion that only wealthy people can afford such gates.

Retractable products with an original design will look good in the country. They are able to save space on the site and will delight you with their modern style.

Many people equip the gate with wooden gates, which can be used not only as an entrance to the territory, but also for zoning the space.
The view of beautiful decorative gates against the background of a corresponding fence always impresses passers-by, and if they are also made by the hands of the owner, they are doubly impressive. To say that it is easy to create an entrance group of the site on your own means to deceive the reader. But the fact that this is unrealistic, too, can not be argued. Making the right gate with your own hands is difficult, but doable.
Swing design preference
Novice craftsmen, of course, do not dare to immediately make complex structures with intricate mechanisms at home, and you can make and install well-known and beloved designs of swing gates on your own.
But, before you start creating in the garden from improvised material or from boards, it is still better to make or order a drawing of the gate, calculate the amount of material needed, provide the workplace with equipment and tools, and only after that you can make the gate with your own hands to the garden fence , or, to the front entrance of a private estate.
Preference is often given to such an option as swing structures for several reasons:
- they are easy to manufacture;
- in comparison with other entry groups, it requires less material and labor costs for manufacturing;
- a well-made product will last a long time to its owner;
- a huge selection of material for cladding;
- the possibility of installing automation;
- a lot of decoration options;
- simple operation.
The listed advantages are accompanied by only one, but a significant drawback - you need the necessary distance to open the gate leaves into or out of the yard. And garden plots do not always have enough space. But if there is no such problem, then you can safely proceed to manufacture.
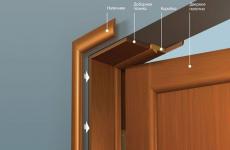
Gate elements

This is the oldest structure that has been modified for centuries, but nothing has fundamentally changed, all the constituent elements have remained the same:
- Support posts are an important part of the gate, which holds the entire weight of the leaves and the wind load. Therefore, their installation must be taken with the utmost seriousness. The material is often metal. And even if the supports are made of brick, then their core will in any case be metal, since the hinges for the sashes need to be attached to the metal.
- Gate leaves consist of a frame, the material of which can be both metal and wood. Although the same metal is more popular, as it is stronger, more reliable and more durable.
- We have already mentioned the finish, that is, the sheathing of the sashes, but this is also an integral attribute of the design, and you should not forget about the weight of the material. The heavier the sheathing, the more reliable the frame needs to be made, taking into account the wind load of the region.
- Loops for the design also play an important role, so when choosing them, it is advisable not to think about saving, it is better to do it on something else.
- The owner selects locks, latches, latches and other accessories at his own discretion, but also taking into account the total weight of the structure.
We figured out the general view of the product, so you can start thinking about how to make a gate according to the drawing and calculate the material.
Often, the place of installation of the product directly affects the material and appearance of the product. If, for example, you need to install an exit gate in an almost imperceptible backyard or garden area, or simply fence off a construction site with a temporary fence and entrance gate, then the design requirements will be simplified.
For front decorative entrances, the requirements are more stringent, and, accordingly, the costs of the entire event can double.

The choice of material is directly related to the size of the entrance group, the weight of the structure and many other factors, including natural ones.
But according to experts, for the frame of the valves, a profile pipe with a cross section of 60 * 40 mm is more often used, where the metal thickness is 1.5 - 2 mm. A pipe with a cross section of 40 * 20 mm may also be suitable, it all depends on the weight of the skin.
The cross section of the pipe for supporting pillars also depends on the weight of the structure, but it is better to be guided by the knowledge of specialists who say:
- for a total leaf weight not exceeding 150 kg, a pipe with a cross section of 80 * 80 mm and a metal thickness of 4 mm can be used;
- above 150 kg and up to 300 kg - it is advisable to use a pipe 100 * 100 mm with a thickness of 5 mm;
- above 300kg, apply 140*140mm pipe, with 5mm thickness.
Regarding the hinges, you can choose any mechanisms - adjustable or non-adjustable, but the material from which they are made must be of high quality so that the mechanisms can withstand the weight of the gate leaves made independently.
Installation of support poles

Maybe someone thinks that home-made entry products in the garden or on the site will never turn out neat and beautiful. But, as practice has shown, if you approach manufacturing with all responsibility and even pedantry, then you can surpass the products that are offered on the construction market with your own efforts.
Do-it-yourself gates, whether they are the simplest summer cottages, made from improvised material, but correctly calculated and made strictly according to the drawing, will be unusual and unique.
So, we build, observing the dimensions, distances and constantly measuring the correctness of all angles, verticals and horizontals.
First of all, it is necessary to install the supporting elements on which the sashes will be hung. Embedded elements must be provided in brick pillars. One part of the loops is welded to them.
If the garden gate supports are supposed to be made of metal, then they should definitely be strengthened. To do this, holes are drilled to a depth of 80 - 120 cm, the bottom of the hole is covered with sand or gravel, poles are installed at the level, fixed with wooden or metal spacers, filled with cement mortar and tamped.
Calculation and welding of frames

While the solution hardens, you can start making frames. There is no need for welding here. Strictly sized pipes cut off by welding are interconnected. It is important to carry out the welding process on a special table or on a flat surface so that it does not skew.
Welding should take place in stages. First, all the parts are stuck in several places, then, the correctness of welding along the diagonal and in the corners is checked, if everything is extremely accurate, then you can start finishing welding.
If rusty pipes are used for the manufacture of garden gates, then it is advisable to clean them of rust before welding. Then the seams will turn out to be more even and of high quality.
After welding, carefully clean all seams, cover the frames with a primer, wait until it dries completely and paint.
For a standard frame, you will need the following material:
- the perimeter of frames and lintels can be made from a pipe 60 * 40 mm. In total, you will need to purchase 22 m;
- the inner frame for reinforcing the frames is made of a 40 * 20 mm pipe, it will take 15 m for it. The lining will be attached to this inner frame.
Since pipes are sold in linear meters, the best option would be to order the required dimensions that correspond to the dimensions of the scheme. This approach has a double benefit - it will not be necessary to measure and cut off the desired length at home, and delivery will also be simplified.
Product dimensions

Ideally, the gate should be built along with the fence. But there are cases when it becomes necessary to expand the passage, or old products are out of order, then it is necessary to make the calculation extremely accurately before manufacturing new structures.
And it is desirable that the stylistic decision fully appeals to the fence. If, for example, a fence is made of bricks, then bricks will definitely have to be used for the gate posts of such a fence. If the fence of the garden plot is low and made of boards, then the option of decorative high forged gates is unlikely to harmonize with such a fence.
When taking measurements and calculating the material, the coverage of access roads should be taken into account. If there is asphalt, concrete or tile at the entrance, then it is enough to leave a gap of 5 cm. And when the garden path is overgrown with grass, then in this case it is better to leave a gap of 10 cm for the doors to open freely.
It is also desirable to provide a gap between the leaves in order to level out the slight displacement of the pillars from time to time.
Sash installation

This process begins with the fastening of the hinges, which are welded to the main frame of the sash and to the supporting posts. If the pillar is made of brick, but the mortgage element was not provided, then a channel is attached to the brick with a dowel, and loops are welded to it. Well, if everything is provided for in a brick pillar, then there should be no problems with fastening the hinges.
By the way, these small but important elements also have their own installation instructions that come with the kit. Therefore, it is better to carefully study the instructions before welding.
When all welding work is completed, a control cleaning of the seams and painting should be done. Only after the paint has dried can the doors be mounted on hinges.
Further, the installation of all the remaining fittings is carried out - locks, latches, latches, automation. These elements of the entrance group, no doubt, must be mounted strictly according to the diagrams attached in the kits. And if the valve can still be attached without instructions, then it will not work to install automation without a diagram, and it is difficult to attach the lock without carefully studying the diagram or instructions.
Finishing
In most cases, the construction of infrastructure facilities in a summer cottage does not require qualified intervention by builders. Since the construction of a fence and the organization of a check-in are top priorities in the arrangement of any home, it is best to understand what types of entrance structures exist and which materials are most rational to use when installing them, as well as how to make a gate in the country.
For the successful manufacture of any type of gate structure with your own hands, three main components are needed - facing material, tools and a margin of time. Each garden plot and internal area is characterized by the use of a certain type of gate, since each of them has its own opening and installation technology, drawings, recommended finishes, and consumables. To determine the optimal one, it is necessary to identify the properties, advantages and disadvantages of the most used types of gates.

The principle of operation of swing gates is due to their structure, which includes two wings that swing open in opposite directions from each other. The construction of such gates will help save a lot of time when organizing entry and exit.
The main advantages are:
- ease of installation;
- reliability;
- durability.

Flaws:
- the presence of a cleared space for opening the gate leaves, which must be maintained in good condition in the winter;
- in the option of using the gate in automatic mode, you will need to purchase two sets of motors for each of the wings, which will significantly affect the total cost.

Possessing an indisputable advantage over the previous type, sliding gates are a structure consisting of one leaf, shifting parallel to the equipped support pillars, along the fence line, in a certain direction.
This category of gates, in turn, is divided into three subgroups, which are suspended, cantilever and rail, therefore, when purchasing one or another set of such gates, it is necessary to understand the specifics of construction and the features of further operation. So, the suspended view provides for the manufacture of a special hinged safety beam, which is the basis for fastening and subsequent movement of the wings.

The cantilever view implies the installation of cantilever mechanisms and a channel beam, as well as the presence of several additional meters for optimal rollback of the gate, and the rail version is inherent in the placement of the guide rail at the bottom of the structure.

The advantages of these gates are:
- compactness and no need to prepare a cleared space for opening the sashes;
- the possibility of using automation;
- practicality;
- moderate pricing policy;
- organization of a wide passage, as well as the convenience of remote control of the gate).
Flaws:
- constant control over the cleanliness and presence of lubrication of roller mechanisms;
- carrying out a number of preparatory procedures (calculation of the distance for the rollback of the valves and the presence of a perfectly even fence);
- basic construction skills and knowledge of installation features.
Any owner of suburban housing will be able to cope with the construction of such a structure, following the step-by-step instructions of the masters, however, due to the high cost of component materials and fixtures, as well as the high chance of making mistakes in calculations or assembling the structure, it is more expedient to seek help from specialists. In this case, you can count on a free visit of the master and warranty service during the agreed period.

Being a kind of retractable structures, sliding gates are two leaves, moving apart in two opposite directions. According to the technology of movement, sliding gates are also divided into constituent groups, as well as the type of gate described above. The defining advantage of such an opening mechanism is the reduction in the total weight of the gate by distributing the load on two frames, but this plus is achieved by using two sets of motors, which greatly increases the final cost.

Among the huge variety of materials presented in the assortment of building stores, which are most widely used in the arrangement of entrance gates, metal and wood should be distinguished. In this matter, the choice of one or another raw material mainly depends on the financial capabilities of the owner.

Of course, the preference in this category of materials is given to the profiled sheet, since it has a number of important distinctive advantages, however, like every raw material, it has some disadvantages.
The advantages of such material are:
- strength due to the rigidity of the fundamental principle;
- moderate cost;
- ease of installation;
- resistance to the harmful effects of the external environment;
- wide choice of colors;
- duration of operation.
Flaws:
- with slight damage to the protective shell of the sheet, corrosion may occur;
- noise from atmospheric precipitation.

In the presented category of materials, one can single out such a representative as a chain-link mesh. Gates of such a plan have a high light transmission capacity, they have a small windage and are light in weight. In addition, the fastening of the mesh is carried out in a short time and without exhausting efforts.

Currently, wood-based gates are a rare occurrence. This circumstance is due to the endless desire for safety and durability, which are easily achieved using metal products. The implementation of the frame for the doors and the cladding of wood, over time, leads to sagging of the gate and deformation of the entire structure due to its bulkiness and high specific gravity. Of course, the use of wood as the basis for gates, the construction of summer cottages and site decorations highlights the natural component of the appearance and allows you to feel the unity with nature, but it requires special processing of each element and subsequent regular seasonal repairs.
Among the advantages of such raw materials should be highlighted:
- low cost;
- the availability of the material;
- the minimum number of tools and consumables, which significantly saves the budget;
- pleasant aesthetics;
- fast installation;
- ease of processing.

However, the pleasant positive characteristics are largely offset by the negative properties of such a material. The main ones are:
- short period of operation;
- low strength;
- exposure to negative environmental factors;
- fear of sudden changes in temperature and high moisture content;
- tendency to ignite.
If, nevertheless, you are determined to use wood for facing the “calling card” of your backyard allotment, then it is most expedient to perform this process on a metal frame from a profile pipe or any other metal support ceilings.

The main purpose of the support base is to securely fix all the constituent elements of the gate. As a rule, the foundation is represented by a reinforced rectangular concrete block placed along the perimeter of the proposed installation of the structure under construction. In our case, concrete pouring is carried out away from the travel line, in the inner house adjoining territory. When manufacturing swing gates, the foundation should be located in the direction of opening the leaves to reduce the load on the hinges in the open state.
Particularly acute is the issue of high-quality pouring of a concrete base in the manufacture of metal gates, since it provides a uniform distribution of pressure of metal products on the soil, protecting the entire structure from shrinkage and distortion.

When starting to work on the arrangement of this element, it should be clearly understood that what quality the foundation will be, such will be the functioning of the gate. When erecting massive objects, it is most rational to prepare deep foundations, for small structures - lightweight supports.
A useful measure preceding the procedure for pouring a reliable foundation is sampling and soil analysis along the perimeter of the future installation sites. Knowing all the features of the soil will subsequently ensure the stability of the gate and determine the optimal type of foundation.
Based on the above recommendations, each owner of a suburban area will be able to easily choose the most suitable gate manufacturing option for him and implement it in the shortest possible time. Any self-made work allows not only to significantly reduce the cost of building a particular object, but also to clearly represent the structure of each connecting component, which subsequently greatly simplifies the possible maintenance and repair processes.
Video
You can learn about the manufacture of different types of gates by watching the videos we offer:
Schemes and drawings
The mechanism of operation of swing gates is quite simple, but automated sliding gates are more difficult to manufacture. We hope the drawings and diagrams we have proposed will help you understand this issue:


In modern conditions, the gate is not only a security element that partially reduces the likelihood of theft or damage to the car, as well as strangers entering the site or garage, but also part of the overall interior of the garage, house or site. In this article, we will talk about the different types of gates, the features of their installation and operation, the advantages and disadvantages, and also talk about how to install them yourself.
What are gates
Although most types of gates are universal, that is, they can be used for a house, garage or fence, there are gates that are only suitable for one thing. Therefore, we will list the main types of gates, as well as indicate what they are best suited for.
- Swing.
- Rollback.
- Folding.
- Retractable.
- Sectional.
- swing gate

This is the most common and versatile type of gate, which has not changed its design for thousands of years and consists of two vertical supports, several canopies (loops) and two wings. Depending on the material of the valves, they can be conditionally divided into:
- solid;
- with gaps;
- wooden;
- metal:
- from sheet metal;
- forged.

The main advantages of swing gates are ease of installation and maintenance, the main disadvantage is sensitivity to the amount of snow cover and dependence on the free space in front of them. If the snow has risen above the lower edge of the gate or there is any obstacle in front of them (a car, a pile of garbage, a FS block), then it will be problematic to open them, other types of gates are free from this drawback.
- Sliding gate - drawing

The second most popular gate, which can only be installed where there is enough free space on the side, that is, 1.5–2 the width of the gate opening. Because of this, they are installed only in fences and garages located in the basement or lower floor of a residential building. Despite the fact that there are sliding gates made partially of wood, they are not widely used, therefore almost all sliding gates are made of metal. At the same time, gates made of sheet, pipe and rod are in the same demand. The main advantage of these gates is that they do not require free space in front of them, but they require maintenance much more often than swing gates due to the heavier operation of the rollers and carriages that ensure the movement of the gate.
- Folding gate

This type of gate is widely used in various enterprises, because it is devoid of the main disadvantages of other types of gates and is located in a protected area. Due to the fact that the lower guide is closed by the gate, even during heavy snowfall it is not clogged with snow, so there are no problems with opening the gate. Therefore, these gates have only two drawbacks - the high cost of the installation kit and installation, as well as a weak security effect, because they perform only a decorative and logistical function. However, if executed correctly, these gates will look very nice on the garage under the house. However, these gates were not widely used in residential buildings.
- retractable gate

Retractable or up-and-over gates are in great demand in garages located inside protected areas. The gates do not depend on the level of snow and are relatively inexpensive, but they take up a lot of space under the ceiling, where they are removed when the garage is opened. Due to the fact that the gate is made in the form of one huge sash that completely closes the doorway, their opening looks very beautiful - the gate rises, unfolds and goes somewhere inside the garage. In addition, such gates require regular professional maintenance, so they are installed only by those who can carry out all maintenance and repair work on their own or have sufficient finances to conclude a service contract with a serious company.
- Sectional doors

Sectional, they are rolling gates are the best choice for a garage located inside a protected area. They do not depend on the amount of snow cover, do not require a large space under the ceiling (with the exception of large-section gates), and are easy to maintain. Thanks to the use of modern materials, they provide good insulation of the garage without any additional measures, because the insulation is located inside a metal (less often plastic) frame, from which the sections are made. Such gates are in great demand, but it is difficult to install them on your own due to the complex design, high requirements for accuracy and tuning.
What kind of gate can you make yourself
If you are an experienced builder, have access to the necessary equipment, components and assistants with the necessary skills, you can make any of the gates described above on your own. If you are an ordinary person whose talents and abilities lie in other areas and have minimal construction, plumbing and welding skills, then you can only create swing and sliding gates. We recommend making swing gates - despite serious shortcomings, they are easy to install, look beautiful, and finding materials for them is not difficult. Below we will describe the main stages of creating and installing swing and sliding gates, this will help you better understand the process, evaluate your strengths and create beautiful and functional gates on your own.

How to create and install swing gates
To create a gate with dimensions of 2.2x2.2 meters, you will need:
- steel profile (square) with a section of 30 mm 20–30 meters;
- steel profile (square) with a section of 100x100 mm or a steel pipe with a diameter of 100–120 mm 6–7 meters (two segments of 3–3.5 meters each);
- garage hinges 4-6 pieces;
- door hinges 2 pieces;
- door lock;
- corrugated board 6-7 square meters;
- steel reinforcement with a diameter of 10–14 mm 3–6 meters;
- manual or mechanized drill with a diameter of 300–400 mm;
- manual tamping (you can use a log of suitable length and thickness), to which handles are attached for ease of use;
- Bulgarian;
- welding machine;
- drill with a set of various drills;
- self-tapping screws;
- screwdriver;
- roulette;
- sharp core;
- square;
- plumb and level;
- sand, crushed stone, cement and water;
- shovels;
- several helpers.
Creation of sashes
When creating sashes, you must determine in advance how they will be attached to the supports, their width depends on this. If from the inside, then the width will be equal to the width of the passage, if from the front (outside), then it is equal to the width of the opening + double the width or diameter of the supports. It is also necessary to determine in advance whether you will cut a gate into one of the wings, because the location of the frame elements depends on this. After that, it is necessary to determine the number of vertical posts of the frame - in regions with weak winds on gates of this width, it is optimal to put 3 vertical posts on each leaf. If the winds blow strongly and often, then it is necessary to put 4 racks.
Mark the vertical and horizontal elements along the length and cut with a grinder, then weld from their frame. Be sure to use a square when marking, and also check the shape of the wings with it during welding, this will avoid skewing the gate and altering it. When the sashes are done, hang them on the supports. Keep in mind that the strength of the gate will depend on the quality of the welds with which you connect the hinges to the supports and sashes. Some craftsmen who have to install gates in mountainous areas first mount the supports, and then make doors under them and hang them. This approach allows you to adjust the gap between the gate leaves.
If you decide to make a gate with a gate, then consider the size and shape of the canopies, because the gate should open and close freely, but there should not be large gaps between it and the sash frame. You can hang the gate and embed the lock both before and after hanging the gate.
Installation of supports

Use a drill to drill a hole for the supports. If there is no drill, you can dig it out with a shovel, but the diameter of the hole will turn out to be several times larger, which means that you will either have to butt the support with stones or pour much more concrete. The depth of the holes for the supports should be 30 cm more than their depth. This is necessary to create a sand and gravel cushion that will protect the gate from groundwater. This pillow must be carefully compacted with a rammer or log.
If it rains abundantly in your region in autumn, and in winter the temperature drops below 15 degrees below zero, then the depth of the hole for the supports should be greater than the depth of soil freezing.
In addition, the hole must be made with a diameter of at least 40 cm and insulated at the level of the freezing depth with foam. You can also install (if space permits) screw piles, which will play the role of supports. When installing the supports, pay special attention to the distance between them and their verticality, for this, use a tape measure and a level or plumb line. Check with a level or plumb from 2-3 sides. Having exposed the supports, fix them and fill them with concrete. You can hang the gate after 20-25 days.
Hanging and sheathing
There are two technologies for hanging and sheathing doors at gates of this size - the first implies sheathing first, then hanging, the second, on the contrary, first hanging, then sheathing. The first technology is used when you can attract a sufficient number of assistants and it is not difficult to raise the sashes, the second is used if you work together or even alone. The gate is hinged in the same way as ordinary doors or windows - the sash is raised, the canopy pin on the support and the hinge hole on the sash are combined from above and below, then lowered. This operation can be performed alone, but only on sashes without sheathing. At least 2 people are required to hang the paneled sashes (preferably 3).
Cut the corrugated board to the nearest millimeter, observing right angles, otherwise the whole structure will look clumsy and ridiculous. For fastening, use self-tapping screws for metal, keep in mind that self-tapping screws are not bolts, so tightening too much will only lead to stripping of the thread.
Installation of locks and locks
There is no single standard for locks or locks for swing gates. Some are limited to a chain and a padlock, others install a mortise lock or deadbolt, and others install automation. Therefore, experiment, based on the materials available to you.