Gas column Junkers 275 1. Gas column Junkers: Review of models and prices. External signs of a malfunction in the work of the gas column
 Junkers existed before 1932. From this point on, the company was redeemed by Bosch Gruppe, which, however, did not affect the name of the water heaters produced by the unit.
Outflow gas columns Junkers (Junkers) are available in several modifications, differing in the ignition principle, as well as the type of combustion chamber. The domestic consumer is popular with flowing boilers working using the ignition burner. The average service life of the UNCERS column exceeds 15 years.
Junkers column device
The Junkers brand is considered to be synonymous with quality and reliability. The columns are distinguished by a well-thought-out internal device and design. The domestic consumer is offered by the following type water heaters:- Semi-automatic - The company's speakers began to release back in 1968. During operation, the ignition burner is used. Rosge is carried out using a piezoelectric element. The main burner is included when opening the Crane of the DHW.
- Automatic - work from batteries or hydrogenerator. The series presents simple gas columns Junkers with an open combustion chamber and multifunctional modulated power models. The performance of the burner device varies depending on the water pressure.

In the internal device of gas flowing columns, the Junkers uses exceptionally high-quality materials. All water heaters undergo mandatory testing and are subject to certification.
More information on the technical characteristics of the Sumpets of the Junkers can be found from the following table:
Specifications | Model column junkers |
|||||
Power and water flow |
||||||
Max. Nominal thermal power PN (kW) | ||||||
Min. Nominal thermal power PMIN (kW) | ||||||
Heavy Power (adjustment range) (kW) | ||||||
Permissible pressure of the supplied gas |
||||||
Natural gas H G20 (MBAR) | ||||||
Liquefied gas (butane / propane) G30 / G31 (MBAR) | ||||||
Gas consumption |
||||||
Natural gas H G20 (m³ / h) | ||||||
Liquefied gas (butane / propane) G30 / G31 (kg / h) | ||||||
Number of nozzles | ||||||
Hot water |
||||||
Max. Permissible PW (bar) | ||||||
Water volume switch in extreme right position |
||||||
Increase temperature (° C) | ||||||
Duch range (l / min) | ||||||
Min. PWMIN operating pressure (bar) | ||||||
Water volume switch in the extreme left position |
||||||
Increase temperature (° C) | ||||||
Duch range (l / min) | ||||||
Characteristics of flue gases |
||||||
Necessary thrust (mbar) | ||||||
Waters of flue gas flow (g / s) | ||||||
Temperature (° C) | ||||||
In the labeling of the water heater, detailed information regarding the principle of operation and the internal device. Disassembled in abbreviations will help table with decoding designations:
- W - Gas column
- R - power regulator
- 10 - Max. Water consumption (l / min)
- -2 - version 2
- P - piezoelectric ignition
- B - Electronic ignition system on batteries (1.5 V)
- G - Electronic ignition system from the hydrogenerator
- 23 - Room designation on natural gas N
- 31 - Number of designation on liquefied gas
- S .... - country code
Installation of flow boiler Junkers
The instruction manual provides a detailed plan for connecting the water heater. In particular, negotiates the following:
Gas pressure adjustment table |
||||
 | Natural gas H. | Bhutan / Propane |
||
Number Identifier | for reconfiguration at 20 mbar | |||
for reconfiguration at 20 mbar | ||||
for reconfiguration at 20 mbar | ||||
Connection pressure (MBAR) | ||||
Max. Pressure until the nozzle (mbar) | ||||
Min. Pressure until the nozzle (mbar) | ||||
After connecting the flow water heater in the passport there is a mark on commissioning. From this point on, the Junkers column is plans for warranty service.
How to light the gas flowing column junkers
In the overwhelming majority, Junkers's water heating columns offered to domestic buyers work in semi-automatic mode. The ignition of the semi-automatic gas boiler is carried out like this:- on the front panel of the water heater there is a valve that opens the supply of gas;
- the button is clamping and with a piezoelectory ignite wick;
- the gas valve is left pressed by another 20-30 seconds;
- now the button is released, the flame on the burner must continue to burn.
How to clean the junket column with your own hands
Any repair work of the gas-consuming equipment must perform a specialist who has the appropriate access tolerance. Cleaning the ignition burner and heat exchanger refers to the work that is prohibited from themselves. Service is carried out at their own risk.To clean the junkers column at home, you will need to do the following:
- turn off the supply of gas and water;
- remove the casing;
- disconnect the smoke receiver and water assembly;
- pull the heat exchanger.
Repair of gas columns Junkers with their own hands leads to the manufacturer's refusal of the manufacturer's warranty service.
Junkers columns - malfunctions and methods to eliminate them
German water heaters are rare. With regular maintenance, the probability of breakage and is reduced to zero. The main malfunctions of the column is the attenuation of the wick and the main burner, the failure of the membrane, water node. The described breakdowns are associated with low water quality and gas.The description of the breakdown and the methods for eliminating the Junkers gas columns are provided in the table:
Fault | Elimination |
|
| The ignition burner is blocked. | Clear. * |
| Gas is fed in insufficient quantity. |
|
The water temperature is too low. | Check the position of the power regulator and set at a higher power. |
|
The burner is turned off during the operation of the device. |
|
|
Reduced duct water. |
|
|
* can only make a service and repair master |
||
So it's time to write an article not about computers and 1, but about the repair of the Gas Column Bosch / Junkers WR13.
Who would have thought that the IT was getting there. As it is established that such things in the department of gas companies and without special knowledge they are better not to disassemble. In fact, there is nothing terrible there and with more or less straight hands, it is possible to do it yourself. Especially in the country the crisis and I want to save.
It all started with the fact that the column stopped to go out when the hot water is turned off, it was necessary to run and turn off the gas manually.
The google suggested that two main blocks correspond for this: hydroarmatura (water assembly) and gas fittings. They are connected together in such a way that when water is supplied, water assembly with the help of a membrane, pressing the pin, presses the gas valve, thereby opening the gas supply. When the water is turned off the gas valve closes. In general, the problem is somewhere here! (in the picture number 14)
So, proceed ...
Here he is our patient: 
All that we need is 2 screwdrivers (cross and flat) and the key to unscrew the fastening nut of the pipe with water.
For safety, shifting the flow of water and gas to the apartment.
Remove the protective casing, unscrewing two screws from below: 
We get access to the internships: 
We take out the bracket fixing the water supply pipe into the heat exchanger: 
We take out the nozzle itself: 
Remove the two screws of the water node mounting to gas valves: 
And then I opened a picture with oxides in the place of attachment. The mechanism was broadcast, and water was seeded there. The metal oxidized and knew the gas valve (stopped returning to its original position). That is the reason for the inapproving of gas supply!
We will try to clear the maximum clean and develop the valve itself: 
It must be pronounced inside and return to its original position.
Now we will analyze the water block itself: 
We take out the bracket and take the flow regulator (Spring sleeve): 
We unscrew the bolts and remove the lid of the water node: 

Under it we see the worn membrane: 
Yes, and the lid itself collapsed (column at the moment is 7 years old): 
As it turned out, spare parts for the gas speakers are not so easy to find. And the prices for them, honestly by horse. At the price of a new column Bosch Junkers GWH 13 P (WR13-2 P2) - 10,000 rubles. I found the cheapest in the city of Membrane (code 8700503083) for 1400 rubles. and water reinforcement cover WR10, 11, 13, 15 (code 8705500105) for 2400 rubles. TOTAL 3600 rub. More than a third column. So, before starting repairing, think about it, and it is necessary, but it was already too late ... The column is dismantled and I did not want to install a new one, so I decided to continue the started! (although I almost walked and did not go for the new Chinese for the same money)
The picture is old and new details. The difference is visible immediately: 
Now we install a new membrane and a water reinforcement cover, collecting everything in the reverse order:


Hooray. I did everything. Now the flame lights up and goes out as it should be!
What do I want to say in the end?! When I pushed the column 7 years ago, it was pressed by junkers as the most reliable and maintainable. I find it difficult to say, 7 years are a lot or a little for reliability, although the old Soviet people still have people and at least that! But at such price parts, this maintainability is not needed. Now I would choose the cheapest Neva or the Chinese oasis for 4-5 thousand rubles and, when breakdown, I simply threw me without soaring and would put a new one for the repairs of this Junkers / Bosh. One hope that this prevention will allow you to work column for even at least as much ...
Well, finally, for those who do not understand the pictures, let's give a link to the video on the disassembling of gas burners Bosch / Junkers from the SPb heat engineering company: http://www.youtube.com/watch?v\u003da2ain93fyq8.
Why is one article right about the columns of two different brands Junkers and Bosch? In essence, the Junkers WR-11 and Bosch WR-10 column is the same column. They have small differences in the housing and handles. For example, on the columns of the Junkers, you can find a crane that is fixed on the water unit and is sold along with the column. On this difference, in general, end. Inside the case is the same stuffing. Both columns are semi-automatic, well established themselves with their simplicity, maintenance, price for new products. In Russia, they are very popular for a long time. Repair of these gas speakers can be made with their own hands, using my step-by-step instruction disassembly.
How does this column work? In order to light it, you must set the slider on the front panel to the middle position and press it on it. Thus, we forcibly discover the electromagnetic gas valve and supply gas to the spinner (wick) of the gas column. So that gas caught fire, it is necessary to light it with a piezoelectric, which is located in the lower left corner of the gas column. After the spark lit up the gas coming out of the wick (stobnant), it is necessary to continue to keep the slider button by pressing from 10 to 40 seconds. At this time, the thermocouple speaker is heating. Then let go of the slider, the wick at the same time should continue to burn without pressing. If this did not happen, then it is necessary to repeat the entire procedure first. If the spinner does not light up, then, most likely, the column requires repair or maintenance, cleaning of the wick (stobnant). After the thermocouple warmed up, it produces EMF, which independently holds the electromagnetic gas valve column in the open position. The column is ready to work. It only remains to set the gas flow rate you need and water consumption on the water block.

What happens when you open the hot water crane of the mixer? Next, everything is simple. The water unit membrane presses on the rod, which in turn opens the mechanical gas valve, and the gas is fed to the main burner of the Bosch column (Junkers). The gas mixture flammives from the burning wick of the stobble and heats the water that flows through the gas column radiator.
1. Consider the handle from the water unit, set the gas regulator slider to the middle position, we unscrew the two screws from the bottom of the column body (on the Junkers there may be just clips-latches) and remove the housing.


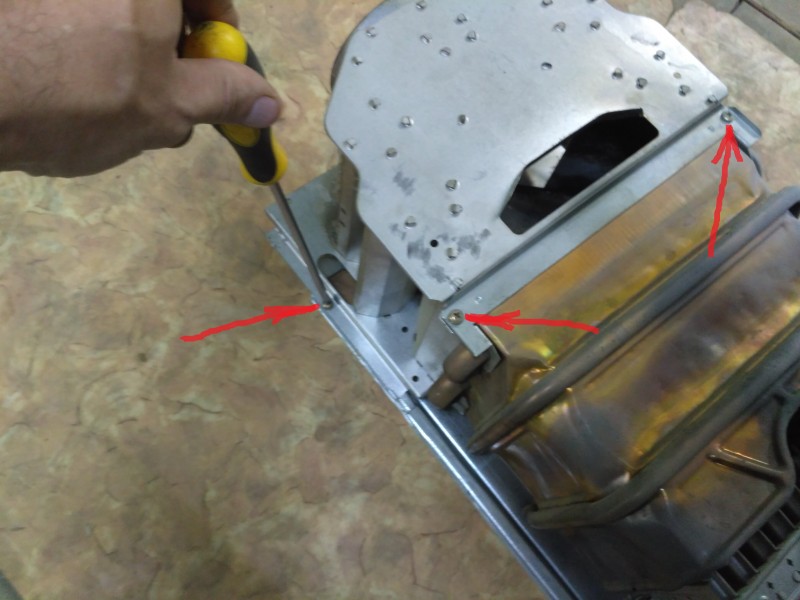
2. We unscrew the two self-pressing, fastening the cap of the gas feeder to the column body and two screws on the bar attached on the cap, which fixes the radiator (heat exchanger) of the gas column.

3. Remove the thrust sensor 1 (it is located on the right side of the smoke pulp), disconnect the wires from it. Remove the temperature sensor 2 from the heat exchanger, disconnecting the automatic wires from it. Here, Junkers and Bosch have little differences. Bosch Wires from the thrust sensor are removed, Junkers are soldered. Do not try to remove them - just break.

4. Next, nothing prevents us from disconnecting the gas feeding cap from the heat exchanger (radiator) and the column body. 
5. To remove the heat exchanger, it is necessary from the left pipe of the heat exchanger to pull the pipe with the thread, after removing the latch. You can not remove the threaded nozzle, and unscrew the hot water hose from it. From the right pipe of the heat exchanger, it is necessary to remove the tube that connects the heat exchanger with the gas column water unit. It is also fastened on the latch, after removing the last it can be removed. Rubber rings are used as seals in both nozzles. They often flow, after disassembling assembly, because Rubber rages and dry. It is necessary to disassemble neatly. When assembling, I advise the gum to change, in any case, the nozzles are lubricating when assembling.


.jpg)
6. Nothing prevents us from removing the heat exchanger. Although ... Bosch on the rear wall of the body, two brackets under the heat exchanger are applied. It is better to beat up. They do not really need and do not affect anything. After that, remove the gas column heat exchanger up.

7. We disconnect the stamp tube from the burner. From above, it is fastened with such a bracket (if they did not throw it up to you) and in the zykler district it is attached to the latch. We use the screwdriver in the latch area and remove at the top of the grooves.


8. Behind the tube is a ceramic ignition electrode. It is also attached to the quick-release latch and is easily removed.


9. In order to remove the burner, we unscrew a pair of screws that fasten the burner to the gas column body, and a pair of screws fixing the burner in the gas column unit. Next, neatly give a screwdriver on the thermocouple down so that it leaves the burner housing. You can step up to extract the burner up from the gas unit.


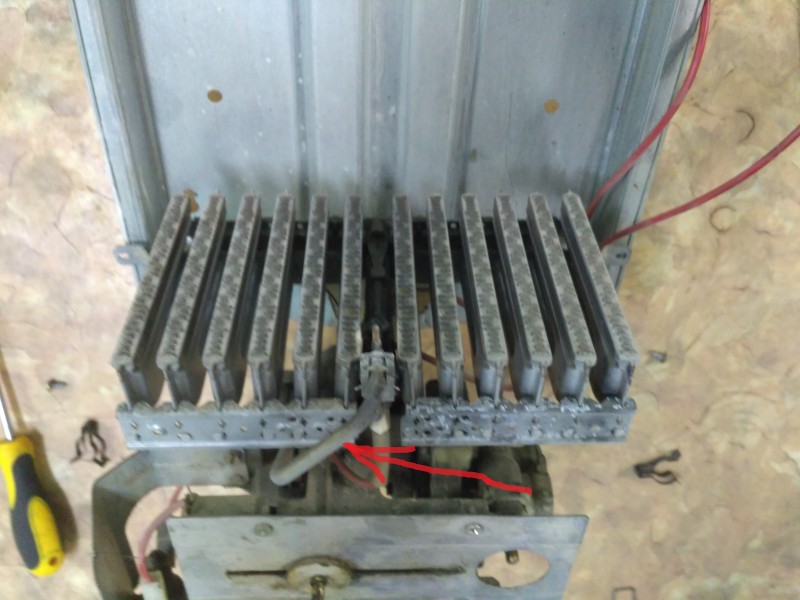
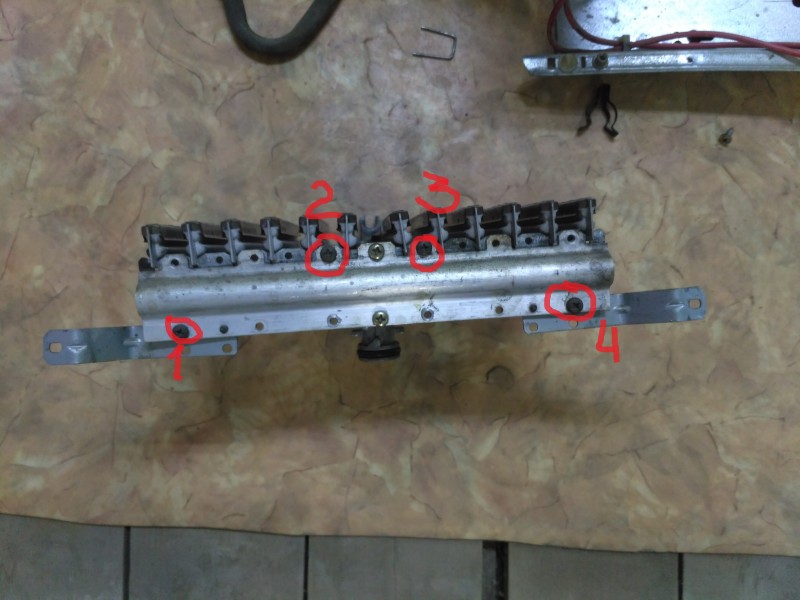
10. To clean the burner, disassemble it into parts. To do this, we need to unscrew 4 screws. Separate two parts of the burner from the gas ramp.


Actually, the disassembly of the column is completed. For maintenance (cleaning), this is quite enough. The gas unit usually does not break if no one climb there. There's nothing to do there. This is a factory. If necessary, you can remove another water unit and disassemble to replace the membrane or the oil cover.
Disassembled elements carefully wipe, rinse from dust, soot and other deposits.
Special attention to the heat exchanger. I wash it both outside and inside the chemistry or citric acid solution. She, by the way, is greatly eaten by scattering and rust from the inside. If water from a well, with increased rigidity, then it is simply necessary to do with each maintenance, for it overgrows from the inside so that the compressor is then not to blow. Screw and soot deteriorate heat transfer, increase gas consumption, can lead a heat exchanger to failure. The burned heat exchangers on these columns are rare, but sooty scored very often. And the Bosch column, and the junkers begin to warm the water well. Usually all these "shoals" are floating at the beginning of winter, when water in the pipes begins to be fed colder than in summer.
In the burner, dust accumulates, which enters the device with air, and combustion products are low on the processes from above. In this column, the burner without disassembly will not twist, so drive all those who offer you to clean the column with a vacuum cleaner are freezers!
Clean the thermocouple from Nagara and soot. The burned thermocouple on these speakers did not meet. Piezorozal electrode isolator is better to wipe from Nagara and dirt with alcohol so that it is neither flashed on the body. Pretty blow the tube of the stamp from dust. Most often, because of this dirt in the tube, the wick becomes weak, smoking, heins the thermocouple and the column can shine and not be lit. Cleaning the tube usually solves the problem, and the wick column lights up. Ideally, the flame of the stamp must be blue and beat the thermocouple horizontally. If the Fitil's Flame is yellow and the big "language" goes up the rear thing clearly need to be cleaned.
Now about the faults of the Junkers columns (Junkers), Bosh (BOSH)
- As wrote above, the column is collected on rubber sealing rings. The old columns are treated, and the seals begin to flow. Well, if the masters have them. Often we meet with different collective farm options from winding to sealants.
- The water block membrane, unlike the Chinese speakers membranes, works for a very long time. Ripped membrane I met once. The price of the original membrane is about 1800 rubles., Chinese analogue stands in the area of \u200b\u200b400 rubles. Who will find how. There is no point in the original, for the price of space.
- Water unit of the gas column assembly stands in the area of \u200b\u200b4500-5000 rubles. The price is high. Repair sets of seals are sold. You can sort out the water unit yourself. Often the block flows the channel regulator. This is treated with a replacement ring.
- Rarely, but it is found to flow the gland of the rod of the water block. Alas, do not replace the gland separately. Changes with a lid of the water block. Price cover with stock 2700 rubles. Very expensive!
- On Junkers (Junkers), the thrust sensor and the overheating sensor are often tormented. Sometimes they suffer so much that I change the entire set of thermocouple and sensors. If you have not entered the plans to change the automation, then the temperature sensor can be painlessly navigate (there is no on many imported gas columns). The thrust sensor shout does not advise the thing clearly necessary and saving not one life. It stops the supply of gas into the column, if the chimney disappeared. It can be shorted for a while not to sit without hot water, and only to quickly find him a replacement.
If you decide to buy such a column, then read the reviews on the useful site "Ozzovik". Everyone described his column and set the estimates. My feedback is old enough. http://otzovik.com/review_1713020.html.
Now I would put the fourth four of this column. I recommend buying. Usually everything is treated without spare parts. From the "minuses" of the column, I will note a large price for spare parts. Fortunately, they break not often.
If anyone is interested, I post here for the Istruction on Bosch and Junkers Gas Speakers
Instructions on the gas column column /upload/file/quickdir/201104111631310. Instructions for the columns THERM 4000 O Type R.PDF
Instructions for the gas column of junkers /upload/file/quickdir/gazovaya_kolonka_bosch_junkers_wr10_13_15p_1.pdf
Briefly I have everything. To climb into the column yourself, or call me, solve you.
I hope the article was more useful to you.
Due to the simplicity of installation, operation and safety, Junkers gas columns are gaining its popularity both in private houses and in conventional high-rise buildings. This device will be very useful in families with young children, because because of the frequent shutdowns of hot water supply, the child may get sick, and constant heating of water on the gas stove is not very convenient.
Column varieties
All German gas columns Junkers are equipped with various types of stobnant. This serves as the basis for distinguishing them from each other. Gas speakers are available in the following versions:
- Junkers in;
- Junkers r;
- Junkers G.
The first type of columns does not have a burning stamp, so the ignition in it occurs with two batteries.
The span column in this case is fully automated and therefore it runs the launch, controls the water pressure level and monitors the pressure in the plumbing to properly adjust the heating mode. It is also equipped with a sensor that will report at the desired time to the owner of the faults in the column, which will help in the shortest possible time to eliminate the malfunction and prevent the breakdown of the entire device.
If you look at the feedback from this version of the column, we can conclude that its service life is more than 10 years, which is a big plus in comparison with the analogues.
Junkers p is equipped with a piezorozhig, that is, the stammer that is installed in the device will be in the adjacent state constantly when the device works. It is not automated, so you have to independently adjust the water pressure in the system.
The form G is equipped with a hydrodynamic generator, which produces a pathele of the burner (there is no scatter in it). Such a device is capable of working at a pressure of 0.35 atm and is equipped with Hydro Power technology. Also this type of the column of Junkers produced in two sizes:
- standard;
- mini.
All components they have the same, the difference lies only in size.
Advantages and disadvantages
The apparatus has both advantages and disadvantages. Advanced benefits the following characteristics:
- flame modulation equipped;
- increased safety;
- adaptation for use in Russia;
- beautiful appearance.
 Thanks to its design, Junkers will perfectly fit into any interior. The device operates at a gas pressure of 13 mbar. Such pressure is present in all gas pipelines in Russian houses. If you compare it with European pressure (20 mbar), it is significantly lower, which creates problems when buying other gas columns. The device effectively functions in a multi-storey house, where the pressure in the plumbing system is very low (running from 0.1 atm.)
Junkers has increased safety and low cost in comparison with its analogues. When changing the water pressure, the device will automatically select the power at which the water heating will be optimal. The device is collected by German designers and has a guarantee of 2 years. With proper installation and operation, the device will be able to serve over 13 years.
Among the disadvantages are allocated The fact that in most modifications of gas columns Junkers has an increased level of noise. During the operation of the device, problems with heat exchanger and leakage in seals appear, which creates the risk to spoil the floor covering under the gas column or at all are flooding neighbors.
Common breakdowns
 Often the device breaks due to its improper operation. It happens that this is due to corrosion, poor water quality and electrical voltage jumps. If a marriage was found after the acquisition, it is eliminated for free in the service center.
Paid repair approximately cost 1500 p. The price depends on the complexity of the breakdown. It is recommended to independently turn the device to the service in order to save on delivery or call a private wizard. The most frequent faults are:
- water leak;
- overheat;
- the emergence of high-profile sounds emanating from the device;
- water does not heat up;
- sensor stopped working.
Basically, these breakdowns occur due to the formation of a large layer of scale. In order to repair the device yourself, you need to determine the cause, purchase original spare parts, follow the recommendations of specialists and explore the basic rules for the repair of this type of boilers.
After repair, it is necessary to make sure that all the fixtures of the device are correctly fixed, and during its operation there will be no leakage of gas. Independently repairing the device is allowed only if there is similar experience. Only original spare parts purchased from Bosch should be applied.
The cost of the device
 The cost of the device depends entirely on the size (standard or mini) and its version (B, P, G). On average, the price of type B varies from 10 to 13 thousand rubles, on the view P from 6.8 to 9.7 thousand rubles, on the version G from 11 to 12 thousand rubles.
Each device is completed with a detailed instruction, which describes the technical component of the device, installation instructions, setting up and care. The manufacturer recommends not to install the device independently, but to confes the specialists from the gas service. After all, the wrong installation can not only break the device, but also to cause significant harm to the ineptly installer.
The device has a large number of positive feedback from satisfied buyers. They consider it a reliable, safe and affordable apparatus.

Competently chosen original spare Parts for Speakers Junkers They are a guarantee of continuous operation of equipment from the company "Bosch" and high-quality water heating in any volumes. In the water engineering technique from the German manufacturer, each touch is thought out, so using high-quality spare parts for gas column Junkers It is possible to significantly extend the life of the water exchange and reduce the costs of subsequent unforeseen repairs.
Our company offers original and recommended manufacturer parts, consumables that are necessary for both repair. If the apartment / house requires repair gas Speaker Junkers Spare Parts Buy It is possible in the following assortment:
- Heat exchangers for WR275 WR350 WR400 water heaters;
- Membranes, glands, gaskets;
- Automatic ignition blocks;
- Temperature sensors overhead and embedded;
- Collectors, three-way valves, smoke pressure relay, etc.
 |
|
 |
Basic security nodes (Fig. 1, 2) 1 Sensor of the outgoing gases (Fig. 1). Temperature Device of water reinforcement (Fig. 3-9) |

Renovated gas junkers column, spare parts For which they purchased in our store, high performance efficiency, economically spending fuel and does not need additional maintenance costs (subject to professional repair, then the installation of parts).
| PHOTO | DESCRIPTION | |||||||||||||||||
 |
Water fittings WR13 / 13-2 Bosch (87070063430) Water reinforcement WR10 / 10-2 / 11 BOSCH (87070062860) Water fittings WR15 / 15-2 Bosch (87070063440)
|
|||||||||||||||||
 |
Piezokopka gas column Junkers. Bosch. Piezokopka (piezoplamenitor, Piezorozaga button) Junkers columns (8748108023) WR 10-13-15 250, 275, 325, 350, 400, W125, 200, 250, 275, 325, 350, 400 |
|||||||||||||||||