Transfer of plastic windows to winter mode. How to adjust plastic windows in summer and winter modes Transfer of plastic windows for winter operation
How to prepare plastic windows for winter?
How to prepare plastic windows for winter?
 Reinforced-plastic profiles are an excellent solution for glazing residential and premises. They perfectly protect the room from heat leakage, street noise, drafts and dust and have significant advantages over conventional wooden frames. A high-quality product can serve 15 - 20 years without any problems.
In order to avoid unforeseen inconveniences during operation, it is necessary to periodically look after the pvc structure, namely: to transfer it to winter and summer mode in a timely manner. The main topic of our article is the preparation of plastic windows for the winter season. We assure you: it is not at all difficult and within the power of anyone, if you follow the list of recommendations below.
We start with cleaning
The first thing to do is to thoroughly wash the window. This means not only a double-glazed window, but also profiles, a window sill, plastic-trimmed slopes. We strongly advise against using caustic or abrasive detergents! They can plastic cover, leaving ugly stains on it that are darker or yellowish in color. Clean with mild washing gels. 
For safety reasons, you should not wield a metal washcloth to clean the dirt - it will probably scratch the plastic, and its aesthetic appearance will deteriorate. You will need a soft flannel rag, rag, or sponge. It is worth washing not only from the inside, but, if possible, also from the outside.
Pay particular attention to the drainage channel. You can get rid of trash or litter stuck there by gently wielding an ordinary toothpick. This will prevent stagnation of water in drains and obstacles in the movement of window sashes. In order for pvc windows to serve without problems in winter, it is also necessary:

And a little more about the seals. They must be periodically lubricated with special grease or technical vaseline. Timely care will help avoid drying and freezing. But during a preliminary examination, wear was revealed - do not worry: replacing the seal is easy to do yourself.
Select the required option on the construction market and install it after removing the old one (using a flat screwdriver). It is advisable to lubricate the seat with grease. After - it covers the entire area of the seal.
Setting up window fittings for the winter period

Before approaching cold weather, it is necessary to adjust the window fittings: the frame should be more tightly pressed against the glass unit: this is the only way to exclude drafts. You will need a hex wrench to complete this step. If you do not know how to adjust the hardware, use our tips.
- The horizontal sides are adjustable from the top and bottom panels. Take a closer look: they have a special hole for a hex key.
- The top panel is adjusted when the window is open. Raising the edge by turning the key to the right.
- If the window is on the ground floor and can be reached from the outside, you will not have to open the sash. The hinge at the bottom allows the vertical sides to be adjusted. To get to the hex hole - first remove the protective cap.
- To increase the pressing force of the profile frame, you need to monitor the eccentrics. To do this, turn them to the right. Specially applied marks that determine the pressing force will serve as a guide. Attention! If the mark is turned towards the seal, the pressure is strong. Often the eccentric is turned with ordinary pliers.
- In the places where the hinges go, there are devices that are responsible for the clamping force. How do you recognize it? Therefore, the tongue protrudes so strongly. The longer, the stronger the frame is pressed against the window. Measurements are usually made with a hex key.
- Do not under any circumstances apply strong pressure on the tongue! This will inevitably lead to rapid wear and complete failure of the window seal.
- Do not neglect the adjustment of the hinges, transferring the pvc structure to winter mode. Please note: on the lower hinge, most manufacturers have provided a protective cap that can be removed. After this, a special bolt is screwed in.
If you carried out these manipulations, the adjustment of the plastic windows for the winter is complete. Everything is quite simple: the main thing is to be neat and consistent. But it also happens: everything is done correctly, but the window still retains heat poorly, and a draft enters the room. Why this is happening and how to fix the situation - we will tell you further.
Preparing plastic windows for winter: how to keep maximum heat?

PVC profile does not retain heat well, transmits noise, and condensation accumulates on the glass unit? Depressurization has occurred, requiring immediate attention. The most common causes of the problem are:
- Shrinkage of the walls occurred after the plastic windows were installed. Solving the problem is easy - just adjust the fittings.
- The sealant has outlived its term. The replacement, which we wrote about above, will help here.
- The junction of the slope and the frame is leaking. We'll have to remove the slopes, insulate them and mount them back. If you do not have enough experience to carry out this manipulation, invite a specialist.
A single-chamber and two-chamber double-glazed window in extreme cold requires additional insulation. It can be produced using a film, preferably frost-resistant. For high-quality insulation, you need to know that:
- Sticking the film inside the room, and not on the outside of the window, is the most effective and energy-saving.
- Glue the film, control the uniformity and tension. If this is not done, breakouts can occur on it.
- It is not worth replacing the film with minor damage. Tape the breaks carefully with tape.
- The best option is a frost-resistant film (it has a high density and a characteristic yellowish tint). We do not recommend buying it on the market. It is wiser to visit a large hardware store that sells certified products from trusted manufacturers.
- At the same time, it is durable and decorative enough, for gluing the window from the side of the room - a greenhouse film. And also - it is durable.
- Do not use a construction stapler or pushpins to secure! They rip the material. All you need is scotch tape.
Recently, an environmentally friendly and reliable pvc insulation has been used. It is resistant to deformation and severe frost. We hope we have exhaustively told about how to prepare euro windows for winter and were useful. Good luck!
PVC window systems are practically maintenance-free, do not require painting and sealing. To maintain a normal microclimate and prevent block wear, it is worth changing the modes. How to adjust plastic windows for the winter season quickly and at no cost? Follow a simple algorithm.
Why customize window hardware?
The peculiarities of PVC double-glazed windows are the absence of vents and the setting of the ventilation mode by turning the sash. At the time of installation, the window is not adjusted - it is in neutral mode (autumn-spring).
- preventing the sash from hitting the fittings when opening or closing;
- tight connection of the canvas to the frame without drafts;
- ease of use;
- prevention of breakdowns and expensive repairs;
- block slack.
On a note! Setting the mechanism for warm and cold conditions is a prerequisite for its maintenance.
Features of the use of mechanisms
To properly adjust the window, you will need to study the principle of the mechanisms.
Types of modes
Manufacturers release systems with the following modes:
- standard - the sash is pressed against the frame with the middle position of the eccentric. The seal is pressed down normally, and the structure provides high quality protection from cold in the winter season and from the heat in the summer;
- winter mode on plastic windows is needed to firmly press the block to the frame. This prevents heat from seeping in during the cooler season;
- summer modes - the sash does not fit tightly. The summer option is used for micro-ventilation, normalization of air movement in the room and outside.
On a note! Seasonal adjustment of plastic windows is carried out by means of side trunnions on the sash.

How to choose the settings?
To understand how to adjust plastic windows for the winter, you should remember the basic rules:
- The operation of the sash is shorter in winter than in summer.
- The switch to a snug fit is carried out at the end of autumn, in March it is returned to its original state.
- 2-3 years after installation, the sash operates in summer mode.
- The structure cannot be pressed tightly in the summer - the fittings will break due to an increase in the load on the welding seam.
On a note! With good thermal insulation of the window, summer modes are left for the whole year.
How to check the sealing?
Adjustment of plastic windows for the winter is carried out at the first cold snaps. Before starting work, he makes a tightness check:
- In the closing mode, the hand is carried along the perimeter of the block. If there are gaps, a slight draft is felt.
- Draw a lighted match or lighter along the line of joints. When the flame deflects, there are gaps.
- A notebook sheet is positioned between the frame and the sash, the window is closed. If the leaf is pulled out well, you need to adjust the mechanism.
Important! Check every point of contact of the glass unit with the frame.

Regulation technologies
How to quickly adjust beautiful plastic windows by rearranging them for winter or summer mode, working independently? There are several configuration options.
Read also: Installation of roller blinds on plastic windows - features of work without the use of tools
By means of locking elements
On the side of the handle there are eccentrics or pins. By changing the location of the locking mechanisms, you can vary the pressure intensity. On a standard window sash there are 2 pins - top, bottom and center. How to adjust eccentrics depends on their shape:
- round adjust in the direction of dots or dashes. Risk with an inward direction means the program is winter, to the street - summer, up - neutral;
- oval - summer direction indicates the location of the dash up, winter - horizontally, neutral mode - diagonally;
- turnkey eccentrics. If the risk is shifted into the room, the sash is transferred to the winter season, outward - to the summer, in the center - to the neutral one.
Advice! Use a hex wrench to rotate the journal and select the clamp.

Replacing the sealing gum
Adjustment of windows is done after visual inspection and checking for drafts. If the seal is damaged, it can be replaced in parts, but it is better to purchase a solid, dense rubber band.
The part is glued, preliminarily smearing the glue at the places of contact. The PVC sash is closed and left to dry completely.

With hinges
Loops are configured for different modes in different ways:
- vertically - the lower hinge screw is rotated clockwise to lift it up. To lower the part down, you need to turn the screw against;
- vertically - use the hinge end screw from the bottom. Turning clockwise, you can pull the frame to the hinges. To facilitate access to the double-sided screw, the window is opened;
- the intensity of pressing the corner from below. You will need to turn the lower hinge screw located at the bottom;
- corner from above. The sash opens in two positions to provide access to the upper scissor trunnion. The handle turns up, the frame tilts, and the eccentric mark is turned towards the block (small clamp);
- striking plates. When loosening, parts are lowered or raised.
Important! The bottom screw is not available on all glass units.

Preparing for setup
Before properly adjusting durable plastic windows for the summer or winter, working on your own, you need to do some preparation. You will need to complete a few simple tasks.
The tools you need
For work, prepare:
- furniture hex keys (diameter 4 mm) with L or S-shaped bend;
- Phillips screwdriver 3-4 mm with a T or TX star bit;
- round screwdriver;
- screws or screws;
- pliers;
- sewing machine oil can with oil;
- aerosol WD-40.
On a note! The S-shaped screwdriver is more convenient to use.

Preparation of the window block and fittings
Adjustment of plastic windows for the winter is independently carried out after preparation:
- The frame is cleaned of dust or debris.
- The fittings are wiped with a fleece cloth or dry cloth.
- An aerosol lubricant is applied to the active mechanisms.
- Excess composition is removed with a dry napkin.
Clean and lubricate prior to tuning to prevent debris build-up and corrosion.
Advice! To evenly distribute the lubricant, the sash must be opened and closed 5-6 times.
Algorithm for transferring a window to any mode
To understand how to transfer plastic windows to winter mode, you will need to use several systems.
For the winter season
The instructions for work are as follows:
- Opening the sash and fixing it in this position.
- Pull recessed pins towards you.
- Translate all eccentrics in one go.
- Adjust the seating intensity according to the mark on the element. The marker must be turned towards the street side for standard parts.
- Turn the oval eccentric horizontally, round standard - towards the street, round with an offset - with the wide side into the room. Use a window wrench, star screwdriver or pliers.
- Check the maximum rotation - for the winter period, the angle should be 180 degrees.
Advice! Use a sheet of paper to check the tightness.

For the warm season
Window adjustment is also carried out step by step after preparatory work:
- Raise the roller on the sash.
- Turn the element to the right with a hexagon.
- Put the roller in place and repeat the process for all parts.
- Loosen the sash - this makes it possible to implement the micro-ventilation mode - the standard position of the clamp changes.
- Unscrew the eccentrics with a hexagon, turning them to the right by 2-3 mm.
Advice! Check the tightness at every step.

basic settings
Adjustment of PVC windows for winter and summer positions also provides for work with details.
Read also: Corrosion of metals: causes and ways to remove rust
How to adjust the quality of the clamp?
If you do not know how to correctly transfer high-quality plastic windows to a tight winter mode, work step by step. You will need to adjust the trunnions:
- For a round one, use a 4 key, which is inserted into the part. The eccentric is displaced to the bottom or up.
- The key is inserted into the element and turned, focusing on the red marker. If it is directed towards the premises, you have changed the seasonality.
- By turning the point towards the street, the sashes are weakened.
- Oval studs for the summer period are turned vertically, parallel to the window structure. In winter, the fittings are turned perpendicularly.
On a note! A mounting wrench is suitable for oval trunnions.

Sash alignment vertically and horizontally
In order for the PVC block to stand level, you will need to set up the awnings with your own hands:
- Set the end adjustments at the top and bottom horizontally. The leaf is in the open position.
- The hex wrench is placed with the short part in the gap.
- Rotating the tool clockwise, pull the sash to the canopy, against - to the impost.
- Vertical adjustment of the windows is carried out when the sash hits the frame.
- The long end of the hex key is inserted into the top of the canopy.
- The bolt is scrolled clockwise to raise, counterclockwise to lower.
Important! The limiting step is -2 ... + 2 mm.

Elimination of drafts
To exclude blowing during the cold season, you will need to figure out how to switch the windows to winter mode. In this situation, you can change the level of downforce. The end pins are tightened with a hexagon, turning it 2-6 turns. Check the density with a paper sheet.

Loose fittings
If the bolts are not tightened in time, the window structure looses, deforms and sags. For work, use a hex wrench.
What if the window cannot be opened?
Before changing the settings, you need to make sure the quality of the handle rotation. Most often it does not "walk" when the window is open. You will need:
- put the plate in place near the handle. Press on the pad and, after fully pressing it against the seal, turn it;
- return the tongue to its original position. To put the element in the direction towards the frame, it is pressed on. The protrusion should slide towards the seal.
Advice! If all else fails, replace the handle.

Checking pen operation
Adjustment is carried out by correct installation in certain positions. Downward direction means closing, to the side - opening, upward - ventilation, between the top and side positions - partial ventilation.

To replace a defective part, you will need:
- Pull the protective strip up or down.
- Scroll the element to a horizontal position.
- Unscrew the perpendicular screws / screws at the top and bottom.
- Put the new handle in the same position.
- Reinstall the plate.
Loose bolts are tightened with a screwdriver, after removing the cover.

Accessories of popular brands
Trade marks are supplied complete with fittings systems. How to regulate it depends on the characteristics of the mechanisms of a particular brand:
- Torx - reliable and durable accessories that can be adjusted with a hex wrench or slotted screwdriver;
- Maso - large oval eccentrics are translated using pliers or a wrench;
- Roto - round head locking mechanisms only fit certain keys.
Advice! Before starting the adjustment work, check which manufacturer's double-glazed windows you have.

Adjusting Rehau windows
It is necessary to adjust the products due to displacement, shrinkage or poor opening of the sashes. The work is performed step by step:
- All pins are located.
- The tool is selected according to the shape of their tip.
- The device scrolls the eccentric heads by 2-3 mm to the same position.
- The pressure is checked by the resistance of a pen, a sheet of paper, a match flame.
When installing plastic windows, the master can set any mode. Experts are guided by the season, but it is still recommended to find out information regarding the clamping force, because this is reflected in the degree of wear of the structure.
Table 1. Modes of adjustment of plastic windows.
| Type of | Description |
|---|---|
| Summer | The polymer seal is not under pressure. The sash adheres tightly to the surface without gaps, but does not press against the rubber too much. The advantage of this method of operation is the possibility of using the seal for many years. So, even a plastic structure can shrink and expand depending on weather conditions, while the welded joints are not subjected to heavy loads. |
| Standard | This method assumes the minimum pressure of the sealant, due to which there will be no drafts or noise in the room. In some regions of our country, such a regime is set all year round. However, the rubber will wear out much faster. |
| Winter | In this case, the rubber is under great pressure. This can be recognized by the characteristic (tight) turn of the handle to the side. If you use this mode constantly, the seal will quickly lose its shape and will have to be replaced. So, if, after pressing, you switch the windows to summer or standard mode, then drafts will appear. |

Of all the possible, only the "summer" mode is considered sparing - this means that it does not contribute to rubber wear. Therefore, if residents do not encounter discomfort, then it can be used all year round - thus it will be possible to extend the life of the seal.
Nevertheless, there are reasons why it is recommended to constantly change the seal pressure:
- draft- residents are unlikely to like the appearance of cold air from the window in winter and dust in the summer;
- problems when opening and closing the sash- in the case of an incorrectly set mode, the sash sometimes jams;
- sagging window sash- occurs as a result of wear of the hinges, this problem can be solved by switching to the strong pressure mode;
- loss of warm air- windows are regulated in order to save money on heating;
- mold on the window frame and slopes- this problem is associated with excessive dampness due to poor tightness.

There are some rules for using the modes:


Types of adjusting mechanisms
Adjustment of one mode or another can be done using special mechanisms, which are called pins (eccentrics). They are located on the sidewalls and upper extreme parts of the sash. Nevertheless, they can have a different appearance, location, shape - it depends on the manufacturer of the glass unit and its cost.

Common types of eccentric mechanisms:

It should be borne in mind that not in all cases, mechanisms for adjustment are installed in double-glazed windows. Most often they are absent in the most budgetary options.
In addition, eccentrics differ from each other depending on the manufacturer. Let's consider the most famous options.
Table 2. Types of mechanisms from different manufacturers.
| Stamp, illustration | Description |
|---|---|
| The eccentric mechanisms on such windows are quite massive and have an oval shape. Therefore, you can use a wrench or pliers to adjust them. |
| This manufacturer produces the most durable fittings according to the opinion of both experts and users. You can adjust it with a hexagon or a screwdriver. |
| In this case, the locking mechanism is convex, and in order to adjust it, a large key is required. |


Adjustment of plastic windows for winter mode
Switching windows from one mode to another is easy, but you have to pay attention to each stage. Some people are even afraid to perform this procedure, so they use the services of a company that is engaged in the installation of windows. In the presence of high pressure, rubber quickly deteriorates, and you can unknowingly spoil an expensive one. But, if you approach the process thoughtfully, there will be no problems.
Adjusting the trunnions on metal-plastic windows: step-by-step instructions
Step one: first you need to find where the pins are located. Usually, their number depends on the dimensions of the structure. However, most often there are three of them on one side (where the handle is located) and one on the other side.


Step three: now you need to wipe the lubrication elements with a cloth, and then apply it to the surface

Step four: now you should consider the condition of the pins, find marks on them and turn them to the desired position.

Step five: upon completion of the installation, it is necessary to check the tightness again using a paper sheet, as we described above.

Note! Some companies make windows with recessed trunnions, so they will need to be pulled out with the same pliers before proceeding with the adjustment. Otherwise, this procedure resembles the transfer of hours.
If necessary, the eccentrics can be loosened in the same way, which means that the windows can be switched to summer or standard mode. It is enough to do this procedure several times, and you will definitely not mix up the modes.
Prices for plastic windows
Plastic windows
Video - Adjust windows by mode
Alternative ways to adjust windows
There are times when after the transition to the "winter" mode, drafts are still observed. Most often this happens when some parts of the sash are distorted. A similar problem occurs over time, when the glass unit wears out.

To establish the correct position for the sash, it is necessary to find the location of the adjustment screws.
From the tools, you will need a hexagon and a flat-end screwdriver. Only first you need to remove the caps that are located on top of the hinges - it is better to do this at the moment when the flap is slightly open.

Table 3. Alternative ways of adjusting plastic windows.
| Method, illustration | Description |
|---|---|
| It is necessary to turn the screw on top of the lower hinge. To raise the sash, turn it to the right. |
| Adjustment is carried out by turning the last screw on the hinge from below. When turning to the right, the frame moves a little closer to the hinges. Since the fastener is located near the slope, it can be difficult to get to. |
| This adjustment is made by turning the lower screw of the lower hinge. It is not installed on all windows. Do not confuse it with the previous screw. |
| You will need to crank the upper trunnion. To do this, the window is opened in several positions at once: tilt and swivel. If the mark on the eccentric is directed towards the sash, then the seal is pressed as much as possible. |
| In the process of using a double-glazed window, these structural elements unwind, so they should be adjusted. |


You should not immediately make many turns, because it is necessary to constantly monitor the location of the sash so as not to overtighten or loosen. Experts do not recommend using such adjustment techniques for those users who have no experience in this area - without calculating the force, you can easily spoil the window structure. Upon completion of this process, it is necessary to ensure that the sash does not cling to the plastic frame.
The handle does not turn to the desired position: repair features
A similar problem occurs for the following reasons:
- After long-term operation, the structure needs cleaning and lubrication, so it must be disassembled into small parts, remove dirt, and then lubricate with oil and a thin brush.
- If the handle turns only up to a certain point, and then jams, the sash clamp should be slightly loosened. In this case, the pins that are next to each other are turned. On the other side are the hinges, in which it is also recommended to adjust the bolts.
Handle locked: adjustment method
Some users rush to replace the handle with a new one in cases of blocking, but this is not always necessary. At the same time, it does not even need to be unscrewed and disassembled into parts, because the problem is related to the locking device, which does not allow the sash to change its position when open. You just need to turn the lever to the side.

There are two ways to fix this problem. So, in the first case, the lever is located at an angle to the rubber (in the form of a tongue). In the second case, it looks like a clamp that is located above the seal.
Broken handle
If the handle is broken, then it will not be possible to return it to its previous appearance - all that remains is to acquire a new one. Dismantling the previous one is not difficult, just unscrew the screws and pull it towards you. Next, all that remains is to fix the new handle.

Prices for various types of plastic window handles
Plastic window handle
Difficulties of adjustment
There are some mistakes that users often make when switching to "winter" mode:
- It is not recommended to move a completely new glass unit to this position, because with strong squeezing, the rubber can be irretrievably deformed.
- The pressure of the seal should be the same on each side, so this should be checked with the same sheet of paper - this is a common cause of rubber damage.

Sometimes, even with the correct window adjustment, the following problems arise:
- drafts;
- accumulation of condensate;
- hypothermia of the room.
Such troubles are preceded by reasons:
- Factory design defects. This happens in exceptional cases, especially when ordering windows from suspicious companies.
- Installation errors. The installation of the window should be trusted only by a qualified craftsman, because you will need to properly observe the gaps, carefully connect all the elements, and also use polyurethane foam.
- Lack of finishing slopes. After installing the windows, finishing the slopes will be required - the foam loses its strength when exposed to humid air or sunlight.
- The seal has become unusable. Even if this is a relatively new window, rubber can lose its elasticity in just a couple of seasons (if used improperly).

Features of the restoration and replacement of the seal (rubber bands)
Unfortunately, over time, all the elements of the plastic window fail, and in particular the elastic polymer seals. The reason for this problem is dirt, dampness, lack of regular lubrication.
If the rubber bands are no more than four to five years old, then you can try to reanimate them. To do this, you will need to dismantle the seals, then take a few rags and thoroughly soap them. Products are wrapped in these rags and left in this form for several hours. Sometimes such an experiment allows you to achieve stunning results, so it is allowed to conduct it for the purpose of "prevention".
The need to replace the sealing strips arises in the following cases:
- loss of color;
- the appearance of "bumps" on the surface;
- multiple cracks.

In this case, all that remains is to buy a new one - usually its thickness is from 3 to 6.5 millimeters. Most often, manufacturers guarantee a service life of up to 10 years, but in practice, rubber dries up much earlier.
Note! A high-quality seal should not become an obstacle to oxygen circulation, so you need to look at its composition - it must be breathable.
Prices for seals for plastic windows
Seal for plastic windows
Video - Replacing the seal
Summing up
Each person will cope with the fitting of plastic windows for the season, because this process is not difficult. Moreover, you only need a minimal set of tools, which can be found in the arsenal of any master.
For the rest, changing modes is a mandatory procedure that will avoid hypothermia of the room, rapid wear of the seal. In this case, it is recommended to use the window carefully - to avoid turning the handles and overloading the sashes.
To remove glazing beads from a plastic window does not require special skills, in you will learn simple ways to dismantle and install glazing beads, and you can also read the step-by-step instructions.
PVC windows have many advantages over conventional windows or other types of double-glazed windows. Take, for example, one of the most significant advantages - it is the setting of the winter or summer mode. Not all plastic structures provide such modes, but many do.
The functionality of the window depends on the fittings that it has. It can be functionally limited, or it can have a lot of useful functions.
Hardware classes
Depending on the class of fittings, the ability of the PVC structure to switch or not switch from one mode to another - from winter to summer and vice versa - is determined. The quality and function of the fittings depends on the class. The manufacturer is also important, but not that much.
The following classes (or types) are distinguished:
- Budgetary. Fittings of this class are installed in windows with the lowest price. Allows only opening and closing windows.
- Standard. The fittings are intended for medium-price PVC structures. Allows to prepare windows for winter or summer.
- Specialized. Such fittings can be combined with anti-burglar fittings. Allows you to customize the window to the required mode.
What are the modes for?
The modes are needed for one simple reason - the weather outside the window is constantly changing. Summer is replacing winter and vice versa. Accordingly, there is a constant drop or rise in temperature. Thanks to the ability to close the window more tightly or, conversely, less tightly, it becomes possible to adjust the "climate" of the room.
Summer mode

For the summer period, the main functions of the PVC structure are to pass heat, dust, dirt and so on to a minimum. For this, the summer system was invented. It allows you to adjust the pressure of the flaps to the maximum weakening, which is very important to do after a long winter. For this, the nut is unscrewed counterclockwise, and the effect of the eccentric on the frame is thereby weakened.
Winter mode

During the winter period, you want to keep as much heat as possible in the room. For this, the position of the eccentrics is changed towards the "sealing" of the PVC structure. Moving, they allow the sash to be fixed more tightly to the frame insulation. By the way, during operation, the insulation can wear out a lot, so it is important to make mode transfers on time.
Transfer from one system to another can be done independently, but everything must be done carefully and slowly. A mistake in action can lead to damage to the plastic structure. To avoid this, you can invite a specialist from the company, the store where the PVC was purchased.
Blowing out of a plastic window can be caused by:
- Poor squeezing of glass with glazing bead. This is especially evident in winter, since materials tend to shrink under the influence of cold. Accordingly, the glazing bead can fly out of the grooves, and the glass, in turn, from the glazing bead. It should be replaced if necessary, but it is best to entrust this work to professionals in their field.
- Incorrect selection of fittings to the structure. If the rubberized seal has an uneven thickness or is pressed unevenly by mechanisms, then slots may appear for the passage of cold air.
- Low-quality material from which the profile is made. It can simply crack over time.
- Incorrect installation of the frame. As a result, the flaps may function poorly and not close properly.
- By passing air at the junction of the frame and the vertical profile element. The gap should be sealed with liquid plastic, which comes with PVC.
Change modes or not
There are a number of reasons why the regime must be changed:
- The doors began to close when opened, or no longer open at all. There may be a reason for the sagging of the sashes, which in turn are attached to the frame with hinges. It is also possible that the winter setting is incorrectly set using the adjusting screw.
- The seal may wear out. In this case, dust, wind will freely penetrate into the interior of the room. If it's warm outside, then you should immediately replace the insulation gasket.
- The flaps can also be displaced horizontally. This directly indicates that the setting was initially performed incorrectly.
One of the reasons indicated about the seal. So, in order to avoid wear and tear, it is not always necessary to adjust the PVC structure for the winter. When pressed firmly, the seal wears out a lot. Therefore, the winter mode is needed, but if possible, its use should be limited. It all depends on the weather, if the winter is windy with blizzards and blizzards, then cold and frost will penetrate into the house.
How to know if a window can be switched to winter mode
In order to find out the functionality of the PVC structure, it is necessary to inspect it from the inner end. There should be a hole for a screwdriver in the area of the handle. If it is, then the plastic window can be converted from one system to another. But you also need to know that the hole must be suitable for the hexagon.
If it is oval, then there can be two options: either PVC is transferred to summer and winter modes, or not. Check with the seller.
How to switch a window to winter mode and back
The translation is carried out by performing the following steps:
- To begin with, the inner end of the sash is examined to find the eccentrics. Their number may be different, but you need to configure each separately.
- The eccentrics are translated mainly clockwise until the sash is firmly pressed against the seal. This requires tools such as a wrench or pliers.
- It remains only to check whether all the actions have been performed correctly. You will need a regular sheet of paper here. It is clamped with a PVC flap. If, after this procedure, the sheet is freely removed from the gap between the sash and the frame, then the window still has a summer operation. If the sheet cannot be removed, the PVC is installed with a winter orientation.
Thus, summer adjustment is performed in reverse chronological order.
Step-by-step instruction
In general, the whole translation process is as follows:
- Initially, the inner end surface of the flaps is thoroughly cleaned. Special attention should be paid to joints and connections. It is also necessary to clean the end of the frame. This is done so that no dirt gets on the mechanisms, sash fittings.
- The hardware itself is additionally cleaned with a hard-bristled brush.
- Seals and surfaces that come in contact with them are wiped with a rag. This is necessary to remove old grease with accumulated dirt.
- The seals, if necessary, can be replaced if they are severely worn out, for example, after long or improper use.
- Upon completion of the preliminary work, the eccentrics, the hinges are lubricated with silicone.
- Further, the trunnions are adjusted with a hexagon or a screwdriver. They are turned in a certain direction, adjusting the clamping of the flaps. Some types of eccentrics must first be pulled at a certain distance from the sash end. They are turned over the protrusions, and then returned to their original position.
- The adjustment is now checked. If the trunnions are adjusted for winter mode, then when you turn the knob, it will function poorly. If summer mode is set, then the handle will turn easily.
Removing a worn seal:
- The old rubberized gasket is removed from the frame grooves.
- The profile must be wiped with a rag, thereby removing dirt and dust.
- The corners of the frame are filled with a special rubber adhesive.
- The grooves are laid with new insulation. This is done carefully, without straining.
- All excess is cut off, and the joints of the seal are glued together.
Incorrect setting

First, a little about the correct setting:
- A correctly adjusted window does not generate any sounds during operation, for example, the sounds of rubbing parts or surfaces.
- The parts responsible for the correct position of the sash in space should be located approximately the same.
- The rubber gaskets between the sash and the frame must be resilient and easily return to their original shape after the sash is opened.
The setting can be carried out independently, since special knowledge and skills are not needed here. But all the same it is necessary to carry out all the work carefully. Even with minor adjustment errors, the window can break, therefore, urgent repairs will be required.
What needs to be done before starting adjustment work, and what non-observance of the rules can lead to:
- You should find and use the instructions attached to the PVC. If you randomly change the positions of the eccentrics, then they may become unusable for further use, the entire adjustment mechanism will be disrupted. The pressure rollers and the rubberized seal may also be damaged.
- It is worth checking the technical condition of the window beforehand. If some parts are very worn out, for example, the seal, then the winter setting will not work. But it will turn out to rip off the bolts.
Thus, seasonal modes have many advantages. They allow you to adjust the "climate" indoors, at home. Winter adjustment is especially relevant, since constant drafts can cause a lot of trouble.
The transfer of modes should be done no more often than once every six months. More frequent change can cause wear on some parts of the PVC structure or even breakdown. In order for breakdowns to happen as rarely as possible or not at all, it is worth taking care of the PVC structure. It must be cleaned and lubricated in time. The instructions contain detailed descriptions of care, the main thing is to follow them.
Plastic windows save from street noise, provide a comfortable air temperature for an apartment or a private house. However, once installed, they require periodic maintenance. Adjustment of locking mechanisms is needed every off-season - only then will the double-glazed windows fulfill the task assigned to them. Today's article will tell you how to switch windows to winter mode, for what it is needed when such actions are performed. Along the way, it is worth understanding the features of the locking mechanisms, the device, and some of the nuances of functioning. Photo and video instructions will help us, explaining in detail the algorithm of the actions performed.
 Off-season adjustment of the window sash locking mechanisms is necessary for its correct operation.
What does "summer" and "winter" mode of plastic windows mean?
Let's make a reservation right away that with a lack of knowledge and experience, our editorial staff recommends contacting professionals in their field. Well, for those who still want to deal with this issue on their own - a small help.
Modern plastic windows are regulated by the clamping force of the sash in three modes:
- summer- the sash of the window is pressed weakly. This ensures air circulation in the room, realizing the ventilation mode. The wear of the sealing gum is minimal;
- winter mode provides a tight hold on plastic windows. There is no air circulation, which ensures the preservation of heat in the dwelling. The load on the sealing gum is maximum;
- standard- the average position of the eccentrics (pins). More often, installers leave the locking mechanisms in this position. The only difference is that professionals who value their reputation show the owner how to transfer double-glazed windows to winter or summer mode, and the negligent (of whom, unfortunately, the majority) do not bother with explanations. Standard mode is for the off-season.
 For this purpose, you can call the wizard, but it is better to do all the work yourself. If you want to do well - do it yourself
 Why switch modes of plastic windows
It is enough for 2-3 years not to switch the "winter-summer" mode on plastic windows, so that after, even with correct adjustments, it starts to blow from under the window sill or balcony door. Let's consider the problems that arise with incorrect settings.
The first is a violation of the indoor climate. Excessive moisture contributes to the formation of condensation on frames, insulating glass units and walls, which leads to the appearance of mold. "Summer" settings in winter lead to heat loss, there is a need for additional heating. The result is higher gas or electricity bills.
 It is better not to touch this unit when adjusting, if there is no experience of such work.
 Important! Using the winter position of plastic windows in the warm season will lead to rapid wear of the seals. The result is the futility of any subsequent adjustments. The way out is to replace the expensive rubber bands.
Switching modes of plastic windows: advantages and disadvantages
Disadvantages of window adjustment can occur only with the wrong actions of the home wizard. If everything is done correctly, switching modes will only be beneficial. Let's figure out in what cases it is justified.
 The pins (eccentrics) can be varied, but their settings are identical
 Timely switching will extend the life of the windows, even if these actions have not been performed for a while. Drafts in winter or dust in summer due to wear of the seals are treated by switching the fittings to winter mode. Even if not for long, the repair will be delayed for a year or two. Sagging of the loops is eliminated in the same way. Replacing fittings is already an extreme measure.
Good to know! Incorrectly set modes can cause jamming of a window or door separately in the ventilation position or together with the opening.
Determination of the possibility of changing the seasonal regimes of plastic windows
Not all models of plastic windows have the ability to change modes. To understand if it is present on your double-glazed windows, you need to look at the shut-off valves. The eccentric, located in the middle, can be oval or in the center it will have a hole for an asterisk or hexagon. This indicates the presence of a winter regime on plastic windows. The photos below will help the reader understand this issue.


The algorithm of actions when adjusting windows with different pins is identical, but their position may differ. Let's try to understand in detail the types of eccentrics.
Forms of eccentrics and nuances of transferring modes
The oval trunnion after installation is often located diagonally - this is the standard position, midway between winter and summer. The horizontal position indicates the winter mode, and the vertical position indicates the summer mode.
If the eccentric of the shut-off valves is round (for a hexagon), then its positions are as follows. Pushed out towards the street - winter, located in the center - standard, recessed towards the apartment - summer.
The third option is a round hexagonal trunnion that does not move when turning. In this case, there is a risk on it, which indicates the correct position. To make it easier to understand, we suggest viewing the pictures on how to switch the windows to winter mode.
 Some eccentrics can be turned by hand without the aid of a tool.
 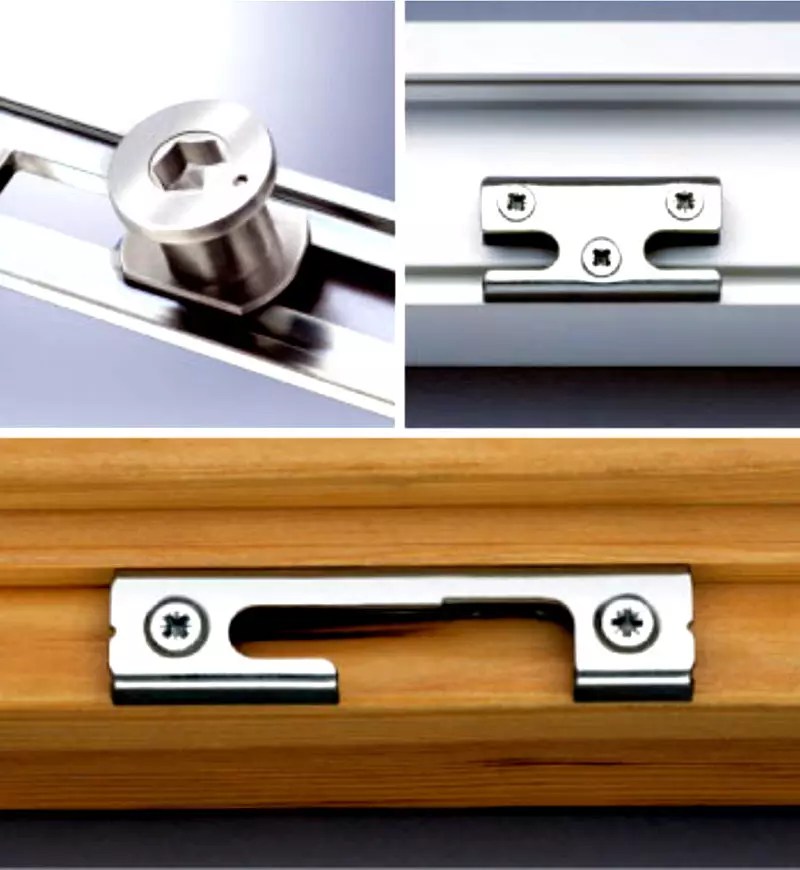 Ecentric for a hexagon - pay attention to the risk or marker
  The most common eccentrics - the mode is defined as follows - the thicker side from the center inward - winter, on the contrary - summer
  This is the standard position. Installed from the factory and rarely changed by installers
 How to switch windows to winter mode: preparing double-glazed windows
Before putting plastic windows on winter mode, preparatory work should be done. The first thing to do is to remove the grease from the components of the locking mechanism with a rag so that dirt and dust do not get inside during adjustment. After all the work performed, the mechanism is lubricated again.
 Here is the treatment of the seal with silicone gel, but it is better to use a spray
 Very important! The rubber seal of the frame should be treated before cold weather. You can do this with a lubricant (silicone or glycerin based), but it is better to use silicone spray, which is available at all hardware and automotive stores.
How and when are plastic windows switched to winter mode
Experts recommend transferring locking mechanisms from summer to winter only in extreme cases, when drafts become sensitive. However, this is only suitable for warm climatic zones in Russia. Switching over at the start of the heating season is optimal.
A fogged glass unit or a slight appearance of ice on it from the inside may also indicate the need for adjustment.
 Consequences of incorrect adjustment of sash with double-glazed windows
 Useful information! Before switching windows to winter mode, you should carefully examine the rubber seal. It is possible that the sash fittings are correctly adjusted, and the seal is cracked or torn. In this case, it is imperative to replace it. Cheap seals can be purchased for one winter, but they do not pass more than the season.
Other adjustment options for plastic window frames
Having figured out how to switch the windows to winter mode with a hexagon, a screwdriver or pliers, you can proceed to the rest of the adjustment. Indeed, over time, the frame can lead, and one side will fit more tightly than the other, which is unacceptable. This puts stress on the window fittings and contributes to the appearance of drafts.
 Various do-it-yourself sash adjustments
 The sash can be adjusted vertically and horizontally from the bottom hinge. Remove the protective plastic cover and find a screw with a hexagon hole located on top. By turning the screw clockwise, the frame will begin to lift. Turning counterclockwise, we lower the glass unit. In order to move the sash away from the frame or, on the contrary, install it closer, we use the screw located on the side at the bottom of the hinge.
Important! If all adjustments are made correctly, and draft problems have not disappeared, this indicates worn seals, a factory defect in the frame or incorrect installation of the sashes. We check the sealing gum, and if they are normal, we file a complaint with the installer. That is why it is important to make adjustments in the first year of operation - there is still the possibility of warranty repair, and sometimes replacement.
Transfer of plastic windows to winter mode: video and photo instructions
Let's start this section with photo instructions on how to switch windows to winter mode:
| Illustration | Action being performed |
 |
Having opened the sash, we find on the end part of the eccentric. There are three of them on a standard window. The photo shows the summer position of the trunnion (the marker is located closer to the street side). We need to move it in the opposite direction, towards the apartment. |
 |
For work, you need a hexagon that is suitable in size. More often a 4 or 6 mm tool is used. But it is better if you have a set of hexagons of different sizes at hand (you need a thin tool to adjust the sash vertically and horizontally). |
 |
Having picked up the right key, we begin to turn the trunnion. The photo shows the moment of setting the "standard" position. |
 |
Turning the eccentric further, we stop in the "winter" position. We perform the same actions with other eccentrics. Then you can check the tightness of the sash to the frame. |
But a photo instruction is one thing, and a video for understanding will be more convenient. So it is worth watching a short, but very informative video on how to switch windows to winter mode:
We hope that after watching the video, the question of how to transfer euro-windows to winter mode has ceased to be relevant.
Let's sum up
Regardless of the design of the plastic window frame, adjustment is easy. The main thing is to observe some of the rules that were mentioned today. If the double-glazed windows have been installed recently and are under warranty service, it is best to call the masters from the company that installed them. This service is free of charge. However, do not expect that the settings will be 100% perfect. Get ready to tweak it yourself. But they will perform the basic adjustments, which will save the home craftsman from unnecessary work.
Subsequently, by adjusting even one sash, you can perform such work completely independently.
 If the rubber seals are cracked or torn, they should be replaced.
 We hope that the reader found the information in the article for which he came to our resource. If you are interested in other topics on construction or repair, we suggest looking through other articles of our resource. We promise that the reader will find a lot of interesting and useful information. If you have any questions, we will be happy to answer them in the comments below.
And finally, one more short video on today's topic:


