Polypropylene frame for a tourist bath. Mobile sauna with their own hands or learn to bathe in hiking conditions. Special stoves for hiking baths
We had 10 meters of three-million meters of the caprochy cord, 20 meters of four-millimeter, 3 meters of roll lightning with runners, 2 meters of red slings, half the meter PVC-250 film and a whole coil of lavsan threads, as well as 25.5 square meters of pink oxford 75D with PU impregnation. Not that it would be the necessary amount for the bath. But if I started to design something seriously, it is better to take with a margin. The only thing that caused me fear is whether we can collect all together. But I really wanted to get into the weekend!
It all began with a campaign to the water park on the coupon coupons. The roller grotes themselves are no longer so impressive, but the bath complex always goes well. And I thought after that - as it would be good to have access to such entertainment more often, in particular on trips outside the city. Later, thought stepped further, in the memories of last year's campaigns, where we often saw the remnants of homemade baths in the parking lots. I scored the search for ready-made solutions in Yandex. The most affordable is the Nova Tour N. tent - the cost of about 5 thousand, but the main minus is the frequent complaints about the quality of the goods of the new tour.
I thought and decided to go to another way. Engineering thought is, the sewing machine is, and the time and the start of the season allows. So, taking the basis of the dimensions of the new tour, we began to design the campaign bath.
The main awning was decided to do from taffett or Oxford with Pu-impregnation. Such an awning material is sold a lot where, but the shops are mainly working on weekdays from 10 to 17, which we categorically did not fit. In-depth search gave a link to the "Materials and Accessories" on Elizarovskaya, where we drove on the day of the opening of a cycle season, aligning a pleasant with useful. The store turned out to be exactly what you need. The choice of fabric was huge, all the accessories from the threads, to the lightning and all sorts of cords. Initially, I was aimed at the cloth 210d with impregnation, cost somewhere up to 100 rubles for the temporon meter. Sales also noticed the remnants of a similar material, in just 59, the truth of nuclear pink. But this is not so basically for the bath? Therefore, we saved well, and you will be waiting for a series of outlined-colored cards :)
Everything cost somewhere in 1300 rubles.
We returned home and at week began to design. First, the dimensions were outlined, the material stripes were measured (the roll of one and a half-meter width) and the location of the input and windows.
2.
Then they cried the walls and roof.
3.
The responsible moment of cutting the pattern is always coming when the error in the markup can spoil the future strongly. But everything went through this time.
4.
On the markup, pattern and work with scissors left the whole evening.
5.
The next step was the designation and creation of the windows, as well as the cutting of PVC "glass" for them. Another evening.
6.
Along the way, I began to think over the design of the stove-Kamenka. With cobblestones, everything is clear, but to fold it with a dome, with risk sooner or later, it did not want to enjoy all the design into the fire. Therefore, I decided to use some lattice as the overlap. That's just where to take it? Options from available materials were excluded, they were not. Something suitable in stores I can't remember either. The search has come to the rescue again and the solution was found - the reinforcement grid! But where to take it? I wanted the smallest cell. Similar, 50x50, was in Petrovich, but on weekdays, I didn't want to go there in the evening, but on weekends we were already going to try the finished design. The option is more or less found in the "metric" on science, no matter how I loved her. Grid 510x2000 d \u003d 4mm with cell 90x50.
Therefore, in parallel with the sewing work, I started metalworking. With variable result, but successful outcome.
7.
Initially, we went long. Note, notice and only then on the sewing machine. Therefore, one window with unaccustomed left, if without fanaticism.
8.
Slowly mounted to lightning.
9.
It turned out to be not easy. The runners refused to sit down, the signs of stitched edges popped up at the most inopportune moment and opposed we were opposed.
10.
True, as a result of watch battles, they were still defeated and sent to the place.
11.
So there were days, and Friday night came slowly. And here we realized that we only have fragments - walls with windows, part of zipper in the doorway. We do everything, not in a hurry, already the second week, and in the campaign tomorrow morning. Will-unillires had to remember the student past. Impact rates by 5 in the morning we all have mercy. Very timely replacing the desilation with a simple brine pin.
12.
The design was ready, but the alarm clock from 8 am were translated at least 10.
13.
Products were purchased back on Friday, so though late, but we have moved to the place. The most comfortable parking for such a rest, I believe, are under Primorsky, the entrance is the most convenient to the monument to Mikael Agrikola. Moreover, now it is not a season and choose a place for every taste, often already equipped with order.
14.
More active classes came to replace the cut and sew. Firewood on the stove and fire had a lot!
15.
Upon arrival thought what to wear stones for the stove. It turned out that the coast is still under the snow, and the stones must be signed one by one in the sand on the former Finnish trenches. Helped ready-made parking. Having walked along the shore on the empty camps, found a great basket, which helped me in the "time to collect stones" :)
16.
Late departure did his job. So far so-yes, slowly evening. But all the materials were collected, and it's time to mount the conservation.
17.
Location, you swing up a foil.
18.
We associate the frame.
19.
We lay out the first level of the heater, ignite the fire, we look at the result.
20.
The bonfire seems to be spoken well, so I put the grille on top and poured the rest of the stones. Now it remains only to drown a few hours and wait.
21.
If in the morning the weather was very decent, during the day there is nothing, and I already believed in the error of the forecast, then the evening showed my mistake. With darkness began morok, which passed into full rain. The stones did not want to warm up, only the top hide, but it was cold with rain. The neighboring parking lots with the remnants of the film came to the rescue.
22.
It happened amazing. Whether the film has changed the flow of air from above, or the stones still warmed up, but the fire fangled, and a great fever went out.
23.
We cut stones for some time and decided that it was time to put the bath and bathe.
24.
On 5D there is no flash, I did not take the external, so there will be no night photos. I will limit the story. We set the bath, climbed inside, led park. Of course, it was impossible to steamed, the first experience revealed a number of constructive flaws.
First, the dimensions of 2.1x2.1x1,8 could be completely reduced to one and a half meters. It would be warmer much easier, it would have weighed less, there would be less seams where steam goes. On the other hand it would be closer. Here is a stove-kamenka need to definitely make larger and more from stones. The current very quickly cooled. I think also affects the air temperature, there was only a light plus on the street. In summer, probably heat the air to the desired temperatures is easier.
But the experience is still chic! By the way, some morning frames, I can not show the results at all.
25.
General view of parking.
26.
Window povered. And inside even with stopped giving steam stones was warm for a long time.
27.
So we climbed inside.
28.
Then I read on the network that such bathrooms are used for a company of 4-6 people!
29.
But in any case, the process of creating, and the result captured us 100 percent. A little modest, and in the upcoming season it will be possible not only to sunbathe on barychka, and it's great to wave a broom!
Hiking bath do it yourself is one of the simplest options. By building a small bathing tent, you can go on a hunt or fishing, as well as in walking. If desired, this design can be built even on the country site, if the traditional option is still at the design or construction stage.
 Hiking bath do it yourself - photo
There are many manufacturer options. You can purchase a ready-made portable tent - entirely or in parts (oven, awning, frame).
 Mobile bath
  Mobile Portable Bath Mobina
  Mobile Bath Mobiba
There is an alternative option - to make a bath from a tourist tent, but exclusively a Soviet model, i.e., made of tarpaulin. It is explained by the fact that modern tents are made from tissues that are not only not designed for high temperature, but also capable of distinguishing harmful substances when heated. As for the old tarpaulin models, they are quite suitable for this: there are no harmful evaporation and the thermal insulation is good.

If we talk about creating a hike bath from scratch, then for this you will need a framework, thermal insulation material and a furnace.
| Features of the design of the hiking bath | Description |
|---|---|
| It is better to make it from aluminum racks (for example, from the trading tent), since this material is safer than a tree. In the absence of those, you can make support from young trees, then in this case you will have to carefully ensure that the wood does not ignore. To fix the frame elements, you can use both the rope and a soft wire. |
| The easiest option is the dense polyethylene film, but due to its disadvantages - low thermal insulation qualities and density - it is preferable to use tarpaulin. It is important that it was a big and solid piece of material. The dimensions of the covering material depends on how many people will be batted at the same time, but if it is not more than four or five people, it is quite enough piece of 6x6 m. |
| Here the choice is also quite wide: you can put the factory oven-chamber, you can make it with your own hands in the form of a mesh metal box made of metal rods or thick wires, and you can simply fold the well from rounded stones and put it with firewood. |


Note! A hiking bath can be performed "in white" (that is, the Kamenka is built separately, and the hot stones are transferred to the tent) or "in black" (the furnace is shutdled directly in the steam room). Today I will get acquainted with each of the options.
Important conditions
Hiking bath can be made only under certain conditions. The prival place must comply with the requirements below.
| Photo | Conditions | Description |
|---|---|---|
| First of all, there should be water. | The perfect option is to choose a place on the river bank or other reservoir. |
| There must be stones there. | It is impossible to use layered cobblestones, because when heated, they can operate into pieces, applying serious injuries to terrible. Stones should not be too small or too large, optimal dimensions - 100-120 mm, the form is somewhat elongated. If the stones are smaller, then you will not be able to accumulate the required amount of heat and very quickly cooled; Large copies will be heated for a very long time. Although in the presence of time you can build out of big stones of a kind of foundation for a future bonfire. If there are no boulders, it is quite possible to use pebbles. As for the quantity, on each person who will be steaming, 1 bucket of stones will be required. Consequently, each participant is obliged to collect a bucket of Valunov. |
| Next to the place of the privala should be thin young trees (or even better - dry), which will be used to build a frame (if aluminum racks were not prepared in advance). | From these trees you need to make a rher with a diameter of about 30-40 mm, you should also think over the way they are fastened. |
| Firewood will be required for the fire, and in large quantities, because it will burn at least 3-4 hours. | All thick logs are not suitable for this, as they are badly burning. The maximum diameter of firewood should be 100-150 mm - so they will quickly ruin and transmit all heat to the stones. |


Production of a hiking bath "Po white"
Initially, the simplest option will be considered, for which only tape and film will be required from the special material (more possibly cloves). This is here about the bath-tent "on white", i.e. the furnace will be separate from the steam.

We begin with the manufacture of placing a hiking bath.
The first stage. Making framework
There are several ways to make a framework, consider them.
Method number 1 (suitable only for Bani "in white")
To work, you will need:
- ax;
- film, 10-15 m; You can use the thinnest film - it will cost cheaper, and weighs less, experience shows that more than once the film is almost not used anyway;
- wide scotch (1 motok);
- stationery clothespins (20 pieces, they can be replaced with the same scotch).
After the preparation of everything you need is proceeding for the creation of a frame.
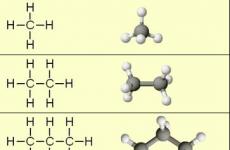
Step 1.Initially, we harm 8 stories at least 100 cm long (you can more, but the heating of the steam will occupy more time). From the poles, we build a parallelepiped or cube, depending on the number of people who will be batted. If there are many people, it is preferable to steam four people - this is the best option.

Gerdie connect scotch. Scotcha will need a lot - it is intended not only for fastening, but also to protect the film from the sharp end of the frame.

Step 2. Having finished with the frame, we build a space for stones on the side using another 3 troards with a length of 300 mm or 500 mm each.
As a result, something similar to the design shown in the image below should turn out. The base of the chamber is lined with stones.
It is worth noting that much is optional here. So, the design of the framework can be significantly simplified and performing it in the form of Wigwam. The frame in this case will consist of 3 jerseys connected at an angle.
Step 3.Next, the framework must be covered with the film. The width of the standard film sleeve is 1.5 m. Cut it and get 10 m or 15 m of a film of 3 m wide. We are tightening the finished frame with a film, we make it extremely careful that sharp ends or knots stick it.
Note! The sizes of the frame can be made so that the width of the shelter material (3 m) is enough not only on the walls, but also on the roof. In this case, the tight procedure will noticeably simplify, it will not be necessary to cut the film and make additional seams.
With the Wigwam Tightness, there will be no problems at all.

 The trunks of trees were used as racks. Film is fixed between them
  Chaolash Hiking Bath
  Ban from within
Step 4.Fresh film to the frame using clothespins or ordinary tape.

Step 5. From the side of the entrance, we leave the amount of film as sufficient for the "door". The entry needs to be reliably close so that pairs from the tent did not go out. This can be done in one of two ways:
- credit the film by cloves from the inside;
- leave at the entrance of the person who will hold the "door".

Almost finished bath
Step 6.Using heavy stones, press the film to the ground around the perimeter.

Step 7. To cover the floor, you can use a husky, which not only smells like, but also useful for health. You can sit directly on the booth, although there are other options: to lay a small tourist rug, make folding chairs or hemp.
Prices for film
roll film
Method number 2 (can be used for Bath "in black")
We use fir-handed materials - for example, four ventilated branches with a length of 1.4-1.5 m. Using tape, we associate two branches in length and set the cross-crosswise. Of course, you can try to find a couple of long branches to cross them, but it will be quite difficult to find those that would have the desired size. You can also build a square design, as described above, but it will require more time and strength.

If the bath is big, and the standard 3-m wide for this is not enough, you can connect two pieces with each other using the stationery cloves.


Method number 3 (can be used for Bath "in black")
From profile pipes you can cook the collection framework. To assemble it on the site of the prival, just a few minutes. In the image, it can be seen below that metal tubes in 60-70 cm long used for the manufacture of such a frame (16 pieces will be required).
Table. Frame Connection Elements
For this, the pipes of a larger diameter were used.
In this case, the thermal insulation material is the awning, pre-stitched according to the size of the structure.

 Awning carcass

Method number 4 (can be used for Bath "in black")
The easiest way is as follows: it is necessary to purchase a regular double tent, cut the tarpaulin, and to use tent arcs as a framework.
Often the tents are put entirely, but according to the reasons described at the beginning of the article (the unpleasant smell, the possible release of poisonous substances) is better to use the film.


Having finished with the frame, proceed to the manufacture of the stove.
Stage second. Stove
To create the stove will be required:
- river stones of the above size, approximately 25 pieces (it is not from the river, but from the shore);
- supper shovel or a slingshot of branches (to transfer cobblestones to the steam room);
- firewood.
Note! Once again I remind you that it is impossible to use fragile stones (such as sandstone), because at high temperatures they can split.
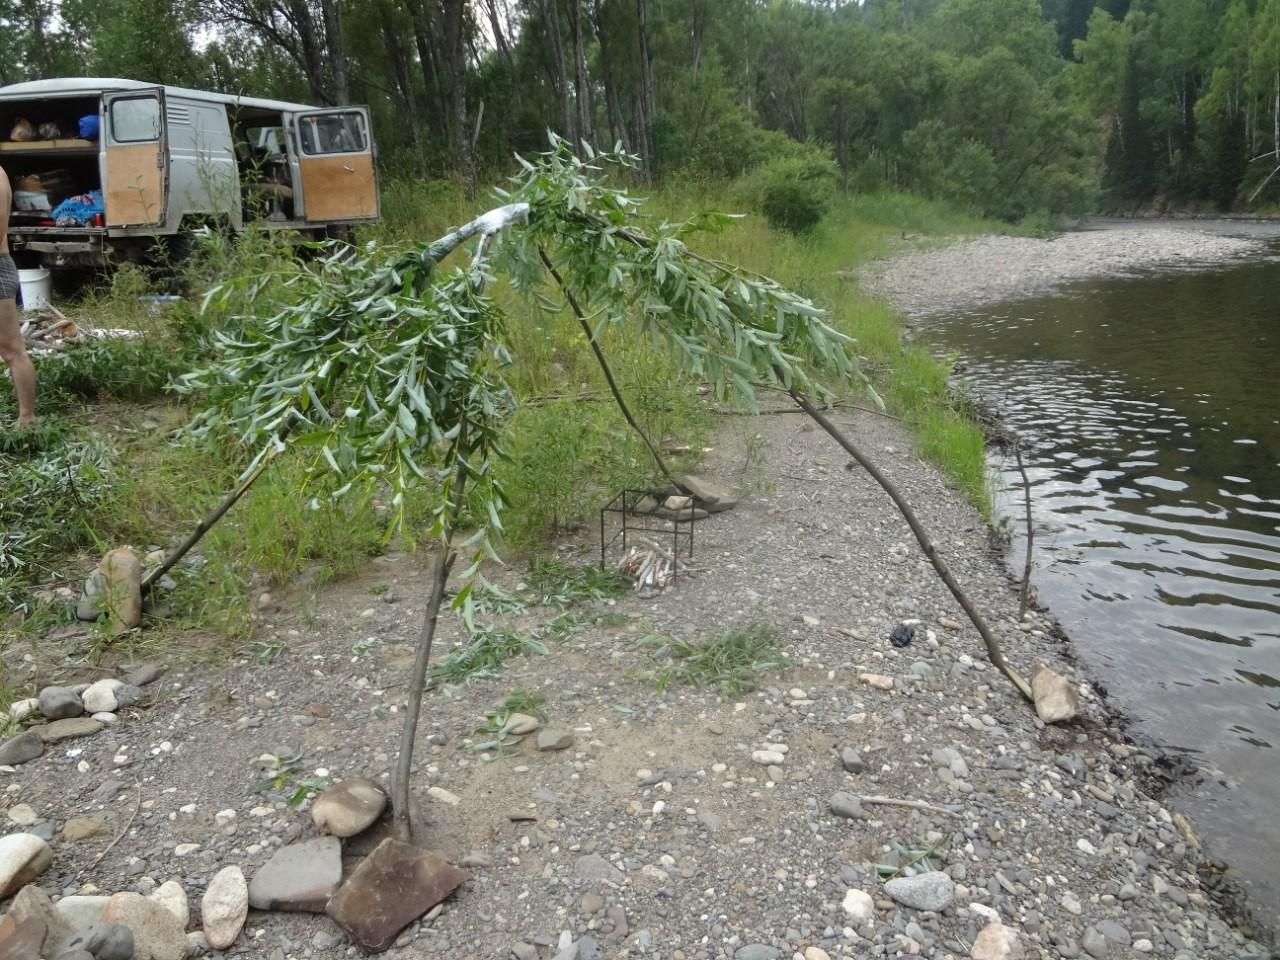
Step 1. From the assembled stones, we build a well about 10 m from the bath. It is important that the well is sustainable, so it is better to take flat stones for it. From the first time it may not work, so it is necessary to gain patience.


Step 2.After that, we put stones to firewood so as to completely hide them. Gilt firewood.

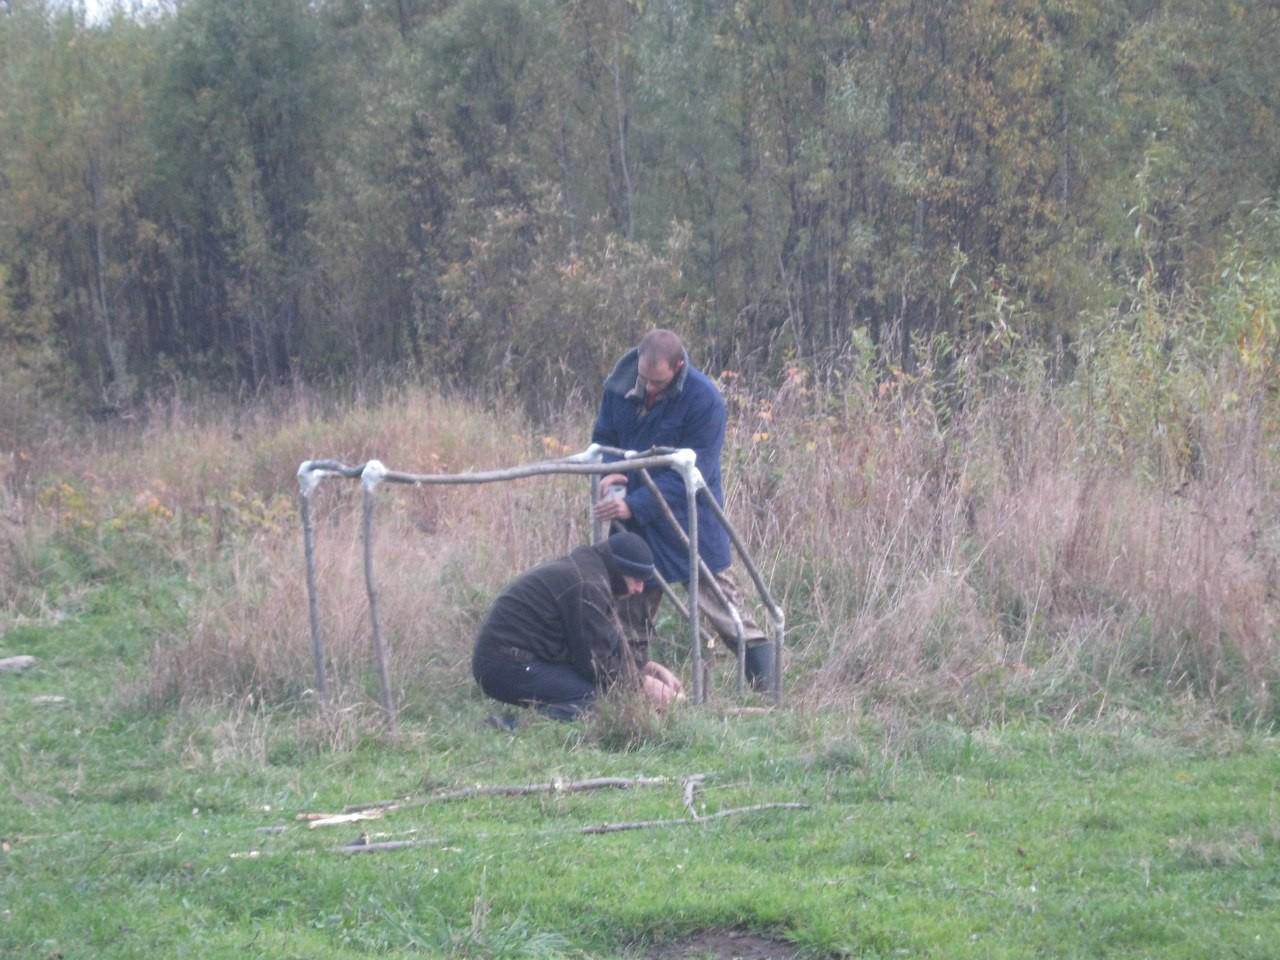
By the way, the film on the frame can be additionally covered with the same sweetheart or branches (as shown in the images below) so that the steam room holds the longer heat.

Step 3. While the stones are warm, prepare a sapper shovel or slingshot. In order for the stones to heat up to the desired temperature, you will need about 1 hour. Throughout this time, firewood should be intensively burning. After heating, the stones are transferred to the bath.


Note! It is advisable to carry stones together to not allow them to cool. Also inside the tent it should be pre-put several plastic bottles with warm water, which will be fascinated by hot cobblestones.


Prices for a hiking stove
hiking stove
Video - Portable Bath
The main difference of this option is that the heated stones will not need to be transferred from the fire to the steam room. A large frame in this case will be made directly on top of the hot cobblestones after cleaning the coal. Manufacturing procedure begins with the construction of the furnace.

The first stage. Bake
Here are two options, you will get acquainted with each of them.
Option number 1
We fold a bunch of stones and we do a hole in it for loading firewood (on the image the hole is from the back side - where the smoke comes from). The stones will need much more than for the bath "on white", but the form, nor the size of a special role is played.
It is worth noting that this option is quite complicated in execution, so you should be prepared for the fact that a bunch will constantly collapse.

Option number 2.
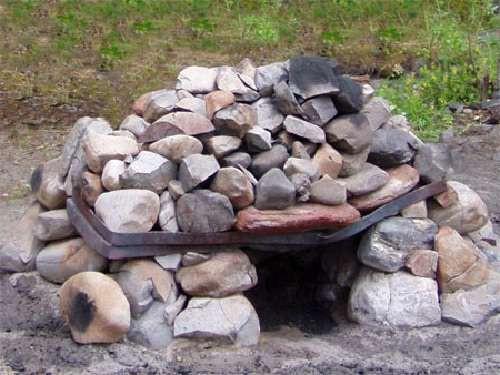
With the help of the welding machine, we make a small frame in advance (in 40-50 cm high, the width is similar) from the reinforcement rods with a diameter of 5 mm. Already on site ready-made framework we are stoned. The main advantage of such a design is that the stones will rely on the frame, so they do not break down. At the same time, they will need more time for their heating than in the described variant.


Note! In addition to its direct destination, such a frame can serve as a kitchen oven, and if you put a sheet of plywood from above, then as a table.


Option number 3.
Here at a predetermined platform, you must lay out the foundation of the heaters with the sides of 100 cm, it is pre-breathing under it a small hole in a depth of 50-60 cm. We make the base from flat stones, laying on top of it rectangular stones with dimensions of 0.4x0.5 m in increments of 25 -30 cm.


On top of the boulders, we set the stone slabs in such a way that the center of the construction was a small through hole, by means of which the fire will reach the top of the heater. At the end, put another stove (it can even be a grid or a sheet of thick metal), which will close the central hole.
Having finished the construction of the oven, loading firewood and set fire to them. Stones, as noted above, will be warm enough. We support all this time intense fire, periodically put firewood. While cobblestones are heated, proceed to the framework of the frame.
Stage second. Frame
We make a frame of one of the possible ways (on the images below - the design of 4 jersey). When stones are warm up to the desired temperature, we remove the corners and cover the frame of the film. In the perimeter, we add the film by large cobblesties, whenever possible weolate the floor with a sweetheart. Everything can be proceeding directly to bath procedures!
For comparison: how much is the factory bath tent?
Today, hiking baths are produced by Russian, and foreign firms. The price of the finished model ranges within 25000-30000 p. (The kit consists of a heater, hood and thermo tents). The amount is considerable, but you can save: to build a frame yourself and buy only a small metal stitch. In this case, the costs will be about 9000-10000 p.

Tips for using hiking bath
- Despite the fact that the manufacture of such a bath requires a large number of time, long to bathe in it will not work anyway, because the stones are cooling quickly, especially if they water them.
- Stones with visible defects at high temperatures can shoot small pieces, so you need to stay from the oven as possible. It is worth knowing that after watering stones water, the risk of their cracking is minimized.
- The furnace must be installed in the opposite part of the tent from the entrance - it will go to go that will go safer.
- The main minus of the bath-tent lies in the low temperature in the earth. Therefore, under the feet you need to lay something, otherwise you can still catch a cold.
Video - Making Bath Manufacturing Instructions
It is impossible to express in the words of the feeling of delight and updates, which is experiencing a man after a good bathhouse. If the bathing procedures were carried out after severe physical work, a long expedition, hunting, fishing, or just staying in the forest, mountains, near the river, the effect is inexpressive. Hiking sauna with their own hands - this is what you need to be tired to restore your forces, communicating with nature.
A bit of history
It is believed that our geologists, gold killers, taiga hunters and just travelers borrowed the idea of \u200b\u200ba hiking bath in the nations living in the plague, covered with deer skins with a hole at the top. In the middle of the plague burned the bonfire, covered by stones. When the stones warmed well, they were watered with water. That's all the bath! A similar hiking bath is available for our travelers. Rate our photos, they can prompt you useful ideas for incarnation in reality.


Different variants of hiking bath
The idea of \u200b\u200bTaigtikov picked up the industrialists. They developed a project of a bath-tent in modern execution complete with a stove, collapsible frame, fire-resistant covering. This option enjoys some travelers going on the path at a spacious car capable of transporting all components.


To install such a bathhouse will not need great experience. All components ideally become in place. The stove, working from wood, has the output of the chimney and provides good heating and soft pairs. There are two disadvantages in such a portable bath: the need to use transport and the high price of the finished kit.
A more modest option is a home billet, in which metal tubes are suitable for frame, tarpaulin, stones, metal blank for a furnace. Made of modern materials, such hiking baths also require transportation and cash investment. There may be a furnace-heater, made of cobblestones, or a finished stove with a chimney.


The most optimal, inexpensive option - a hiking bath with your own hands, made of dried trees, stories, fir branches. For the Kamenka, stones lying on the shore of the reservoirs are suitable. Firewood for the hearth is also gathering at the place. All materials are natural. As a last resort, you need to pluck the film with polyethylene or tarpaulin segment and the rope for fastening the film or tape. Although in this case, travelers can take advantage of the young scroll of deciduous trees.
ATTENTION: When the sauna device can not be used by modern tourist tents made of synthetic material, they are weakly resistant to ignition.
Stages of work carried out during the construction of their own baths
Hiking bath do it yourself - is not very simple case without preliminary home preparation. But our people are "sly on fiction", they will be able to make a small bathhouse on 2 people and such where several people can sit.

For the construction of a mobile sauna, you need to choose a place near the river or other reservoir. After all, the water will need for washing, watering stones.
1st stage: Kamenka device
The most important point in the construction of an improvised sauna is a focus device.

From the way pebbles warm, the entire effect of the guy will depend. For the oven you need to prepare large stones. They warm longer, but also "exuded" more heat. They are folded in such a way that inside it turned out to lay a 50-60 cm depth of wood for long lane. The inlet with a width of 40-45 cm and 40-45 cm in the height will be convenient for lining wood and maintaining fire. Specialists performing not the first time a fireplace fireplace device, choose for this stones of a certain shape, which add up to each other reliably, but not too tight. In order for firewood well burned, they need oxygen access. Competently laid cobblestones provide air supporting air access. Do not apply granite and stones with a non-uniform or layered structure for the sauna. For the sauna, cobblestones are most suitable for a round or oblong form.
Screen billet.
Some travelers bring a blank from steel rectangular rectangular rectangular fittings, which will serve as a furnace with a sauna device, and in other cases an improvised table, a chair.

ATTENTION: Turn the heater needs no less than 5 hours. The result of all works will be a hot sauna, in which you can warm 2 hours. The number of pyrachikov depends on the size of the hiking bath.
Tip: In order for the stones to heat well, it is necessary to prepare firewood, giving high heat transfer. It is desirable that the company was one person responsible for the furnace-heater furnace. It is impossible to allow the furnace to extinge, and then melted again.
2nd Stage: Frame Production
While the oven will be treated, you can mount the frame. It is made by any convenient way. In some cases, even use trunks of growing trees. The easiest and safest way to build a bathing bath is not thick round.


The frame can be mounted a square, rectangular shape or in the form of a shala. Rounds are knocked into the ground and fix in different ways.
Council for building baths from undergraduate materials: In order to ensure the best stability of the structure, the roof diagonals can be combined with jerseys. In some cases, you need to connect the sidewalls.
Some "experienced" travelers use for frame tube from a tent, a board, metal pipes, pre-prepared and brought by the car. This option will significantly reduce your work, but again it requires the use of vehicles.
3rd stage: internal arrangement and preparation of benches for seating
The floor inside the steam room can be displayed with branches, moss, install benches for seating. For a low shop, a rounder will fit (for several people) or hemp - on one seated place.
Finishing stage
Taigtians first "stick up" the bathhouse, and then remove the coals, ashes. It is performed when the stones warm well. The ashes and coals are absorbed by a shovel or a wide stick. The remaining coals need to be put out sand or moss. This is done in order to "not be lit" (not to choose carbon monoxide). Then the frame is wrapped with a film, fasten with rope or scroll. In order for the film to do not inflate and kept tightly, it is possible to dig a ribbon foundation around the heater. A covering film at the bottom is pressed by stones, sand, cobblestones. When arranging a hiking bath, you need to provide a way out. Each builder has its own version of the input window. It is performed, depending on the design and size of the bathhouse, construction methods and the existing material. An ideal option for covering the bathhouse is the old tent without the bottom. In the afternoon, it will serve as a cover for the sauna, and at night - it will perform its own direct function. But in this embodiment, there is a minus - weak illumination.
Steering process in a hiking bath
Pairing in a hiking sauna, watering hot stones with water. At the same time, a high temperature is achieved in the plague, causing sweating and a pleasant feeling from natural flavors. In such a sauna, you can warm up well, relax, remove the cargo of everyday worries. We will not be superfluous in the hiking sauna there will be a broom brought with it or made of fresh birch or oak twigs. Fresh broom in a hiking atmosphere is beaten with cold water. In the water for watering the stones, you can add fragrant herbs, leaves, chevy, balms.
Output
Armed with the proposed ideas and knowledge, you can not be afraid that in the campaign it is impossible to wash. If you wish, you can find the stones of the corresponding sizes, firewood for the hearth, barcass trunks. If there is no film, in this case, pine or fir green branches will be able to help.

True, an elevated comfortable temperature in such a hiking bath will be kept much shorter. Each is your choice!
Today I will tell you how to build a hiking bath with your own hands and not to suffer at the same time \u003d)
And then in the taiga, you know, anything happens ...
To drink, eat, sit by the fire, talk - this is of course cool ... But the coolest, without jokes, in the taiga is a hiking bath, and it is self-made, when you praise with your own hands, well, or took part \u003d)
Such a sauna is almost all.
Before writing this instruction, climbed into the Internet, looked like there with the coverage of this question ...
In general, it is good with lighting, I would even say that there is a powerful such lighting, almost searchlights shine ... but ...
I noticed two curious moments - either the bath is put on the purchase (including the stove), or homemade, but such sizes and design, as if there will be a motorized rifle platoon ... it can scare it ... it can scare away - buy expensive, and building a hefty design - troublesome ...
Both, both, in my opinion, or impractical, or suitable for a large company, stuck with a camp for several days, or in general a majority ...
I want to tell here how we do, when the departure for a couple of days (respectively, the bath is needed for 1-2 pm), the company is small, and with a grain material or a problem, or I don't want to bother ...
To begin with, we consider the easiest option in which only the film and the tape is taken to the manufacture of special materials for the manufacture (also, possibly cloves).
So ... how to make a hiking bath with your own hands ...
Frame
First of all, we need to make an acting room in which we will bathe.
What will take:
* Toporic
* Wide Scotch (Minimum 1 Motor)
* Local vegetation (Ivnyak or something else, the main thing is that the branches are smooth)
* Film. Meters 10-15. Take the finest, it will be cheaper, and it is easier to carry. As practice shows, more than 1 times the film is used well, it is very rare, so it is not necessary to break.
* Stationery clothespins (pieces 20). You can use the same tape instead.
When suitable branches are found, start doing the frame.
We need 8 sticks long minimum meter. Maximum - at your discretion. Suddenly, you have a basketball players or sums there. \u003d) It is better not to do a lot more meter, it is problematic to warm the steam room.
Of these 8 sticks, you will make a cube or parallelepiped, pretend to be what sizes you need it to fit. If the company is big, then it is better to bathe in part of 3-4 people, a motorized rifle compartment in such a bath is not recommended at a time)). 3-4 people are quite optimal.
You can make more spacious premises, but then the frame is different, and the firebox is specific, about it in another post.
So, take 8 long sticks and make the framework of the main premises, where people will sit. Sticks fasten with a scotchball among themselves, and no need to regret it. In addition to the attachment, he will also protrude and will not give the film to the acute ends of the frame, because the ventilation in the bath is completely nothing to do ... 
When the frame will be ready, added to the side of the stitch)) There will also be three more sticks for 50 cm and three to 30. 
As a result, you should get this design. The stones posted the bottom of the future "stove", however, it is optional. In this bath, there is generally more optional \u003d) the main thing is to catch, and then there is already a space for creativity ... 
By the word about optionality and work ... you can not bother at all and it is simpler - just three podlitsa podlins at an angle from the main frame. At the same time it will be necessary to just closely monitor so that hot stones accidentally do not pay the film where we put them. 
If the time in the edged or very badly with natural material (we once stood on the island almost without trees), then you can make an economy version in the form of Figvama ...
Here you can see the frame from only three branches. It will be cramped, but it is better than nothing ... in Tesne, as they say, styled)) 
The next step is to tighten the frame of the frame. Usually sleeve films of the width of a meter and a half. Cutting it, we obtain a film of 3 meters of width and 10-15 meters of length (surplus in case of which apply in the farm - firewood there to cover from rain or beds to cover Caica \u003d)).
This film is tightened by the frame around the perimeter. We do it carefully so that any knots do not sneak the film. I repeat, we don't need a colander ...
For convenience, it is possible to make such a frame size, so that the width of the film (3m) has been enough for the walls, and on the roof, then the tightness is carried out quite quickly, without unnecessary hassle in the form of additional seams and everything is made from a single piece of film (including the door). Everyone likes to love and quickly and quickly? ..

Turn on FIGURS \u003d) 
Clothespins or scotch fasten the film on the frame. 
From the other side, from where you come to the bath, leave enough film on the "door" and think how to close it look so that steam does not go out. We either from the inside clutches to the film fasten, or someone at the entrance sits and sticks the door \u003d)) 
In the earth in the perimeter, the film is pressed by stones. 
The floor in the bath can be lined up. The smell is pleasant and healthy is useful. (See the topmost picture). You can sit right on the booth, you can put a hemp, chairs folding, tourist rug. In general, optionally at your discretion \u003d))
Stove
Now, understandable, the steam room must somehow warm up.
What is needed for the stove:
* River stones in the amount of 20-25 pieces (not necessarily straight from the river, better from the shore \u003d)))
* Dry firewood,
* Rogatulins from branches or sapper shovel to wear stones from a fire in a bath
Stones are needed by a medium size about 2-3 male fists. If your girlfriend is engaged in weightlifting or bodybuilding, you can stand it with fists)))
Remember that too much the stone is more difficult to warm up, and the little cooled will cool. The shape of the stones is desirable oval-flat, but here it turns out, no one specifically decides on the shore of the stones of the desired size and shape \u003d))
In no case do not use a sandblast or other fragile stones that can split either in the fire (this is still okay) or in the bath itself (it will be sad). Shard wounds to us in a taiga for nothing ...
The collected stones are folded in the form of a well nearby (meters at 10) from the bath, so that while you will sort out the legs, the stone is not cooled on the road.
The well should be sufficiently stable (for which they needed flat stones).
After 4-5 times we ruin everything nafig and ignore, you should have exactly, we believe in you \u003d) 

Next, carefully peel the well to firewood so that the stones are not visible, well, and ... Mahmoud, ignite! (from).
It all depends on the presence of firewood and your desire.
The fire may turn out so small and neat: 
And maybe this: 
Or even here, from the series: I do not refuse yourself \u003d)
Please note, there is also a frame from above covered with branches, so that it is warm to keep it longer, and for entourage))) Straight some partisan camp with a slurry and alarm bond for aircraft))) 
While the stones are warm, prepare horns or sapper blades to wear heated stones in the bath. Here, too, you need to pre-eat, experience ... He is the son of difficult mistakes ...
Stones warm to the desired temperature for about an hour. Firewoods must be actively burning all this time, no coals for kebab or potatoes, we do not yaw, put firewood as they are combustion.
As soon as the stones have grown grate with coatulins or shovels in hand and a mild walk in the pace of the Waltz quickly wearing hot stones in a bath. It is better to run in a pair, so that you pull everything faster and do not cool, we still want to get out, and not just to work out the physical culture ..
Do not forget about security techniques - stones will be very hot. You do not need blisters in the taiga, as well as fragmentation injuries?


The process went
Well, then happens then, for which it was still treated \u003d)
Those who want the bullet fly inside, close and ... let the whole world wait \u003d)
Put in advance in the couple of semi-cable bottles of cold water in order to water hot stones, but what will happen later - you know without me, in the bath everyone was at least once))
Above the ferry can be held with the laps - it turns out a great effect. You can even attach through brooms if there are brooms and a space for a duel \u003d)
However, it is optional ...
As for any bath, it makes sense to wear a head if not a special hat, then at least a Panama somehow relieves suffering significantly \u003d))


And here is just in cramped, yes ... what are the insults there at such a temperature ... 
Help!..... 
Well, as soon as it comes to "staying there is no more strength" the same bullets fly and buy-buy in a mountain river))) awesome, I tell you, feelings ...
Thus, the heated stones, in such a type of bath there are enough approach to 4, after which the stones are already cooled. I want more - then you need a bath type "Major", which I will tell next time))) 


After all this, you can also arrange a photo session ... 


Well, naturally .. and I was there, honey beer saw \u003d))) 
Next time we will talk about the homemade hiking bath type "Major" \u003d))
Thanks for attention)))
Speaking about the bath, we mean not only the opportunity to quietly wash away, we are talking about health. Going on a campaign, we also go for rest, health, beauty and energy. So, the bath in the campaign is health in the square! And how to strengthen it? The only option is a mobile bath. That's how you can get it, we will talk ...
Who and why do you need hiking baths?
Remember how you wash in a long campaign: after a whole day of active recreation (from which, by the way, you get tired more than from hard work) You find the first reservoir, break the camp next to him and put yourself in order how God gives it. Sometimes, it happens, you have to go to bed with a scorge wash. No pleasure. Now imagine that you have the opportunity to lie down not just clean, but relaxed and rejoiced after a good bathhouse. The difference is huge! And you feel it immediately! From how you rest at night, the whole day depends. Make conclusions ... Often the baths hiked by dachas who do not have the opportunity to build a full-fledged building. Also, this is a great option for the construction team, for a long time "tied" to the object near the reservoir. In general, if you know the price of a good rest, take care of the health and love the steam room, then, of course, the mobile bath is for you.
What does a hiking bath look like?
The design of the structure is almost no different from the usual: it will take a closed space that performs the functions of the steam and oven for the hiking bath.. Sometimes in hiking conditions do not use a special furnace, and they build something from stones resembling a fireplace in which the fire is bred. Stones are then put in it. The most important thing is to warm up these stones so much to get the right amount of hot steam. If such a homemade "oven" is installed, then it is usually tried to find rounded stones, because flat and layered can crack. Floating, in different directions, the fragments of stones can arise around others, so during the warming the bath it is better to stay away or go to others, more "civilized", by purchasing a finished furnace, and possibly the whole design.

While the stoves for hiking baths heat the stones, you need to build a frame from Geria. You will need four vertical racks, four more porses for connecting from above. Four diagonal stiffs will keep the "walls" and two more - "ceiling". Having gathered the frame, it needs to be covered with its plastic film - it will be a kind of warming of the steam, the cracks must be carefully closed. This will be the steam room. To get down, you will have to constantly throw up firewood. It also does not have to count on high temperature. So, it is labor, but "one-time" option. It is better, of course, to make anything more reliable and durable or still go to the finished design. Read on all this further.
Finished hiking bath: what, why and how
As for ready-made mobile designs, there is a choice here. You can just buy a tent for mobile wage or with a stove. There are also separate awnings to which the frame is not attached: you will have to assemble it yourself.

If you buy a ready-made kit together with the furnace immediately, then the problems will be treated "in the field" you will not be at all, but it is desirable to have any vehicle: not so easy to wear a tent and stove, even if even Maximum lightweight. But this is the perfect option for dacms and builders.
You can simply buy a special awning based on the fact that in the place where you are planning a rest, be sure to have a ride for the frame. You can also buy a bathing tent in which the frame is already provided. In any case, it is convenient: the problem of heat loss is solved much easier, since these awnings are perfectly held by couples, unlike the plastic film. Only a stove for hiking bath will remain. Completing it correctly, you get a full-fledged steam room - warm, cozy and, most importantly, hermetically closed.

How to make a hiking bath: features
If you firmly decided that you need a mobile sauna with your own hands, boldly construct it. There is nothing difficult in this. How to do it? You will need the following materials and conditions:
Frame
For frames need racks. It is quite suitable carbonted or aluminum. Take ready-made racks from 4-bed tents. It is believed that they may not withstand the "bath" temperature, however, practice shows that these materials are quite safe and relatively durable. You can, of course, use and wooden rods, but they are unreliable and quickly fail. In addition, the tree is a fuel material, and you will constantly have to worry about security.
Purchase material
If you do not buy a special awning, then take the usual wide polyethylene. When buying, watch not to be mistaken with a piece of sideways. Calculate it, based on the fact that the area you need to hide is 6x6 m. This amount of material is enough for the construction of the steam room for 6 people. Some of our practical compatriots have adapted to use as ancient material of old banners. You can try and you. The main thing is not to risk and do not put a regular awning from a modern tent, otherwise you will definitely definitely with him, but the tarpaulin tents of Soviet times have perfectly withstand temperatures.
Conditions:
Firewood
You need to put a mobile steam room in place where there are firewood in excess. Moreover, for the bath you will need dry firewood with a maximum of 10-15 cm with a diameter. Do not harm too thick logs.
Stones
They also need to prepare in advance. You will need approximately a bucket of stones for one approach. Drive more - good. Pick large rounded boulders. Carefully inspect the finds: stones with chips and impurities of other breeds, flat and layered do not take any way. If you failed to collect the right amount of large stones, take more small pebbles.
Water
Hiking bath is constructed on the shore of the reservoir. If necessary, adjust the dam in advance so that you can reappear normally.
Phased instructions built
Stage First
Place firewood in one layer on the ground, and on top of the layer of stones. Divide the fire. When he defeats well, put the second layer of firewood, after which - again the stones. The procedure for making firewood and stones continues until all the collected stones will be in the fire. After that, just maintain a good flame. The fire must give a good heat.
Stage two
Take the prepared racks and install the cross. Frame Collect not far from the fire. If you decide to use porshi, then they should be a thickness of 3-4 cm. With the help of a rope, scotch or tapes, build a cube without a bottom or shala, closing the ends of the tart to the cloth so that they do not break the polyethylene.
Stage Third
When the stones in the fire will become red, it's time to install the tent. Take a shovel or long thick sticks and rush stones from a fire in the frame. The ideal option is to dug a fence in advance for them to not drive throughout the camp. When all major stones are under the frame, remove all the small fragments and water to be swallow "track" on which they rolled out. So you will save the future tent, and your own legs. Next, cover the frame of the film, avoiding the place where the stones are located. The edges press to the ground with pebbles, logs, can sprinkle with sand. The steamer is ready. With the opposite side of the stones side, make the entrance.
If you make a bath hiking in black, then the frame and awning can be put right above the fire. In this case, the stones will not have anywhere, but the fire is preparing a little different. You can build something like a stove letter P, put over the usual bone a box with stones from rods or thick wire, or build a design like a pyramid with a large boulder in the center. Keep in mind: such a bath is less safe, so constantly monitor the materials to be burned and did not melt.
Some nuances of the hiking bath
Remember: Stones during heating are severely crack. So try to stay away from them. But there is also good news: when you wipe them, they are no longer scattered on the fragments, so you can safely bathe. Making conclusions about how high in the room temperature, you can, watching the ferry. If it rises up the hot wave, then the temperature is high, you can stay long. And if the couple spreads across the entire tent thick fog, then this approach is the last. Lack of hiking bath - in a relatively low temperature in the earth. In order not to catch a cold, squeeze the rug or dry grass under my feet. War on your health!