Smart hard drive testing. Check hard disk for bad sectors
Or removable USB HDD devices are almost the most common. That is why comprehensive measures for checking the hard drive need to be given primary attention. Now we will try to briefly consider what a HDD check is in several main areas, and give an understanding of the basics of the methodology for correcting errors of various types.
Why Hard Disk Errors Occur
There are many reasons for failures, both in software and in physical terms. First of all, this should include a sudden power outage, which is accompanied by a short-term increase in voltage. And if we take into account that at that moment, say, data was copied, it becomes clear that mistakes cannot be avoided.
Something similar is observed in the case of an incorrect shutdown of the operating system, when the computer terminal or laptop is forcibly turned off by long pressing the power button.
It's good that the next time you turn it on, the standard program for checking the HDD, originally present in any Windows OS, starts automatically. True, not everything is so simple here either. The fact is that the HDD check can start over and over again on subsequent system boot-ups. This is due to the fact that the "native" application simply cannot fix system errors on the hard drive automatically. How to get rid of the constant launch of this process will be discussed a little later.
HDD check: main directions
Before proceeding to consider the issue of the work of numerous testing tools for the hard drive and fixing errors, we will consider the main directions that are provided for the complex verification system.

For example, viewing detailed information about a device is considered to be the simplest method. Today there are many different utilities like Everest, CPU-Z or CPUID Hardware Monitor. I must say that such programs give out the most detailed characteristics of the device, and at startup even the HDD speed is checked (or rather, the spindle rotation speed).
Another area is testing the hard drive for system errors in order to fix them later. In this case, the HDD is checked for bad sectors.
This process is somewhat reminiscent of defragmentation, only in the case of defragmenting the hard drive, frequently used files and applications are moved to the fastest areas of the HDD (with a change in the physical, not the logical address). Checking the HDD for bad sectors functions in a similar way. The program itself reads the current address from the damaged sector, and then overwrites it into a normally functioning one. As already clear, in this case the logical address remains unchanged.
The third priority is to check the surface of the disk, because the lifespan of hard drives is limited, and physical damage simply cannot be avoided. It is clear that by the end of its service life, the hard drive can simply "crumble", and in most cases it will have to be thrown away. Although, if the damage is not too serious, you can restore the hard drive, for example, using special resuscitation utilities. We will consider them separately.
It goes without saying that you cannot ignore data recovery on inoperative hard drives. Actually, this is often done by various federal services when investigating computer crimes committed by hackers, when the corresponding equipment is seized from them. But let's not go into the jungle. Checking HDD sectors can also be carried out by an ordinary user. The main thing is the availability of a set of special utilities.
HDD check and error correction using Windows
Now a few words about the built-in tools of the Windows family. They also have an HDD check. Windows 7, for example, is no different from its predecessors and successors (XP, Vista, 8, 10).

Such a tool is called from the usual "Explorer" by right-clicking the manipulator (computer mouse) on the corresponding disk or logical partition. Properties are selected in the menu, after which the transition to the corresponding tabs is carried out, where you can carry out maintenance.
When calling such a service, it is strongly recommended to set the parameters, when activated, the HDD will be checked. Windows can also automatically fix system errors. True, this approach may not always help. It so happens that the system issues a warning that it is not possible to automatically correct errors.

In this case, it is better to use the command line or the "Run" menu, where a variety of commands are written, depending on what exactly needs to be done. The simplest command of this type is "chkdisk c: / f" (testing with automatic system error correction). For NTFS file systems, you can use "chkntfs / x c:". By the way, it is precisely this type of manipulation that allows you to get rid of the annoying check of the hard drive when you restart the computer terminal.
In general, it is better to read the background information on the use of a particular command, because checking the HDD disk can be done in completely different ways, depending on which letters will be written after entering the main command.
Informer programs
As for information applications, you can find quite a few of them. As mentioned above, the most famous are utilities like CPU-Z or Everest. But these are programs, so to speak, of general purpose.

CrystalDiscInfo is considered to be the most acceptable and most powerful utility that combines the functions of an informer and a scanner. By the way, it is capable not only of displaying information on the device, but even controlling some basic parameters, for example, changing the spindle speed.
Programs for checking HDD for bad sectors
Speaking about what a program for checking HDD for bad sectors is, it is worth mentioning separately such a powerful utility as Victoria, created by a Belarusian developer.

The application can run both in standard mode in Windows environment and in DOS emulation. What is most interesting is that it is in DOS that the utility shows its maximum capabilities.
Checking the disc surface
Testing the surface of the hard drive (Surface Test mode) can be used in the standard tools of the Windows OS itself, or you can turn to specialized utilities such as HDDScan.
It is noteworthy that the software package itself is released as a portable version and does not require installation on a hard drive. It goes without saying that you can start the scanning process even from a regular flash drive, using the default settings or applying your own (they are located in the Process section).
Of course, the program will be able to identify problems with the integrity of the HDD surface, but it will not reanimate a damaged hard drive. But here, too, there is a way out.

Resuscitation programs
Even a damaged hard drive or a removable USB HDD can be reanimated thanks to a unique development called HDD Regenerator, which, when it first appeared, made a lot of noise in the field of modern computer technologies.
According to the developers themselves, this application is able to restore physically damaged sectors of the HDD surface using the technology of magnetization reversal. It makes no sense for an ordinary user to delve into all the subtleties of the technological process. The main thing is that the program works perfectly. From the outside, this may seem strange: how can you programmatically re-magnetize a hard drive? Nevertheless, in combination with the use of physical methods, this process has become possible for use in stationary computer systems. Winchester does not even need to be dismantled.
Data recovery
The situation with data recovery is somewhat worse. This is understandable, because not every utility is capable of working like an HDD Regenerator.
Of course, you can recommend using some software packages like Acronis True Image. But such a utility works on the principle of creating a backup copy. In case of damage to the hard drive or accidental deletion of information, it is better to use tools like Recuva, PC Inspector File Recovery or Recover My Files. But even they cannot give a full guarantee of data recovery, for example, in case of physical damage to the HDD.
By and large, with a sufficiently large volume of the hard drive, it is recommended to create backup copies of data in advance. Then you don't have to look for specialized utilities or puzzle over how to recover the lost information.

Comprehensive solutions for HDD testing
In order to carry out a comprehensive check, including the prompt receipt of information on the device, actions that provide for a complete check and repair of HDD failures and damage, data recovery, etc., it is better to use several software packages together. For example, as a last resort, the combination might look like this:
- information stage - CrystalDiscInfo;
- full HDD check - Victoria;
- surface test - HDD Scan;
- recovery of a damaged hard drive - HDD Regenerator.
Which program is the best?
It is not possible to say which program is the best for checking HDD or removable media, since almost all utilities have their own specific direction.
In principle, among the main applications for checking and automatically correcting errors, the Victoria package (high-quality HDD error checking) can be highlighted, and in terms of disk recovery, the HDD Regenerator undoubtedly belongs.
Conclusion
We briefly talked about what HDD testing is and what some types of software products are intended for. However, in conclusion, it is worth noting that it is not recommended to bring your hard drive to an extreme state, you need to check it at least once a month. This approach will avoid the emergence of many problems in the future.
In principle, you can set an automatic check of the hard drive on a schedule, even using the standard "Task Scheduler" Windows, so as not to call the process every time in manual mode. You can just choose the right time, but here you need to take into account the moment that when the testing process is running, it will be extremely difficult to work with the system.
By the way, even the installation of a conventional uninterruptible power supply unit or stabilizer will protect the hard drive from the harmful effects associated with power surges or power outages.
You can check your hard drive for errors and fix them both with the help of third-party programs and through the built-in services that are in Windows by default. Below we will consider several ways to automatically check the hard drive and fix the problems found on it.
Check disk for errors in Windows 7
Diagnostics can be performed through the Command Prompt, Disk Properties, PowerShell, and Control Panel. Each of the proposed options scans the disk for errors of various types, therefore it is recommended to use all three instructions and only after that, if the problem is not found, resort to diagnostics through third-party programs.
Checking the hard drive using commands
Through disk properties

Video Tutorial: Checking HDD
Through PowerShell

Using the control panel

Using third-party programs to diagnose and check the hard drive for bad sectors
If checking the disk using standard methods did not bring the desired results, then you can use third-party programs that perform disk diagnostics.
You can download the program for free from this site - http://programdownloadfree.com/load/system/test_hdd/victoria/71-1-0-122. Its capabilities and advantages are in the following parameters:

HDAT 2
Similar to the previous application, but supporting a larger number of hard disk models and modes of its operation. The official website of the program is https://hdat2.com.
CrystalDiskInfo
The program is distinguished by a beautiful and understandable design, as well as the presence of the Russian language. Official site of the developer -
http://crystalmark.info/?lang=en. In addition to the basic functions inherent in all the programs described above, CrystalDiskInfo supports diagnostics of external drives, checks the status and temperature of the HDD, and has a wide selection of disk settings.
Fixes found issues
In most cases, the errors found will be fixed automatically. But sometimes, the computer can detect an error, but not get rid of it, but only inform you about its presence. In this case, you must correct the error yourself.
Using the Victoria program
The Victoria application can both scan the disk for errors and fix the found ones.

So, checking a hard drive or SSD can be done both with the help of third-party and through built-in programs. In most cases, the errors found will be fixed automatically. Before starting to work with the disc, it is recommended to restart the computer, the same should be done after you have finished working with it.
Good day.
The hard drive is one of the most valuable pieces of hardware in your PC! Knowing in advance that something is wrong with it, you can manage to transfer all data to other media without loss. Most often, testing of a hard disk is carried out when buying a new disk, or when all sorts of problems appear: files are copied for a long time, the PC freezes when opening (accessing) the disk, some of the files stop reading, etc.
On my blog, by the way, there are quite a few articles devoted to problems with hard drives (hereinafter referred to as HDD). In the same article, I would like to collect in a "heap" the best programs (with which I have dealt with) and recommendations for working with HDD.
1. Victoria
Official website: http://hdd-911.com/
Rice. 1. Victoria43 - the main window of the program
Victoria is one of the most famous hard drive testing and diagnostic software. Its advantages over other programs of this class are obvious:
- has an ultra-small distribution package;
- very fast speed of work;
- many tests (information about the state of the HDD);
- works "straight" with a hard drive;
- free
By the way, I have an article on my blog about how to check HDD for badges in this utility:
2. HDAT2
Rice. 2.hdat2 - main window
Service utility for working with hard drives (testing, diagnostics, treatment of bad sectors, etc.). The main and main difference from the famous Victoria is support for almost any disks with interfaces: ATA / ATAPI / SATA, SSD, SCSI and USB.
3. CrystalDiskInfo
Rice. 3. CrystalDiskInfo 5.6.2 - readings S.M.A.R.T. disk
Free utility for hard drive diagnostics. During operation, the program not only shows S.M.A.R.T. data. disk (by the way, she does it perfectly, in many forums when solving various problems with the HDD - they ask for readings from this utility!), but also keeps track of its temperature, shows general information about the HDD.
Main advantages:
Support for external USB drives;
- Monitoring the health status and temperature of the HDD;
- Schedule S.M.A.R.T. data;
- Manage AAM / APM settings (useful if your hard drive, for example, is noisy :).
4. HDDlife
Rice. 4. Main window of HDDlife V.4.0.183
This utility is one of the best of its kind! It allows you to continuously monitor the health of ALL your hard drives and notify you of any problems in time. For example:
- there is not enough disk space left, which can affect performance;
- exceeding the normal temperature range;
- bad SMART disk readings;
- the hard disk "has not much time left" to live ... and so on.
By the way, thanks to this utility, you can (approximately) estimate how long your HDD will still last. Well, unless, of course, force majeure does not happen ...
5. Scanner

Rice. 5. Analysis of the occupied space on the HDD (skanner)
A small utility for working with hard drives that allows you to get a pie chart of the occupied space. Such a diagram allows you to quickly estimate what wasted space on your hard drive and delete unnecessary files.
By the way, such a utility allows you to save a lot of time if you have several hard drives and are full of all sorts of files (many of which you no longer need, and it is dreary and time-consuming to search and evaluate "manually").
That's all. Have a great weekend everyone. For additions and reviews to the article, as always, grateful!
Hello friends. Checking the hard drive or how to check the hard disk for errors and bad sectors, we will talk about this in detail today.
In the previous article, I showed. Today you will learn about programs for testing hard drives and other storage media. At the end of the review, I posted a small video tutorial.
Checking our disk
Anyone who has a computer is useful to know about the state of the hard disk or disks, if there are several of them. After all, the hard disk stores information that is important for someone, but for someone not very important. So, in order not to lose it, I recommend making backups at least once a month.
You can purchase a portable disk or a USB flash drive to store important information, you can also use regular CD and DVD disks. If you do not know how to save information on optical plastic discs, then I recommend reading.
You can test computer disks in different ways and with special programs. In this article we will look at:
- Checking a disk using Windows 7
- Useful Victoria v4.3
- HDDScan software
- Ashampoo HDD Control 2
There are, of course, many other useful and decent programs and utilities, but in this publication we will only talk about these 4 methods.
How to check a hard drive using Windows 7
Any hard drive or flash drive can be checked for operability using Windows tools. I wrote more about this here. Here is a simple algorithm for the required actions.
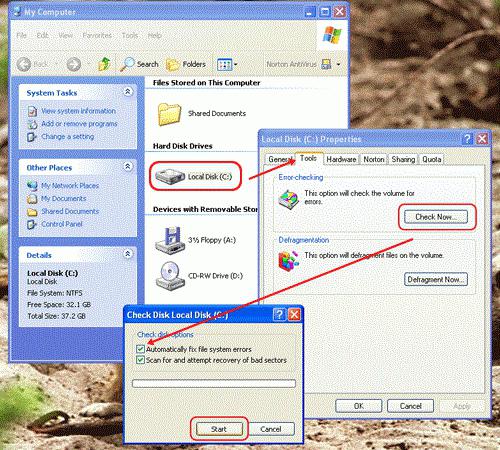
Go to My Computer, select the required hard drive or USB flash drive, right-click on it and go to Properties.


We put the necessary or all the checkboxes and click Start.

This procedure can take a long time, everything will depend on the volume of the storage medium that you want to check for errors and bad sectors.
Disk check with Victoria program
Victoria one of the main programs that I personally use to check the hard drive through Windows, or if the operating system does not start at all, then through the boot disk with this utility.
After downloading Victoria version 4.3, you need to go to the archive, unpack it or run a file with a green cross called Victoria43.

We launch the program, it is in English, if you do not know this language, do not be alarmed, I will help you figure it out.
The Standart window describes the main characteristics of the storage medium: its model, serial number, disk size, how many cylinders, sectors it contains, and so on.

In the Smart tab, you can see the status of the hard drive. Click on the Get Smart button and look at the indicators that appear. Since I have a new hard drive, my indicators are normal, SMART status = Good. You may have different meaning and information.

Smart Is a technology for analysis, self-control and reporting. With the help of it, you can view and evaluate the state of the hard disk, its built-in self-diagnostic equipment, as well as predict the possible time of its failure.
To check the storage medium, go to the Test tab and click on the Start button. If you have a lot of green, orange, red and blue rectangles (sectors), this is not good. Ideally, all sectors should be light gray and gray.

If you have bad sectors marked "Err X", then after the end of the test, check the box next to the word Remap and start the test again. Victoria's program will try to restore these sectors and fix errors on the hard drive.
Checking the hard disk can take a long time, so be patient, it all depends on the amount of information on the media. In the meantime, testing is underway, I recommend reading the article on how to set up your computer yourself or.
Checking the hard drive using HDDScan
HDDScan Is a program for diagnostics and testing of hard drives in English.
After downloading, you need to run the file named HDDScan.

Select the desired Select Drive device, on the right there will be basic information about it.

Click on the blue round button and select the desired action. Go to Surfase Test - select and run a test.

Check the boxes next to Verify or Read and click the Add Test button. I do not recommend choosing Erase - this is data erasure.

After you click add a test, it will start automatically, information about this will appear in the bottom Test Manager window.

We click twice with the mouse on RD-Read, go into the test that has begun and look at its process, you can use the Graph graph.

View on Map Map. Above there are navigation buttons for controlling the test process Pause, Stop and Report, clusters and testing speed in KB / s, and on the right the time of scanning sectors in numbers from< 5 до >500 milliseconds.

In the third column, Report, you can see the scanned clusters and sectors of the information carrier, and at the very bottom, the progress of the test process is shown in percent.

Upon completion of the test, a corresponding message will appear in the task manager window.
If for some reason you did not like the first three methods, then I suggest you familiarize yourself with a powerful and useful utility for diagnosing hard drives and storage media from Ashampoo.
Cool program Ashampoo HDD Control 2
I have already worked with this utility for diagnostics and monitoring of hard drives from Ashampoo. I really liked this program, so I decided to mention it in this article.

After downloading and installing Ashampoo HDD Control 2. Depending on the language pack, the program can be either in Russian or in English.
She has a simple and accessible interface that anyone can understand.
Here you can probably see almost all the information you want about a hard disk or flash drive: model, partitions, size, state, performance, temperature and a lot of other useful information.

This program has extensive capabilities and many settings; there are seven navigation tabs at the top:
- Control
- Defragmentation
- Testing
- Disk cleanup
- Removing Internet Traces
- Deleted files
- Content analysis
You can walk through all seven tabs and learn useful information.
We are interested in checking the hard drive, go to the Testing tab, click Scan hard drives, select the desired one and click on the magnifying glass with the inscription Start. This test can measure the speed of your hard drive.

In order to check the surface of the disc, you need to return to the Control tab and click Test Surface.

After that, the Hard disk surface testing window will appear, in which there are designations: blue square - not tested yet, green - great, red (already bad) - at least one bad sector.

Scanning time will again depend on the size and speed of the hard disk or flash drive.
In custody
Today we have discussed in detail the topic of checking a hard drive or how to check a hard drive for errors and bad sectors. To do this, we used four methods: the standard Windows tools, the useful Victoria, the HDDScan utility, and the cool Ashampoo HDD Control 2 program.
Now let's watch a short video tutorial on how to check your hard drive.
Checking the hard drive | site
You may have questions related to checking your hard drive. You can ask them below in the comments to this article, as well as use the form with me.
Thank you for reading me in
Or removable hard drives are almost the most important for ensuring the health of the entire computer system and proper storage of information without losing data in unforeseen situations. HDD performance should be monitored regularly. Consider what programs for diagnosing a hard drive exist today and what they are capable of.
What is the diagnosis of hard drives
Let's start by dwelling on some of the most important aspects. Monitoring and diagnostics of a hard drive includes several basic processes. The most significant here are the following: preliminary collection of information about the state of the hard drive (monitoring), checking the hard disk (scanning), error correction and data recovery (if the error cannot be corrected programmatically).
In principle, the utility programs themselves for diagnosing a hard disk must be divided according to their direct functions (informants, scanners, "doctors" and restorers). More will be said about them a little later, although today there are many software packages that combine all these functions.
The most common HDD malfunctions
In considering the question of what are the best programs for diagnosing a hard drive, it is worth dwelling on the most common problems and errors that they can fix.
First of all, the most common are system errors that can occur when the Windows operating system itself malfunctions, improper shutdown of applications, incorrect copying or moving to other areas of HDD files and folders, sudden power outages, etc. In principle, most These problems are identified and resolved by hard drive diagnostic programs.

Another thing is when the user is faced with a situation of physical damage to the surface of the hard drive. This is where the problem is much more complicated. It is sometimes possible to programmatically transfer information to another area and section, but, alas, damaged areas cannot be restored. If there are a lot of them, in the worst case, you will have to change the hard drive. Of course, you can try to recover some of the information yourself, but in especially difficult cases, say, after a jump in temperature, when the hard drive has melted, such a procedure will be simply impossible without the intervention of specialists.
Information preview
Now let's dwell on specialized utilities that allow you to collect and view complete information about the state, operation and main characteristics of the hard drive. According to experts and users, the most popular are utilities such as Everest, CPU-Z, CrystalDiscInfo, etc.

Any diagnostic program for hard drives of this kind allows you to view a full report, and it will contain much more information than in standard Windows reports, although you can still see something using such tools.
Incidentally, it’s wrong to believe that monitoring applications fix bugs or problems. They were originally created only in order to view all the parameters of the equipment, and certainly not to influence their setting. In this regard, only the CrystalDiscInfo utility can manage some HDD parameters.

However, some parameters can be viewed and adjusted even when accessing the BIOS before starting the system directly. But even there the information is far from complete, and changing the parameters will affect, say, a fan or something else. But some of the settings of the hard drive controllers will sometimes have to be applied.
HDD check by means of Windows OS
As for the "operating systems" of the Windows family, there is a minimum set for checking the hard drive for errors, as well as for fixing them. But this only applies to system errors.
In the monitoring plan, information can be viewed by calling the "Properties" menu from the context menu by right-clicking on the "My computer" icon. For more information, see the DirectX dialog box, which is invoked from or from the Run menu by entering the dxdiag command. In any case, the information contained in these reports cannot be compared to what the free utilities offer.
In Windows, the "native" program for diagnosing hard drives is very easy to invoke. To do this, in the standard "Explorer" on the disk or partition letter, a right click is made, and the "Properties" line is again selected from the drop-down menu. On the "General" (or "Service") tab, there is a special button "Check".
In the menu that appears, you can put a checkmark in front of the automatic line. If this is not done, the system will simply display a message stating that errors have been found and they need to be corrected. In some cases, it will not be possible to eliminate problems even with automatic error correction, and with each subsequent boot of the "operating system" an intrusive message will appear stating that one of the disks needs to be checked. Agree, quite inconvenient, especially since even a given test of the hard drive surface takes a lot of time. It is better to use special programs for diagnosing a hard drive with advanced capabilities. By the way, the effect of their application will affect immediately. Any user will be able to see the result even, so to speak, with an inexperienced eye.
Hard disk diagnostics: programs for testing HDD for bad sectors

Naturally, among the software for monitoring the operation or the main parameters of hard drives of any type, you can find a lot of paid, shareware or completely free utilities. What is most interesting, as practice shows, free applications are often not inferior to licensed software and cope with the functions assigned to them quite effectively.
Among all the variety, it is worth highlighting utilities such as Norton Disc Doctor, HDD Scan, Hard Disc Sentinel, the same CrystalDiscInfo application, as well as CheckDisc or something like that. For Western Digital hard drives, a special utility called Data Lifeguard Diagnostics, designed specifically for WD hard drives, is perfect.

Interestingly, some utilities are even delivered as portable versions and take up only a few megabytes of space.
All utilities of this type have a fairly simple and understandable interface for any user, in which you just need to select the required disk and set several scanning and error correction parameters. Basically, the same Disc Doctor of "grandfather" Norton allows you to specify a disk or partition, as well as use the options for checking the hard drive for bad sectors and automatic error correction. Separately, in the advanced settings, you can set the Surface of the HDD surface).
Checking the HDD for physical damage
Unfortunately, physical damage to the surface of a HDD or removable hard drive is a very common problem. This may be due to the ingress of dust, overheating, a short circuit in electrical circuits, etc.
It is quite simple to check the physical condition of the hard drive. You just need to turn to the appropriate programs and applications for help, which will detect problems, if any, within a few minutes.
Principles of correcting HDD errors in physically damaged sectors
In principle, testing of the surface of disks can be performed by any standard utility for HDD or a diagnostic program for an external hard disk. This is not the point. The main thing is that such utilities can overwrite information (checksums) from bad sectors to the spare areas of the disk. Thus, an interesting effect is achieved. In fact, the logical sector address does not change, although in fact the physical location on the hard drive is completely different. In general, almost all applications of this type use this principle. In addition, most of them are designed for completely different file systems and partition table formats.
Victoria: a program for diagnosing a hard drive
Separately, it is worth dwelling on the Victoria program, unique in its kind. It has truly the most powerful capabilities in its field. True, some experts recommend using the DOS-based version. Well, in some cases, this is a justified step.

The application itself was developed by the Belarusian programmer S.O. Kazantsev and has proven itself in the computer world at a very high level. It is not surprising that in the West it is now used very often. I must say that this utility is a multifunctional package that combines the capabilities of monitoring and testing hard drives of any type and any manufacturer, the ability to automatically correct errors and recover data even with very significant damage to hard drives.
Although for the uninitiated user, this software package may seem somewhat overloaded with features and settings, but professionals appreciate it. Perhaps, today nothing better has been created yet, since the program itself can be classified as All-In-One (“all-in-one”).
Data recovery from damaged HDD
Of course, you can restore data using the Victoria utility, but few ordinary users will deal with it. In this case, something simpler should be advised.
For example, the best hard drive data recovery software includes many powerful utilities. You can use applications such as HDD Regenerator.

According to the developers of this package themselves, they have found a unique way of using certain algorithms of signal sequences that allow literally to restore physically damaged sectors of hard drives not just by rewriting information into other sections, but using the magnetization reversal technique. This is how the effect is achieved, when information from the damaged area does not disappear anywhere, but is read after recovery.
Naturally, if reading heads or a spindle flew on the hard drive, no even the most modern programs will help. However, in most cases, software and, as you can see, even physical problems can be fixed.
Advanced BIOS options
As for additional settings, many programs for diagnosing hard drives sometimes display errors during the analysis of the hard drive or simply not see it.
In this case, you need to change the SATA controller parameter in the BIOS, most often just change from AHCI to IDE. This should help.

The most common myths and misconceptions
Very often inexperienced users using diagnostic programs or looking at the parameters of a hard drive or fan in the BIOS for the first time panic, they say, the temperature is too high (for example, 40 degrees), the hard drive will "fly" in this mode of operation. Nothing like this! For almost all hard drives, the optimum operating temperature range is between 35 and 45 degrees Celsius. Even a value of 50 degrees is not critical for many hard drives. Worse, when the temperature drops below 25 degrees, then the likelihood of a hard drive failure is much higher. However, this is extremely rare, except when working in the cold (I think, hardly anyone is smart enough for this).
Diagnostics of the hard drive. Which program is the best?
So, albeit in a nutshell, we have covered the question of what exactly is a hard drive diagnostics. The program (which is better - for the user to decide), designed to analyze, test and correct errors, in principle, can be anything. Should you use a specialized or highly targeted product? The answer to this question depends on what exactly the application should be able to do. Some people prefer separate programs, some tend to use packages that combine all the possibilities for working with HDD.
For inexperienced users, simple free utilities are suitable, especially since even portable versions "weigh" not so much and have the functions of "smart" S.M.A.R.T scanning. without compromising the system. But for professionals, the best in their field, of course, is the Victoria program. This is out of the question.
Conclusion
In general, if you deal with testing hard drives and monitoring their condition, finally, you can add only one thing: in order to prevent catastrophic situations, at least some kind of hard drive diagnostic program should be regularly used. In some cases, even a simple dust-free with a regular vacuum cleaner will help (of course, without fanaticism). As statistics show, those who check the hard drive at least once a month and monitor the general condition of a computer or laptop have a much lower HDD failure rate than users who never think about it, but try to fix the situation when everything will go almost to the extreme.


