How to level the floor in the apartment yourself. How to level the floors in the apartment. Additional methods of processing a base made of wood
It is equally relevant for apartment owners in old buildings and for residents of new buildings. The former are looking for an answer because the base coating in their living quarters is in a deplorable state due to the already rather long service life (yes, perhaps, it has never been good, even in the years of its "youth"), but the latter need to know this by the reason is that, despite the use of new technologies, the quality of finishing even in newly commissioned buildings is still far from ideal. While modern floor coverings sometimes require an almost flat surface. How to create acceptable conditions for them? What to do? How to level the concrete floor and how best to do it? You will find the answer to all these questions in our review.
We evaluate the existing surface and select a new floor covering
It should be noted that the alignment procedure can sometimes be quite expensive and time-consuming. That is why, in order to reduce material and time costs, you need to be able to correctly assess the situation. That is, carefully examine the existing base and decide which floor covering will be used. As for the first one. The base surface can be different. Sometimes it is in quite good condition, with the exception of some cracked places. Or there are only small protrusions and depressions on it. In such cases, you can get by with a little blood, leveling the floor locally, as they say, according to indications. If there are significant defects on the base coat, as well as huge differences in height, it will naturally have to be leveled from corner to corner. Now with regard to finishing materials. Some floor coverings are very demanding on the substrate. Take the same laminate. Even a slight drop in some five millimeters can nullify all the finishing work. A laminate laid on such a base can simply deform and crack at the seams in a year. While such minor defects are not terrible for linoleum. So it is precisely from the choice of the finishing floor covering and the very state of the base base itself that you need to build on, being in search of an answer to the question of how and with what to level the concrete floor.

Irregularities that require elimination
So which concrete floor should be leveled? It is imperative to put in order a foundation that has:
- Roughness, chips, various cracks.
- All kinds of protrusions or pits that are visible during visual inspection.
- Slope or differences in height.
Depending on the existing defects, the leveling method and the material required for the work are selected.
Alignment types
If the floor does not have any special differences in height, but has some defects such as cracks, then they are sealed using a self-made compound or epoxy concrete, while doing some preliminary work to prepare the base. Local protrusions and pits are sealed in the same way. Height differences are eliminated by dry screed, leveling along beacons or using a bulk compound.

Getting rid of cracks
Such defects can appear both on the old foundation, and on the recently filled one, if the stages or requirements of the technological process have been violated. Therefore, every master needs to know how to get rid of cracks on a concrete floor. So, you can't just cover them up from above. First, you need to carefully tap the entire surface of the crack, and in a very peculiar way - you need to drive the chisel into the defect as deep as possible with a hammer. Thanks to this procedure, you, firstly, will be able to detect chips hidden under the defect, and secondly, create the necessary gap for the mixture. After the preparatory work has been carried out, you need to carefully remove all pieces of concrete, clean the cavities from dirt and dust, fill with water. After drying, the entire surface must be primed. The composition of Grund is ideal for these purposes. After that, you need to mix cement of the M400 brand with water. The solution should have the consistency of liquid sour cream. And then you should add liquid glass or PVA glue to it. The amount of additional ingredient should be equal to the volume of the prepared mixture. Then you need to fill the cracks with the resulting solution, wait for it to dry and grind the surface. Very small cracks can not be widened, but simply repaired with tile glue of any brand, without forgetting to prime them first.
Close up the pits
If the floor surface is sufficiently flat, then it is not necessary to complete the screed completely. It is enough just to get rid of the pits. To do this, their walls and bottom must be processed with a grinder to remove chips and fragile layers. After that, the pit must be cleaned of pieces of concrete, dirt and dust, filled with water, and primed after drying. At the bottom, you need to pour dry fine-grained crushed stone in a sufficiently thin layer, and then seal the defect with epoxy concrete. The domestic composition "Kleypol" is perfect for these purposes. We fill a hole with it so that the solution does not reach the top of a centimeter by two. After drying (after about an hour), compare the surface with a special concrete putty. Experts recommend paying attention to the Elakor-ED brand.

As for the bumps, it is enough to grind them with a grinder, clean, prime, and then level the surface using the same "Elakor".
Dry screed
How and how can a concrete floor be leveled if you have little time at your disposal and you don't really want to mess around with mortars? Make a dry screed. This procedure is quite simple, so almost any home craftsman can handle it. The principle is as follows. The base base is thoroughly cleaned from dirt and dust. Then a waterproofing film is laid on it (you can use ordinary thick polyethylene). Then a dry leveling mixture is poured over the entire surface in a layer five centimeters thick. It can be made of expanded clay, granulate, quartz sand or even expanded polystyrene. And from above they are already laid on logs and fastened with self-tapping screws either plywood, or fiberboard sheets, or moisture-resistant drywall. But it is best to use a special sheet material called "Superfloor" for this purpose. After the dry screed, the finishing floor can be installed almost immediately. It is for home craftsmen that experts recommend first of all to consider this method, since you can level the concrete floor with your own hands using this method without any problems.

Beacon screed
Since it is almost impossible to level the floors using less costly methods, you will have to consider such a method as pouring a new floor using beacons. As for the financial side of the issue, it is not so terrible, but the time-consuming procedure will require significant. In addition, in this case, you need to have at least minimal skills in working with lighthouses and cement mortar. What should be done? First of all, clean and prime the base. Then carry out the markings, preferably using a laser level, and stretch between the walls in the direction from the window to the door, the guide lines for the beacons. And after that, install perforated guides on them on the floor, using cement (gypsum) mortar for fixing. The step between each beacon should not be more than one meter. After that, you need to prepare a mortar of M400 cement (the amount of water will be indicated on the package), pour it between the installed profiles and align with the rule, moving backwards in the direction from the window to the door. Such a screed dries for a long time, in addition, it must be moistened with water for the first three days. However, it is this method that is quite budgetary and allows you to get a really even and durable coating. Therefore, if you have enough time and do not know, for example, how to level a concrete floor under a laminate, take this method into service.

As for the lighthouses, some masters leave them inside. However, experts recommend still getting the profile, and filling the voids with tile glue. The budgetary, but therefore no less durable composition "Lux" is perfect for these purposes.
Self-leveling floor
If the difference in height is no more than five centimeters, and there are available funds, a leveling mixture for a concrete floor is perfect for arranging the base surface. It is quite expensive, but easy to work with, in addition, the alignment procedure does not take much time. As for the technology, you need to start, as always, with preparation. The base base needs to be cleaned and primed. Then you need to mark with a laser level, drawing lines on the walls along which the upper boundaries of the new floor will pass. After that, you need to mix the solution according to the instructions on the package. The best mixtures for leveling, according to experts, are self-leveling Ceresit CN 69 and Ceresit CN 68, Vetonit 3000, EK FT03 FINISH. Many masters also praise more budgetary domestic mixtures produced under the Prospector brand. So, we start leveling from the far corner, pouring the solution onto the floor and leveling the coating (according to the markings applied), first with the rule, and then with a special roller with needles.

How to level a concrete floor under a laminate
Laminate flooring is perhaps the most capricious floor covering, requiring an almost perfectly flat base. What is the best way to level the concrete floor under it? By and large, in this case, any of the three methods described above will do. However, there is another option. You can try to level the concrete floor with plywood. Unlike the same tiles, the laminate does not require the use of mortar when laying, so the presence of wooden sheets under this coating will not affect the quality of the base base in any way. And the alignment method itself is quite simple and fast. The concrete base is cleaned of dirt, primed, after which sheets of moisture-resistant plywood are laid on it without any fasteners (10 mm thickness will be enough), and according to the same principle as the laminate (so that the seams of the elements do not coincide, but are staggered) ... After that, another layer is laid, but so that its joints do not coincide with those of the lower layer. This plywood is already attached to the bottom sheets with self-tapping screws. After installation, you need to walk along the seams with a sander in order to finally level the subfloor.
A few words about the loggia
On the loggia, you can also use all the methods described above. However, many experts consider it very attractive to level the concrete floor in this room using the same plywood, but on logs. How do they determine their choice? The fact that thanks to this method, you can additionally insulate the floor of the loggia by laying the appropriate material between the logs. Let's say polystyrene, mineral wool. Or professional, but more expensive insulation "Technonikol".
... about the garage
It is quite understandable that nobody is laying laminate or parquet in this room. The floor here is usually made of concrete. The basic requirements for the base are that it is even. And naturally durable. How to level it It is best to do and then cover it with a special layer of hardener - the so-called topping - which will protect the surface from damage. The best formulations are the mixtures Caparol-Disbon, Neodur (Korodur), MasterTop (BASF) and domestic Herkulit and Reflor.
... and about ceramics
If you plan to lay ceramic tiles on concrete and at the same time the base itself is not particularly crooked, you can level the floor in the process by adding more or less tile adhesive under level control. True, this method is applicable only if the differences are no more than three centimeters. In addition, if you decide to resort to this method, you need to buy only high-quality, with improved characteristics, for example, designed for Ideal for these purposes "Ceresit".
Conclusion
We tried to tell you in sufficient detail how and what is the best way to level the concrete floor in this or that case. In addition, they touched upon the issues of leveling technology, named the brands of the best materials used in this type of work. We hope that now you can easily find the right option for your particular case. After all, you already know as well as any professional how and how to level a concrete floor.
Smooth floors are considered not only the finishing touch of the interior, but also an indicator that the repairs in the house have been carried out efficiently. Ideally, the floor should have one level without drops and steps, because in the future, the functioning of doors and furniture will depend on the correct laying of the decorative coating. In addition, a crooked floor in living quarters is often the cause of technical problems, because of its unevenness it is difficult to install a refrigerator or stove.
Today, there are many ways of leveling, thanks to which the surface is flat and in the future serves as an excellent basis for installing any type of floor covering.

Peculiarities
During the renovation of the house, sometimes it is necessary to replace the floors if they have lost their original appearance or simply do not fit into the modern design of the house. Before you start laying new material, you need to not only dismantle, but also level the old floor in the apartment.
Each type of coating has its own characteristics of surface preparation:
- Ceramic tile. Installation of this product is carried out on various types of screeds with mandatory waterproofing and cleaning the base from dirt and dust. Due to the fact that the tile is laid on a thick layer of glue, slight irregularities are allowed for its installation in the floor, but in this case the glue consumption will be large.


- Linoleum. The substrate for such a flooring requires a flat surface without defects and cracks. Therefore, the screed should be made of high-quality mixtures that will not only preserve the old floor layer, but also eliminate all its flaws.


- Laminate. If you put his boards on a curved surface, then over time they will be able to undergo deformation and will constantly “creak”. As a result, the flooring will not last long and will have to be repaired again. To avoid this, it is recommended to install the laminate on a perfectly flat base.


- Carpet. For its flooring, a well-prepared surface is required, which must be leveled, cleaned and primed. For this, chipboard sheets are most often used. After their laying, the joints are putty and primed. You can also fill old wooden floors with self-leveling mortar.


To make the base ideal for covering, first of all, it is necessary to comprehensively inspect the room and determine in which places there are differences, then find the lowest and highest point of the floor. After that, it will be possible to choose the appropriate method for leveling the surface and eliminate all flaws. For this, as a rule, a laser level is used.
Such measurements are carried out as follows: a skip is made around the perimeter of the room and with the help of tools on the surface they find the desired point at which all the lines from the perimeter are collected. She will serve as the beginning for determining the height of the floor.
In the case when there is no professional level at hand, you just need to select any point on the wall and draw parallels from it to the ground and draw lines using a regular board.
This procedure must be repeated until a closed loop is formed. The floor should level from the lowest point to the highest point.


Why is this needed?
There are many reasons for keeping the floor level. The future fate and operation of not only the floor covering, but also equipment and furniture will depend on the condition of its surface. In addition to all this, the presence of bumps and grooves on the base will spoil the appearance of the room.
During installation, most materials do not tolerate defects in the "rough" layer, for example, a laminate or parquet installed on a curved floor, six months after operation, will begin to loosen and crack. And an uneven surface in the bathroom and toilet will serve as a serious problem with plumbing, the drainage system will be disturbed and the water will not drain well.


Leveling the floor is important in both residential and non-residential premises.
If you lay out ceramic tiles in the bathroom on the bumps, then its strength and adhesion properties will be lost, and the product may "float", and this will provoke the appearance of voids and dampness: later, mold and fungus will appear in such rooms, which will be difficult to remove.
It is worth noting that an uneven surface is found both in old houses and in new buildings, where slopes often exceed the permissible limits. Therefore, starting the repair of the floor, it is necessary to eliminate the drops in all rooms of the apartment and make a screed that will correct surface defects and simplify the laying of new coatings.

The ways
You can do floor repair yourself or use the services of hired workers. Of course, in this case, it is best to trust the professionals, but recently, most home owners prefer to save money and level the flooring with their own hands. In fact, there is nothing complicated in this, you just need to choose the right material and technology for performing the work. First, the old base is dismantled, large cracks are rubbed and waterproofing is applied.


After preparing the surface, the level of the future floor is determined and the leveling process begins, which can be done in several ways.
With a solution
This is considered the most affordable and simplest option for eliminating surface defects. The mixture is prepared from cement, water and sand. The solution turns out to be liquid and spreads evenly over the base, creating a smooth surface.

The stage of the work is as follows: a primer is applied to the preliminary surface, and then a solution is prepared and the floor is covered with it.
In addition, during the preparation of the solution, it is necessary to strictly observe the "recipe" and the ratio of water with sand and cement, all the constituent ingredients are thoroughly mixed with a drill with a nozzle. The finished mixture is poured onto the surface and distributed evenly around the entire perimeter, while removing air bubbles with a needle roller. This floor dries completely on the third day and is ready for further finishing.


Concrete screed
This technology provides for leveling the floor with concrete. The result is a solid, solid and even surface. Such a screed is used when the bulk mixture cannot be used.
Although concrete is considered a heavy material, it provides the base with a long service life and allows the floor to be perfectly level. First, prepare the surface, perform waterproofing and find the zero level. Then, beacons are placed around the perimeter of the room and slats or metal profiles are attached, retreating 30 cm from the walls.


Lighthouses must be placed strictly according to the level, so at the end of the work, horizontal guides should be obtained. After the solution dries, you can proceed to the screed itself. The main point in such alignment is the correct preparation of the mixture, the slightest inaccuracies can further spoil the coating.
The concrete is laid out in strips, performing shaking movements, this will help get rid of air bubbles, at the end of the installation, the surface of the solution is moistened with water, covered with a film and left to dry for two weeks. This method is often used both in a panel house and in a "new building".


Loose screed
Expanded clay is also used to obtain a flat floor. It is a lightweight material that is easy to install and can handle strong slopes with deep holes.
As a rule, expanded clay is chosen when you need to raise the level in the "stalinka" and level the floor on your own. It will not create large loads on the floors and will ideally eliminate all defects.

In this case, the zero level is chosen as the highest, since the floor thickness will increase due to filling the material by 4 cm. After preparing the base, beacons are set up and expanded clay is prepared, for this they mix fine and medium fractions well with each other.
When expanded clay is filled up, sheets of chipboard or fiberboard are laid on it. In this case, it is important to ensure that the seams of the sheets coincide; self-tapping screws are used to fasten them.
Then a "light" cement mortar is poured and a waterproofing film is covered; for greater reliability, it is recommended to complete this leveling with a concrete screed.


Lag alignment
This technology is suitable for wooden bases and is the installation of logs on old boards. At the end of the work, slopes are removed and small irregularities are hidden. To determine the zero level, in this case, the thickness of the beams is added to the highest point in the room.
Compared to previous alignment methods, this method is characterized by speed and purity.

Most often, logs are used in private houses and apartments on the ground floor. In addition, when performing such an alignment, it becomes possible to lay additional communications and thermal insulation.
The base of the floor is prepared, primed and logs are applied. In this case, you can buy both ready-made material with adjustment, and ordinary beams with a section of 40 * 100 mm. Lags must be laid out strictly according to the level at a distance of 50 cm.
If necessary, you can additionally put a plastic spacer or plywood board under the beams.
The lags are fixed to the floor using plates or anchors, and the cells formed between them are filled with insulation.


Coating installation
For such leveling, ordinary sheets of plywood or chipboard are used. They are laid in two layers and fixed with self-tapping screws, and the resulting joints are putty.


What to choose?
When the question of leveling the flooring arises, everyone wants to find cheap options for this. Recently, in the interior of houses, they prefer to make the floor from laminate, linoleum or tiles. If you choose a bulk solution or a screed for their installation, then you will not only have to wait a long time for drying, but additional costs for the material will also be required. Therefore, it is best to give preference to a wooden floor, it is installed in one day and allows you to immediately continue finishing.
A screed based on cement mortar is also considered an economical option.
In contrast to natural wood, cement and sand are much cheaper, and such leveling is characterized by strength and durability.


How to make a flat floor?
The result of any repair is a finishing floor covering, but before that it is imperative to make a rough screed and level the surface. In order to prepare the floor correctly, it is necessary to follow all work technologies and use high-quality material.
Before installing decorative flooring, it is usually necessary to properly level the subfloor. For this, you can purchase various materials and mixtures. Let's consider in more detail all the subtleties of this process.

Peculiarities
When organizing apartment renovations, it is important to remember the need to level the floor surface in order to avoid problems in the future. Due to the unevenness of the base, it can be difficult to install furniture, so it is usually better to start repair work with leveling the floor.
Before starting the process itself, it is necessary to carry out preliminary preparation in the apartment, which begins with cleaning the surface. The first step is to remove the old coating, remove cracks. Using a punch, you will be able to get rid of the protrusions. In rooms such as the kitchen or bathroom, a base waterproofing should always be installed.


Further along the perimeter of the room, a special tape is laid, which helps to prevent the appearance of sounds. Once all the preparatory work is completed, the floor is leveled using various methods.
Variants
Floor leveling methods differ in time, technology, and materials used. The choice of leveling method depends on how uneven the surface is. Regardless of which method is chosen, the purpose of this process is to create a strong, smooth base for laying the selected canvas.

Using a leveling solution
This way of leveling the floor is distinguished by its simplicity and affordability. Therefore, you can easily give a smooth surface using your strength, without resorting to the services of a master. Before starting the process, you should consider the types of equalizers.
There is a mixture for rough leveling. This type is used if the floor is characterized by numerous chips. Another type of compound is intended for a topcoat. Thanks to this appearance, the base will acquire absolute smoothness.


The essence of this leveling method using a special composition is that sand mortar, cement and special additives are used. The base is poured with this mixture.
But this method is not suitable for all uneven surfaces, but only for those where there are slight roughness. Most often, in the "stalinka" one has to deal with a high level of bias and this technique has to be abandoned. However, the method is well applicable as a finishing point after using a concrete screed.
In order to correctly perform floor leveling yourself, it is important to determine the stages of work:
- Primer application. It will help raise the level of protection of the base from mold and mildew.


- Dilution of the solution... The dry mixture must be mixed with water, following the instructions exactly to obtain the desired consistency.
- Distribution of the solution to the surface... Special tools will come to the rescue to remove air bubbles from the mixture.
- Let the floor dry... The drying process will take 2 to 3 days.
- If the leveler was used correctly during operation then the floor covering will always fit perfectly and will be able to serve for many years.

Concrete screed
Another option for leveling the floor is a concrete screed. This method differs from the previous one in that concrete or cement is used. The structure of the mortar allows you to create a strong screed that will hide even the largest defects in the base. It is more expedient to apply this type of alignment during repairs in a new building., since the materials are quite cheap, and the manufacturing technology has been tested over the years.
The floor screed in a panel house can be trusted to be done by craftsmen, or you can try to do it yourself. To date, there is a wide range of special dry building mixtures on sale. They are made on the basis of sand and cement. Due to the large number of such products, it is very difficult to choose the right mixture.


All these products differ in the content of the binder. It is worth noting that low quality mixtures contain less cement and more sand.
It is necessary to know in detail the sequence of work on the implementation of the concrete screed:
- Preliminary preparation of the base. This stage includes cleaning, waterproofing, and laying roofing material along the lower edges of the walls.
- Marking... This is where you need a level. Around the entire perimeter of the room, you need to make marks, put up beacons.


- If the height of the screed is small, then the beacons can be made from mortar... It is necessary to lay out the strip from the solution and secure with tape. After that, it is important to check with a level the correct application of the screed. If irregularities are found, the excess solution should be removed.
- Concrete screeds can be of different layers... There is a single layer, that is, it is poured at a time over the entire height. This type is applicable in those rooms where there are no high requirements for the evenness of the floor.
- Multi-layer screeds are used in several steps... Most often, applying the first layer serves to give the base strength, while the second layer fixes the result and gives the floor a significant leveling.


Leveling with expanded clay
The use of this technique is associated with the useful properties of expanded clay. Among the distinctive ones are environmental friendliness, durability, affordability. Leveling with expanded clay can be done in various ways with a combination of materials.
The first option provides for the combination of expanded clay cushion with the use of a cement screed... First, expanded clay is poured onto the base in an even layer, then it is checked how evenly the insulation is placed. Next, you should carefully lay the prepared solution.
In order to avoid displacement of the base, it is allowed to make a protection in the form of a mesh before starting the coating with a cement screed. This floor will dry in about 3 days.
After complete drying, you need to remove the beacons and process the traces. Final surface strength will be reached after 4 weeks.


Before the expiration of this time, it is necessary to cover the base with a film so that the process of moisture release is slower.
Another method of leveling using expanded clay is expanded clay concrete screed... This technique involves filling the floor with an expanded clay pad using sand and cement. The third option for using expanded clay includes combination of this product with self-leveling floor.
The simplest and cheapest way is to make the surface smoother. by dry leveling the floor... The advantage of this method is that you do not have to wait long for the base to dry. Such a floor can be used immediately after sprinkling with expanded clay. The work sequence is quite simple. The expanded clay mixture is scattered over the surface and must be leveled along the beacons. The minimum coating thickness must be at least 4 cm.


Living in a house where the floor is leveled with expanded clay, you don't have to worry about keeping warm, since this material has excellent insulating properties.

Leveling the floor along the logs
It is quite possible to make such a floor with your own hands, if you correctly master the installation technology. It is worth paying attention to the fact that this method of leveling the floor is distinguished by its economy. The use of this method greatly simplifies the laying of various cables and wires..
It is better to take care in advance of purchasing the necessary tools to work on leveling the surface along the logs. For work, you will definitely need tools such as a hammer drill, drill, screwdriver, hammer, tape measure.
It should be remembered that the room humidity should not be higher than 60%. The logs themselves must be dried, cleaned of dust immediately before the masonry itself.
The minimum length of the logs should be 2 m. Before fixing the logs to the floor, the level of the future surface should be calculated.


It is important to consider the thickness of the flooring, plywood. Lags should be installed on beacons. The distance between the two beams will depend on the height of the floor covering.
The most relevant option for leveling the surface along the logs is an adjustable floor. The principle of operation of this method lies in the fact that slots are made in the logs, plastic bushings are screwed into them, allowing you to adjust the floor height. Fixation of the bushings in the log is carried out using several screws. Next, the logs should be attached to the concrete, on which you need to make marks for future holes. Using nails, you need to attach the bars to the base. Plywood sheets are screwed on top.


What's better?
Having considered the main methods of leveling the floors, you should decide which of the methods is the most suitable. Which technique is better to choose should be decided based on the state of the surface, what is the degree of its unevenness, and also what type of coating you want to lay.
It would seem that of all the options, the use of a concrete screed is considered the most reliable method, however, concrete has a number of disadvantages, among which a too long drying period is noted. This slows down the repair. The concrete base is prone to cracking. Working with a concrete screed is quite laborious.


It is also worth remembering the advantages of this option. This method is used only in the presence of slight irregularities.
We will find out whether the rotband is suitable for the final leveling of the subfloor ... Before installing the final floor covering, it is necessary to level its surface, hiding deep cracks and irregularities. So how to level the floor self-leveling a mixture?
Can the floor be leveled with a rotband? Of course, yes. First, about leveling the walls with a rotband:
Concrete floor leveling tools and implements
To level the floor, you will need the following tools:
- WITH self-leveling mixture. To level the floor, the area of which is 20 sq. meters, you will need to buy about 2 packs of 25 kilograms. But experts advise buying materials with a 10 percent margin, since it is not always possible to calculate everything correctly;
- Overalls - closed, spiked shoes, rubber gloves, respirator. This is necessary in order to protect the skin and respiratory organs from the harmful substances contained in this mixture;
- Tools - a container for preparing a solution, a construction mixer (drill with a special attachment), a wide spatula, a needle roller;
- Primer mix;
- Lighthouses for calculating a flat floor surface. Ordinary wooden bars or metal profiles can act as beacons.
Advice ! When buying a roller, it is necessary to take into account that the length of its needles should be 1–2 millimeters longer than the thickness of the layer to be leveled. One of the most popular methods is blend.
Let's return to the question of whether it is possible to level the floor with a rotband:
 Preparation for leveling the floor with a rotband (if the picture is difficult to see, hold down the ctrl key and, while holding down the key, rotate the mouse roller)
 We'll get back to the rotband soon, but for now - about the mixtures.
Leveling the subfloor with the mixture
We will analyze step by step how to level the floor using self-leveling DIY mixtures:
1 . Applying a rough layer
Place elastic tape between the wall and the future screed. This stage is performed after the floor has been cleared of excess debris and dust.
If the subfloor is laid with a significant slope, it is recommended to set up beacons that will serve as a guide to create a flat surface. They are mounted along the room and fixed with cement mortar. Extreme guides - planks are established at a distance of 20 centimeters from the wall, the rest along them, observing an interval of 1 –1, 2 meters.
 Preparation for work - is it possible to level the floor with a rotband
 2. Dilution of the mixture
This process is carried out according to the attached instructions on the back of the package. When the composition is completely ready for use, it is poured onto one of the equipped "paths" (work should be done from the window) and with quick movements they begin to smooth the mixture with a wide spatula.
Attention ! If the mixture in the container has already begun to dry out a little, its repeated dilution is unacceptable, it is disposed of and the solution is prepared again. Therefore, it is recommended to start with small portions. This is especially true for novice novice refurbishers.
3. Insulation
It is necessary to isolate the room from drafts and from direct sunlight. Once the floor is dry and ready for further work, the beacons can be completely removed as they are no longer needed. The final layer is made from a more liquid solution.
Let's briefly return to the question of whether it is possible to level the floor with a rotband:
 It is easier to align the floor with a rotband than it seems (if the picture is hard to see, hold down the ctrl key and, while holding down the key, rotate the mouse roller)
 4 . Surface primerhnosti
The mixture is prepared in the proportions indicated on the label. Further, it is evenly distributed over the entire floor surface, and after a while a second layer is applied, and after that, the floor is finished.
What is the priming of the surface for? First of all, this is done in order to improve the adhesion properties and prevent the rapid drying of the last, finishing layer. The final layer of the leveling compound will have better adhesion to the subcoat. Preparation for work - can the floor be leveled with a rotband? Some say that it is extremely fragile and will crumble. In addition, it does not have waterproof properties.
5 . Filling the finishing layer
The layer is also made from self-leveling mixtures. To complete this stage of work, you will need a millimeter scale and benchmarks. They allow you to adjust the thickness of the poured layer. After these beacons are displayed, you need to start preparing the mixture (see the instructions).
After preparing the mixture, it must be poured onto the floor in small portions and smoothed with a spatula. Further, the benchmarks are removed and they pass over the entire area with a needle roller to remove air bubbles that have appeared on the surface of the last layer.
The mixture hardens very quickly, almost instantly, so it is necessary to work actively, but at the same time carefully.

Let's return to the story of whether it is possible to level the floor with a rotband:

Selection recommendations material for leveling concrete floor
What to consider when choosing self-leveling mixtures:
- Look for the presence of modifying additives in the composition. To improve the adhesion of the mixture to the floor surface, manufacturers add quartz sand.
- The plasticizer in some mixtures serves to impart a high thermal conductivity and elasticity.
- The degree of unevenness of the floor should be correctly determined.
- Read the instructions before you start preparing the mixture yourself, not knowing what with what and how to combine it correctly.
Leveling the floor with self-leveling the mixture is not such a complicated process as it might seem at first glance. The main thing is to respect the proportions and streamlining of actions.

The better to level the floor in a private house with your own hands
We found out whether it is possible to level the floor with a rotband, but in general, the leveling of the floor must be done immediately before finishing. The question of which technology to use depends on several factors - whether the floor is strongly deformed, what material it is made of, what type of floor covering will be used, even the dimensions of the room play an important role. These and many other factors affect the quality of future finishes. How to level the floor in an apartment correctly and without mistakes? We will answer this and other related questions that arise for everyone who thinks about the question of how to level the floor in an apartment or private house on their own ...
How the final level of the floor surface is measured
To say exactly which floor leveling technology will be more effective in a particular case, it is necessary to accurately measure the level. In order to determine the level, the highest accuracy and some specific knowledge are required. It is impractical to measure the level with the naked eye - such changes will be inaccurate and are unlikely to be able to give even an approximate picture of the existing level. What tools are used to determine the current level? Can the floor be leveled with a rotband? If under a light laminate and do all the work very carefully, then quite.
- A level is a special tool that is used in surveying. With this tool, you can measure the level on large-scale construction sites. The level is difficult to work with and requires specific knowledge to use it, but it guarantees the highest level of calculation accuracy.
- Ordinary level - this tool is often used in construction. In case of shortage of length, you can use the usual rule, which allows you to adjust the position of the level.
- The laser level is the most accurate measurement and calculation tool. It is easy to operate, but gives good results - the error will be no more than 2 millimeters. It is best to wear protective goggles when using the laser level. A large number of functions allows using the laser level for calculations of various types - the measurement process takes place in automatic mode.
- Hydro level - This tool is ideal for calculations and measurements on large construction sites. Measurements are quick and easy, but you need to keep an eye on the tube to avoid air getting into it.
Is it possible to level the floor with a rotband - of course, but keep in mind that this mixture is not durable.
To begin with, in order to properly level the floors in the apartment, you will need a zero output. In other words, you need to get zero level. This means that after all construction work is completed, the level should be the same in all areas of an apartment or private house. To do this, you will have to take into account many additional parameters, for example, the height of the subfloor. The latter may differ in rooms in which different floor coverings are laid - by a maximum of 3 centimeters.

Types of screeds for leveling a concrete floor
Cement and sand - cement-sand type of screed
Screed with sand and cement is considered one of the best in popular circles. Is it really?
Advantages:
- Durability
- Low cost
- You can hide small communications inside the screed
- Used when leveling even serious drops above 6 centimeters
Disadvantages:
- Long grasps
- To create a cement-sand screed requires experience and knowledge
Whether it is possible to level the floor with a rotband, we figured out. As for the cement-sand screed, we have the following. To create this screed, zero must be calculated. To do this, you need to take an ordinary level. Then, at a height of one and a half meters, you need to mark a stop line - from it the distance to the floor itself will be measured. It is necessary to take a course for the minimum allowable distance - it is calculated using the level. It should be borne in mind that the minimum level of the screed should be two centimeters. You can make the line even and accurate by drawing an additional line, which is made along the bottom of the wall and marks the boundaries of the imaginary floor (future level).
In order to prepare the base itself, you need to remove dirt from it as much as possible and get rid of dust. You need to thoroughly sweep it, and then vacuum it additionally. Only after maximum cleaning is it necessary to proceed with the direct priming of the base. Immediately after creating the initial layer, it is necessary to apply a waterproofing solution to it, and then apply the next primer coat. Thanks to this technology, the maximum possible degree of adhesion of the adhesive to the concrete will be achieved.
Is it possible to level the floor with a rotband and in general the better to level the floor is an individual question. Move on! Now you need to set up beacons, which make the surface even and smooth. Improvised metal elements can be used as beacons - they are fixed directly on the base with the help of regwints. If this technology cannot be used for some reason, then there is a lightweight technique. It is necessary to create small guides from a solution of cement and sand of the required dimensions directly to the slides. The level of evenness of improvised beacons must be confirmed each time using the building level. The first lighthouse must be fixed at a distance of twenty centimeters from the wall, and the others at a distance of forty to sixty centimeters in parallel from the wall. Can the floor be leveled with a rotband? Quite! Take a look at the result below:
 Lacquered parquet is stylish and beautiful in any interior
 Materials and compositions for organizing floor leveling
They are prepared either from their ready-made dry mixtures, or the ingredients are kneaded on their own. To make the leveling compound, water must be added to the finished mixture. The proportions are always in the instructions that come with the building mixture. In order to make a leveling compound with your own hands, you need cement, sand and water. For this, the solution is mixed with a construction mixer. The finished composition should be similar in consistency to sour cream and be sufficiently homogeneous - it should not flow over the surface, but only slightly blur.
So, a fresh solution is applied directly between the lighthouses themselves. Start - from the farthest corner of the room and move towards the door.
Is it possible to level the floor with a rotband - definitely, yes, but is it worth it? Some masters say that it is intended exclusively for plastering ceilings. Let's go back to applying the mortar. After pouring the solution between 2 beacons, the resulting mixture must be equalized at the level of the beacons. In this case, you need to shift the mixture in your direction. During the creation of the floor screed, it is necessary to "prick" the still fresh mortar using a metal rod. This is done so that in the process of setting the entire mixture, so-called voids do not appear in it. In the case of independent work on the creation of a floor screed, installation must be performed at least by two people. The sequence of work is as follows: one aligns the composition with the beacons, the other prepares the next part of the mixture. An important rule is that a floor screed limited to one room should be done in one day.
You can move on the floor with a fresh screed after 3 weeks. It is after this time that she will completely grab and harden. On the 3rd week, the floor surface with a new screed must be covered with PVC film - this will insure the screed against cracking. If there is no film, then you can simply wet the surface of the screed several times a day. Can the floor be leveled with a rotband? Undoubtedly. But, as mentioned above, this is often not advisable - after all, this is just an expensive plaster for leveling ceilings and light drywall partitions-walls.

What does a properly made screed look like?
It has a gray tint that covers the entire surface of the screed. When struck with a wooden rolling pin, the sound will be the same at all points of the tie. What horizontal deviations are acceptable? Not more than 0.25% - speaking for example, for a room four meters long, the total level of the height difference should not be more than eight millimeters.
It should be noted that the screed can be both the main leveling method and only part of the overall plan for creating a flat floor surface.
It is interesting that today the so-called wood-concrete screed is practically out of use. More recently, this method of equalizing the sex was extremely famous. It differed in that when creating the composition, sawdust was added to the solution. The sawdust made the concrete more stable and durable, it became breathable, but the ironing process was difficult as large pieces of sawdust rose upward and tore the resulting mixture.

Semi-dry type screed
Is it possible with a rotband to level the floor under the rough base - the answer was given above. We can say that the semi-dry type screed is a relative of the sand and cement screed. A semi-dry screed is placed almost identically, and the main difference concerns the composition of the solution. It lies in the fact that the amount of water that is added to the mixture is minimal. Water is added only to activate the hydration of the cement. To strengthen the composition during the preparation of the mixture, fibromaterial is added to it. Seemingly such minimal changes in the cooking process
mortar should not affect the final screed, but these are misconceptions.
Semi-dry type screed has a number of advantages:
- Highest density
- No voids
- Moisture practically does not evaporate
- Shrinkage is at a minimum
- Freezes quickly
- Building materials can be stored in rooms with a fresh semi-dry screed
- In rooms with a fresh semi-dry screed, finishing work can be carried out
- Installation without dirt
Disadvantages of a semi-dry screed:
The semi-dry method also has its weak points. Can the floor be leveled with a rotband? It is possible, but it is impractical and keep in mind that after drying it can give different shades.
- It is difficult to fill the corners (due to the high density) - this drawback is easily corrected by adding plasticizers to the mixture
- An area of no more than 70m2 can be leveled on your own. For leveling large areas, a pneumatic stacker is required
As mentioned above, the technique of laying a semi-dry screed repeats the technique of laying a screed from cement and sand. Nevertheless, there are some features that must be mentioned. They concern mainly the preparation of the solution. So builders are advised to mix three shovels of sand to one shovel of cement until the required amount of mortar is obtained. The mixture is continued to knead and water is carefully added, which already has added fibrous material. Fiber is taken at the rate of eighty grams per bucket of water, but only if there is no additional instructions from the manufacturer of the fiber. It is necessary to add water until the composition acquires the characteristic sandy loam state, which is similar to the state of sand with a high clay content, which sticks together strongly. If the resulting mixture is compressed, then water will not protrude from it, and the resulting form will remain. If the wrong amount of water was added, then you can correct the mixture by adding sand and cement. This is done in previously dried proportions, but in reduced quantities. Whether it is possible to level the floor with a rotband, we found out. And you can do it like this:

There is a rule - the composition is put in 2 layers. The first layer is lower than the position marked with a level, but with the greatest possible tamping. The second layer - with a significant broach using the building rule and with high-speed grinding. You need to work quickly and accurately - the solution sets within one hour. There is a widespread opinion according to which the first layer is directly immediately along the perimeter of the room. This can be done, but only if the second layer applied next is completed in one hour. Expansion joints near the walls are allowed to be cut already one day after the installation of the screed. Their width should not be more than three millimeters, and their depth should not be more than a third of the level of the screed. Now you don't need to ask yourself whether it is possible to level the floor with a rotband.
Self-leveling mixes
Sometimes such formulations are also called self-leveling. The basis of such a mixture is ordinary cement with the addition of special components that increase the plasticity and change the consistency of the solution. Components are sometimes added that create reinforcement to contain and prevent cracks in the future. Using self-leveling compounds, you can quickly and easily level almost any floor, provided that its differences are no more than three centimeters. Self-leveling mixtures are used in works related to leveling floors for finishing with carpet, tiles, and also often cork and linoleum. All self-leveling mixes can be divided into several types:
- Thin
- Durable
- Set soon
- Underfloor heating mixtures
Is it possible to level the floor with a rotband - it's better to forget about it. Take a quality mixture and work - as easy as shelling pears. But mixtures of a self-leveling type, as you might have guessed, are used not only for rough finishing, but also for finishing. There are also mixtures for the so-called rough leveling of the floor - they are used only for leveling a floor with significant irregularities.
What are the advantages of self-leveling mixes?
- Simple assembly
- Fast setting
- Resistance to sudden changes in temperature
- Increased reinforced properties
- Resistant to physical impact
There are also disadvantages of self-leveling type mixtures:
- You need to work quickly with a mixed composition.
- Significant differences in surface level
Can the floor be leveled with a rotband? It is better to use a different quality mixture intended exclusively for floors! Working with self-leveling mixes is simple and easy. They are ideal for leveling sand floors, concrete floors and some other materials. How is a self-leveling type mixture prepared? It's very simple - you need to dilute the store mix with water and just mix it. This is best done with a construction mixer. If it is not there, then an ordinary drill with a special nozzle will do. The solution-composition must be prepared in parts or in portions - this is done because the solution loses its original properties within the first fifteen minutes. As in the case with other types of screed, it is first necessary to prepare the work surface - clean it of dirt, eliminate all irregularities and then prime it.
 Any floor needs to be leveled - even if it seems level enough
 We realized that the answer to whether it is possible to level the sex with a rotband is negative. In general, how to level the tenth question, the main thing is to correctly calculate all the stages of work. After the mixture is completely prepared, it must be poured directly onto the floor. The principle of operation of a self-leveling mixture lies in the laws of physics - it is not necessary to level the mixture and fix the beacons. Self-leveling mixtures, after preparing the solution and pouring it onto the floor, must be leveled with a spatula. If it is not there, you can use a needle-type roller. It is justified to pour the solution onto the entire floor at once, but if this is impossible, for example, the room is too large, then you need to apply the solution in improvised stripes. You need to work as quickly as possible, since it is unacceptable for the edge of the strip to dry out. To achieve a perfectly flat plane, you need a firm hand and a lot of experience, but even with this combination of circumstances, the result is not guaranteed - it is very difficult to do it manually. Can the floor be leveled with a rotband? Review of the master:
Spilled two liters of water on the rotband screed. Such a scientific experiment. And nothing terrible happened - the moisture just went inside. Verdict - you can align small defects with a rotband with a clear conscience.
The setting speed depends on several factors among them - the total area of the room, the level of humidity, the thickness of the screed layer. You can walk on a fresh screed made on the basis of a self-leveling type mixture after 12 hours, and install a finishing floor covering after 5 days.

Leveling a concrete floor using gypsum plasterboard
This type of leveling is sometimes referred to as a dry screed. GVL are gypsum fiber sheets. This technology provides a simple and quick screed creation process. Nevertheless, the screed using the gypsum fiber sheet technology is inferior to the screed made using the monolithic technique. An expanded clay layer is placed under the gypsum fiber sheets as a thermal insulator. It is possible to use other building materials, but only if they have the required thermal insulation properties. Whether it is possible to level the floor with a rotband or not is up to you.
Leveling with gypsum fiber sheets starts, like other types of leveling, with a thorough cleaning of the surface. All dirt and other debris must be removed. Then waterproofing is laid on the floor. As the latter, you can use PVC film or any other synthetic material with similar properties. PVC in the form of stripes is laid directly on top of each other ten centimeters. This is done with an overlap of ten centimeters on the walls. Directly around the perimeter of the room, it is more advisable to use an edge band - it should be based between expanded clay and PVC film.
The expanded clay layer must be effectively tamped, and then leveled at a predetermined level. The starting plate is fixed as close to the door as possible and fixed with simple self-tapping screws. After the starting layer is done, it is necessary to proceed to the creation of the second layer - it is laid on glue. A prerequisite for creating the second layer of gypsum fiber sheets must be shifted by twenty-five centimeters in relation to the starting layer. If you want a durable and reliable subfloor, it is better to forget the question of whether it is possible to level the floor with a rotband. Let's go back to the alignment of the GVL. To ensure additional stability, you can fix the second layer to the starting layer using simple self-tapping screws. It is better to install beacons in the form of wooden or metal blocks that have a U-shaped profile. Moving along the expanded clay layer can be done using plywood sheets or gypsum fiber sheets.

At the final stage, the joints and fasteners are primed using construction screws. Next, the remaining surface is primed.
Surplus PVC film and tape must be trimmed. Leveling the floor using this method has a great advantage - all installation work can be done in stages and not in one day. This approach greatly simplifies the screed process and makes it more efficient. When asking yourself the question of whether it is possible to level the floor with a rotband, always remember that there are much better and more reliable options.
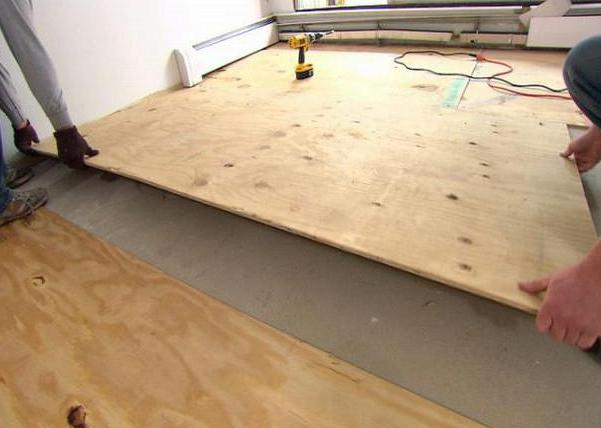
Plywood leveling of concrete floor
This method of creating a screed belongs to the dry type - to create it, you need to use sheets of plywood. Plywood leveling can only be used in rooms in which there are no sharp temperature drops and a constant moisture level is set. This type of screed is ideal for wooden floors, as well as for concrete floors with parquet, laminate and its derivatives. There are two ways in which plywood alignment occurs:
- Installing plywood sheets on the floor
- Installation on lags
Installation of plywood on a plank floor is used in cases where the height difference is at a minimum and significantly smoothed. Often the installation of plywood to plank flooring is used when floor deformation is caused by the floorboards. In the latter case, even logs as such are not needed - they will be replaced by projections on the floorboards if they are sufficiently curved. In this case, the thickness of the plywood should be 10 millimeters, and its width should be no more than 20 centimeters. All boards must be deformed to the same degree. If the floor boards are wider than 20 centimeters or some floorboards will not rest against the leveling layer, then the solution is to use plywood about 20 millimeters thick. Can the floor be leveled with a rotband? The result is in the photo below:

All used plywood sheets are best kept in a room where work will take place later for two to three days. An antiseptic should be applied to the plywood sheets. Before starting work, plywood sheets should be placed on the floor in the order in which they will be subsequently fixed. In the case of using sheets of 125 by 125 centimeters in size, there is a little trick - it is more practical and more convenient to simply cut them into four equal parts.
Then they are laid on the floor and each next row is moved relative to the past - in this way, brickwork is simulated, but a gap is left between the sheets, which should be equal to one centimeter, and, accordingly, the gap between the wall and the sheets is about one centimeter. Such gaps will be salutary in case of swelling of the tree. The next step is to fix the plywood sheets to the combs of the boards using self-tapping screws.

Often, plywood sheets are placed directly on the already leveled concrete - this technique allows you to create an almost perfectly flat surface. Is it possible to level the floor with a rotband without defects - yes, but without experience in such work, it is extremely difficult to do this on the first try.
Installation of plywood sheets on logs is used when significant temperature differences are recorded in the room. With the help of the lag system, concrete floors, as well as wooden floors, lend themselves to leveling. The start takes place as usual - first, the base is freed from debris and dirt. When a tree acts as a base, it must first be covered with an antiseptic solution. After that, waterproofing is created - as a rule, it is a simple PVC film. All logs and also plywood sheets need to be applied with an antispetic solution.
To create lags, elements from a bar, plywood or other wood with equal sides of forty, fifty or sixty millimeters are perfect.
There are times when it is impossible to raise the floor - in this case, plywood sheets will be an ideal option for creating logs. In this case, they are placed across the rays that fall from the window from steps of forty centimeters. The next step is to install cross-type jumpers and fix them with self-tapping screws. Can the floor be leveled with a rotband? It is highly impractical.

In the next step, absolute accuracy and a firm hand are important - fixing the lathing should take place according to the level that was applied to the wall. Wedges made of metal or gaskets made of wood are mounted on improvised logs, sometimes roofing material - these elements must correspond to point-type supports. Some builders recommend using sand during this process. Then the entire resulting system must be fixed with the floor - for this you need to use dowels, which should be about three times longer than the thickness of the improvised lags. Is it possible to level the floor with a rotband, but can you find another more suitable material. The choice is yours.
The insides of the crate must be filled with high-quality insulation, you can use a simple mineral wool, or a screed (PVA + wet sawdust). To do this, you need to apply a two or three-layer mixture, and then wait about three days until it sets (you can use a thin plywood base). The pre-selected and processed plywood sheets are fixed with self-tapping screws, but care should be taken that there is a gap between the sheets of at least a few miles.
In cases where the drops are more than five centimeters, but less than eight, the lag-mini system is used. To do this, directly under all the jumpers, as well as the lags, you need to mount wood gaskets. The height of the resulting supports can be completely different.

If you do not take into account the specific techniques that take place with a plywood screed, in general, this is a quick and reliable way of leveling the floor. There is no need to wait for the glue to set - this is a definite plus. Plywood sheets are “lightweight” - they do not press on the floors as is the case with concrete. Plywood alignment requires a qualified approach to the performer, otherwise it will not bring the desired result.
Bottom line. The secret to leveling a concrete floor
The main thing when leveling any type of floor is to remember that it is better to overpay and do all the work correctly than to get a partially deformed floor later. You need to approach floor leveling with knowledge - then the result will be reliable and durable. We hope that after our article it will become clear for you forever whether it is possible to level the floor with a rotband.
Concrete floor leveling - the American approach
Not be sure to live with uneven concrete floors.If you are planning to install new floors above the slab, then you do not have to put up with a defective floor.To obtain a smooth and even surface, use the highest quality leveling compound available on the market. So, let's begin!
Do-it-yourself concrete floor leveling
Concrete floors are among the strongest, most durable and reliable.However, especially in areas where moisture builds up, such as a basement or laundry room, concrete floors become extremely vulnerable.There are at least several reasons to consider leveling a concrete floor.This is primarily done to prevent structural problems in concrete.Secondly, if you plan to install the decking above the subfloor, it must be perfectly flat.Since floor leveling is a common thing for any homeowner, industry leaders provide a range of products designed to make leveling as easy as possible. Can the floor be leveled with a rotband? Think well. Can I replace it with another mixture?
If you will be doing specific leveling work in the future, get started with Concrete Leveler products.Convenient and effective, self-leveling compound from CTS Cement easilyspreads over uneven slabs, filling all the depressions. As it progresses, this compound creates an even and smooth surface during the setting process. Subject to the technology and the proper experience of the master, you can count on the fact that the new floor will be able to be put on the rough floor after several hours of leveling the subfloor. Concrete Levelersuitable for both outdoor and indoor use. This composition greatly simplifies the complex and demanding work of leveling concrete. That is why this composition will allow leveling the concrete floor even for those who do not have special skills and experience.

Planning. Calculation of the amount of mixture for leveling a concrete floor
Instead of improvising in the process, start by assessing the condition of the concrete surface.Your goal is to determine not only the scale of the project, but also the amount of the mixture.The key question is what kind of floors will be laid on the sub-floor.Carpets, vinyl boards, and parquet flooring tend to forgive minor sub-floor defects.But for a successful solid wood “tile” installation, the subfloor must be perfectly level.Here, the difference between the lowest and highest point on the floor can be no more than 0.6 centimeters.Thus, if you intend to leave a concrete sub-floor or use carpet, vinyl or parquet flooring, then leveling only the problem areas with a special mixture such as Cement All is the best option. If you are still wondering whether it is possible to level the floor with a rotband, then most likely you missed the answer at the beginning of the article.
If you want to prepare the sub-floor for solid wood flooring, you will need to create a perfectly flat base. It requires a sufficient amount of concrete screed to cover the entire area.With a floor thickness of 1.27 centimeters, a 50 kg bag of concrete screed is sufficient to cover 1.3 square meters.For a floor with a thickness of 0.6 centimeters, the same bag is enough for 2.7 square meters.
 The finishing floor will look even and beautiful only if the subfloor is perfect.
 Preparatory work for leveling the concrete floor
After getting everything out of the room, including the baseboard, clean the concrete surface as thoroughly as possible.Be sure to remove dirt and debris, including flaking paint, flaking glue, and chips.Pay particular attention to stains resulting from grease and oil spills, as residues can jeopardize the bonding of the mix and concrete. Is it possible to level the floor with a rotband often people with no experience in repair ask themselves.
For best results, it is allowed to carry outrobust blasting.Please note that shot blasting equipment can be rented.Then “fix” the locations of all test connections.After applying the leveling layer, re-cut the test joints to protect the concrete from cracking due to shrinkage and temperature changes.
To further level the concrete floor, a primer kit is required. Then use chalk to mark any obvious indentations in the surface.Then use the level to reveal any low points that you may have missed with the naked eye. Look for pits, depressions, and other defects.
In the end, leveling a concrete floor with serious defects will require the use of an excessive amount of leveling compound.For this reason, consider using a concrete mixer -As with shot blasting equipment, the concrete mixer can be rented. Now you know for sure whether it is possible to level the floor with a rotband.
Leveling the concrete floor with a self-leveling mixture
After you have planned your project and prepared the surface, proceed to cover the concrete with a leveling mixture.Specially developed CTS formulationThe Rapid Set works great in tandem with any concrete screed. This primer has one critical function: it seals the surface of existing concrete, preventing water loss and making the surface free from stains and bubbles.The primer also improves the adhesion of the leveling compound, helping it to better set and hold onto existing concrete. Can the floor be leveled with a rotband? Only if the defects of the subfloor are minimal, it is better not to cover large cracks.
Apply the concrete screed with a soft bristle brush, gently spreading the liquid evenly over the surface without creating puddles.As you walk forward, make sure the primer reaches the imperfections and into the pores of the concrete.Depending on the condition of the surface, 0.25 centimeters of primer can cover 4.6 to 9.2 square meters.For large areas up to 37 square meters, large gallon bags are ideal.After application, the primer is dried for at least three hours, but not longer than oneth day. Perhaps, it is the self-leveling mixture that is the best option not only for an apartment, but also for a private house.

Concrete level - order of work
Is it possible to level the floor with a rotband - the reviews are contradictory and often people fail to achieve the desired result on the first try.
When the primer is dry, it's time to apply a concrete screed.To do this, you need to properly prepare the composition.Pour a 22 kg bag of concrete leveler into a bucket and add five liters of water.Mix the mixture with a mixer drill.
Using the long handle of a scraper and other tools, apply the mixture all over the floor, working its way into all corners and edges.The leveling process will be faster if you use a wide trowel and squeegee. Under the influence of gravity, the mixture will naturally fall into the holes and pits.A smooth surface will be formed shortly.The leveler should be in contact with the floor within four hours.After 24 hours it will be possible to walk on the floor.
Is it possible to level the floor with a rotband - it is possible, but only under the laminate. If you plan to install tiles on top of the sub-floor, you can do so after six hours - from the moment you apply the leveler. Carpets and other resilient, moisture-sensitive materials will take about 16 hours.If you want to leave a rough concrete floor as a finish, then use the compositionRapid Set - NewCrete Concrete Resurfacer. This mixture provides a beautiful concrete surface for years to come. So the question is can the floor be leveled with a rotband?


