How to secure the accumulative water heater on the wall. How to fix the boiler on the wall from various materials? Connecting a boiler to an electrical network
To understand the principle of installing a cumulative water heater, it is necessary to know the technical characteristics of the equipment.
The cumulative water heater is a cylindrical vertical and horizontal type tank, designed to heat water from 55 to 75˚ with the help of electrical tanks. After heating the water to a given temperature value, the water heater is turned off and switches to the automatic temperature maintenance mode.
Advantages and disadvantages
The advantage of accumulative water heaters is that they are universal and do not require large energy costs. Their installation is allowed in any rooms where there is wiring and plumbing.
In addition to these advantages, there is another and no less weighty plus - this is the use of water from the tank in several places at the same time. From the cumulative water heater, there is a supply to the main water tap, from where the water layout is made. The only negative is that its dimensions do not allow them to install them in small rooms and in close space.
If you are standing before choosing and do not know which of the two types of water heaters to choose, then the best and economical option, of course, will be a vertical water heater. This is argued by the fact that in the vertical water heater, the Tan is located at the bottom of the tank. And at the horizontal heater in the side part. As a rule, cold water is lowered into the lower part of the tank. For vertical water heaters, its heating is not difficult.
Horizontal accumulative water heaters cope with water heating worse. As a result, electricity consumption increases.
Video
Below you can see the video about the varieties of accumulative water heaters and the principles of their work:
What can influence the durability of the water heater?

First of all, the water quality affects the durability of the cumulative tank. If you use water that is saturated with iron, it is best to use an enameled tank. In enameled tanks put large protective anodes, they will neutralize the active components of the iron. The only requirement is the regular replacement of the protective anode.
As for stainless accumulative water heaters, they are supplied with small protective anodes. Consequently, when using iron water, the anode does not cope with the load, and the iron settles on the surface of the tank and on the bench. As a result, it is necessary to change the lane and the anode at the same time.

There is another nuance that affects the durability of the water heater is the operation of the water heating device. Incorrect operation of the device in the winter time leads to the fact that the tank with water freezes, resulting in beans and protective anodes. The locations of the compounds begin to flow, as a rule, it leads to premature utilization of the water heater.
Cumulative water heaters are made with one and two Tanes of different capacities - 1.5 and 2.5 kW. Two-lane heater is installed in places where high electrical power consumption is provided.
The heater with one agent is designed for low-power electrical lines.
Cumulative Water Heater Installation Places

The most ideal place where the device can be installed, the lower part of the wall under the sink is considered. Thus, the space is not clogged and the risk of tank breakage under the weight of water is reduced. You should not be afraid that splashes of water will fall on the surface and the locations of the connecting elements. Water heater manufacturers have worked out the electrical security system and designated the degree of protection on the water heater body. Consequently, before installing a cumulative water heater, read the marking.
Installation of fasteners

We indicate the place of installation of fasteners and install anchor bolts or hooks. The installation of anchors and hooks is performed using a filter key, and they are clamped with full force. At the end of the fixation of the fasteners from the anchor bolts, the nuts are twisted, and the tank is put on the anchor, after which the clamp of nuts is made.
The choice of fasteners is selected according to the tank of tank.
Water supply to the water heater

To facilitate the process of eyeliner to the water heater, it is necessary to start with the supply of cold water. The inlet of the nozzle is marked with blue, the outlet with a predetermined layer of a pacular impregnated with silicone is inserted into it.
A tee is screwed to the treated nozzle and an emergency sloping crane, a reset valve and a cutting faucet, is mounted in each hole. At the end of the installation of cranes and valve on the tee, a threaded adapter is installed and connect to the apartment water supply.
Next, go to hot water. On the hot water supply system, we establish an exfigging crane and a threaded adapter, it will serve as a link between the apartment wiring and a hot water pipeline.
Video
Electrical Water Heater Connection Rules:
Electrical installation

Prepare a cable with a square cross section of 2.5 squares and an automatic ampere switch in 16 A. Then make the wiring to the electrical switch and the fasteners in the tank according to the applied instructions.
Today we will tell you how to install the water heater of the house with your own hands.
About signs of comfort
The presence of hot water in the house is one of the main signs of comfortable housing.
In apartment buildings, hot water supply is often centralized. Water is heated separately in the boiler room and is served in all apartments.
However, now such a water supply is economically ineffective, moreover, has many drawbacks in the form of a possible shutdown of hot water supply during pillars or servicing in boiler room.
The owners of private houses and such ensuring warm water is not available, so they have to solve the problem with the feed.
The exit is to use the autonomous supply of hot water. The house establishes a water heater, which provides heating.
This method of providing hot water becomes so popular that the owners of the apartments often refuse to centralized filing in favor of autonomous.
Water heaters provide accommodation with hot water in the right amount, it is available at any time, and is cost-effective.
Types of water heaters
The main types of water heaters that are currently used are electrical and gas.
In turn, electric water heaters are divided into accumulative and.
However, the method of heating the water they have one - with the help of Tan.
In the gas heaters, an increase in water temperature is performed due to gas combustion.
It should also be noted that the installation of the water heater in the house is not so complex, they can be performed and independently, having a lot of tools and equipment at hand.
Of course, with gas water heaters, the situation is somewhat more complicated, but about it below.
Positive and negative qualities
By establishing an independent water heater, you can safely save, it is the main advantage. But there are self-installation and other advantages.
Because the work is carried out by the host itself, then when servicing or needing to replace a faulty water heater, it will not be necessary to understand the connection system.
In the future, the replacement of the heater will be simple. In addition, installation work will increase the skills in the performance of different homework.
Of the disadvantages of the independent installation of the water heater, it is possible to note the occurrence of problems with connecting both to the water supply system and with energy or gas supply.
In addition, the inclusion of work can lead to the fact that the system will not work.
Before making work on the installation of a water heater, several factors should be taken into account.
1. It is necessary to immediately decide on the type of water heater.
Electric cumulative heater, it also "boiler" less consumes electricity, but it has quite large dimensions, so it should immediately decide whether it is a place for installation.
The protocating electric water heater is much more compact and the place to find it easier. But it consumes more electricity.

2. When choosing a cumulative heater, you should immediately decide, withstand the wall on which it will be located, considerable weight.
3. Immediately you need to ask. If it is old, it is unlikely to endure a large load. Therefore, it may be necessary to replace the mains of the house.
Calculate whether the wiring can hold the load, will help the cross section of the wire.
So that the wiring can withstand the load generated by a 2 kW boiler, a wire is required by a cross section of at least 2.5 mm. If a running heater is installed, then the wiring must be thicker.
4. The water supply system should also be asked. If during its laying provided individual conclusions for the connection - then it is very good.
If they are not, but the system consists of plastic pipes, then it is not so difficult to carry out the concentration. The most difficult thing will be the case with metal pipes.
Required tools and materials
If the wiring of the house is completely able to work with water heaters and it is possible to connect it to the water supply system or to produce insert, then you can start working.
You need from tools:
- Perforator with a brown of the desired thickness;
- Roulette;
- A set of keys;
- Screwdrivers;
- Pliers;
- Hammer, etc.
Additionally, you may need a soldering iron for plastic pipes or a dye to cut the thread on metal pipes.

These tools are needed in the case of the need of the inserts with the water supply system.
Such materials will also be required:
- Pacle with paste to seal the connection or fum-tape;
- Stop valves (quantity - from 1 to 3 pcs.);
- Tees (plastic or metal);
- Mounting hooks;
- Connecting hoses (if they are not included);
- Safety valve (for boiler);
- 3-core cable (in length it should be enough to counter);
- or socket.
Installation of a flow water heater
The first is the water heaters of the flow type. These heaters are divided into portable and stationary.
With portable water heaters and there should be no problems on the installation. Often the supply of water in them is made from a shower hose with a pre-removed sprayer.

To install, it is enough to choose the location of its location. Then make measurements of the places of fastening. It should be considered the length of the wiring, it should be enough to the nearest outlet.
After that, heater hang on the hooks, connect to the incoming output of the hose from the shower and connect to the outlet.

On this installation will be completed. Below are examples of work.


The complexity of the installation of a stationary flow water heater depends mainly from the water supply system at home.
If only a cold water pipeline comes into the house, the installation will be easier, and if with cold and hot - additional work will be required.
First consider the first case.
First of all, again, it will be necessary to determine the location of the heater. But here you need to focus on the pipeline with water, the heater must be located not far from it.
If in a water pipeline, there is an output with a locking crane for connection, then the water supply will be easy.

It is enough to connect the flexible hose to the locking crane and to the propulsion of the heater itself.
But you should worry about the output of the heater. It is also necessary to connect a flexible hose to it, and the second end to the mixer.
If there are several water intake points, it will take a laying of plastic pipelines to them, and after connecting the hose from the heater to this pipeline.

If there is no separate output in the system of the system, it will have to do it.
If plastic pipes, then the tools additionally need a soldering iron for plastic pipes, scissors for their cutting, and from materials - a tee and a shut-off crane.
Before starting work, it is necessary to overlap the flow of water into the system and drain its remnants.
Then cut the pipes in the place closest to the location of the device.
Using the soldering iron, the tee fall into the case, and connect the crane to it. After connecting the hoses to the device.

If the pipes are metallic, then for the inserts you need a dice to cut the thread on the pipes.

The sequence of work is the same as in plastic: the pipe is cut, the thread is cut at its ends, the tee is screwed, and the shut-off crane is screwed.
After installation, check the tightness of all connections. To do this, water supply is turned on and compounds are checked for the presence of leaks.
Second case.
If a hot water pipeline comes into the house, then in addition to connecting the supply to the heater from the pipeline with cold water, it will takes an installation of additional two shut-off cranes and one tee.
The tee is crashed into the hot water supply pipeline. Before it is set to the first crane, and the second is at the outlet of the heater.

This will ensure the connection and shutdown of hot water from different sources.
When using hot water from centralized feed, cranes are overlapped with input and output to the heater.
If the water will be used, a heated device, then the taps leading to it are opened, and the crane mounted in front of the tee embedded into the pipeline with hot water overlaps.

Installation of a cumulative water heater
Approximately the installation of the accumulative water heater is also carried out.
Initially, the location of the boiler is selected. It should be good access for maintenance.
Then all measurements and drilling holes for installing mounting hooks are performed.

Additionally, the installation of insuring bolts may need.

Another way.

Then the water supply is connected. If only a pipeline with cold water comes into the house, the tee crashes into it, and already a shut-off crane.

On the undermining output to the boiler, a safety valve must be located, which ensures the maintenance of the desired pressure in the boiler.

Since this valve has a water output, then it will be necessary to connect the silicone tube to it, the end of which is derived.
To the exit from the boiler joins the hose through which hot water will be supplied to the pipeline leading to consumers.
Therefore, the laying of this pipeline is desirable to produce in advance.
After the heater is connected to the electrical network. Connection is better to produce a distribution box located closest to the meter. Now you can use for these purposes, but you need to know the models that can withstand a large load.

It is advisable to lay the wire in the stroke with subsequent sealing. Not far from the boiler to the wiring you need to install a circuit breaker.

Boyler installation concept.

If a pipeline with hot water comes into the house, it will be necessary to produce a cutting pipe from a boiler to this pipeline and the installation of another tee and two additional cranes.

After you need to download the heater with water. To do this, you need to open one of the cranes of the consumption point, and after already - the water supply faucet to the heater.
If there is a connection to the central hot water pipeline, the crane installed in front of the tee is to close and open the valve on the output from the boiler.
Water, filling the system, will push the air available in the system and it will go through the crane of the consumption point.
During the injection, it is necessary to inspect all pipeline connections for the presence of leaks.
When needed, the connection can be tightened. If after tightening the flow is saved, the connection is better to repack, pre-break all the cranes of the feed and draining the water from the system.
Examples of boiler installation .


After filling the systems with water, the boiler is connected to the network.


Installation of a gas water heater
With gas water heaters, everything is somewhat more complicated. If such a heater was not previously used, it would not work independently.
For installation, approval with the relevant authorities, the installation of the water heater is also produced.
But to replace the faulty gas water heater is quite possible. Especially since all connections are already available.
To replace, it will be necessary first to completely overlap the gas supply to the water heater.
Usually, when installing such a heater, a crane is installed before the gas pipeline input.
It is also necessary to overlap and water taps and drain the water residues.
Then a faulty water heater is removed, and a new one is fixed in its place.

It is important to trace so that this pipe is tight.
If there is a gap and it is hoping freely, it may be necessary to replace it with a pipe with a smaller diameter.

To do this, you may need a special rubber hose with adapters at the ends.

After connection, immediately need to check the connections. To do this, they must be rich in soapy and open the gas supply valve.
If the connection is performed correctly, no bubbles in the soap solution should not occur in the connection points.
If they are available, you need to overlap the gas supply, and tighten the connections and re-check.
The latter is connected to the heater of water pipelines. It can be done before, but the water supply must be blocked.
Again, after installation work with pipelines, check them for the presence of leaks and, if necessary, eliminate it by tightening the connection or full repack.
Cumulative water heaters (boilers) are a cylindrical container. Its purpose is to warm the water to + 55-75º and create a stock of this resource. Heated fluid to a user-defined temperature, the device switches to maintenance mode.
With some skills, you can mount the water heater yourself. How to do it, this article will tell.
How to install a boiler
To understand the principle of mounting the accumulative type of water heater, it is necessary to know its technical properties.
Choosing installation site
First of all, it should be competently choose the location for the installation of the boiler. It is necessary to take into account the type of device and the rules for its installation. By the installation method, the accumulative heaters are:
- mounted (wall);
- outdoor;
- embedded.
The first variety is most in demand.
By orientation in space, boilers are divided into such models:
- vertical;
- horizontal;
- narrow (compact).
When you need to disguise the water heater, you can hide it in the closet. In most cases (especially in apartments), devices are mounted in a bathroom or kitchen room, sometimes in the hallway.
Often it is often required to install a boiler in the country, in a rustic or rural house where there is no utility water supply. Then for the device you can equip a small technical room. - Boiler, boiler room. In this case, heating equipment will not interfere with tenants.
Here are some rules for installing a boiler:
- The device should be placed at a distance from 1 m and more from outlets and other electrical appliances.
- The boiler must be lowered as much as possible to the consumers of heated water. Then water will not cool in the pipes. Otherwise, you will be waiting for an increased consumption of electricity.
- The heater should be placed so that 0.3-0.5 M of free space remains between its lid and the wall. This will facilitate access to the device elements when repairing or maintaining it.
- The devices with a capacity of more than 15 liters are desirable to hang only on the capacitated walls only.
- The floors in the boiler room should be waterproof or equipped with ladder for dumping water into the sewer network during accidents.
- In the absence of municipal water supply, the reservoir from which cold water flows should be set to 5 m above than the water heater.
- The boiler in the country or in a country house must be equipped with a drain crane. It is needed to prevent the heater freezing in the winter.
Connecting the heater to the plumbing network
The heater tank is attached on the wall with two steel hooks. They do not go buckle, so they are purchased separately. After fixing the boiler, it can be connected to the water supply.
We are usually rigid water, so you need to put a filter at the inlet to the heater. It will increase the service life of the device.
To connect the device to the water supply, it is better to apply hoses or copper tubes. Their wear resistance is higher than that of plastic analogs.
The easiest way to connect to the pipeline, when it was mounted in advance the removal from it to the heater. In this case, it will only be bold to it hose connected to a boiler. The tightness of the conjugation is provided by the seal in the form of a gasket of rubber.
The inlet nozzle on the boiler is marked with blue. It is necessary to mount the safety valve, it makes it possible to discharge excessive pressure. For the convenience of maintenance, it is desirable to put a tee on the heater removal, and to screw the cutting valve to it. He will give the opportunity to drain water from the tank as needed.
All tap joints must be made hermetic. Therefore, the sections of the interface of the elements of the pipeline should be applied to the sealing tape.
Installation scheme of heating device
First prepare the necessary toolkit and materials.

Required tools and materials
For mounting the heater, such tools will be needed:
- bubble level;
- plumbing and horn keys;
- passatia and nippers;
- roulette and pencil;
- a hammer;
- perforator;
- plus and minus screwdrivers.
Materials will be needed:
- fastening hooks;
- plastic or metal-plastic pipes;
- ribbon Foney or linen threads;
- pair of connecting hoses;
- three cutting valves;
- three tees.
How to Install Water Heater: Step-by-step instructions
If the wall boiler, then the height of its location depends only on the convenience of the instrument operation. The user must easily set the temperature modes on the control panel.
First of all, the heater is installed at the place of operation:
- Mark the line that area on the wall, where the lower side of the device will be.
- Mark and mark the distance between the outlined axis and the location of the fixing plank. It is welded on the back side of the device. There are no holes on the fixing bar, it is adapted to anchors-hook.
- Drill two holes on the upper line.
- In the holes with a hammer, hammer the plastic dowels. Then screw the steel anchors with hooks to the stop.
- After that, hang on the fastenings of the boiler, hooking them with a fixing plank.

After the device is installed, it should be connected to water supply. The easiest way to use reinforced hoses is used. On the boiler there are two labeled nozzles:
- blue (input) serves to connect cold water;
- red is an output for a heated resource.
In the configuration of the device there is a safety valve. It should be screwed into the nozzle for cold water:
- First, the pairing is compacted by FUM-ribbon.
- Then the valve is screwed.
- Then the fuse, which is in its bottom, hose is screwed. This pairing should not be seal, because In the cape nut there is a rubber gasket.
Then the second hose to the heated water pipe is connected in the same way.
Thereafter, it will be left to screw flexible connecting elements to the discharge of pipelines for a cold and heated resource.
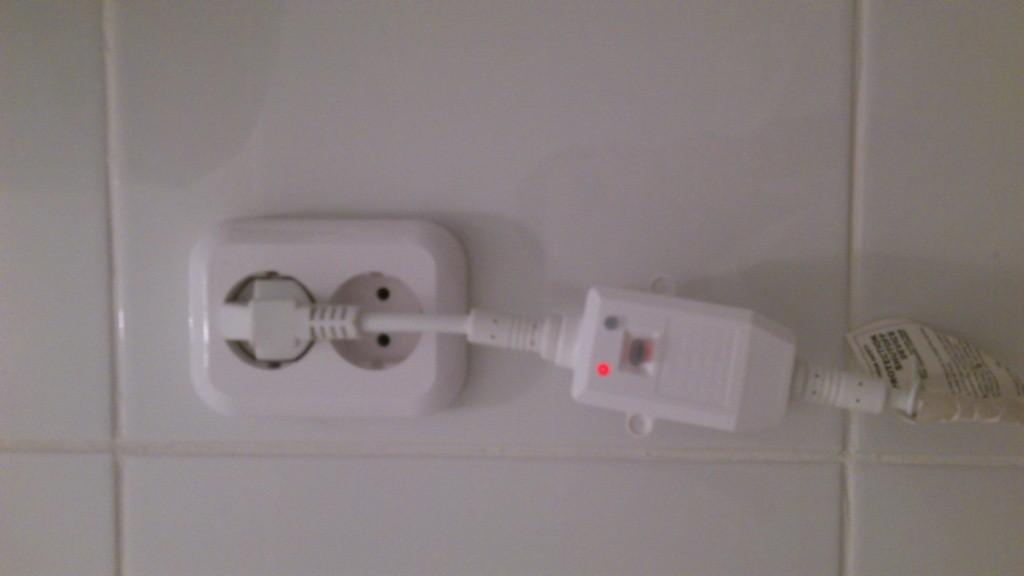
Next, you must enable the instrument in the power grid. Most of the boilers are equipped with a wire with a fork and a safety relay. You will need to mount a grounded electrical outlet from the water heater in advance. You can equip the device and the circuit breaker.
All device terminals are labeled under the appropriate color cable lived:
- the wire for the phase of the same color is connected to the brown connector;
- with a blue terminal mates lived for zero;
- a yellow or green wire is joined to the ground contact.
After pairing, lived with all the terminals you can feed the voltage. If everything is connected correctly, the indicator on the device should light up.
Next, you should set the desired water heating temperature and check the boiler. To do this, you need to fill the tank, and open the gilt of the hot resource to remove air from the pipeline. Then connect the plug to the power outlet. If the indicator lights up, and the resource will begin in the heated water branch, then the device can be used.
- It is forbidden to include a dry tank on the network. Also can not be drained from the tank, if it is connected to electricity.
- Do not change the design of the device and the fixing features of anchors.
- When the power is on, it is extremely undesirable to remove the cover.
- It is not recommended to apply elements that were not approved by the manufacturer when installing the device and using it.
- It is impossible to operate the water heater without its grounding.
- It is forbidden to match the boiler with a water supply system without mounted a pre-protective valve.
- It is impossible to connect the device to the pipes when the pressure in them is more than 6 atm.
- Implement all sanitary and electrical work follows with strict safety compliance.
- Water passed through a boiler is technical. It is impossible to use it for cooking and drinking it.
- Water pipeline must be in good condition. Do not connect the boiler to a two-way network for the resource transportation. As required, the pipeline is best replaced with a new one.
All models of accumulative devices are equipped with powerful heating elements that quickly bring water to the desired temperature. Therefore, the electrical wiring in the house or apartment should have certain parameters to withstand the load from the boiler.
To connect the device, it will be needed wire 3 × 8 or 3 × 6.
Cumulative water heater will give you the opportunity to use hot water without interference. At the same time, it will always contain the necessary supply of this resource. Install the boiler is simple enough. The main thing about to comply with all the rules and requirements of the installation of the device, its connection to the water supply and the electrical network.
The water heater makes it possible for residents of apartment and private houses to always have hot water at their disposal. Its independent installation is capable of performing any homemade sample, which has minor jokes of plumbing and electric work.
Such different devices - accumulative and flow
Water heaters (boilers) used in private homes and high-rise buildings are divided by power supply to electrical and gas, on the principle of operation - to accumulative and flowing. Gas aggregates are a conventional column. Its connection is carried out to the gas highway. But electrical devices operate from the household network. It is they who are interested in consumers interested in the presence of a permanent source of hot water in their home.
Flowing electric heaters have a special container - the flask in which the electrical element is mounted, designed to heal water. The devices of this type have compact dimensions. They must be installed on a tap with water. The main advantage of the flow instrument is a quick (essentially instant) heating of the fluid, the main minus is increased electricity consumption. Such devices may have heating elements (tanes) with a capacity of 3 to 27 kW. It is easy to understand that they wrap a lot of electricity during operation. For most consumers, this situation is unacceptable.
Some flow devices are not equipped with Tanni, but spirals. These devices consume even more kilowatt (by about 15-20%), but they are more durable. The life of their operation is significantly higher than that of water heaters with the case. Experts give one very important advice. If water has high rigidity in your home, buy and mount the boiler with a spiral. In other situations, stop the choice on devices with a conventional heating element.
Cumulative water heaters are used much less electrical energy, have an affordable price, are considered universal units. They are allowed to mount in any dwelling - both in the country house, and in the apartment, and in a country cottage. These devices are supplied with a tank in which the fluid heating occurs. This container may have a different volume. Heated water in it requires some time (from 10-15 minutes to several hours, depending on the tank capacity).
Lack of cumulative boiler - large sizes. For this reason, it is practically unrealistic to establish in close space or indoors with a small area. But the water heated in the tank is allowed to use simultaneously from several cranes. It is enough to establish the main waterproof crane. And from it to make a wiring onto the kitchen sink, in the bath, on the washbasin in the toilet.
Cumulative water heaters are horizontal and vertical. In the devices of the first type of TEN is located in the side part. In the vertical boilers, the heating element is put at the bottom, which provides better and rapid water heating in the container. Horizontal aggregates consume more electricity. Remember this by choosing the device.
An independent installation of the described aggregates allows you to save money on a challenge of a specialist (its services are not suiced), and also allows a home master to get an indispensable skills in servicing such equipment. But let's say at once - if you do not have the slightest experience of holding sanitary ware, it is better to abandon the attempt to install the heater with their own hands. The consequences can be deplorable, up to the flooding of neighbors from the bottom and failure of electrical wiring and network in your apartment.

If you are confident that you can install the water heater yourself, be sure to pay attention to the following points:
- 1. Evaluate the condition of the posting in the dwelling. Old cables that are exploited not one dozen years, it is desirable to replace to more modern. Even the most modest electrical flow heater consumes 2-2.5 kW. Soviet wiring of this load may not withstand.
- 2. Select a place to install the device. The accumulative water heater, as we said, is a sufficiently massive aggregate. If it is planned to install it on the wall, you need to make sure that it will endure the weight of a large volume device. In addition, during the entire period of operation of the water heater, a free passage should be provided.
- 3. Analyze the condition of water risers and pipes. With their deplorable state, it is desirable to replace the highways. And only after that proceed to install the heater.
It is also required to prepare tools and special materials in advance. We will need: metal-plastic pipes, fittings, pliers, bollard, screwdrivers, perforator, nippers, keys (spanning and adjustable), fluoroplastic tape or thread (linen), connecting hoses. For the installation of the cumulative device, we purchase three plumbing tees and three lockable cranes, for a flow - two units of these devices.
If you need to perform electrical replacement, you will have to purchase an automatic fuse, the desired amount and a socket for connecting the water heater. Wires take a cross section of 4-6 square meters. mm., Avtomat - on 32-40 A. Recommended types of cable for connecting the unit - 3x8 and 3x6.
Mount the accumulative heater - warm water is provided
After we studied the basic rules for the installation of boilers, you can take a job. Let's start with the installation of the accumulative unit. Installing the water heater with a tank begins with determining the place of its attachment on the wall. Then we take the roulette and measure the distance between the holes in the boiler anchors. We carry the obtained measurements on the wall. Serve in it in the designated places perforator with an appropriate nozzle hole for fasteners. As such, we will use the dowels. In some boilers there are four mounting holes, in others - only two. The number of dowels used should be the same (4 or 2).

Next, insert the dowels, carefully spin (in some cases I scored) hooks. There may be a small problem. It is connected with inaccurate markup. We will definitely need to measure the height from the top point of the water heater to the holes and to withstand exactly the same (insignificant deviation is allowed) the distance between the ceiling and dowels. If everything is done correctly, hooks will be twisted without problems. Otherwise, it will be very problematic to wear them.
After fixing the boiler on the wall surface, we proceed to connecting it to the water supply system. Well, when the conclusions are already available for this. But usually they are not. The scheme of work on arrangement of conclusions will be like this:
- 1. Turn off the water supply.
- 2. Cut the pipe with a grinder on the plot where we will mount the tee.
- 3. Cut the thread with a drain (we use the tool, the cross section of which is equal to the diameter of the pipes) and sealing it with fluoroplastic ribbon (FMU) or linen pacles.
- 4. Install the tee, we attach the crane to it, we seal the resulting node specified in the method above.
To the conclusions made. This can be done using metal-plastic pipes or flexible hoses. In the first case, the resulting connection must be sealed with fum-ribbon. When using flexible products of the additional sealing node is not required.
The next step is the installation of a special valve to enter the cold water on the heater. This element is of great importance for the normal operation of the boiler. The valve automatically resets the excess pressure in the system, the replete equipment from the failure. In the sets of inexpensive water heaters, such a device may not enter. But this does not mean that it can not be installed. Buy the valve separately and mounted it if you want to use a boiler without any problems.
It is also recommended to put an additional tee before the shut-off valve and connect another crane to it. In principle, this element can not be installed. But then you will be quite difficult to lower the water from the boiler when conducting regular maintenance of heating equipment. It is better to make life easier in advance, mounted in an inexpensive crane in an inexpensive for a couple of minutes. Plots of connecting additional parts also need sealing.
Next, connect the output of the boiler with the crane of the hot water supply. We connect the water supply to the dwelling. Open the cranes and wait when hot water goes. Nuance. First, air will go from the hot water crane. Do not worry. This is a normal phenomenon. Then we examine all available connections for leaks. If everything is fine, proceed to connecting the unit to the power grid. About this next.
Connecting equipment to the network - Feel yourself with an electrician
Many self-taped masters This stage of installing the heating unit is worried most. And in vain. If at least once connected to any household appliance, you can cope with a cumulative boiler. The plug from it can simply stick into a standard outlet for 220 V if the wiring in the house has changed recently, and it fully complies with the requirements previously described.

But it is better to be restrained and connect the heater through a separate automatic. Believe the difficulties will be minimum. At the terminals of the heating device we find three contacts:
- reverse wire or zero (N)
- phase (L);
- ground.
Zero in most cases is denoted by blue, the phase is brown, grounding - yellow. We need to gently connect the wiring of a three-core cable to these inputs and insulate them if necessary. Then we apply the voltage. If the wire connection is performed correctly, the boiler will light up the equipment availability indicator to use. We can safely use the self-installed and connected to the network.
Flowing boiler - Install and temporary, and stationary
Electric heaters of the flow type can be installed in two different schemes. If you are planning to use the unit only when the centralized hot water supply is disconnected, temporary installation of the device is performed. In cases where the water heater will be used constantly, choose a stationary installation scheme. Temporary connection involves the use of a conventional shower hose to use heated water. With this installation, we need to connect the device to a cold water supply pipe. Operation is performed simply:
- we cut a tee in the "cold" pipe;
- mount the shut-off crane;
- connect the input of the boiler to the flexible hose.
After these works, we open cold water, then the valve for heated water and turn on the machine to the power grid. We are waiting for seconds 30-40. Enjoy hot water coming from the wonderful device.

With inpatient connection, two tees will need. In this case, the equipment will function simultaneously with the centralized supply of hot water. We cut tees in the pipes and mounted crashes, performing on the obligatory order of their sealing of the packles, fum-ribbon. Next, connect the boiler to the pipe with cold water. And the output by which the heated liquid will go connect with the corresponding stop valve. Opening the cranes and the mixer, check, there are or no leakage. If necessary, we additionally seal the problem compounds.
Connecting to the electrical network is performed separately. Use the circuit breaker for these purposes. Directly in a domestic outlet, powerful flow heaters are prohibited. Another point. The machine takes the indicator more than 40 A. So we will definitely keep the wiring from emergency situations, and their home from fires.
We put a modern gas heater instead of an old column
The boiler, who needs gas for work, is only flowing. It is allowed to mount instead of a standard gas column. In cases where there is no such dwelling (not provided for by the project), the water heater is prohibited. You first need to get all the permissions in the gas economy service. And only after starting to install a gas boiler.

If the column is available, boldly change it to the flowing heater. The scheme of work will be like this:
- 1. We establish a boiler on the wall according to the method that we have already described (we make holes for fastening dowels, tighten the hooks and so on).
- 2. Connect the corrugation of a suitable cross section to the boiler. According to it, carbon monoxide will go to the smoke tract. One end of the corrugations is stretching to the appropriate output of the column, the second - on the chimney.
- 3. The rubber hose (it must have a certificate) connect the introductory hole in the heater to the gas pipe.
- 4. Lubricate the resulting connection with soap solution. Turn on gas supply. If bubbles are not observed, everything is done correctly. If there are bubbles, you need to pull the connecting nut and check the leakage again.
- 5. Using polyvinyl chloride pipes or flexible hoses, perform water supply to the device. The connection scheme of the elements will be the next - the tee on the pipe, then the valve, again the pipe, at the end - the hose of the boiler.
The next step is to search for possible leaks. Opening the valves with water. We inspect connections. In areas where water noted, we re-seal nodes, reach the nuts. Be careful! It is impossible to rearrange and disrupt the thread from the nuts. After elimination of the leaks, connect the power supply. Now you can open the "hot" valve. The boiler itself begins to warm the water (if we fulfilled all operations correctly), which you can enjoy literally through a couple of seconds.
The boiler is a very useful option in a modern apartment or house. That is why demand is growing in this technique every year. How to hang a water heater is the most popular question that worries all potential buyers. Indeed, when the cumulative boiler is already standing at home, the man begins to think about how to connect and attach it to the wall.
How to hang a water heater is the most popular question that worries all potential buyers.
Fastening the water heater of the house, to the wall, can cause certain difficulties. There is a large number of factors, everyone should be taken into account. For example, the weight of the boiler itself is an important criterion. Often, the water heater is chosen carefully, taking into account the material of the wall itself in advance. Try to work with a plasterboard or hook a boiler on a wooden wall - it's not so easy.
Feature design
Water heaters can be of different sizes and dimensions, so you need to take into account the design features before starting to hang the design on the wall. Cumulative instruments may also differ by weight. Large size is not yet an indicator. For example, the boiler from the company Ariston has compact visual characteristics, but always have an impressive weight.
Therefore, you need to divide boilers by type, in the end it turns out:
- Gas water heater, which is always connected to the highway or cylinder. Popular option, but not very practical because of its requirements. The main thing is the presence of a chimney that can go beyond the house.
- Electric water heater, which can work from a home power grid. Often it is installed in apartments because of this advantage. The chimney is not required, because there are no combustion products, which is another plus.
- Heaters with indirect heating. Always equipped with heat exchangers that need to be connected directly to their heating system.
What is common between all these models? There is one detail - cumulative capacity. It looks like a tank, but by weight significantly exceeds this item. When it is filled with water, it becomes really impressive. Therefore, the sizes of the tank are an important nuance before attaching the design to the wall. It is necessary to take into account the dimensions, weight, visual characteristics and characteristics of the container.
As for the fastening elements, there is a large number of questions, but it is not worth worrying. Any model, any brand, is immediately sold with them in the kit. If the device is a floor species, then it is very easy to install it. If the wall is a lot of problems arise. Need a robust wall that can withstand weight. If you hang a heavy boiler on a very thin wall, it may simply not stand.
Each wall boiler has a feature - it is pre-equipped with special mounting eye pieces. This is done so that the device is installed correctly. Included you can find special steel hooks. Sometimes they are not, have to buy the missing part on the market. The main feature is the diameter of the hole in the eye should correspond to the diameter of the hook itself.
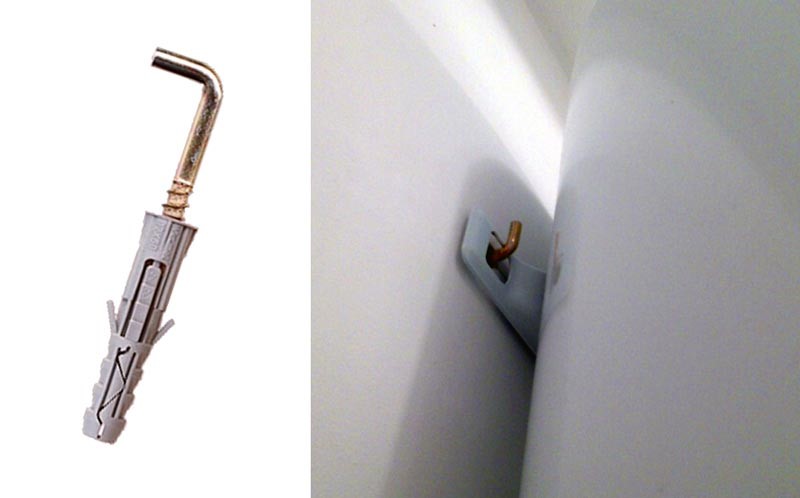
Special hook and hole for fastening
When the boiler lies in the living room, and the wall for the installation is already chosen - you need to figure it out a little in the design itself. Make it can even a person without experience, you do not need to be a professional installer of water heaters. Despite the differences in size and design, most boilers look almost the same. So, you need to deal with the options for fasteners:
- The first is more difficult, but also reliable. You need to purchase several dowels that ride into the walls with the help of a special construction gun. The main difficulty is that the necessary toolkit is not all. He will have to do it, buy a construction gun for one process is stupid, because it costs a lot.
- The second option is not so strong, but much easier. You need to buy a dowel, but with plastic tips. We drill a few holes of the required diameter, insert a dowel there and screw the steel hooks. Just and reliably.
Remember that these options are suitable for durable walls. If the house is foam blocks, then you need to take into account their fortress and state. Any material loafness and design can break. For example, frame houses often do not have the lining of the inner walls, the owners leave a tree. Wood can not withstand large loads, so you need to think about similar mounting options.
Walls from different materials - how to fix
Since the materials from which the walls can consist are very much, each of them needs to be discussed. This depends on the quality of the fastening of the boiler. And this nuance significantly increases its operational qualities. Yes, and there is no chance of what the wall is simply collapsed with time. Therefore, it is worth a scrupulous to approach the issue of material, and calculating which capacity has a tank.
If the tank is huge, for example, 100 liters, this is not a problem. But only if the walls are made of durable concrete or a stone base. Only these materials are able to withstand such a load. In another case, it is necessary to apply additional tools and methods. In this material, we will consider situations with each of the possible options.
Foam concrete
Popular in recent years material used by many. Resistant, reliable, but with its own characteristics. Here you do not need to understand for a long time if the tank does not exceed 50 liters. In this case, it will be enough to prepare simple nylon dowels of a spiral form. But what if the volume of the tank ranges from 80 to 100 liters? It is already a very hard design and can not do without additional tools.
- You can use the mounting plate, which is fixed with long steel dowels. It is necessary to clarify that the hairpin and thread are skipped through the wall, and then the lining of the washers must be tightened with nuts.
- Also an excellent option can be a special anchor, which is manufactured precisely for foam concrete. It is created specifically for such cases when you need to attach the device on the wall. But it is not a fact that they will be able to withstand a load of 100 kilograms.
- You can use an anchor with glue, which is also called chemical. He is very firmly sitting in foam concrete and looks neat.
We listed all the options that can be used with such material as foam concrete. But the best one is the third. Such dowels perfectly cope with temperature drops and are environmentally friendly, special glue is used.
How to attach chemical anchor to the wall and make the right foundation for the future installation of the boiler? You need to make several holes. Put the drill at an angle and turn it along the axis. A niche will appear inside the material that will look like a pocket. First, it is necessary to fill it with glue, and then enter inside the anchor. They frozen quickly, become incredibly durable.
Adobe
Samama is another interesting option that the modern market offers. The material can be quite durable, it all depends on its quality. But even at best, do not do without additional tools, there is not enough simple anchors here. A seducker is the main weapon, it is she who will help come up with a way out of the situation. The easiest option is to manufacture a special shield.
It looks like a simple metal plate, which is its shape, allows you to distribute the load correctly, throughout the wall. The shield itself contains several elements. It is necessary to prigerate a couple of mounting hooks, they can be replaced with eyelashes that will help lock the boiler bolts. The shield itself is attached to very long anchors, you can also use studs and lining for wide washers.
Ceramic tile

Water heater on ceramic tiles
How often do ceramic tiles use in the house? In the kitchen - almost always. This is an excellent material that is ideal for such purposes. In turn, it must be said that the boiler also put in the kitchen often. Therefore, this subtitle is ideal for such cases. Water heater can only be hung on this material only when performing two conditions:
- Under the lining very often leave emptiness during the procedure of their installation. To keep the boiler on such a slide material will simply can't. Therefore, they should not be, immediately behind the tile - the main material of the wall.
- The main material of the wall should be durable.
- The tile should be attached as hard as possible, without any deformations and so on.
If you do not comply with at least one of these rules, then problems will necessarily arise. The first concerns the complete breakdown of the wall structure. In this case, the ceramic tile will be very damaged. There may also be a problem when the wall is withstanding the load, and there is no tile. As a result, he begins to crack and push into the structure. This happens on the softest areas, as well as where empties are formed.
Plasterboard partitions

Special stud with a grid sleeve, will help install a boiler for plasterboard
Plasterboard has never been considered reliable and strong material. Therefore, to hang a boiler for such a wall - a dangerous and adventurous undertaking. In any case, this can be done in the place where mortgages are provided. Often they are created even during the construction of the wall itself. It is this design that allows you to secure the boiler of almost any size, the anchor will not fall out.
Playmark area should be almost similar to the boiler. It may be more, but definitely no less, the design will not stand the load.
There is also another option - the carrying structure immediately behind the plasterboard partition. In this case, you just need to drill the hole in both materials. And insert standard anchors there, screw them up with a typical method. When drilling, the thickness of the plasterboard is not taken into account. Design to get strong and reliable, the boiler will be able to hang over and do not even go to any of the parties.
Wood

Special shield that is installed through the wall
Wood structures have excellent visual characteristics. But the wood never knew how to work as a reliable bearing design. Therefore, a heavy boiler is simply not to keep. But this is not the most important thing, you need to think about security. The tree can easily ignite, so when installing the boiler, some of the non-combustible materials are always used as lining.
If your carrier wall is a wooden bar or a log, then it will be able to withstand the largest water heater. We simply screw the M-shaped bracket and ready. But it is worth understanding that wood is very quickly wearing. When it loses its properties, the design will begin to roll, it can fall. Therefore, experts advise the use of an additional shield.
It looks like a simple steel plate that can distribute the load on all its area. Also, such a shield works as a lining for avoiding a fire. This is the ideal option, if we are talking about interior wooden partitions. Sleeple is very often made from the pillar, which will be frown and filled with clay with straw. In this case, you need to use a hairpin with a nut, we skip the tool through partitions.
Lining
The lining is one of the most capricious materials and in this case, it does not make any exceptions. Here you need to create a non-flammable lining, as in the past version. But how to pick up the mount, it is too difficult here to give some tips. It is necessary to solve this question individually, exploring the circumstances.
The most optimal option, if you can fix it reliably and chain, installing racks from a bar. You can also use the profile pipe. The design itself is usually painted in the color of the lining, so as not to spoil the overall stylistics. The lining is the worst option for fastening the water heater. If there is no choice, then you need to think and decide, and if there is, it is better to revise other options.
Plaster
Another material that is a very bad option. The wall will not be able to withstand a large boiler, no fastening will help. Therefore, it is often necessary to use the ceiling as an additional support. You need to get two metal tires. The first is fixed to the ceiling beam and the ceiling concrete plate. The second must be attached to the material itself, do it with a dowel.
Brick and slagoblock

Fastening, which is ideal for using slag blocks
If the wall is from the slag block, the anchor screw will be the ideal option. It will not only help if the material is poor quality. If the blocks are porous, they will not hold out the load. A pair of studs or bolts will help that need to skip through the entire wall. Brick also has its own characteristics. If this is a silicate variety, then it is better to use an anchor screw or a stud with a colangua. The design will be very strong.
In this case, the bearing design should be strong. The minimum wall thickness is measured very simply - no less brick. If the conversation is about red brick, everything is much more complicated here. The material is weak, for it you need a welded frame or shield. Without this, the design is simply angry, spoiling the entire brick when falling.
If you have a thin wall, then you need to use additional shields or frames from the profile pipe. Often, anchor or studs are skipped to hold the design as securely as possible. If the wall is made of concrete, it is necessary to repel from the capabilities. Mounts are simply thousands and the material gives the advantage of choice.
Features of mounting work

Perfect mount - dowel with plastic tips
First you need to select the location of the installation. It is worth considering the fact that watershed cranes and electrical protection should be nearby, it will increase the usability. Also, the structure itself should not occupy a unnecessary place, it should look harmoniously and do not interfere with moving around the room. The first step is to test the strength. On the wall you need to draw marking.
After that, the creation of holes begins, plastic dowels are driven, a homemade shield is installed to improve strength. Each boiler model has several fastening plates with eyelets. They are behind. Inside the opening you need to insert anchor and tighten it into a dowel of plastic. It is also recommended to use hooks, easier with them. Just hung the design through the eyeles and that's it.