How to properly configure the BIOS on a laptop (BIOS) and a computer. How to boot from an "installation" DVD or flash drive - BIOS setup in pictures
Many computer owners are not very tired of the BIOS on English language, they would gladly make his menu in Russian.
Unfortunately, this is not easy, but it is possible not only theoretically. As an example, I give the picture below.
Below you see a translated version of the AMI bios - one of the most popular.
The whole difficulty with the translation is that each motherboard has its own BIOS.
This means that you will need to download the firmware, take it apart, translate, compile and reflash the one that is currently installed.
Under the force of such a process (translate the bios into Russian), only a few. Therefore, given that there are hundreds of motherboards (gigabyte, Intel, asus .... .), you will have to leave everything as it is and use English.
There is truth and good news, on the new processors, the bios in Russian has already appeared completely officially. It is installed on new motherboards where there is UEFI. See pictures below.

Here is another picture of the Russian bios.

UEFI is perfect new technology, which is much superior to the old versions of the BIOS, moreover, in Russian.
Previously, it was installed only on Apple PCs, but recently other manufacturers, including ASUS, have begun to use it.
In general, the fact that he is in English is scary only at the beginning. On the net or here on this site, you can easily find out what this or that option means.
You can also perform tasks on it, quickly acquire the necessary skills.
If ever, in Russia, there is a manufacturer of motherboards and processors, then its menu will be in Russian - hope dies last. Good luck.
Category: UncategorizedHow to properly configure BIOS on a computer? BIOS - Basic Input / Output System (basic input / output system) is responsible for the initial boot of the device and initialization of the equipment on a personal computer or laptop.
Today, BIOS has a lot of versions and boot options. But what it is and why, and most importantly, how to set it up, few computer users know.
First of all, let's figure out what it contains in itself and what can be done with it. And so, usually the BIOS consists of several parts. Information, Advanced, Main, Power Security, Boot, Exit.
Now in order.
In the Information or Main section you will find information about your PC, namely: data and characteristics about the process (frequency, number of cores, etc.), RAM (volume, frequency), hard disk (about "volume and technical data ), video (integrated, discrete, size).
In Advanced, you can make changes to the settings of the device as a whole or individual components.
You can overclock the processor, video, RAM frequency (remember, if you do this incorrectly, this will lead to device failure, if you do not have the necessary experience and knowledge, it is better not to do this)


In the Power section, we can configure how our computer will start and shut down, as well as improve energy savings, and get information about how much and what our components consume.


Boot is important when we need to choose which device our system will boot from and set their order (optical drive, USB, HDD, etc.)
This is necessary when installing the operating system, or when diagnosing software(same operating system).
Exit will help us save our changes, or load the default or optimal settings for your system.

Remember that you make all changes under your own responsibility and they can dramatically affect the operation of your computer.
Almost all motherboards have a speaker (beep), and when you turn on the computer and hear a one-time squeak, this BIOS sends a signal to the speaker so that it squeaks 1 time. The BIOS is essentially needed to interrogate the equipment, for the correct transfer to the “next step (I will explain later)”. BIOS has a clock, thanks to them in your computer in a de-energized state - the time does not go astray. The BIOS also includes a minimum package of parameters for the operation of the motherboard and devices on it, but let's talk about everything in order.
BIOS setup
What are bios
BIOSes are different, looking at the picture above, you can understand that outwardly they can be very different from each other. But, main feature of each bios is that they are all similar. Therefore, if you understand one BIOS, then understanding the second one will not be difficult for you. Further in the article, I want to open each tab and talk about all the functions so that you can understand how you can configure bios.
How to set up BIOS - Main
The "Main" tab contains information about the current time, date and main devices on the board.
System time - current time in Hours:minutes:seconds format (can be configured);
System Date - current date in the format "Day of the week day / month / year" (it can be configured);
BIOS Version - the current version of your BIOS, on the developer's website you can download the BIOS update and install them, read the article on how to update the BIOS;
Processor Type - information about the processor that is installed in your motherboard at the moment;
Processor Speed - processor clock speed, measured in megahertz (MHz) or gigahertz (GHz);
Microcode Update - stability update version for processor microcode;
Cache Size - processor cache size, measured in KB or MB;
Total memory - total volume random access memory(RAM), which is installed in the motherboard;
DDR3_A1-A2 / B1-B2 - slots for installing RAM, contain information about the type of RAM (ddr - ddr4), the frequency of operation of each bar and the amount of built-in memory, if "None" - then the slot on the motherboard is empty.
How to set up BIOS - Advanced
The tab "Advanced" contains information about the main parameters of the system. Many Advanced systems are different, so don't be surprised if you see other options in this menu, as I said - the principle is similar.
JumperFree Configuration - setting the voltage and frequency of the processor, memory, etc.;
CPU Configuration - setting the parameters of the central processor, or viewing its current parameters (cache, frequency, multiplier, etc.);
Chipset - chipset setting (south/north bridge);
Onboard Devices Configuration - setting up "onboard" devices, such as a network (LAN);
PCIPnP - setting the parameters of Plug and play devices, as well as PCI / VGA (palettes);
USB Configuration - setting USB - ports, you can change the parameters of the speed of the ports, disable / enable ports;
Interesting fact: Advanced most often has a processor overclocking menu. If anything, here is a small article about overclocking, if anyone is interested.
BIOS setup - Power
The Power tab contains settings and information related to the computer's power.
Suspend Mode - selection of the operating mode of the motherboard in economy. mode (depending on the PSU and the motherboard itself);
ACPI 2.0 Support - enables or disables the power management interface version 2.0;
ACPI APIC support - enable or disable the extended interrupt controller;
APM Configuration - allows you to turn on and off the power supply to the keyboard / mouse PS / 2, PCI / PCIE, etc.;
Hardware Monitor - contains information about the processor temperature, cooler rotation speed and incoming voltage;
An interesting fact: in some versions of the BIOS - in the "Power" menu, the rotation speed of the coolers can be adjusted manually.
BIOS setup - Boot
The Boot tab is probably one of the most interesting tabs. In it, you can configure the boot order of the OS from different media.
Boot Device Priority - allows you to build the boot order. If you put cd-rom in the first place, then before starting the normal boot of Windows from the hard disk, the system will first check the CD-ROM, and if there is no disk in the drive (or there is no suitable data on the disk), the system will go to the second step and start loading Windows on your hard drive;
Hard Disk Drives - option to select the 1st hard drive. If your computer has several hard drives, then some BIOSes can only accept 1 in the boot queue. Sometimes, to install Windows from a USB flash drive, you need to select your USB flash drive in this menu, and only after that it will appear in the Boot Device Priority menu;
Boot Settings Configuration - adjustment of secondary boot parameters (power Num, Quick boot, logo, etc.);
Security - allows you to set passwords for editing BIOS parameters;
Bios tab Tools
The "Tools" tab usually contains a BIOS update utility. For more details, read our article on how to update the BIOS. In a nutshell, I want to say that you need a flash drive and a firmware file, said from the official website of the motherboard manufacturer (in this case, Asus).
How to set up BIOS - Exit
The Exit tab contains the final step in setting up the BIOS:
Exit & Save Changes - Exit and save changes;
Exit & Discard Changes - Exit without saving changes;
Discard Changes - discard changes;
Load Setup Defaults - Apply all Default settings;
In this guide, you can find descriptions of various BIOS settings in pictures, because it is the complexity or simply fear of this firmware that prevents many from installing Windows on their own.
An example is the ASUS BIOS setting of the P5QL SE motherboard.

What is BIOS
BIOS is special program written to the motherboard chip. This is where all system settings are stored. This microcircuit can be classified as a volatile storage device, but at the same time it remains a permanent storage device. You might think that when you turn off the power of the PC, in this case, all the settings that are stored in the BIOS will fail, but this is not so, because the BIOS has its own power source - a battery, which is also installed on the motherboard. The main task of the BIOS is to recognize all devices connected to the computer (video cards, processor, RAM, etc.), check them for operability, and start them with certain parameters, after which the BIOS transfers control to the operating system loader. Thus, the BIOS is a basic input / output subsystem, and an intermediary between the computer hardware and the operating system, i.e. The BIOS enables devices to communicate with each other and with the operating system.
There are currently several BIOS versions, the most popular of which are the Phoenix Award BIOS and the American Megatrends (AMI) BIOS. To configure your BIOS, if you have never done this before, it is better to find out the version and model of your BIOS and look up the configuration details on the Internet. This article describes BIOS AMI setup.
What do I need to do to open the BIOS settings menu?
Immediately after turning on the PC, the BIOS starts loading the very first. Having quickly loaded, it begins to perform the POST procedure, with the help of which it polls all connected devices for operability and readiness for work. If all connected devices are ready to use and work normally, a short beep will sound from the speaker located in the BIOS. After this short beep, you should quickly press the "del" or "F10" key on your keyboard. If you do not hear the signal, for some reason, then you can press these keys while on the screen, various data will be displayed on a black background, which are the result of the POST being carried out to readiness of the devices. To make sure that you get into the BIOS, you can press the keys many times, immediately after the computer starts to turn on. If, when you turn on the computer, instead of the usual short BIOS signal, you hear a signal that is longer or repeated, then during the POST procedure, it turned out that one or more connected devices did not work correctly or failed.
After you successfully got into the BIOS settings window, in AMI BIOS version 02.61 (and in many other AMI versions), you will see:
MAIN section

In this section, you will be presented with the opportunity to independently configure the system time and date, as well as configure connected hard drives and other drives. Typically, the BIOS automatically detects all connected devices, so you won't need to enable them manually here, but you can change some settings when they are automatically enabled. To do this, select the hard drive or other drive you need, and press "Enter" on the keyboard. After that, you will be taken to the settings menu of the selected drive. In our case, we see all the information about the hard drive connected to the first channel. If no device is connected to the channel, then we see the inscription “Not Detected”.
Once in the hard disk settings, in order to make your own settings, you should change the “Type” parameter from Auto to User.
LBA/largemode- this parameter is responsible for supporting drives larger than 504 MB. Thus, it is desirable to select the value AUTO here.
Block (Multi-Sector Transfer)- using this parameter, you can disable the transfer of data of several sectors at the same time by 512 bytes, i.e., by disabling this parameter, the speed of the hard disk will sharply decrease, because only 1 sector equal to 512 bytes will be transferred at a time. For fast work, it is better to set the AUTO mode.
PIO Mode - using this parameter, you can force the hard disk to work in legacy data exchange mode. Automatically, modern hard drives operate in the fastest mode, therefore, it is also better to set the AUTO value here.
DMA Mode - direct memory access. To achieve higher read/write speed, leave AUTO.
SMART Monitoring- using this technology, you can monitor the status of the hard drive. In other words, it is a technology of self-observation, reporting and analysis. It is also better to set the value to AUTO.
32 Bit Transfer– if the value is Enabled, then the data transmitted via the PCI bus will be transmitted in 32-bit mode. If this option is disabled, then in 16-bit.

Systeminformation
In the MAIN section, you can also find out some information about the system. To do this, select the System Information item in this section. In the window that opens, you will see the BIOS version and the date of its production, there is also information about the processor and system memory.

StorageConfiguration
Selecting the Storage Configuration item in the MAIN section, we will go to the settings of the disk subsystem. Here, by changing the SATA Configuration parameters, we can disable the SATA controller that is soldered to the motherboard by selecting the Disabled option. By selecting the Enhanced mode, the system will work in the usual mode familiar to all modern operating systems. Finally, by selecting the Compatible mode, the disk subsystem will run in compatibility mode for legacy operating systems. (Windows 98.95 Me)
Configure SATA as. By changing this parameter, you can select the IDE mode, using which you will see all connected drives as IDE devices, or you can select the AHCI mode, which is supported by most modern operating systems. Selecting AHCI will allow you to use modern technologies such as Plug-in-Play.
Hard Disk Write Protect and SATA Detect Time out. The main purpose of these parameters is to protect disks from writing, i.e. it is better to leave the Hard Disk Write Protect option in Disabled mode. By changing the SATA Detect Time out parameter, you can change the time that the computer will spend searching for the disk subsystem when it is turned on. Accordingly, by setting a shorter time, the download will be faster, but you don’t need to greatly reduce it, but rather, on the contrary, increase it a little or leave it by default, because with a short time, the disks simply may not have time to be determined by the system during the POST procedure.

Advanced section

By selecting the JumperFree Configuration item in this section, we get to the Configure System Frequency / Voltage section.
Configure System Frequency/Voltage
AIOverclocking - By selecting the AUTO mode in this parameter, you can automatically overclock the processor, but if you select the Manual mode here, then the settings for overclocking the processor can be made manually.
DRAMfrequency - this parameter allows you to set the memory bus frequency independently of the processor bus frequency.
Memory Voltage and NB Voltage– these parameters allow you to manually adjust the memory module supply voltage and set the system chipset voltage.

Going from the Advanced section to the CPU Configuration, we will see a window Configure Advanced CPU Settings. In this section, you can change all settings related to the central processor, you can also monitor its operation and find out all the information about the central processor.

OnboarddevicesConfiguration
Here are the parameters that affect the operation of the built-in controllers and ports. For example, by changing the Onboard LAN values, we can disable or enable the built-in network adapter.
Serial Port Address - allows you to assign one of the fixed addresses to the COM port, and an interrupt number, which will be used by the operating system in the future.
Parallel Port Address- assigns one of the fixed addresses to the LPT port, which will be used by the operating system in the future.
Parallel Port Mode- Specifies the BIOS in which mode the computer's parallel port should operate.
You can also assign addresses to other ports in this section.

USB configuration
In this section, you can make changes to the operation of the USB serial interface. Here you can also completely disable all USB connectors on your computer.

POWER section (power settings)
In the Power section, you can configure the power-saving features and how your computer turns on and off.
ACPI - Advanced Configuration and Power Interface - this advanced power management interface.

Going to the item Hardware Monitor, we will find all the information about the temperature of our processor or the speed of the fans. Also here you can find out information from all other sensors of the computer, and make changes to some parameters of the power supply.

Boot section (boot options)
In this section, you can make changes to the boot options.

Let's go to the section Boot Device Priority.
Here we have the opportunity to configure which drive we will boot in the first place. Thus, the figure shows that, first of all, information is loaded from the hard disk, i.e. when you turn on the computer, the operating system will start loading from the hard drive.

These parameters are not difficult to change, and already from the next figure we see that information from the connected drive will start loading first. These settings should be changed if you are using a portable version of the operating system or when reinstalling the OS.

HarddiskDrivers
This option will allow you to change the hard drive from which the operating system will initially boot.
This option should be used when your computer has multiple hard drives installed.

Boot Setting Configuration (Boot)
This section contains settings that affect the boot process of the operating system, keyboard and mouse initialization, error handling, etc.
Quick Boot- an option, by activating which, every time you turn on the computer, the BIOS will test the RAM, which will lead to faster loading of the operating system.
Full Screen Logo- by activating this option, every time you restart the computer, a graphic image will be displayed on the monitor instead of text information, on which you can see information about the processor, video card, RAM and other PC components.
AddOnROMdisplayMode- an option that determines the order in which information about devices that are connected via expansion cards and have their own BIOS appear on the screen.
Bootup Num-Lock– an option that determines in what state the “Num Lock” key should be when turning on the PC
WaitFor'F1'Iferror- enabling this option will force the user to press the "F1" key if an error is detected at the initial stage of loading the PC.
Hit ‘DEL’ Message Display- an option that controls the appearance on the screen (or hiding) of an inscription that tells which key should be pressed to open the BIOS settings window. For many users, it is no secret that in order to get into the BIOS, you should press the "del" key, so this feature can be disabled.

Security Setting– protection settings.
Supervisor Password- this function allows you to change, delete, or set a new administrator password to access the BIOS.
userpassword - this function allows you to change the password, create a new one or delete it, only for ordinary users.
The difference between these functions is that by entering the BIOS using a user password, you will only have the opportunity to view all the settings set there without making any changes, and if you entered the BIOS as an administrator, you will have access to change all BIOS settings .
When you press the "del" key, after starting the computer, to get into the BIOS, each time a window will pop up asking you to enter the password.

Tools section
ASUS EZ Flash - With this option, you have the ability to update the BIOS from a storage device such as a floppy disk, Flash disk, or CD.
AINET– using this option, you can get information about the cable connected to the network controller.

Section Exit
exit &SaveChanges (F10) - is used to exit the BIOS while saving all changes made.
exit &DiscardChanges- exit with the cancellation of all changes made.
DiscardChanges- cancel all changes made.
loadSetupDefaults– setting default values.

That's all in general terms. After you read this BIOS guide, you can set up your computer, you can set up your BIOS to install Windows on your own, enable or disable built-in devices such as audio or network card. By the way, do not forget to read about the new UEFI BIOS version, it will soon be installed in all modern motherboards.
How to set the system date and time? How do I boot my computer from a CD or flash drive? These and other common questions will be answered by getting acquainted with the basic BIOS settings and how to edit them.
Introduction
If you still do not know what a BIOS (BIOS) is and what this firmware is for, then we advise you to read our previous material that tells how the computer boots up and what role the “basic input system / system” plays in this process. conclusion." In the same article, we will get acquainted with the BIOS setup program, which is most often called the BIOS (CMOS) Setup Utility.
By the way, in most cases, users use the abbreviated names of this program, calling it BIOS Setup or simply BIOS. For example, you can often hear expressions such as “enter the BIOS” or “open the BIOS”, which is somewhat incorrect, since in both cases we are talking about entering the BIOS Setup program, which is only part of the BIOS.
In most cases, BIOS Setup is used by ordinary users only to set the system time and date or select boot devices. But in fact, this program can have a lot of possibilities. With it, you can manage the operation of the processor, RAM, chipset and other important PC components, monitor temperature regime devices and perform many other useful actions.
Enter BIOS (CMOS) Setup Utility
In order to launch the BIOS setup program, it is necessary to press a certain key or a combination of them during the initial PC testing procedure. In the vast majority of cases, on desktop computers, the Del key is used to enter the BIOS Setup, less often F1 or F2. In laptops, on the contrary, it is the function keys (F1, F2, F11, F12) that are most often used for these purposes.

You can find out exactly which of the keys are used to start BIOS Setup from the instructions for the computer or motherboard. Also, in some cases, during the POST procedure, a hint is displayed on the monitor about which key you need to press to enter the settings.

True, in modern computers and laptops, on-screen prompts are less and less common, but in any case, a search query on the Internet will always help you find the right key.
In addition to the need to know the right key to get into BIOS Setup, it is equally important to choose the right moment to press it. In order not to be late, it is better to repeatedly press the enter key immediately after the start of the PC boot. In most cases, this method is guaranteed to run the BIOS settings.
BIOS Interface (CMOS) Setup Utility
The Bios Setup program has a text interface without any design tricks and is controlled exclusively using the keyboard. This is explained by the fact that the graphical shell of this application has not changed much since the 80s, so everything looks very simple and ascetic.
In general, the BIOS Setup interface is of two types: with the location of the main menu in two columns or horizontally. You can understand what type is in front of you immediately after entering the program and opening its main window.

In the first case, you will see a list of sections placed in two columns on a blue background. This option is typical for BIOS versions developed by Phoenix Technologies (AwardBIOS, Award Modular BIOS, Award WorkstationBIOS). They are traditionally used in their motherboards by manufacturers such as MSI, Gigabyte, Foxconn, ECS and others.

In the second case, a window with a gray background will appear in front of you, in which the menu with the main sections will be placed on top of the screen, in the form of a blue horizontal strip. Such an interface, as a rule, is inherent in the American Megatrends BIOS (AMIBIOS, Aptio AMIBIOS) used in ASUS, Intel, ASRock and some other motherboards.
Despite such differences in the interface of these two options, all BIOS Setup sections have a similar presentation. To verify this, let's look at the structure of the program's windows in both cases.
At the top of the screen, you will always find the name of the current section (in the case of a horizontal menu, the name is highlighted) or subsection.

The main part of the screen is occupied by an area containing a list of subsections (indicated by triangular arrows) and parameters of the selected section. To the right of the parameter names are their values. At the same time, it should be noted that if a parameter is highlighted in pale color (blue or light gray), then it either has the read-only status and is purely informational, or in order to edit it, you need to change another parameter associated with it.

The right part of the screen is usually occupied by a column that displays brief reference information on the selected parameter or subsection, as well as tips on possible actions and use of control keys (American Megatrends). In the BIOS setup program with a blue background, the function key prompt is usually located at the bottom of the screen.
As you can see, despite the difference color design and slight differences in the arrangement of work items on the screen, at their core both interfaces are very similar, and present information to users in almost the same way. That is why the methods of working with BIOS parameters in both cases are almost the same.
Arrow keys are used to navigate through the menu and select the desired options, subsections or sections, and the Enter key is used to open them. The "ESC" key is responsible for returning to the previous screen and exiting the current settings. Also, with this key, you can exit BIOS Setup without making changes to the settings by pressing it in the main menu. In addition, the functions of the "F1" key, which calls for help, and "F10", which initializes the exit from BIOS Setup, from any place in the program, with saving the changes made, are unchanged. The "PageUP"/"PageDown" or "+"/"-" keys are traditionally used to cycle through the available values of the parameters to be changed.
In addition to the above keys, other function keys ("F2" - "F9", "F11", "F12") can also be used to work with the BIOS settings, but their purpose may differ depending on the board model and its manufacturer. However, in order to understand what each of them is responsible for, it is not difficult. It is enough to refer to the prompts that appear on the screen or look through the manual for the motherboard.
Main sectionsBIOSSetupwith a columned main menu (blue background)
Each motherboard model in many cases has its own unique set of customizable parameters, but the names and thematic focus of the main BIOS Setup sections usually remain unchanged.
standard CMOS Futures
This section contains the main (standard) computer settings, which include: setting the system date and time ( date, time), disk drive parameters ( IDE Channel), as well as various information about the system (information about the installed processor, the amount of RAM, and others).

By the way, setting the date and time for most users is one of the key reasons for visiting BIOS Setup.
Advanced BIOS Features
This section contains advanced BIOS settings. The most common of them include:
- CPU Cache Management
- Options related to the nuances of booting a computer. For example, here you can enable / disable NumLock mode, accelerated loading mode ( Quick Boot), as well as displaying the logo of the board manufacturer during the self-test procedure ( Full Screen LOGO Show).
- Selecting the sequence of polling boot devices ( First/Second/Third Boot Device). Another most requested feature in BIOS Setup, along with setting the date and time.
- Enable/Disable S.M.A.R.T.

It should be noted that depending on the motherboard model and BIOS modification, the set of settings in this section may vary.
Advanced chipset Features
This section describes the settings of the chipset installed in the motherboard, so the set of parameters here directly depends on its type and modification. In most cases, here are collected options that are responsible for the operation of RAM (adjusting the frequency and timings), the data exchange bus between the processor and RAM, the AGP / PCI-E graphics bus and the video adapter.
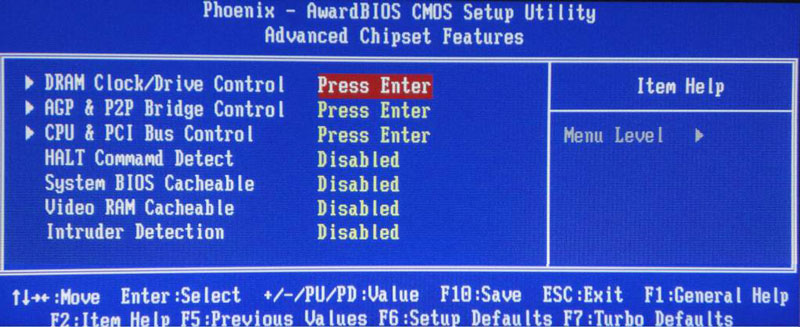
It should be noted that in some situations it is by changing the parameters of this section that you can increase the speed of your computer or, as they say, overclock it. True, recently, the options responsible for increasing the speed of the PC are most often taken out by manufacturers in a separate specialized section of the BIOS.
integrated Peripherals
This section contains parameters responsible for the operation of peripheral devices integrated into the motherboard, such as controllers for hard drives, USB ports, sound and network adapters, and others.

For example, here you can enable/disable the built-in sound card, support USB input devices, or select RAID mode to create an array of hard drives.
Here are collected options that are responsible for the power supply and power saving modes of the computer. Almost all modern computers allow you to manage power directly from the operating system, but this requires BIOS support for specialized ACPI standards, the mode and functions of which are regulated in this section.

Also here you can specify what actions should take place when you press the power button, set the conditions for turning on the PC and switching it to low power consumption or exiting hibernation.
PnP/PCI Configurations
This section contains the control parameters of the Plug and Play technology, which is responsible for the distribution of resources between PC devices and their quick configuration, as well as the settings for the operation of the PCI bus. As a rule, these functions are successfully performed by the system and do not require manual intervention. Therefore, in modern computers, this section may be absent altogether.
PC Health Status( H/ W monitor)
Modern motherboards are always equipped with sensors that monitor the operating temperatures and voltages of the main devices, as well as the speed of rotation of the cooling fans. All their indicators are displayed in this section.

In addition, in PC Health Status, you can control the fan operation modes and configure alert options in case of overheating, the cooler stops or the case cover is opened.
frequency/ Voltage control
This section contains parameters that are responsible for setting the operating frequencies and voltage values for the processor, RAM, video card and other devices. By default, all frequencies and voltages have recommended values and are adjusted automatically, which guarantees reliable system operation.

However, the value of some parameters in this section can be changed manually. This makes it possible to overclock the processor, memory and other components, forcing them to work at higher frequencies. It is only necessary to remember that, on the one hand, overclocking allows you to increase the overall performance of the system, and on the other hand, it can cause PC malfunctions and cause overclocked hardware to fail (for example, when setting too high voltage values). So you have to be very careful here.

It is worth noting that many major motherboard manufacturers list options for setting frequencies and voltages in a special section with the original name, for example MB Intelligent Tweaker (M.I.T.) or Cell Menu .
load Fail- safe Defaults
This is not a partition, but a command that resets all BIOS settings to their default values, which guarantee stable operation of the entire system. After selecting this item, a window will open in front of you, in which you will need to confirm the reset by pressing the "Y" key.

A command that sets the BIOS settings in such a way that the optimal performance of the computer is ensured while maintaining the stability of all its components. However, the parameters that are subject to automatic change depend on the model of the motherboard and may vary.

However, please note that such optimization of settings in some cases may lead to unstable operation of the system due to the incompatibility of the installed equipment. Then you should return to the default settings using the command Load Fail-Safe Defaults and try to configure the desired parameters manually.
Set Supervisor Password
A command that allows you to set, remove or change the administrative password, which is used for full access to all BIOS settings, as well as when booting the PC.
Set User Password
A command that sets a user password that allows access to view BIOS settings. That is, most of the settings will be closed for editing. Also, this password can be used when booting the computer.
Main sectionsBIOSSetupwith horizontal main menu (gray background)
As we have already noted, the BIOS setup interface exists in two main versions, which differ not only in the external design and location of the main menu, but also in the layout of the parameters in sections. So now let's get acquainted with the second type of interface, which is used by such motherboard market leaders as ASUS or AsRock.
Main
Based on the name, according to the developers, this section contains the main BIOS settings, which include time and date, parameters of installed disk drives and general system information (BIOS version, processor model, amount of installed memory). In this way, Main is almost a complete analogue of the already familiar section .
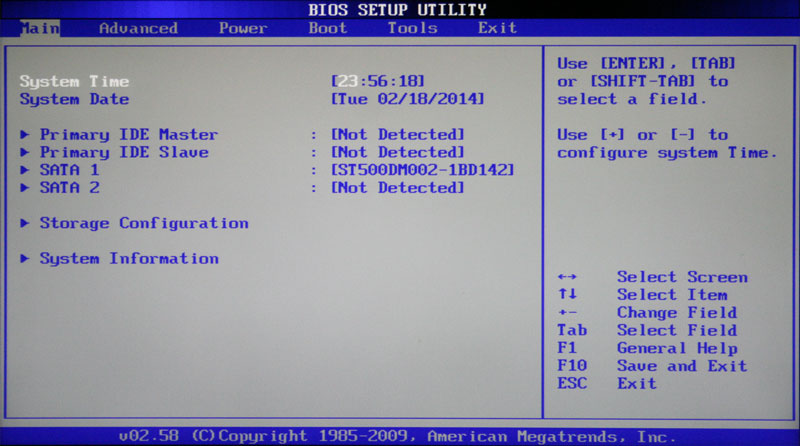
As you probably already guessed, the most requested option in this section is setting the system date and time.
Advanced
Typically, this section is the largest number options for setting up components and a PC and includes several significant subsections at once. Here are the parameters responsible for the operation of the central processor ( CPU Configuration), RAM, video adapter, chipset ( chipset), PCI data bus and Plug and Play technology ( PnP/PCI Configuration, PCI PnP), built-in peripherals ( Onboard Device Configuration), USB ports ( USB configuration) and other equipment.

Also in this section you can find overclocking options that allow you to manually set the frequencies and voltages of the processor, memory, and the PCI-E bus. In some cases, users can additionally adjust RAM delays (timings / latency). In many motherboard models, the parameters responsible for overclocking are placed in a separate subsection (for example, Jumper FreeConfiguration) or even an independent section of the main menu ( AITweaker, Overclocking or ExtremeTweaker).
Due to a sufficiently large set of components and a variety of parameters, the section Advanced practically does not have a unified structure. Depending on the board model and BIOS developer, the number of subsections/settings and their names can vary greatly. Indeed, if compared with the BIOS Setup version, which has a blue background, it turns out that in the section Advanced collected the contents of five sections at once: Advanced BIOS Features, Advanced Chipset Features, Integrated Peripherals, Frequency/Voltage Control and PnP/PCI Configurations.
power
This section is identical in content and essence to the sections and PC Health Status (H/W Monitor).

Here are the parameters responsible for the power supply and energy saving of the PC, monitoring the operating temperatures and voltages of its main components, as well as controlling the fan speeds.
Boot
Already from the name it is clear that this section is responsible for configuring the boot parameters of the computer. It is here that the settings for determining the sequence of polling boot devices and enabling / disabling the “Num Lock” key are located, which are in demand by many users (subsection Boot Settings Configuration).

In many cases the section Boot includes subsection Security A containing commands to set, remove, or change administrative and user passwords. In some versions of BIOS Setup, password management parameters can be placed in a separate section of the same name.
Tools
Most motherboards from the popular ASUS manufacturer contain an additional section that contains auxiliary tools for updating the BIOS ( EZ Flash 2), disable/enable mini-OS on the Linux kernel ( Express Gate), creating profiles of individual BIOS settings ( O.C. Profile), as well as checking the connection network cable during PC boot AINET 2).
exit
This section is responsible for exiting the BIOS settings menu and combines commands such as:
- Exit & Save Changes- provides an exit from the program with preservation of all changes made by you.
- Exit & Discard Changes- exits the program without saving all the changes made.
- Load Setup Defaults- returns BIOS settings to default values (factory reset).
- Discard Changes- Cancel the changes made without exiting the program.
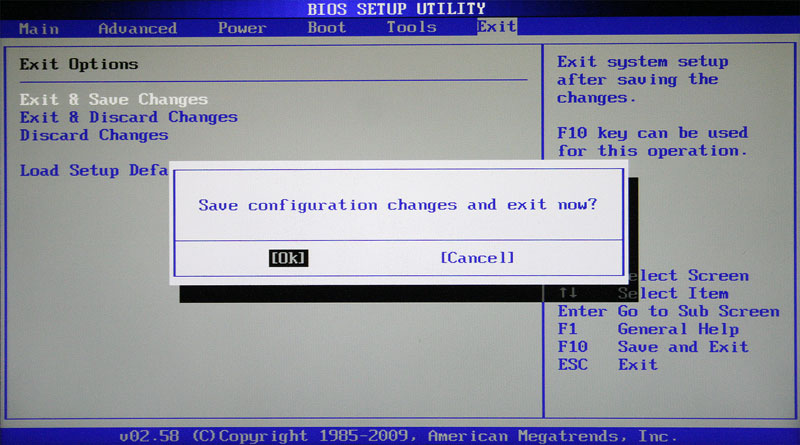
After selecting any of the above commands, a window will appear in front of you in which you need to confirm its execution by pressing the “Y” key and then “Enter”
Setting the time and date
When you turn on a new computer for the first time, it is better to immediately take care of setting the correct system time and date in the BIOS, thereby setting a baseline for both the operating system and software that can function without an installed OS.
To get into the BIOS settings menu, immediately after the computer starts booting, press the desired key (usually "Del" or "F2"). After the main BIOS Setup menu appears in front of you, in order to achieve the task, we perform a few simple manipulations.
BIOSSetup with blue background
Use the arrow keys to move the cursor to a section and press "Enter" ("Enter"). Often this section is the first and nothing needs to be moved anywhere, but there are exceptions.

In the window that opens with options, on top we find the two parameters we need - Date (Date) and Time (Time). Use the arrows to move between parameter values. To set values, you can use both the "+" / "PgUp" or "-" / "PgDn" keys, as well as direct entry of numbers from the keyboard. The “Enter” key is used to fix the set values.
The general algorithm of actions here is quite simple: place the cursor on the desired field (highlighted in red), enter or select its value and press "Enter". Next, go to the next field and repeat everything until all parameters are set.
After all the values are entered, to save the changes, press the "F10" key. In the red window that opens, enter the letter "Y" by pressing the key of the same name on the keyboard. After the reboot, the new time and date values will take effect.
BIOSSetup with gray background
Use the "←" and "→" keys to select a section Main, although in most cases this will not be necessary, since it is almost always located first and opens by default immediately after entering BIOS Setup.

We find in this section the parameters System Date (System date) and System Time (System time) and move the cursor there using the "↓" and "" keys. Further, to enter values, we use either the number keys directly, or the “+” and “-” keys. To move between fields within one parameter, the “Tab” key is used here. After entering the required value, press "Enter".
Boot device change
When installing an operating system or carrying out maintenance work with an already installed OS, it is often necessary to ensure that the computer is booted not from a hard drive, but from an optical media, USB flash drive, or some other data storage device. Therefore, one of the most popular tasks for which ordinary users have to "climb" into the BIOS settings is the need to change the boot device.
BIOSSetup with blue background
After opening the BIOS Setup program, use the arrows to move the cursor to the section and press "Enter".

Use the "↓" key to go to the parameter (First boot device) and press "Enter" again.
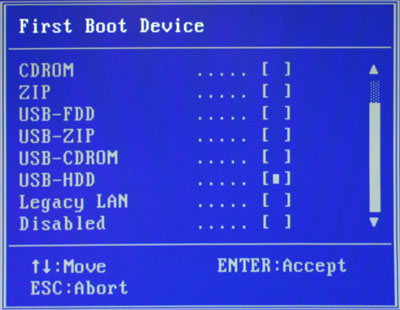
Next, you will see a window with a list of devices that you can select as bootable. If you plan to start the PC from an optical disk, then use the arrows to select the CDROM value and then, as usual, "Enter". If you need to boot from a flash drive or an external portable drive, then select the USB-HDD option. In the same way, you can select the second and third boot devices ( SecondBootdevice and ThirdBootdevice).
At the same time, it is worth considering that if several hard drives or solid-state drives that contain the system and are bootable are installed in the computer at once, then a special item is intended to indicate the sequence of their polling. HarddiskBootpriority.
In order for all the settings you have made to take effect, do not forget to press the "F10" key, then "Y" and finally "Enter".
BIOSSetup with gray background
After opening the BIOS settings window, use the "→" key to select the item Boot and press "Enter". Next, you may expect two options, depending on the BIOS version.

In the first case, you will immediately see a list of boot device assignments. They are designated as 1st, 2nd and 3rd Boot Devices (the first, second and third boot devices, respectively). Moving through the list is done with the "↓" keys, selection of values (HDD, CDROM, USB, Removable) - with the "Enter" or "+/-" keys.

In the second case, section Boot will contain several subsections, among which in this situation we are interested in the item Bootdevicepriority. Move the cursor over it and press Enter. Immediately after that, a window will open in front of you with a list of boot devices, the selection of which is carried out in exactly the same way as described above.
The owner of several drives should pay attention to the subsection Harddiskdrives. It is in it that the priority boot disk is selected among the hard drives installed in the computer. If you have several optical drives installed, then in this case the choice of a priority device among them can be organized in the subsection CDROMdrives.
After completing the settings, it remains to press the "F10" key, and then "Enter" to save the changes made.
Conclusion
Despite the fact that the BIOS is still the most common system used for initial hardware setup and PC booting, its time is inexorably coming to an end. Today, most motherboards are equipped with a new promising software boot interface - UEFI, which has a modern graphical shell and has much more functionality.
Nevertheless, it is too early to write off the "old lady" BIOS. After all, the mass introduction of UEFI began just a few years ago, while the BIOS has been the main boot system for several decades. Therefore, for a long time, a huge number of computers with BIOS will be used by many users.
It is not uncommon for PC users to have to dig into BIOS settings. There are many questions and problems here, since on various motherboards there are sewn different types of BIOS. Menu items differ in name and location, but in general they perform similar functions.
The own type of BIOS is integrated by the motherboard developers themselves or by third-party companies that have concluded an agreement with the manufacturers. The market is dominated by third-party companies.
Three main types of BIOS should be distinguished:
- AWARD
Let's dwell on these types and consider in more detail the interface and distinctive features.
It is a leader in this field. Back in 1998, Award Software was bought by Phoenix, but BIOS is still labeled as Award.
Traditionally, the base system shell has a blue (grey) background with English menu items. The interface is different in different versions.
For example, in version 4.51 PG, navigation is visually divided into two vertical compartments. At the very bottom are the control keys.
If we consider version 6.0, then surprisingly already appearance looks different. The gray color scheme prevails. The menu items have different names. The main sections are arranged horizontally. In the column on the right, there is a brief background information.

Takes an honorable second place. It is the property of American Megatrends Incorporated, hence the abbreviation AMI. In all respects, the similarity with the AWARD BIOS is noticeable. The names and location of the main sections coincide, but not always.
The presence or absence of BIOS options primarily depends on the manufacturer of the motherboard and its functions. Therefore, it is impossible to single out specific features of AMI unambiguously. Also, different versions have different interfaces.
The appearance of BIOS versions 2.5x (2.6x)
And this is what BIOS 3.31 looks like
UEFI BIOS:
The third type of BIOS is truly modern technology. It has a graphical interface, something even resembles an operating system.
The menu is made in the form of pictures with inscriptions. Without knowing English, you can intuitively guess what this or that section is responsible for.

It has a big advantage over the old types. As you know, the traditional BIOS, due to its functional limitations, is able to see no more than 2 TB. UEFI breaks the limits, as there are practically no volume limits.
The new software boasts a rich set of system utilities. It is possible to backup data or optimize the operation of RAM. The following features should be highlighted:
- Convenient interface;
- Ability to control the mouse;
- Expanding functionality by adding new utilities;
- Internet update;
Of course there are many more benefits. Large manufacturers have already begun the transition to the new kind BIOS. UEFI technology has proven itself only with better side, knowingly such giants as Intel and Microsoft became interested in it. I bring to your attention a video.
How to find out the type and version of BIOS
There are cases when you need to find out the current BIOS version. This can be done in the operating system Windows 7, XP. To do this, click "Start" - "All Programs" - "Accessories" - "Utilities" - "System Information". In the window that opens, find and read the item “BIOS version”.
At its core, there is no big difference between AMI and AWARD. They perform the same function, the distinctive differences were discussed above. Special attention it is worth paying attention to UEFI, since this type of BIOS is a new technology with high functionality.