DIY chandelier - instructions for making and a master class on creating designer models. DIY chandelier: give the room a complete look. How to do it yourself? DIY glass chandelier
Find out how to make a lamp out of wire, building mesh, so that flowers grow inside it. How to turn a snag into a lamp, and tree branches into a floor lamp?
How to make an original lamp?

A very interesting design item is obtained from the simplest materials, most of which are left over from a picnic. If you went with friends, relatives to nature, you must definitely remove the garbage behind you. This not always desirable job will be made more enjoyable if you ask to fold the plastic spoons separately. If you have children traveling with you, arrange a competition to see who can throw more and faster spoons into a separate garbage bag or bag.
You will also need water canisters. After a fun picnic, after arriving home, after some time, you can make original lamps from the containers left after the feast. Hand them to your friends, leave them for yourself to hang in the hallway, in the kitchen or in the country.
So, here's how such a chandelier is created with your own hands or with the help of your home. First put side by side:
- 5 liter oval plastic bottle;
- disposable plastic spoons;
- cable with cartridge and plug;
- low power LED bulb;
- pliers;
- glue gun;
- screwdriver
- stationery knife.
So that such original lamps do not lead to a fire, take an LED, and not an ordinary Ilyich light bulb.
For information: 4–5 W of LED bulbs correspond to 40 W, and 8–10 W to 60 W of conventional electric ones.

Carefully, so as not to cut yourself, remove the bottom from the canister with a knife.

Also, observing safety precautions, so as not to get hurt, cut off the handles of each plastic spoon completely. Applying a little hot glue from a gun to the cuts of the “blades”, glue them to the bottom tier of the bottle. Usually 17 pieces go here. Then, overlapping, attach the second and subsequent rows, arranging the elements in a checkerboard pattern.

To cover the neck, glue 10-12 spoon blades together, forming them into a ring.

Pass the cartridge with a light bulb and cable through the cut bottom hole in the bottle. If this "electrical" part causes difficulty for women, call the husband. If you don't have one, buy a cable from the hardware store with the socket and plug already screwed to it. You can borrow this working part of the lamp from the old one.

Put a “ring” of spoons on top of the canister, screw on the lid. To do this, let the husband drill a hole in it with a drill, and you yourself can do this manipulation with a hot nail or self-tapping screw, holding it with pliers. The original lamp is ready.

3 models of designer lampshades with your own hands
Ideas are in the air. If you are in the country and this piece of furniture is not there, it is easy to make it yourself from what is at hand. Take:
- hollow dishes;
- wire;
- mounting foam;
- gloves;
- paint;
- brush;
- pliers.
As a basis, you can use unexpected things: an old pot, a planter, an already unnecessary children's pot.
Turn over any of these auxiliary items, put on a plane upside down. Wind the wire, its turns repeat the shape of the future product, should be the same as the lampshade. With your own hands, but with gloves, pick up a can, squeeze a little foam out of it onto the frame, close the wire, let it dry.
After that, make the contours more even with a knife, cutting off the excess. Paint in your favorite color, white looks airy and elegant. Such a lampshade, made with your own hands, will decorate a country gazebo. You can make a few and hang them here. By avoiding big expenses, this way you decorate the space.

This lampshade looks stylish and modern, while the next one has a classic look. For it use:
- thick wire;
- pliers;
- small plastic water bottle.
Now roll the large outer ring from the wire. We will fasten it. To do this, cut 4 identical pieces of wire with pliers, fasten the first end of each to the small, and the second edge to the large ring. The upper part of the lamp is ready.
The size of the lampshade depends on whether it is made for hanging from the ceiling or for a table lamp. The first is greater than the second.
Roll the bottom ring out of the wire, it is the largest. Connect it to the second top five pieces of wire, distributing them evenly. It remains to decorate the frame of the lampshade. To do this, pass the wire through the second ring, twisting it in a wave and twisting it through the base. Do the same for the second ring.

It remains to sheathe it with fabric. Attach the flap from the second top to the bottom ring, cut to size, adding to the seam. Hem the large sides of the resulting rectangle. Sew the canvas on the side right on the frame, decorating this place with braid. That's it, you made a wonderful lampshade with your own hands.
If you want to get acquainted with the most modern ideas on this topic - please! In skillful hands, the construction grid will turn into a stylish lampshade.

With your own hands or, having called on a man, cut a rectangle from it with metal scissors. To fix the cartridge, twist a circle from the wire, fix it on top of the lamp with four pieces of wire.
If you do not have coarse mesh, use pliers to cut off the excess sections so that the distance between the strips of wire becomes larger. Paint the lampshade, and its frame is ready.
And now the magic begins. You can make an original lamp, which will benefit not only people, but also plants. Attach a planter with a flower at the bottom of the lampshade. You can tie, woven using the macrame technique, for the lower turns of the wire with a thick rope. Check that the fastening is secure.
If there is a man and a welding machine in the house, call on this tandem to make a metal ring with "beams" that need to be welded to the bottom of the lamp.

If you have a home climbing plant, such as ivy, pass its lashes between the cells of the lattice. The original lamp will become a house for a flower. It is better not to use ordinary electric bulbs, as they are very hot and can burn the leaves of plants. In addition, the air around the flowers will be too hot. Screw in an LED or fluorescent light bulb.
For such an original lamp, you needed:
- construction mesh or strong wire;
- brush and paint (optional)
- pliers;
- light bulb with cartridge;
- flower.
You can well fix cups with seedlings on such a lampshade, thereby finding an additional place for growing it and conditions for lighting in the evening.
We make a floor lamp, a table lamp with our own hands
Walking in the forest, do not pass by a rolled ornate driftwood. Put it in a bag, take it with you. Wash at home, if there is bark, peel off with a knife. Go over the surface with fine sandpaper, if required. Finish with wood varnish.

In order for the table lamp to hold well, the snag must be screwed with self-tapping screws to a solid pedestal. It should be heavy enough. Oak is suitable for him. If you find a broken branch of this tree in the same forest, saw off a circle 5–7 cm thick from the thick part.
It will also need to be sanded and varnished. When these wooden blanks are dry, connect them with self-tapping screws of sufficient length, first passing them through an oak stand, and then plunging them into a snag. You can also use nuts and bolts.
How to make a lampshade with your own hands, you already know. Therefore, make it and attach it to a snag, wrapping it with wire.
If the old floor lamp stand is no longer happy or you just want to decorate it, also use wood for this. See how good the birch racks look. Attach a branch of this tree to the lamp and see what kind of floor lamp you could make with your own hands.

How to crochet a lampshade?
If you are fed up with an old floor lamp, you can transform it with your own hands, giving it a "zest". Take the openwork braid, sew it on the top and bottom of the fabric lampshade. You can decorate with glitter by gluing them in the form of a pattern, evenly or randomly.
A floor lamp or a chandelier will turn out unique if you knit a lampshade for them with your own hands. This can be done with a crochet or thin knitting needles. For the first option, you will need:
- hook;
- cotton threads;
- pattern for knitting napkins;
- water;
- starch;
- ribbons.

Measure the top circumference of the lampshade, we need its diameter. Tie a chain from the air loops. Next, knit in a circle, based on the napkin pattern. Measure the height of the lampshade and the diameter of its bottom circle. Based on these data, draw a trapezoid or a rectangle (depending on the shape of the lampshade). Crochet this pattern. Sew on the side.
With single crochets, tie the upper circle of the lamp and this trapezoidal or rectangular part.
Boil a glass of water, stirring, pour in 200 ml of cold water, in which 1.5 tbsp is diluted. l starch. Boil for 1 minute, remove from heat, cool. Drop a knitted lampshade here, soak well, then wring out, let the water drain, and the fabric will dry, but remain slightly damp.
Put it on the plafond. In order for the knitted lampshade to hold well, you can skip several ribbons or ribbons between the loops and tie them.

Plafonds look very nice if they are decorated with crocheted flowers.

A solution of starch or PVA will help shape the knitted lampshade. Put it on the frame, apply glue, let dry.
In the second case (when knitting needles are used), you need to make calculations for knitting, draw a pattern according to the standards of the lamp, knit a trapezoid or rectangular lampshade. Similar models are suitable for floor lamps, chandeliers of a strict form. If you need to crochet a semi-circular lampshade, make wedges first, and then connect them with single crochets.
Here is another openwork chandelier. It is pleasant to make kisei with your own hands and decorate the bottom of the product in a circle. But first you need to create the lampshade itself. The crochet pattern for this beautiful thing is presented right there.

A table lamp will look amazing on the bedside table if there is such a lampshade on it, the knitting pattern of which is also given.

If your son or daughter does not let you finish the work, demanding attention, invite the children to make a lampshade too, let them twist strips of paper into tubes with their own hands. It is better to wind them on a thin pencil or a wooden sushi stick, and then glue the free edge so that it does not unfold.

Now you need to glue the resulting blanks, using an object of a suitable shape as a frame, for example, a 5-liter canister. Having made the first inner layer, let the child move on to the second. There should be several of them to close the gaps. When the PVA is dry, cover a table lamp with this lampshade or hang it from the ceiling. Looks original and extravagant.

If you are interested in other ideas on this topic, watch the video:
A very interesting version of the lamp from the disks:
Chandeliers and lamps in the premises of a house, apartment, cottage play a special role. They give each room its own style and are an interior decoration, especially if they are made by hand. Although such chandeliers are expensive, as they are made by hand.
DIY wooden chandelier with energy-saving lamps
If you want to make a lamp yourself, then with a little effort and turning on your imagination, you can make something special, individual, something that will give the room a special originality. This will not only save money, but also make the chandelier exclusive. Households and guests will admire her, you can also earn money on this.
Master classes that are available on the Internet in large numbers, their own ingenuity, as well as the desire to create with their own hands will help to make a chandelier from improvised materials. There are no restrictions in design, as well as in the materials used.
Chandelier materials
Before proceeding to the manufacture of a chandelier with your own hands, you need to decide:
- for what room it will be made (kitchen, bedroom, living room, hall, etc.);
- with the style in which it will be performed (business, romantic, classic, rustic, etc.).
These factors will help you choose the right material. It can be very different: fabrics, wood, plastic products, threads, lace, beads and much more. The first question concerns the foundation. There are many options here too. Old unfashionable chandeliers, metal and wooden hoops and frames, wire. Fantasy should not be limited. Everything will do, the main thing is to make the lamp carefully. Its appearance depends on it.
Chandelier for living room
Chandelier for the living room should be elegant and solemn. The figure shows one of the manufacturing options, made of beads. A master class for making such a chandelier begins with the selection of the necessary materials and tools. In this case, you will need:
- hoop;
- beads;
- strong threads or easily bending wire;
- nippers or scissors;
- spray;
- glue gun.
The hoop can be used plastic, metal or wood. It is better to wrap it with fabric or ribbons in the color of the future chandelier. You can combine fabrics - this will only make it more original.

Elegant chandelier made of beads with your own hands
You can buy the cheapest beads in the store or use the old ones available at home. It's okay if they are different colors. Then you can use the spray to give them the desired color.
Beads are strung on a thread or a thin wire and then intertwined with each other. The pattern may be as shown in the photo, or may be made in a different style. A glue gun will help to fix the beads in the right places. The strung threads are attached to the hoop with a thin wire. This is how a lamp design is created using beads. Other products can be additionally used in the decor, but this is already the taste of the manufacturer.
Currently, many lovers of making chandeliers with their own hands use material such as LEDs. LED strips are especially popular. It turns out economical and very effective lamps.

LED strips for chandeliers
The following types of tapes are used:
- SMD 3528 with 60, 120 and 240 lamps;
- SMD 5050 with 30, 60 and 120 lamps.
LED strips are produced with a length of 5 m, with varying degrees of protection, which allows them to be used in rooms where humidity is high (IP44).
When creating a chandelier with your own hands from several colors, you must observe the polarity when soldering and install the controller. It will allow you to use the remote control to adjust the brightness and switch the light.
Chandelier for nursery
Making a chandelier for a child's room is not difficult at all. It must be remembered that in this room there should be an atmosphere of childhood, and it is connected with the flora and fauna. Therefore, most often such a chandelier is made with butterflies, fish, flowers, various plants, and fabrics with a children's pattern are also used.
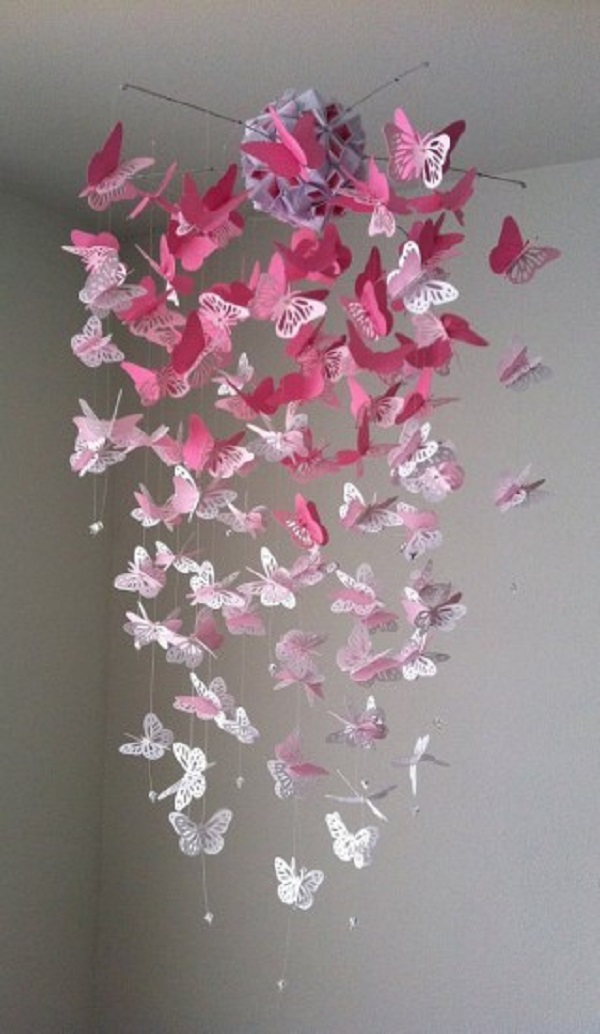
Original DIY chandeliers with butterflies
The work begins with thinking through the design. The photo shows what you need to have to make such lamps:
- frame;
- thin strong threads;
- white cardboard;
- pencil;
- scissors;
- sharp knife;
- butterfly stencils of different sizes;
- glue;
- screws for fastening the structure to the frame or ceiling.
To make a white chandelier, it is necessary to draw the silhouettes of butterflies on cardboard of the appropriate length using stencils, cut them out and then connect them to the frame, securely glue and fasten them. Hang butterflies on thin threads inside the lamp at different lengths. If you add beads to these threads, then the chandelier in the nursery will have a rather original design. When you turn on the light, moving shadows will be cast on the walls of the nursery, which kids really like.
A chandelier designed for the bedroom should have an unusual decor. The design of such a lamp should be conducive to coziness and comfort. It is appropriate to use fabrics, napkins, threads, etc. The photo shows a small chandelier in the bedroom, made by hand using lace napkins. The master class consists of the following steps:
- inflate the balloon to the required size;
- lubricate with vaseline;
- then grease with PVA glue;
- apply napkins;
- let the structure dry;
- blow off the ball.
It remains only to put the chandelier on the cartridge, insert a lamp into it, best of all energy-saving or LED, and run the wire from the switch.

Chandelier from napkins for the bedroom
The photo shows a handmade chandelier made of flowers. The manufacturing technology is similar to the manufacture of a chandelier with butterflies. Only here it is necessary to make a more complex frame. This lamp looks great in the bedroom. Subdued light and glare on the walls will create a unique atmosphere.

Flower lamp in the bedroom
Chandelier in the kitchen
It is impossible to imagine the interior of the kitchen without the original lamp. Here the flight of the manufacturer's imagination depends on the materials used.

DIY twine chandelier for the kitchen
This original lamp is made of twine. Suitable for a country-style kitchen. Its master class on its manufacture consists of the following steps:
- make a frame consisting of 3 hoops located at some distance from each other. Install thick wire partitions between them (it is best to weld);
- then, taking the twine, wind it up and down, as seen in the photo.
It will not take much time to make such a chandelier with your own hands, and the cost of materials will be minimal. But with its design and originality, it will outshine purchased copies.
Another type of lamp in the kitchen, which you can do with your own hands, deserves close attention.

DIY thread chandelier
The manufacture of such a chandelier is described by many masters in master classes posted on the Internet. The step by step steps are as follows:
- inflate a balloon;
- lubricate with vaseline;
- grease with PVA glue;
- wind the threads (you can use multi-colored ones);
- grease with PVA glue;
- let the product dry;
- release the air from the balloon and take it out.
It remains only to insert a cartridge with a light bulb, conduct wiring in the right place and install a switch so that it is convenient to turn the lamp on and off.
In the distribution network you can buy various chandeliers and lamps that have standard dimensions. The handmade market offers a wide variety of ready-made modules. At home, you can, rummaging through old things, find materials and designs that are suitable for making chandeliers with your own hands. It is easy to assemble the original design from them. Master classes that are easy to find in the literature and the Internet will help in this.
How to do. Video
The video will share useful tips on how to make a quality chandelier with your own hands.
By adding your imagination, you can create an original, one-of-a-kind chandelier that will become an exclusive design element of your home. The premises of an apartment, house, cottage will be the personification of comfort and originality, and all thanks to the chandeliers and lamps made by the master with a soul, in an atmosphere of creative inspiration.
People who have developed creative abilities very often create interior elements with their own hands, and making a master class chandelier is not difficult. Only bathroom fixtures are better to buy factory ones, because they should be small and reliable.
Dwellings, in which handmade items are present, acquire an exquisite and original look.
We make a chandelier with our own hands from plastic bottles
To make a chandelier from plastic bottles, we take:
- If there is an old chandelier, you can take its island
- Lots of colorful bottles
- No more than ten steel rods
- From plastic bottles with scissors we cut out any figures that you want to see on your chandelier (animals, flowers, etc.)
- We attach several twigs to the island of the chandelier. From the rest we make something similar to a hedgehog, connecting the rods in the middle. We remove one rod where the light bulb will be
- Next, we supplement the resulting frame with previously cut plastic figures
- We connect the island and the hedgehog together.
Now you know how to make a plastic chandelier with your own hands. To consolidate the material, we recommend that you watch a video in which examples of chandeliers from plastic bottles are collected:
We make a chandelier with our own hands from wood
To make a wooden chandelier, we need:
- Twelve planks for facing the door, 30-45 cm each.
- Liter jars, from which we will make ceiling lamps (6 pcs).
- White and wood paint.
- Self-tapping screws for wood.
- Sandpaper.
- Rolling machine.
Description of the manufacturing principle.
- Smoothen planks with sandpaper
- We need a place for the electrical wire, so we make a notch on the back of each plank.
- We drill three strips, to which we attach the shades.
- We paint the planks in wood color.
- We make a regular hexagon from the plans.
- We attach the cartridge to the hole in the lid.
- We roll up jars with light bulbs inside.
- We paint the ceiling in any light color.
DIY chandelier made of wood, photo below:
We make a chandelier with our own hands from threads
To make a chandelier from nylon threads, we take:
- Let's make a lampshade from a plastic bowl
- multi-colored threads
- Fastening paste
Description of the manufacturing principle.
- Let's make the pasta first. We mix half a glass of flour and two glasses of water, two glasses of water with a temperature above 60 degrees there, boil and throw about three tablespoons of sugar. We stir and wait until it cools down. Next, consider how to make a lampshade with your own hands for a chandelier
- We throw the yarn into the paste.
- The resulting yarn is wound on a bowl.
- After 24 hours, we separate the resulting lampshade from the threads from the bowl.
- We attach the ceiling to the bottom and that's it, the chandelier can be hung on the ceiling
Attention! A do-it-yourself lampshade for a chandelier provides for the use of a light bulb of no more than 60 watts, as it is made of flammable materials.
Have you decided to change your interior and want something unusual? The store offers a huge selection of different things, but why not make something yourself? The designer lives in each of us, you just need to wake him up, change the world that surrounds you, make it the way you see it!
Why not start with a chandelier? It can become a hallmark of your home that no one else has. This will not only save you money but also give you a sea of unforgettable emotions.
Make a do-it-yourself chandelier shade. You will be surprised that things that you were ready to throw away can be useful to you and be reborn in your new invention.
First you need to decide on the style, what kind of chandelier you want.
If you are young - a romantic style chandelier is for you, you need to decorate a country house - country style will be just right.
DIY chandelier (photo on lampshade decorations)
To make a chandelier with our own hands, we take:
- Bulb socket.
- Power cord.
- Chandelier frame.
- Decor for jewelry.
- Multicolored threads.
- Hot glue.
- 60 watt light bulb.
For the frame, what is left of your old, long-forgotten chandelier is suitable. Many famous designers have started their illustrious careers by polishing old pieces, bringing them to life and putting them up for sale.
Take measurements, decide on the fabric you will use. After sewing the cover of the desired size, put it on the frame. You can decorate the lampshade as you like. It can be carved flowers, animals, figures, beads and much more that will reproduce your imagination. We fasten the cartridge equipped with a low-power light bulb to the lampshade and you're done. A handmade lampshade will cheer you up every time you look at it.
We make a New Year's chandelier with our own hands
How to make a New Year's chandelier with your own hands to surprise your friends with a suddenly discovered talent?
To make a chandelier, we take:
- Organic glass or thin wooden sheet.
- Linen rope.
- Multicolored balls.
- Small stapler.
- We use the glass parts left over from the old chandelier.
Description of the manufacturing principle.
We start by cutting off a square from plexiglass, the dimensions of which are 50:50 cm. We make holes over the entire area every 5 centimeters, as chaotically as possible. We take a linen thread and thread it through a hole and bring it out into another, adjacent one. The length of the output ends should be two meters. We do this procedure until we fill all the holes in the square.
We hang this composition instead of a chandelier on the ceiling and continue to decorate the chandelier like a Christmas tree. We take the balls and tie nylon threads of different lengths to them, and tie them to the structure, concentrating them in the central part. Next, we perform the same operation with glass products, but we hang them already at the edges, the length of the thread should be less than on the balls. If you look at the design as a whole, it will look like an inverted pyramid.
Now you know how to make a Christmas chandelier with your own hands. Start your crafts right now and you won't stop at the chandelier.
Recently, such decorations for a chandelier as winding with threads have become very fashionable.
Description of the manufacturing principle.
We will need a lot of thread and PVA glue, as well as an inflatable balloon. Cotton threads for our venture will come in handy, as the glue falls on them evenly and behaves obediently.
We wrap the inflated balloon with threads, apply glue and wait until it dries. Then we just burst the ball with a needle. Cut a hole in the top for the bulb and you're done. Your result can be compared with a handmade chandelier in the photo.
In this example, the thread can be completely replaced with lace and you get a good kitchen lamp.
Instead of a balloon, other shapes can be used, such as a juice bag. Choose on the Internet a sconce that you like and use the appropriate mold.
Another way with which you can make a wonderful chandelier with your own hands from improvised means.
If you accidentally have an embroidery hoop lying around at home, do not miss the opportunity to make a magnificent lamp out of them. The hoop and wire will serve as the basis here, they will give your lamp the shape you want. You can stretch fabric on the frame or use a pendant. A New Year's unobtrusive garland can serve as an excellent decoration if it is attached to the inside of the lamp. If you make not one such lamp, but several, then in combination they can give your bedroom a completely new and fresh look.
Budget version of a chandelier made of plastic cups. The fishing line and stapler work wonders, you can look at the photo how it will look.
An indispensable lighting device in the form of a chandelier can be found in every apartment. The modern range of chandeliers is extremely rich, so the choice of this item creates a lot of problems. We will talk about how to choose the right chandelier or make it yourself in our material below.
The purpose of chandeliers for all types is the same, they all perform the function of a lighting fixture. Distinctive features of the varieties of chandeliers are the shape and design. The model ranges are represented by a wide variety of them, we suggest that you familiarize yourself with the common varieties.
- ceiling chandeliers;
- pendant chandeliers;
- chandeliers in a classic style;
- crystal chandeliers;
- eco chandeliers.
ceiling chandeliers
Ceiling-type lighting fixtures are compact, which is very important in rooms with low ceilings. The plafond can adjoin directly to the ceiling or recede a small distance. Compact models of chandeliers can be made from a wide variety of materials. Modern designers often use a noble combination: wood and glass. 
Chandelier pendants
An elegant and stylish variety of lamp models is used to decorate rooms with high ceilings. With the help of this technique, due to the hanging chandelier, the room will become more comfortable. They are often used for zoning rooms. Bright lighting in one of the zones allows you to get a mysterious twilight where it is needed. 
Chandeliers in classic style
The classic version of lighting fixtures can be found everywhere. Their popularity is justified by the variety of designs. With the help of such a chandelier, you can solve the problem with lighting in the room. By introducing, thus, an accentuating moment, you can beat any interior. 
crystal chandeliers
The nobility and exquisite brilliance of crystal will emphasize the sign of good taste and tell about the prosperity of the owners. Crystal chandeliers can be safely called the ideal solution for arranging a modern interior in a classic style. Thanks to this option, the room acquires a unique brilliance and beauty. 
Eco chandeliers
The use of environmentally friendly materials in the manufacture of lamps allows you to get closer to nature. This approach in interior design today is considered very popular. In modern society, there is a whole army of fans of eco-style design. For the manufacture of chandeliers, precious woods, straw, leather and other natural materials are used. 
Pros and cons of different types
The disadvantages and advantages of one or another type of lamp depend on the room where they will be placed.
- In a room with a low ceiling, a pendant version of the lamp will look appropriate;
- In the kitchen, you should not use chandeliers of complex designs; in case of contamination, it will be difficult to wash them;
- Massive chandeliers look good in spacious rooms. The miniature version will be lost against the background of the general interior;
- To create twilight, it is better to select darkened shades;
- If room zoning is required, use several types of fixtures;
- Hanging chandeliers of bright lighting are appropriate to place in the kitchen, living room and dining room, this option is not suitable for the bedroom.
Chandeliers with colored shades can influence the mood of people who are in the room. For example, yellow and green are calming, red is exciting, and blue is depressing.
How to make a chandelier with your own hands
Skilled craftsmen say that everyone can make a chandelier with their own hands. Using simple recommendations and illustrative examples, you can build a lighting device in a few hours. There are many variations of ceiling lamps for chandeliers, we suggest that you familiarize yourself with the most popular of them.
Necessary materials:
- cable with lamp sockets;
- insulating tape;
- glue gun or glue;
- materials for finishing the ceiling;
- scissors and other auxiliary tools.
Step-by-step instruction
- With the help of an old lampshade, you can make a chandelier by decorating it with paper of any color. By connecting fantasy, you can build an original version of the lamp for a child's room or bedroom;
To prevent the paper from catching fire, it is necessary to use LED lamps during operation.

- Using natural materials, you can create a masterpiece. A chandelier made of branches, combined with candle-shaped light bulbs, will fill the room with warmth and comfort. Chains can be taken as fastening to the ceiling - this will give the structure a special look;

- Fans of eccentric styles will love the wine bottle chandelier option. No one will definitely have such a chandelier, experimenting with the idea, you can get an amazing version of the lamp in the kitchen;
Instead of bottles, use cups, zinc buckets, and oddly shaped jars.

- Recently, it has been popular to make lamps from improvised materials. The most unusual material can be wooden clothespins. They need to be divided into two halves. Attach with a glue gun to the base of the lampshade. If desired, the surface can be painted or varnished.
Expert verdict: experimenting with different methods and materials for manufacturing, you can get an unusual result. An original chandelier with a minimum of costs will be a worthy decoration for both a modest and sophisticated interior home.
Currently, beautiful chandeliers are available to everyone, the range is able to amaze any imagination. Guided by the advice, do not forget to take into account your own taste sensations and the opinions of designers. Whatever the choice, even a hand-made chandelier will please the eye and attract admiring glances.
We invite you to watch a video on how to make a beautiful chandelier from threads with your own hands:
Looking to brighten up a nursery or freshen up your home office space? Or maybe you are a lover of the East, where did the fashion for these delicate things come from? Then you should definitely read how to make a paper lamp with your own hands - unusual original gizmos will instantly add a drop of magic to any corner of the house!
We guarantee that your guests will ask for a long time where you bought this designer lamp, and when they learn that you made it yourself, they will ask you to tell you how to make a paper chandelier with your own hands and its step-by-step instructions.
In this master class, we will show as many as four ways to make a paper lamp, watch and choose the option that is right for you.
To create this delicate lamp, prepare:
- Colored paper of any color;
- PVA glue or glue stick;
- Paperclips;
- Compass;
- Scissors;
- Fishing line;
- Colored yarn;
- LED lamp ( );
- Wire with switch.


Step-by-step instruction:
Step 1
- On a colored sheet, using a compass, draw semicircles 1 cm wide.
- With each line, increase the diameter of the semicircle.
- Note that the sheets will require quite a lot. Then cut semicircular strips and cut them into pieces of 2-5 cm.


Step 2
- Fold and glue the resulting strips, making one side larger than the other - this will make it easy to glue them together into a domed shape. After that, you can connect them with five pieces of glue.
- Glue the clusters together, reinforcing them with paper clips until the glue dries. Glue until you have a circle, with a small hole for the lamp.
Of course, you can fantasize, and your lamp will be a little different than ours.

Step 3
Now, while our glue is completely dry, let's decorate our wire. For this, take the yarn of any color you like and carefully begin to rewind the wire with it. Try not to leave bumps when winding the yarn on the previous layer.
You can put a drop of glue on the end of the yarn in order to strengthen it.


Step 4
Let's make a holder for the LED lamp. To do this, we will tie a fishing line to our glued strips from three sides (preferably evenly measure the distance), and the other ends to a paper clip, which we will first straighten to the shape of a triangle.

Everything! It remains only to place the lamp in a circle and screw it to the wire. You can hang such a lamp both separately and in combination with, for example, .

Master class number 2: Rice or parchment paper chandelier
We bring to your attention a new master class, where we will teach you how to make lamps from rice paper. There is nothing complicated, as it might seem at first glance, in manufacturing, and you can connect all household members to this exciting activity. The designer lamp is suitable for both the nursery and your bedroom.
Instead of rice paper, you can buy a roll of parchment paper for baking.

So, to make a lamp you will need:
- Unnecessary lampshade;
- Thin wire;
- Several rolls of rice paper;
- Iron;
- Paper cutter;
- Sewing machine.
Self-manufacturing
Step 1
Take the lampshade you don't need (you can buy inexpensive new) and remove everything from it, leaving only the base. If your lampshade is similar to ours, then add a wire in the middle, securing it well.

Step 2
- Prepare the parchment paper by unwinding the rolls and cutting into roughly equal rectangles.
- Iron the sheets until they are completely flat and smooth.
- Fold each sheet with an accordion, measuring the equal distance of the strips, and cut the same even circles with a paper cutter.
- Try to use the cutter carefully and don't leave too much paper- You will need a lot of circles.


Step 3
- Connect together, stitching in the middle, all the circles. Make connected circles of equal length and begin to strengthen them around the circle of the lampshade.
- As soon as you complete the first circle, go around the subsequent ones, reducing the length each time.
- Carefully secure your lamp in place, straightening out all the threads.
Remember to use only LED bulbs to avoid fire.


This beautiful chandelier is the result of painstaking work, after which you will admire your work and be proud of yourself for a long time. On our site you will find many more ways to diversify your home lighting, for example:
- can or .
- , for modern lovers.
- Or for lovers of eco-style.

Also, you can paint the rice paper circles any color you want based on the color scheme of the room. If you want to hang this lamp in a children's room, you can add, for example, glass angels on long gold threads - again, choose the right accessories for different rooms, this will add warmth and originality.


CAUTION: Be aware that incandescent lamps heat the paper very much, which can cause it to ignite. For paper lamps and fixtures, use only LED lamps.
Master class number 3: Paper origami chandelier

This beautiful bright lamp really resembles a ripe berry!
To make it, take the following:
- 2 paper bags, so that when gluing you get a one and a half meter bag (preferably with an interesting print);
- LED lamp (no incandescent bulb );
- Wire with switch;
Once you decide that training is no longer needed, start preparing the paper bag. Remove the handles and cut the bottom off the bags and glue them together to make one large paper bag.

Fold the resulting bag in half, and then fold the halves with an accordion so that you get 16 identical folded strips. Then fold the two outer strips diagonally.


Follow the simple schemes and you will get wonderful lamps for decorating your home. It may take a little practice to fold origami perfectly, but you won't regret it, because origami is a whole world of various interesting things created by your own hands. And your children will be simply delighted with your skillful hands!

Master class number 4: Corrugated paper lamp

To make an unusual lamp you will need:
- Corrugated paper 88×44cm;
- Ruler;
- Spoke;
- Glue;
- A thread;
- Cable;
- LED lamp ( no incandescent bulb ).
Step 1 
- Using a ruler, mark a sheet of paper at equal intervals and fold accordion according to the markup.
- Helping yourself with a knitting needle, fold the folded sheet of paper diagonally, first on one side, and then, unfolding it, on the other side.
- Expand the sheet - you should be able to diamond-studded double sheet.
Step 2
- Connect the marked lines according to the photo, it is desirable that the sheet is not heavily wrinkled at this time - otherwise the appearance of the lamp will be spoiled.
- It remains only to connect the top of the lamp with a thread so that it does not fall apart, and fix the cable with the LED lamp.

Watch out for safety - do not use ordinary incandescent lamps, they heat up the paper very much and it may catch fire.

paper butterfly chandeliers
The most popular paper chandelier is the butterfly chandelier. And such love for this product is not simple:
- firstly she looks very chic and expensive.
- And secondly The production is very simple, you can even attract a child.
Such an elegant lamp will go well with any style of interior, and it is also appropriate in the living room or dining room, and even in the children's room.

Manufacturing technique:
- The basis is an old chandelier or a frame from it. If this is not the case, then you can take a regular metal or wooden rim. If this is not the case, he takes a thick wire and makes 2-3 skeins of himself, so that a circle is obtained.
- Cut out the butterflies according to the pattern (butterfly pattern below)
- We take a nylon thread or fishing line and attach butterflies to it. Fastenings can be of two types: either we pierce the butterflies or put them on silicone glue. Whichever is more convenient.


Butterfly pattern
To make a butterfly chandelier, simply take a template and scale it to your size. It looks very nice if you make butterflies of several sizes, for example 3-4 diameters. Using a pencil, draw a sketch on paper and cut it out.
- Cut best stationeryknife or manicure straight scissors without rounding.
- paper is better to use denser and which does not attract dust, such as velvet texture. Since you will often have to vacuum such a chandelier

Also, a very beautiful option is obtained if you make a ball of wire, take an old suspension from a chandelier as a basis and place several butterflies with a glue gun.


Paper ball chandelier
The basis of such chandeliers is a ready-made Chinese lamp ball made of rice paper. Usually they are very cheap up to 1-2 dollars. But you can decorate it as you like with paper tartlets, an unnecessary map, a newspaper or sheets of old books. We publish a few ideas for decorating a ball chandelier with paper.


Lamp for the New Year made of paper
A standing idea for the New Year is to use an old lampshade and string snowflakes of various shapes on a thread. Very effective and beautiful. Below are a few photo ideas for such decor for the new year.


To polish your skills, as well as replenish your collection of unusually beautiful lamps, see more ideas and. We are sure that among them you will find many that you will definitely want to create!
2 ratings, average: 5,00 out of 5)