Do-it-yourself pond aerator. How to make an ejector aerator from a pump. We make an aerator for the pond on our own - a step-by-step guide, tips, recommendations
Dug out with your own hands and you want to keep fish in it, then sooner or later you will think about aerating the water. Better early. Until your fish floats upside down.
The problem with small ponds is that there is not enough oxygen dissolved in the water for the fish to breathe. If there are algae in the water, then of course they supply oxygen to the water during the day, but the question is volumes. At night, they no longer release oxygen, but only absorb it. In addition, the organic matter that all living organisms “generate” if it does not “burn out” with oxygen consumption, then quickly poisons the water. And most fish will definitely not like it.
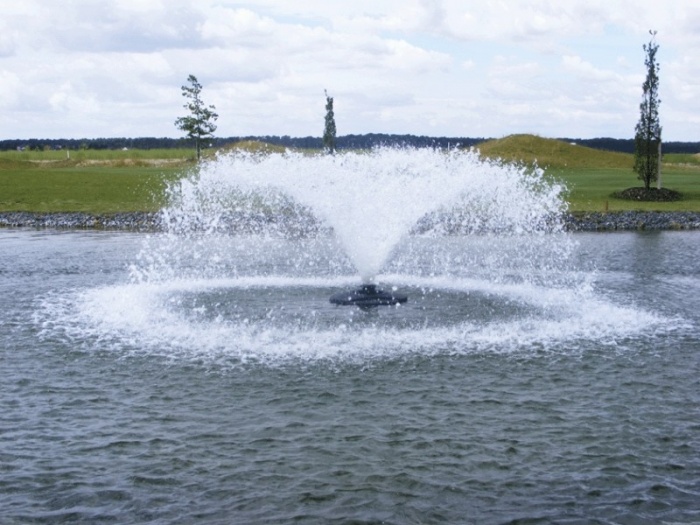
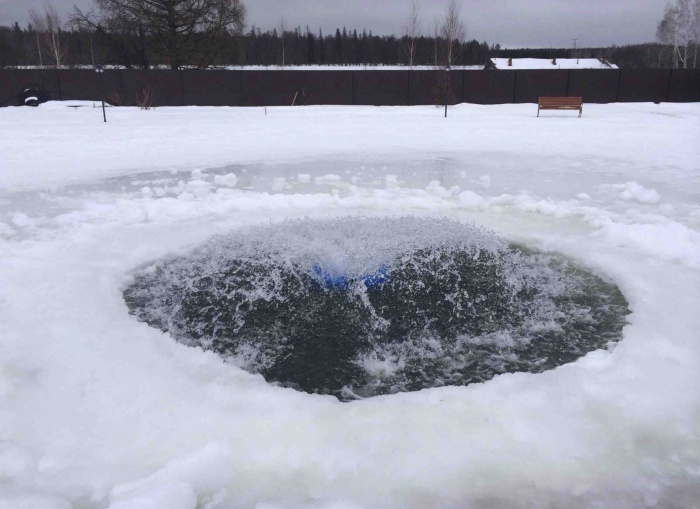
There are several ways to aerate a pond. The simplest is to mix the water with a pump from the deep layers to the surface, but this option gives a low oxygen saturation, but it has positive moment- can be used in winter. It is only necessary to provide sufficient water pressure to provide them with non-freezing polynya. The fountain is more effective, but you can’t say that it is very effective either. In addition, the fountain cannot be used in winter. The third option is to create an artificial waterfall with as much water flow as possible and several rapids. The waterfall oxygenates quite well, but can also be useless in winter. Severe frosts can kill all the benefits of a waterfall and freeze it corny. There remains one more option - various kinds of aerators.
The easiest way to buy a ready-made pond aerator. But this pleasure can cost decently enough, unless of course you take something productive and reliable. It is much more interesting to make an aerator yourself. It can be up to 10 times cheaper. The video below shows the principle of creating an ejector aerator based on submersible pump for dirty water (or clean). Quite large fragments of organic matter can come across in the pond (leaves, algae, and little or no one can swim in the pond), so a pump is preferable for dirty waters. Having finalized this pump with the help of several tubes and corners from sewer pipes of the required diameter, we get a budget ejector aerator. All detailed instructions on video. On my own behalf, I want to note that such an aerator may not be suitable for a deep pond, since it works up to a depth of one and a half meters maximum from the surface. Well, this aerator has no problems with operation in winter. It also works under ice. True, you need to slightly modify the design and the author of the video reveals this.
There are also emergency ways of aeration. But this is chemistry and you need to clearly know how to apply it. It is better not to bring the fish to a state of starvation and provide it with comfortable conditions for staying in your pond in advance.
- A simple stove with barbecue and smokehouse for the garden. Quickly and with your own hands. (one)
I really liked the idea. Dragged to himself. Cheap, cheerful and can be done beautifully. In addition to everything written in the description, I […] - Sand filter for the pool with your own hands. Simple sand filter design. (0)
Many probably tried to buy an inflatable or frame pool for their dacha. They are not expensive now, and seem quite worthy [...] - Drip irrigation with your own hands. We do drip irrigation in the country. (0)
Highly visual video about how you can do drip irrigation plants in the country with their own hands. The author clearly explains everything. Brings everything […]
The lawn has long been considered an attribute of the landscape design of a large number of suburban areas.
In order for the green coating to always look neat and aesthetically pleasing, it is necessary to regularly carry out work with it, such as watering, cutting, and periodically fertilizing the grass.
However, many site owners forget about another type of work - aeration needed to improve oxygen access to grass roots.
The Importance of Aeration
When areas of compacted soil are formed in the sod, the level of oxygen, water, and nutrients penetrating to the roots is significantly reduced.
At the same time, carbon dioxide accumulates, and this significantly slows down the growth of grass cover. Thus, aeration may well be called airing the soil. In fact, this is loosening the soil or making special holes in it.
Without such an operation, bald spots will begin to form in some places of the lawn, and the grass itself will become more susceptible to harmful effects excess moisture and cold.
As a rule, aeration is carried out in the fall, once a year, but in some cases it is worth carrying out unscheduled work:
- in dry summers, they are necessary to increase the moisture supplied to the roots;
- with heavy rainfall, grass roots begin to rot, and aeration contributes to the drying of the soil;
- if in the summer a lot of guests with children come to the dacha, the lawn will be trampled down in any case, which will make it necessary to ventilate the soil.

The meaning of aeration
What is soil aeration?
Soil aeration has one of critical values in agriculture, because the fertility of the land depends on this process.
During a severe drought or heavy rains, the level of oxygen available to the roots of agricultural plants is greatly reduced, making them weak.
That is why, after irrigation, farmers loosen the soil, and in especially difficult years, in terms of weather conditions, they aerate several times a season. It is worth noting that farmers carry out soil weathering also near shrubs and trees.
Ways to ventilate lawns
Depending on at what time and to what depth holes are made, two methods of aeration are distinguished:
- piercing- work is carried out in early autumn. The depth of the holes must exceed 8 centimeters. This method used in places where excess moisture accumulates, in trampled areas of the lawn or in places where creeping moss grows.
- impaling- this method is used when the fibrous layer of the turf becomes too dense. As a rule, the depth of the holes does not exceed 4 centimeters. Work is carried out either in late spring or in summer, when there is a drought.

Aeration devices
Of course, to carry out the process of weathering the lawn soil in a small area, you can do it with a rake or pitchfork, but this method is quite rough with respect to tender grass.
That is why it is optimal to use special devices called aerators. On today's market for gardening equipment, there are two options for such devices: the first run on gasoline or electricity, and the second are mechanical aerators.
For large areas
The compact equipment equipped with a motor is ideal for airing a lawn of a large area.
There are two types of such equipment:
- gasoline-powered equipment is highly maneuverable, the ability to perform a large amount of work at a time, but is difficult to maintain;
- electric aerators are almost silent, do not pollute the surrounding air and are easy to use, but the range of such equipment is limited by the length of the electric cable.
In the video, a do-it-yourself mechanical lawn aerator:
Manual technique
Mechanical devices for enriching the soil with oxygen do not need power sources.
There are several such devices:
- rake aerators- at one end of the product there are thin plates that cut the top layer of soil; designed for processing small lawns;
- sandal aerators- a flat sole, equipped with special spikes, is attached to the gardener's boot;
- roller aerators– improved rake; devices allow for as soon as possible treat a large area of the lawn without special costs physical forces.

Making a fixture with your own hands
If there is no desire or financial opportunity to purchase a device for weathering the soil, then you can make a lawn aerator with your own hands.
Homemade Spike Aerator
So, for lawns, the area of \u200b\u200bwhich is small, special shoes equipped with sharp spikes are suitable. The production technology of such a device is simple:
- first, the owner of the site needs to cut blanks from wooden board according to the size of your shoes;
- either long nails are driven into the blanks, or self-tapping screws are screwed in (the minimum length is 10 centimeters);
- next, you should attach wooden plates with nails to the boots, for which old backpack straps are quite suitable.
Despite the simplicity of the device of such an aerator, safety measures should be observed when using it. First of all, make sure not to inflict wounds on yourself, others living on the site, as well as pets with sharp nails or self-tapping screws.
Work on the lawn with such a device must also be done with all care so as not to damage the grass.
Device for large lawns
For lawns large areas such an aerator will not work, as it requires large physical activity on your feet. Optimally - to make a universal mechanical device.
To do this, you will need the following materials: a piece of pipe more than a meter long, a sheet of iron, about 20-30 nails at least 100 millimeters long, bearings.
The manufacture of the aerator takes place in several stages:
- piece of pipe required sizes fill it with sand or gravel for weighting, and then nails are welded to it in a checkerboard pattern with the tip up;
- the workpiece is planted on a shaft pre-planted on bearings for the easiest possible rotation;
- a bracket is installed on the shaft with wooden handle for greater ease of use.
Safety precautions for such equipment are standard - you need to look under your feet while aerating the lawn so as not to injure others.

The owner of the device should also handle it carefully. Such a homemade mechanical device significantly reduces the time spent on aerating the lawn.
Some craftsmen make devices powered by electricity.
This requires a steel frame, on which an axle with special knives is installed, which will act as a ripper.
The drive in this technique is an ordinary electric drill. The frame is equipped with rubber wheels, and a power socket is installed on the handle of the aerator drawbar.
One of the lawn aerator options:
How often should you aerate?
It is optimal to carry out work to saturate the lawn soil with oxygen in early autumn, however, in late spring, work will lead to the improvement of lawn grass.
If you aerate in the fall, you should do it a couple of months before the expected frost so that the lawn recovers.
Processing in the spring begins at the moment when the first shoots come out of the soil.
The number of lawn aeration operations depends on the nature of the soil on which it grows:
- clay soils are characterized by a high density of all layers and tend to accumulate a large amount of dry grass, so they should be aerated at least 2 times a year;
- if the lawn grows on a clay or sandy soil, it is enough to carry out weathering only once so that the irrigation of the lawn improves and the amount of oxygen entering the grass roots increases.

To do this, you can purchase a mechanical, gasoline or electric aerator. However, with free time and some skills in making such devices, you can completely make a weathering device with your own hands.
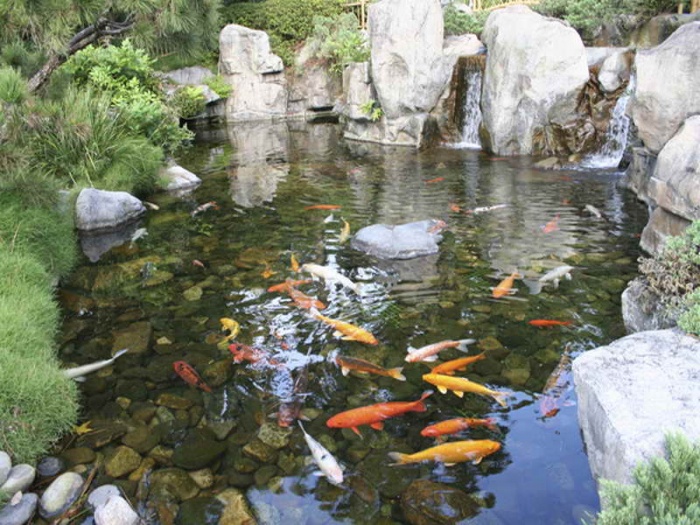
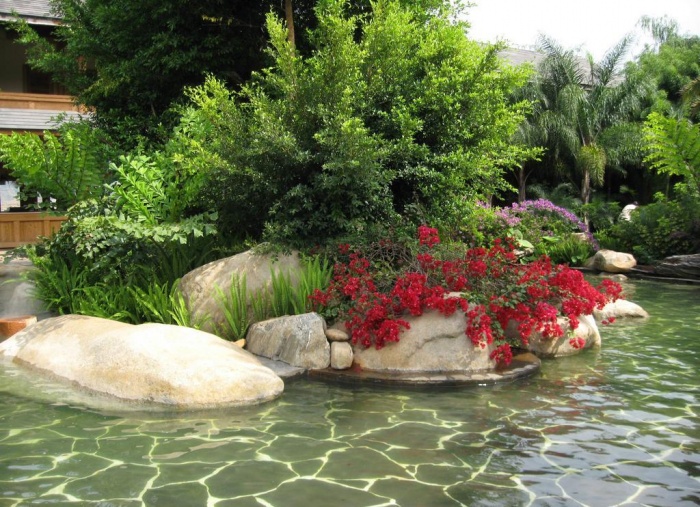
Artificial reservoirs are very popular today, they are widely used by designers in the design of landscapes. Almost every owner suburban area tries to equip at least a small pond or fountain in his garden.
But probably everyone knows about the difficulties of such an event, and the main one is the stagnation of water and the flowering of reservoirs. A foul-smelling pond with muddy green water is unlikely to promote relaxation and have a rest.
Why water stagnates in artificial ponds, why aerators are needed, and how you can assemble such a device with your own hands - this will be the article.
Purpose of aeration
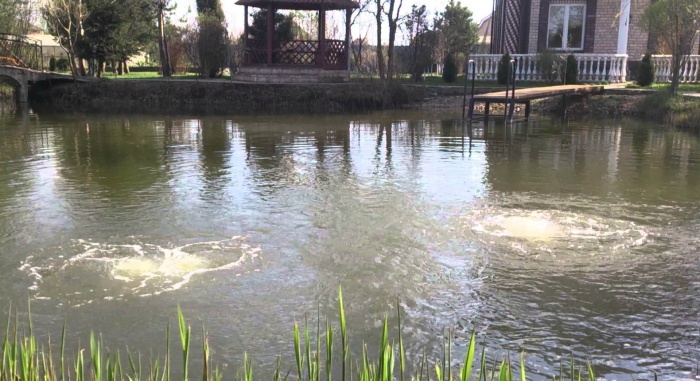
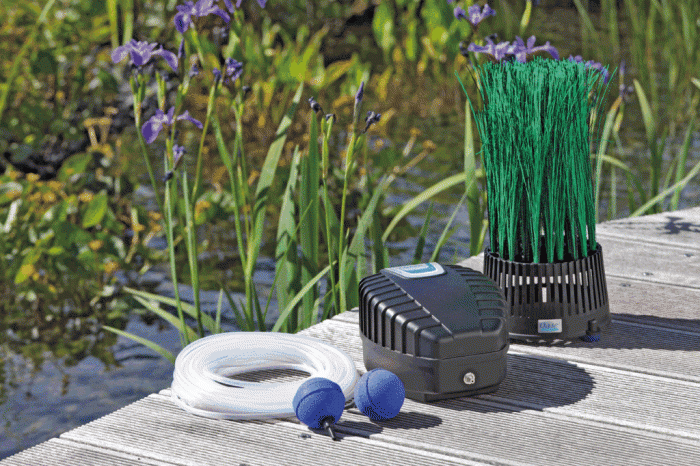
Pond aerators are compression units that mix water with air, thereby saturating it with oxygen, which is why these devices are also called air compressors.
As you know, without oxygen, life on the planet would be impossible. Everyone needs to breathe: humans, animals, birds, plants and even fish. The plankton and algae that every pond needs a constant supply of fresh air. And if fish live in the reservoir, the need for oxygen will double.
In natural rivers, seas and lakes, the process of air exchange is clearly established: oxygen constantly enters the water when water flows mix, when rivers flow into the sea, for example, or it rains, it blows strong wind. Fresh portions of water saturated with oxygen and useful minerals are regularly added to the reservoir from underground sources and springs.
At the same time, artificial ponds differ significantly from lakes and rivers, as they are an autonomous, isolated ecosystem. The bottom of a home pond is usually lined with a layer of insulation, which makes it impossible for oxygen to enter from the soil. The surface area of the reservoir is usually small, and it is located in the garden among the trees, so the wind and rain cannot properly saturate the water with air.

Due to the lack of oxygen, fish, plankton, snails and other inhabitants of the pond begin to die, but there is plenty of silt, putrefactive formations and bottom sediments - beautiful pond turns into a swamp.
Attention! The owner can find out about the lack of oxygen in his pond by the following signs: a film appears on the water, fish stick out to the surface to breathe, snails rise up from the bottom, the pond silts up.
If water stagnation in the pond has begun, an aerator will help.

Varieties of aerators
For ponds, various aeration installations are used, the purpose of which is to mix water layers, create artificial flows, and saturate the reservoir with oxygen.
All aerators are divided into two large groups: mobile and stationary devices. Mobile aerators can be used temporarily, seasonally, they can serve several reservoirs at once. These compressors are used for small ponds or where there is no constant need for artificial water saturation.
Stationary aerators are capital devices that are installed on a specific body of water and operate continuously or in accordance with a given regime.
According to the method of location and principle of operation, all aerators are classified into several groups:
Advice! Wind aerators are simply indispensable for summer residents or those who rarely visit their site. Devices can work all year round without any intervention from the owner.
How to make a do-it-yourself pond aerator
A homemade aerator is a great solution for owners of small home ponds. A purchased installation is quite expensive, in fact, an aerator is the most expensive part of an artificial reservoir.
For small home-made ponds, purchased powerful pumps are not needed; the simplest aeration device that can be assembled from improvised materials will be enough here.
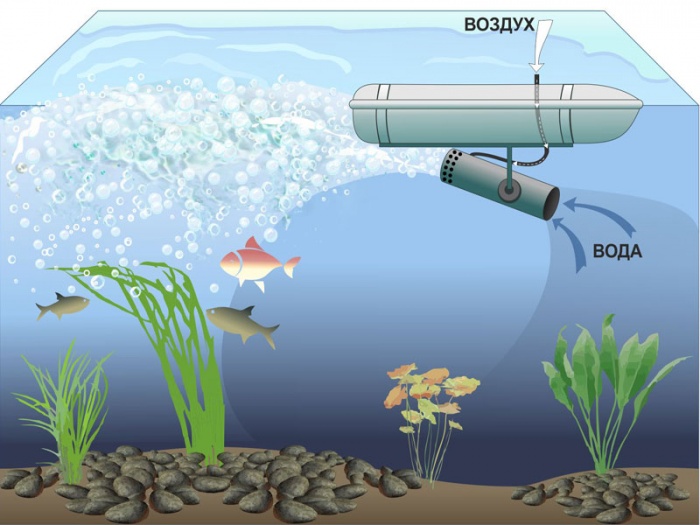
How to make an ejector aerator for a home pond
First of all, you need to look around in your garage and pick up the necessary details:
- drainage pump (not very high power);
- a two-meter section of a sewer pipe (diameter 32 mm);
- forty-centimeter pipe (of the same diameter);
- elbow tee at 45 degrees;
- Good double braided cable.
Important! The tee must be exactly forty-five degrees. If you connect the aerator pipe at a right angle, water will constantly be thrown into the device.
Assembling a homemade aerator is simple:
- The sewer tee is connected to drainage pump using the included fitting. For reliability, you can use silicone sealant.
- On the other hand, a branch pipe of shorter length is inserted into the tee.
- Insert a 45 degree angle into the top outlet, and then attach a long pipe.
- Now you need to connect to the aerator electrical cable. The wire must be airtight, so it is wrapped with several layers of electrical tape and placed in a hermetically sealed corrugation.
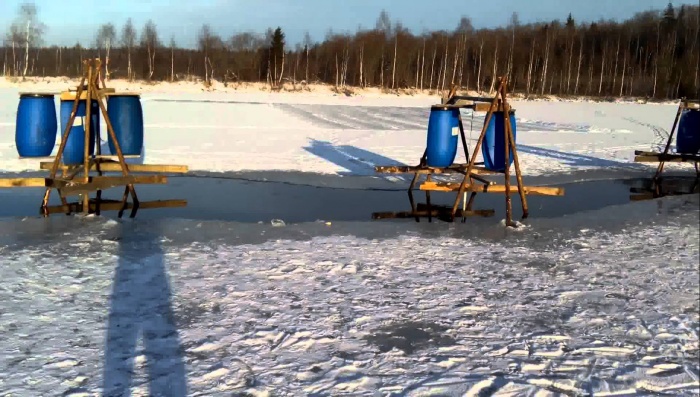
- The pump must always be at a depth of 70-100 cm from the surface of the water, while the intake pipe must be located above the water level. To ensure this, it is necessary to weld the mast from a metal pipe and fix it at the bottom of the pond.
- It remains to attach the aerator to the mast and apply voltage.
Advice! If there are fish in the pond, it is better to enclose the pump in a mesh box.
Do-it-yourself bottom aerator for a pond
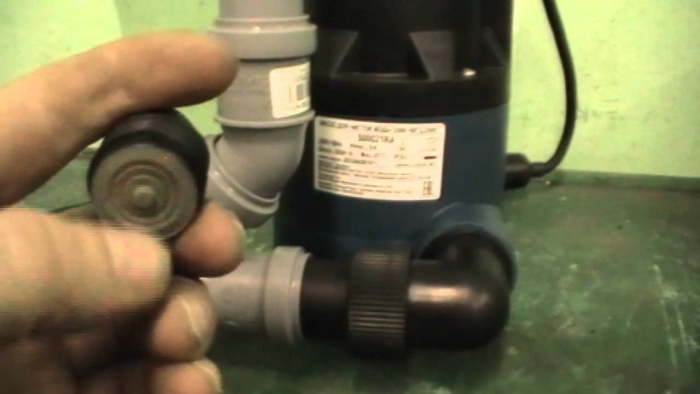
Such a device will cost quite inexpensively, especially if the owner has an unnecessary car compressor with a receiver. So, for a homemade bottom aerator you will need:
- compressor (from a car, vacuum cleaner or refrigerator);
- high pressure hoses;
- clamps;
- tees;
- sprayers or nozzles.
Advice! You can make nozzles from simple improvised means. For example, empty plastic bottles in which you need to make small holes. If you need to further reduce the size of the air bubbles, you can wrap the bottles with thin foam rubber.
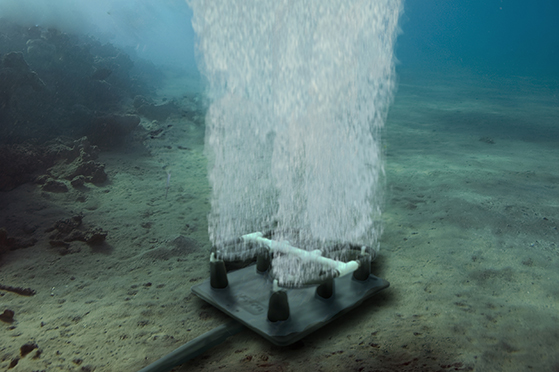
Assembling an aerator with your own hands is not difficult at all:
- The compressor unit is placed in comfortable spot(this may be a barn located next to a pond).
- A central hose is connected to the compressor and pulled towards the pond.
- Using tees, it is necessary to make taps according to the number of nozzles. For a secure connection, it is better to use clamps.
- Fix sprayers to tees.
- Attach sprayers to the bottom of the pond. They can be pressed with cobblestones or metal pins with a bent end can be driven into the bottom.

Attention! Such an aerator will not be able to work continuously, moreover, the device will make a lot of noise. Therefore, a homemade bottom aerator is suitable for irregular saturation of ponds.
DIY wind aerator
In winter, engines and compressors do not “feel” very well. If you need to enrich the pond with oxygen in winter, it is better to use a wind aerator, and you can assemble it from the most common parts.
For work you will need:
- metal square with sides 30x30 cm;
- a long smooth metal rod with a cross section of about 20 mm;
- bearings closed type, corresponding to the diameter of the rod;
- two strips of metal 2 mm thick, the length of which slightly exceeds the dimensions of the bearings;
- plastic barrel;
- a fan from the car's cooling system or something similar;
- fasteners and tools.

Assemble the wind aerator as follows:
- From the metal you need to cut 8 identical squares, and then weld cubes from them.
- A crossbar should be installed inside each cube, a hole should be cut in it and a bearing should be installed inside it. The centers of the holes in both bearings must be exactly on the same line.
- A metal rod is inserted into the bearings.
- The plastic barrel should be cut into two equal parts - these are the blades of the windmill.
- Using metal loops, the blades should be fixed at the top of the rod.
- Fan blades are fixed to the bottom of the metal rod - they will be located under water.
- They assemble a mast for a wind aerator and install it in a pond, fix a device with blades assembled with their own hands.
Attention! The wind aerator can be made floating. To do this, foam is attached to the bottom of the mast, plastic barrels or bottles.
This aerator design is relevant for large ponds, and so that the device does not swim too far, you can tie a rope.
Conclusion
Aerator - indispensable for small artificial reservoirs device. It prevents stagnation of water, the appearance of a bad smell, silting of the bottom and walls, saturates the water with oxygen and creates favorable conditions for the life of plants and animals.

It is not at all necessary to spend a lot of money on the purchase of an aerator, it is quite possible to make it yourself using the most simple materials and tools. You can watch the video story on how to assemble a pond aerator:
Along with watering, weed control, mowing, and fertilizing, aeration is an essential part of good lawn care. The process of enriching the soil with air is carried out regularly and requires the use of a special tool. Learn about what a lawn aerator is, how to make and effectively use this device on the site. Set deadlines and procedures spring work: tamping, combing, aeration and scarification.
What is aeration and why is it needed
Lawn aeration is the process of forming holes and partially removing the grass felt. The procedure improves the access of oxygen, fertilizers and water to the root system of plants. Organized air saturation is considered a prerequisite for healing and improving the appearance of a green lawn.
Lawn grass aeration
Why pierce the lawn? Aeration solves several problems at once:
- The remains of last year's dried grass form a "crust" on the soil surface. In addition, the compacted earth blocks access to the roots. Subsequently, carbon dioxide accumulates in the soil, vegetation growth slows down - bald spots are visible on the grass, deadwood, moss and weeds appear. Piercing the soil of the lawn helps to prevent the listed consequences.
- Holes in the soil increase the efficiency of irrigation during the dry season, and in autumn they contribute to the rapid evaporation of excess moisture, preventing root rot and the development of pathogenic bacteria.
- Puncture the lawn increases the efficiency of plant nutrition mineral fertilizers and activates "beneficial" microorganisms that improve soil composition.

The need to pierce the soil
Aeration allows the lawn to rest, soak in oxygen and become more active in growth. The soil becomes loose and perfectly retains moisture.

Soil saturation with air
When to aerate
As a rule, to maintain the grass cover in good condition, do-it-yourself aeration is carried out in late spring or early autumn. The first option is more preferable. In the spring, it will be possible to objectively assess the state of the “green carpet”, identify overgrown areas or bald patches.
At the end of summer, the grass already has a well-formed root system, and the organization of ventilation will be beneficial. When planning, it is necessary to calculate the time so that by the onset of winter there are no open roots.

Spring is the best period for aeration
When thinking about when you need to aerate the lawn, you should take into account the characteristics of the soil, the condition and type of lawn grass. Nuances of the organization of the process:
- If the site is planted with bluegrass, bent grass, fescue or ryegrass, then the procedure is best done in the fall. When growing hogweed, zoysia or other heat-loving grass, airing is performed in late spring.
- On the clay soil and loam, grass growth slows down, so the site needs double aeration - in spring and autumn.
- Sandy soil is not as easily compacted as clay soil. It is enough to aerate it once a year.
- With a high load on the planted grass, unscheduled aeration is permissible. Places with yellowed vegetation or moss need additional ventilation.
- It is better not to actively saturate the soil with oxygen in a site with an abundance of weeds. First you need to overcome the weeds, and then proceed to aeration.
- Avoid tillage on a freshly planted lawn. Work should be started after the rooting of the grass cover - one year after sowing.
- It is undesirable to carry out aeration in a drought. This will speed up the evaporation of moisture and expose the root system, making it vulnerable to sunlight.

Assessment of the state of the root system
The condition of the grass roots indicates a lack of oxygen. If their length is up to 5 cm, then the plants experience oxygen starvation and need aeration.
DIY lawn aeration tool
The technology for enriching the soil with air is very simple; for aeration with your own hands, you can use special equipment or assemble a tool from improvised means.
Mechanical method and tools for it
- mechanical devices;
- units on an electric or gasoline engine.

Mechanical lawn aerator
A mechanical lawn aerator does not need power sources. The aerator-ripper is suitable for compact lawns, the area of \u200b\u200bwhich is not more than 2-4 acres. Structurally, such devices consist of a drum and many spikes or cutting discs.
A simple version of the universal ripper can be made by hand using the following materials:
- a pipe cut about 80 cm long, diameter - 8-10 cm;
- nails "weaving" - 20-30 pieces;
- bearings;
- handle for aerator;
- metal profile for the manufacture of the frame.
Assembly order:
- Fill the pipe with gravel or sand to weight the structure.
- Weld the nails in a checkerboard pattern, placing them with the tip up.
- Assemble the frame from the metal profile, install the bearings and fix the shaft.
- Fix the handle by adjusting its length to fit.

Homemade mechanical aerator
For high-quality piercing of the felt cover, you will have to press the handle with force. Some shop models are equipped with a foot platform above the drum.
Caring for a large area requires the use of motorized aerators. The electric lawn cultivator is convenient and economical. Modern models operate almost silently and have protection against power surges. The disadvantage of the electric unit is the attachment to the extension cord. It will be problematic to process a site located remotely from home.

Aerator with electric motor
An important parameter for choosing a model is engine power. For a spacious area, you need to choose a unit with a large motor resource and a wide working part. Aerators received good customer reviews from companies: Makita, AL-KO, Viking, Stiga and Ikra Mogatec.
Features of gasoline lawn aerators:
- high productivity - processing a vast area in one run;
- mobility and endurance of the unit;
- the cost of lawn care increases - fuel costs are added;
- it is advisable in areas of more than 10-15 acres.

Comparative characteristics of aerators
Hand and foot tools for small areas
For enrichment with oxygen of the soil at the dacha or personal plot fit simple fixtures.
Ordinary pitchfork - a primitive manual lawn aerator. The process is time-consuming and time-consuming, so we only implement it on small lawns.

Air enrichment with forks
Forks with hollow teeth are indispensable on heavy (clay) soils. Piercing the lawn with a pitchfork is carried out to a depth of 8-10 cm. Each prong takes out the earth, which is then removed from the surface. The operation is carried out every three years.

Fork-aerators for lawn grass
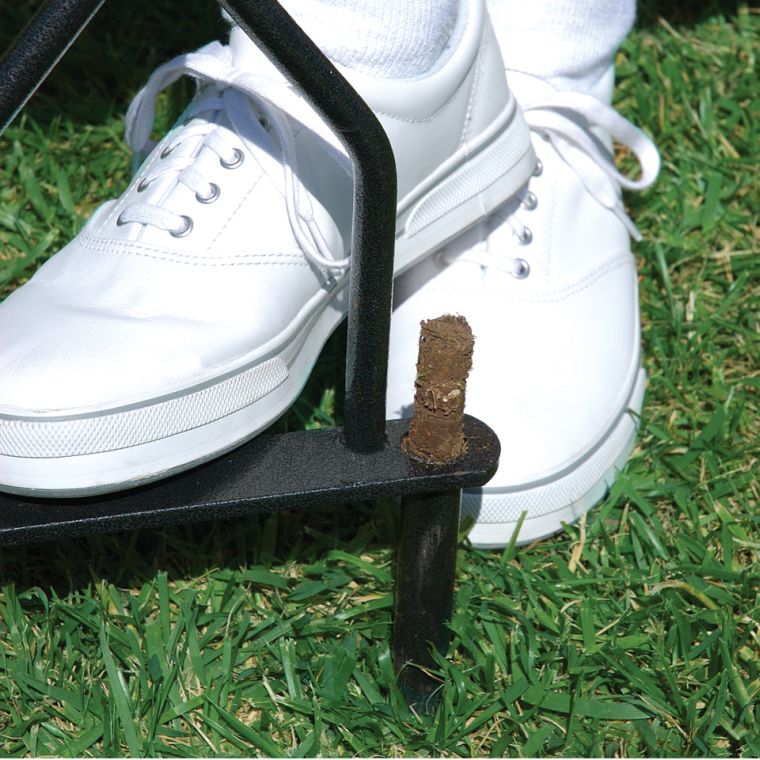
Lawn aeration sandals. In shoes, it is enough to walk on the grass - the mounted teeth will do their job. Ready-made shoe covers for lawn aeration are plastic soles with long spikes. The device is attached to the gardener's boots with straps.

Studded shoe covers
The roller-type manual lawn aerator resembles a conventional rake. The spikes are placed over the entire surface of the metal roller and as the tool advances, the teeth pierce the ground.
The most popular foot lawn aerator is very easy to make. To create overlays for shoes you will need:
- plywood, board or thick rubber 4-5 cm thick - the basis of boots for aeration;
- nails or self-tapping screws from 10 cm long;
- fixing belts - straps from backpacks or bags;
- tools: jigsaw, screwdriver, screwdriver, sharp knife and hammer.

Roll type aerator
How to assemble sandals with turf spikes:
- Pick up shoes for work, put them on the base and circle the outline with a marker.
- Leave allowances (1-2 cm) over the entire area of the lining and cut out two blanks resembling insoles.
- Fasten 10-13 screws for each part, placing them evenly in a checkerboard pattern.
- Cut out eyelets on the sides of the pads, thread the belts through them.

Studded turf sandals
For safety reasons, the studded lawn aerator must be stored in a protected place from children and animals. It is advisable to place the sandals in a box to prevent injury from sharp nails.
Other types of lawn work
Creating an emerald green lawn in front of the house is painstaking work that takes a lot of time. To simplify the process, you need to take care of specialized equipment in advance.
Purpose and technology of tamping
Compaction of the site is carried out before sowing lawn grass. The work allows you to achieve a flat surface and remove voids from the soil. An indispensable assistant in this case is a tamping roller for the lawn.
The device also solves a number of other tasks:
- maintaining the aesthetic appearance of the lawn;
- compaction of restored areas of grass cover;
- destruction of the ice crust in winter;
- removal of relief defects;
- rolling of cut grass and mulch.
A lawn rammer can be made from a thick log, an asbestos or metal pipe, a barrel, a gas cylinder or a water bottle. Recommended fixture parameters:
- capture width - 50-100 cm;
- the weight of the lawn roller is from 50 kg.

Before you make a lawn skating rink with your own hands, you need to draw up its diagram and prepare materials.
For work you will need:
- sheet metal;
- reinforcing bars;
- metal pipe;
- bushings;
- lever;
- sand.
The procedure for making a lawn rink from a pipe with your own hands:
- Prepare two circles from sheet metal, the diameter of which corresponds to the diameter of the pipe.
- In the center of the "pancakes" make a hole for the axle. Check hole centering.
- Weld bushings or bearings to metal circles.
- "Pancakes" welded to the pipe.
- Fill the pipe with sand and insert the axle through the holes.
- From the fittings, assemble the frame of the rink according to the drawing.
- Connect all structural elements: handle, frame and roller.

Homemade skating rink from a pipe
Before tamping the lawn, it is important to consider some points:
- Fighting unevenness in a planted lawn with a roller is suitable for sandy soil. In other cases, seals are formed.
- When preparing a site for sowing grass, you first need to get rid of large mounds with a shovel. Then level the area with a rake, and then proceed to tamping.
- Leveling is more effective if the soil is kept moist. In this case, the grass should be relatively dry.
Scarification for thorough cleaning
Many gardeners often confuse scarification with aeration. Translated from Latin, scarification means "scratching". The use of special garden tools allows you to clean and renew the green cover.
The need for scarification arises in conditions warm winter or a rainy, drawn-out spring. Sod is formed on the surface of the soil, under which moss “ears”. The first cleaning procedure should be carried out in early to mid-April, the second - at the end of May, and the third - in the first decade of September.
For thinning the lawn, a special tool is used - a scarifier or a verticutter. What is a lawn scarifier can be understood from the photo.

The principle of operation of the scarifier
Outwardly, the scarifier resembles a lawn mower. Powerful garden tools performs the function of a surgical apparatus for the lawn. The work involves metal blades, which, when rotated, remove debris, lichens, moss and dry grass from the surface.
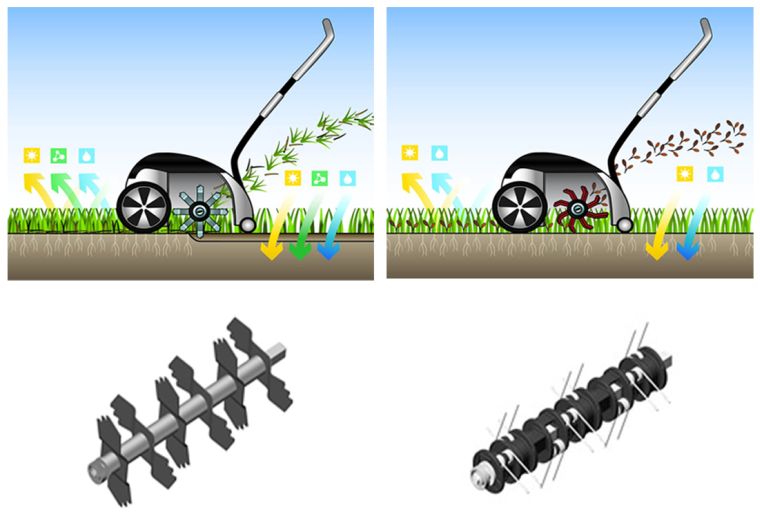
Scarifiers, like aerators, are mechanical, electric and gasoline. Are in special demand universal models lawn aerator verticutters. By switching the unit from one mode to another, you can set different tasks:
- loosening the turf with simultaneous incision of the roots (scarification);
- piercing the turf and combing out the caked felt (aeration).

Lawn grass scarification
Complete care for lawn grass provide multifunctional devices:
- Combi Care 38 E Comfort from AL-KO (Germany) - working width - 38 cm, power - 1300 W, equipped with a grass collector;
- Gardena ES 500 (Germany) - compact dimensions (weight 9.5 kg), power 500 W, width of the working part - 30 cm;
- Makita UV3200 (Japan) - a semi-professional tool with an emergency brake, power - 1300 W, aeration shaft is purchased separately;
- MTD Optima 37 VE - allows you to serve a plot of up to 800 sq.m, capture width - 37 cm, five modes of processing depth (0-12 mm).
On a small garden lawn, you can use a manual analogue of a scarifier - a fan rake.
Combing lawn plantings
A mandatory procedure in the spring is combing the grass. The stage is physically difficult and monotonous, but essential for healthy plant growth. The fluffiness of the emerald carpet depends on the thoroughness of the combing.
Last year's grass and leaves accumulated since autumn should be removed in mid-late April. Make sure the soil is dry enough before mowing your lawn. If you start the procedure prematurely, then the wet soil will be compacted. However, it is undesirable to hesitate - it is necessary to clean the lawn before the vegetation begins to grow actively.

Fan rake for combing grass
Sod cleaning is best done fan rake for combing the lawn - springy hard rods well collect debris from the surface without damaging the grass. Ordinary garden tools less efficient. In standard rakes, short bars are spaced far apart.
You can use the special Gardena lawn rake. When raking, all waste settles on a special crossbar, reducing the time for cleaning up residual debris. The models have a convenient telescopic handle that allows you to adjust the tool for growth.

Gardena lawn rake
The combing procedure itself consists in alternating repeated processing of the lawn in different directions. It is advisable to rake along the site, across and diagonally. During operation, you can not strongly press the inventory, so as not to damage the roots of plants.
The most difficult activities for the care of the landscape carpet occur in the spring. At this time, leveling, combing, scarifying and aerating the lawn is carried out in stages. High-quality preparation will allow you to admire a well-groomed emerald lawn all summer long.