Gloxinia flower care. Gloxinia is a pet with velvet "skin": watering, fertilizing and other room care. Gloxinia: care and reproduction by leaf cuttings and peduncles
Gloxinia is a herbaceous perennial native to Brazil. Flowers can be of various shades, they are called bells, gramophones. If you want to have a healthy gloxinia, home care must be done according to the rules. Even a beginner can cope with the cultivation of a flower, if he tries.
Among the varietal variety, single-row and terry varieties with a velvety surface stand out. In addition, the flowers themselves are not always the same color palette, most often they have several shades. You can create real Garden of Eden on the window!
- Drainage and soil are placed in a pre-disinfected bowl. A recess is made, planting material is placed in it with the sprout up. When filling up the soil, you need to ensure that the growth part is free. By planting gloxinia with a tuber, you can quickly get a new plant.
Reproduction of gloxinia at home
There are several ways to reproduce a flower, each of them has its own characteristics.
Breeding methods:
- Vegetative - tubers and its parts, cuttings, leaves, leaf cuttings
- Seed.
Vegetative reproduction
Consider how to propagate gloxinia vegetatively in more detail.
- Reproduction by cuttings
When propagating gloxinia at home, you can use leaf cuttings, which are taken only from a healthy flower. A young leaf can be planted directly in the ground or germinated in water:
The cut stalk is left in the air for 50 minutes, then placed in a transparent glass. Water should be warm and clean. Accelerate the root formation of charcoal. You can use growth promoters. The appearance of roots is a signal for planting.
How to propagate gloxinia with a leaf that germinates in the ground. First, the soil is prepared from sand, peat, deciduous soil in a ratio of 3: 1: 1. Drainage is laid at the bottom of the tank, soil is placed on top. The earth needs to be heavily shed. Gloxinia leaf is placed vertically, a glass jar is on top. A constant temperature of + 22-25 degrees should be maintained. Germination lasts less than a month.
- Using part of a leaf to get a new plant
Gloxinia can reproduce with a leaf blade petiole. Veins are cut on the sheet, laid on the ground. It is necessary not to press the petioles strongly, a greenhouse is installed on top. With proper care, several small gloxinias are obtained from one sheet plate. Small nodules should be planted in prepared containers.
- Peduncles - a good planting material
After flowering gloxinia, flower stalks remain. This is an excellent breeding material for gloxinia. The peduncle must be cut and placed in water for rooting. And planting is carried out in the usual way, as with leaf propagation.
- We divide the tuber
Reproduction of gloxinia by tuber division is the most common method. As a rule, several sprouts appear on it. When dividing, pay attention to the presence of two shoots in each part. After cutting, the resulting planting material is sprinkled with charcoal. Each piece is planted separately. So that the plantings do not stretch out, they are left without watering for a couple of days. But this method has negative side possible occurrence of fungal diseases.
- Have you tried stepchildren?
Stepchildren appear after the plant has faded twice. They can also be grown healthy flower. They need to be rooted in water. Gloxinia grown in this way bloom in the same year.
seed propagation
Seeds can be sown from November to February. It is not necessary to thicken the crops, as well as to deepen. good seedling obtained by creating favorable conditions. Elongated material can create problems when transplanting. Therefore, the bowl with seedlings must be rotated daily. When the planting material is ready, it must be dived, moreover, this operation is carried out several times, not allowing the seedlings to stretch.
Growing problems
How to properly care for beautiful plant with velvety leaves and bluebell flowers, we told. But gloxinia, like other indoor flowers, have problems from time to time. Florists, especially beginners, need to know what to do.
Sometimes leaves begin to curl on the flower. The appearance of the plant becomes unpleasant. If the leaves of the gloxinia are twisted, then most likely the room is cold or dry, or the plant is overfed with nitrogen fertilizers. This problem is easily solved. Curling leaves appear when harmful insects settle on them. Will have to resort to pesticide treatment. Leaflets of any size can be wrapped.
No less worried about the question of why gloxinia does not bloom. There are many reasons too. Among the most common mistakes in organizing gloxinia care are lack of lighting, too large a pot. The presence of pests, improper watering, uncomfortable temperatures can also leave you without beautiful multi-colored gramophones.
Grow gloxinia, it gives considerable pleasure.
From a botanical point of view, Gloxinia Sinningia, the systematics of the Gesneriaceae has changed, but among flower growers, favorite flowers are still called glosses, glosses and gloxinias. Therefore, in order not to create confusion, we will keep the outdated name, but remember that her name is Sinningia beautiful - a popular indoor plant, unpretentious, abundantly flowering.
Place for gloxinia
Gloxinia is photophilous, but it is better not to put it in direct sun, especially in the flowering phase, the flowers fade quickly, and the duration of flowering is greatly reduced.
In the spring, when the sun is still not too hot, it will also feel good on the southern window, but with the onset of June-July (depending on climate zone) the plant will need to be rearranged to the eastern or even western windows, or shaded from straight lines, sun rays.
I do this: as long as gloxinia grows and lays buds, it is in the brightest place, and when the first flowers bloom, I put it in a less lit and cooler place.
Gloxinia is a plant of long daylight hours, for normal growth and development, it needs 12-14 hours of illumination of at least 5000lx. In case of insufficient lighting, especially during the period of the beginning of growth, the plants are strongly stretched, which subsequently negatively affects the number of buds laid. There will be few of them, or maybe not at all. After the rooting of the tuber and the appearance of leaves, the lighting should be as bright as possible, then the stem of the plant will be shorter, there will be a lot of buds and gloxinia will delight you abundant flowering. The color intensity of future flowers also depends on the illumination, in bright light the flowers have a saturated color, and in low light the color is noticeably paler.
Gloxinia line "Brocade"
 Gloxinia line "Brocade"
 Gloxinia line "Brocade"
Ground for gloxinia
You can use a mixture of leaf, peat soil and sand (1: 1: 0.5), however, the composition may be different, the main condition is that the soil is loose and breathable. Acidity pH 5.5 - 6.5, on more acidic soils gloxinia grows poorly and for this reason pure, not deoxidized peat is not suitable for it.
Before planting the plant, I strongly recommend disinfecting the soil. Now I use the drug Maxim (1 ampoule per 2 liters of water).
For growing gloxinia, wide and shallow dishes are more suitable. For young tubers, pots with a diameter of 7-10 cm are suitable, and for larger and adult tubers, 11-15 cm. Pots can be either made of plastic or clay.
Tuber planting
In February - March, less often January (it all depends on the storage temperature), the tuber begins to germinate. If it was stored in your pot with old soil, you need to get it out, clean it from the remnants of last year's roots and earth. Disinfect in a pink solution of potassium permanganate (30 min) or in any fungicide solution. For faster root formation, the tuber is soaked in a heteroauxin solution for 18-24 hours (making sure that the solution does not fall into the tuber recess), but this is not necessary. The tuber is planted in the ground with a recess up and sprinkled with soil no more than 1 cm. At the bottom of the pot, there must be drainage (polystyrene, expanded clay, crushed stone, etc.). The higher the pot, the more drainage (up to 1/3).
During the germination period, the tuber is always the most big losses and they are associated with waterlogging of the soil, as a result of which the tuber rots. Since the development of the roots is preceded by the formation of the aerial part, watering should be very accurate along the edge of the pot or into the pan and only until the soil is slightly moist. To avoid unwanted losses, I do this:
I plant the tuber in moist soil flush with it, put the pot in a bag and put it in a bright place (22-25 degrees) without direct sunlight. I air once a day for 10-15 minutes. After the appearance of the first pair of leaves, I open the top of the package and teach young plant to room conditions for 3-4 days, then I remove the package completely. As the stem grows, I fill up the soil and close the tuber by 1-2 cm. While the plant is in the bag, there is no need to water it, the soil remains evenly moist and loose, high air humidity and heat remain, the roots grow faster and there is almost no loss.
Growing temperature
At the stage of tuber germination after a dormant period, it is necessary to maintain a temperature of about +25 degrees. After rooting and with the beginning of the growth of the vegetative mass, the temperature is reduced to +22 degrees during the day and +18 at night. Lowering the temperature is necessary so that in conditions of insufficient illumination (in February-March there is not enough light), the plants do not grow too rapidly and do not stretch. The temperature can not be reduced, but in this case, the plants need to be illuminated.
During the growing season, the temperature should not fall below 18 degrees Celsius. Lower temperatures (from +15 - +20) slow down the growth and development of the plant. The optimum temperature for the growth and development of gloxinia ranges from +22 to +26 degrees.
During the period of active vegetation, a short-term increase in temperature to +28 degrees is allowed, but at higher temperatures, few buds are formed. If elevated temperatures hold for a long time, then gloxinia begins a period of stagnation, i.e. stopping growth and development, and blooming flowers last no more than 3 days.
Thus, it can be concluded that high temperatures for gloxinia are even more detrimental than excess lighting.
 Gloxinia line "Avanti"
 Gloxinia line "Avanti"
 Gloxinia line "Avanti"
Air humidity
Air humidity should be in the range of 70-80%, but gloxinia feels good even at a lower humidity of 50%, however, even lower humidity is undesirable, the plant develops poorly, growth slows down and leaves become deformed. The edges of the leaf blade are bent down.
To increase the humidity of the air, you can place the plant on pallets with wet expanded clay, moss, water, but the gloxinia itself cannot be sprayed. brown, dry spots form. However, far from light and draft, gloxinia tolerates water procedures very well. At night, you can bring it into the bathroom, sprinkle or wash it with warm water and leave it there with the doors closed and the lights off until the water on the leaves dries completely.
Watering gloxinia
For irrigation, you need to use soft water (melt, rain, filtered or partially boiled), chlorinated tap water must first be defended for at least a day.
It is better to water from a pallet or carefully along the edge of the pot, preventing water from getting on the leaves and into the center of the tuber (where the sprouts come from). in most cases, not from the roots, but from above, from the point of growth, the rotting of the tuber begins. The water for irrigation should be warm, but if the gloxinia is at a temperature of +18 degrees, then this does not mean at all that it needs to be watered with water at a temperature of +25 degrees, nothing good will come of it. Water should be 2-3 degrees higher than the ambient air temperature. After 20-30 minutes after watering, drain the remaining water from the pan.
Between watering, you need to dry a clod of earth.
It is necessary to reduce the frequency of watering in rainy, cloudy and cold weather.
At this time, the soil does not dry out for a long time, and the roots can rot from excess moisture.
Top dressing with fertilizers
After planting the tuber, the first 1.5 - 2 months, gloxinia does not need to be fed.
Fertilizers are applied an hour after the main watering, along the edges of the pot, making sure that the solution does not fall on the leaves and at the growing point. It is advisable to do this in cloudy weather or in the evening, so that after feeding the plant is not in the sun.
Top dressing with a complete mineral fertilizer, alternate with organic fertilizers every two weeks, but the first top dressing should be mineral.
 Iron deficiency on gloxinia (photo by Tydeus)
You can feed every 10 days, but then make the concentration of the solution weaker.
Before the appearance of buds, organic matter is alternated with nitrogen: (potassium nitrate, ammonium nitrate)
With the advent of buds, organics are alternated with phosphoric ones: superphosphate, potassium phosphate), if this is not done, dormant vegetative buds will wake up, which will lead to a suspension of the normal development of the plant.
- Nitrogen fertilizers cause enhanced vegetative growth, with their excess almost no flower buds are formed. Excess nitrogen can also cause root rot. For this reason, nitrogen fertilizers are given only at the beginning of growth.
- Phosphate fertilizers - enhance flowering, but them. excess causes premature leaf senescence and leads to plant chlorosis.
- Potash fertilizers - improve flowering. Excess leads to the formation of shortened peduncles, yellowing of the lower leaves, deterioration in the color of flowers.
- Trace elements - affect the size of flowers, their color and the number of buds.
Organic fertilizers for tuberous flowers
bird droppings
Litter is a very potent fertilizer and the concentration must be strictly observed when using it. Pour 1 tablespoon of manure with 2 liters of water, close the lid and place in a warm and dark place. In the next 3-4 days, stir with a stick until fermentation begins (bubbles appear on the surface). After the completion of the fermentation process (about a week), the bubbles disappear, solid particles settle to the bottom of the jar, the solution brightens. Now it is ready for use.
250 ml of a concentrated solution is poured into 1 liter of water and mixed well, plants are watered with this solution after preliminary moistening. (one hour after the main watering).
You can just buy ready-made organic fertilizer.
Mineral top dressing for tuberous flowers
for 10 liters of water take:
- 10 g simple superphosphate
- 10 g potassium chloride
- 4 g ammonium nitrate
- 5 g magnesium sulfate
- 0.1g ferric chloride
- 0.07 g boric acid
- 0.004 g copper sulfate
- 0.05 g manganese sulfate
- 0.008 g of zinc sulfate.
If it is not possible or too lazy to look for everything separately, then just buy phosphorus-potassium mineral fertilizer and micronutrients.
I use Uniflor - flower, Uniflor-bud or Malyshok (dry, granular for pepper and tomato), as phosphorus-potassium, Uniflor - growth, uniflor - green leaf, as nitrogen and Uniflor-micro, as trace elements.
After flowering, feed 2 times with potassium-phosphorus fertilizers with an interval of 14 days. This will help the tuber regain strength and survive the dormant period well.


Blooming gloxinia
In a properly grown plant, buds are laid after the third or fourth pair of leaves. Their number depends primarily on the mass of the tuber and growing conditions (light, temperature, humidity).
Gloxinia can bloom again (for example, Avanti and Brocade hybrids) if the first flowering was early. In this case, the aerial part (stem and leaves) is cut off, leaving a shoot about 2 cm high. Soon, gloxinia develops lateral shoots of the second generation (second growth) on which buds are laid, the plants bloom, but not as abundantly as during primary flowering. Flowers are smaller.
Repeated flowering is not characteristic of all species and varieties of gloxinia, for example, the lateral shoots of the summer generation of the Kaiser Friedrich variety develop slowly, by the end of summer they have time to grow leaves, but they do not pass into the budding and flowering phase.
Rest period for gloxinia
In autumn (September - October), when it becomes clear that the soil does not dry out for a long time after watering, watering is reduced, and after the leaves begin to turn yellow or dry out, they stop watering altogether. After the aerial part of the plant completely dies, the tuber goes into a dormant state, which lasts 3-4 months, depending on the storage temperature.
Tubers are stored in several ways:
- A pot with a tuber is placed in a cool place with a temperature of +10 to +15 degrees. During the winter, the soil is slightly moistened several times so that the tubers do not dry out and do not wrinkle much, especially if the tubers are small, they are stored worse because they dry out quickly. If the storage temperature is higher, then moisten more often.
- 2 weeks after the above-ground mass has completely died off, the tubers are dug up, cleaned of root residues and placed in wet sand and stored in a cool place. This method is convenient in that at any time you can easily get the tubers out of the sand and inspect their condition.
I store it like this: I dig up the tubers, put them in wet sawdust or sand and store them on the bottom or middle shelf of the refrigerator door. Once a month I take out and inspect the tubers, if the sawdust dries up, I slightly moisten them and put the tubers there again.
According to literary data, as well as based on data from Internet resources, storage temperatures below +8 degrees are detrimental for gloxinia. On my own years of experience I can’t agree with this, it’s only +5 in the refrigerator, but I didn’t have any losses. The main condition is not to overmoisten the substrate in which the tubers are stored, it should only be slightly wet, and the sand may even be dry.
Reproduction of gloxinia
Gloxinia are easily propagated by seeds, leaf and stem cuttings, part of the leaf blade, peduncle and tuber division.
Seed propagation is predominantly for specific gloxinia; you can immediately get a lot of young plants and not desirable for varietal and hybrid; splitting of traits at the genetic level can occur, which manifests itself in the appearance of the plant. There is no guarantee that you will get a plant with the original parental traits.
Sowing gloxinia seeds
Sowing is carried out at the end of January - February (with obligatory illumination with fluorescent lamps) or in March.
Seeds germinate in the light, they are sown superficially on a moist substrate (the composition is the same as for planting tubers), lightly pressed against it and covered with glass or film. The bowl with crops is placed in a bright place. At a temperature of 24-26 degrees, germination begins on the 12-14th day from the moment of sowing, with more low temperatures it takes up to one month or even longer. Care of crops is reduced to maintaining temperature and humidity, preventing the soil from drying out. If there is a need to moisten the soil, then this should be done from the pallet. It is not necessary to water from above, because the seeds are small and can be easily washed off with water.
About a month after the appearance of the cotyledons, the first pick can be made, especially if the crops are thickened. They dive according to the scheme 2 * 2 cm into light soil. A month later, after the appearance of the first pair of true leaves, young plants dive a second time or immediately planted in separate pots with a diameter of 6 cm (cactus). The temperature is maintained at least +20 degrees. Gloxinia tolerates picking well, and after it begins to grow rapidly.
I do this: if the seeds are granular, I lay them out at a distance of 4 * 4 cm from each other in order to do without picking in the cotyledon phase in the future. I put a bowl with crops in a transparent box from the cake, and there they are until 1-2 pairs of true leaves appear. After that, I plant them in separate pots and again put them in this mini greenhouse for 2 weeks for rooting and survival. In the future, I accustom rooms to the open air and, if necessary, transfer to pots bigger size. My seedlings bloom 4-5 months after germination.
Gloxinia grown from seeds may not have a dormant period in the first year, and will vegetate (continue to grow) all winter.
How to get gloxinia seeds
On the second day of flowering, after the flower has opened, take a soft brush and transfer the pollen to the stigma of the pistil. Repeat this procedure the next day for greater assurance of pollination. If pollination has occurred, then the perianth falls off after a few days, the ovary begins to grow, and with it the receptacle noticeably thickens. former flower, and now an unripe fruit of a dark green color, does not dry out for a long time. Seed ripening lasts 1.5 - 2 months and it is uneven, i.e. in the box, the seeds do not ripen at the same time. After the fruit (box) opens, bring a piece of paper and, tapping on the pedicel, shake out the seeds. Repeat the seed collection after a couple of days. Seeds are very small, dusty. Germination is retained for 2-3 years. Germination is good.
Normally, the plant should have no more than 3 boxes with seeds. If the plant is young or the tuber has insufficient mass and size, limit yourself to one fruit, remove the excess.
Vegetative propagation of gloxinia
Vegetative propagation is the most common method, it is the most simple and affordable. If rooting occurs in spring or in the first half of summer, then from the resulting young plants you can see flowering in the same season.
Propagation of gloxinia by leaf cuttings
In the budding phase or during flowering, a leaf of the lower tier of the rosette is cut off (young, upper leaves should not be taken). It is desirable that the petiole is short and thick; the size of the resulting tuber will depend on the diameter of the petiole. Then you can proceed in a way convenient for you:
- Immerse the cutting in water by 1 - 1.5 cm and keep it until roots form (you do not need to change the water, just top up if necessary), then plant it in the ground to a depth of 2-2.5 cm. For better survival of the cutting in the ground, it can be cover with a jar or bag.
- The stalk is dipped in charcoal powder and planted in moist soil. Cover with a glass jar on top. At a temperature not lower than +22 degrees, rooting occurs within 2-3 weeks, then the jar can be removed. little trick: if you have only one leaf, and you need to get two tubers, split the base of the petiole along the length of 1 - 1.5 cm, after rooting, 2 smaller tubers will form.
Reproduction of gloxinia stem cuttings

If a gloxinia tuber has a lot of lateral shoots, leave 1-2, and break out the rest. Stem cuttings are, in fact, finished plants, but without roots. They are rooted in the same way as leafy ones and they bloom in the same season.
Reproduction of gloxinia by a leaf plate
- Cut off the large leaf at the base of the outlet. On the underside of the leaf blade, make cuts across the prominent veins at the thickest points. Lay the sheet on moist soil, press down on the soil at the cuts and cover with a bag or place in a greenhouse. In places of incisions, roots will soon appear, and then nodules will form. It is important to maintain high humidity.
- The sheet plate is cut across into 2-3 parts, depending on the size of the sheet, and each part is planted in soil or sand, covered with a jar or bag to maintain humidity. Root at a temperature not lower than +22 degrees. Optimal about +25.
Reproduction of gloxinia peduncle
It should be mentioned that not all varieties of gloxinia can be propagated in this way. Some varieties take root well with peduncles, while others do not take root at all.
After withering of the corolla, the peduncle is broken out and placed in water for 1 - 1.5 cm and make sure that it does not touch the walls of the vessel. Do not change the water, add as it evaporates. After about a month, roots and a nodule form on it. After that, the peduncle is planted in moist soil to a depth of 1.5 - 2 cm. Care like a leaf cutting.
Reproduction of gloxinia by dividing the tuber
Large tubers that have more than two shoots can be divided. The tuber is cut into pieces so that each of them has at least one sprout. Sections of tuber parts are sprinkled with crushed charcoal, dried for 3-4 days in a dark place at room temperature and then planted in moist soil.
Further care is similar to caring for a whole tuber after planting.
Possible failures in growing gloxinia
A tuber did not form - this can happen when planting a very long stem cutting or if the cutting was very deeply planted and watered abundantly.
The buds turn black and die off - the reason is a lack of micronutrients and a shortened daylight hours.
Reddening of the leaves is a lack of phosphorus.
Yellowing leaves - lack of nitrogen or excessive watering.
Leaf discoloration is a magnesium deficiency.
Leaf curl - insufficient air humidity.
Spotting (non-infectious). On the leaves, yellow or brown spots of an indefinite shape - too bright lighting, drafts or watering with cold water.
Twisting of flowers, slowing down of plant growth - the temperature is below +15 degrees.
Twisting of the edges of the leaves and their arching, the formation of deformed flowers and shortened pedicels - excess moisture in the soil.
Rotting of petioles and buds - excessive acidity of the soil, excess nitrogen fertilizers, waterlogging of the soil.
The plant does not bloom - insufficient lighting, lack of nutrition, dry or cold air, improper dormancy, excess nitrogen fertilizers.
Gloxinia diseases
- Tuber decay. Occurs with excessive watering. At the initial stage, the disease is manifested by a decrease in leaf turgor, after watering the turgor is not restored. With a strong defeat of the tuber, gloxinia droops completely. It is necessary to cut and re-root leafy cuttings. If the tuber is not rotted from the point of growth, then the rotten parts are cut to a healthy tissue, disinfected in a strong solution of potassium permanganate or another fungicide, powdered with crushed coal and dried for 2-3 days, after which they are again planted in moist soil.
- Late blight. It is the most common disease of the Gesneriaceae family. It develops quickly and leads to the sudden death of gloxinia. It starts with a slight wilting, then the growth of the stem stops and its color changes. After watering, the leaves fade even more, the base of the stem begins to rot, passing to the petioles and leaves. An attempt to save the plant is unsuccessful, cut leaf cuttings do not take root, quickly blacken and rot. The plant must be destroyed along with the earth.
- Fusarium. The plant becomes infected through the soil. The leaves turn brown, curl and wither. Dark stripes and cracks form on the stem. Fusarium damage to the plant is facilitated by excessive watering and constant soil moisture.
Pests on gloxinia
Most often, gloxinia are affected by thrips and red spider mites.
Treat with systemic insecticides in a place protected from light and drafts (spray the plant itself, spill the soil). After the moisture from the gloxinia leaves dries completely, you can put it in place. The procedure is well tolerated.
Gloxinia is one of the most famous indoor plants, which is loved by flower growers all over the planet. This flower with its unique appearance is able to bring a touch of natural beauty and romance into the room.
 Gloxinia is a desired flower for every housewife
 Domestic gardeners also did not remain indifferent to the room beauty. But not everyone knows how to provide proper care for gloxinia at home.
plant history

Gloxinia is native to warm and sunny Brazil. Also, this plant was cultivated in European latitudes thanks to the work of the famous botanist Benjamin Peter Gloksin. This plant is named after him. Some time after the work of this scientist, another botanist, Wilhelm Sinning, took up the hybridization of the plant. The fruits of Sinning's work are presented in the form of a wide distribution of subspecies of this flower and its domestication.
Varieties and varieties

The plant has a powerful root system, from which comes a lot of green fleshy leaves covered with small hairs. Gloxinia tubers are pronounced and immediately catch the eye. The flower stem is no different great length, and on its top there are many bright flowers that differ from each other in shape and color depending on the subspecies. Subspecies are classified as follows: miniatures and classic varieties, the length of which can exceed thirty centimeters. Other varieties are intermediate between the two main categories.

- Avante- white petals that make up a bud, resembling a bell in shape.
- Royal- contains a lot of purple petals.
- Tigrina Red. This variety implies the presence of a bright red or burgundy bud.
- Gloxinia Hollywood implies a collection of dark purple petals. Inside the gloxinia flower, there is a white area framed by purple particles.
- Esinia- a kind of flower that grows up to thirty centimeters in height. On the edges of the petals there is a border of white or delicate pink.
- Kaiser Wilhelm implies lush purple flowers, along the edges of which a snow-white border stands out brightly. The spotted core of the plant attracts attention.
- Blanche de Merou- a variety of elongated flowers, the outer surface of which has White color. Slightly curving flowers are painted in pink color, and velvety fleshy leaves form the basis of the plant.
- Shagane- a domestic variety of gloxinia, implying terry buds of dark blue color. Mass of petals of blue color covered with a bright blue border with a white core, which has bluish blotches.
- Anfisa- a beautiful pinkish tiger. Mass of petals on a bud. Inside the flower you can see a white core with red patches. The border of the petals has pink shade. Outside, the petals are painted white.
Necessary conditions for growing

Gloxinia care at home requires a specific list of gardening skills. However, the indisputable advantage of the flower is its unpretentiousness in care. He does not need constant attention and a lot of effort, like many other representatives of indoor plants.
Soil and pot: basic requirements

The plant is not picky about soil conditions. Suitable soil is soddy soil, leaf humus, garden soil and river sand in equal proportions.
If desired, a small amount of sawdust can be added to the ground. The resulting soil should be soft and airy, and if the resulting soil consistency does not meet this requirement, a baking powder can be added. It is important to ensure that there is a special hole on the bottom of the flowerpot. About fifteen percent of the height of the flowerpot should be filled with crushed stone or pebbles to create good drainage. Ideally, the resulting substance should be soft, airy and well absorb the water that flows from the bottom hole.
Watering, top dressing and suitable fertilizers

Gloxinia is a flower that is not picky about fertilizers. Of course, this plant cannot do without fertilizers at all, therefore, without their regular application, it is unlikely to please the gardener with abundant and lush flowering. Complex compositions created specifically for feeding indoor plants can serve as fertilizers. The warm season is ideal for applying nutrient mixtures, from spring to the second month of summer. Mixtures should be applied no more than twice a month, and the last month of summer is not at all suitable for feeding due to the preparation of the plant for the cold season. At this time, Gloxinia will gather all the resources in order to withstand the harsh environmental conditions.
Gloxinia should not be watered too often. Gloxinia tubers that have not reached sufficient maturity may protrude from the surface of the earth, being exposed to excess moisture. During such a period, the plant is most susceptible to the occurrence of fungal diseases and mold growth, and these conditions can have an extremely negative impact on the life of a motley pet.
It is also important for already formed plants to avoid excessive watering, which will help competent soil preparation and a drainage system on the bottom of the pot.

Gloxinia loves a humid environment and grows faster in conditions of high humidity. Despite this, it does not require regular spraying, and this is a distinctive property of this plant. For supporting good conditions for plant growth, it is important to maintain a relatively high level humidity around the flowerpot with a pet.
A few saucers of water are unlikely to be able to radically improve the situation, so you can plant moss in a flowerpot if you wish, or put a couple of flowerpots of green plants near the beauty. Plants with green leaves tend to release the moisture needed for this flower.

Competent lighting will also help to ensure the flowering of gloxinia. Diffused light is ideal for a flower. Therefore, the flowerpot can be placed in the southern, eastern or western part of the apartment, while the curtain on the window should not be too dense.
Prolonged exposure to direct sunlight on the plant can lead to burns on delicate petals: illiterate watering, which involves spraying, can aggravate this condition. For this reason, it is better to water the root of the plant itself, and not to resort to the help of a spray bottle. You can not put a flowerpot with gloxinia in places through which drafts pass or on window sills with cracks. Otherwise, the plant may look lethargic, and the loss of elasticity and dullness may indicate not only hypothermia, but also the beginning of decay processes in the root system of the flower.
 Falling leaves of gloxinia before winter
 In the cold season, the flowerpot should be kept in a well-lit room with an air temperature of + 10-17 degrees Celsius. In this case, the plant will be able to calmly shed its leaves, but you should not be afraid of this: in the spring, new, strong and beautiful shoots will come from the stem. The content of gloxinia in such conditions will help her gain strength in the cold season, and with the onset of heat, release the accumulated energy reserves in the form of bright, lush and juicy flowering.
Rules for pruning and transplanting a plant
Some gardeners argue that competent pruning of a plant is to cut off all the growing foliage, since radical methods pruning leads to the fact that new, profusely flowering shoots grow out of the gloxinia tuber over time. In fact, this makes no sense and is of no practical use. Of course, new shoots will grow, but this method can cause the root system to rot, which will receive some water without being able to direct it to the branches for nourishment. In addition, the last half of summer can lead to the onset of secondary flowering.

You need to transplant a flower into a flowerpot corresponding to the size of the rhizome. Small, newly formed roots can fit in a small pot, while an already formed root system should be placed in a flowerpot that does not constrain the root. You should not pick up flowerpots that are too large, as they can lead to excessive moisture ingress into the root of the plant, which can lead to the beginning of its decay.
Gloxinia flowering: what is it and what to do after?

The period of development of inflorescences begins from the first month of spring to the last month of summer. The buds can last for about a month, after which they must be cut.
After the plant has faded, you need to rid it of weak, sluggish and dried flowers. Be sure to clear the stem of thick leaves that can be used to propagate the variety.
Incorrect content of gloxinia and ways to correct errors

If the flowers of gloxinia have become dull and lethargic, or there are other signs of plant overflow, it must be placed in another pot. To do this, remove the affected flower from the pot, shake off excess earth from it, clean it of rotten foliage and flowers and place it in a flowerpot with new earth. The soil in another pot should be more airy and loose than in the previous one - for this you can add more baking powder to it. After transplanting, water the plant, cover with polyethylene film and place in a slightly dark place for the recovery period. You can remove the film for ventilation once or twice a week.
The root is rotten if it separates too easily from the tuber. Rotten roots should be cut off, leaving a healthy part. The root may be dark, almost black in color and smell moldy and rotten. This indicates the beginning of decay. In this case, you can use the fleshy leaves for the rooting process in the soil.
Reproduction of gloxinia with a leaf

sheet method breeding is the most common among gloxinia. To do this, cut off the fleshy leaf and shorten it to two centimeters. Next, place the leaf in coarse sand and cover with foil. In about 1-2 months, roots will begin to emanate from the leaf. When their length reaches two centimeters, this means the sprout can be transplanted into a pot with prepared soil. At the very beginning of the growth of a rooted leaf, leave a film with a small hole above it, and as it develops, increase the volume of the hole in the film. After two weeks, the polyethylene film can be removed.
Propagation with seeds

Plant the seeds in the sand and cover the flowerpot plastic wrap. It will take a long time for the seeds to germinate: from four to nine months. When most of the sprouts have sprouted, the film can be removed.
Tuberous propagation method

This method of dividing gloxinia is quite complicated and risky, so they resort to it. experienced gardeners. Large tubers without damage and signs of decay should be divided precisely during the dormant period.. One tuber is recommended to be cut into two parts and covered with coal. This transplant method is not used very often due to the increased risk of root rot.
Gloxinia cuttings

Cuttings emanating from the stem of gloxinia are also suitable for the propagation process of the plant. The complexity of this method lies in the small length of the cuttings. Therefore, cuttings must be carried out exactly according to the same algorithm as with a leaf: place the cut component in coarse sand, cover it with plastic wrap and wait for rooting to begin. A rhizome appears in about a month.
Disease prevention and treatment

In general, proper care for gloxinia at home involves regular watering of the plant. In addition, do not forget about the periodic application of dressings, compliance with the required temperature and lighting in the room. If all the above recommendations are followed, the plant will be able to please its owner with lush flowering.
All indoor gloxinia belong to the genus Sinningia, which has over 60 species of herbs and shrubs with large pubescent leaves. The original material for breeding work served as a flowering plant, delivered at the beginning of the 19th century from the tropical regions of Brazil to Europe. Thanks to the sophisticated appearance, variety of flowers, Europeans liked the unusual, delightful gloxinia. Caring for this plant is simple, which allows it to march victoriously around the world for two centuries, taking its rightful place in indoor and greenhouse collections.
Gloxinia, synningia - what is the correct name for the plant?
In 1785, botanists discovered a new species with bell-shaped flowers in the forests of Brazil. According to one version, the name of this plant - Gloxinia speckled - was given in honor of the German naturalist of the 18th century B.P. Gloksin. Another explanation for the botanical term is the flower's similarity to a bell ("glock" in German). Also in the tropical part of South America in 1815 a similar plant was found with a tuberous rhizome and a bell-shaped corolla. The new kind attributed to the already known genus Gloxinia. At first, Europeans found it difficult to care for a flower at home because of the dormant period in winter.
In 1825, when similar plants had already been described, the species Gloxinia speciosa, which means “Beautiful Gloxinia”, was assigned to the genus Sinningia. Gradually, Europeans learned to cultivate a flower, but continued to call it as before - Gloxinia.
Gloxinia perennial is not synningia
In rooms and greenhouses there is a plant that really belongs to the genus Gloxinia. This is Gloxinia perennial (G. perennis). The natural species in the tropical forests of South America reaches more than 50 cm in height. The fleshy, sparsely pubescent stems are covered with bare, shiny ovoid leaves. From above, pointed green plates are painted in dark shades, from below they have a reddish tint.
Axillary gloxinia flowers - usually blue, purple - are collected in groups; the diameter of the corolla is about 3 cm. Small and medium-sized bell-shaped corollas, an almost bare stem and leaves are the main features of the genus Gloxinia. Care in greenhouses and rooms for related plants is the same as for synningia.

Beautiful gloxinia (sinningia) - royal flower
Carried away by the description of species in natural conditions, let's not forget that among the indoor and greenhouse forms, not real gloxinia, but hybrid synningia predominate. They appeared as a result of crossing two natural species - royal and beautiful synningia (S. speciosa and S. regina, respectively).
Now more than 60 species are known that belong to the genus Sinningia. According to some reports, their number has already exceeded 90. The genus belongs to the vast family of Gesneriaceae. The first beautiful Sinningia brought to Europe received an already familiar name - gloxinia. Home care for this plant consists in the correct alternation of the growing season with winter dormancy. Otherwise, synningia are undemanding and easy to breed. Russian flower growers, according to a long-term habit, continue to lovingly call flowers gloxinia, sometimes - "gramophones".

Features of the stem and leaves of gloxinia (synningia) hybrid
The underground part of the perennial undersized plant forms a tuberous rhizome. An upright stem with large leaves grows from it, their length reaches 10-20 cm. Varieties with a shortened stem forming rosettes are also gloxinia, care for such forms should be especially careful to avoid rotting during excessive watering.
The fleshy leaf blades are oval shape, the petioles are almost perpendicular to the stem. Only in pillow forms do they form rosettes. The vegetative organs of the plant can be covered with many short thin hairs. There are varieties without pubescence, with a bare stem and leaves. Groups according to the size of the aerial part of gloxinia, or Sinningia hybrid (Sinningia hybrida hort):
- standard - 25 cm or more;
- compact - 15-24 cm;
- miniature - 6-14 cm.
- microminiature - up to 5 cm.

Blooming gloxinia (synningia)
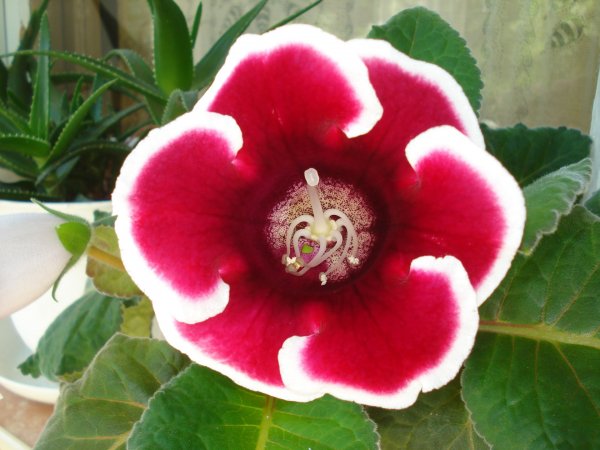
Plants of amazing beauty gracefully complement the interior of a living space and office. For a long time, that gloxinia, the care of which is properly organized, will delight everyone with its large “gramophones”. Bright pubescent corollas sometimes reach a length of 10 cm. Coloring is monophonic: red, pink, white, burgundy. There are blue and purple synningia in indoor collections. Often there are two-tone forms: red-white, white-pink. Red and purple velvet gloxinia (synningia) are especially valued.

A variety of flowers of different varieties:
- tubular or funnel-shaped;
- simple or multi-petal;
- terry or semi-double;
- with regular or wavy petals.
Gloxinia bloom in early summer, until mid-autumn, beautiful "gramophones" appear on the plant. To prolong flowering, it is necessary to cut wilted flower stalks. But if it is necessary to collect seeds, then dry petals are left with ripening fruits.
Gloxinia: care and reproduction by leaf cuttings and peduncles
IN industrial scale Gloxinia is propagated by seeds. IN indoor floriculture less time-consuming methods of vegetative propagation have found distribution. To do this, divide the gloxinia tuber, root different types cuttings in a light mixture of humus and leafy soil with sand (2: 1: 1).

Gloxinia (synningia) is propagated by cut wilted flowers. To do this, select fleshy peduncles and immerse them 10 mm in a shallow container of water. Leave it like that for about a month. On average, after 4 weeks, roots with small nodules grow. This is a young gloxinia, planting and caring for it differ in a number of features. Nodules are planted in a pot with light soil, watered. On the surface, green shoots may appear only after a month. But next year, this young gloxinia will bloom at the usual time. Care and propagation by leaf cuttings:
- cut off several green leaves with short dense petioles from gloxinia;
- disinfect the sections with a pink solution of potassium permanganate for 8 hours;
- leave the cuttings in a glass of water;
- can be rooted in containers or plastic cups with wet sand;
- when young shoots with roots appear, you can plant the plants in pots with light soil, water;
- cover with a glass jar or a transparent film, leave for 3-4 weeks;
- open daily for airing for 15 minutes, then completely remove this protection.

Gloxinia flower: planting and caring for root tubers, stem cuttings
Gloxinia is also propagated by parts of root tubers. With a sharp clean knife, the tuber is divided into parts according to the number of developed ground shoots. Slices are treated with chopped activated carbon, days wither. Then this planting material is placed in pots so that the very top of the tuber remains above the substrate. Water the plant carefully, trying to prevent moisture from getting into the growing point. The top is sprinkled with soil only when the young gloxinia is already getting stronger.
Care and cultivation flower culture from stem cuttings:

Transplanted stem cuttings bloom in the same year that they were separated from the tuber. At the same time, small buds appear, but next season gloxinia will please with abundant flowering.
Seed propagation of synningia
Sowing the seeds of the gloxinia plant, caring for and propagating varieties from the industrial series "Avanti", "Pikoti", "Brokadi" is distinguished by a number of features. Usually such synningia are grown in greenhouses, containers and pots are used. In the room, you can make a mini-greenhouse from a plastic container filled with a light substrate. Sow the seeds in the soil, sprinkle with water and cover with a transparent lid or glass. The soil and the entire mini-greenhouse should be well lit and protected from the cold. Shelter should be removed twice a week for airing, watering the substrate.
What should be the care of flowers after germination? Gloxinia is a plant that requires hardening and watering seedlings. Within a month, every day for 30-60 minutes, the mini-greenhouse is opened and ventilated. Then the sprouts dive and transplant gloxinia into plastic cups. After 4 weeks, young plants are ready for transplanting into pots. Flowers will appear on the seedlings only next year.

Gloxinia, planting and caring for which are very diverse, has certain requirements for light, room temperature, soil properties and watering.
Gloxinia requirements for lighting and heat
By the beginning of winter, the above-ground organs of the plant dry up, and the tubers “rest” in the ground for some time. Because of this "hibernation" flower growers inspire some apprehension beautiful perennial gloxinia. Care at home for him should be correct, then the plant will delight with its flowers in summer and autumn, and will safely endure winter peace.
Gloxinia is grown in good light, but insolation should be scattered. Direct solar radiation leads to burns on the leaves, drying of the soil. The best position is the windows of east and west exposure, where many green indoor pets do well, including gloxinia indoor flowers. Plant care with the southern position of the windowsill is to protect from direct rays during the hottest hours. Adult gloxinia needs a temperature of + 18 ... + 20 ° C, then the leaves will not be lethargic, they will retain turgor and their usual bright or dark green color.

Soil and top dressing
Gloxinia needs good drainage, a light substrate with high air permeability. The reaction of the soil should be slightly acidic or neutral. The composition of the soil mixture can be as follows: peat, sod land, humus, sand, vermiculite. IN flower shop ready-made substrates "Saintpaulia", "Gloxinia" are sold. Home care involves complex organo-mineral plant nutrition from spring to mid-August.

With a lack of macro- and microelements, the color of gloxinia flowers fades, growth retardation and a decrease in the number of new buds are observed. The lack of boron during the period of intensive vegetation leads to deformation of the leaves. In greenhouses and greenhouses, gloxinia is fed with every watering, and three times a month is enough in the room.
Moisture needs of gloxinia
The plant is watered regularly during the growing season, pouring soft, settled water into the pan. It should be a couple of degrees warmer than the air in the room. The breaks between waterings are determined by the condition of the soil in the pot. A dried layer of 1-1.5 cm is a signal for watering. Excess moisture is very harmful to indoor gloxinia plants.
Foliage care usually excludes spraying, because water at the base of the petiole, in the outlet, often leads to rotting of the leaves and stem. Lack of moisture causes loss of turgor, the plant becomes lethargic. The dust on the leaves is not washed off, but shaken off with a soft brush. If gloxinia still needs to be sprayed, then use a soft warm water room temperature. Allow the drops on the leaves to dry, only then return the pot of gloxinia to permanent place. At the end of October, it is necessary to reduce watering (not the volume of water, but the multiplicity). late autumn synningia pass into the usual state of winter dormancy for the genus.
Storage and planting of root tubers
Care for gloxinia after flowering falls on four autumn-winter months (from November to February). At this time, the plant almost does not need watering. Reduce the amount of moisture, and at the end of October, pots or containers with tubers are placed in a dark, dry place. There must be good ventilation during storage and a temperature of + 12 ... + 13 ° С. A completely dried stem must be cut off, leaving only short cuttings.
Tubers before storage should be cleaned of soil and treated with a fungicide solution from fungi and decay bacteria. Then it is necessary to sprinkle with vermiculite or sand in containers, place them in plastic bag. Open it twice a month to spray the tubers with fungicide water. Gloxinia hibernates from 30 to 90 days at a temperature of +10 ... +12 ° С.

After winter dormancy in February, the tubers are disinfected in a dark pink solution of potassium permanganate, planted in pots, leaving about a third of them on the surface. Of the shoots, only 3 are left, the rest are pinched. After a day, the tuber is completely sprinkled with a substrate so that the distance from the soil surface to the top is 1 cm. Gloxinias are watered in pots, a permanent location is selected taking into account the requirements of plants for light.
Diseases and pests
Aphids, mites, whiteflies, mealybugs, thrips - this is not a complete list of insect pests that are attracted to the gloxinia flower. Care of the affected plant consists in isolating it, replacing the soil in the pot and treating it with insecticidal chemicals (it is not recommended to use the BI-58 solution). Common diseases of gloxinia - powdery mildew, rot, blackleg, late blight. In case of infection, watering should be reduced and treated with fungicides. Often flower growers mistake plant changes for diseases with insufficient care. Correct conditions content will avoid most problems, get healthy and beautiful gloxinia.
The key to abundant and long flowering of any houseplant is good care. And gloxinia is no exception to this rule. Lush rosette of large, bright and attractive flowers, characteristic of synningia, may well compete with a real bouquet.
bud ripening
The laying of buds occurs only as a result proper cultivation. buds on a plant appear immediately after the number of pairs of leaves on it reaches three or four. The number of buds themselves depends on the conditions in which synningia was kept (temperature, lighting and humidity), as well as on the age and weight of the tuber.
Flowering period and its features
The duration is about 5 months and lasts, as a rule, from April to August (taking into account repeated flowering). This factor is also influenced by the variety of this houseplant.
Flowers
Sinningia flowers look like bells. Thanks to this, the plant received its popular name - gloxinia(if translated from German - “bell”).
range of colors, inherent in gloxinia flowers, it is distinguished by its amazing diversity. The main color is white, pink, red and purple. Depending on the variety, there are terry and non-terry, multicolored, with frilled edges, varieties of flowers.
The presence of in the flowers of synningia aroma. There are varieties that do not have any smell at all, and there are those that simply smell fragrant. The smell of flowers in such varieties of gloxinia is pronounced and delicate, it may slightly resemble the aroma of jasmine flowers.
Care during budding
During the development of buds and flowering, synningia needs proper care:
- the plant should receive enough light at this time.
Gloxinia should not be placed in direct sunlight (to avoid burns)
- do not allow the soil in the pot to dry out. Needs to be watered regularly and experienced growers it is recommended to place the plant on a tray with soft and warm water (for about 10 minutes).
Do not allow moisture to get on the flowers and leaves (this can cause them to rot)
- it is advisable to feed 1 time in 7 days using fertilizers for flowering plants.
Care after flowering
flowering time can be significantly extended with proper care. Many varieties and types of synningia have a tendency to re-bloom, especially if the first was early. Usually it is not so lush and plentiful, and the flowers are much smaller.
After flowering, gloxinia should be carefully examined for the presence of a growth point on the stem. If there is one, in a month the plant will give new flowers.
pruning
Sometimes to stimulate re-blooming may pruning required synningia. In this case, the ground part is cut off (leaves and stem; 2-4 bottom sheet can not be removed) and a shoot about 2 cm long is left. Soon after this, the second growth of gloxinia occurs: side shoots appear.
Not at all necessary leave all side shoots, one or two of the strongest will be enough - the rest are cut off so as not to weaken the plant. A month later, new buds begin to develop on them.
During the period of budding, synningia must be fed with fertilizer.
Why does not bloom and how to deal with it?
Often, flower growers notice that their pet is in no hurry to please them with rapid flowering. The reason for this phenomenon is most often illiterate care of the plant. Incorrect content can be judged if:
- the plant is overfed with nitrogen-based fertilizers. Nitrogen acts as a stimulant for the rapid growth of greenery and at the same time an obstacle to flowering. The best top dressing for gloxinia is phosphorus-potassium fertilizer;
- lacks lighting. Sinningia is a light-loving plant, and lighting is simply necessary for it to lay new buds and beautifully shaped flowers.
With a lack of natural light, gloxinia can be arranged for additional artificial lighting.
- the plant does not fit the size of the pot where it grows. The ideal pot for synningia is low, wide and small, with a diameter of about 9-15 cm. In a large and deep one, it will spend energy on building a tuber, to the detriment of flowering.
- there is no transplant. Transplantation should be carried out annually;
- the soil in which synningia grows is poor. Gloxinia needs fertile soil containing humus, coniferous and leafy soil, sand, perlite (or hydrogel) and peat. Planting mix for a plant can be made independently, or you can buy a ready-made one.
Before planting the plant, the soil must be calcined for about half an hour in the oven - to destroy pathogens.
Bloom- a wonderful sight that can give a sea of \u200b\u200baesthetic pleasure. In order for it to be magnificent, plentiful and long, it is required to provide this unpretentious beauty competent care.
Photo
Below you can see a photo: