Laying tiles diagonally: tile selection, calculation and instructions. Laying tiles diagonally: useful recommendations (24 photos) Tile laid diagonally
Laying tiles diagonally on the floor is a rather difficult operation even for experienced tilers. Moreover, with a certain degree of caution, such a decision should be made if this is supposed to be done for the first time. However, the desire to decorate the interior of one of the rooms in an original way leads to bold attempts to try your hand.
Choosing this installation method floor covering, you should prepare yourself in advance for painstaking, patient work. In addition, it will be useful to practice cutting tiles. For a beginner, this process can be the most difficult. Especially in the absence of accumulated experience and in the absence of the special tools necessary for its implementation.
If you entrust the flooring with diagonal tiles to professionals, then it will cost much more. Therefore, by doing this work yourself, you can save a decent amount. So there is a reason to try!
Laying floor tiles diagonally - advantages and disadvantages
Diagonal laying method ceramic tiles on the floor is somewhat different from the standard approach to cladding. The process of performing work is not only more difficult, but also requires more material. This is explained by the fact that the tiles will have to be cut diagonally to complete the row of masonry along the walls. And trimmings will very often no longer be suitable for use on other parts of the floor.

It will be even more difficult to cut a fragment of a complex configuration from a tile. And this is sometimes necessary to do if the walls of the room are not straight along the entire length - there are protrusions or, conversely, niches.
This method of masonry, as well as any other, has its positive and negative sides. They should certainly be taken into account if the choice stops precisely at such a cladding technology.
To virtues Diagonal laying tiles include the following points:
- The oblique lines of the seams between the elements of the floor cladding visually expand the space. And this is important for tight spaces. This is especially noticeable when using two, and sometimes even three colors of the material in the composition.
- Laying diagonally looks much more impressive than standard tiled flooring.
- Very valuable is the ability of such an option for placing ceramic tiles to "mask" the uneven location of the walls of the room, by attracting attention to itself. This is facilitated by the absence of lines parallel (or should be parallel) to the walls.
- Side elements cut diagonally look in overall composition more accurately and effectively than with traditional straight masonry.
disadvantages this method floor coverings can be called the following:
- Installation work will take much longer. The master will have to very accurately mark and cut a considerable number of tiles.
- The consumption of facing material is increasing - the reasons are obvious.
- For beginners, the likelihood of incorrect marking and cutting tiles is much higher. This, of course, also leads to an increase in material consumption.
Calculation of the required number of tiles
When choosing a facing material, it is recommended to compare the sizes of tiles very carefully, especially from different packs. If there is a discrepancy in length or width, even one or two millimeters, the masonry will turn out to be sloppy. All her decorative benefits just disappear! So you should use the tiles as much as possible. high grade, with the most accurate calibration.

At the same time, of course, the tile should be designed exclusively for flooring. This is indicated by the pictogram on the package with a footprint. No matter how much the buyer likes outwardly (and at a price, perhaps) a model designed for wall cladding, such a coating will not “live” for a long time on the floor. In addition, tiles are usually used for cladding in rooms where water can get on the floor. That is, the tile must also have anti-slip properties. Just for personal safety reasons.

Before you purchase a facing material, you should decide on its quantity. To do this, of course, you should clarify the dimensional parameters of the selected tile.
After that, it will be reasonable to make a drawing of the floor of the room in which the installation will be carried out. In this case, everything must be taken into account - ledges, niches, the location of heating radiators, communication risers, fixed pieces of furniture or overall plumbing equipment(bath, shower, etc.) Careful execution of the drawing is especially important if you plan to create complex patterns on the floor with tiles of different types.
The drawing must be drawn exactly to scale. For example, it could be 1:10.

Tile calculation is done in several ways:
- If it is not supposed to decorate the surface with a complex pattern, then it is not so difficult to calculate the number of tiles. To do this, you just need to divide total area rooms per tile area.
- If it is planned to lay out a panel on the floor, then the scheme should be more detailed, with exact dimensions each of its elements. Such a graphical calculation allows you to determine the number of tiles of different colors and sizes.
When determining the number of tiles, focusing on the drawn up scheme, the following must be considered:
- Two tiles cut less than half should be counted as one.
- If a large part of the tile is cut off, it is also considered as one.

It is necessary to add 15÷20% of the total amount of material to the result obtained as a result of calculations. This is a reserve for the remaining unavoidable trimmings, in case of unsuccessful cutting, not detected during the purchase of marriage or accidental independent damage to the tile during the stages of its transportation and work.
If the calculation will be carried out for tiles of the same type, then the reader can use the calculator below.
Calculator for calculating the required amount of ceramic floor tiles
The program is simple - it compares the area of \u200b\u200bthe room for cladding with the dimensions of one ceramic tile. True, there will be some nuances.
- First of all, it is necessary to determine the area on which the laying will be carried out. ceramic cladding. With rectangular rooms, problems usually do not arise. Difficulties occur if the floor has a more intricate configuration. But even here you can be smart, break it up into several sections more simple shapes, calculate their areas and sum them up.
The area value is entered in the first data entry field.
Calculation of the area - to help in difficult cases.
Geometric formulas learned at school can be forgotten. No problem, we'll help. A special publication of our portal is devoted precisely, with an analysis of complex cases and with built-in convenient online calculators.
Further, in the appropriate fields, the length and width of the selected tile model are entered. Since most manufacturers practice indicating the size in centimeters, the same unit of measurement is also left in the calculator.
Do not forget about the thickness of the tile seam. When laying on the floor, it is quite solid, and on large areas this parameter introduces quite significant adjustments to the calculation result. The thickness of the seam is indicated in millimeters.
Finally, you should choose the method of laying the tiles. It directly affects the size of the stock pledged when purchasing the material. If for direct laying 10% is enough, then for diagonal it is better to lay a reserve and all 20%.
The result will be shown in piece expression - the number of tiles.
As you know, tiles are laid along one of the walls or diagonally. The second method is more complex, however, visually expands the space. Consider this way of laying tiles from the very beginning of the process to its completion.
We prepare the base and apply the markup
The first thing that almost all tilers start with is the choice of a landmark along which the tiles will be laid out. And here, many make a simple mistake, outlining a diagonal connecting the two corners of the room. As a result, the tiles do not lay out as smoothly as we would like. And the thing is that the diagonal should pass at an angle of 45 degrees, which means that it will connect the corners only if the room is equilateral. In all other cases, the angle of the diagonal will change, as will the perception of the laid tile. In some cases, such an error is imperceptible, but it is still better to do without it.
Diagonal styling tiles visually expand the space even in the smallest rooms
For proper styling diagonal tiles use an isosceles triangle that is drawn along two adjoining walls. Identical segments are measured along the walls, the ends of which are connected by a third side. This side will be the guide for the side of the first tile. Segments have any length, but the diagonal is considered the best segment tiles, thanks to which you will start laying out the surface from a single tile, and not from its pieces, which often lead to a run-up.
Substrate preparation is the easiest part of the process. For its high-quality performance, you will need a comb that will not allow you to lay the tiles crookedly, even with all diligence.
Sequence of work
It is easier to express the progress of work in the form step by step instructions. It should be noted that these rules apply to both laying the floor and walls, but with only one caveat - the tiles on the wall must be supported, do not let it slide down.
The whole process can be divided into the following steps:
- Markup.
- Surface primer.
- Glue primer.
- Working with a notched trowel.
- Laying the main tiles.
- Laying the remaining tiles around the edges.
- Seam grouting.
Photo gallery of work stages
Marking and primer
With marking using an isosceles triangle or a tile diagonal, everything is clear. But what if we veneer an uneven surface? In this case, you will have to set the plane for laying the tiles. At the ends of the segments, we drive in the dowel and pull the thread between them. This thread, by its location height, indicates the height of the laid out tile and is at the horizon level. Thanks to these marks, it will be much easier for you to lay the first tile.
 The primer allows you to plant the tiles as tightly as possible on the surface to be veneered.
 Priming is an integral part of the work. If you bypass it, then after the glue has dried, you will have to shift the tile. The primer penetrates deep and holds the top layer of the substrate together, while increasing the adhesion of the surface to the adhesive.
After the primer has been applied, the base must be left to dry for at least an hour.
Since the tiles are laid seriously and for a long time, additional priming measures will not be superfluous. Such a measure is a primer with glue. The tile adhesive is diluted a little less often than the instructions require, after which the surface of the floor and wall is puttied with it. Such a move allows you to fill all the irregularities invisible to the eye with glue, increasing the area of \u200b\u200bcontact between the tile and the base. The main thing is not to wait until this layer of glue dries.
Working with a spatula
Now it's time to arm yourself with a notched trowel with a tooth depth of 10mm. With this spatula, we apply glue to the base and to the surface of the tile. By the way, it would be nice to prime the base of the tile with glue in the same way as the surface of the floor and wall. So you will create a high-quality adhesion of the tile to the surface. Sometimes masters skip this moment and do without it. As a result, after five years, the tile ceases to serve correctly. But the tile, primed before laying, can last for two decades without losing ground.
 A notched trowel designed to apply adhesive to the base and tiles
 Laying tiles (video)
We orient the tile according to the drawn line or stretched thread. After we put the tile on the floor, we begin to tap it with a rubber mallet until excess glue appears from under it. Their appearance means that there are no more voids under the tile. This means it's time to move on to the second tile. We put it - we take the building level and check the plane of the finished floor. There are two points to note here. Ideally, the bubble should show the level in any direction, i.e. no slopes are allowed. Also, there should be no free space between the tile and the level. If all these conditions are met, we continue laying.
We lay out the rest of the tiles, constantly checking the surface of the floor with a level. During this process, it is not necessary to be distracted by laying tiles against the walls and, therefore, trimming. First, the bulk of the tile must be allowed to dry, and only then proceed with the rest of the work.
To work with tiles in this case, you will need a tile cutter or grinder with a diamond wheel.
Grouting
This is the final stage of work with tiles. The dry mixture is diluted with water to the state of thick sour cream, and then with a rubber spatula they begin to fill the joints between the tiles with a mixture.
Grouting does not tolerate haste, because in the event of an error in the work, it will be almost impossible to correct the defect. After every one and a half or two square meters tiles, remove excess mortar from the joints with your finger, and from the surface of the tile with a dry cloth.
Tile calculation
It is worth briefly mentioning how to calculate the number of purchased tiles when laying diagonally. There is no difficulty here - we measure the surface covered with tiles, and add ten percent of the total. As a result, we obtain the required volume of tiles with a small margin in case of unforeseen material costs.
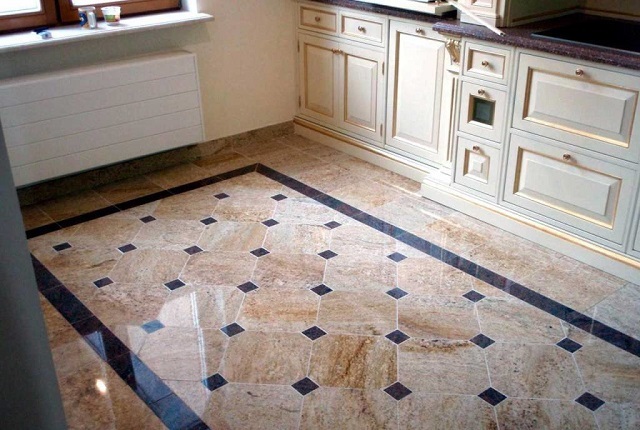
 Tiles neatly laid diagonally look even more interesting than those laid in the usual way.
 At its core, laying tiles diagonally is not much different from regular laying. The difference is only in the direction of laying and the number of tiles used. Properly laid tiles can serve faithfully for decades, as is required of this coating.
Laying tiles diagonally has some advantages over the usual (generally accepted) cladding method:
Diagonal floor tiles.
- When there is a narrow undercut under the wall, the triangular pieces look more natural and less noticeable. Oblique, narrow pieces with chess (ordinary) lining, constantly attract the eye.
- When laying porcelain tiles of the same pattern in several adjacent rooms, the geometry of the rooms does not affect the seams and the resulting layout of tiles against the walls. The location and shape of these rooms can be of any configuration and the tiles on the floor will look natural.

Laying tiles diagonally.

Diagonal tiling in two adjacent rooms.
- When facing two adjacent premises floor tiles with different color and pattern, it is possible to play with contrast on the door line. This can be done by placing tiles on the floor diagonally in one room and in straight rows in another.

Contrast when laying tiles in different ways
I am not alone in my reasoning about the ability of tiles laid in a rhombus on the floor to hide irregularities in the geometry of rooms:
The technology of laying tiles on the floor diagonally.
There is an opinion that in order to lay tiles diagonally, it is necessary to draw diagonals on the floor and start facing along these lines.
This condition is possible only in one case. If the room is square in plan. That is, the sides are the same, and all the angles in the room are 90 degrees.
There is an easier way to glue tiles diagonally. To do this, you need to cut several tiles exactly diagonally and start facing using these oblique halves. The first whole 4-5 tiles laid in a square will give one even side. It must be taken as the base. Align, if not a straight line, with a wedge. And in the future, continue the straight line with a chopping cord or a laser beam. At some stage (section), you can reproduce a right angle on it, and already carry out all further laying according to this angle. This will help to get even rows of seams even on non-calibrated tiles.

technology of laying tiles on the floor diagonally.
Filling the space with whole tiles, pruning can be done the next day. These triangular pieces no longer affect the geometry and layout.
Where to start laying diagonally.
The impracticality of facing along the diagonals applied on the floor is that you have to start from a corner or some wall. But the most prominent place often becomes the passageway of the room and the doorway without a threshold. In this place, there are usually two various coatings. If you start gluing tiles from a corner, you can get a kaleidoscope of pieces on the aisle.

Diagonal start of cladding
Therefore, the technology for laying out tiles in a “diagonal” way is slightly different. Laying begins with walkways and areas that will not be blocked by furniture or equipment.

Diagonal tiles on the aisle.
In arbors of irregular shape, when laying diagonally, it is better to bypass the perimeter with a whole tile. And fill the middle, then already, with diagonal rows.

Diagonal tiles in the gazebo.
This will help to avoid the appearance of pieces on the edge of the site and the formation of a cut, not always even edge. Small pieces do not hold well, especially at the edge of steps or platforms. A whole row of tiles around the perimeter also creates a visual frame. A frame in design is always a winning option. Be it a frame or ceiling frieze frame.
Where to start laying tiles diagonally in the garage on the floor is shown
How to measure and cut a tile diagonally.
In the West, for this case, invented various fixtures facilitating the procedure.

Porcelain stoneware measuring fixtures for trimming
But, often, it's all vanity from scratch. There is nothing easier than directly on the tile to mark with a pencil the points along which the cut of a manual or electric tile cutter must pass.
This idea is more clear in a short video. All videos are short. Without introductions and philosophy. Main essence, supplementing the text on the site.

Difficult sections of cutting tiles are easier to do with a pre-cut paper stencil.
Details below:
Calculate the consumption of tiles diagonally.
Earlier, in an article on , it has already been said that the consumption of tiles diagonally is the same as with normal installation and is 7-8 percent. And this figure depends on the size of the tile itself and the presence of a complex pattern on it, representing a set of several tiles. How less tile, the less percentage of it goes to pruning.
Price (rates) for laying tiles diagonally.
It is generally accepted to consider this method of laying as increased complexity. Therefore, the cost of this work is somewhat higher than with the usual method. The appreciation can be expressed 1.2 – 1.3. This value can vary and depends on some incomprehensible accidents, currency fluctuations and traditions of a particular area.
Tiling a floor is not as simple a process as it might seem from the outside. However, if you wish, you can easily cope with this task on your own, if you do the work carefully and slowly. And, of course, to get down to business only being at least a little “savvy” theoretically, knowing the basic nuances of the technology.
Somewhat more complicated than the usual, "straight" cladding is laying tiles diagonally. It has its own characteristics, which primarily swing planning and layout. Therefore, all stages of such tiling will be considered below, starting from surface preparation and ending with the assessment of the lined surface.
AT modern interiors designers very often use various techniques to create certain effects in the room. One of them is just the location of the cladding diagonally. Therefore, if there is a desire to include something unusual in the design of the hallway, corridor, bathroom, kitchen or toilet, then diagonal tile laying is one of the available options.
To benefits this design reception the following points can be included:
- Achieved visual extension space, especially if the walls are at least slightly reflective.
- It becomes possible to visually divide the room into zones using different directions for laying tiles.
- The spectacular location of the floor finish immediately attracts the eye of the person entering the room.
To shortcomings This masonry option includes:
- Increased complexity of work, including difficult markup.
- Forced cutting more tiles diagonally.
- Increased consumption of facing material.
- There is a high probability for beginners to make mistakes in calculations, drawing up a diagram, as well as when performing lining.
Diagonal tile options
Everyone has it good master, perhaps, has its own proven technology for performing diagonal laying of floor tiles. But in many respects, the marking for cladding depends on the evenness of the corners, as well as on the shape of the room in which the cladding will be carried out.
As a rule, the walls in the premises of apartments are not perfectly perpendicular, unless, of course, they were previously aligned. This means that the corners of rooms are not always exactly straight. And this circumstance, in turn, affects the option of starting laying.
It can be done in the following ways:
- At uneven corners rooms, after marking the floors, the lining starts from the corner into which two triangular elements of one or different size. They must fill this indirect angle and at the same time set an even diagonal, from which further “dance” is already taking place.

- If the corners of the room are aligned, then the masonry can be started with one tile cut diagonally, as shown in the illustration above.

- Laying tiles diagonally from the center of the room can be done at any angles, if the tiles are laid in the traditional way along the perimeter of the room.
- Laying starts from the center of the room when used for tiling different color, from which a certain pattern should be laid out.
In any of the selected options, it will be necessary to draw up a project for the future cladding on paper, transferring the floor plan to it on a scale. At the same time, they do not forget about the thickness of the seams - although it is small, it runs a lot on the scale of the room.
By the way, the Microsoft Publisher program, which is probably on every computer, can be a good help in drawing up a scaled plan for laying out tiles on the floor - it is included in the usual Microsoft Office package
Then, the floor surface is also drawn, as it looks on the drawn up plan. According to this scheme, it will be easier to prepare tiles for masonry in shape and size. Yes, and count the number, especially if several are used various models tiles, it will be much easier.

In order not to spoil the material, before proceeding to cutting, you should lay out the whole tile on the surface, on a pre-marked base. Some masters at that stage immediately cut out the fragments, precisely fitting them, and then carry out the general numbering of the entire “mosaic”. And in the process of laying, side operations are no longer distracted. But this approach still requires some experience.
Any small mistake can lead to a considerable number of incorrectly cut tiles. And it will be even better if there is an opportunity to use these fragments usefully. And worth the quality floor tiles maybe a lot.
ceramic floor tiles
Tools and materials for work
Before proceeding to the description preparatory work, it is necessary to list the tools without which it will be impossible to prepare the floor and lay the cladding.

So, for marking and laying tiles you will need:
- Painting cord for marking the surface;
- Roulette and a long metal ruler;
- Marker and a simple pencil;
- The laser level is desirable, but not required, but in this case, you can not do without the building level and rules.
- Containers for mixing solutions of glue and grout, as well as a paint tray with a ribbed surface for priming;
- Electric drill and mixer attachment.
- Roller with fur nozzle;
- Spatulas - traditional, notched and rubber;
- Rubber mallet;
- tile cutter, Sander with a disc for ceramics, in extreme cases - a high-quality glass cutter;
- Handy tools, for example, a block for tamping tiles.
From materials other than tiles, it will be necessary to prepare:
- primer for concrete surfaces;
- tile adhesive;
- grout composition.

In order not to purchase excess tile adhesive, it is best to calculate its consumption in advance. At the same time, given that its quantity will depend not only on the area of \u200b\u200bthe room, but also on the parameters of the selected tile. The larger its dimensions, the greater the thickness of the adhesive layer applied with a notched trowel. It follows from this - the larger the tile, the more glue required for installation.
| The linear parameters of the tile (when it rectangular shape, considered on the longest side), mm | Recommended tooth height of notched trowel, mm | Approximate consumption of glue, kg/m² |
|---|---|---|
| 400 or more | 12 | 7.6 |
| from 300 to 400 | 10 | 6.3 |
| from 200 to 300 | 8 | 5 |
| from 100 to 200 | 6 | 3.8 |
| from 50 to 100 | 4 | 2.5 |
| up to 50 | 3 | 1.9 |
This table will help you navigate when purchasing a dry mix. But even better is to use a calculator that will calculate the number of tiles, tile adhesive, and grout at once. True, it is full-fledged, in all three positions it will help if it is planned to cover the entire floor with tiles of the same format.
Laying tiles diagonally is one of the most difficult ways to work with tiles. There are a number of features for marking the room, cutting and laying tiles, if not observed, it will not be possible to achieve the desired proportions. Despite a number of difficulties, diagonal tiling remains very popular due to the fact that it allows you to visually enlarge the space and embody a lot of design solutions.
Wall tiling, diagonal laying
One of the most common mistakes made when laying diagonal tiles on your own is choosing the wrong reference point. Most often, the role of the guide is assigned to the marked diagonal, which can be a good guide only indoors square shape With smooth walls. With slight deviations in the size of the diagonals, the disadvantages of diagonal tile laying will be almost imperceptible, otherwise the direction of the rows may be significantly distorted. In general, such an error cannot be considered a serious drawback, since it will not affect the quality of the installation in any way, however, the orientation of the rows of rhombuses will be somewhat disturbed.

Marking for laying tiles diagonally
For correct execution markings should abandon the orientation to the diagonal, and give preference to the construction of an isosceles triangle. To obtain a guideline, from any two corners adjacent to one wall, set aside identical segments and connect them. In this way, an excellent guide will be obtained for laying the first tile. The segments can be chosen in any size, however, it would be preferable to focus on matching the diagonal of the tile, which will allow you to start working with the whole tile. It is not recommended to start work with laying cut tiles, as this may cause the joints to converge or run apart later.
Work sequence
In order to get more detailed instructions on diagonal tile laying, phased work should be considered. When facing walls and laying tiles on the floor, the only difference will be that you will have to install rails on the wall that act as a support for the laid tiles.
Foundation preparation
The technology of laying tiles involves cleaning and leveling the base, performing a primer. The latter type of work is mandatory when facing surfaces characterized by weakened and highly absorbent surfaces.
To perform the primer, dilute the tile adhesive to liquid state and apply a thin layer on the surface with a spatula. With this treatment, not only all the pores and irregularities are filled, but also an increase in the area of adhesion of the laid tile to the base is achieved.
Learn more about markup
As already discussed above, the direction of laying the tiles is determined using equal segments, at the end points of which you need to install dowels and pull the cord. In this case, two indispensable conditions must be observed:
- The cord should be level with the horizon;
- The cord should orient the tile laying in height.
Preparation and application of glue
The mortar for laying tiles can be prepared independently by mixing 4 parts of sand with 1 part of cement, but this composition does not provide reliable and durable operation. Where better to use ready mixes with better adhesive properties and higher plasticity. To prepare the solution, it is necessary, in accordance with the instructions, to add the required amount of water to the dry glue and mix well with a mixer or a special nozzle on an electric drill.
Apply glue with a notched trowel not only on the base, but also on the tile itself. To improve the laying on the corrugated surface of the tile, first apply a thin layer of adhesive with a conventional trowel and only then apply the remaining layer of adhesive with a notched tool. Compliance with the technology of applying glue will ensure the reliability and long-term operation of the laid tiles.
Tile Orientation
When placing the tile on the surface, you should orient its placement in accordance with the stretched cord. After correct installation ceramic tiles must be evenly tapped with a rubber mallet until excess glue appears, which will confirm the absence of voids. The position of the tile in the vertical plane must be consistent with the stretched cord, the check is carried out using the building level. It is important to lay exactly the first tile correctly - when the level is turned to any of the four sides, the level bubble must be in the same position.

Tile Orientation
After that, you can start laying next tile, all work is performed similarly to the instructions above. Next, the position check is performed using the same building level of both laid tiles. The correct installation will be indicated by the absence of a gap between the surface of the level and the tile. Further laying tiles are made in a similar way with constant monitoring of observance of the horizon. On the this stage only a whole tile is laid, so you can not be distracted by cutting.
Tile position control
When laying tiles diagonally, the rows are not oriented parallel to the walls, but at an angle of 45º. You can control the location of the tiles in the vertical plane using a long wide rail. Horizontal arrangement rows is carried out by controlling the intersection of the seams, which should form a right angle. To do this, you can use a special square, or any object whose two planes intersect at an angle of 90º.
cutting
AT ideal adjacent to the walls, floor and ceiling, the tile should be intact, but in reality this is quite rare. In this regard, at the junction, trimming should be performed using a tile cutter or a grinder with a stone disc. The latter option looks preferable, as it makes it possible to cut a strip of any width - from 1 mm to several centimeters. At the same time, when working with a tile cutter, it is almost impossible to cut a strip of ceramic tiles less than 1 cm wide.

Working with a tile cutter
Start filling out empty corners it will be possible in 1-2 days, such a period of time is necessary for the glue to harden. Not only triangles of tiles cut in half will be used, but also quarters, and even any other trimmings suitable for filling frieze rows.
Grout
The final phase of laying tiles diagonally will be grouting. To prepare the filler, the dry mixture must be mixed with water until it acquires the consistency of thick sour cream. Next, using a rubber spatula, press the seams with the mixture. Work must be carried out on a plot of 1.5-2 sq.m, after which it is necessary to remove excess grout, if this is not done, the grout will dry out, and it will no longer be possible to correct the defects.
Features of diagonal tiling in large rooms
The above workflow is suitable for diagonal tiling in small spaces. When facing large rooms more sophisticated technology is used. In this case, laying does not start from the center, but from the edge of the wall. It is necessary to lay the first row in a direct way, the tiles should be located at an angle of 45º to the floor when facing walls, and at an angle of 45º to the walls when laying tiles on the floor. The cut out triangles will be a good guide when laying the next row.
Diagonal laying of rectangular tiles on the floor
For laying on the floor, it is customary to use a standard square-shaped tile, however, it is also possible to use rectangular tiles. In relation to the walls, it is usually turned at an angle of 45º, which allows maintaining the proportionality of the flooring. With the help of rectangular tiles, it is possible to make good use of the elements of room modeling:

Laying rectangular tiles diagonally with a run
- Expand the space by directing the long side of the tile to the narrow side of the room;
- To make the room lighter when laying in the direction of the source of natural light, however, the proportions of the room will be somewhat elongated;
- Hide defects and irregularities and change the layout of the room by changing the slope of the tiles.
Calculation of the required number of tiles
When laying tiles diagonally, the consumption of tiles increases significantly. When performing standard calculations focused on the surface area to be finished, the number of tiles must be increased not by 10%, but by 15%.
conclusions
In general, we can say that laying tiles diagonally practically does not differ from standard technology tiling work. The only difference is that the laying direction is not parallel to the walls and the floor, but at an angle of 45º. Additionally, the work is complicated by the need to cut ceramic tiles, so for a quality job, you need to purchase a good tile cutter.