Rafter system of a frame house with a gable roof. Step-by-step installation of a gable roof - a guide for the home craftsman. stage: Acquisition and preparation of necessary materials and tools
The rafter system of a gable roof is a simple design that can be installed with your own hands even by a novice developer. You just need to make preliminary calculations, familiarize yourself with the details and stages of roof construction, and calculate the materials needed for installation. When making calculations, it should be taken into account that load bearing capacity a gable roof depends on the influence of loads on it from wind, snow, and the weight of materials.
In order for the construction process rafter system gable roof was given to you as easily as possible, below is a detailed step-by-step instruction for installing a rafter system with your own hands.
In contact with
Classmates
Requirements for building materials
 For the installation of a rafter system the best option will use lumber from coniferous species wood - pine, spruce or larch, grades I - III.
The material for the rafters is taken at least grade II, the mauerlat is made from boards or timber of grade II, material of grade II is taken for racks and purlins, the sheathing is made from lumber of grades II-III, it depends on the roof. Crossbars and tie-downs are made of Grade I material. Grade III material can be used on linings and linings.
Note! The lumber must be dry with a moisture content of no more than 20%. It should be treated before installation fire retardant compounds and antiseptics against fungal diseases.
 Lumber should be stored under a canopy, providing protection from the sun and moisture. Level the storage area and cover the lumber with pads for ventilation.
For installation you will need fastening elements: ties, plates, studs, bolts with washers and nuts, self-tapping screws with EPDM gaskets, 2.8 mm thick, mounting tape, galvanized brackets.
Brackets are used when attaching the Mauerlat; they are secured with nails or self-tapping screws.
KR corners serve to attach the rafters to the mauerlat and prevent the rafters from moving.
All fastening material must be made of high quality material and have corrosion protection.
Tools for constructing a rafter system
 To install a gable roof rafter system, you will need the following set of tools:
- roulettes, different lengths 5, 10, 20 meters;
- markers, pencils;
- cord for tensioning;
- hammers, for various purposes, nail puller;
- scissors, for cutting;
- roofing knife;
- putty knife;
- scotch;
- hacksaws, electric saw, electric drill with various drills and attachments;
- screwdriver with attachments;
- markings, horizontal and vertical levels;
- slats, rulers;
- polyurethane foam;
- safety belt and rope - for safe work.
Keep all tools on the roof in a tool bag for safety reasons.
Types of rafter systems for a gable roof
Sent rafters
They rest on the Mauerlat and racks mounted on internal wall, with a step equal to the rafters. To provide rigidity for spans of 6 m, additional struts are installed.

Scheme of layered rafters gable roof
Hanging rafters
If the building is small in width, you can arrange a rafter system where the rafters rest on the mauerlat or walls, without intermediate supports. The maximum span is 9 meters. Such roofs can sometimes be installed without a Mauerlat. The rafters are installed on the wall using spacers; in this embodiment, a bending moment acts on the rafters.
To unload, wooden or metal plates are installed. They securely strengthen the corner. For hanging rafters longer span The headstock and struts are installed. For hanging systems, the rafters are made with a larger cross-section, and lumber is chosen at least grade I II.

Scheme of hanging rafters of a gable roof
Calculation of the rafter system
 You can determine the cross-section of a gable roof beam required in a rafter system by collecting all the loads acting on it: the weight of the covering, sheathing, snow, wind pressure, precipitation.
Constant loads can be determined by the weight of 1 m 2 of roofing and sheathing. It is important that the weight per 1 m 2 of roofing be in the range of 40-45 kg.
Variable loads from snow and wind are calculated using table values regulatory documents SNiP, depending on the height of the building and temperature zone. The load from snow is equal to its weight multiplied by a coefficient depending on the slope of the slope. All these calculations are performed during the project.
What if there is no project and the roof is being erected on a small building? You need to look at the construction of a house in the neighborhood, which is being carried out according to a design whose roof area is the same as your building. The gable roof rafter system will serve as a model.
Dimensions of timber for rafters
At the top point a ridge is laid that connects the rafters. The height of the ridge depends on the slope of the roof. The slope is affected by the choice of coating material. Minimum dimensions are:
- For tiled roofs, slate 22 gr.;
- for metal tiles - 14 g;
- ondulin - 6 g;
- corrugated sheeting - 12 gr.
The optimal angle is 35-45 degrees. tilt, ensures rapid discharge of water and snow. In regions with strong winds, the roofs are made flat and then the angle of inclination is within 20-45 degrees.
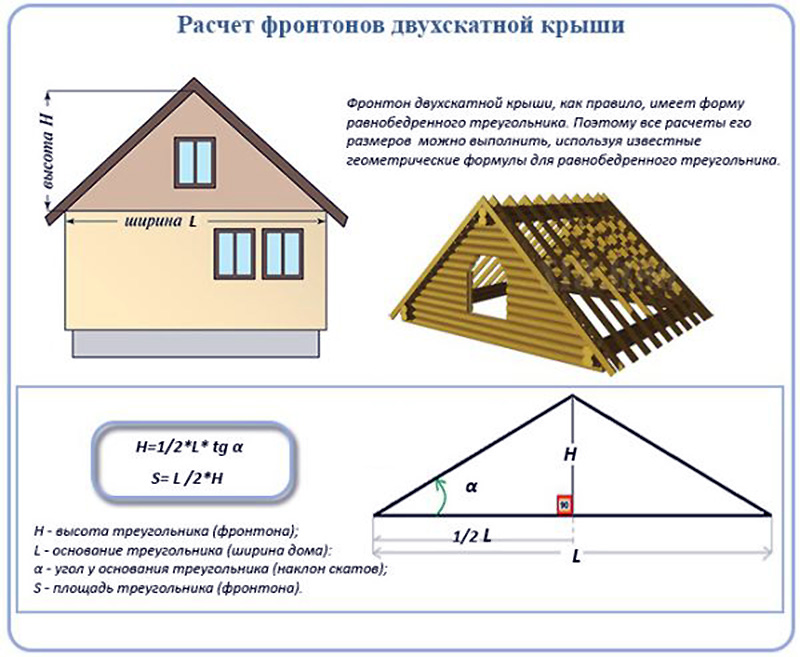
The height can be determined using the formula: H=1/2Lpr*tgA. Where A is the angle of inclination, L is the width of the building.
The task is simplified when using a ready-made table. The coefficient depends on the width of the building and the angle of inclination. Multiply the coefficient by 1⁄2 the width of the building.
The rafters are made from pine or spruce bars, with a section of 50x100 mm, 50x150 mm.
The size of the rafters depends on the pitch. The pitch of the rafters is smaller, a larger number is installed, and the cross-section will decrease. The distance between the rafters on a gable roof ranges from 600 mm to 1800 mm, it all depends on the design of the roof and the materials used for its construction.
|
Length rafters, mm |
Distance between rafters, mm | Rafter beam cross-section size, mm |
| up to 3000 | 1200 | 80×100 |
| up to 3000 | 1800 | 90×100 |
| up to 4000 | 1000 | 80×160 |
| up to 4000 | 1400 | 80×180 |
| up to 4000 | 1800 | 90×180 |
| up to 6000 | 1000 | 80×200 |
| up to 6000 | 1400 | 100×200 |
The roof does not end at the level of the walls; it is extended outward by 500 mm. The rafter leg can protrude, or a board or block can be built up. In this case, moisture does not get on the wall and the foundation is not poured.
Step-by-step installation of a gable roof truss system
The rafter system of a gable roof consists of the following elements:
- Mauerlat.
- Lay down.
- Racks.
- Rafters.
- Struts.
- Puffs.
- Lathing.

Mauerlat installation

Fastening the Mauerlat to a monolithic reinforced concrete belt
Mauerlat evenly distributes the load on the walls of the building; its installation can be done in several ways:
- attached to the wall through a reinforced concrete belt with studs;
- studs are inserted into the masonry;
- simple and common way to simple roofs, fastening with wire rod.
For it, take timber with a cross section of 100×100 mm, 150×150 mm or 200×200 mm. Which section to choose depends on the size of the roof and its covering. The Mauerlat is joined along its length; to do this, make 100 mm cuts, 500 mm long, fold the bars and fasten them with pins.
In the corners, the mauerlat is tied with notches into the floor of the timber, fastened with staples or bolts. U wooden buildings, Mauerlat is the last crown. On brick walls, make a monolithic reinforced concrete belt with a cross-section of 400×300 mm. Along the belt, place threaded pins 12 mm in diameter, every 120 mm, for fastening.
Drill holes with a diameter of 12 mm in the Mauerlat, lay them so that the pins go into the holes. Tighten the top with nuts. First, we lay two layers of roofing felt or roofing felt under the block. WITH outside brick the walls and mauerlat. Lay the Mauerlat on a horizontally and vertically level base. You need to check with a level that the surface is horizontal. Check diagonals. If necessary, level with pads.
Installation instructions for beds, racks, rafters, struts and tie rods
The installation of a gable roof rafter system with your own hands is carried out in the following order:
- Install the beam with the rafters in place.
- Mark the installation step of the rafter legs.
- Prepare according to the size of the rack.
- Install them if there is a need to secure them with spacers.
- Lay the purlin. Check geometry. Install fasteners.
- Try on the first rafter leg and mark the cutting areas.
- Mark the points and install the rafters at the beginning and end of the roof, stretch the cord between them in order to align the remaining elements along it.
- Having installed the rafter leg, we first attach it to the mauerlat, then to the ridge purlin, to each other.
- Screw each second leg to the mauerlat with wire.
The rafters are fastened to the mauerlat using notches, stop corners and a hemmed support bar. Secure with nails or staples.

Methods for attaching rafters to the Mauerlat
Install the support posts on the beds or pads and overlays. A log is a beam 50×100 mm or 50×150 mm, laid on the middle wall along a layer of roofing felt. Place under the linings brick pillars, 2 bricks high.
The rafter legs are connected to each other at the ridge. Let's consider the common connection nodes of the rafter system:
- They make cuts at one leg and cut down at the other. Insert one leg into the cut of the other and fasten with a bolt.
- Install overlays, wooden or metal.
- Using notches in the purlin, they are secured with nails or bolts.

Methods for connecting rafters on a ridge
To ensure the roof's resistance to wind loads, tie-rods, struts and purlins are installed. The tightening is a 100×150 mm block, purlins and struts are made from a 50×150 mm or 100×150 mm block.
With the installation of contractions, the reliability of the rafter structure increases. The sections of the timber are the same as the rafters. They are attached to the legs with bolts or nails. The device of struts adds rigidity to the structure. They are installed tightly to the surface of the rafters
Lumber has standard length 6 m. Rafters can be longer. Then you need to dock them. There are several connection methods:
- Fasten by placing bars on both sides at the junction, connecting them with nails in a checkerboard pattern.
- Connect with an overlap, one part of the rafters to another, at a distance of 1 meter, fasten with nails in an alternating order.
- Make a cut obliquely, cut out part of the rafter legs, connect them, strengthening them with bolts.
Sheathing device
 Lathing is installed along the roof rafters. It serves to distribute the load from roofing material, snow on the rafters. Acting air gap between the roof and the rafter system.
The design of the sheathing depends on the roofing material used:
- under soft tiles make the sheathing continuous, lay an anti-condensation film on the rafters, press it on top with a counter batten, nail the sheathing onto it, then OSB boards and underlay carpet, lay tiles on top.
- Under the roof made of corrugated sheets, the sheathing should be sparse. The pitch of the sheathing depends on the brand of corrugated sheeting, its thickness and the angle of inclination of the roof.
- lathing under standard slate make in increments of 500 mm from a bar of 75×75 mm or 50×50, as well as boards from 30×100 mm. The design features of the roof should be taken into account when making the final choice of the appropriate option.
The lumber from which the sheathing is made is first or second grade pine. It is advisable to take the width no more than 14 cm. With a wider width, the boards may warp and damage roofing decking. The length of the nails should be three times the thickness of the sheathing. Lay the boards along the ridge. Install the first board of greater thickness to the height of the roofing.
Install continuous sheathing along the roof slope.
The first layer is to place a board along the ridge from it at a distance of 500-1000 mm to the next one and so on. Lay the second layer of sheathing along the rafters. Place the joint between the boards only on the rafters at intervals. Sink the nail, head and all, into the flesh of the wood.
Cornice overhangs
They are installed to protect from precipitation and play an aesthetic role. Eaves overhangs are arranged tightly without gaps. The final stage of installing the roof.

Device diagram eaves overhang gable roof
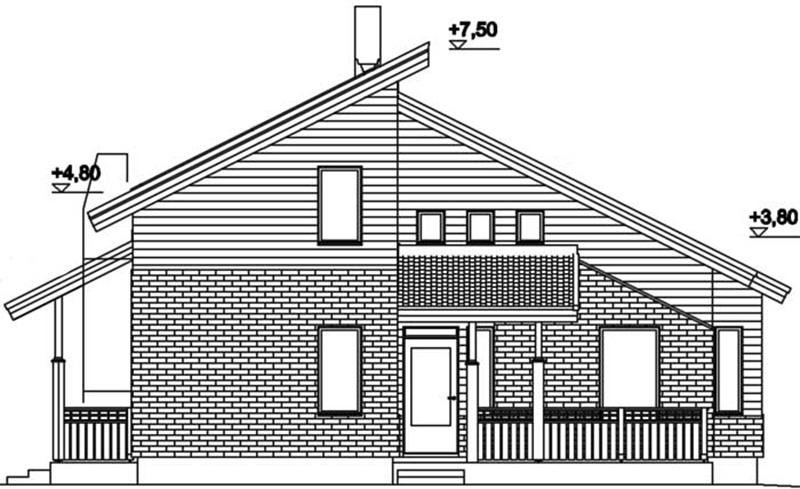
Gable
The gable roof has two gables. They have the shape of a triangle, with the apex at the ridge and the sides coincide with the slopes of the roof. The gables support the rafters and enclose the attic space. They protect from wind and precipitation and provide stability to the roof.
IN wooden buildings the pediment is made frame. IN brick buildings, frame or brick. Gables made of brick or gas block are erected before the roofing is installed. They require very precise execution.
Frame pediments fit into the finished opening when the rafter system is already assembled.
The frame is made of bars or boards. The frame elements are connected on tenons or in the wood floor, all fastened with nails. They are sheathed by nailing boards, lining or siding, maintaining the color scheme in the decoration of the building facade. To construct a window opening, an additional frame is made under it according to the size of the window. If the attic is insulated, then the gable also needs to be insulated. The insulation is placed in the middle of the frame. Mineral wool insulation with reduced flammability is used. On the outside, the frame is covered with a hydro-windproof film or windproof membrane, with inside under finishing material nail a vapor-proof film or a vapor-proof membrane.
In contact with
When constructing private houses, the roof is most often made of a gable roof. There are reasons for this. The first is that it is reliable. Copes well with wind and snow loads. Second, it is compatible with any roofing covering. The third is relatively inexpensive. The fourth is a simple design that is difficult to spoil. Fifth - she looks attractive. All this, and the fact that a gable roof is built with your own hands without special knowledge, determines its popularity.
The assembled gable roof with your own hands is ready for installation of the roofing covering
Step-by-step installation of a gable roof
As you saw above, there are a lot of rafter systems. Accordingly, each assembly has its own characteristics, but in general order same. It is necessary to talk about the general step: pre-drying and processing of wood. This step is required if you bought fresh lumber rather than dried.
Using raw wood with natural moisture in the construction of a roof will lead to problems: the beams will bend, they will dry out, and the geometry will change. All this will lead to stress points and at the slightest sign of overload (lots of snow, strong wind or rain) negative processes will begin. Eliminating them is a complex and expensive undertaking. Therefore, either buy dry wood (no more than 20%, ideally chamber drying 8-12%), or buy the material a couple of months in advance and put it in ventilated stacks. Then treat with the necessary impregnations (against fungal attack and to reduce flammability) and only then use it in the installation of the rafter system.

Lumber should be dried in ventilated stacks. To do this, they are laid with short sections of boards. They are placed a meter from the edges and then every meter. Spacers must be installed under the lower one
We will tell you about the main stages of assembly and how to make a gable roof with your own hands in this section.
Mauerlat
The assembly of the gable roof rafter system begins with the installation of the Mauerlat. It must be positioned strictly horizontally, therefore, before installation, the horizontality of the wall to which it is attached is carefully checked, and if necessary, it is leveled cement mortar. You can continue work after the solution has gained 50% strength.
Depending on the system, this is a beam with a cross-section of 150*150 mm or a board with dimensions of 50*150 mm. It is attached to the top row of the wall masonry. If the house is wooden, its role is played by the upper crown. If the walls are made of lightweight building blocks - foam concrete or aerated concrete and others - their rigidity is not enough to redistribute the load. In this case, on top last row The masonry is made of a reinforced reinforced concrete belt into which embedded fasteners are embedded - wire or pins. A beam or board is then placed on them.

There are several ways to connect walls and mauerlat:
- Smooth rolled wire is fixed in the masonry (in the reinforced concrete belt) large diameter(two ends sticking up). Holes are then made in the board in the required places into which the wire is threaded. It then curls and bends.
- Studs with a diameter of at least 12 mm are immured in the wall. Holes are made in the Mauerlat for them, a timber/board is inserted) and tightened with nuts and wide washers.
- Having aligned the beam or board along the outer or inner edge of the wall, take a drill with a diameter of 12 mm and make holes for anchor bolts. They (the same diameter of 12 mm) are hammered in to the very top, then tightened with a wrench.
The distance between the studs (wire) should not be more than 120 cm. A cut-off waterproofing must be installed on the wall (belt) under the Mauerlat. This can be rolled up roofing material or waterproofing material in two layers, or coated with bitumen mastic.
Installation of rafters
There are dozens of types of gable roof truss systems. First of all, you need to choose what yours will look like. Further, in order to make it easier to work, from thin boards make a template for all cuts, cuts and other similar details. To do this, you may need to assemble the first form on the roof, and then make templates using the finished form.

The assembly procedure depends on the type of rafter system. If the rafters are layered, they are installed gradually, assembled from elements directly on the roof. In this case, it is convenient if the ceiling beams are laid and, if possible, the rough flooring of the attic or attic.
On systems with hanging rafters a truss is assembled on the ground - a ready-made triangle of tie rods and rafter legs with all the required struts and racks. The required number of farms is assembled immediately. Then they are lifted to the roof, placed vertically there and attached to the Mauerlat.
On the one hand, this is convenient - it’s easier to work on the ground, and with a high assembly speed, the accuracy is high: one truss is not much different from the other, which simplifies the procedure. But lifting prefabricated trusses can be difficult, especially for large buildings. To make this easier, install two inclined boards, one end of which rests on the ground, and the other sticks out slightly above the wall. The trusses are brought closer to this “lift”, one at a time they are installed below, ropes are tied and pulled along the boards onto the roof. If there is no winch or crane, this is the most acceptable method.
Assembling rafters requires certain knowledge: how and in what order to install them, how to mark and make cuts. Watch the video for assembling one of the headstock circuits.
The procedure for assembling the rafter system

That’s it, the gable roof is assembled with your own hands and is ready for installation of roofing material.
The process of installing rafters itself raises enough questions, but there are many ways and it is impossible to tell about them all. Watch one of them in the video. The system was large and was lifted to the roof in parts, and then assembled into a single structure. For big houses it's comfortable.
Features of installing the rafter system of a wooden house
Difference wooden houses is that the log house shrinks, and this leads to a change in the geometry of the rafter system. If the elements are fastened tightly, the roof may fall apart. Therefore, the fastenings are made floating. There are special sliding fasteners, which in this case are used to secure the rafters to the upper crown and to the purlins, if any (see photo).

In order for the rafter to move freely during shrinkage, its long part is fastened strictly parallel to its edge, and placed strictly perpendicular to the support. If necessary, a platform is cut out for it. Mark the fastening so that the hook is in the lowest position or near it. Attached to special screws, which are included (regular ones are not suitable). If installation is carried out on a log, so that rafter leg not slip on it, a semicircular hole is cut out in the lower part on which it will rest.
Such fasteners are sold on any construction market, they are called “slipper”. Watch the video to see how to attach the slider to the beam.
Video on assembly and installation of gable roof rafter system
Building a gable roof with your own hands is not easy: there are a lot of subtleties and nuances, there are different ways fastenings, extensions. Describing them in words is a thankless task. This is the case when it is better to see. Below we offer you a selection of videos that may be useful to you.
Video report on how a gable roof is made
The house owner's story about the stages of construction. There are interesting technical points, which may be useful.
Two types of rafter connections: rigid and sliding
Video about the two most problematic types of connections.
How to determine the angle of rafters
Full video report on the assembly of the rafter system
This film takes just under an hour, but the process is demonstrated from start to finish in great detail. The roof is placed on, but when installed on buildings of another type (except wooden houses) there is no difference.
Reading time ≈ 10 minutes
The most common option in the construction of private houses is a gable roof, assembled with your own hands from the mauerlat to the ridge. Below in this article you will find drawings and photos, and detailed step-by-step instructions will help you understand them. You will also learn about what height the ridge should be and how it depends on the functionality attic space, learn to calculate the thickness and pitch of the rafter system.
Classic gable roof
What kind of roofs are there?

Main types of roofs of private houses
In order to clearly imagine what a gable roof is, look at what other options are used in the construction of private houses. And this is not all, but the most popular:
- - the simplest coating option for construction in the private sector. Mainly used for country houses and utility rooms.
- Gable - the most common option for country houses. Despite its apparent simplicity, this type is very practical and beautiful in execution.
- Hip - more suitable for houses with a large area. This design can withstand very strong wind loads, up to the storm, thanks to its streamlined shape.
- Half-hip - this option is made more for beauty, since it is a prototype of a gable roof with cut corners from the ends of the ridge.
- Tent - pyramidal shape is suitable for square buildings. In essence, this is a prototype of a hip roof.
- Vaulted - rarely used for residential construction, although it is no exception.
For a rectangular house with an area of 60 to 100 m2, the option with two slopes can be called the most suitable - it is simple to implement and inexpensive to implement. In addition, you can arrange not only an attic, but also an attic.
Stages of construction of a gable roof
Now let's figure out how to build gable system roofs in a private house. There are several stages in this process and we will consider each of them separately.
Calculation of the rafter system taking into account the current loads
You don’t have to use formulas for calculations if you don’t make roofs in the future and just download the program (http://srub-banya.by/programs/raschet_stropil.exe). By opening the downloaded file, you will be taken to a page with a menu - it is located in a horizontal line at the top.
Main operating loads:
- Snow cover.
- Wind pressure.
In addition to the main loads, there are also secondary or “default” ones, these are:
- Weight of roofing material.
- Weight of insulation (if provided).
- Own weight of the rafter system.
Values:
- S – load value in kg/m2.
- µ is the coefficient corresponding to the slope angle of the slope.
- Sg - standard snow load in kg/m2.
The slope of the slope is expressed in degrees and is designated by the symbol α (alpha). To determine the value of α, you need to divide the height H by half the span L. Below is a table with the results of determining the main slopes.
In cases where:
- α≤30⁰, µ=1;
- α≥60⁰, µ=0;
- 30°<α<60°, µ = 0,033*(60-α).

Distribution of snow loads across Russia
The map shows eight snow regions, and the Sg value for each is calculated in kPa, converted to kg/m2:
- I - 0.8 kPa = 80 kg/m2;
- II - 1.2 kPa = 120 kg/m²;
- III - 1.8 kPa = 180 kg/m²;
- IV - 2.4 kPa = 240 kg/m²;
- V - 3.2 kPa = 320 kg/m²;
- VI - 4.0 kPa = 400 kg/m²;
- VII - 4.8 kPa = 480 kg/m²;
- VIII - 5.6 kPa = 560 kg/m².
For the map given above, Appendix 5 of SNiP 2.01.07-85 “Loads and Impacts” is required. Now let’s make a test calculation for Ivanovo (this is the IV district on the map), the value is 240 kg/m².
This means: H/L=2.5/3.5=0.714
According to the table α=35⁰. Considering that 30°<α<60°, вычисление µ делаем по формуле µ = 0,033·(60-α)=0,033*(50-35)=0,825. Следовательно, S=Sg*µ=240*0,825=198 кг/м², что и есть максимально возможной снеговой нагрузкой.
Wind loads
On steep roofs, where α > 30°, the slopes have a large windage. For flat roofs, where α< 30° увеличена турбулентность.
The average value of wind load Wm at height Z above the ground surface is calculated using the formula Wm=Wo*K*C.
In this formula the meaning is;
- Wo – wind pressure;
- K – coefficient of change in wind pressure relative to height;
- C – aerodynamic coefficient.

Wind loads in the territory of the former USSR
Wind pressure standards by region
Coefficient value
Let's perform a conditional calculation . The aerodynamic coefficient C can be from -8, when the wind undermines the roof, to +0.8 with a large windage (the wind presses on the slope). Taking into account the conventionality of the calculation, we take C = 0.8.
In the same Ivanovo district we take a house where h=6m (α=35⁰). This is region II, where Wo= 30 kg/m², the coefficient is less than 10, which means K=1.0. Therefore: Wm=Wo*K*C=30*1*0.8=24 kg/m².
Roof weight
The weight of the roof varies depending on material
Weight of all components
The conditional calculation for the same house using cement-sand tiles will be:
And here is the calculation for the lightest roofing material, metal tiles:
We calculate the rafter system
In this case, we will be guided by GOST 24454-80 for coniferous species.
| Section width (according to board thickness), B | Section height (across the board width), H | ||||||||
| 16 | 75 | 100 | 125 | 150 | — | — | — | — | — |
| 19 | 75 | 100 | 125 | 150 | 175 | — | — | — | — |
| 22 | 75 | 100 | 125 | 150 | 175 | 200 | 225 | — | — |
| 25 | 75 | 100 | 125 | 150 | 175 | 200 | 225 | 250 | 275 |
| 32 | 75 | 100 | 125 | 150 | 175 | 200 | 225 | 250 | 275 |
| 40 | 75 | 100 | 125 | 150 | 175 | 200 | 225 | 250 | 275 |
| 44 | 75 | 100 | 125 | 150 | 175 | 200 | 225 | 250 | 275 |
| 50 | 75 | 100 | 125 | 150 | 175 | 200 | 225 | 250 | 275 |
| 60 | 75 | 100 | 125 | 150 | 175 | 200 | 225 | 250 | 275 |
| 75 | 75 | 100 | 125 | 150 | 175 | 200 | 225 | 250 | 275 |
| 100 | — | 100 | 125 | 150 | 175 | 200 | 225 | 250 | 275 |
| 125 | — | — | 125 | 150 | 175 | 200 | 225 | 250 | — |
| 150 | — | — | — | 150 | 175 | 200 | 225 | 250 | — |
| 175 | — | — | — | — | 175 | 200 | 225 | 250 | — |
| 200 | — | — | — | — | — | 200 | 225 | 250 | — |
| 250 | — | — | — | — | — | — | — | 250 | — |
We take an arbitrary section width and determine the height:
H ≥ 8.6*Lmax*√(Qr/(B* Rbending)), where slope α< 30°,
H ≥ 9.5*Lmax*√(Qr/(B*Rbending)), where Rbending and slope α > 30°.
Values:
- H—section height, cm;
- Lmax - rafter leg of maximum length, m;
- Qr - distributed load per meter of rafter leg, kg/m;
- B - section width, cm.
For softwood lumber Rbending:
- I grade – 140 kg/cm²;
- II grade – 130 kg/cm²;
- III grade – 85 kg/cm².
Now let’s check whether the deflection falls within the standard, which for all materials under load should not exceed the value L/200 (L is the length of the working section of the leg). The indicator must correspond to the inequality: 3.125*Qr*(Lmax)³/(B·H³) ≤ 1.
Meaning:
We are counting on the same house in Ivanovo, taking into account the conditions where:
- slope α=35⁰;
- rafter pitch A=0.8 m;
- working section of the leg Lmax=2.8 m;
- 1st grade pine beam R bend = 140 kg/cm2;
- cement-sand tiles 50 kg/m2.
In the table above we calculated that with such materials the total load is Q = 303 kg/m².
- We calculate the load per linear meter of the leg: Qr=A*Q= 0.8*303=242 kg/mline.
- Let's take a board thickness of 5 cm and calculate the cross-section in height: this means: H ≥ 9.5*Lmax* √(Qr/B*Rbend), since the slope α>30°. H≥9.5*2.8*√(242/5*140)=15.6 cm. Based on the table, the board with the nearest cross-section will be 5×17.5 cm.
- We check that the inequality is satisfied: 3.125*Qr*(Lmax)³/B*H³≤1 or 3.125*242*(2.8)³*5*(17.5)³=0.61<1.
As a result, we received a cross-section of rafters for constructing a roof of 50x175 mm with a pitch of 80 cm.
Mauerlat installation

Mauerlat on a brick wall
To build a gable roof yourself, you cannot do without a Mauerlat, which is the basis of the rafter system. If we are talking about a residential building, then they usually use timber with a cross-section from 50×150 mm to 150×200 mm (the thicker the wall, the larger the cross-section of the beam in width). The board or beam is mounted on load-bearing walls and fixed with anchors. If we take into account that the Mauerlat will withstand the entire rafter system with associated loads, then its installation will directly affect the mechanical strength of the entire roof. Below is a video that shows how to install a Mauerlat on the walls of a block house.
Video: Installing the Mauerlat
Assembling the rafter system

Rafter legs are easier to assemble on the ground
It is most convenient to assemble a structure such as rafters (2 legs plus additional elements) on the ground, as in the photo above, and not on the roof, in order to then raise it with blocks or simply ropes, but this is not a requirement. Above you could find out how to make calculations for such a system taking into account all the loads, therefore, you already know what section of boards you will need, what the height of the ridge will be and the step size. At the top, the boards are butted together, and the ridge beam is installed only after the outer rafters have been installed.

A system without an overhang, where the legs are fixed with different fasteners

For systems with an overhang, the fasteners are also different
Above you see two diagrams showing rafter systems without an overhang and with an overhang, but the most important thing is to pay attention to the method of fastening, or rather, to the fastening itself. This can be a steel corner (preferably reinforced), short pieces, tightening boards, nails, screws and staples. This is a very important point, since during turbulence the roof can be undermined, and under lateral load it can be overturned, although the result in both cases will be equally disastrous. After installing the side rafters, fix the ridge beam, checking each leg vertically with a level.
Watch the video, which explains some of the nuances of installation, but do not forget that each master may have his own methods, and if you hear or see inconsistencies with your ideas, then this is quite normal.
Video: Installation of the rafter system
Roof

Installation of ceramic tiles
Further work on the installation of the rafter system depends on what is provided in the attic and what roofing material will be used. For example, if you want to arrange an attic there, then it is quite natural that you cannot do without insulation and waterproofing. The heating system, or rather the presence or absence of a chimney, as well as ventilation, will also play a certain role.
Depending on the choice of roofing material, the sheathing is made. That is, it can be intermittent, as in the top photo, or continuous, if you decide to make a roof from bitumen shingles. Also, for roofs they sometimes provide for the installation of a heating cable against icing, and it can be mounted not only from the outside, but also from the inside, laying it under the roof.
Conclusion
You, I hope, have understood how to make a gable roof with your own hands - the most important thing is the correct calculations of the pitch, cross-section of the rafter legs and slope. If you are interested in certain points, such as fastening the Mauerlat, rafters or roofing work, then these are topics for separate articles, which you can also read on our website.
Any pitched roof has a system with inclined planes (slopes). The selection and calculation of the rafter system must be done taking into account the supports required for it, as well as the type of roof, dimensions and shapes of the structures to be covered. By calculating the rafter system of a gable roof, you will be able to choose the desired size of the rafter leg, and also ensure high strength of the roof.
Types and structure of a gable roof truss system
This system should be selected based on the conditions and number of supports, as well as the distance between them.

For example, layered types of rafters will rest on the load-bearing walls of structures (from the outside), as well as on additional. supports inside, if suddenly there is a distance of more than four and a half meters between the main ones. At the bottom, the rafter leg rests on beams that transfer weight between the roof and the wall of the structure. As for the upper end, it is connected to a ridge type purlin, as well as to another rafter leg.


The hanging rafter system of a gable roof has a tie located at the level where the lower support units are located, and maybe higher than them. There are no intermediate supports here. As for the distance between the carriers from the outside, it should be up to six and a half meters. This option refers to a triangular truss, and the distance between them according to the plan is from 1.3 to 1.8 meters.

Coatings
Eternite roofing types are fibrous or flat asbestos-cement sheets. They are cheap and easy to install.

Slate refers to slate roofing options; they are made from natural layered slate materials. Slate also includes ondulin and euroslate.


Metal coatings are used to cover residential buildings. They will reliably protect from atmospheric influences, are lightweight and easy to install. This includes aluzinc, galvanized sheeting and corrugated sheeting.

Roll type refers to soft roofing. It has the property of not allowing moisture to pass through, and is very resistant to negative environmental influences. They are also easy to install. This includes roofing felt, bit-polymer material, and membrane roofing.

Some people use wood roofing. But very rarely, because they are difficult to install.


Roofing options that transmit light are made from glass and polymer.
Let's frame

It is the sheathing that is the base of the roofs. Made from beams or wooden boards. If a wooden, metal, or tiled roof is being installed, a beam is selected whose cross-section is:
5 by 5 cm, if the distance between the rafters in the range of one meter is 1.1 m).
5 by 6 cm, if the rafter pitch is from 1.2 to 1.3 meters.
6 by 6, if the step is 1.4 or 1.5 meters.
In other cases, the boards can be up to 2.5 cm thick.

Wooden versions are made of logs, which are cut literally to one edge. In order to make layered rafters, a more suitable section of a round log with a diameter of 12 to 20 cm is more suitable.

How to calculate a table rafter leg?
There can be a distance between the legs from a meter to one and a half. Their cross section must be determined in accordance with calculations. To do this, the strength and rigidity of structures is determined. Therefore, you need to find out what the constant load on the rafters is, which includes regular loads and snow, for each linear meter.

To carry out calculations, you need to know the following information:
- The step with which the rafter legs are installed
- At what angle is the roof sloped?
- What are the dimensions of the roof

What parameters will be selected and, in general, many coefficients, depend on the selected material for the roof and its detailed composition.

It is worth considering that there must be a reliable connection between the purlins and the rafter legs. Thanks to this, the walls of the structures will not be opened destructively. If you have wooden structures, they need to be inspected periodically.

Options for gable roofs are quite common today. But by properly arranging the roof, you will have a strong, beautiful and very durable home!
The last stage of building a house is arranging the roof. Traditionally, a gable roof is erected for any residential building, and a single-pitch roof is erected for outbuildings. Technological processes for the installation, fastening and arrangement of a roof with a rafter structure in a gable roof version have been perfected for centuries, and these operations do not change depending on the type of roofing materials (clay tiles, corrugated sheets, metal tiles, asbestos slate, metal or plastic).
Types of gable roof
People say: “a roof like a house,” that is, they mean not only the shape, but also the reliability of the structure, which has a long list of advantages:
- A variety of roofing scheme options and architectural roof shapes;
- Simple calculations and cost-effectiveness of the roof;
- Natural runoff of precipitation;
- Simple geometric shapes of the roof ensure a low probability of water accumulation and roof leakage;
- Large usable attic area, it is possible to make an attic;
- Good maintainability, high strength, durability and wear resistance of a roof made of two slopes.

The three most common options for a gable roof:
- Symmetrical gable roof: This is the most popular solution due to its absolute reliability and ease of execution. Symmetrical slopes evenly distribute all loads on the mauerlat and walls of the house. The choice of roofing material does not depend on the type and thickness of the thermal insulation layer. The load-bearing load can be easily increased by making the rafter system from thicker timber; the jibs and spacers can be attached anywhere. Negative factor - a full-fledged attic will not work in such an attic - either there will be low sloping walls with many “dead” zones, or a small but rectangular room;
- Asymmetrical roof of two slopes: Different slope angles reduce the usable area of the attic, but on one side you can make a full-fledged living space. Due to different roof slope angles, the load on the load-bearing walls and foundation of the house is distributed unevenly, which requires recalculating the load-bearing capacity of the base and load-bearing walls of the house, recalculating the types of materials and their quantities, as well as changing the methods of insulation, waterproofing and finishing;
- Asymmetrical gable roof with internal or external bend: Allows you to design living spaces without regard to the roof structure. The disadvantages are the same as in the paragraph above.
Preparing to build a house roof
The shape of the roof and its design can be selected based on the size of the building, the material of the load-bearing walls, and the geographic location of the site. These and other parameters specified in the project determine what loads a gable roof can withstand during operation.

The slope angle of the slopes has a certain optimal range, in which weather conditions have the least influence on the formation of maximum loads on the roof. If the slope angle is ≤ 400, then this limits the possibilities of equipping an attic or a full-fledged room in the attic, and a slope angle ≤ 100 increases the load on the roof from rain, wind or snow. If you definitely want to have an attic or a room in the attic space, it is better to use the option of a sloping asymmetrical roof, and if the walls of the house are more than 6 meters long, then the rafter system must be strengthened with additional purlins. 
When calculating building materials for a gable roof, it is necessary to proceed from the axiom that the weight of roofing materials should be as small as possible so as not to load the walls and foundation of the house. Wooden elements will be stronger not only by increasing their cross-section, but also by using suitable types of wood. The main parameter when calculating materials is the total area of the roof, and a symmetrical structure in this regard is easier to calculate than others - it is enough to know the perimeter of one slope, double its area, and get an accurate result.
The main load from the weight of the roof is borne by the long walls of the house, so the rafter system is built on the principle of distributing the load along the system. For a small house (≤ 6 m), it is more practical to use a system of hanging rafters (without supports); when building a larger house, a system of layered rafters with a more complex configuration is used. 
A finished gable roof for a private house consists of the following elements and components:
- Mauerlat is a wooden (sometimes metal, if the roof will be covered with rolled metal) beam or log that is attached to the surface of the external walls to support the rafters on it;
- A rafter system, the design of which is selected based on the design of the house;
- Struts (diagonal fastening of rafters to each other) and ridges (beams along the roof ridge for fastening the slopes);
- Lathing – used for installation of roofing and hydro-noise insulation elements;
- Insulation and moisture protection;
- Roofing covering.
How to mount the Mauerlat
The Mauerlat along the walls of the house holds the weight of the roof, evenly distributing it over the walls and base of the house. The width of the timber for the mauerlat should be equal to the width of the wall. The timber is impregnated with an antiseptic and substances that increase the fire resistance of the wood. The outer border of the Mauerlat should not protrude beyond the outer edges of the walls. 
The Mauerlat is attached in different ways. Steel wire Ø 8-12 mm is laid in the brick wall, holes for the wire are drilled in the wood, and through them the timber is tied to the wall. The timber can also be secured with staples, threaded rods of one or two teeth, metal plates, wooden pegs or anchors through the same holes in the Mauerlat. The gables and lower edges of the sheathing are attached either directly to the mauerlat, or to a beam of smaller cross-section, which is nailed (screwed) to the top frame.
Floor beams
When arranging beam floors for the roof of a private house, it is necessary to use a wooden beam with a cross-section of 200 x 100 mm. The larger the area of the house, the larger the section of the supporting beam should be. Begin the installation of beams by attaching the outermost elements along the long wall of the house. Then the points where the remaining floor beams will be attached are marked. 
The lathing is mounted on longitudinal beams, which are located at a distance of 50-60 cm, and attached to the mauerlat with nails 200 mm long or any of the above methods. The beams are carried beyond the edges of the walls to a distance that determines the width of the cornice - from 30 to 50 cm. The cornice will be nailed (screwed) from below to these beams. Since a pediment will be installed at the ends of the roof, to attach the cornice and pediment, an insert is made into a groove on the transverse beam of the mauerlat. When constructing a sloping roof for an attic, the pediment will have a fairly large area, so it is necessary to ensure the design of the ebb and gable overhang. 
The rafters of a gable roof are several identical wooden beams of the same length and cross-section. After installing the floor beams, a ridge beam is attached, for which beams with a cross section of 100 x 50 mm are secured along the central longitudinal axis of the house with spacers. The height of the racks in a typical gable roof scheme is equal to the distance from the floor to the upper surface of the Mauerlat. Instead of timber for the ridge, you can use boards 50 mm thick.
Before installing the rafter system, it is recommended to make a scale template. To do this, the board from the rafter structure must be attached with one end to the beam, the other to the ridge, and mark its length. This will be the standard length of the rafters. 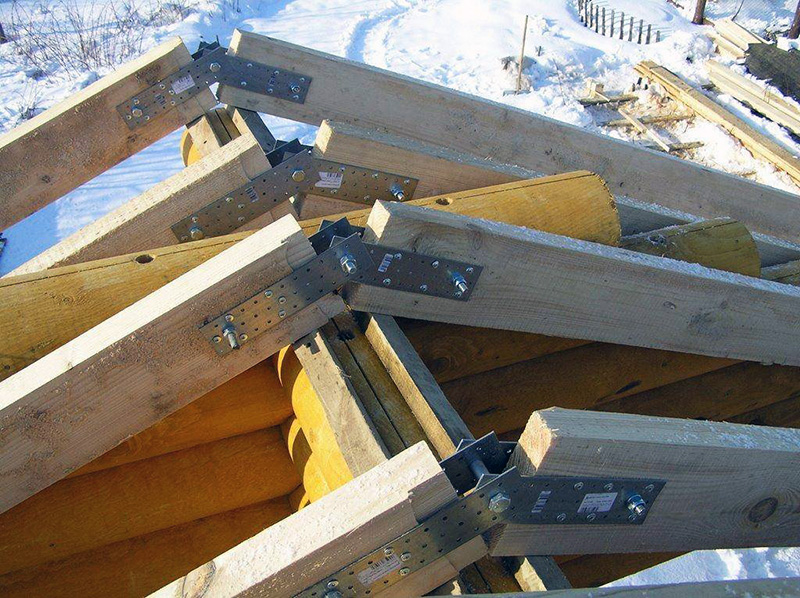
The rafter system is also installed according to the template, observing the sequence of processes. After installation and fastening from the lower end of one rafter beam, you must immediately fasten the opposite rafter and connect the beams with their upper ends to each other through the ridge. The rafters are nailed to the ridge beam, and to the floor beam - with steel brackets or angles, self-tapping screws or anchors. For a roof of any shape with two symmetrical or asymmetrical slopes, boards are fastened lengthwise and crosswise under the rafters to give rigidity to the system.
Pediment and cornice
The pediment is sewn up after the construction of the rafter structure is completed. Modern materials are increasingly replacing traditional wood when sheathing gables, and now they use lining, siding, corrugated board, and other durable decorative finishing materials. Any cladding material is attached to a frame, which is mounted in advance. Regardless of whether or not there is a room or attic in the attic, it is necessary to leave a window opening in the gable - for ventilation and minimal natural lighting of the space. 
The cornice must be installed around the entire perimeter of the house - it is necessary for moisture and wind protection of the truss structure, the walls of the house and the foundation. Since every self-respecting owner must install drainage systems around the perimeter of the house, they are also attached to the eaves, and drain pipes to the walls. The plastic drainage system is mounted on plastic clamps. The bottom of the cornice boards or cornice frame is painted, sheathed with siding, clapboard or corrugated sheeting - in unison with the finishing of the pediment. 
The roof is mounted on the sheathing, and, based on the type of roofing materials, the sheathing is first done with vapor barrier, hydro- and heat-insulating materials. For roofing, you can use ondulin, metal tiles, ceramic materials, soft tiles, etc.
- Self-tapping screws for roof construction must have the manufacturer’s mark and EPDM gaskets ≥ 2 mm thick, otherwise roof leakage cannot be avoided;
- Poor-quality protective coating of fittings will quickly deteriorate under the influence of weather conditions, which will lead to leakage at fastening points and an unsightly appearance in the form of rusty or dirty spots;
- The absence of a snow retention system means the possibility of unexpected snow falling off the slopes, which can lead to failure of the roofing and drainage systems;
- Poor ventilation leads to the formation of condensation in the under-roof space.