A fun game that will get around very cheaply: how to make darts with your own hands. How to make a dart with your own hands at home Homemade darts for darts
Darts in ready-made games are a construction of four main parts: a metal body (in the form of a torpedo or a drop), a sting, a shank and a tail. A homemade dart can be made from steel wire with a diameter of 2.5-3 mm, and the rod will need to be sharpened at one end. On the tail part of such a dart, the tail unit made of Whatman paper or feathers is glued with Moment glue. If selected paper version plumage, it is necessary to cut 4 blanks, the size and shape of which is shown in the figure.
The workpieces are bent along the center line at an angle of 90 degrees and all the elements are glued together. After the glue has dried, the tail unit should be painted in bright color, for example, in red. The body of the dart is cast from lead. It can be taken from an old cable - cut the core into pieces and melted over a fire in a steel spoon. For filling, a form is needed, it can serve as a wooden block with drilled hole to a depth of 35 mm and a diameter of 6 mm. Molten lead is poured into this form, and when it hardens, the bar is split, and a hole with a diameter of 3 mm is drilled in the resulting workpiece. The body of the dart is attached to the shaft with glue. In order to prevent this part from moving from impacts, it is necessary to first fix the retainer 4 on the rod. An annular groove is made at the place of its fixation to a depth of 0.5 mm. The lock itself can be a steel washer or nut with an inner diameter of 3 mm. It is fixed in the resulting groove using light hammer blows. The lead body of the dart must be wrapped with electrical tape, and after that the dart is ready to be thrown at the target.
Ready-made darts targets are made from special fibers with compressed pile, which does not damage the dart points. The target circle is drawn into sectors of four colors: red, white, black and green. And metal leashes divide the circle into sections. Each allocated area has its own value of points. An example of a darts target is shown in the photo.
The base of a homemade dart board can be made from wood. Several (two or three) pine or linden planks are glued together in the form of a square with a side of 400 mm. On the back of the part, attach a pair wooden slats... The working side of the target is processed with a plane and carefully sanded sandpaper... The target can be drawn and painted on the base itself, or it can be printed on a color printer and changed as it wears out. The finished target is mounted on a wall or stand. It is recommended to attach the target at a height of about 173 cm from the center of the target to the floor. This is not a whim, but the rules of the International Federation of DARTS. Target placement diagram below
Darts or darts is a game that many people like. In addition to being fun, this game is also useful for concentration. The darts game can be purchased in stores, however, we suggest that you do not rush to the store, as we will look at how to make this game at home.
First, we will watch a video on making a darts game, after which we will repeat the process
What we need:
- A4 sheets;
- scissors;
- glue;
- needles;
- box;
- matches;
- a thread.

First of all, we have to print the target on a sheet of paper with an ordinary printer. The target template can be downloaded on the Internet or made by yourself in a graphic editor.
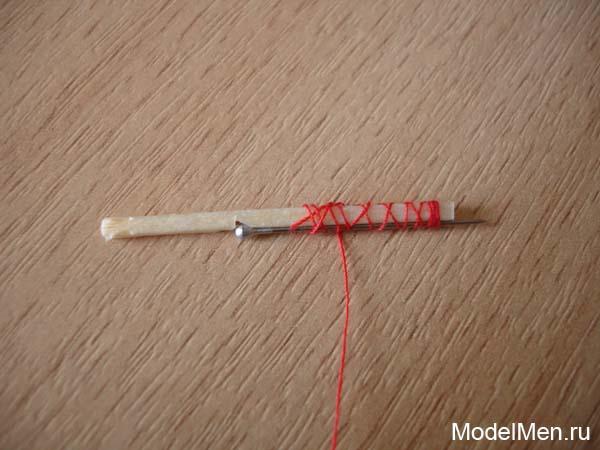
Next, let's move on to making a dart. For this we take four matches and a needle. Place the needle in the middle of the four matches and wrap them with thread. The construction must be strong, so the thread must also be wrapped tightly and firmly.

We fold the square in the corners so that we get a triangle. Next, fold in the other two corners.

Now we need to fold our square so that we get an asterisk with four ends.


We push our asterisk between the matches with the sharp end to the needle and fix it with a thread.

The dart is ready.
Now you can start making the target. To do this, cut out a square from the box and glue a sheet with a target on it.

This is how you can make one of the most popular and beloved games in the world in a matter of minutes. At the same time, there are virtually no manufacturing costs, since all materials are likely to be present in all houses.
Playing darts can be a great way to brighten up the time with friends. Not everyone has a good dart board, and it is expensive, and cheap toys are not even worth buying, as a rule darts do not hold in them.
A good dart board can be made with your own hands, in this article I will show you simplest example, and to what your imagination will reach, we will surely see in the photos you published.
The most important thing in darts is good darts that fly smoothly and stick perfectly to the target. In second place in the game is the goal itself, a board with drawn circles and numbers. I won't show you how to make a target, you can just print it out on paper, here's a drawing of a dart target:
ATTENTION! Playing darts may not be safe! Throw darts only at the designated spot - the "target". Place the target for darts in places where the passage for people is limited, in no case hang the target on the front doors.
To make a dart board, you will need matches, thread, a sheet of paper, a needle, scissors, a blade, or sharp knife, drawing accessories.

Draw and cut out an even square with sides about 9 centimeters. Next, we will bend our square diagonally.

Fold the square of paper as shown in the photo:

There are several ways to build a dart, let's start with the first one. Take two matches and attach a needle to them so that it protrudes 5 mm forward. Where the head (eye of the needle) lies, cut out the indentations, in the future they will not allow the needle to fall inside the dart.

Now wind a needle to one of the matches using threads.

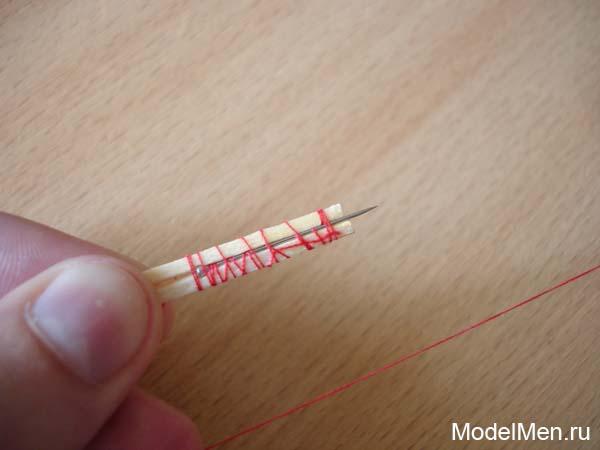
Without cutting the threads, insert our previously prepared paper square between the matches, now it will serve as a stabilizer for the dart.

Tie one more match with threads from two sides.

So our dart is ready, you can start the game, although playing with one dart is not very interesting, so I will show you the second option for making a dart.
Take a good, even match and cut off the head with gray from it.

As in the first case, we cut out a recess in the match under the head of the needle and wind the needle with threads.
Without cutting the threads, we wind two more matches shown in the photo.


Attach the target to the wall and start playing.

The darts we make will stick very well into any target as they have a very thin and sharp needle. Homemade darts with high-quality assembly fly very smoothly and smoothly, enjoy the game of darts.
There are games that both children and adults are not averse to playing. One of them is darts - a relaxing activity at home and at work, in the apartment and in the yard. Over time, the previously purchased kit becomes defective, sometimes it is impossible to find the lost items. In such a situation, the question arises, how to make a dart with your own hands, saving you money and the time it takes to shop.
In fact, the procedure for making this homemade product is quite simple. Necessary materials and everyone can find the tools within minutes. The creative process will not take more than half an hour.
Necessary materials
The first step is preparing the materials. These include:
- Dry branch of any tree species;
- Plastic bottle or cardboard;
- Nail 30, gypsy needle or 3-4 cm of steel wire with a diameter of 1.5-2.5 mm.;
- Plaster, tape, or duct tape;
- Ballpoint pen tip or ball inflating needle.
Tool
A simple tool with which to make DIY darts even a child can:
- Nippers;
- Scissors;
- Sandpaper, file, or other abrasive material or tool.
Stages of making a dart
Having prepared everything you need, you can get down to business. At the first step, cut off a piece 8-10 centimeters long from the branch. Break into 2 parts gypsy igloo or bite off 3-4 cm of steel wire. This element will serve as the front sharp part of the dart. Alternatively, you can use a small nail (30 or 40 mm.), After biting off the cap with nippers.

From the needle for inflating the balls, you need to break off the tip through which air is injected. This item is not useful. You need the part that is screwed into the pump when inflating.
Before, how to make a dart dart completely, you can sharpen a wire or a nail. If a sewing needle (gypsy) is used, this is not necessary. However, it is advisable to carry out this procedure at the final stage. The reason - the likelihood of piercing the fingers is less.
The next step is to screw the piece of iron into the wooden base. The nail, needle or wire must be inserted exactly into the middle of the end of the branch. The core of the wood is softer in this case, which makes this step rather simple.

Ball Needle Inner Diameter less diameter branches. It is necessary to remove the layer of wood in the part of the dart where the point is already inserted. Having adjusted the size to the required one, we put on the iron tip. It is important not to overdo it or remove too large a layer. The tip must be applied with force, which greatly increases the strength of the product. Alternatively, you can use the plastic tip of a ballpoint pen, but it is better to opt for iron.


Be especially careful to proceed further. The back of the dart should be cut to accommodate the wings. It is preferable to use a knife with thin blade... This ensures the integrity of the workpiece, preventing cracking in unwanted areas.

We make two cuts in the form of a cross on the end part wooden base... Their depth should not be more than 4 centimeters. Accuracy at this moment is the answer to the question how to make a homemade dart without damaging your fingers or breaking the workpiece prematurely.

The consequence of the cuts will be the expansion of the tail of the homemade product in diameter. Having made some efforts, we tightly tighten the parted parts of the base by winding the plaster. Apply the patch just below in the same way. Now you can remove the top winding. The sections are practically invisible.

Many fans of experimenting with scrap materials amaze with their masterpieces made from plastic bottles... In this case, such a container will also come in handy.

Using scissors, we cut off a piece in the shape of a butterfly from the bottle. We divide it into two parts, which need to be broken along the length, having received an angle of 90 degrees.

The use of such a material resistant to moisture and other influences is more acceptable than the use of cardboard, since how to make a dart at home, which will last longer, is possible in this case.

At the final stage, it is necessary to install the wings into the existing cuts. Having pressed with effort, you need to drown these elements until they stop until they touch the plaster. We sharpen the dart. The product is ready.

As a target, you can use any board with a sheet of paper fixed on it with a drawn target.
(Visited 3,367 times, 1 visits today)


