How to make a large basket in a flowerbed. Do-it-yourself wicker basket flowerbed: how to weave and decorate for landscape design. Materials for making wicker flower beds
When spring comes, followed by summer, it’s time to plant flower beds, which delight the eye with delicate aromas and a riot of colors. But in order for them to look even more attractive and organically combine with other decorative elements of the garden plot, it is best to make wicker flower beds for flowers and other plants with your own hands, the time and financial costs of which will be minimal.
Materials for making wicker flower beds
To make a wicker flower bed, first of all, you should stock up on material. It uses twigs and tree branches, distinctive feature which is flexibility. Among them:
- Willow twigs.
- Hazel twigs.
- Birch twigs.
- Willow twigs.
- Dogwood branches.
- Apple tree branches.
- Raspberry branches.
- Vine.
All of the above shoots are distinguished by their considerable length and evenness; it is very easy to remove the bark from them, and the surface underneath is completely homogeneous. Such rods are allowed to be prepared all year round, with the exception of June and July. During these months, the young shoots of last year are just beginning to bush, and the shoots of this year are loose and grassy, since they have not yet fully matured. It is best to prepare material for weaving flower beds closer to autumn, at the end of August, when the shoots have already reached the desired condition and the movement of juices in them has slowed down. Such rods can be quickly cleared of bark and, if necessary, split.
If it is assumed that Wicker basket the flowerbed will be large, you need to take care of a sufficient supply of shoots for work. It is unrealistic to collect the required number of them in one day, since at the first stage you will need at least 1.5-2 thousand rods. Chopped shoots and twigs should be cleared of bark immediately after collection within 2-3 hours and split before they dry. Leveling with a knife can be done a little later.
In the case when the preparation of the material for weaving could not be done immediately and the shoots have dried out or when they are harvested in the cold season, the rods are boiled in water or boiled with boiling water for 30-40 minutes and only after that they begin to clean and split. At home, it is quite acceptable to carry out such heat treatment, for example, in an iron herring can, where the material for weaving is folded.
We should not forget that the bark of the shoots contains tannins, so the ribbons that are obtained from steamed but not yet cleaned twigs will color the container in Brown color. Therefore, it is not recommended to perform such operations in a bath; in extreme cases, it is covered with a synthetic film.
Sometimes, instead of boiling, the so-called method of “reviving” the rods is used. For two to three weeks, they are placed with their thick ends in a container of water, immersed to a depth of 5-10 cm. The water must be changed periodically. As soon as the first green leaves appear on the shoots, they are cleaned and split.
Pruning twigs has a beneficial effect on the growth of shrubs, the splendor of which increases significantly. If you plan to make wicker flower beds constantly, it is good to start your own “plantations” of the material, planting new cuttings on them every year. This should be done in May or October. They do this as follows:
- A cutting is cut from the middle of the rod, the diameter of which is 3-4 mm, and the length reaches 25 cm.
- Make a hole in the soil with a sharp stick.
- Place the cutting in the ground to a depth of at least 20 cm. In this case, the thin end of the shoot with several buds should protrude 4-5 cm above the soil surface.
Finished rods must be sorted by thickness and width, moistened, rolled into skeins and stored only in a dry place. Before work, they are slightly moistened with a shower or simply wiped with a damp sponge, after which the material is ready for further use.
Types of wicker flower beds
To create wicker flower beds with your own hands, photos of which are presented in the article, you should decide on their variety. There are two types of such products:
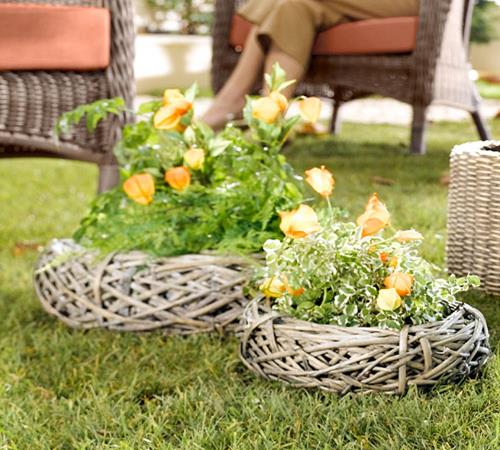
- Ground wicker flower bed. This is the most common option. If the area of the flower garden is large enough, it is made in the form of a wicker fence in rustic style, which protects plants from accidental stepping on them, and also plays a decorative role. Often there are above-ground flower beds in the form of baskets, which are more compact in size. If a wicker border fence is often square or rectangular, then the basket has a round shape and the presence of a handle, which makes it possible, if necessary, to move it from place to place. The height of the basket varies widely: than smaller diameter such a flower bed, the higher its walls will be. The handle is made from several thin and long branches placed between the bars of the basket. The bottom of the flowerbed is covered with film, soil and drainage are poured into it. Flowers often grow much better in flowerbed baskets, since the likelihood of weeds germinating in them is negligible, and the soil warms up well.

- Hanging wicker flower bed. Its advantage is its ease of placement: a hanging flowerbed looks good on the veranda, on the wall of the house, and even on tree branches. This product attracts with its variety of shapes: depending on personal preferences, it can be woven in the shape of a basket, cone, ball, or rectangular. However, it is imperative to take care of the reliability and strength of the fastening for the hanging flower bed. In addition, it is good if it rotates 360 degrees. This will allow you to rotate the plant in the flowerbed in such a way as to protect it from constantly changing direction sun rays. To prevent moisture from evaporating from the hanging flower bed of the basket, its walls are covered with moss, which retains moisture, and the inside of such a pot is lined with film.
Methods for making wicker flower beds
Making wicker flower beds at your dacha with your own hands is not at all difficult. This will require a minimum of time and effort. To make a flowerbed in the form of a wicker fence for a flower garden, you need to take pruning shears or sharp knife, a wooden mallet, flexible shoots with a diameter of 1-1.5 cm, pointed pegs made from branches at least 2-3 cm thick. Now we actually begin the process:
- We choose the place where the future flowerbed will be located. After this, we remove the top soil layer along with the weeds and grass growing on it and determine the contours of the flower bed.
- We calculate the required number of pegs, based on the fact that they will need to be driven into the ground at a distance of 25-30 cm.

- To make the flower bed more durable, near the corner peg, at a distance of no more than 5 cm, we drive in one more peg on both sides. This allows you to connect the rods into an improvised lock. To do this, without cutting, we pass them through three corner sticks. Then the rods will not fall out, even if you accidentally hit the flowerbed.
- Calculate the length of the vertical stakes. We decide on the height of the fence and take pegs twice as long: the rest will be underground.
- We sharpen the stakes and treat them with an antiseptic to reduce the rate of rotting in the ground. In some cases, metal supports are used, but this does not look very nice.
- We hammer the pegs into the ground using a mallet at the same distance from each other. The closer they are, the greater the strength of the flowerbed.
- We take flexible and long rods with a length of at least 50 cm. It is advisable that one rod is enough to weave 3-4 spans. To increase elasticity, the shoots should be soaked in water a day before.
- We remove the bark from the rods and treat them with a special compound to stop the decomposition process.
- We begin to weave the rods around the stakes in a zigzag. In this case, the tapes end up either behind or in front of the pegs. Weaving begins from the ground and thicker shoots are used first. When the rod ends, take the next one. We cut the place where they connect at an angle of 45 degrees and further strengthen it with wire or twine.
- To ensure that the bottom row of rods does not fall to the ground, and the top row does not lag behind the fence, they are securely tied to the vertical shoots with wire.
- We weave from the thick end of the branch to the thinner one. When one row ends, start the next one on the other side, keeping an eye on uniform distribution thin and thick ends of shoots. In this case, the thickness of the weaving will be the same throughout the flowerbed.
- If the end of the rod coincides with the peg on which the shoot from the previous row ended, shorten this rod or take a longer one.
- Lay out the bottom and sides of the flowerbed plastic film. This will prevent it from rotting and soil spillage.
- Making drainage for drainage excess moisture, harmful to the roots, from pieces of crushed stone, brick and sand, fill the soil and plant flowers.
Very interesting option flower beds - a wicker basket equipped with a canopy-support for climbing plants. To make it you will need scissors, cardboard, a shovel, rods up to 1.5-2 m long. Then we proceed directly to the process:
- We soak the rods and sort them by length and thickness.
- We cut out a round cardboard template, the diameter of which coincides with the diameter of the bottom of the future flower bed.
- We cut off a small part of the circle to get a back support wall.
- We remove the top layer of soil with a shovel (removal depth is about 30 cm) along the contour of the template and insert low thick shoots into the resulting trench at a distance of 10-15 cm from each other.
- We insert 4 long branches along the perimeter of the cut edge of the template and 6 long shoots along the rest of its outline.
- Let's start weaving pegs at ground level. The first tape usually consists of two to four rods. We begin to weave the next circle, moving one peg, but weaving each row to the end. We trim the ends of the shoots with pruning shears or weave them into the edges.
- We collect the ends of the long rods installed along the border of the beveled edge of the template, and weave their opposite ends diagonally until the roof of the wicker basket is on required height. For strength, the tapes are fastened with wire or rope.
- We take the remaining six long rods. We cross two of them and weave them into an improvised basket roof, and then weave the remaining four shoots. Thus, a wicker lattice is obtained.
- Fill the flowerbed with soil and plant the plants.

To create another type of wicker flower bed in winter, in addition to twigs from the willow, you will need a barrel and sleight of hand:
- For vertical posts we take thick shoots, for weaving - thinner rods and clear them of bark.
- We fill the barrel tightly with snow and install vertical “pillars” of twigs in it. Even or odd number there will be them - it doesn’t matter, since weaving is done with a “string” - two twigs that intertwine with each other.
- We continue to weave in a circle until the basket reaches the desired height, after which we cut the vertical posts.
- Then we make a handle: several thin rods long length twist it with a rope and tie it to the sides of the wicker flower bed.
- We remove the basket from the barrel and use it for its intended purpose.
Wicker flowerbed as a decorative element
A wicker flowerbed will look harmonious on any site, regardless of its size and the presence of other decorative elements. Since it is executed from natural materials, it goes well with the now fashionable wicker furniture or a large fence around the house, also made of wicker.

With such fences around the flower beds local area will look more well-groomed because they prevent grass and plants from growing. In addition, wicker fences are great for dividing an area into functional zones: for the garden, for the vegetable garden, for relaxation. They are environmentally friendly, protect flower beds from damage and at the same time allow you to maintain your garden plot in the same style.
When creating flower beds, they often use a variety of decorative elements. These can be stones, figurines, lamps, windmills and much more. One of these elements can be a simple classic wattle fence created from various materials. And if earlier it was made only as a fence for a territory or site, now it has become decor and decoration. To understand how to make a wattle fence for a flower bed with your own hands, you need to get acquainted with the materials, methods of processing them and manufacturing technology.
It is suitable for decorating areas in a rustic, ethnic or natural style. But even if general style landscaping is different, then wicker fences of different heights are used as supports for ornamental shrubs, perennial and annual plants.
The fence can be horizontal, vertical and intermediate (sloping and others).
The advantages of this fencing, which gives a special emotional touch to a flower garden, garden or personal plot, are environmentally friendly, affordable and available in production. Other advantages include mobility (the ability to disassemble, assemble, move), use different material in its manufacture, an interesting and original appearance.

The disadvantages of wattle fence are that it cannot be used as a very strong fence, as well as its short service life.
A low wattle fence made from thin branches and twigs is suitable for any shape. Shoots of flowers and ornamental crops hanging through such a fence add a special charm to the entire composition and emphasize the beauty of the plants. The walls of this border can be vertical and look like a small fence. But they can be located at an angle, and general form such a flower bed will look like a basket.
A variety of wicker containers for flowers also look interesting and impressive, especially if they are hanging baskets - flower pots, which can be hung on a balcony, loggia, terrace or simply in the garden next to the house or recreation area.
Almost all wicker fences and containers are made from cut shoots, but sometimes you can find wicker with slanted weaving from living willow branches. This type of fencing is created as decorative fence, which can separate one part of the garden or cottage from another. You can even build a “living” gazebo from willow twigs. But it is worth remembering that such a fence or gazebo requires regular maintenance.

One more interesting idea The use of wicker fencing made from twigs is to create portable screens for a garden or cafe. The base and frame are made of boards and timber, and inner part It is made like an ordinary horizontal wattle fence.
Selecting materials
The main requirement for shoots and branches that are suitable for creating a fence is flexibility and plasticity. Willow is best suited for this, but hazelnut, willow and birch can also be used. For wattle fence, shoots of raspberry, apple and dogwood trees and grape vines are also suitable.
All materials are harvested in the fall after the end of sap flow or in the spring before the beginning of the growing season. To fence a flower garden, shoots or twigs with a thickness of 1 to 2 cm and branches with a thickness of 2 to 3 cm are cut. Optimal length thin shoots range from one and a half to two meters. They are collected and tied into bundles, and the difference in the length of the rods in the bundles should not be more than 10-15 cm.

The length of thicker branches, which are used as support, should be 30-40 cm greater than the height of the fence. Immediately after harvesting, the shoots and branches are cleared of bark (within 3-4 hours). As a result of this treatment, the wood material takes on an orange-yellowish tint. But if this has not been done, then before starting work on the construction of the fence, they are soaked in boiling water and the bark is removed. Although, it is worth noting that branches and shoots that have not been cleared of bark give the fence a natural or natural appearance.
If the prepared twigs and shoots are too dry, then a day before production begins they can be treated with steam or wrapped in a wet cloth.
To protect against rotting, harvested branches are treated with special preparations, and to impart the desired shade- stain.
The length of thick branches that are used for support should be 30-50 cm greater than the height of the fence. In addition to harvested shoots and branches, you will definitely need the following tools:
- pruner;
- wooden mallet;
- sharp knife.
You can make your own wattle for a flower bed from straw, and rye straw is best suited for this, since it has greater strength due to its elongated internodes. This straw is also dyed in a beautiful shade, but it is quite easy to change it using aniline dyes. It is also quite easy to make wicker fences from reeds, which are harvested from August to October.

Technology for manufacturing horizontal wattle fence
Before you start creating a wicker fence, you need to count the number of supports. To do this, we define an area for a flowerbed, from which we remove garbage, weeds and stones. Then we outline the contour of the flowerbed and dig up the soil to the required depth. We measure the perimeter and calculate the number of stakes based on the fact that on one linear meter there should be 3 to 4 pieces.
To better preserve the fence and drain excess water, you can dig a narrow trench 15 cm wide, about 30-40 cm deep along the edge of the flower bed and fill it with small crushed stone or gravel. Thick branches - supports - will subsequently become clogged here.
To increase the stability of this fence, you need to drive 2 small pegs about 5 cm long near each support on both sides to form a lock that helps hold the wicker fence in place.
The supports are placed at a distance of 25 to 30 cm and driven into the ground to a depth of 20 to 30 cm using a wooden hammer or mallet. It is worth remembering that the greater the number of supports on one linear meter, the denser and stronger the fence will be.
Now we begin to weave thin and flexible shoots in a zigzag pattern around the support stakes. Moreover, the next shoot should not repeat the weaving of the previous one. If one rod begins to wrap around the supports from left to right, then the other from right to left. And this should continue alternately. Rods less than half a meter in length should not be used. You need to start weaving the fence from the bottom, stepping back a few centimeters from the ground surface. To prevent the rods from sliding to the ground, they are attached with wire to the supports.
At the beginning of work, thick shoots are usually used, and then gradually move on to thinner rods. For greater strength, sometimes intertwined shoots are fastened together with wire or very thin branches. It is imperative to ensure that the thick and thin ends of the rods are located fairly evenly over the entire surface of the wicker fence. Its thickness should be approximately the same.

It is also worth noting that a beautifully made wattle fence is obtained if the rods for it are chosen to be the same length. You also need to ensure that the end of the shoot does not fall on the support and the next one does not start there. In this case, the ending shoot should be shortened a little, and the next one, accordingly, will not start on a support.
At the end of the work, you need to trim the height of the supports using a powerful and sharp pruner, but do not forget to leave the length of the ends of the branches at least 30-40 cm, if such a possibility exists. This will allow you to use them to decorate wicker fencing.
Man always strives to create beauty around himself. Remember Russian villages, where houses are surrounded by fragrant flowers...
Creating a “living” or “green” fence
To construct such a fence, you will need already rooted willow shoots, which are planted in a trench filled with moisture-intensive and moisture-retaining soil with a sufficient amount of nutrients.
Immediately after harvesting from willow, cuttings of the same length and thickness are placed in containers with water and kept at a temperature of 18 to 20 degrees Celsius. Rooting occurs within 3-5 weeks, after which the shoots are planted in a prepared place and fastened in a suitable manner. To speed up the appearance of roots, you can use special preparations, for example, “Kornevin”.
But it is worth remembering that such “green” cuttings should be planted only after the end of frost (May-June). You also need to pay attention to care, which consists of regular watering, loosening and removing weeds. Since willow is a moisture-loving crop, the soil should be constantly moist, but excess moisture should be avoided.

A little about decoration
At classic version When decorating a fence, sunflowers were usually planted next to it, the heads of which elegantly hung on it, and snow-white daisies. But the range of crops that harmonize with a wicker fence is much larger. It can be perennial and alpine aster, chrysanthemum late date blooming, delphiniums, various varieties nivaria, as well as gillyflowers, mimulus, dahlias, marigolds, nasturtiums and decorative (and not only) sunflowers.
And the wattle can also be an excellent support for climbing plants such as beans (edible and decorative), sweet peas (the flowers look like colorful butterflies), morning glory, kobea, decorative pumpkin and others. The leaves and flowers of these crops will look great against the background of intertwined branches and shoots.
To add some color to the tops of the supports, you can hang a variety of pottery(simple and glazed) and build a bench from logs and stumps next to the fence.
And you can find out how to do it on garden plot original flowerbed-clock.


Such a garden composition in the form of a basket is beautiful, catchy, and at the same time harmonious, since the very idea of a basket can be combined with any plants and any garden design option. Many gardeners plant flowers in old baskets. But to get really stylish garden accessory, it’s still worth using an old, even very large basket - it will be too small for a real flower bed, and at the same time it will look too trivial. It’s better to “weave” a stylized basket yourself! Moreover, it is not at all difficult. What about the costs? Virtually none, since everything needed to make a flower bed-basket will probably be found at your dacha.
To work you will need:
- Several wooden slats 3 cm wide.
- Old checkered oilcloth
- Antiseptic for wood
- A piece of plastic box for electrical wiring 2 m long.
- Clothesline
- Scissors
- Hacksaw
- Garden barrel lid
- A little sand
- Trowel
Manufacturing procedure:
1. Saw wooden slats into 45 cm long pieces. In total you should have about 40 pieces. Coat all parts with wood preservative.
2. Cut the old oilcloth into strips 4 - 5 cm wide. The length of the strips is as long as the oilcloth allows.
3. Place the lid of a garden barrel on the ground in the selected location. Outline it with sand or string, then remove.
 In the photo: Place the bottom of the future basket in the place where your flower garden will look spectacular
4. Using a garden trowel, install wooden slats along this circular “path”, with small gaps between them. Just cut the soil with a shovel and insert each slate deeply into it.
 In the photo: Strengthen the slats to the diameter of the future basket
5. Weave the exposed slats with oilcloth ribbons, like a basket. If the length of the tapes is not enough, connect them together with an ordinary stationery stapler.
6. Wrap plastic box clothesline.
 Pictured: Choose a durable clothesline
7. Bend and insert the box into the resulting basket as a handle.
The cart is ready! Now you can pour soil into it and plant flowers, put containers with flowers, and place a mini-garden for herbs on the table.
 In the photo: Flower garden-basket for garden compositions
An interesting solution, because it is a luxury to receive a basket of flowers as a gift. You can receive such a luxurious gift from yourself if you have a small summer cottage at your disposal.
Making a flower bed in a basket is not at all difficult, it's even easier than making a fence. The sizes are much smaller and you don’t have to worry too much about stability.
Moreover, to decorate a flower garden, improvised means are used in the most literal sense - thicker sticks are stuck into the ground along the perimeter of the planned flower bed, a fence of the desired size and height is woven from long thin twigs and pieces of bark. All these materials are on suburban area can actually lie right under your feet. Even dry branches and bark can be used by first soaking them in water for a couple of days.

But the best choice, of course, is willow twigs. Prepare the required amount in the spring and you will have excellent material for your flowerbed and more.
We make a flower bed in this order.
- carefully remove the bark from the twigs;
- cut to length so that they all turn out the same;
- we mark the area and drive pegs in a circle;
- the distance between the pegs is arbitrary, but the more tightly they are installed, the more reliable the fence will be.;
- then we pass the rods between the pegs, as in the picture;
- after the fifth row, tap to the right and left of the peg wooden hammer, this is for compaction;
- secure the ends of the rods.
The resulting depression is filled with a suitable earthen mixture, into which selected flowers - annuals or perennials - are sown or planted. You can choose plant varieties so that they bloom from spring to autumn, decorating the area.
The flower bed can be of any shape, for example square or rectangular. The principle of installation and weaving is the same as for the round one. 
It’s even easier to make such a flowerbed; we also fill in the pegs and start weaving the rods on the front side. 

The rods should be laid tightly, tapping with a wooden hammer, so that after drying, cracks do not form. 
The difference with a round flower bed is that in this case we weave each wall separately, and then fasten it at the joints. In principle, such sections can be made in advance and then driven into the ground, but there are some nuances here, because they will have to be dried first.
Flowerbed-basket with support
 If you are planning to plant a flower bed-basket climbing plants, make a support for them. Visually it will look like a basket with a handle. The result will be a tall wicker structure of human height; it will look very beautiful if placed at the porch or gate at the entrance to the yard.
 Making such a basket will not take much time; the main thing is to prepare the rods of the required length in advance. For our flower bed you will need rods up to two meters. Then make a template from plywood or thick cardboard. This will be the base around which we will build the flower bed. Since the basket will not be completely round, in this case a back support wall is provided, make a cut on one side of the template.
 Prepare the site; in the place where the flower bed will be located, you need to remove the turf and prepare a small depression in a circle, in a word, a small trench. We will insert thick rods into it, the future wall of the basket. The distances between the rods can be chosen arbitrarily, but not more than fifteen centimeters.
 Then we begin to weave a basket, the first vine will lie on the ground, braid the pegs with several rods, moving one peg with each level. To prevent the ends from sticking out, they can be trimmed or carefully woven into the edge of the row. Each “ribbon” must be woven to the end.
 Where we will have a wall, we marked it with a cut template; the ends of the rods must be collected and intertwined diagonally with opposite ends. You should end up with a high “handle” that can be secured with wire. Then we form a “lattice” from the long rods of the wall. At this point the work is completed, then the most enjoyable part is filling in the soil and planting flowers. A combination of flowers and climbing plants will look very beautiful.
Flowerbed from an old basket
 If you don’t know how to weave and don’t want to learn, although it’s easy, you can make a flowerbed from an old basket, although it is possible from a new one, if you don’t mind. There is no need to do anything here at all, except perhaps saturate the basket with an antiseptic, otherwise it will very quickly become unusable in the ground.
There are two options: you can make a stationary flowerbed, remove the bottom of the basket and dig it into the ground, or use it as a portable flowerpot and place it, say, on the veranda. Or hang it, which is what they often do. But in this case, let’s consider the first option, the photo shows how made a permanent flower bed from two old baskets s, and one of them was placed on its side, also beautiful. In this case, unpretentious summer flowers were used - marigolds and pansies. But if you are installing a flowerbed for a long time, you can plant seeds of perennial plants in the spring.
Hanging planter from a basket
 As mentioned above, you can do something wonderful hanging planter from the cart, for this you can use ordinary baskets, but to make it look beautiful, it is better to use special ones for flowers, it is better different sizes. In this case, a variant of three baskets is shown. You can, of course, do more if you have somewhere to hang it. In general, we need to buy baskets and find strong rope.
First, we distribute the flowers, depending on what composition we have in mind. In the upper part, you can plant plants that will hang beautifully, because ordinary ones simply won’t be visible, but at the bottom, something brighter or vice versa, as in the photo, is also good. 
Then we assemble the structure; we need to make sure that the distance between the baskets is the same. You can lay everything out on the floor as in the photo and measure carefully. Next we thread the rope and secure the baskets with knots. 
 We hang it up and see how it will look. You can adjust the distance between the baskets by weight; by the way, this is easier to do if you don’t tie knots, but make small wooden sticks, which can be threaded into a rope, although in this case it is better to use not an ordinary rope, but thin braided rope. In my opinion, this is even better, the design is stronger and you don’t have to guess with the nodes, and if necessary, you can move the baskets to the required distance. Knots will only need to be tied under the bottom of the lowest basket.
That's all, all that remains is to plant the flowers.


Flower beds in baskets can be made very beautiful, of course, rods, the material is not durable, but if everything is done correctly, it will last for several years. Look at this selection of flower bed options, you will probably also want to do something similar.
There is a very simple solution on how to make a fence for a flowerbed with your own hands - this is an ordinary wattle fence. Such a wooden fence will look especially natural in a dacha.
Sometimes in a garden you can’t just use a border for a flower bed - you need a low fence that will not only divide the border of the flower bed, but will also block the path of small animals to the flowers and ornamental plants. But which one and from what?
From boards, wire or brick? Please note that they all require a lot of effort to install and costs for purchased materials. The answer is simple - you need a fence made of stumps or wattle fence. You can do these with your own hands. Today we are talking about the fence.
Surely everyone in the garden has materials at hand to make a wicker fence. And there will be a place, of course.
Choosing a location for a country fence
First, choose a flowerbed around which you decided to make a fence. You can simply separate a group of tall flowers and shrubs, surround a tree with a fence, or put up a small decorative wall separating the vegetable garden and flower bed area.

After you have chosen a place, draw a line on the ground along the perimeter and calculate how many stakes you will need - they need to be driven into the ground with an interval of 25-30 cm from each other.
If you want a wattle fence for a year, then next to the corner peg you additionally need to drive very close (5-7 cm) one more wooden peg on each side to make a vine castle. In a conventional wattle fence, the rods are cut off at the corners, which is why they often fall out if the fence is touched. If you place additional pegs next to the corner pegs, then you can run the rods around the three corner pegs without cutting them. Such a fence will not have the ends of the rods sticking out at the corners and, by the way, is much more beautiful.
Let's prepare materials
For vertical pegs around which the twigs intertwine, find branches 2.5 -5 cm thick and cut to the required length.
To find out what length you need, first make length marks on one peg and try to drive it in according to the principle: “the deeper, the stronger.” Look to what depth it went into the ground in this area, add the height of the fence and decide on the size.
You can start preparing the peg. Cut the branches to the specified length, clear them of knots and sharpen them on one side. To prevent the branches from sprouting, treat the pointed ends with an antiseptic and paint them.
For weaving we will need flexible shoots 10-12 mm thick: birch and willow twigs, vine, raspberry branches, which are thinned out in the fall anyway, are perfect.
It is easier to harvest twigs in spring and autumn, when there are no leaves on them.

How to make a fence for a flower bed?
The day before weaving, it is advisable to soak an armful of twigs overnight in a large basin or bathtub. It is best to pour boiling water over them - they will bend softly and lie down easily.
Drive the stakes around the perimeter and make sure that they do not wobble and are driven firmly. The stakes can be adjusted in height with a hammer. If you leave a few taller ones, you can hang small pots or jugs on them for beauty.
Next, braid the stakes with twigs in a zigzag pattern and make sure that the protruding parts go inward. Do not forget that each vine must be compacted and pressed against the previous layer. If the vine is too thin, you can take several pieces in one weave. Do not start the next layer until you have gone around the entire perimeter of the fence. And layer by layer, raise the fence to the height you need.

A few weaving rules:
- Do not start weaving the rod from the corner pegs. Start somewhere in the middle so that the branch, when weaving, passes the corner and ends on the other side of the perimeter. Then the corners will be prettier and the structure more stable.
- Align the thick end of one rod with the thin end of the next so that the knitting is even.
- Make sure that the end of the vine does not fall on a peg where there is already another tip from the previous layer. Either choose a vine of a different length, or shorten this one.
- To make the fence stronger, you can additionally tie them with rope in several places, for example, on the corner stakes.
- By adjusting the distance between the vertical stakes, you can make the fence more or less densely woven.
And finally, after finishing the work, trim the protruding edges of the rods - cut with a knife or pruning shears. That's it, the fence is ready!
The base of a flowerbed made of wattle
By the way, you can combine a wattle fence and a base for a flower bed. Such a flower bed is good in places where the soil is unsuitable for growing flowers - clay, stones or construction garbage. Make a low wall of wattle fence around this area, fill it first with crushed stone and sand in the case of clay soils, and cover the top with a layer of fertile soil.

For stability, use thick stakes less than 20 cm apart and drive them at a slight angle into the center of the flower bed. After filling with soil, they will level out and steadily hold back the soil pressure from inside. It is better to use rods that are a little thicker and more flexible - then the weaving will be denser, stronger, without large holes, and the earth will not spill out.
Such a flower bed with a wicker fence base does not require extra expenses and will look great both in the country and in the garden of a city house. Don't worry if you think wicker won't look good next to concrete, metal and glass. On the contrary, they will soften modern design houses, the look of cast fences and will create comfort in your urban garden.

I wonder how such a base for flower beds is made? If you have any ideas, write in the comments so that others can make a base for a flower garden or vegetable garden from a wooden fence.