Make a sandbox with a lid. Variants of children's sandboxes in summer cottages. How to make a sandbox with your own hands. Stages of work and basic recommendations for making a sandbox with your own hands. Video: How to make a wooden sandbox with a lid
The construction of a full-fledged children's playground begins with the sandbox, consisting of many elements (slides, swings, a house), which will be added as the child grows up.
According to parents, the sandbox is a place for games where you can keep your child busy for a long time. Psychologists say that the sandbox for children plays an important role: the motor skills of the hands develop, the Creative skills showing perseverance and patience.
Do-it-yourself children's sandbox for giving
Before you figure out how to build a children's sandbox in the country, you need to familiarize yourself with what types, types there are and choose suitable option for specific conditions.
Sandboxes for children come in two varieties:
1. By design features:
- open sandbox (easy to manufacture design);
- closed sandbox. Popular with users because
allows you to protect the sand from: debris, rain, wind, animals. Except
of this, the children's sandbox with a lid protects the sand from weathering, allows
store under the lid of the toy (children's inventory: little bits, scoops, shovels,
rake, etc.), and can also serve as an additional playground (if
transforms into a table and chairs).
2. According to the material of manufacture:
- plastic, metal, wood
Each of the materials has its own advantages and disadvantages.
plastic sandbox
Does not overheat in the sun, has a compact size,
light, easy to move, transport, and during the absence can be hidden in
outbuilding or garage. Among the disadvantages are instability to ultraviolet,
high cost.
metal sandbox
Provides long-term use but not safe
for children, as well as subject to corrosion and laborious to manufacture.
wooden sandbox
The best option, since the tree is environmentally friendly,
safe and accessible.
Therefore, consider how to build a children's sandbox from
tree - independent technology using scrap materials
(of funds). Let's start with an open one, since this is the most easily implemented option.
for beginners with no construction experience. It only takes a few to make.
hours, and if there is a competent drawing, the cover can be attached to it in
any time.
How to make a sandbox with your own hands - step by step instructions
Stage 1 - Drawing of a sandbox made of wood
Although the design is simple, the detailed diagram
sandboxes allow you to rationally calculate the amount of material, and correctly
choose a location for installation.
Often a sandbox made of wood is a square
of a given height, protecting the sand from spreading.
Sandbox drawings (for a simple design) are shown below.
 Wooden sandbox drawing
 Scheme of a wooden sandbox
The design can be more complex: including
chairs, benches, tables, cover, roof, slide, etc. or a sandbox
made in the form of a car (car), a boat-ship, a house-castle.
The diagram below gives an idea of what it consists of.
sandbox in the form of a machine (sandbox-machine).
Anyway, functional purpose basic
the construction is the same - a fence that protects the sand.
Advice. When planning the construction of a sandbox, it should be taken into account that
how many children it will be calculated.
Stage 2 - Material for the sandbox
The table lists building materials With
dimensions and quantity for the manufacture of a simple sandbox with dimensions
1500x1500 mm, 300 mm high.
| lumber | Purpose | Quantity | Note | |
| Bar 50*50*450 | corner element | 4 things. | Beam 150 mm. treated with an antiseptic | |
| Board 30*150*1600 | Side walls of the sandbox | 8 pcs. | Carefully sanded and coated with a primer for wood. | |
| Board 30*150*1600 | Sides for sitting, folding toys, etc. | 4 things. | Sanded and primed with wood primer. | |
| Wood screws, 45 mm. | For fastening | 50 pcs. | ||
| Geotextile | bottom | 2 rolls | Can be replaced with foil | |
| Antiseptic | For wood processing | |||
| Primer for wood | For wood protection | |||
| Dye | For coloring | 1 can (1 liter) | oil or acrylic | |
| For closed sandbox(with lid) additionally needed | ||||
| Bar 30*30*1600 | 2 pcs. | The beam is sawn into pieces depending on the width of the cover | ||
| Board 20*125*1600 or plywood, 18 mm. | 12 pcs. sheet | |||
| Piano loops (canopies) | 4 things. 8 pcs. |
for hinged lid for convertible cover |
||
| Pens | 2 pcs. | |||
The material was prepared for the site www.moydomik.net
Building a sandbox for a summer residence with your own hands - tips
- the length of the beam depends on the height of the sandbox, which, in its
The turn is determined by the age of the child. The height of the sandbox should be
so that the child can step over it. Optimal Height– 300 mm (150 mm remains
for fixing and fixing the structure). - the thickness of the boards must be at least 30 mm. This will provide
sufficient structural strength and protect the tree from cracking. - plywood is indispensable in the manufacture of complex structures,
such, for example, as a sandbox in the form of a ship (boat). From her
are made shaped products round, oval shape. - boards are best processed before installation. In this way,
there will be no unprotected pieces of lumber left.
Tools: saw, grinder, drill, drill,
screwdriver, pencil, tape measure, level, pegs and rope, paint brushes.
Stage 3 - Marking the place for the sandbox
a place for installation is selected. With stakes and rope
the outer perimeter of the structure is indicated;
inside the outlined square, soil is selected to a depth
300-400 mm. You can do without this and pour sand on top of the soil, but it
will quickly become unusable, as it will mix with the soil during the game. To
besides, ants and other insects can start in it;
drainage is arranged - a tightly packed pillow of
crushed stone / gravel and sand. The pillow will allow water to flow freely into the ground, and sand
dry faster. Additionally, users recommend laying geotextiles,
it does not prevent the flow of water, but protects the sand from below from insects or moles.
Advice. When using polyethylene, you need to drill in it
holes for water drainage.
Many users complain that there is a sandbox around
puddles appear after the rain. This is eliminated by arranging a pillow and for
the perimeter of the sandbox is drainage laid 400-500 mm. around the sandbox will allow
water flow down quickly.
Stage 4 - Making a children's sandbox with your own hands
Brief construction technology:
- stakes are driven in at the corners marked with a rope - a support
future sandbox;
- on each side is installed one, covered
antiseptic board;
- then the second row of boards is nailed;
- for arranging seats on top of the structure horizontally
processed boards are installed (2 s opposite sides, 4 from each
sides) or plywood corners - the most budget option.
Advice. It is important to ensure that the caps of the screws are securely
recessed into the wood and did not cause injury.
The second option is how to make a sandbox out of wood
The method assumes a slightly different order of execution
works, namely: first, the manufacture of the sandbox, then the preparation of the site
installation and further installation of the sandbox. This option is convenient when
conducted together, because the design, although light, is rather bulky and
it is inconvenient for one to install it in this order.
Step-by-step instructions for making a sandbox with your own hands
(master class) is shown in the photo.
 Building a sandbox with your own hands - master class - 1
 Building a sandbox with your own hands - master class - 2
 Building a sandbox with your own hands - master class - 3
 Making a sandbox with your own hands - 4
 Making a sandbox with your own hands - 5
 Making a sandbox with your own hands - 6
 DIY sandbox - 8
 DIY sandbox - 9
 Homemade sandbox - 10
 Homemade sandbox - 11
 Homemade sandbox - 12
 Sandbox made of wood - 13
 Sandbox made of wood - 14
 Sandbox made of wood - 15
 Do-it-yourself wooden sandbox - 16
 Do-it-yourself wooden sandbox - 17
 Do-it-yourself wooden sandbox - 18
 Do-it-yourself wooden sandbox - 19
 Wooden sandbox for giving - 20
 Wooden sandbox for giving - 21
 Wooden sandbox for giving - 22
 Wooden sandbox for giving - 23
 Wooden sandbox for giving - 24
 Wooden sandbox for giving - 25
Stage 5 - Making a lid for the sandbox
Since, a children's sandbox with a lid to give more
an attractive option - consider how to make a lid for the sandbox.
by the most simple option will be removable cover representing
a shield knocked together from boards, but his significant disadvantage is the need
remove the lid before playing.
Therefore, it is more expedient to make a design with two doors,
which transform (open and fold) into seats. In the photo below
two variants of the sandbox lid device are shown - folding and transforming
into the seat. Please note that the two extreme boards on both sides are stationary.
They are securely fixed, this will allow a child and even an adult to sit on the lid,
without fear of breaking it.
 Children's sandbox with lid
 Wooden sandbox with lid
Sandbox option with awning (soft cover, rolled up)
 Children's sandbox covered with an awning
 Children's sandbox with canvas awning
Stage 6 - Construction of a roof for a sandbox
Given that children want to play in the sand at any time
days, you need to take care to protect them from direct sunlight.
To do this, you need to install a visor over the sandbox. It could be beach
umbrella or fixed roof, made in the form of a fungus / canopy.
 Umbrella roof for sandbox
 Mushroom roof for sandbox
Stage 7 - Sand for a children's sandbox
How to choose sand for a sandbox?
It should be noted that GOST (18322-78 (ST SEV 5151-85) and GOST
R 52301-2004) regulate the requirements for maintenance
playground equipment, but do not contain recommendations regarding sand,
in addition, when selling sand, you must provide certificates.
However, users have determined what kind of sand is needed for
sandboxes and impose the following requirements on it:
- absence of foreign matter/objects;
- good flowability;
- dustlessness. Fine sand particles (fractions less than 0.1 mm)
may enter the child's lungs. To eliminate them, the sand is usually washed and
dried or sifted through a very fine sieve;
- formability (it’s good to mold into beads);
- humidity. The sand must be dry;
- hygiene. Sand should not contain living creatures (bugs,
spiders, worms, etc.).
What kind of sand is best for a sandbox
When choosing sand it is better to give preference to:
- river, not career. It is purer in itself;
- sifted, not containing foreign objects;
- quartz sand - perfect option. He is clean and good
molded.
Ready-made sand for children's sandboxes can be bought at the store.
The presence of a quality certificate guarantees its purity and absence
impurities.
How much sand do you need in a sandbox?
In order to fill a sandbox measuring 1500x1500 mm.
you need to prepare about 0.5 cubic meters. sand.
Average price per bag (25 kg) of sand for a children's sandbox
shown in the table.
DIY children's wooden sandbox - video
How and where to install a children's sandbox
So that the sandbox lasts a long time and does not pose a threat
for children, you need to follow a few recommendations in its manufacture and
installation:
- do not use metal elements;
- do not leave boards unpolished;
- provide shade;
- place in a well-visible place;
- ensure the absence of thorny shrubs, plants
honey plants and allergens;
- use high-quality wood and other building
elements;
- provide secure fastening;
- lack of electrical wiring, hoses, pipes, etc.
Conclusion
A wooden sandbox with a lid or an open one is
an opportunity not only to please the child, but also to show their creative
capabilities. And a sandbox in the form of a table, a car, hexagonal or round is not
will only please the child, but also allow you to decorate country cottage area extraordinary
creative design.
Tags: Sandbox Playground Tree
At first glance, a home children's sandbox is a simple and unpretentious structure. However, in order for the kids to be interested in playing, and for parents not to worry about their safety, it is worth taking the arrangement of the playground with all responsibility. Before you make a sandbox with a lid or an ordinary open one with your own hands, you need to carefully study all the recommendations for construction.
How to build a sandbox with a lid in one day
When landscaping a children's corner in the country, many questions arise - what type of sandbox is better, where to place it, what dimensions should the sides have. All sandboxes are divided into two types - open and closed. The latter, in turn, are divided into sandboxes with a canopy, with a lid, with temporary protection, such as a tarpaulin.
The sand under the lid always stays clean
The advantage of sandboxes with a tight lid is that they are not only protected from falling leaves from trees and debris, but also from the invasion of cats. Thanks to the lid, children will always play in clean sand. Such a structure can be closed for the winter, it will calmly survive the bad weather and remain unscathed.
The best place for children to play on the site
When choosing a place for children's games, you need to consider the following points:
- the corner should be shady, because children are able to mess around in the sand for several hours, and games in the sun are unacceptable. At the same time, you should not place the sandbox in deep shade, without glimpses sunlight, in such a place the sand will dry for a long time after the rain;
- if children play not only in the hot season, but also in spring or autumn, you should choose a place protected from the wind;
- the playground should be clearly visible so that parents can see at any time what is happening there and what the kids are doing;
- the best place is slightly elevated or level. Placing in the lowlands is undesirable, because water will accumulate there, and the sand will always be damp;
- for safety reasons, it is unacceptable to place near water bodies, open wells, as well as landing near a children's facility poisonous plants such as wolfberry, dope, castor bean.

A place for children's games should be clearly visible
Selection and preparation of materials
Traditionally, children's sandboxes are made of wood. Iron in this case is not too good option, because in summer it is hot in the sun, and in spring or autumn it is very cold to sit on it. However, you can make a combined sandbox with a metal lid and wooden benches combining comfort with reliability.

Tree - best material
For sides, smooth logs without bark, boards with a thickness of at least 2 cm and bars are used. The lid can be made from more thin boards, OSB sheet or roofing sheet. Everybody wooden details carefully planed and checked for protruding chips. If the lid is iron, the sharp edges are protected with overlays made of wooden slats or fold inwards.
The sides are made no more than 25-30 cm high, so that children can freely climb over them. High walls can become an insurmountable barrier for kids. The size of the sandbox can be any, depending on how many children will play in it. On average, a design of 1.8 by 1.8 meters is enough for 3-5 children preschool age.

Sandbox can be made from improvised materials
To make a children's sandbox with a lid measuring 1.8 by 1.8 m, you will need:
- four boards 180 cm long, 30 cm wide and at least 3 cm thick for the sides;
- four bars 5 by 5 cm and 30 cm long each;
- two sheets of OSB 180 by 90 cm for the lid;
- two pieces of board 180 by 30 cm and two bars of 180 cm each for fixing the lid flaps;
- four door hinges;
- wood screws 3.5x45 mm;
- geotextiles, crushed stone for drainage;
- hacksaw, Phillips screwdriver, building level, tape measure, shovel.
Step by step installation instructions
To make a children's sandbox with a lid and a bench with your own hands, it is advisable to first study the photos of the finished models and draw up your own drawing of the future creation. On the diagram, you must indicate the dimensions of all parts. This approach will greatly simplify the subsequent work.

Drawing of a sandbox with a lid
The entire installation process is divided into the following steps:
- drawing up a drawing;
- preparation of material and tools;
- clearing the site and arranging drainage;
- base installation;
- cover installation.

Stages of installation and installation:
- On the leveled ground, a square of 1.8 by 1.8 m is marked out and a layer of earth of 5-10 cm is removed. In the center, a hole is made deeper - about 45 by 45 cm.
- The central recess is covered with crushed stone, after which the entire area of the square is covered with geotextiles in several layers. Crushed stone in this case plays the role of drainage for runoff. excess water after rains, and geotextiles keep clean sand from mixing with the ground.
- A sandbox box is built from the boards, placing a bar in the corners to stiffen the structure. Boards with bars are connected with self-tapping screws. To make the structure strong, at least four self-tapping screws are screwed on each side. During operation, be sure to check compliance with 90-degree angles.
- Start making the lid. To begin with, racks are attached to each of the wings, on which the lid will rest in open form. Stepping back from the long edge of the OSB by 5 cm, a bar is screwed parallel to it along the entire length. A board 180 by 30 cm is attached to the bar, perpendicular to the lid. Do the same with the second sash.
- Fasten in two door hinges on opposite sides of the box. Lay the sashes on the box so that support posts were in the middle and screwed to the hinges.
- Fill the resulting container with sand. It is preferable to take river sand, it is much cleaner than quarry, in which an admixture of clay and pebbles is often found. For children's games, a layer of 15-20 cm will be enough.
- The closing sandbox is ready! During games, the folded doors serve as a seat, and in closed reliably protect sand from debris and moisture.
Interesting ideas for creative parents
A square or rectangular sand box is the most common place for children's games. But you can show your imagination and do something interesting and non-standard. A sandbox in the form of a pirate ship, a train or a car will undoubtedly cause great delight among the kids. All that is needed for this - skillful hands, a little material and time.

Idea for dads "with hands"
How to make a fun sandbox boat
A do-it-yourself sandbox-boat will become not only a decoration for the playground, but also a favorite place for young sailors to play. Make it easy. The simplest option is rectangular base with two posts 1.7 m high in the center, on which an awning sail is stretched.

It is very easy to make such a boat
To build a sandbox boat with an awning, you will need:
- two boards 170 cm long, 30 cm wide and 3 cm thick for the sides of the box;
- four boards 70-80 cm long, 30 cm wide and 3 cm thick for the ends and seats on them;
- two bars 5 by 5 cm and 200 cm long, as well as one 70-80 cm long (along the width of the box) for the mast racks;
- 3 meters of dense awning fabric;
- twine for attaching the sail;
- four threaded hooks, wood screws;
- fixing metal corners.
Work sequence:
- A rectangular box is assembled from boards and mounting corners.
- At the ends of the structure, they are screwed along the seat.
- Install the future boat in a prepared place.
- For the mast, all three bars are connected with self-tapping screws in the shape of the letter U and dug in in the center of the box, deepening 30 cm into the ground. For greater strength, you can additionally screw the bars to the box boards.
- The awning fabric is folded in half and thrown over the horizontal crossbar of the mast.
- In the corners of the box, they are screwed on a hook. Tie the awning to the hooks with the help of pieces of twine.
The second option is for experienced craftsmen, after all, only real craftsmen can make a sandbox in the form of a real ship with their own hands. The basis of the design are boards and bars. However, you can build something similar using sheets of thick plywood or OSB, from which the outlines of the ship are cut out and mounted on a standard box.

The real ship

Decoration of the site and the joy of children
Sandbox car for little riders
Making a sandbox in the form of a car with your own hands is not at all difficult. The main thing is that the structure has wheels and a steering wheel, and other details such as headlights and bumpers can simply be painted with paint. The machine is based on a traditional rectangular box. If the farm has unnecessary tires, this greatly simplifies the work. They are simply dug in a third on the sides of the box, imitating wheels. The steering wheel can also be taken real or cut from a piece of plywood.

If there are no old tires, cuts of thick logs, pieces of OSB, cut and painted under the wheels, will be used. As in the case of a boat, the structure can be completely cut out of plywood. For such a machine you will need:
- standard OSB sheet 1.22 by 2.44 m 1.0 cm thick or several sheets of plywood;
- metal fastening corners;
- wood screws;
- door hinges, if it is supposed to make an opening hood;
- jigsaw, sandpaper, tape measure, screwdriver.
Parts to be cut for assembly:
- body side panels - 2 parts;
- body ends - 2 parts;
- side panels cabins - 2 parts;
- hood - 1 part;
- bumper - 1 piece;
- roof - 1 detail;
- dashboard in the cabin - 1 piece;
- seat - 1 piece.

Stages of work:
- A drawing of machine parts is marked on the sheet, after which they are cut out with a jigsaw. All edges are carefully treated with coarse-grained sandpaper so that children do not get hurt by protruding chips.
- Connect all the parts with the help of mounting corners.
- The seat in the booth is additionally reinforced with a piece of a thick bar so that it does not loosen.
- The hood cover is screwed with self-tapping screws or mounted on two door hinges so that it can be opened.
- The steering wheel is installed in the cab.
- The finished machine is painted, along the way, finishing small details.

A beautiful and solid sandbox will undoubtedly become the center of a children's corner in the country. Its installation does not require any special building skills and does not take much time.
I decided not to shelve the sandbox story that I mentioned and talk about the construction process. In addition, we still have warm Indian summer days ahead of us and, perhaps, someone will even have time to do something similar. :)
Almost all summer my wife and daughters spent at the dacha with grandparents. For children there expanse. You can walk on the street all day long, pluck raspberries and strawberries straight from the bushes, and generally enjoy your childhood and life. :)
But, no matter how good it is, and without the main component of childhood (unless, of course, it takes place in permafrost conditions), the mood of any child will not be the most positive. I'm talking, of course, about the sandbox. So my child at some point remembered that in the city, they say, there is this same sandbox, but in the country, much to the chagrin, no.
As a result, after agreeing with my grandmother (our main dacha field marshal), at an emergency family meeting, a decision was made - there will be a sandbox! :)
After wandering through the expanses of the Internet and reviewing a bunch of sandboxes of the most different forms and sizes, I decided to stop at a fairly simple, but functional and convenient option. But since I couldn’t find any diagrams and drawings, I had to do it “just like in the picture” :) The photo below was found by me on the Internet and was taken as the basis for construction.
Having estimated the approximate dimensions of the future sandbox, I went to the construction market. I bought boards, timber, wicket hinges and paint.

After I sawed the required number of parts, it remains only to grind everything and assemble it into a single structure. My faithful assistants helped me with these tasks :)

Grinding was carried out using a grinder and a grinding wheel, which is not entirely correct, since the process produces a lot of fine dust, which literally clogs everything. I want to buy next year grinder with a dust collector, otherwise cleaning takes almost as much time as the construction itself.

After all the details were processed, I proceeded to the assembly.

I extended the beam, to which the boards of the side walls of the sandbox were attached, since later I planned to dig it into the ground and these “tails” were supposed to serve as supports for the entire structure so that it would not fail.

Gathering everything together, pulled this colossus into the street. It turned out impressive (the sides of the square were about one meter and twenty centimeters).

For strength and reliability, I reinforced the corners with the help of the remnants of the timber.

Went through the first coat of paint. The “legs” of the sandbox were treated with used engine oil.

Well, more precisely, I didn’t paint the legs at all ... :)

I figured in place the pre-painted boards of the future sandbox cover.

With a grinder with a rough skin, he removed the edge from the boards, giving them a prettier look.

I firmly fixed the first two boards by screwing them with self-tapping screws. Then he began to assemble the first part of the movable sandbox cover, adding two more boards and attaching the gate hinges.

Something is starting to happen... :)

Then proceeded to the second part of the cover. The fact is that this lid is not simple, but with a curious mechanism that turns it into a shop! To do this, I added two more boards and fastened them with the help of bars.


Attached two boards, fixed with bars to the previous two boards, using the same wicket hinges. As a result, I got this design:

The bars are calculated so that when the lid is opened, they rest against the wall of the sandbox and serve as a support for the back of the bench.


Thus, our cover folds up and turns into a comfortable bench.

The fifth and sixth boards are fastened with the bars that I spoke about above. In the same way, I strengthened the third and fourth boards, reinforcing them with additional small bars. Now the boards are held not only on hinges and securely fastened to each other.

In addition, these short bars protect children's priests from being scratched on the hinges, and also serve as a back stop for the back of the bench so that it does not fold and fall on the children's arms and backs. Still, don’t say anything, but safety is above all! :)
So that the bench does not sag under the weight of those sitting, I screwed a small support plate in the center onto the first two boards.

After one side of the sandbox lid was finished, I proceeded to assemble the second side.

I decided to make the second half of the lid without a back, thus modifying and improving the original design. :) The fact is that if an adult suddenly decides to play with a child, it is convenient to do this without getting entirely into the sandbox, but sitting on its edge. In the original version of the sandbox, from which I took an example, both sides of the lid were with backs, which made it difficult for adults to board.

In my version, there are no such problems. :)

I closed the corners with a wooden corner so that the ends of the boards do not absorb moisture, and in general it looks much neater.

Having fully assembled and painted the entire structure, I went to look for a shovel ... :)

Having dug a pit around the perimeter, I lowered the support legs of the sandbox into it so that side walls lay down on the lawn.
When choosing the design of a small children's sandbox, it is necessary to take into account not only its direct (functional) purpose, but also pay attention to how harmoniously it will "fit" into the surrounding landscape.
Most suitable material for the sandbox there will be ordinary wood. Let's look at how to make a sandbox with your own hands.
Main questions:
- what design to choose;
- how many boards will be required for its manufacture;
- how to choose the right color solution.
The design and dimensions of the sandbox for the playground
There are no special requirements for the size of children's sandboxes. If there is enough free space on the site, you can choose any dimensions convenient for you (within reason, of course). Most often I make the sandbox square, which makes it much easier preparatory work associated with cutting blanks of the same size.
Boards can have a length of 4, 5 or 6 meters with a width of about 12 cm. As for the height of the walls of the entire structure, the optimal size is about 24 cm, which corresponds to a bundle of two boards. Thus, if you have five-meter boards at your disposal, you will need eight of them to assemble the entire sandbox.
The thickness of the boards used for its manufacture is usually chosen equal to 30 mm. Blanks of such thickness provide the required strength and reliability of the structure and exclude the possibility of cracking. The depth of the sandy bulk layer used to fill the sandbox is chosen to be 15 cm.
The main stages of manufacturing a sandbox: the order of work

After all the boards are prepared, you can proceed to the construction of the frame. For bonding individual elements structures between themselves, you can use pre-prepared metal corners, fastened to the boards by means of self-tapping screws.
You can, of course, do without corners; but then half of the boards used to assemble the frame should be 6–7 mm longer. In this case, part of the prefabricated boards is attached to the ends of adjacent blanks using conventional wood screws, which makes it possible to obtain a fairly reliable and durable frame.
In conditions suburban area you will definitely need to worry about the bottom of the sandbox; and it is necessary to approach this issue with all seriousness. Protect playground from the penetration of rodents on it, in particular, it is possible by covering the bottom with a special agrofibre, the edges of which are fixed on the boards using a conventional furniture stapler.
Choosing a place to place the structure

When choosing suitable place come from the following considerations:
- the place should not be open to the winds and the sun;
- the place for children's games should be clearly visible from all points of the garden, i.e. it would be "in plain sight";
- there must be a "visor".
It is best to place the sandbox under the canopy of trees or in such a way that a shadow from the nearest building falls on it for most of the day.
Concerning color solution, then it should be chosen at your personal discretion (to taste). The palette of colors should be quite diverse, as well as bright and saturated as possible. On the sides wooden frame you can apply patterns or drawings.

Here are a couple of tips:
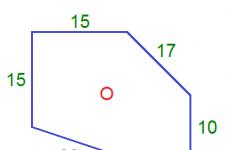
- The shape does not have to be square at all. If you try to move away from patterns, then it is quite possible to imagine a triangular, trapezoidal and even polygonal design.
- In the sandbox itself, you can prepare some kind of labyrinths, passages and grooves in which it will be interesting for the baby to arrange outdoor games.
Video
Sandbox Photos: 14 Unusual Ideas


Schemes and drawings