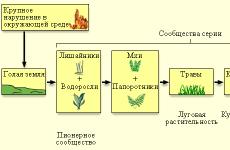
How to close the sandbox. How to build a children's sandbox with your own hands. How to choose material
Fussing in the sand is an indispensable attribute of children's summer happiness. And if there is no shortage of sandboxes in urban courtyards, then in personal plot the child runs the risk of getting bored without the usual entertainment. If your baby is growing up, it's time to start building a sandbox on country yard. We tell you how to design and build a functional and durable sandbox with a lid with your own hands.
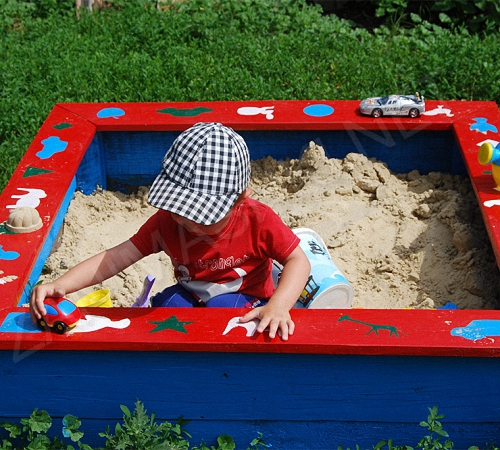
Sandbox with lid: design features
When starting construction, think through the main details in advance, starting with size. The sandbox should be deep and roomy enough so that a one-and-a-half-year-old baby can climb into it without any problems, but so that even a five-year-old child doesn’t feel cramped there. For this purpose, dimensions of 1.5 m x 1.5 m are suitable: such a sandbox will not take up much space and can comfortably accommodate 3-4 children.
Calculate the height of the structure so that the sand layer is at least 15 cm. Do not forget to leave space on top for sitting. With a board width of 12 cm, you can build a sandbox using two boards, that is, 24 cm high. This is quite enough for the child to not only sculpt Easter cakes on his “construction site”, but also build a sand castle.
But does the sandbox need a lid? For those who love order and care about the health of children, the answer is obvious.
The cover protects the sand:
- from being scattered throughout the territory;
- from excessive getting wet during rain;
- from debris, branches, rotten fruits;
- from the encroachments of dogs and cats, arrange a toilet there.
The lid will protect the sand from contamination and become a convenient bench
The simplest cover is a shield made from boards, which is used to cover the sandbox after the game. It is the easiest to make, but such a lid is very heavy and bulky and takes up extra bed on the site in daytime, and moving it from place to place is quite difficult. Therefore, we suggest choosing a transforming lid: its construction will take more time, but the result will be justified. Build a lid that, when opened, turns into a table and/or a comfortable bench with a back: not only will the child like them, but they will also entice adults to join him.
Design of a transforming sandbox (photo gallery)


Where to start
To begin with, you should stock up on materials and tools. We offer a list of the minimum essentials that you cannot do without.
Building materials:
- Boards: to build a frame 1.5 m x 1.5 m, you will need two pieces with dimensions of 32x120x6000 mm; for the lid, two boards with dimensions 20x120x6000 mm.
- Beam 2 pieces 50x50x1000 mm for fastening the body and the back of the lid.
- Agrofibre 1600x1600 mm for lining the bottom.
- Door hinges 6-8 pieces. To get more reliable design use wicket hinges.
- Self-tapping screws.
- Staples for stapler.
- Wood impregnation, stain, paint.
Tools:
- saw (jigsaw);
- screwdriver;
- stapler;
- a device for grinding (plane, grinder + grinding wheel, sandpaper, etc.);
- roulette.
Construction step by step
Let's start with building the frame. To do this, we cut the boards into the sections we need. At standard length 6 m. We divide each board into four equal sections, which ensures waste-free production.
We carefully plan and sand the boards to achieve smooth surface. We definitely don't need splinters in the sandbox. To make the sandbox last a long time, treat the boards with a solution against fungi and rot. An antiseptic will provide protection against pests and extend the life of the product.
We saw the timber into four equal pieces of 25 cm each and sanded them.
We assemble the sandbox body, fastening it with timber
We assemble a two-tier building from eight boards, fastening the boards in the corners with timber. We carefully drive the heads of the self-tapping screws (nails, screws) so that they do not protrude beyond the surface of the board and timber. Glue a strip of self-adhesive sealant between the boards, then sand will not spill into the cracks.
Seal the joint of the boards with self-adhesive sealant
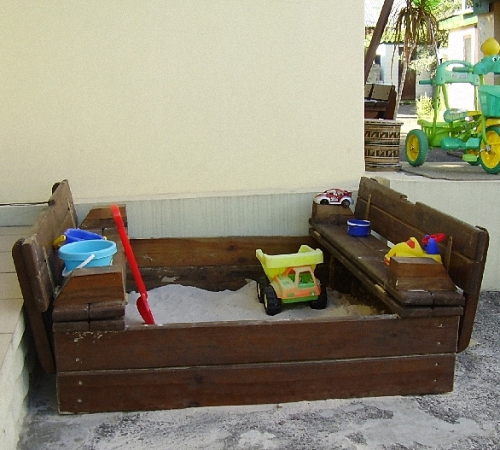
Having measured the dimensions of the resulting frame with maximum accuracy, we begin to manufacture the transforming lid. You can make a table on one side of the sandbox and a bench on the other, or you can place two benches opposite each other. Let's consider the first option.
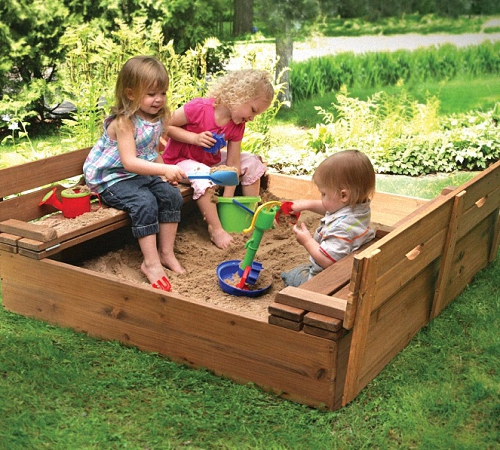
Transformable sandbox with bench and table
We attach the first board to the sandbox with self-tapping screws, the second one is attached to the first using two door hinges. This way we can adjust the size of the table and make it wider if necessary.
For the bench we will need six identical boards, two of which will go to the seat, two to the back and two to attach to the frame. How it should look is shown in the diagram:
Sandbox bench diagram
We screw the hinges to outside lids so that the inner strips bend when opening upwards. To fasten and fix the backrest, use a sanded beam. Calculate its length so that when opening the lid it provides a stable support for the backrest.
The beam should provide good support for the backrest
Important: to prevent the hinges from rusting, paint them on both sides before installation.
If you actively use the sandbox, the self-tapping screws may not be enough to securely fasten the hinges: if you open/close them frequently, they quickly begin to fall out. For greater reliability, use bolts for fixation.
To prevent your baby from getting carried away with sandy excavations and start digging from the depths, make a bottom in the sandbox. It will not allow not only the soil, but also unwanted insects and plants to penetrate into the clean sifted sand. For the bottom, dense agrofibre with high moisture permeability is suitable, which will prevent stagnation of water in the sandbox.
Stretch the agrofibre along the bottom of the sandbox and secure with staples around the perimeter.
DIY sandbox (video)
Installation and care
Choose a suitable place on the territory. Do not place the sandbox on open area to avoid overheating and sunburn during the all-consuming game. It is better to install the structure in partial shade - from a house, fence or bushes. Make sure in advance that during the midday hours the place for the future sandbox is protected from the sun.
In the selected area, dig a flat pit 3-5 cm deep. more area sandbox so that she can easily “sit” in it. You can make a gravel pile around it.
If you want the sandbox to be installed thoroughly, use a longer beam to secure the box, then legs will form at the corners of the structure, which can be dug into the ground.
Sandbox pit
Choosing between maritime, career and river sand To fill the sandbox, we recommend choosing the latter. It is clean and does not contain impurities and salts, but it is still better to sift it when pouring it out, then the sand will be free of pebbles and dirt, soft, gentle, and pleasant to work with.
To make your children's "construction site" look cozy, surround it lawn grass and lead a path to it.
Now the sandbox is absolutely “ready for use” and you can let the first little builders into it to test the object. All that remains is to fill it with bright buckets, spatulas and molds as finishing touches. A sandbox made using this technology is simply bound to last for many years.
How more complex design sandbox, the more time and effort it will take to build it. At the same time, a good thing, made conscientiously, will bring joy to more than one generation of children. After all, sand games develop fine motor skills, creative thinking and simply give the joy of a carefree childhood. And for this it’s worth trying a little.
The construction of a full-fledged children's playground begins with the sandbox, consisting of many elements (slides, swings, houses), which will be added as the child grows older.
According to parents, the sandbox is a place for games where you can keep your child occupied for a long time. Psychologists say that the sandbox for children plays an important role: hand motor skills develop, creativity, persistence and patience are shown.
Before you figure out how to build a children's sandbox at the dacha, you need to familiarize yourself with what types, types there are and choose suitable option for specific conditions.
Types of children's sandboxes for the garden
Sandboxes for children come in two varieties:
1. By design feature:
- open sandbox (easy-to-make design);
- closed sandbox. Popular among users because it allows you to protect the sand from: debris, rain, wind, animals. In addition, a children's sandbox with a lid protects the sand from weathering, allows you to store toys under the lid (children's equipment: beads, scoops, shovels, rakes, etc.), and can also serve as an additional play area (if it is transformed into a table and chairs ).
2. According to the material of manufacture:
- plastic, metal, wood
Each of the materials has its own advantages and disadvantages.
Plastic sandbox
It does not overheat in the sun, has a compact size, is lightweight, easy to move, transport, and can be hidden in an outbuilding or garage when you are away. Disadvantages include instability to ultraviolet radiation and high cost.
Metal sandbox
Provides long-term use, but is not safe for children, and is also susceptible to corrosion and labor-intensive to manufacture.
Wooden sandbox
The best option, since wood is environmentally friendly, safe and affordable.
Therefore, let's look at how to build a children's sandbox out of wood - independent technology using available materials (means). Let's start with the open one, since this is the most easily implemented option for beginners without construction experience. Manufacturing will take only a few hours, and if you have a competent drawing, the lid can be attached to it at any time.
How to make a sandbox with your own hands - step-by-step instructions
Stage 1 – Drawing of a wooden sandbox
Despite the fact that the design is simple, a detailed diagram of the sandbox allows you to rationally calculate the amount of material and choose the right place for installation.
Often, a wooden sandbox is a square of a given height that protects the sand from spreading.
Sandbox drawings (for a simple design) are given below.


The design can be more complex: including chairs, benches, tables, a lid, a roof, a slide, etc. or a sandbox made in the form of a car (car), a boat-ship, a house-castle.
The diagram below gives an idea of what a sandbox in the form of a machine (sandbox-machine) consists of.
Anyway, functional purpose The basic design is the same - a fence protecting the sand.
Advice. When planning the construction of a sandbox, you should consider how many children it will be designed for.
Stage 2 – Material for the sandbox
The table lists building materials with dimensions and quantities for making a simple sandbox with dimensions 1500x1500 mm, height 300 mm.
| Lumber | Purpose | Quantity | Note | |
| Beam 50*50*450 | Corner element | 4 pcs. | Beam 150 mm. treated with an antiseptic | |
| Board 30*150*1600 | Side walls sandboxes | 8 pcs. | Carefully sanded and coated with wood primer. | |
| Board 30*150*1600 | Sides for sitting, folding toys, etc. | 4 pcs. | Sanded and coated with wood primer. | |
| Wood screws, 45 mm. | For fastening | 50 pcs. | ||
| Geotextiles | For the bottom | 2 rolls | Can be replaced with film | |
| Antiseptic | For wood processing | |||
| Primer for wood | To protect wood | |||
| Dye | For coloring | 1 can (1 liter) | Oil or acrylic | |
| For a closed sandbox (with a lid) you will additionally need | ||||
| Beam 30*30*1600 | 2 pcs. | The timber is cut into pieces depending on the width of the lid | ||
| Board 20*125*1600 or plywood, 18 mm. | 12 pcs. sheet | |||
| Piano hinges (awnings) | 4 pcs. 8 pcs. |
for hinged lid for a cover transforming into seats |
||
| Pens | 2 pcs. | |||
Material prepared for the website www.site
- the length of the beam depends on the height of the sandbox, which in turn is determined by the age of the child. The height of the sandbox should be such that the child can step over it. Optimal height– 300 mm (150 mm remains for digging and fixing the structure).
- The thickness of the boards must be at least 30 mm. This will ensure sufficient structural strength and protect the wood from cracking.
- plywood is indispensable in the manufacture of complex structures, such as, for example, a sandbox in the shape of a ship. They are made from it shaped products round, oval shape.
- It is better to treat the boards before installation. This way, there will be no unprotected parts of the lumber left.
Tool: saw, grinder, drill, drill bits, screwdriver, pencil, tape measure, level, pegs and rope, paint brushes.
Stage 3 – Marking the space for the sandbox
a location for installation is selected. The outer perimeter of the structure is marked with stakes and rope;
Inside the outlined square, soil is selected to a depth of 300-400 mm. You can do without this and pour sand on top of the ground, but it will quickly become unusable because it will mix with the ground during the game. In addition, ants and other insects can live in it;
drainage is arranged - a tightly compacted cushion of crushed stone/gravel and sand. The cushion will allow water to flow freely into the ground and the sand to dry out faster. Additionally, users recommend laying geotextile; it does not interfere with water flow, but protects the sand below from insects or moles.
Advice. When using polyethylene, you need to drill holes in it for water drainage.
Many users complain that puddles appear around the sandbox after rain. This can be eliminated by arranging a cushion and, behind the perimeter of the sandbox, drainage laid at a depth of 400-500 mm. around the sandbox will allow water to quickly drain down.
Stage 4 – Making a children's sandbox with your own hands
Brief construction technology:
- At the corners marked with a rope, stakes are driven in - the support of the future sandbox;
- one board coated with an antiseptic is installed on each side;
- then the second row of boards is nailed;
- to arrange the seats, treated boards (2 on opposite sides, 4 on each side) or plywood corners are installed horizontally on the top of the structure - the most budget option.
Advice. It is important to ensure that the screw heads are securely recessed into the wood and do not cause injury.
The second option is how to make a sandbox out of wood
The method involves a slightly different order of work, namely: first making a sandbox, then preparing the installation site and further installing the sandbox. This option is convenient when the work is carried out together, because The design, although lightweight, is quite cumbersome and it is inconvenient to install it in this order alone.
Step-by-step instructions for making a sandbox with your own hands (master class) are shown in the photo.


Stage 5 – Making a lid for the sandbox
Since a children's sandbox with a lid for a summer house is a more attractive option, let's look at how to make a lid for a sandbox.
The most simple option will removable cover, which is a shield knocked together from boards, but it significant drawback consists in the need to remove the lid before playing.
Therefore, it is more expedient to make a design with two doors that transform (open and fold) into seats. The photo below shows two options for constructing a lid for a sandbox - a folding one and one that transforms into a seat. Please note that the two outer boards on both sides are stationary. They are securely fixed, this will allow a child and even an adult to sit on the lid without fear of breaking it.


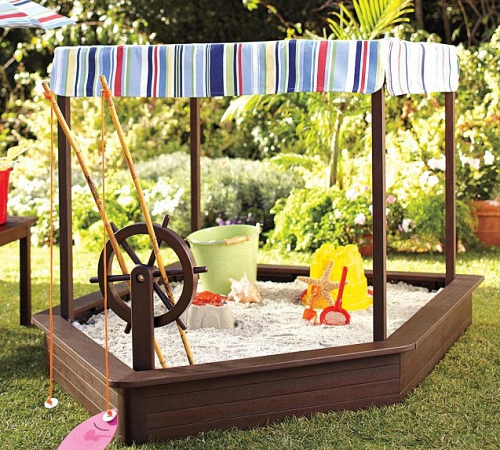
Sandbox option with awning (soft cover, rollable)


Stage 6 – Installation of a roof for the sandbox
Considering that children want to play in the sand at any time of the day, care must be taken to protect them from direct sunlight. To do this, you need to install a canopy over the sandbox. It could be a beach umbrella or fixed roof, made in the form of a fungus/canopy.


Stage 7 – Sand for the children's sandbox
How to choose sand for a sandbox?
It should be noted that GOST (18322-78 (ST SEV 5151-85) and GOST R 52301-2004) regulate the requirements for the maintenance of playground equipment, but do not contain recommendations regarding sand, except that certificates must be provided when selling sand.
However, users have determined what sand is needed for the sandbox and have the following requirements for it:
- absence of foreign impurities/objects;
- good flowability;
- dustlessness. Small particles of sand (fractions less than 0.1 mm) can get into the child’s lungs. To eliminate them, sand is usually washed and dried or sifted through a very fine sieve;
- formability (fits well into beads);
- humidity. The sand must be dry;
- hygiene. The sand should not contain living creatures (bugs, spiders, worms, etc.).
Which sand is best for a sandbox
When choosing sand, it is better to give preference to:
- river, not quarry. It is purer in itself;
- sifted, not containing foreign objects;
- quartz sand is an ideal option. It's clean and molds well.
Ready-made sand for children's sandboxes can be bought in the store. The presence of a quality certificate guarantees its purity and absence of impurities.
How much sand do you need in a sandbox?
In order to fill a sandbox measuring 1500x1500 mm. you need to prepare about 0.5 cubic meters. sand.
The average price per bag (25 kg) of sand for a children's sandbox is shown in the table.
DIY children's wooden sandbox - video
How and where to install a children's sandbox correctly
To ensure that the sandbox lasts a long time and does not pose a threat to children, you need to follow several recommendations when making and installing it:
- do not use metal elements;
- do not leave boards unsanded;
- provide shade;
- place in a clearly visible place;
- ensure the absence of thorny bushes, honey plants and allergens;
- use high-quality wood and other building elements;
- provide reliable fastening;
- lack of electrical wiring, hoses, pipes, etc.
Conclusion
A wooden sandbox with a lid or an open one is an opportunity not only to please your child, but also to show your creativity. A sandbox in the form of a table, car, hexagonal or round will not only delight the child, but will also allow you to decorate your summer cottage with an extraordinary, creative design.
Summer season - best time to gather with families or friends at the dacha who have children. It's easier for adults to find general occupation, including kebabs and barbecues. A comfortable place for kids - a children's sandbox for the dacha and an inflatable pool nearby. They are placed in a secluded corner of the site, and it is better to make them together with friends if you have tools and several planed boards. For the simplest rectangular sand box it will take only a couple of hours. But it’s better to approach this matter creatively and arrange a sandbox for children according to all the rules.
Varieties of decorating children's playgrounds with a sandbox with their own hands
For lovers landscape design It is important that every element in the yard fits into the overall concept and pleases the eye. A thoughtful design of a playground with a children's sandbox with your own hands is a great way to tidy up that part of the yard that has not yet been landscaped. It doesn’t matter if this requires a place where tulips or other colors propagated by tubers grew. It is important that children are supervised and engaged in interesting educational activities. This will free up some time for adults to do something useful or just have some quality rest.

The decor of a play area for children involves using available materials. If you look at this from a practical point of view, items that should have been thrown away a long time ago will get a second life:
- plastic containers and bottles;
- boxes and packaging containers;
- large bricks and foam blocks;
- unnecessary tires and wooden wheels from an old chaise;
- tarpaulin, fishing nets, thick rubberized sheets;
- freshly planed boards and wood scraps;
- large stones and other natural materials.
An equipped playground involves not only a homemade children's sandbox for the dacha. Preschoolers cannot sit without moving for a long time; they consciously or impulsively constantly move somewhere and change their occupation. To do this, children are equipped with:
- benches and tables;
- trampolines and swings;
- labyrinths and paths;
- slides and ladders;
- horizontal bars and parallel bars;
- tire curbs;
- houses, huts and “halabuds”.
Children tend to develop as they grow, and every day they rush to demonstrate to others their small successes. Therefore, you should not deprive them of praise for taking out the sand mold right on the bench or in another inappropriate place. Over time, they will master fortresses and castles by the sea or even in the sandbox built by dad or grandfather on the property. Therefore, it’s worth making an effort, showing a little diligence and all your skills to learn how to make original children’s sandboxes, photo:
Advice: You should not hire a craftsman from outside, his task is to make a wooden sandbox as quickly as possible and get his earnings. Loving parents are able to “work miracles” only for their own child.
IN exciting process All family members can join in to carefully consider how to make a children's sandbox, which will become a real decoration of the summer cottage. Even the most “creative” building for a child is nothing complicated if you do everything step by step, with creative approach. You shouldn’t wait for a special occasion to give your baby a surprise on which his happiness depends, even if it’s just for a few days.
It’s worth thinking about in advance:
- configuration of the playground for children and the appearance of the sand box;
- shape and dimensions;
- the presence of benches and shading;
- necessary materials;
- open format or children's sandbox with a lid.
A sandbox for a child in the country can be considered:
- as a self-contained object or part of an overall design;
- as a center for children's games on the site - benches and crossbars, an awning or “mushroom”, a table for finished products, a lid (to keep the sand clean).
Attention: The design of the sand container affects the emotional background of children's games and the general perception of the summer cottage, but there are other aspects that are important to consider.
Location of the sandbox in the country
Most summer cottages do not have enough space, especially free space. It is important that the child is visible, so the place for enthusiastic play should not be removed to the far corners of the garden.
If the choice of place for a sandbox is limited, then it is placed:
- near the porch or entrance to the house;
- under the window or at a short distance from it;
- opposite the window - for visual contact with the child.
Children should be visible, especially if there are several of them, as they may quarrel and throw sand at each other. And if there is nowhere to install a wooden children's sandbox, you can limit yourself to a box on wheels that is easy to move. One option is to purchase a ready-made sand container made of bright plastic.
If there is not enough space on the site, the sand box is placed in any free place, for example, near a fence to which an awning is attached. Additional shade is provided by a high continuous hedge, vineyard or tall tree. But teach that plants attract insects, dry inflorescences, caterpillars, wilted leaves, barren flowers and stalks fall from the branches.
Remember: Plant debris creates discomfort for a baby playing in the sand. Children instinctively put ripe fruits into their mouths unwashed. During strong gusts of wind, dry branches from a nearby tree may fall into the sandbox, which can injure the child. It is important to do revision and pruning on time garden trees and shrubs, remove dead wood.

Quality of sand in the play container
Guaranteeing the safety of children playing in the sandbox - a clean filler. A cat-proof container and sifted sand for a children's sandbox at the dacha is what doctors and teachers recommend. IN kindergarten in warm weather, change the sand once a month or a little less often. For this, a large river substrate is most suitable, which must be sifted.
Tip: Treat the outer perimeter with a special cat repellent spray from the pet store.
The contents of the sand container gradually decrease - children spread sand around summer cottage. Well-sifted sand for a children's sandbox becomes contaminated by various reasons, dust and soil blown up by the wind from neighboring areas and the street get into it. It is recommended not only to replenish sand supplies, but also to change the entire substrate a couple of times a season. The extracted “old” sand is sprinkled on the yard, paths or entrance to the dacha. Near the sandbox they make a small table or stand for buckets, scoops and other children's equipment.
Benches, tables and benches, alleys
A designated place for children to play must be compacted well after leveling. Paths sprinkled with sand are an excellent option, especially when it rains often, and it is advisable to improve all places for children to play. But if before paving slabs It’s not their turn, children should not make their way to the sandbox through the puddles. The path should not pass by angry dog or through currant and gooseberry bushes.
Sitting on wet sand is harmful to children's health, especially during cold weather. Caring for the child is also manifested in the fact that the construction of a children's sandbox with your own hands involves seating on the side. Great options:
- wide border on the walls around the entire perimeter;
- full-fledged benches adjacent to the sandbox;
- folding seats on a pole for a canopy;
- crossbars at the corners diagonally of the rectangle, as in the photo:

The shape of the sand box and its dimensions
Dimensions country sandbox largely depend on the amount of building materials and free space for its installation. If suitable place Not at all, but the yard of the dacha is paved with paving slabs, make a compact box on wheels for sand.
The dimensions and shape of the space for children's creativity are chosen to suit your taste. Of course, the easiest way to make a square or rectangle from wood. For any children's sandbox, you need drawings that indicate all the dimensions. The only exception, when it is enough to make a simple sketch, is a place for free-form sand from wooden saw cuts.
Tip: A standard sandbox for small children is 1.5m x 1.5m or 1.75m x 1.75m. But if there are several children in the family, and they of different ages, it is advisable to build a multi-section sandbox of complex configuration. This will minimize disagreements, and the kids will not be disturbed by more active older children fussing in the sand, but the younger brother or sister remains in their sight.
When decorating a multi-section children's sandbox at the dacha, places for girls and boys can be decorated in different ways. Children's supermarkets also offer ready-made sandboxes made of plastic; they are comfortable, compact and bright, and easy to clean. But they have 2 noticeable drawbacks - they are very small and break quickly. It makes sense to buy them if there is no person in the family who can independently make a sandbox of any configuration and size.
Canopy or awning for shading?
“Mushroom” is a classic form of sandbox with a canopy. But the pyramidal lid made of wood, crowning the base in the center of the container with sand, casts the shadow to the side if the pillar is very high. And the low canopy creates dangerous situations - children, after playing too much, get “bumps” on their foreheads. Therefore, the canopy over the sandbox should not interfere, and the shadow should not “run away” beyond the sand. The awning on the frame is also made high.
Advice: If the family does not visit the dacha often, and the sandbox is improvised, you can limit yourself to a temporary awning in the yard or a beach umbrella. The sandbox at the site often has natural shade, and if there is none, then a stretched tarpaulin on the south side of the sand area will suffice.
If the place for playing with sand at the dacha is made in the form of a recognizable object, then the canopy must “play along” with the general design concept. For example, an awning in the shape of a sail for a boat or a boat with sand, as in the photo:

Painting a board sandbox
It is important to approach the choice of paint carefully if there is a choice. When painting a wooden sandbox with unstable, cheap paints, fumes with a pungent chemical odor appear at midday. This is extremely undesirable for the baby's health. Therefore, experts recommend choosing harmless paint or performing this work in the absence of household members.
To cover a children's sandbox made of wood with varnish or paint, choose what is safest. It is better to contact specialized stores paint and varnish products or in a construction supermarket. There, the consultant will suggest a quick-drying composition that is safe for the child.
Many exterior paints stick to your hands after finishing the wood. This is extremely undesirable for a child playing in the sand at the dacha - kids lick their “colored” fingers. The sides of improvised sandboxes are also often made from large tires, which are painted in bright colors.
Please note: The safest modern eco-paint for children’s health is made from natural resinous substances. Read the instructions carefully!

Arranging the bottom of a country sandbox
If you are making a place for playing with sand, a sandbox, according to all safety rules, then it is important to think through everything. Even caring parents lose sight of what open ground Insect larvae, worms and microflora enter the base of the sandbox. They didn’t think about this before, but today they recommend lining the bottom of the sandbox with:
- tarpaulin;
- agrofibre;
- fiberglass;
- film membranes.
A great option is to lay unnecessary bricks on the bottom or building blocks, remains of paving slabs. The film is attached with a construction stapler or nails to the sides of the sandbox made of boards. However, an open sandbox with a film on the bottom can easily fill up from a rainstorm, so it is important to consider the slope and drainage.
Decorating a homemade sandbox for a summer residence
The sides of the sandbox and its shape are not a reason for creativity? The walls of the “dry tank” are made of different sizes, and steps or stumps are built. For example, do-it-yourself children's sandboxes, photo:

Polygon-shaped sandboxes or multi-level structures are uncommon. They are dangerous for children, but older children willingly run along the edge of these original-shaped sandboxes.
Designer sandboxes in the form of a mansion for a gnome, car or boat are intended to become the best decoration for the dacha. Sometimes several materials are used for this to give the design more originality.
As everyone knows very well, children love to play in the sandbox, sculpt figures, castles, and just mess around pouring sand from place to place) The activity is very exciting for a child and he can play in the sand for hours, and in the meantime parents can do important things around the house , but the child must remain within sight and under supervision.
To make a sandbox, it is best to use environmentally friendly material (wood), for which you will need boards 30 mm thick and 1.8-2.4 m long, as well as 50x50 timber for attaching the corners. You need to make a box out of the boards, then sand them thoroughly so that the child does not get scratched or get a splinter. For durability, it is necessary to coat it with a special impregnation for wood, and then paint it in a bright and joyful color. Before installation, the top layer of turf is removed and agrofibre is laid so that worms and beetles from the ground do not crawl into the sand, and the sand does not sink into the ground.
So, let's look at what exactly the author needed to make the sandbox?
Materials
1. board 30 mm
2. timber 50x50 mm
3. bolts, nuts, washers, engravers
4. screws
5. paint
6. wood putty
7. agrofibre
8. staples (for stapler)
Tools
1. hacksaw
2. drill
3. screwdriver
4. ruler
5. pencil
6. roulette
7. key head
8. spatula
9. brush
Step-by-step instructions for creating a children's sandbox with your own hands.
Before starting construction, you should decide on the selection and marking of a suitable location on the site. The sandbox should be in sight of adults so that the child is under control. Children need sun) but in moderation, which means they need a canopy that protects from ultraviolet radiation or, as they usually do, a fungus. The space should not be blown through by wind. The sandbox can also be placed next to a tree that will let in the optimal amount of light and provide shelter from the wind.
Having decided on a place, it needs to be cleared and marked.

Then you need to prepare the boards, namely how to plan them, so that they are even and smooth.

First you need to try it on and figure out how everything will be located.

The corner is sawn to the height of the side board.

2 holes are drilled in the upper and lower parts, then drilled out with a crown - this is done so that the nut is recessed into the cavity of the wooden beam.

In the same beam, 2 more holes are drilled in exactly the same way, but the location in height is different, so that later the connections do not intersect.

And so all 4 bars.


It turns out that a beam located in the corner secures 2 boards.

This is how the box itself is assembled.

It is imperative to make benches on top of the box so that the child can sit and play comfortably.

He cuts out blanks and tries them on.

The corners of the benches are twisted using self-tapping screws.

The master also sinks the self-tapping screw into the cavity of the board so that nothing sticks out of it.

For greater reliability, everything is secured with a metal plate on the back side.

He screws the bench directly to the box where he previously drew a guide line.

The master seals the joints where gaps and cracks remain with a special putty for wood; it can also be used to seal the heads of screws recessed into the wood, that is, everything will turn out uniformly and neatly. By the way, you can easily make this kind of putty yourself, you need to take some small sawdust after sanding and add wood glue to it, stir it in some kind of bowl and bring it to a homogeneous mass (in the form of semolina), and then you can putty it. This putty will be no worse than store-bought putty.

The putty surface must be given time to dry, and then everything must be sanded thoroughly.

The dust generated during the grinding process should be blown off and wiped with a damp cloth.

In order for the sandbox to be durable, it needs to be coated with impregnation and then painted in a bright, joyful color.

And so, the box itself is ready, now you need to remove the layer of turf in the marked area.