Valve clearance adjustment. Probes in hand - wheelbarrow to pitch! Adjusting the engine valves of a modern car
Valve drive types
During vehicle operation, as a result of wear and heating of the mechanical parts of the gas distribution mechanism, the gap between the levers (rocker arms) of the valves and the camshaft cams changes (in other types of engines, between the camshaft and pushers, between the rocker arms and valves). Therefore, periodically (after about 30 thousand km), as well as with any repairs to the mechanism or removing the cylinder head, this gap should be checked and, if necessary, adjusted in engines with a mechanical valve drive.
The quantity thermal gap for each engine is individual and ranges from 0.10 mm in Volkswagen GT cars to 0.60 mm in Ford Fiesta cars. V technical characteristics engines can be given thermal clearances for both cold and hot engine, and for a hot engine, the clearance can be either larger or smaller, depending on the design of the gas distribution mechanism.
Cold consider the engine, the temperature of the coolant in which is below 35 ° C, which is achieved by cooling the engine after warming up for at least 4 hours at a temperature environment 20 ° C. Hot consider the engine, the temperature of the coolant in which is about 80 ° C (the moment the large circuit of the liquid circulation is turned on).
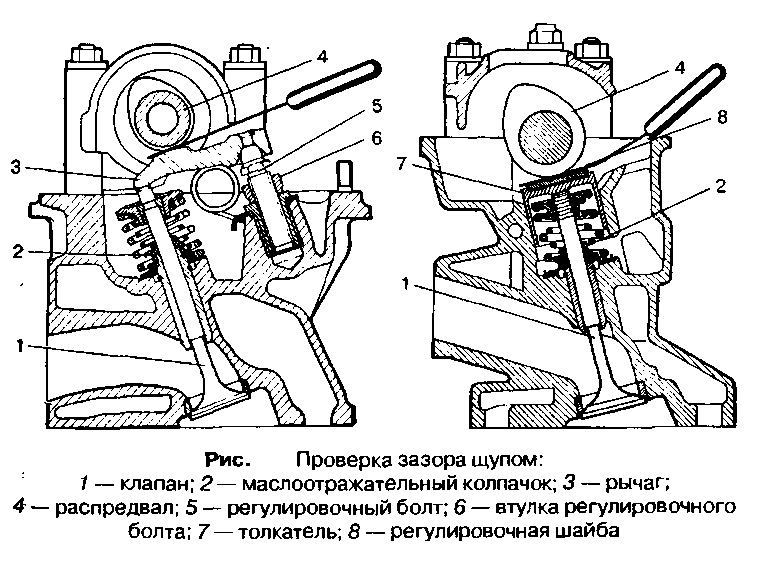
Check and adjust the thermal clearances of the valves when closed valves, i.e., at the maximum distance of the top of the camshaft cam from the rocker arm (pusher rod, pusher) of the valve. This shaft position can be achieved different ways... Checking the gaps is done with a feeler gauge (Fig.)
Fig .. Adjustment of clearances in the gas distribution mechanism:
1 - barbell; 2 - lock nut; 3 - adjusting screw; 4 - screwdriver; 5 - rocker; 6 - probe; 7 - valve
The most common is the way in which the valve clearances of the 1st cylinder are first adjusted; while its piston is at TDC on the compression stroke.
The compression stroke is determined by the increase in air pressure in the cylinder when the piston moves at TDC. To determine this cycle, it is necessary to unscrew the spark plug (nozzle), close its hole in the cylinder block with a special whistle, plug or just a finger and turn the crankshaft until a whistle occurs (pushing the plug, a sharp increase in pressure on the finger).
For gasoline engines, the position of the piston on the compression stroke near TDC can be determined by the position of the breaker slider - ignition distributor, if the breaker was not removed and the engine was not disassembled (assembled). With the distributor cover open, the slider should be located near the high-voltage outlet leading to the spark plug of the 1st cylinder.
The piston is located near TDC and when a spark overshoots at its spark plug (in gasoline engines). To determine TDC, unscrew the spark plug (or disconnect the high voltage wire from it and connect it to a “spare” spark plug or spark gap), turn on the ignition and turn the crankshaft until a spark appears on the spark plug. After finding desired position the piston combines certain marks on the crankshaft pulley and the gear cover (sprocket, pulley) of the camshaft drive, marks on the flywheel and other parts.
After adjusting the thermal clearances of the valves of the 1st cylinder, the clearances in the remaining valves are adjusted in the order of their operation, each time turning the crankshaft by 180 (for 4-cylinder engines), 120 (for 6-cylinder) or 144 (for 5-cylinder).
For some engines (for example, VAZ), it is recommended to combine the marks on the camshaft cover and its drive pulley, which corresponds to the end of the compression stroke in the 4th cylinder. In this position, the thermal clearance of the exhaust valve of this cylinder and the intake valve of the 3rd cylinder, and then of other cylinders, is adjusted, in the order of their operation, each time turning the crankshaft by 180.
The less accurate position of the cams relative to the tappets or their rocker arms can be determined visually by the rotation of the camshaft. In this case, the shaft cam should be as far as possible from the pusher (rocker arm), that is, it must face the pusher with the back side, and the valve is closed.
Engines of modern passenger cars do not have a handle for manually turning the crankshaft. Therefore, its rotation to determine the moment of closing the valves in the cylinder, in which it is planned to adjust their thermal clearances, can be carried out using a key or a special device that is put on the central bolt of the shaft belt pulley. It is not recommended to turn the crankshaft by the camshaft pulley mounting bolt, as this can damage the bolt or stretch drive belt... In the absence of such a bolt, the crankshaft can be turned by turning the wheels of the drive axle, hanging the wheels of the car and engaging direct gear. Previously, to facilitate this operation, it is advisable to unscrew the spark plugs (in gasoline engines).
In practice, the method of cranking the crankshaft using the transmission has also found application - rolling the car when the direct (overdrive) gear is engaged. With this method, the closing moment of the valves is determined visually. After adjusting the thermal clearances of the valves of a certain cylinder, the car is rolled again until the camshaft cam resting on adjustable valve, will not be as far as possible from the pusher (rocker arm) of the latter.
There are several options for the transfer of force from the camshaft cams to the valve stems (i.e. types of valve drive), and hence the methods for adjusting the thermal clearances.
1. Drive through a rod and a rocker arm (Fig. 4.44) for Renault, Ford, early releases, Volga, Gazelle. With this version of the drive, the thermal gap is checked between the rocker arm and the valve. When the gap deviates from the nominal, unscrew the nut of the adjusting screw and, turning the screw with a screwdriver, set required clearance along the laid probe. After that, holding the adjusting screw with a screwdriver, lock it with a nut and check the correctness of the gap setting.

Rice. 4.44. Valve drive through the rod and rocker arm:
1 - valve seat; 2 - valve; 3 - slinger cap; 4, 5 - valve springs; 6 - plate of springs; 7 - biscuit; 8 - rocker; 9 - adjusting screw; 10 - adjusting screw nut; 11 - pusher skirt; 12 - support washer of springs
2. Drive through a rocker arm (Fig. 4.45) for cars "Mazda-626", ZAZ-1102. With this design, the camshaft cam acts on the rocker arm, at the end of which a roller bearing can be installed to increase service life. The other end of the rocker arm has an adjusting screw with a locknut that acts on the valve stem. To adjust the clearance, loosen the locknut and turn the adjusting screw to achieve the required clearance between the end of the valve stem and the adjusting screw, and then tighten the locknut.

Rice. 4.45. Valve drive via rocker arm:
1 2 - rocker; 3 - adjusting screw; 4 - lock nut; 5 - clearance
3. Drive through a rocker arm and an adjusting eccentric (Fig. 4.46) for BMW-518, BMW-520 vehicles. With this version of the drive, the cam acts on the rocker arm, which, through the adjusting eccentric, comes into contact with the valve stem. The clearance is measured between the eccentric and the end of the rod. If the size of the gap does not correspond to the required one, use a screwdriver or a special rod (2 mm thick) to turn the eccentric so as to obtain the required gap, and then tighten the lock nut.

Rice. 4.46. Valve drive via rocker arm and adjusting eccentric:
1 - adjusting eccentric; 2 - rocker; 3 - camshaft cam
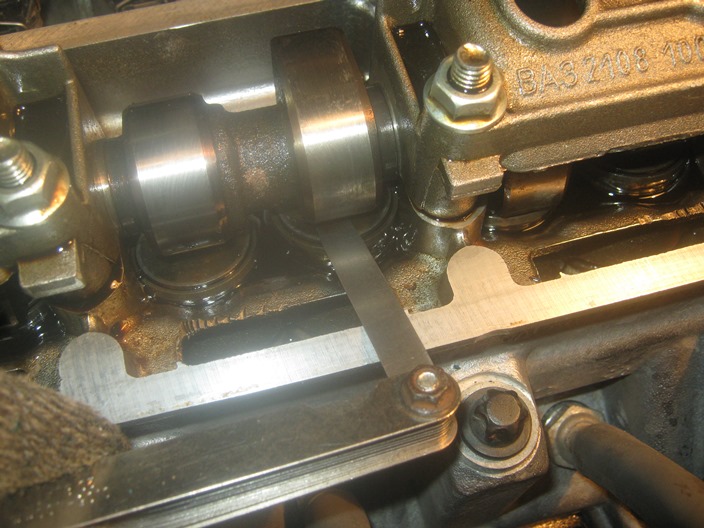
4. Drive through the lever (Fig. 4.47) for cars "Mercedes-Benz 123", "Suzuki". With this design, the camshaft cam acts on the shoulder of a special lever, the back surface of which transfers the force to the adjusting nut located at the end of the valve stem and locked with a locknut. If it is necessary to adjust the thermal gap, the locknut is loosened, the required gap is set by turning the adjusting nut (by laying a probe of the appropriate thickness between it and the lever) and the locknut is tightened.
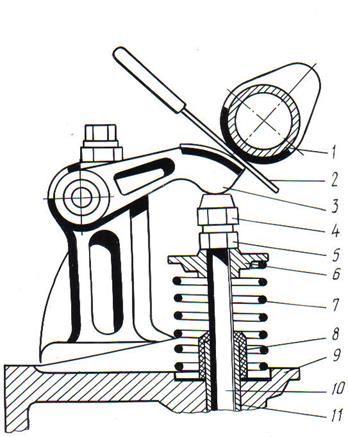
Rice. 4.47. Valve drive via lever:
1 - a cam of a camshaft; 2 - a probe for adjusting the thermal gap; 3 - lever arm; 4 - adjusting nut; 5 - lock nut; 6 - valve spring plate; 7 - valve spring; 8 9 - cylinder head; 10 - valve stem; 11 - valve guide sleeve
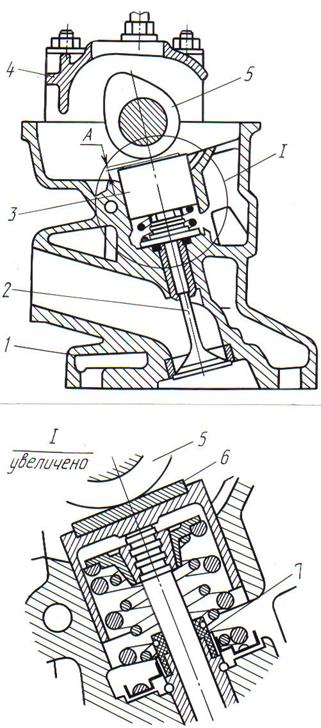
5. Drive through a rocker arm with 4 supporting surfaces (Fig. 4.48) for VAZ-2101… VAZ-2107 vehicles. With this version of the drive, the thermal clearance is checked directly between the rocker arm and the camshaft cam. For adjustment, loosen the locknut, set the required clearance by rotating the adjusting bolt (by laying a probe of the appropriate thickness between the camshaft cam and the rocker arm) and tighten the locknut.

Rice. 4.48. Valve drive through a rocker arm with 4 bearing surfaces:
1 - cylinder head; 2 - valve; 3 - valve guide sleeve; 4 - rocker; 5 - camshaft bearing cover; 6 - a cam of a camshaft; 7 - adjusting bolt; 8 - lock nut; A- thermal gap
6. Drive through a cup pusher (Fig. 4.49) for Ford, Opel, Volkswagen, Audi, VAZ-2108 ... VAZ-2110. Such a drive is most common in car engines from 1980 to 1990. release. The camshaft acts on a cup pusher, the force from which is transmitted to the valve through an adjusting washer. In such a drive, there are no rocker arms, which increases the reliability of the gas distribution mechanism.
Rice. 4.49. Valve drive through cup pusher:
1 - cylinder head; 2 - valve; 3 - cup pusher; 4 - camshaft bearing housing; 5 - a cam of a camshaft; 6 - an adjusting washer; 7 - valve stem seal; A- thermal gap
The thermal gap is adjusted by adjusting the thickness of the adjusting washer. If the gap differs from the nominal, use a screwdriver to turn the cup pusher to a position that provides access to the adjusting washer through the slot in its upper part. The pusher is recessed using a special device (in its absence - with a screwdriver) and is fixed in the lower position (Fig. 4.50). After that, using another device (a steel plate with a flat magnet), and if it is not available, the adjusting washer is removed with tongs, a magnet or compressed air. The thickness of the washer is measured with a micrometer, and then the thickness of the new washer is determined by the formula
H = B +(A - C),
where H- the thickness of the new washer; V- the thickness of the removed washer; A- measured clearance; WITH- nominal clearance. So, for example, let A= 0.29 mm, V= 3.75 mm, WITH= 0.20 mm. Then
H= 3.75 + (0.29 - 0.20) = 3.84 mm.
Within a tolerance of ± 0.05 mm, the thickness of the new washer is taken to be 3.85 or 3.80 mm.
A new washer is installed in the valve tappet with the markings towards the tappet. During assembly, the washer and pusher are lubricated with oil. After adjusting the thermal clearances of the valves of such a drive, it is necessary to pour oil into oil baths cylinder heads.
Spare parts are supplied with shims from 1.65 to 4.00 mm in 0.05 mm increments.
When checking the thermal clearances of the valves in the actuator valve train any type of probe should be slightly pinched in. In order to ensure the accuracy of the test, you can use a slightly thicker and slightly thinner styli. At the same time, the thicker stylus should not enter the gap, and the smaller stylus should enter freely.
Since the 80s, on most engines of foreign cars, hydraulic pushers have been used to drive the valve mechanism, which do not require adjustment during operation.

Rice. 4.50... Drowning ( a) and fixation ( b) of the valve tappet to replace the adjusting washer:
1 - device for recessed pusher; 2 - cup pusher; 3 - a device for fixing the pusher; 4 - adjusting washer
Adjusting valve clearances in a car engine: why and how to do it?
On the engines of many modern cars, valve clearance adjustment is not necessary due to hydraulic lifters. If there are none, then the manufacturer must indicate in the repair manual exact dimensions engine valve clearances, non-observance of which results in:
- to a decrease in engine power;
- unstable idling;
- increased fuel consumption;
- premature wear and failure of timing parts and some others (we will consider later).
Consequences of increased valve clearances
Valve clearance measurement
When the engine is running, the parts of the gas distribution mechanism become very hot. Because of this, there is a linear increase in their size. Therefore, when assembling, it is important to observe the thermal clearance of the valves to compensate for this increase. This will prevent increased friction between parts. But the increased valve clearances do not allow the drive mechanism (which includes the camshaft, rocker arms, pushers, etc.) to open them to the required amount. Consider what this leads to.
An insufficiently open intake valve will prevent the combustion chamber from filling with the fuel mixture, which will negatively affect engine power.
In such a situation, the exhaust will interfere with the removal of combustion products, which is why carbon deposits appear on the parts, which will be deposited on:
- the bottom of the piston and the surface of the combustion chamber, impairing heat dissipation and thereby contributing to overheating of parts;
- a spark plug for a gasoline engine or a glow plug for a diesel engine, which will fail prematurely as a result;
- work surface(chamfer) of the valve and its seat, which will prevent them from snuggling against each other and cause a decrease in compression in the cylinder.
In addition, large valve clearances increase the shock loading of the interacting parts and can provoke:
- work hardening of the upper ends of the valves;
- saddle deformation;
- breakage of springs;
- damage to pushers;
- breakage of the rocker arms.
On a running engine, excessive clearances give themselves away with a resonant characteristic knock.
Reduced engine valve clearances can inhibit snug fit the latter to the seats, due to the fact that the valve "lengthened" from heating will be pressed from the seat by the pusher. In this case, the significantly overheated edge of the outlet can be burnt. In addition, compression naturally decreases.
Clearance between valve and guide sleeve
Excessive increase in the diameter of the bore of the guide sleeve due to wear causes the valve-sleeve pair to begin to work like vacuum pump, "Pumping out" oil from under the valve cover into the combustion chamber. We have already talked about what the formation of soot leads to. Another unpleasant consequence of bushing wear is oil consumption.
Measurement and adjustment
Adjusting valve clearances
Detailed description of these procedures will take up a volume the size of a brochure, since along the way it would have to go into technical terminology and details of the timing device of various designs.
Basic and necessary rules concerning for all ICEs without exception:
- measurement and adjustment of valve clearances should be carried out only on a cold engine;
- these actions should be carried out only when the valve is closed, for which you need to know the order of operation of the cylinders and the location of the timing marks on the sprockets (gears) of the camshaft (or camshafts) and crankshaft;
- the marks on the sprockets and gears must be precisely aligned with the marks on the engine housing, turning the crankshaft in the direction of rotation. For two crankshaft revolutions, the camshaft makes one revolution.
The simplest measuring tool is the valve adjustment dipstick. For classic "Zhiguli", for example, it is sold separately (0.15 mm), but on some motors, not all valves have the same clearance (for example, on the ZMZ-402) and a set of probes is required. Using a micrometer, you will achieve greater accuracy, but you must use it in conjunction with a gap measuring device.
Special tools are used to adjust the valves.
For the same "Zhiguli" it is a rail, which is installed on the studs of the camshaft "bed". It shows the angles of rotation corresponding to the closed position of a valve.
except measuring instruments, sometimes you need devices to adjust the valve clearances.
For example, on engines of the VAZ 2108 family, this is a set of two tools. One pusher of the valve ("cup") is squeezed from the camshaft cam, the other fixes this position of the pusher, which makes it possible to replace the adjusting washer.
In any case, if you decide to make the adjustment yourself, auto parts stores will not leave you barehanded.
For more information on adjusting valve clearances (for example, VAZ cars), see the video on our website!
Uninterrupted operation of an internal combustion engine requires periodic adjustment of its valves. They are located in the cylinder head and belong to the gas distribution mechanism. We will show you how to adjust the valves yourself.
Preparing to adjust engine valves
The operation to adjust the valve clearances is included in Maintenance your car. On domestic cars, it is carried out every 15 thousand km, for foreign cars - every 30 thousand or 45 thousand km. The fact is that when the gaps change, the valve timing is shifted. In this case, the engine starts to work intermittently due to lack or excess of fuel. In the most neglected cases compression will disappear (the engine simply will not start) or the valves will meet the pistons (it will be required overhaul device). The latter is true for both gasoline and diesel engines.
How to determine if adjustment is required
Professionals identify the following symptoms of improperly adjusted clearances:
- The engine is troit, compression in the cylinders is noticeably different or completely absent. If the gaps are too small, the valves do not close completely, therefore the tightness of the combustion chamber is compromised.
- Extraneous knocking is observed at the top of the engine. This can be caused by both too large (knock of the pushers on the valves) and too small (the valves rest against the pistons) clearances.
If any of the listed symptoms are present, check for gaps in the valve train.
Clearance adjustment is always carried out on a cold engine. In this case, the cylinder head with the camshaft is installed and tightly tightened. The dependence of the size of the gaps on temperature is shown in the table.
Table: dependence of the size of gaps on temperature
| Standard 0.15 | ||
| Temperature degrees |
mm | indicator |
| -10 | 0.128 | 44.1 |
| -5 | 0.131 | 45.4 |
| 0 | 0.135 | 46.8 |
| 10 | 0.143 | 49.4 |
| 20 | 0.15 | 52 |
It follows from the table that optimum temperature for adjustment - 20 degrees.
V mandatory clearance adjustment is required:
- after engine bulkhead;
- after removing and installing the cylinder head.
When replacing equipment with a gas cylinder, it is not necessary to adjust the valves.
Valve adjustment on domestic cars
The simplest adjustment is carried out on domestic cars of the VAZ family.
Video: how to adjust valve clearances on a VAZ 2106
The clearance is adjusted using a flat probe. First, you should set the piston of the first cylinder to top dead center (TDC). Then we adjust the clearances according to the table.
Table: sequence for adjusting valve clearances
The adjustment process differs depending on the VAZ model. So, on the VAZ 2106, the clearances in the valve mechanism are adjusted using a screw with a locknut.
On the VAZ 2106, the gaps in the valve mechanism are adjusted using a screw with a locknut
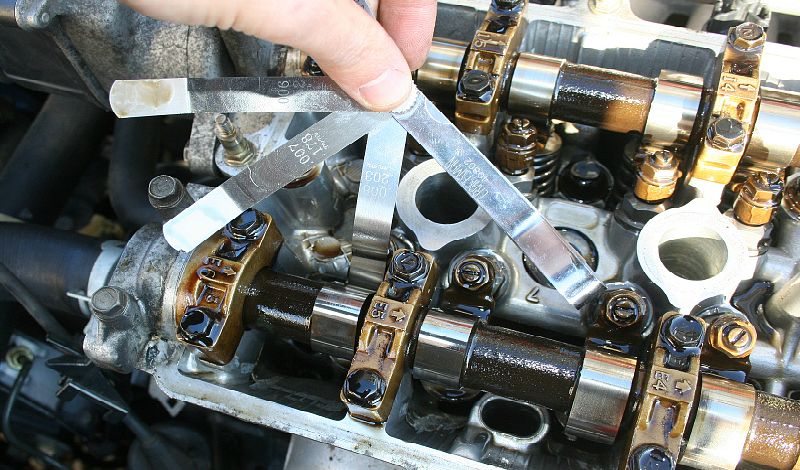
On the VAZ 2108–09, adjusting washers are used for this, and the amount of clearance is determined using flat probes.
 On the VAZ 2108-09, the gap is determined using flat probes
Earlier, in the days of the USSR, a special rail with an indicator was used to accurately adjust the valve clearances.
 Previously, a rail with an indicator was used to control the valve clearance
 The VAZ 2106 engine clearances are adjusted immediately, without intermediate measurements. On the VAZ 2108–09, a set of shims should be used. After measuring the clearance, the old washer is pulled out, and in its place, taking into account the measurements taken, a new one is selected.
 On the VAZ 2108-09, adjusting washers are used to adjust the valve clearances
A special puller is needed to replace the washers.
 To replace the adjusting washers on the VAZ 2108-09, a special puller is required
When adjusting the gaps, the valve cover is first removed, and then the puller is installed.
 Replacing shims with a special puller
When adjusting valve clearances, the type of engine (petrol, diesel or gas) is absolutely not important. The only thing that matters is the design of the valve-pusher-camshaft assembly. By changing the clearances, it is possible to shift the valve timing by several degrees (the moments of opening and closing, expressed in degrees of crankshaft rotation).
 By changing the valve clearances, you can shift the valve timing
The phase shift occurs when the camshaft is displaced relative to the crankshaft by repositioning the timing chain or belt. Usually, such an adjustment is only needed when forcing engines or chip tuning, so we will not consider it here.
Hydraulic lifters are often used in modern engines. With their help, the valves are adjusted under the action of a spring and oil is supplied from the engine lubrication system. In other words, hydraulic lifters automatically adjust the clearances while the engine is running.
How to adjust valve clearances on foreign cars
First of all, using the instructions for the repair and maintenance of your car, we determine the type of engine. The fact is that some foreign cars can have up to ten types of engines on one car model. There is also indicated the tool necessary for adjusting and installing timing marks. However, in most cases the set wrenches and flat probes. Consider the features of adjusting the clearances on the Mitsubishu ASX 1.6 with a gasoline and diesel engine.
Gas engine
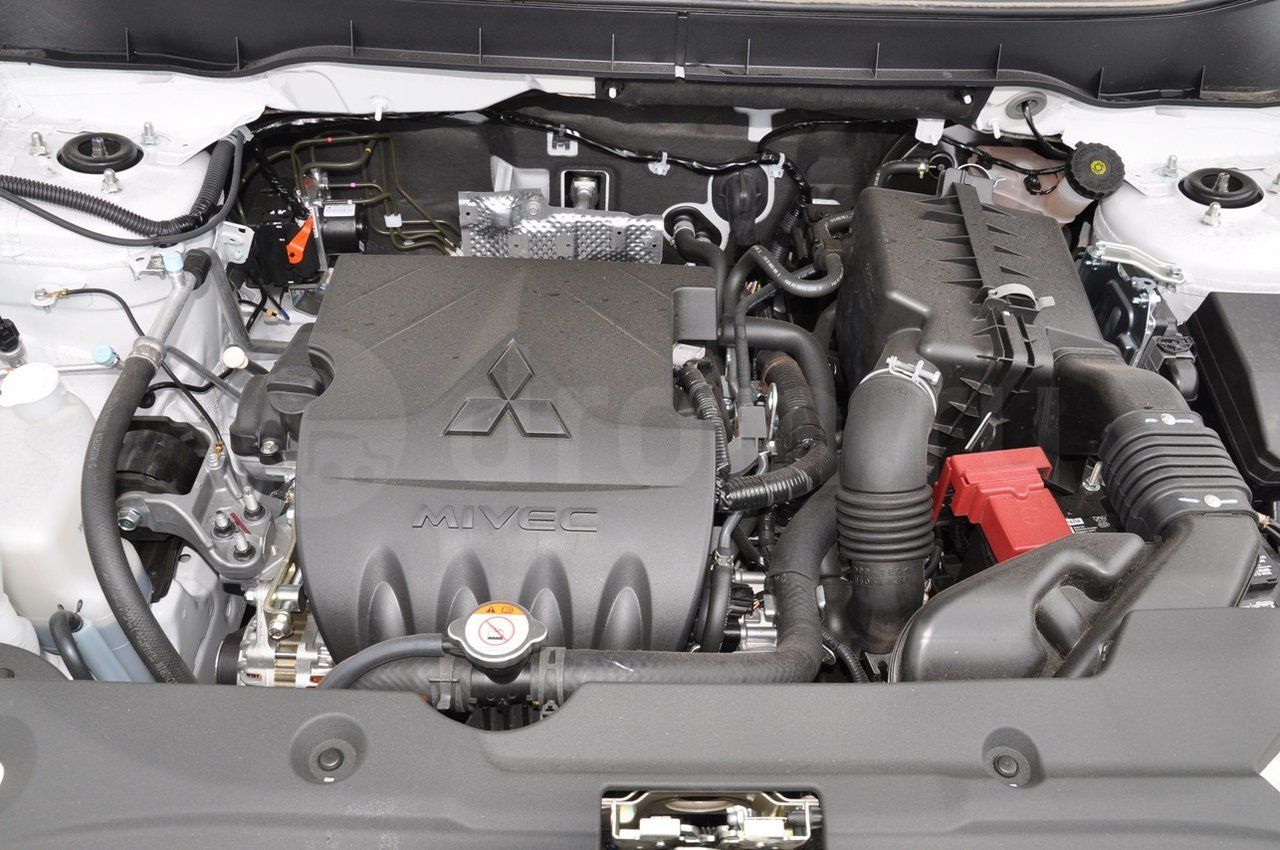 It looks like a Mitsubishu ASX 1.6 engine with a gasoline engine
To do this, follow these steps:

Diesel engine
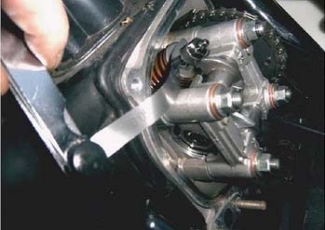
Sometimes Mitsubishu ASX 1.6 can be equipped with a diesel engine. In this case, the valves are adjusted using the bolts in the tappets.
 This is how the valve clearances on the Mitsubishu ASX 1.6 with a diesel engine are adjusted.
The main signs of incorrectly performed work
If the valve clearances are set correctly, the engine will run quietly and smoothly. With increased intervals, it will emit extraneous knocks and noises, with reduced intervals, it will work unevenly. Further operation of such a car is impossible, you need to carry out repairs yourself or contact service center... Otherwise, you may lose your car.
The trouble-free operation of your vehicle is largely determined by regular valve clearance adjustments. The frequency of these operations is set by the manufacturer, and the adjustment technology is quite simple and does not require special knowledge and skills. Good luck on the road!
While the cars that entered the VAZ classic series, and these are models from 2101 to 2107 and "Niva", will drive on the roads of the country, their owners will have to study how valve clearances are regulated. These new cars are equipped with self-adjusting hydraulic compensators, which independently adjust the operation of the gas distribution mechanism. The good old Zhiguli need more attention.
Why are the thermal clearances of the valves set?
One of the most common types of adjustment work is the adjustment of the gas distribution mechanism, in particular the gap that must take place between the camshaft cams and the rocker (valve lever).
Many people have a question about what this gap is for? Wouldn't it be better to adjust the parts so that they just fit as tightly as possible to each other? The answer to this question is found in school textbooks on physics, and more specifically in the section talking about thermal expansion solids.
The fuel mixture, burning in the cylinder, heats all parts of the engine, without exception, to a very high temperature... Naturally, all the details increase slightly in size. For the gas distribution mechanism, such an expansion can lead to negative consequences. The inlet and outlet valves must close the seat very tightly. If the valve stem rests rigidly in the upper part, then during thermal expansion, its disc will go down and the channel will be slightly open, and this leads to an undesirable result, namely:
- decrease and loss of motor power;
- increased fuel consumption;
- overheating and destruction of the timing parts (valves, and so on) by the escaping flame.
To ensure that the valve always remains closed during expansion and the thermal clearance of the valves is calculated. A gap is present on a cold motor, but when its temperature reaches operating parameters, the gap gradually decreases. Naturally, the driver is interested in what valve clearance is set during regulation. The gaps are strictly set - 0.15 mm. An adjustment error of 0.05 mm is allowed. This value is calculated for a cold engine. Regulation on a hot engine is allowed, but this setting is considered inaccurate.
- sustainable;
- fuel economy;
- increasing the motor resource.


What you need to prepare for regulation
Fearing to do something wrong, many motorists, if necessary, adjust the valves, go to a car service. Considering that such a procedure should be carried out, on average, after every 15-20 thousand km of run, you have to pay a significant amount, from family budget... In addition, a lot of time is spent waiting in line at the service, and the motor must cool down to the required temperature. Therefore, it is better to adjust the valve clearances yourself in a garage. This work is simple and the tool for the operation will need a simple one:
- stylus 0.15 mm thick;
- wrenches.
In order to start work, it is necessary to install the car in a well-lit place or equip an artificial illumination of the engine compartment. Next, detach the case air filter, timing case cover, remove the dipstick.
Adjusting the thermal clearances of the valves
To start the process of adjusting the clearances, you should set the piston of the first cylinder to the top dead center on the compression stroke. It's simple: you should turn the crankshaft with a key until the drilling on the camshaft drive sprocket matches with the fusion and the marks on the crankshaft pulley and the engine block.
Now you can start directly adjusting the gaps, and this is done like this:
- the probe is inserted between the working parts of the cam and the lever of the corresponding valve;
- if the dipstick enters with little difficulty, the clearance can be considered normal;
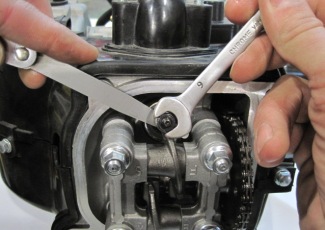
- if the probe does not fit, it goes in very tightly or passes without any effort, it is necessary to start the adjustment: hold the head of the adjusting bolt with a key 13, release the lock nut with a key 17 and turn the bolt in the right direction until the required clearance is obtained, check the clearance height with a probe, after why tighten the lock nut.
The 8th valve (4th cylinder) and 6th valve (3rd cylinder) are regulated first. The valves are regulated in pairs, and for each of them the camshaft must be turned 90 ° (crankshaft 180 °). With each next turn, the following valves are adjusted:
- No. 4 (2nd cylinder) and No. 7 (4th cylinder);
- No. 1 (1st cylinder) and No. 3 (2nd cylinder);
- No. 5 (3rd cylinder) and No. 2 (1st cylinder).
Perhaps, on the first try, you, as a novice auto mechanic, will not be able to make the perfect adjustment of the valve drive, but after a while, the adjustment skills will come by themselves. It is desirable that the work, especially the first time, be supervised by an experienced mentor.
Even an experienced car enthusiast should definitely check the compliance of the technology for adjusting thermal gaps. This is done after the check and adjustment of all valves has been completed. Using a key or hanging the rear wheel, it is necessary to turn the crankshaft several times. After that, you should install the crankshaft and the camshaft on the coincidence of the marks and check the clearances according to the algorithm described above. Repeat the gap adjustment if necessary.
Page 1
An increase in the thermal gap is accompanied by a metallic knock, which is well heard at a low engine speed when the engine is running without load. In this case, there is an increased wear of the ends of the valve stems and a decrease in engine power due to incomplete opening of the valves.
An increase in the thermal clearance in the valves causes a deterioration in the filling of the cylinders with a combustible mixture, a drop in power, difficulty in starting the engine, and also leads to the appearance of a characteristic metal knock. With a decrease in the air gap at the intake valves, part of the combustible mixture is thrown back into the intake manifold, which causes flashes to appear in it. With a decrease in the thermal clearance at the exhaust valves, part of the combustible mixture during the compression stroke is pushed into the exhaust pipe, in which it burns, which leads to the appearance of pops in the muffler.
An increase in thermal clearances in the valve drive is less dangerous because, accompanied by an increased knock, it is recognized by the owner in a timely manner. Much more dangerous is the decrease or absence of thermal clearances in the valve drive, since knocking may not be heard at all.
To increase the thermal gap, the ends (bevels) of the joints are sawn off, to reduce it (in order to prevent gas leakage), they are soldered with copper and one joint is sawed off. The thermal gap increases as the rings wear.
With an increase in thermal clearances, the knock of the valves increases, the filling of the cylinders with a fresh combustible mixture and the cleaning of exhaust gases from them deteriorate, which makes it difficult to start the engine and leads to a decrease in power. Additional signs of a loose intake valve fit are flashes in the carburetor, and a loose exhaust valve fit - shots from the E silencer.
| Schematic diagram of the K-69 M NIIAT device. |
Valve knocks can be heard well on a warm engine. They arise as the thermal clearance between the valve stems and the toe of the rocker arm increases.
The thermal gap in the lock is measured with a feeler gauge at the ring inserted into the hole of the caliber ring cage. The ring cage is placed on a flat plate, the piston ring is inserted into it and pressed against the plate until it stops, then the thermal gap is measured with a probe. With an increase in the thermal gap in comparison with the initial 3 - 4 times, the rings are replaced.
If the thermal gaps in the valve drive are increased, then the knock of the valves is heard when the engine is cold, and as it warms up, it increases slightly and is heard clearly. This is a characteristic thump, usually at regular intervals; its frequency is less than any other knock in the engine, since the valves are driven by a camshaft, the speed of which is half the speed of the crankshaft. You should not operate the engine with a clearly audible knock of valves, since with an increase in thermal clearances, the filling of the cylinders and their cleaning of combustion products deteriorate, and shock loads increase. Knocking is eliminated by adjusting the thermal clearances in the valve drive.
In sliding pistons, the condition of the babbitt weld is checked. Before installing the piston on the piston, the piston rings are checked for adherence to the cylinder bore, for the radial and thermal clearance in the frame, as well as for warpage. The thermal gap is also checked with a feeler gauge. To increase the thermal gap in the lock, the joints are sawed, to reduce, one of the joints is soldered with copper and then filed. The inner edges of the rings are rounded off with a scraper. The rings in the groove are wound along three to four guide strips laid between the ring and the generatrix of the piston.
Practice shows that in most cases, leaks can be eliminated by tightening the connections or replacing damaged gaskets. Increased smoke at the outlet of a diesel engine or an increased content of CO in the exhaust gases of a gasoline or gas engine most often occurs due to a malfunction of the fuel equipment. Knocks and sharp noises can be due to wear of the piston pins, holes in the piston bosses and in the bushings of the upper connecting rod heads, wear of the connecting rod and main bearing shells. They also appear when the surfaces of the cylinders and pistons are scored, as well as when the thermal clearances in the valve drive increase or the valve springs break.
Pages: 1


