Four main principles - how to attach drywall to the profile. Installation of a profile for drywall guide type Fastening drywall to the profile
Specialization: master in the construction of plasterboard structures, finishing work and installation of floor coverings. Installation of door and window blocks, facade finishing, installation of electrics, plumbing and heating - I can give detailed advice on all types of work.
From how correctly the installation of profiles is carried out, both the strength and appearance walls. If everything is done with high quality, then in the end you will get perfect flat surface, which is easy to finish and which will be distinguished by reliability and durability. I will describe the workflow in great detail so that you can understand it as best as possible.
Profile mounting technology
We will not think about the pros and cons of this option, they are already well known, but we will immediately begin to consider the workflow. To begin with, let's deal with its main stages, and to make everything as clear and visual as possible, I made a small diagram.

Stage 1 - surface marking
To obtain perfect wall, you need to build an even frame. That is why, first of all, we need to outline the plane of the future wall, and the markings will be made along the floor, ceiling and adjacent walls, and not along the surface being trimmed, because the frame is indented from the base.
To work, you need the following set of devices:
- Two building plumb;

- Construction cord or fishing line;
- Dowels or nails for fastening (depending on the type of base);
- Rule with level;
- Pencil or chalk for marking.
Now let's analyze the workflow in detail, because if you make mistakes at this stage, then your wall will learn to curve. The work instructions look like this:
- First of all, you need to determine the most protruding place on the plane of the wall, we cannot go below it, so it is important to initially determine the starting point. Then you can simply hold the plumb line in your hand and make a mark on the floor and ceiling, then step back at least 3 cm so that you can place the profile and fix it with straight hangers;
- You need to fix plumb lines along the edges of the wall in order to create vertical guidelines, for this you need to fix a nail or dowel in the ceiling, and then hang the structure so that the tip of the weight does not touch the floor surface. No elements should touch the rope or fishing line on which the load is hanging, otherwise the vertical will turn out to be distorted;

- Then a cord or fishing line is stretched horizontally so that the thread slightly touches the fishing line on the plumb lines. You need to make three horizontal lines - above, below and in the middle, this will be an excellent guideline and will allow you to markup as quickly and as accurately as possible;
- With the help of a long level, a rule or even a ruler, you can put marks on the wall every half a meter. You must go around the entire perimeter and carefully mark the surface;
Do not forget to check the distance from the wall in the most protruding place, it is important that the frame does not rest against the surface when mounting.
- Plumb lines and building cord are removed, after which you can draw a line around the entire perimeter. For this type of work, you can use any device that is convenient for you: from a pencil or chalk to a special construction lace. The lace is pulled along the surface, after which it is pulled away from it and released, as a result of which a clear and even line remains;

If you have a laser level, then you can carry out the process much faster and easier, because this device can very accurately and quickly draw verticals and horizontals on the surface. Of course, in order to do the work with your own hands, you will have to read the instructions or at least consult with a specialist.

Stage 2 - fixing the guide profile
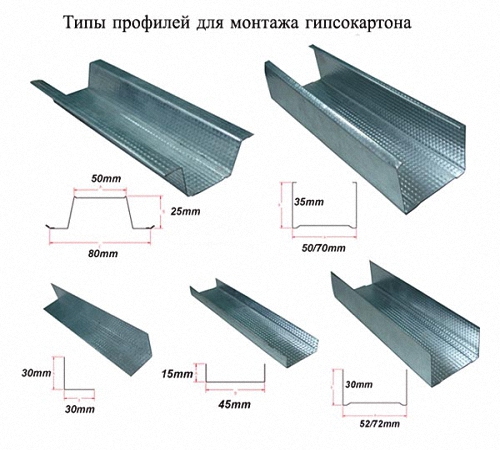
When your surface is marked, you can proceed to the next part of the work - fixing the guide profile, which is marked PN or UD and has dimensions of 27x28 mm. The elements are made of sheet steel with a thickness of 0.4-0.7 mm; for work, take options of at least 0.5 mm.

To do the job, you need a whole set of materials and fixtures:
| Tools | Description |
| Wall profile | The quantity is determined simply: you need to add up the length of all surfaces on which the profile will fit. Naturally, it is always worth taking with a small margin, as waste may result in the process. |
| fasteners | For fastening the profile to wooden bases, self-tapping screws with a length of 25 mm or more are used, and if you have walls made of concrete or brick, then it is best to use dowel-nails 6x40 mm |
| Hammer drill or screwdriver | When using dowel-nails, it is necessary to pre-drill holes, and if you work with self-tapping screws, then it is easiest and fastest to tighten them with a screwdriver |
| Metal shears | Cutting the profile into pieces of the required size is easiest with ordinary metal shears. If you don’t have them, then the easiest way is to buy the simplest option, especially since the price is low, and the scissors will serve you for many more years. |

If everything you need is at hand, then you can start work:
- First you need to attach the profile along the line (it can pass both from the outside and from the inside of the profile, it all depends on what is convenient for you) and mark the places for drilling holes for fasteners. Dowels should be located in increments of 40-60 cm, it all depends on the strength of the base. If there are no holes in the profile, then drill them yourself, a screwdriver will also cope with this work;
- Holes are drilled using a drill with a working part length of at least 50 mm. If you have a longer element, then in order to see a guideline when working, I advise you to stick electrical tape or masking tape on the drill, so you will constantly control the correct depth and will not be constantly distracted by this aspect;

- Fastening the profile to the wall under drywall is very fast. If self-tapping screws are used, then they are simply screwed into the surface, and if the dowel is nails, then first it is inserted into the hole plastic stopper and then the impact screw is driven in. Naturally, the element must be fixed tightly;

- The next piece can be connected with the help of cutting edges, but I usually just place the elements close together and fix them that way. The guide profile is not designed for high loads, so you do not need to fasten it, do not listen to those who claim the opposite, the rigidity of the structure is provided by completely different elements;
- Profile cutting is very easy: measurements are taken, after which the profile is marked with a felt-tip pen. Then you need to cut with scissors for metal side walls to the very base, then bend the element and cut it off to the end;
If you are sheathing walls adjacent to each other and want to strengthen gusset, then at the stage of assembling the guide structure, two main profiles are fixed in the corner as shown in the photo below. Such a system is much stronger than standard options.

- The system is attached around the entire perimeter, the main thing is that all profiles are located along the line, since the plane of the future wall depends on them, any miscalculations will lead to many problems in the future.
Stage 3 - installation of vertical racks
It is from this part of the structure that both the plane and the strength of the future wall directly depend, so I advise you to pay Special attention this stage. First you need to figure out what will be needed during the work:
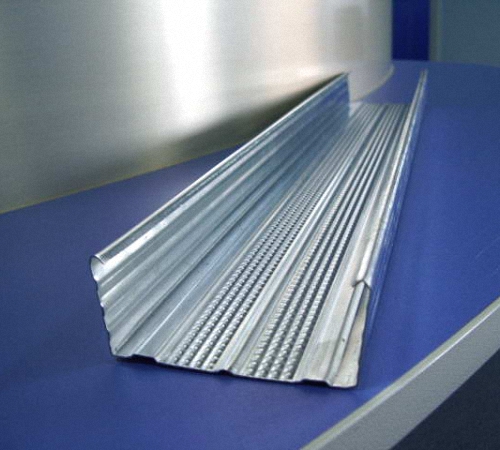
- The main profile, which is marked PS, PP or CD and has dimensions of 27x60 mm. That is, these elements are tightly inserted into the guide frame and create an excellent basis for the subsequent fixing of drywall. It is better to choose products made of metal of at least 0.5 mm, pay attention to the quality of the coating: zinc should lie in an even layer without streaks and uncoated areas;

- Direct suspensions - with their help, you can very quickly and very accurately set the position of the element and fix it. Most often, products have a length of about 300 mm and look like the one shown in the photo below. It is also important to choose an option made of durable metal;

- Drywall hangers are fastened with dowels quick installation, and the profile itself is connected to each other with special self-tapping screws, which builders call bugs or seeds. Their size and configuration can be different, the main thing is that the fasteners have a fine thread pitch for a strong fixation of the profile;

- From a power tool, you need a screwdriver for tightening self-tapping screws and a puncher for drilling holes. Naturally, if you have a wooden base, then you only need a screwdriver;
- Construction cord or fishing line will allow you to make landmarks that will simplify the workflow, but you also need to have a level on hand to control the plane;
- Marking is done with a tape measure and a pencil or felt-tip pen, and the same scissors for metal will be used for cutting.
Installation of a drywall profile on a wall begins with measuring work:
- First of all, you need to carry out preliminary marking, for this, 120 cm (the width of the drywall sheet) is measured from the edge of the wall and a mark is placed on the floor. Thus, the entire plane is marked out so that you can see where the joints between the sheets will be located. If there are window or door openings, then it is necessary to arrange the sheets so that the joint does not pass along the edge of the opening, since in this case the risk of cracks is very high;

- Next, you need to draw another line in the middle, there will be stiffeners that will make the wall much stronger and allow you to fix the drywall more rigidly. If your surface will be covered with two layers of drywall, then both rows will be load-bearing and they should be set with all care;

- To transfer marks from the floor to the ceiling and make lines on the wall, the easiest way is to take a plumb line and set it so that the tip looks at the mark. A dot is placed on top, you can also put several marks on the wall. After using a rule or a long rail, vertical lines are drawn, everything is very simple.
When you have clearly marked the position of future racks, you can proceed with the installation:
- First of all, you need to measure the length of the profile that will be installed. Standard length elements are 3 meters long, so most often they need to be cut off, there is one caveat: the profile should be 10 mm shorter than the total height from floor to ceiling, this will allow it to be freely placed in the guides;
- Cutting is done like this: first, marking is done, it is better to draw a line from all sides in order to see a clear guideline. Next, the side walls are cut, the profile is bent and cut off to the end along the bend, everything is very simple and the main thing is to be careful and not get hurt on the sharp protrusions of the metal;
- The next important operation is the fastening of the suspensions, they are located along vertical lines or marks perpendicular to the profile and are set so that the middle of the element falls on the markup. Each suspension is fixed with two dowels or self-tapping screws, the spacing of the elements is 40-60 cm, the more often they are located, the harder the wall will turn out, remember this;

- Next, the extreme profile is inserted and located along the line, after which you can bend the suspensions so that they are pressed against the rack. Using the level, the plane is checked and set to the optimal position. Then a screwdriver is taken, the profile is screwed with self-tapping bugs, after the work is completed, the extra ends of the suspension are bent to the sides, they do not need to be cut off;

- It is best to first set and fix the two extreme racks, then pull the cord between them from above and below, it will simplify further work, because you will have plane reference points that will help you not to be constantly distracted by checking with a level;
- The further process is carried out in a similar way, you need to fix all the racks, after which you can proceed to next step. In fairness, it should be noted that if there are no openings on the wall and the rigidity of the vertical racks suits you, then it is not at all necessary to make crossbars. Although I would still advise to strengthen the structure with their help.

Stage 4 - installation of horizontal lintels and strengthening of openings
To achieve even greater structural strength, as well as to strengthen the openings, it is necessary to install horizontal lintels. Installing a profile under drywall on the walls in this case does not involve fastening to the surface, we will fix the elements between the vertical posts.
To work, you need the same set as described above, but you may additionally need a drywall cross connector, which is called a "crab" because of its shape.

As for the workflow, then everything can go in two ways. Let's deal with each of them and start with the option that involves the use of crabs:
- First you need to purchase the required number of single-level connectors, as crabs are also called. They are located in increments of 600-650 mm from each other;
- In order to place the crabs on the same level, I personally pull the cord horizontally, then it can be cut or torn off. But you can markup using a level, here you work in the way that is more convenient for you;
- The connector snaps into the profile with inside, after which the side antennae are bent and screwed to the profile with self-tapping bugs. Everything is very simple here and the main thing is to fix the elements in desired position;
- Then jumpers are cut, their length should be 5 mm less than the distance between the uprights. Elements are inserted into spacers with outer side, after which the antennae are bent, and they are also fixed with self-tapping screws. The result is a robust and reliable system;

- If there are openings in the structure and the connection is made from three sides, then part of the crab can simply be cut off with metal scissors.
As for the second option for carrying out the work, it does not require any additional elements. The workflow goes like this:
- The distance between the racks is measured, after which the elements are cut off 6 cm longer than necessary. This is necessary in order to subsequently make the connection of the frame without additional nodes;
- As for the configuration of the jumpers, there can be two options, in both cases, 30 mm cuts are made along the bend between the sides and the base. But then you can either unbend the sides and get a T-shaped element, or cut them off and fasten the jumper through upper part. The photo below shows both options very clearly, you have to choose which one is better;

- Further operations are simple: you need to mark the racks in order to know the position of the crossbars, after which you can begin to mount them. If you have an option with protrusions on the side, then you can fasten through them, but it is not necessary to screw the screws on top. I like this method more and it seems more reliable, because if necessary, the connection can be strengthened by wrapping self-tapping screws and from above.

Conclusion
Building a drywall frame on a wall is not as difficult as most people think. Of course, you will have to tinker, but then you can be sure that you will get the result no worse than that of professionals. The video in this article will tell you Additional information and show clearly important points workflow, if something is not clear, then write all the questions in the comments below.
It's hard to imagine creating modern interior without drywall, from which ceilings, arches, interior and decorative partitions, walls are made. Gypsum board(GKL) is sheathing, the shape is the same various designs attaches a frame of metal profiles. Next, we will tell you how the metal structure is formed and with the help of what devices the profiles are connected to each other and to the supporting base.
What drywall constructions are formed from - a set of necessary components
The main element of any frame of plasterboard structures are galvanized profiles. The most popular of them are the ceiling guide (UD) and the ceiling carrier (CD). The name "ceiling" does not limit the use of these elements only on the ceiling. With their help, most other fasteners for drywall are created: wall battens, frames of arches, niches, decorative boxes etc. For use other profiles - guides (UW) and rack (CW). These profiles are made in various widths (50, 75, 100 mm) to vary the thickness of the partitions.
In addition to profiles, for the installation of load-bearing structures, you will need the following details:
- direct suspensions;
- single-level connectors;
- self-tapping screws for connecting metal frame elements;
- dowels or self-tapping screws to attach structural parts to ceilings or walls.
Direct hangers are perforated metal plates, which in the working position take P-about different shape, which is why professionals often call them "pawns". The purpose of the hangers is to fasten the profile to the ceiling and wall (to the base structures). Hangers are available different lengths, which makes it possible to adjust the distance of the frame from ceilings or walls.
The maximum length of the supporting parts of the ceiling batten is 4 m. If a longer length is needed, longitudinal connections have to be made. To make the joint rigid and neat, special longitudinal connecting elements are used in the form of galvanized metal cases. When it is necessary to connect the profiles perpendicular to each other, other details are used - "crabs", which allow creating a cruciform structure in one horizontal plane.
To fasten profiles for drywall to each other or to connect with other metal structural elements, special self-tapping screws for metal are used - "fleas", which got their name for their small size. Their length is 10 mm. At the end of the thread, such screws are equipped with drills, thanks to which, with rotation and slight pressure, they are independently screwed into the metal parts of the frame.

If the base surface to which the frame is fixed for the GCR sheathing is made of brick or concrete, dowels are used as fasteners. When it is necessary to fasten to a porous building material (wall made of foam block, shell rock, aerated concrete) or wood, phosphated (black) self-tapping screws are used.
Quick-mount dowels in loose materials and wood are not securely fastened, but their function is perfectly performed by ordinary ones.
You will also need fasteners for the drywall itself. Plasterboard sheets are attracted to the metal base with the help of special self-tapping screws. They look like black wood hardware, but have a fine thread pitch. Drywall screws are available in lengths of 25.35 and 45 mm. Self-tapping screws 25 mm are designed for thin ceiling GKL, fastenings for wall drywall have a length of 35 mm. Screws with a length of 45 mm are useful for frames with a second layer of drywall sheets.
GKL suspended ceiling - how is the frame made?
Let's figure out how to fix a profile for drywall using the example of assembling a single-level frame. Work begins with the beating of horizontal landmarks, for which the water level or laser level. According to the drawn lines, a guide profile is installed around the entire perimeter, which is fixed to the wall in increments of about 50 cm. Further, the process of assembling the ceiling crate goes like this.

According to the selected frame scheme, carrier profiles are inserted into the guide parts, cutting them to the required length. If their length is not enough, it is necessary to lengthen the bearing strips, connecting them longitudinally. How to connect a profile for drywall to get a longer part? To do this, use the above-mentioned connecting case, into which, on the one hand, a whole profile is inserted, on the other, the missing one. desired length fragment. But that's not all - from the side of the shelves (side surfaces), two "fleas" are screwed on each side.
Having distributed load-bearing elements according to the proposed scheme of their location, they begin to attach direct suspensions. "Pawns" are fixed to the ceiling through special holes in their central part with a step of 50-60 cm opposite each profile. Having attached all the suspensions to the ceiling, their "ears" are bent and with their help they raise the profile above the installation plane.
At the level of the lower shelves of the guide profiles, the threads are pulled perpendicular to the supporting parts of the frame. Now each profile must be set so that its back barely touches the reference threads that indicate the horizontal plane. The exposed load-bearing part is fixed to the suspensions with “flea-plates”, after which the protruding plates of the “peshka” are bent upwards.
In places of transverse joining of gypsum boards, it is necessary to install lathing battens perpendicular to the supporting parts, for which “crabs” are used. First, the connecting device is put on longitudinally installed profile, after which the crossbars are inserted into the perpendicularly located "crab" connectors and fixed with self-tapping screws.
It is necessary to fasten drywall to the profile so that the transverse butt joints do not match, which is taken into account when installing the crossbars. The sheet is lifted and pressed against load-bearing structure back side, while adjusting its position relative to the frame elements. GKL fixed in the desired position is attracted to all the supporting parts of the ceiling metal crate fasteners for drywall (25 mm self-tapping screws), in increments of about 20-25 cm.
Plasterboard wall cladding - what's special?
If for installation suspended ceilings a thin plasterboard sheet 9.5 mm thick is used, then the wall structure is sheathed with a thicker plasterboard. The thickness of the wall sheet is often 12.5 mm, less often - 15 mm. Sometimes, to create a structure of increased strength, the technology of two-layer sheathing of the frame is used, when a second one is sewn on top of the first layer of GCR. In this case, fasteners for two-layer drywall 45 mm long are used.

The technology for mounting a wall crate is somewhat different from working on a ceiling, although the principle of creating a structure is generally similar. First, guide profiles are installed, but the perimeter of the formed vertical frame runs along the floor, opposite walls and ceiling (ceilings). Bearing racks (CD-profile) are inserted into the upper and lower guide parts of the structure and fixed to the wall with hangers. Everything is almost the same as on the ceiling, but there are features.
- 1. It is usually not necessary to add lengths to CD profiles using longitudinal connecting cases, since rooms with a ceiling height of more than 4 meters are rare.
- 2. Hangers are also fixed opposite the racks, but their location is somewhat different. Since the main operational load is assumed to be on the lower part of the wall, the suspensions are fixed at such a height: the first is 50–60 cm from the floor surface, the next is 1–1.2 m, the third is between the second “pawn” from the bottom and the ceiling.
- 3. Fasten the profile during assembly wall frame taken with a step of 60 cm and the device of transverse stiffeners - this standard scheme the location of the bearing racks. If it is necessary to strengthen the structure, the profile pitch is reduced to 40 cm.
When installing drywall sheets on the created wall crate of metal profiles, you also need to take into account some of the nuances. Firstly, the GKL is mounted so that the panels do not rest against the surface of the floor and ceiling (ceilings). A deformation gap is needed, which prevents the pressure of building structures when the building moves on drywall and allows the material to change dimensions when changing temperature conditions in room. How is clearance made? The sheet is cut out about a centimeter less than the distance from the floor to the ceiling, and before the GKL is attached to the frame, small (about 0.5 cm) stands are placed under it from below. After screwing the plasterboard panel to the profile, the stands are removed.
Secondly, when sheathing the created structure from metal profiles with two layers of drywall, vertical seams should not be located on the same rack. To do this, the sheets of the second layer of GKL are displaced when installed by one profile relative to the first.
Before installing drywall, you should prepare the frame on which it will be attached. For these purposes, a special profile is used, which differs in size, cross section and configuration. We will talk about the features of installing a profile for drywall and its purpose further.
Profile for drywall: characteristics and general information
Drywall is a material that is quite simple to use. However, in order to fix it on the surface, it is necessary to build a special structure from the profile. In the process of performing these works, difficulties often arise.

Construction of a structure from metal profile for fixing drywall this material perform their functions in full. Since the frameless fastening of drywall is gypsum sheets that decorate the room. At a time when frame structures differ in shape, size, have arched openings, etc.
The absence of a crate will not allow you to level the walls, finish the ceiling or install partitions.
There are two options for profiles used in the installation of drywall structures:
- wooden;
- metal.
The first option is distinguished by a lot of disadvantages, among which, first of all, the low duration of operation, compared with metal. Besides, wooden profile more susceptible to moisture than metal.
Steel profiles are several times more expensive than wooden ones, this is their main drawback. Despite this, they have a lot of advantages, among which we highlight:
- high resistance to all external influences;
- availability of acquisition;
- simplicity and reliability in use;
- duration of operation, galvanized steel, 6 mm thick, is used for their manufacture;
- this profile is easy to restore;
- a variety of profile options that are suitable for use in certain situations.
The main types of metal profile for drywall
In accordance with the purpose, all profiles for the installation of drywall are divided into:
- basic;
- guides.
The dimensions of the drywall profile vary in relation to the design features that are being built from it.
The first option is marked PS and PP. It is designed for high traffic areas. Exactly on given type profile and plasterboard sheets are attached. The two versions of the guide profile differ on the edges in the form of the letter P or S.
For the guide profile, there is a PN marking. It is a horizontal bar, which is the basis for attaching vertical racks. It is this profile that forms the basis of the steel frame.
We suggest that you familiarize yourself with the main profile options for drywall made of metal:
- PN - are guide profiles for ceiling purposes, since it is on them that the drywall used in the process of finishing ceilings is attached;
- PP - a kind of ceiling main profile, used in the process of fixing drywall on the ceiling, it is fixed around the perimeter of the room when installing suspended ceilings;
- PN - profiles for wall purposes, perform the function of a vertical rack in wall structures.
Tip: Ps profiles are used partially, that is, they are installed in segments, in order to save material. This does not affect the final quality of the design.

There are two more profile options that are used infrequently:
- corners - help form corners drywall partition, they are installed directly on the already installed drywall and protect it from exposure different kind mechanical irritants, when arranging the ceiling, the corner profiles are fixed around the perimeter; when arranging the walls, they are mounted on the floor and ceiling;
- arched - are used in the process of constructing arches, in addition, with its help they form radius and various asymmetric shapes of walls or partitions, simple self-tapping screws are enough to fix such a profile.
Please note that the maximum bending radius of the arched profile is 50 cm, with a greater load, there is a risk of structural failure.
Features of fastening a metal profile
To fix the material, special suspensions are used, with the help of which the interval between the wall and the profile is adjusted. Thus, before the construction of the structure, it is not necessary to pre-align the walls.
If the ceiling height is more than two meters, then 5 hangers attached to the ceiling or wall are required to install the profiles. With their help, the evenness of the entire structure is adjusted.
Please note that the base is metal frame structure- guide type profile. It is fixed with dowels and screws. The average distance between holes is 200 mm. Thus, the structure will be securely attached to the wall.
Some kinds of profiles are already pre-installed drilled holes, for beginners it is better to choose just such materials.
In order to facilitate the installation of a profile for drywall, we suggest that you familiarize yourself with useful tips for this process:
1. Two drywall sheets can easily fit on the wide wall of the profile, but keep in mind that each of them should be evenly spaced on it.

Tip: Calculate the installation of vertical racks so that the interval between them is six centimeters less than half the width of the drywall.
2. Screws are installed in close proximity to the wall to ensure a more secure fastening.
3. Drive the self-tapping screws only at a right angle, otherwise, unscrew the self-tapping screw and install it again.
4. All self-tapping screw heads are recessed by 0.5 mm in the profile.
5. Vertical racks have a special place for installing engineering communications. Although in most cases, wires and pipes run directly under the drywall.
6. When finishing a private house, you should take care of the presence of additional heat and sound insulation.
7. When buying profiles and guides for drywall, you should increase the required amount of materials by 10% to compensate for various cuts and technical issues.
Features of installing profiles for drywall around the perimeter of the room
First you need to mark the plane along which the frame will be installed. Next, prepare the tools in the form:
- two plumb lines;
- fishing line;
- rulers;
- hammer with nails;
- chalk.
To fix the plumb line on the wall, nails are used, it must be fixed to the ceiling, but hang down to the floor. The second plumb line is attached in the same way. Please note that the plumb lines should not touch anything, as the evenness of the vertical will be disturbed.
A fishing line is stretched along the wall in three places: top, bottom and center. The most high point on the wall will serve as a place for installing a metal frame. Retreating from her place, check the accuracy of the breakdown. Parallel to the previously stretched fishing line, pull another part of it against the side wall. Connect the sections of the woods located on the two walls with a ruler, thus making marks according to the location of the plane.
Repeat this procedure with all other walls and with the ceiling. Using the rule and chalk, draw the perimeter of the structure.

Mounting profile for drywall guide type
In order for the further construction of the profiles to be even and correct, it is first necessary to correctly fix the guide profile, which is the basis of the frame, which takes on most of the entire load.
To fix the guide profile you will need:
- perforator;
- electric drill;
- hammer;
- fasteners;
- scissors for metal;
- pliers.
Install the guide profile on the wall, according to the markings made in advance. To make it more convenient to work, it is better to start the whole process from the bottom. Step back from the top of the profile 0.3 m, and drill a hole, which should be a few millimeters longer than the length of the dowel-nails. Make two more holes in the center and bottom and install the dowel-nails.

Check the evenness of the entire structure according to the given markup, if necessary, correct the profile and hammer in nails. Next, measure the distance that remains to the end of the wall and add twenty millimeters to it, since the guides are installed with an overlap.
Using scissors for cutting metal products, cut off the side sections of the profile and bend it outward, cut off the central part and align with pliers. Install the next part of the profile, while at the butt section, hammer in an additional dowel-nail.
Align the profile according to the marking and fix it with dowel-nails. In the same way, all subsequent guide profiles are installed along the perimeter of the walls and ceiling. For additional strengthening of the entire structure, dowels are used, installed in increments of thirty centimeters. Before this, it is recommended to once again check the design for evenness and compliance with the markup.
Do-it-yourself installation of a drywall profile: vertical sections
Profiles vertical purpose must be fastened in accordance with the size and type of installation of drywall sheets. From the beginning of the wall, a distance equal to the width of the drywall sheet is measured, a mark is made. It is here that the vertical profile will be located, which will become the junction of two sheets. The mark indicates the transverse middle of the metal profile.
Mark all in the same way. vertical sections profile mounting. The drywall sheet is divided into two parts according to its width, each of them should not be more than fifty centimeters. Make marks on the floor surface, they will indicate the middle part of the vertical profiles.
Throw a plumb line from the ceiling to the floor, and mark the places where the vertical profile is attached to the ceiling. Using the first mark, transfer the dimensions to the ceiling surface. To check the correctness of the work, throw a plumb line from the ceiling to the floor, if the marks match, then the marking does not require adjustment.

To fix vertical profiles on the ceiling, you will need:
- electric screwdriver;
- self-tapping screws for metal;
- fishing line;
- pliers;
- regulations;
- pencil
- suspension in the amount of three pieces;
- hammer;
- fasteners;
- electric drill.
On the central part of the wall, measure the gap between the ceiling and the floor. Transfer all measurements to the profile surface, while subtracting one centimeter. To avoid errors, use a pencil to mark the size of the entire workpiece. Cut off the side sections of the profile, bend its edges outward, cut through the central part. Use pliers to straighten the cut. Thus, the guide will connect to the vertical profile.
After installing the workpiece on the wall, you should mark it around the perimeter. Further, the wall is divided into three sections, on which marks are made and the workpiece is removed.
Install the suspension according to the marks made, drill holes in the suspension with a perforated drill and fix it on the marks with dowel-nails. With the help of plumb lines, drywall is very conveniently attached, in addition, with their help it is set in the required direction.
Mount the second hanger and return the workpiece. Attach the vertical profile to the surface of the guide using metal screws. First fix its upper part, and then the lower one. Please note that the height of the profile is less than the total height by one centimeter, so care should be taken to have an allowance of 0.5 cm at the top and bottom.

On the surface of the vertical guides, screw the screws on which the fishing line is fixed. The side sections of the suspensions need to be bent, and a vertical profile is set along the fishing line. This process will require more than one person.
Please note that the profile, in no case, should not push the line or move away from it. It is possible to check the evenness of the structure using the rule.
Tip: If even minor errors are found, you should resort to correcting them precisely for this stage work. After installing vertical profiles, errors cannot be corrected.
Installation of horizontal fragments from a metal profile
The horizontal parts are jumpers that increase the strength characteristics of the structure. These components are fixed directly to the structure, not to the wall. In order to save material, in the process of fixing the horizontal parts of the profile, the principle of fixing drywall should be applied, that is, install jumpers in areas under the drywall.
Please note that during the installation of drywall, you should use the principle of a checkerboard pattern, that is, first a whole sheet is laid, and then half of it. This will help prevent the appearance of long seams and strengthen the strength of the structure.
To complete this process, you will need:
- screwdriver;
- self-tapping screws with scissors for metal;
- pliers;
- crabs;
- marker.

Where the cross section intersects with vertical design a special part is installed, which is called a crab. If an even cross does not form, follow these steps:
- measure the distance between the middle sections of the two verticals;
- cut the workpiece and install in place;
- using a marker, mark the sections of the profile installation;
- using scissors for metal, cut off the desired section of the profile;
- pliers will help align the cuts and bend the side sections at a right angle;
- install the profile and attach it with self-tapping screws;
- check the evenness of the resulting structure.
Video installation profile od drywall:
The use of profile strips is a common method of fastening various materials in construction and repair work. The reliability and durability of the resulting structure during operation depends on the quality of the operation performed. Therefore, it is important to initially determine the optimal fixation method. An even more responsible task is caused by the question of how to fasten the profile to the profile as part of a finished or mounted structure. In such situations, the load increases both on the profile components themselves, and on the fixing hardware, as well as on the base material, which will eventually be installed. In addition, the profiles themselves can act as the target material during installation, forming a complete structure.
What is a profile?
Usually these are metal strips, which can have different shapes and sizes. The task of the profile is to strengthen the target material. Most often, this fixing technology is used for facing coatings. In particular, the drywall installation method allows you to most fully reveal the functions of the profile. In essence, a construction similar to wooden crate. Only metal allows you to save space and at the same time ensure a more accurate convergence of the mounting elements. In order to save money on the crate, many people think about the following question: "How to fix drywall to a wall without profiles?" This operation is also feasible, but only on condition that the panels will be fixed on smooth surface without defects.
In itself, the use of a profile of one of the tasks poses just the creation of a rough base with optimal characteristics. You can also do without crates with the help of special facing mixtures, primers and putties, which will allow you to level the wall or ceiling. Next, the plasterboard panels are directly fastened - to mechanical fasteners or an adhesive base.
When is the profile fastening to each other?
If, nevertheless, the technique of installing drywall using a metal profile is chosen, then it may be necessary to fasten its individual elements together. Moreover, these do not have to be similar full-sized strips - often it is also required to install additional fittings in the form of crosses, corners and various adapters into the structure. What are they used for? The formation of the crate structure requires the reduction of several planks to each other. This is not always necessary, but for greater reliability, experts recommend performing such operations. Also, the question of how to fasten a profile to a profile depends on specific task. A classic example of such a mounting is the cross joint. That is, in the lattice, where two profiles are crossed, a node is created that gives the reliability of the entire structure. Direct mounting available different ways, but mainly due to mechanical fixation elements - the same hardware, brackets or auxiliary accessories that come with the profile.

Features of attaching a profile to a profile
The nuances of this operation are that each design is almost unique. Differences between metal gratings for installing drywall are most often determined by the characteristics of the profiles themselves. They not only differ in shape and size, but also have technological holes, openings, grooves and perforations. This is necessary to simplify installation. It can also be done using a rough technique using self-tapping screws, ignoring the technological holes, and in accordance with the instructions, which just recommends using ready-made deformation areas for installation. How to fix a profile for drywall, taking into account technological holes? This method has a lot of advantages, which are to obtain robust design, but there are also disadvantages. The fact is that this technique is performed with the help of rivets, which are introduced strictly into the prepared holes. For this reason, careful calculations are initially required, which do not always make it possible in the future to carry out installation exactly according to the intended scheme.
How to fix the profile to the wall?

First of all, the configuration according to which the crate will be made is thought out. For example, as metal base it may not be a cross structure that protrudes, but a group of profiles running parallel along the walls. In this case, further linking of the profiles with each other is not provided, but the exclusion of the reinforcing function of such fastening should be compensated by a more rigid installation tool. So, how to attach a drywall profile to the wall so that optimal rigidity is ensured? Such fastening of single metal strips is implemented using self-tapping screws or dowels. Spacers are also used to enhance the role of hardware. But it is important to consider that the direct introduction of the same dowels is carried out not with the capture of the profile base, but through special fittings. These are hardware elements or clamps that themselves capture the running bar, allowing you to further fix their edges with the same hardware.
Features of fastening the profile to the ceiling
Usually, ceiling installation of drywall profiles is carried out according to the same scheme, but there are also significant adjustments that are determined by the installation plan already decorative panels. The fact is that drywall in this case can form both a classic single-level ceiling and a more modern multi-level structure. Accordingly, in the second case, it is impossible to do without the implementation of a complicated sheet fastening scheme. Least, metal carcass will be two-stage. Then the question arises: "How to fix the profile to the ceiling, which will have a two-level structure?" Also, with the use of dowels, self-tapping screws and metal clamps, the first, a basic level of crates. Then, on its basis, the “second floor” is attached for drywall panels, which will cover the protruding surface.

Profile joining techniques
It is practiced to use two basic schemes for attaching profile components to each other. This is the extension technique and the cruciform connection method that has already been mentioned. In both cases, the installation instructions involve the use of special fittings. So, for building, that is, lengthening, a docking segment is used. This is a metal profile retainer into which two ends of the slats are inserted. After their correct installation, it is necessary to fix the ends with a press washer. Now another question: "How to attach a profile to a profile in a cruciform pattern?" To do this, use the so-called segment-crab. In fact, this is a cross, into which not two, but four profile endings are introduced. Fixing is also done with press washers or special rivets.
Profile bending technique
This operation is not suitable for closed profiles in the form of rectangles or pipes. It can only be implemented with flat models- and even then, subject to the initial refinement of the lateral bent sides, which will interfere with the fold. That is, you first need to make the necessary cuts with metal scissors, and then perform a direct bend. This operation may be required in cases of implementation complex projects With non-standard scheme cladding installation. For example, if the question arose of how to attach a profile to a profile in order to form a transition segment in a curved ceiling. In this case, the curved profile will create a reinforcing contour along the edge of the frame. In this case, fastening can also be carried out using self-tapping screws.
Suspension fastening technique

The hanger is a perforated metal strip, which is also included in the sets with accessories for the main profiles. These are auxiliary segments that may be required to strengthen the structure or perform complex wiring diagrams. How to attach a drywall profile to a hanging wall? To do this, it is enough just to prepare a scheme for fixing the segments, and then twist the hardware through the finished holes in the perforation.
Proper fastening of the profile guarantees reliability drywall construction. During work, you have to connect and lengthen parts, use various dowels and screws for installation.
Anchorages profile frame on the wooden bases made by means of black or galvanized self-tapping screws with a large thread pitch. For mounting on concrete, block and brick surfaces, there are various fasteners:- Dowel-nail with a mushroom cap - quick fastening of the frame on the wall, dowels with a diameter of 6–10 mm and a length of 30 mm or more are used;
- Nylon or polypropylene dowel - for any wall, used with screws with a diameter of 2-6 mm;
- Expansion dowel ("hedgehog") - horizontal, and with a length of more than 50 mm and vertical fixing in concrete;
- Anchor metal dowel - reliable installation on the ceiling, the size is selected depending on the load;
- Dowel-hook - for attaching a wire suspension;
- Anchor-wedge ceiling - for vertical installation in a clogged way.
- Self-tapping screws such as a press washer (“bugs”) with a drill or with a sharp tip;
- Rivets with pre-drilling;
- With the help of a cutter - a special tool that pierces through the walls of the profile and bends the metal petals along the sides of the hole.
- The extension is carried out by a direct connecting element, into which the two ends of the joined profiles are inserted and fixed with "bugs";
- The cross-shaped connection is carried out by a “crab”: the ends of four profiles are snapped into it, then the antennae are bent and screwed with self-tapping screws;
- Fastening without crabs: the transverse profiles are cut along the fold, the side is bent, then they are superimposed on the longitudinal guide and fixed;
- A T-shaped connection is made by the same method, or a cropped “crab” is used;
- When joining the rack and guide profile, the first is inserted into the latter and pulled together with a self-tapping screw.
- The profile is cut 1 cm shorter than the distance between the installed lower and upper guides and inserted between them;
- On the wall, after 60 cm, marks are made on each side of the profile, the workpiece is pulled out;
- Hangers are attached across the lines, holes are drilled and nail dowels are installed;
- The workpiece is put in place, attached to the guide screws;
- The vertical profile is aligned with the cord and screwed to the hangers;
- The protruding parts of the plates are bent inward.
Horizontal jumpers are attached to vertical guides in one of the previously discussed ways.
To the surface of the ceiling, the profile is mounted using hangers, which are of two types:- Direct suspensions are perforated plates bent in the form of the letter “P”, the profile is fixed to them with self-tapping screws with a press washer;
- Hangers with traction - consist of a knitting needle, an expanding element and a figured plate that snaps into the protrusions of the profile.
In the absence of factory hangers, they are made independently from the remaining scraps. Profile pieces are cut along the sides and bent at an angle of 90 °. The resulting mount is highly reliable, and is inexpensive.
After getting acquainted with the advice of professionals, the work will go easier, and most importantly - correctly. Beginning with flat structures and gaining skills, they gradually move to complex forms and become real masters.