How to make automatic sliding gates. Automation for sliding gates: electrical circuit assembly. Installing the rack
Do-it-yourself installation of automatic gates is not an easy task, since it requires certain skills and knowledge. The convenience of the design is due to the fact that special components for automatic gates are used. Installation of the mechanism does not require large financial costs, so all the work can be done independently.
Types of automatic country or garage doors
There are the following types of automatic gates:
- retractable;
- swing.
Design of automatic sliding gate, which are a solid canvas, has a mechanism that opens the sash to the left or right. It does not provide the necessary tightness to the premises, since the gate must move with the help of rollers along a special rail. Install automatic gates open type preferably at the entrance to the territory.
Automatic swing gate involves the installation of double doors, as well as the connection of automation that drives the mechanism. The structure is controlled by an electric drive. It is possible to choose it correctly by assessing a number of initial parameters:
- leaf size;
- the weight of the entire product;
- length from the middle door hinges to the side walls.
The shutters can open outward or inward. The first way is the most suitable. Swing models have the following disadvantage: the possibility of breakage due to the presence of any obstacle in the way when the wings are closing.
The cost of swing structures is the main argument that is the reason for the increased demand for this product. For example, gates, the dimensions of which are 2x4 m, cost the buyer 0.8–1 thousand cu. e. If there is a gate in the door leaf, the cost of the model increases by 25-30%.
A prerequisite for the installation of fast gates of any type is the availability of free space, which allows you to open the leaves without interference. For the manufacture of the frame for such models, a profile with high rigidity is used. It should be sheathed with metal or wood panels.

Automatic forged gates always look presentable. The design provides for durable elegant sashes that have the ability to block openings of different sizes. In this case, a separate gate is not required. The disadvantages of this model are:
- the need for free space;
- high cost of the product.
Models of forged carved lattices are always very beautiful and elegant.
Elements of swing structures
The components of swing models are the following details:
- bolt and hinges;
- flaps and handles for opening and closing;
- poles for fastening;
- central and side stops;
- electric drive for gates - 2 pcs;
- brackets for fastening the electric drive to poles and doors.
For the manufacture of poles for fastening structures, pipes made of steel are used. If the gate has a rather large weight, instead of pipes, a U-shaped frame is installed. This is a guarantee of the reliability of the entire mechanism. load-bearing structure it is best to mount on the base of the glass type. Together with the product, hinges and bearings are supplied in the kit, which are used to fasten the doors of the structure to the supports. This ensures smooth running of the valves.
The total number of hinges that can be mounted is 4 or 6 pcs. It is selected depending on the weight and size of the product. There are two types of hinges available:
- polymeric.
- metal.
The sashes consist of the following elements:
- frame;
- fill panel.
Filling is of three types:
- solid;
- sparse;
- combined.
The frame of the product is assembled from metal profile, which could be:
- corner;
- connecting.
For the manufacture of filling sections are used:
- metal fence;
- sandwich panels;
- aluminum roller profile.
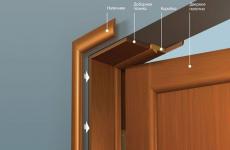
After assembling the parts, the product is primed and painted. Before installation, a sketch is made hinged construction automatic gates, the scheme of which includes the following components:
- stone support;
- outer frame;
- center stop;
- side stops;
- bottom latch;
- mechanism control unit;
- internal stiffener;
- automatic linear door opening mechanism.
The necessary components of the design are stops - lateral and central. The presence of such pins-limiters is an obstacle to the exit of the doors beyond the prescribed limits. Stops are divided into 2 types:
- removable;
- permanent.
Mandatory components are a deadbolt and handles that allow you to open the doors in the event of a power failure manually.
How to fix a lever drive to a brick wall
To install automation for the gate with your own hands, you will need to purchase a kit that includes the following components:
- self-locking right-hand and left-hand drive;
- bushings, bolts, nuts and keys used for emergency unlocking;
- construction control unit (transformer and board);
- a set of photocells;
- mounting plate kit.

The gate is controlled by a remote control.
Before choosing an automatic swing device, a number of parameters should be considered:
- weight and area of the canvas;
- intensity of the opening process;
- smooth running of doors.
Before you buy an automation for the gate, you should make sure that all the components are included in the proposed kit. In order for the mechanism to function without failures, it will be necessary to make a simple calculation of the wind load on the structure. For example, if the value of the average wind load in the region where the suburban area is located is 50 kg / m, then by multiplying it by the area of \u200b\u200ba standard gate, you can calculate wind load to the design. It should be: 2x2x50 = 200 kg.
Cloths have parameters dependent on each other: weight and area. The sash and the electric drive of the installed structure are under the influence of the strongest wind loads. If the selected automation is designed for a web weight of up to 100 kg, it will be necessary to take into account the area of \u200b\u200bthe structure, otherwise the wind will blow the device away at the first gust. Next, the weight of the sash, equal to 100 kg, is added. As a result, you can calculate the parameter, which is 300 kg.
Taking into account the margin of safety, it is necessary to install an electric drive designed for a canvas weighing 400–800 kg and the corresponding wind load. Such a mechanism will serve for a long time. The intensity indicator of the gate opening can be represented as the time of actual operation for 1 hour, which is expressed as a percentage. For example, 30% per hour. The value of this parameter is always indicated in the data sheet for the automation kit.
Automation for swing gates and its types
Gate automation should take into account all the features of the fittings. The most common type of sliding gates, but their design is quite complex. As for swing gates, automation for sliding structures in modern times is not a curiosity. The automatic gate opening mechanism must only be visible from the inside.
It is necessary to install automatic gates taking into account the ease of movement of the doors of the structure. Its value is determined depending on the quality of the installation of hinges and poles, as well as on the magnitude of the friction force in the hinges. Ordinary lubrication allows you to solve this problem. The influence of weather conditions on this parameter creates additional structural resistance. The gate opening mechanism must have an appropriate power reserve, which should be taken care of when buying it.
Automatic devices by type of work are divided into the following types:
- Linear (worm), working on the principle of lengthening or shortening the rod, driven by a worm gear.
- Lever, acting on the principle of the work of the human hand.
The opening mechanism operates in the presence of a long working lever connected by a movable hinge. Swing structures with linear actuators provide ease of operation of the entire automatic device. Their cost is not high.
Due to the presence of lever automation, it is possible to adjust the opening of the leaves suspended at a distance of 20-40 cm from the edge of the support. Gates with a lever type drive can be mounted on stone columns, which are located in front of the frame supports of the structure.
Brands of automatic devices manufactured for swing structures should be chosen based on your own preferences and financial capabilities. You can purchase products manufactured by the Italian company Came Group. The company is engaged in the manufacture of electric drives, it has been on the market for about 30 years. It was she who came up with the idea of using remote controlled gates.
Benefits of sliding gates
Retractable structures with a lot of advantages are made using conventional tools. The most obvious advantages of these gates are as follows:
- unpretentiousness in operation and maintenance;
- clarity of operation of the gate opening mechanism;
- lack of guides at the top and bottom of the gate opening;
- the ability to remove restrictions on the height of vehicles at the entrance;
- no need to get out of the car to open the doors.

To make sliding gates with your own hands, you must have the skills to use a grinder and welding machine. When buying automation for sliding gates, it is important to remember that its price is higher than that of other types of structures. High price justified by the possibility of operating the product for several decades. The entire system is designed for 50,000 cycles, including opening and closing, for the entire life of the sliding gate automation.
Automatic gates for giving an open type are made from the following materials:
- corrugated board;
- metal fence;
- tree;
- forging;
- a metal sheet;
- polycarbonate.
To arrange your country cottage area modern sliding gates, it should be noted that they are divided into 2 types:
- with built-in gate;
- with full canvas.
Gates with automation are complemented by a set of fittings, which includes the following components:
- rolling rollers;
- top support rollers;
- guide profile;
- upper and lower catchers;
- rubber plugs.
The quality of sliding gates depends on the manufacturer. The dimensions of the product affect the cost of a set of accessories for it. For example, if the weight of the structure is 400 kg, and the length of the guide is 5 m, then a set of domestic-made fittings will cost 5.7–6 thousand rubles. If you purchase a product weighing 800 kg, then the kit will cost 2.5–3 thousand rubles. expensive.
How to make a sliding gate with your own hands: the preparatory stage
At the initial stage of installation, a set of fittings for self-made sliding gates is selected. Here it is important to consider the length, width and height of the movable web. Entrance gates must have the appropriate dimensions and weight, which will allow vehicles to enter the site without any problems. The ideal distance for sliding the leaves is considered to be a space that is 1.5 times the size of the gate opening.
Before installing an automatic street gate, a thorough inspection of the site will be required to make sure that the installation of the product is possible. Installation of the structure requires compliance with certain rules for the adjacent territory and the opening. In order for the sash to roll back unhindered, free space is required. An important condition free closing and opening of the sashes is the evenness of the relief. The presence of bumps or depressions can make it difficult to maintain automatic gates. The distance to the depth of the site should be from 40 cm.
It is not necessary to plan the placement of the gate in the path of the fence door. It is best to equip it on the opposite side. For normal operation of the gate opening mechanism, at least 1.5 of the opening width should be left along the fence. An alternative solution is a gate with a built-in gate. The design has the following disadvantage: a high threshold, which makes it difficult for children and the elderly to move.
How to install supports yourself
For the installation of support poles, the following types of materials will be required:
- profile pipe made of steel;
- timber oak;
- channel;
- concrete or brick pillar.
According to the basic rule for mounting supports for sliding gates, it is necessary to take into account the depth of soil freezing. The post must be sunk into the ground by 1/3 of its total length.
Gates for a warehouse or garage must be securely supported by poles, which implies compliance with a certain scheme for their installation. When doing work with your own hands, it must be borne in mind that in the spring season the vertical position of the support column may change. As a result, the entire frame will lose its original position. It may be necessary to reinstall the supports in order to return the blade to the correct condition.
So that the geometry of the frame is not violated in winter period, you should choose the correct installation depth of the pole. Before installation, it is necessary to dig a hole, at the bottom of which a 15-cm layer of sand with gravel should be laid. It must be carefully tamped and a support for the gate frame must be installed strictly vertically. Then the concreting should be done.
How to make a gate foundation
Before you make automatic gates with your own hands, you need to fill the foundation for them. It is the basis of the entire structure, which must hold a significant weight of the fence. The channel along which the sash moves is mounted precisely in the base. Laying the foundation consists in performing the following basic steps:
- excavation and arrangement of the pit;
- pouring the foundation with concrete;
- laying the channel in concrete;
- installation of rollers for the gate panel.
Before laying the foundation, it is necessary to dig a pit. Its depth depends on the level of soil freezing in the region where the site is located. The shape of the base should be U-shaped. The bottom should be filled up, as well as when installing supports.

After that, it will be necessary to weld the channel and metal fittings. The latter should be welded to the vertical sections and the channel. The structure is installed in a prepared pit and poured with concrete.
After pouring, the concrete solution must be left for at least a week so that it can harden and gain strength. This period depends on the brand of concrete. Installation of the top of the channel is made at ground level.
To prevent cracks in the pour, concrete must be watered every day.
How to make a supporting frame for a sliding structure
For the manufacture of the bearing frame for sliding gates, a profile steel pipe is used. The installation of the frame should be carried out in stages. To do this, you must sequentially perform the following steps:
- Cut the profile into segments of the desired length.
- Remove rust from the pipe with a grinder with a nozzle.
- Degrease the pipes with solvent or gasoline.
- Apply anti-corrosion primer.
- Assemble the frame based on welding.
- Clean up welds.
- Make a fine anti-corrosion primer of the frame.
Do-it-yourself sliding gates must be made according to the drawings, where all required dimensions. The supporting frame must consist of the following types of profile pipes:
- 50x50 mm;
- 60x30 mm;
- 60x40 mm.
To make a crate or an inner frame, which should act as a reinforcing element, a 40x20 mm pipe is needed. It will need to strengthen the sash.
The work of the grinder must be done in protective glasses. Frame sheathing can be of the following types:
- one-sided;
- bilateral.
In the first case, the frame should be welded close to the edge. If it is planned to carry out double-sided sheathing, then the frame must be welded in the middle of the supporting frame. Before installation, the pipes are degreased and primed.
Welding of pipes is carried out starting with tacks, which should be carried out after 30 cm.
It is better to weld the guide rail and pipe at the bottom of the base frame in a staggered pattern. This will prevent it from twisting. Then cleaning and priming of welding corners is carried out. After the composition has dried, it will be necessary to paint the entire structure with alkyd enamel in 2 layers.
The canvas can be attached to the frame using rivets or self-tapping screws. It should be mounted to the inner frame of the fence. To make it, you need to stock up on loops and additional pipes.
Installation of automation on sliding gates
Gate automation is mounted after the place for the electric drive has already been selected. The product is supplied with a mounting base on which the drive is mounted. Then these components of the system must be mounted on the channel between the carriages.
Automatic gate opener shown in working position, allows you to determine the location for mounting the drive. Next, you need to put the electric drive on a special spare part - a rail with teeth. You will need to determine the location where you want to direct the drive in order to position the rack with teeth in the middle of the gear. After that, the part should be fixed to the profile pipe on the frame from the outside.
When the place for installing the drive is calculated, the device can be mounted by welding. It may be necessary to lift the adjustable drive slightly higher for it to be installed correctly. This requires a profile pipe, which should be welded to the drive. Its dimensions are listed above. After mounting the channel on the base, it will be necessary to weld the electric drive to it, fixing it with bolts.
When installing the rack and pinion, the gate must be fully opened. It must be left in a small amount to secure the limit switches. After that, you can weld the rail to the pipe, and then stretch the canvases behind it. Installing the next rail requires the same procedure. It should be noted that there should not be any gaps between the joints. After re-welding all elements of the automation fasteners, it is necessary to set a gap of 1 mm.
The limit switches are bolted to the rail. They are magnetic and mechanical. Magnetic switches can also work in severe winter frosts. Each configured switch must function under the plus or minus signs. The automatic operation of a gate with a magnetic limit switch depends on the presence of a spring.
How to connect a drive with your own hands
Automation on the gate is always connected according to the scheme, taking into account the provisions of the instructions for the system. To test the installed mechanism, you must use the remote control. Adjustment of automatic gates is done by hand by actuating the drive. If it does not completely close the electric gate, this indicates the correct installation of the mechanism. In the event that this condition is not met, the automatic gate connection diagram should be revised.

To install safety photocells, which are 2 devices, you must select best option installation. A beam of light sent by one element must be captured by another device. The movement of the wings occurs in the presence of a light signal. If the beam is obscured by something, then the doors do not close.
The correct setting of the security system is due to the timely transmission of the light signal. The photocells must be fixed against each other in order for the beam to pass quickly. You can weld special columns or pedestals. For this, the remains of a profile pipe may come in handy.
When connecting wires in the pipe, you need to make a hole. Then you need to lay pipes under the roadway. To avoid wire breaks, it should be hidden in a corrugated hose. Safety photocells are fixed with ordinary self-tapping screws.
The lamp is installed on the roadway so that it can inform about approaching vehicles or pedestrians. The need for such a lamp should be considered in advance. It is recommended to install all security elements on high-speed gates. Lamps are fixed with self-tapping screws. The connection is made using wires 2x0.5 mm or 2x0.75 mm. All elements should be connected in accordance with the diagram in the instructions.
Installing automatic sliding gates does not require much effort. IN certain cases can be connected instead of a wired system to open a radio control for the gate. If you have any questions or lack of experience in installing automation, all work can be entrusted to professionals. In any case, for a warehouse or garage alarm system, the installation of automatic gates with photocells will not be superfluous.
They have long replaced wooden gates and gained immense popularity among the owners of individual houses. Such gates save space and have attractive design. By equipping them with an electric drive, operation can be made more convenient. How to make an electric drive for sliding gates with your own hands, you should understand in more detail.
Drive design
Before proceeding with the manufacture of the actuator, its design should be understood. The drive for consists of the following parts:
- engine;
- reducer (rotation converter);
- control node.
These are the main mechanisms that set the web in motion, while the electric motor acts as a source of traction.
There are two transmission options:
- asterisk and chain;
- pressure roller.
In the presence of three-phase voltage, a star-wound motor is perfect, which will allow you to use the maximum power of the motor. In the absence of three-phase voltage, a single-phase motor can be used, but be prepared for the fact that the starting torque will be deficient due to low power.
When choosing an engine, the following parameters must be considered:
- Door leaf size. The more massive the canvas, the more powerful the engine must be installed.
- Intensity of use of the structure. Home gates are only used a few times a day. Even the smallest motor will be able to provide movement with the intensity of their operation 5-6 times per hour.
- Gearbox material. This indicator should be paid attention to, since when using a high-powered engine, plastic gear-reducers will quickly fail.
- Rotation speed 500-1000 rpm.
Three-phase electric motors A100L8 or single-phase AIRE 80 brands are perfect for installation.
Choosing a converter for homemade drive sliding gates, you should focus on important points:
- The output torque should be around 80-100 rpm.
- The rotation speed of the motor must match the input torque of the inverter.
Converters with polymer gears will fail faster than those with steel gears, so when choosing, you need to pay special attention to these details.
Making the main components yourself
If you have knowledge of kinematic diagrams, you can use tools that are always at hand to manufacture drive parts. The motor from a worn-out washing machine will perfectly cope with the role of the power unit. During the connection, you should use a multimeter to determine the ends of both pairs of windings, for this, set the resistance measurement mode on the multimeter. Fasten the motor and converter shaft with a coupling.
Instead of a gearbox, you can make a belt drive. For accurate calculation gear ratio it is necessary to divide the value of the two radii of the larger pulley, which is connected to the drive wheel, by the diameter of the smaller one, which is located on the motor shaft.
However, this option is associated with the problem of manufacturing tensile structure for the belt. The issue can be resolved if you use an automobile timing belt tension wheel. In addition, in this case, it is necessary to pay special attention to the design of an independent shaft equipped with two radial-axial bearings. The shaft must be precisely adjusted, since it is the basis for installing the parts of the main transmissions: the belt pulley and the drive wheel.
Drive rack and pinion mounting
This is one of the most popular options for supplying traction from the motor to the gate using a chain. Weld an asterisk on the converter shaft, which is used on the rotational elements of bicycles and motorcycles. A chain tape with an identical link pitch as that of an asterisk should be pulled along the lower perimeter of the blade and fixed at its ends. When the gear rotates in different directions, the thrust is transmitted to the chain belt, which, in turn, tightens the canvas frame.
To install the frame, where the traction transmission system and the engine will be located, it is better to use angular steel, while the width of the shelf should be about 5 centimeters. The motor and converter are mounted to a metal support with bolts. Longitudinal holes must be provided in the base so that it is possible to correctly adjust the position.
To fasten the chain tape to the gate, it is recommended to attach an additional drive beam to the door leaf. In this case, a height of approximately 600-1000 mm from pavement. To the bottom of the beam, fasten with self-tapping screws a chain tape or a rack with teeth, protected by a side rubber or plastic casing. The fastening of the edges of the chain tape to the canvas is carried out by welding.
Important! The chain has the property of stretching, especially under severe loads, which will adversely affect the operation of the mechanism. This disadvantage can be easily eliminated by welding the studs to the last link of the chain tape and passing them through the brackets installed on the blade frame.
Tension problems can be avoided by using a metal rack with teeth instead of a chain belt. However, it is very problematic to make it with your own hands, so it is better to contact a locksmith shop equipped with special equipment for such work.
Transfer by drive roller
There is another type of electric drive, in which the pressure roller performs the main task. It is more difficult to mount such a mechanism on your own, however, it is convenient because you do not need to place additional accessories on the gate. In addition, such a mechanism is not subject to pollution and the formation of ice deposits.
The principle of operation of the pressure roller consists of several points:
- A roller protected by a rubber tire is pressed against the outer wall of the rail guide.
- The force is provided by the compression force of the spring, which is installed on the pusher pin
- The axes of the shaft are fixed to the shelves of the U-shaped bracket.
To compensate for the pressure created by the rotating wheel on the door leaf, two identical wheels are attached to the opposite side of the guide rail.
Tips for choosing parts for the design of the pinch roller:
- Wheels should be chosen only those where the base is metal, the bearings are covered with a casing.
- The load pressure level should be 300-360 kg.
- The pusher springs must have a force of at least 3.5-4 kN, while it is important that it be no higher bearing capacity wheels.
Options for transmitting torque to the roller:
- The V-belt transmission provides for fastening the pulley to the wheel base using 3 M12 studs and makes it possible to use a pair of open gears if they can be securely fastened.
- The rotating wheel can be mounted on the converter or motor shaft by first removing the bearings from the wheel base. At the same time, it is unacceptable that the tensioning mechanism acts on the axial shaft of the wheel, since this will immediately lead to breakage. The impact force must be directed to the base of the transducer housing, freely mounted in the slots of the frame.
In addition, it is necessary to take into account the load on the front bearing of the transmission mechanism, which must have a value less than the clamping force of the springs.
It is not easy to build automatic gates yourself. Certain skills and knowledge are required. However, if you responsibly approach the work with your own hands, then the task is doable.
Automatic gate device
These gates are used by everyone every day in great demand. Structures can be divided into 3 main groups:
- retractable automatic structures;
- hinged design with automation;
- automatic structures for garages.
Each type of gate has its own characteristics.
Sliding automatic structures are gates that are familiar to many and are used quite often.
Swing gates require free space on the side
It's all about the cheapness simple device. The disadvantage is the need for free space for opening in the side parts.
The frame is most often made of a rigid metal profile. Next, the structure will need to be sheathed. Sheathing can be made of wood or metal. Another option is to use forged carved gratings for sheathing gates.
The design consists of the following elements:
- gate leaves;
- fixing supports;
- a set of loops;
- bolt;
- one or more drives;
- opening handles;
- elements for side stop;
- center stop;
- brackets for fixing the electric drive to the supports and sashes.
Mandatory design details are lateral and central stops. These are limiters that will not allow the valves to go beyond certain limits. Stops can be fixed or removable.
TO required details The designs also include the handle and the deadbolt.
Elements needed in case of power outage
In the event of an electrical problem, the gate can only be locked and unlocked manually. The actuator comes with these parts. It is undesirable to purchase separately, as the elements may not be compatible with each other.
According to the device, automation can be divided into:
- a drive that performs the operations of opening and closing the valves with fixing the required position;
- automation that controls the operation of the main parts of the drive mechanism.
All moving parts must move freely along the guides. The owner must periodically control them. It is important to regularly clean and lubricate the moving parts of the structure. If the leaves are difficult to move, then there may be an increase in the load on the drive and the electric motor. In this case, mechanical failures may occur.
Retractable design
The drive consists of the following elements:

Each type of gate requires an individual drive that can provide a certain type of device movement over the required distances.
Swing construction
According to the principle of operation, they are divided into:
- Lever. Consist of a set of blocks with levers.
Lever drive gate
- Linear. Fixed at one point. The moving bracket moves in a straight line inside the case. The most commonly used is turning a screw through a nut, gears with a chain or belts.
Linear drive for automatic gates
- Hydraulic. They are used for heavy structures, the weight of the leaves of which is 950 kg or more. The required leaf width is from 4.5 m. The elements will be subjected to intensive use.
Hydraulic drive is necessary for structures that are subjected to heavy loads
- Telescopic. The elements are divided into sections. The design consists of internal sliders that allow the sections to move apart to move the end holder.
Telescopic drive for automatic gates
The drive must be firmly fixed to the base. Distortions and gaps during the operation of mechanisms are not allowed, therefore, the deepening of the base under the gate and automatic devices should be greater than the level of ground freezing in winter. Only in this way can the high-quality functioning of the gate be guaranteed.
In order for the automatic control of the functioning of the leaves to take place reliably, all devices must be debugged and checked manually. These works are being carried out at the final stage. construction works. Automatic mechanisms can work:
- Remotely. Based on the transmission of commands via radio waves from the remote control to the receiving device, which controls the operation of the electric motor and other parts.
- From a stationary remote control, which is located on the wall of a private house.
- From a combination of the first two options.
Base Management remote way is based on the same principles as for a permanently mounted remote control with ordinary on and off buttons for a simple electric motor. The difference is that in this case it is possible to solve auxiliary technical problems.
The principle of operation of automation
First of all, the method of operation of automation from the remote control will be considered. In this case, a slight addition to the previous scheme is used. It consists in connecting in parallel with the control keys of the electronic key. It works from the signals of the receiving device, which receives commands via radio waves from the transmitter in the form of a remote control. Devices are presented in a wide range and may have different functionality and appearance, but the principle of operation remains unchanged.
The placement of control sensors and power mechanism components will depend on the design of the gate and the conditions of the region. For example, you can implement automatic sliding gates according to the following scheme:
You can implement automation in swing gates according to this scheme
Photocells will control the quality working surface. To do this, they will need to be mounted on posts fixing racks, walls and supports. After that, they need to be configured so that they can clearly cover the entry zones, control the doors reaching the extreme positions and exclude them from hitting people, cars or animals that may suddenly appear.
The drive of each of the leaves must be installed on the supporting parts.
The drive must be placed with inside yard
The key to disable the structure is located on the inside of the wall near the gate.
A signaling lamp is needed to illuminate the roadway.
A signal lamp is needed to notify the opening of the gate
The device for receiving signals from the transmitter, which is located in the control unit, together with a separate drive, is fixed to the rack support. Near it, you should place a closed terminal box with wires that connect the system components to a fixed console and an input shield with a protective coating.
Electrical wiring must be hidden in special channels and protected from unforeseen damage. The command transmitter, which is built into the console, can be controlled by pressing the keys on the case.
You can control the gate with the remote control
As a result, the transmitter will broadcast encrypted radio signals of the set frequency through the antenna, which can only be perceived by the receiving device inserted into the main control unit.
After processing, the received commands are sent to the key and executed. Then the circuit will work in the same way as in the case of a fixed control unit.
For the convenience of working with the remote control, it is recommended to pre-configure the device for various algorithms. For example, you can open or close the gate leaves by single or double pressing on the control button. To do this, the receiving device and transmitter will need to be turned on and programmed according to a certain algorithm for pressing buttons on a configured mechanism. Electronics will remember this sequence of actions and will follow it in the future.
The system can be integrated with the ability to disable the operation of the automatic mechanism so that the gate is operated only manually. A manual lock and lock key must be used to complete the task. Parts must be placed in a place convenient for operation, but inaccessible to unauthorized persons.
If it is planned to manufacture automatic sliding gates, then the locations of the drive and automation devices are somewhat different, but the principle of operation remains unchanged. It will only be necessary to take into account the conditions of the design, the region and the requests of the owner of a private house. For a sliding sash, you only need to place 2 safety photocells. The stop of the drive can be provided by end mechanical devices to turn off.
All automation schemes provide a system for repeating specified processes. It allows redundant protection functions. For example, in the event of a failure of the limit switch to suspend the leaves, the motor overload protection should work. As a result, the drive will stop working. This prevents damage to the entire system.
Preparation for construction: drawings and diagrams
Installation of automatic gates should begin with drawing up a drawing. Using a pencil on a sheet of paper, draw a diagram of the gate, taking into account the dimensions. It is desirable to indicate the main dimensions of the parts on the diagram.
The dimensions of the automatic design must be specified as accurately as possible. During the calculation, the following requirements must be observed:
- when a vehicle enters the garage, at least 30 cm must remain on each side;
- the higher this indicator, the easier it will be to enter the territory of the site;
- the width must be determined taking into account the type of vehicle.
For an ordinary passenger car, a width of 2.5 m and a height of 2 m are enough. For a minibus, the height should be about 2.5 m.
From the standard swing design, the automatic one differs only in the presence of a drive. At this stage, you should decide on the type of device - lever or linear will be installed. If you plan to install sliding gates, then the drive with levers is most often used. Linear is set if there is a minimum distance from the extreme part of the support to the loop. If there is a gap of more than 15 cm, then it is advisable to use a lever device.
Automation installation diagram indicating the number of cable cores and their cross sections
Sliding gates will be affected by the wind load, so it is important to take care of protecting the devices in advance.
If you plan to install automatic garage doors, then the ceiling level must be lowered by 25 cm. This should be taken into account, since installation will require space under the ceiling structure.
The scheme of the retractable automatic design is practically no different.
The layout of the elements of automatic sliding gates
In this case, only one electric motor will be needed.
Having decided to carry out the installation of automation, the owner of a private house assumes that it will serve for decades. A high-quality set can function for many decades, but low-quality components can become an unnecessary “headache”. To do right choice the following recommendations should be taken into account:
Manufacturer selection
Today, in construction supermarkets, you can find automation from Chinese and European factories. Chinese devices are aimed at a significant reduction in cost at the expense of quality, but there are exceptions. Well-known Chinese companies offer quality products to automate gates of various types.
From European manufacturers, Italian and German fittings should be preferred, but the latter is more expensive. Regardless of which manufacturer is chosen, you should not buy cheap parts that no one has heard of. Automatic mechanisms are purchased for a long time, so you should not save on it.
Gate drive selection
The best option can be recommended by an automation installation specialist, however, you need to understand this issue yourself. As mentioned earlier, the drive can be worm or lever. First of all, the choice should be made based on preferences for appearance products. You should also consider in which direction the structure will open - into the yard or the roadway.
The worm drive is easy to install, easy to maintain and has a long service life. This type mechanism can be installed on gates that open both inside and outside the building. If the structure opens outward, then there are limitations: the gate opening will decrease by approximately 30 cm. This is due to the installation features. If there is no free space, then such a drive is not suitable.
With the help of a drive with levers, gates opening into the territory are automated.
The lever drive can only open the gate inward
The lever mechanism is more perfect in terms of manufacturability. The disadvantage is the high cost.
Accordingly, if the gate will open inside the territory, then you can choose a drive of any type. If outward, then only a worm gear is allowed.
Drive power selection
In the process of choosing automatic mechanisms, the weight of the wings must be taken into account. The technical documentation indicates how much the device is designed for. It is recommended to mount electric drive, which is designed for more weight. The recommended power margin is 30%. If the device is operated at its power limit, the drive will overheat. This will lead to the failure of the mechanism earlier than the period declared by the manufacturer.
Wind load should also be taken into account. If the gate consists of a single leaf, then the drive will have to overcome the effect of the wind. Accordingly, a more powerful design is required.
Another problem is climate change in cold weather. In summer, the design can easily open a gate weighing 250 kg, but in winter, difficulties may arise, since the drive will operate in labor-intensive conditions. Be sure to take into account that in some regions during this period the voltage of the mains drops. Drives without a power reserve may not start in this case.
Availability of additional functions
Manufacturers produce a wide range of accessories. Be sure to purchase photocells that help stop the process of closing the gate if obstacles appear in the coverage area:
It is also recommended to purchase an antenna that can increase the range of the remote control. Signal lamps can warn others that the gate is open. This function will be needed if the exit goes to the sidewalk on which people walk.
Choice additional options depends on the operating conditions of the door.
It is also important to take into account technical specifications, which are used to classify automatic mechanisms:
- Torque (Nm) - the basic parameter of automation for a lever swing structure. This characteristic is not used for worm automatics. Torque can show how much weight the design can open the actuator. The higher the indicator, the more the weight of the valves can open the automatic mechanism. For doors weighing up to 800 kg, the optimum torque is 3000 Nm.
- Intensity (%) - a parameter that shows the maximum intensity of the use of the electric motor. The intensity is the ratio of the period of operation of the device to the total time. For example, if the parameter is 30%, then the structure can work 30% of the time, while the break in work will be 70% of the time. Usually this value is sufficient for gates with standard parameters.
- Traction force (N) - the parameter will show with what force the mechanism presses on the leaves. The larger the characteristic, the more powerful the drive. Optimal value for gates 6 m - 400 N.
Parameter maximum weight sashes should not be taken into account. The choice must be made on the basis of tractive effort and torque.
Calculation of materials and list of tools
The minimum set of automation includes the following elements:
- rack;
- limit switches;
- electric drive.
- photocells;
- warning lamp;
- remote antenna.
Laying a cable with a voltage of 220 V on the territory of a private house underground can be performed without additional protection of the wire from damage. Under the passage of the car, additional cable protection must be used. In this place, the wire must be laid in a case. The structure can be built from a metal or plastic pipe. The depth of the wire laying is 0.8–1.2 m.
Underground cable laying is best done in technical HDPE pipes
Such pipes cost 2 times lower than standard ones, since they cannot withstand the same pressure that ordinary water pipes can withstand. For laying the electrical cable, pipes with a thickness of 3 mm will suffice.
To bend pipes at an angle, fittings, reducers and flanges are needed.
Cable laying underground and connecting pipes with fittings
It is important to know the typology of wires and their minimum cross section:
The antenna is connected using a RG58 coaxial wire with a characteristic impedance of 50 ohms.
If you plan to install an additional intercom near the gate, then from the private house to the structure you need to lay 2 two-wire wires 2x0.5 mm² or 2x0.75 mm².
Sliding gate materials
For installation of automatic retractable design you also need to prepare the following elements:
- bicycle carriages;
Bicycle carriages can be used in automatic gates
- flaps;
- top support rollers;
Top rollers for gates
- guide bar;
- rolling rollers;
roller for gates
- several traps;
Gate catcher
- jack;
- coating material (profiled or iron sheets, polycarbonate or wood);
- channel;
- brick.
You also need to prepare an unused washing machine, some elements will be needed for automation.
Sliding Gate Materials
For automatic gates of this type, it is necessary to prepare the following elements:
- reinforced hinges with bearings;
- handles;
- central and side stops;
- valve;
- washing machine;
- coating material;
- profile pipes;
- bicycle carriages.
Unlike the retractable design, in this case you will need 2 electric motors.
To build a sliding or sliding gate drive, you will need to prepare several carriages with asterisks.
Geared motors can be used as motion activator various types. If you plan to install small gates with low weight, then a battery-powered screwdriver electric motor, a drive for a car glass cleaner or window lifter will do.
You will also need to resolve the issue with the clutch for the shafts of electric motors. To do this, determine the required torque. For example, the closing force of the flaps can be 13.5 kg. Each kg corresponds to 9.8 N. Accordingly, the thrust force will be 132.3 N. Given value must be divided by the diameter of the drive wheel.
You will need these tools:
- electric drill;
- insulating tape;
- pliers;
- meter;
- hammer;
- soldering iron;
- screwdriver.
Step-by-step guide to making gate automation
There are many options for making a drive with your own hands from various materials.
How to build a drive for sliding gates?
You can make a drive from two carriages. You will need to do the following:
- The frame must be cut so that the vertical pipe that comes from the axis protrudes a few cm above the star.
- On the one hand, it is necessary to dismantle the pedal, and on the other hand, remove the pedal and connecting rod.
- There should be 2 sprockets. Their dimensions and tooth pitch should be the same, since the drive will use a single chain.
- The carriages must be welded to the top of the frame. Stars that are placed at the corners should be placed parallel to each other.
- The connecting rods should be positioned a short distance from the frame.
- The rods that connect the connecting rods with the gate are recommended to be selected in accordance with the dimensions of the stars.
- When the stars move, the bar that connects the sashes to the connecting rods will move the canvas.
- It is problematic to choose the exact length of the rod, as there are various models of bicycles. Suitable design with a diameter of M-8. The bar can be made from a metal strip.
- The chain must be crossed over the stars. As a result, they should scroll in different sides. The design is made of several chains from a bicycle. They will need to be fastened to each other.
- It is important to tighten the chain well. However, this will not solve the problem that it may sag or come off. This can only be fixed by welding a few steel strips to the frame to support the chain. Details will be used as guides. Another option is to fix the large width rollers along which the chain will move.
Homemade drive for gates from a bicycle frame assembly
The chain is mounted exclusively on closed gates. After that, a design check should be performed. To do this, you need to push out one sash. The second will have to move symmetrically to the first. If overlap is obtained, then the chain should be moved one tooth.
How to make a sliding gate drive?
The lightweight sash can be driven by a drive from a modernized power window mechanism. The advantages of the method include ease of manufacture and operation with virtually no noise. The following power windows can be used as a drive:
- a drive that functions with a gear;
- a design in which a rack with teeth is used as a moving element.
In each case, the drive part must be installed on an iron platform, which is securely attached to the pole. The metal bar should move parallel to the base of the gate and extend towards it.
The power window mechanism needs to be improved:

Automation for sliding and sliding gates
On next step installation of a motor for sliding gates.
After manufacturing the drive, you will need to install the automation for the gate
To open the gate, you need to push one leaf or pull the chain towards you. To automate the design, you can install an electric motor and connect it to the gearboxes from the car wipers.
The electric motor will need to be connected to the gearboxes of the car wipers
An old battery can be used as a power source. Due to this device, automation will not depend on electricity. The disadvantage of the old battery is that it will open the doors slowly.
Another option is to use an electric motor from a washing machine. The average power of the device is 105–115 W, the scrolling speed is 1500 rpm. A screw jack for passenger cars can be used as a gearbox. Vehicle. The jack will need to be improved. To do this, behind the bevel gear, you need to install a pulley from the washing machine. In this way, you can turn the jack into a linear gearbox.
The jack must be welded parallel to the chain so that during movement the slider pulls the chain. Iron wire is used to fasten the parts together.
It is important to know: if the electricity is turned off, you will have to unwind the wire each time to open the gate.
To connect the electric motor to the pulley, you will need a belt from a washing machine. The motor speed will be reduced approximately 1:4, so the pulley diameter should be as small as possible.
To remotely control the gate, you will need to buy a single-channel 12 V car alarm and connect it.
Connect radio control with car alarm it is possible according to this scheme
Automation for sliding gates consists of the same elements. The only difference is that you need 2 electric motors. They are located in the side parts of the gate. You will also need to install levers. You can make them from a profile pipe.
How to set up automation?
Each mechanism has its own characteristics. In order for the design to serve for a long time, you will need to correctly program the control apparatus. Different manufacturers have different settings, but the following settings are most often configured:
- current sensitivity. The parameter is responsible for launching protective device. If there is an obstacle, the gate stops.
- Speed change. The speed of movement of the leaves can be changed by reducing or increasing the power of the electric motor. It is not recommended to install fast pace as this can lead to equipment failure. To increase the speed, you can increase the voltage to 38 V.
- Automatic closing. To implement this function, the design must provide for the presence of a timer. The part is best purchased in finished form.
Other functions can be implemented by adding appropriate details to the design diagram.
In order for these gates to serve for a long time, you need to adhere to the following tips for use:
- Mechanisms need to be serviced from time to time. The process consists in lubricating moving parts. Only non-freezing grease may be used.
- Periodically, the guides should be inspected and cleaned of debris. If ice forms, the canvas may jam.
- Automation mechanisms are also subject to verification. Parts should be checked at least once a year. If any of the elements is out of order, it is recommended to entrust the repair to specialists.
- You have to take care of the fabric. It has an anti-corrosion coating, but it is often damaged. It is recommended to clean the gate from dirt in a timely manner with water and soapy water. If any of the sections is bent or scratched, then it should be treated with special anti-corrosion agents or replaced.
It often happens that some of the hand-made parts are easier and cheaper to replace with others.
Video: do-it-yourself automatic gates
You need to start installing automation after adjusting the hinges and the position of the gate.
You can make automatic gates with your own hands, but you need at least minimal knowledge in connecting electrical appliances.
Video of the process of laying electrical wiring for sliding gates:
The first thing you don't need to do is to take thick wires - "old school" electricians lay wires with a cross section of 2.5 mm2 or more, up to 6 mm2 of copper, including for photocells, a key button, and other weak currents. The only relatively thick wire that is needed for automatic sliding gates is the power cable, and that is not thicker than 1.5mm2.
The figure above shows typical terminal contacts on the gate automation control board, the maximum wire cross-section that can be clamped into them without additional tricks is 1.5 mm, however, it should be noted that some wires have to be twisted together and then clamped into the terminal. On photocells, these terminals are even smaller.
So, first consider the wiring diagram of the sliding auto gate.

At first glance, it doesn't make sense. It's all right - that's the way it should be. Let's try to figure it out if we want to save our money. The first thing to understand is that all the wires come to the electric drive in the diagram, it is indicated by a green rectangle. It is recommended to leave free ends 1-1.5 m each. It makes sense to place the drive immediately behind the roller carriage, the one closer to the opening. Thus, you will reduce the consumption of the gear rack and you will not have to go far from the opening to get to the drive if necessary.
So, we decided that all the wires go to the drive and exit in plastic corrugations from the drive installation site. In practice, this is implemented as shown in the photo below:


Consider the first cable coming from the drive - this is 220V power, it makes sense to make it a PVA cable 3x1.5. This wire goes from the drive to the outlet or machine. It is recommended to install a voltage stabilizer on the gate automation.
The second cable is from the drive to the signal lamp, on the diagram it is marked 2x0.75 (you can take 2x0.5 or even less, the amperage on the lamp is small). This cable goes from the drive to the top of the pole closest to the drive, if it is better to hide it in the pole. If there is a decorative "hat" on the top of the post, bring the wire to the front plane of the post directly under the "hat".
Next is the cabling of the photocells. It is this stage that causes the greatest difficulties, so we will dwell on it in more detail. The wiring for the photocells is best done with a "doorphone signal cable" 4x0.22. The aforementioned PVA 2x0.5 is also suitable, just do not forget that the photocell closest to the drive requires 4 wires, and the far one 2.
The first thing that causes difficulties is where to install the photocells. Photocells are installed at the ends of the poles, at the same height of 500-600mm from the ground. See photo:

The photocell closest to the drive (receiver, RX) requires a 4-wire wire - 2 wires for power, and 2 more control contacts. In the diagram, this wire is designated 4x0.35. It goes from the pole to the drive. Often they forget that they need 4-core cables and put 2-core cables, be careful. If possible, it is better to hide this cable in a pole, leaving a free end of 15-20 cm. If this is not possible, you need to strengthen the wire on the pole, since there are now enough fasteners for the wire. Often this wire is laid in the seams between the bricks, and then sealed with mortar.
The photocell on the pole farthest from the drive (TX) requires a 2-wire cable, in the diagram it is marked 2x0.35. It is better to do the wiring again in the same way signal wire 4x0.22, you can use 2 cores, or you can use all the cores by twisting them in pairs. The wire of this photocell passes under the opening, so make sure that it is reliably protected, because vehicles will pass from above.
Do you have any questions? Call and our managers will be happy to advise you on all issues! Call or book a consultation.
For the manufacture of automatic gates, certain skills in working with equipment will be required, you do not need to believe those who convince you of the opposite. This has been repeatedly proven by folk craftsmen.
The types of automatic gates, as well as how to make automation for them, will be discussed in this article.
The popularity of such gates has influenced the growth of supply, and numerous modern models can be divided into three large groups:

- swing structures;
- retractable;
- garage.
Given the pros and cons of each group, we can conclude that swing gates are the best option.

The main advantages of the hinged design are simplicity and ease of use, moreover, when opening it does not require a lot of free space. These positive qualities and due to the popularity of such gates.
Important! The average duration of operation of swing gates is approximately 50,000 opening/closing cycles.
What will be required in the work
Here is a list of all the components that will be required for installation:
Manufacturing instructions
The manufacture of the gate must begin with the choice of material.

Stage 1. Material selection
In this case, everything depends solely on the preferences and financial capabilities of the owner of the site. For the gate leaf you can use:
- corrugated board;
- polycarbonate;
- iron fence;
- steel sheet;
- tree;
- forging.
Stage 2. Size
After choosing the material, you need to determine the dimensions of the structure. The weight of the gate and the distance it takes to move the leaves depend on the size.
Important! It is desirable that this distance be 1.5 times the opening itself.
Stage 3. Support pillars
One of the following materials can be used for the manufacture of support pillars:

During installation, the poles must go into the ground at least a meter, otherwise in winter they will move along the vertical axis, as a result of which the entire structure is deformed.
When installing the support, you must:

Stage 4. Foundation
The foundation is the base of the gate, which performs two functions at once. Firstly, it will withstand the weight of the structure, and considerable. Secondly, a channel is installed in it for the movement of the rollers.

Outward swing gates - scheme of embedded elements
Below is the technology for laying the foundation.
Step 1. A U-shaped trench is pulled out with a size of 45x100 cm and a depth of 115-120 cm, after which a crushed stone "pillow" of the same thickness is filled up.
Step 2. A channel is made for the movement of the rollers (or a "bench", as it is also called). This will require steel reinforcement ø12 cm and the channel itself 20 cm wide. Meter-sized “swords” are cut from the reinforcement and welded to the channel shelves.
Step 3. "Banquette" is installed and poured with concrete.
Important!
1. At the end of pouring, concrete must be defended for at least a week.
2. During this time, it must be watered daily to prevent cracks.
3. The upper part of the "bench" is installed flush with the road.
Stage 5. Carrier frame
For the manufacture of the supporting frame, it is better to use a profiled steel pipe. The manufacturing process takes place in several stages.
Step 1. The profile is cut into pieces of the required length.
Step 2. Pipes are cleaned of rust.
Step 3. The surface of the profile is treated with a solvent, after which an anti-corrosion primer is applied.
Step 4. The frame is welded.
Step 5 Welds are cleaned, after which the entire structure is primed again.
Some helpful tips.
- As stiffeners, you can use a pipe with a section of 3x4 cm.
- The outer contour is made of a profiled pipe 4x6 cm.
- All components of the frame and guide should be assembled only in a checkerboard pattern. Otherwise, when the temperature rises, the gate will definitely “lead”.
Stage 6. Stitching, staining
The paint is applied after the primer is completely dry. It is recommended to use alkyd enamel, moreover, apply it in at least two layers - this way the gate will look “rich”. Between the application of the first and second layers, pause for the paint to dry.
Important! Sewing material is selected based on the wishes and financial capabilities.
The material is fixed on the stiffeners with rivets or self-tapping screws.

Stage 7. Installation
The structure is assembled, catchers are welded to the supporting pillars, automation is installed (we will talk about its manufacture a little later). After that, the gate is tested.
Important! Such a design will cost several times cheaper than the factory model. You can save even more by making an automatic drive yourself.

To make the drive, you will need two carriages from a bicycle with drive sprockets.
Step 1. The bicycle frame is cut in such a way that the vertical tube emanating from the axle protrudes 2-3 cm above the sprocket.
Step 2. On the one hand, you need to remove only the pedal, while on the other hand, the connecting rod is additionally removed.
You will need two such sprockets, as long as they are the same size and with the same tooth pitch (one chain will be used for the drive).
Step 3. The carriages are welded to the top of the frame. It is important that the stars located at the corners are opposite each other. The connecting rods are parallel to the frame, and the rods connecting them to the gate are selected in accordance with the size of the sprockets. When the latter rotate, the rod connecting the gate leaf to the connecting rod will make the canvas move.
Important! It is difficult to determine the exact length of the rod, because there are quite a few models of bicycles. We only note that a product with a diameter of M-8 will be quite enough. The rod itself is made of steel strip.
Step 4. The chain is put on the sprockets. This must be done crosswise so that they rotate in opposite sides. To make such a chain, you will need several bicycle chains at once - they are connected to each other.
The chain needs to be well tensioned, but even after that it will sag and therefore jump off. To avoid this, a couple more metal strips are welded to the frame, which will support the chain and at the same time serve as guides. There is another option - to fix wide rollers so that the chain moves along them.
Important! The chain must be put on when the gate is closed. Next, the design is checked - one leaf is pushed out, while the second should move symmetrically to the first. If the sashes overlap, then you need to move the chain one tooth.

Electric motor installation
So, to open the gate, you need to either push one leaf or pull the chain towards you. In the future, you can automate the design - for example, install an electric motor and connect it to gearboxes from car wipers. The advantage of this option is that even an old battery is quite applicable as an energy source, so that the automation will not depend on electricity. But there is one drawback: the doors may open too slowly due to the low battery power.
Video - Do-it-yourself automatic gates
In addition, you can use the motor from the washing machine. The average power of such motors is 110-115 W, the rotation speed is 1500 rpm. In this case, a screw jack for a car will serve as a gearbox. The jack needs to be somewhat modernized - install a pulley from the same washer behind the bevel gear. So the jack will turn into a linear gearbox (or an actuator, as it is also called).
Video - Automatic swing gates. Installation
The jack is welded parallel to the chain so that when moving, its slider pulls the chain behind it. To connect the latter to each other, you can use ordinary steel wire.
Important! When there is a power outage to open the gate each time you have to unwind the wire.
To connect the motor to the pulley, a conventional belt from a washing machine is used. The engine speed will decrease by about 1:4, so it is advisable to make the pulley yourself, moreover, of a minimum diameter.
The gate is now ready for use. For a more detailed acquaintance with automation, you can watch the thematic video.
Video - Homemade swing gates