Additional reinforcing belt in an existing cinder block wall. Armopoyas in aerated concrete house. Fastening with wire
Remove from wooden barrel steel hoops and it will fall apart. Remove the reinforced belt from the house and the building will not stand for long. This is a simplified, but very clear explanation of the need to strengthen the walls. Anyone who is going to build a solid house will benefit from information about the purpose, types and arrangement of armored belts.
What is this design and what functions does it perform? Armopoyas - a tape made of monolithic reinforced concrete, which is laid on several levels of a building under construction.
fill reinforced belt performed in the foundation, under the floor slabs and under the power plates (rafter support beams).
This amplification method performs four important functions:
- Increases the spatial rigidity of the building.
- Protects the foundation and walls from cracks caused by uneven settlement and frost heaving of the soil.
- Does not allow heavy floor slabs to push through fragile gas and foam concrete.
- Connects securely truss system roofs with walls made of light blocks.
The main material for increasing the rigidity of the walls was and remains reinforced concrete. For small outbuildings, you can use a less powerful brick armored belt. It consists of 4-5 rows of brickwork, the width of which is equal to the width of the bearing wall. In the seam of each row, a grid with a cell of 30-40 mm made of steel wire with a diameter of 4-5 mm is laid on the mortar.

In what cases is an armored belt needed?
for walls
Strengthening the walls with a reinforced belt is not always required. Therefore, there is no need to waste money on its device in the following cases:
- under the sole of the foundation lies a solid soil (rocky, coarse or coarse sand, not saturated with water);
- the walls are built of brick;
- under construction cottage, which is covered with wooden beams, not reinforced concrete panels.
If on the site lie soft soils(pulverized sand, loam, clay, loess, peat bog), then the answer to the question of whether a reinforcing belt is needed is obvious. You can not do without it in the case when the walls are built from expanded clay concrete or cellular blocks (foam or aerated concrete).
These are fragile materials. They do not withstand ground movements and point loads from interfloor floor slabs. The armored belt eliminates the risk of wall deformation and evenly distributes the load from the plates to the blocks.
For (the wall thickness is not less than 30 cm, and the strength grade is not lower than B2.5), the armored belt is not needed.
For Mauerlat
The wooden beam on which the rafters rest is called the Mauerlat. She cannot push through the foam block, so it may seem to someone that an armored belt is not needed under her. However, the correct answer to this question depends on the material from which the house is built. Mauerlat fastening without armored belt is allowed for brick walls. They securely hold the anchors with which the Mauerlat is attached to them.
If we are dealing with light blocks, then the armored belt will have to be poured. In and anchor fastenings cannot be securely fixed. Therefore very strong wind can tear off the power plate from the wall along with the roof.
For foundation
Here the approach to the amplification problem does not change. If the foundation will be assembled from FBS blocks, then the armored belt is definitely necessary. Moreover, it must be done at two levels: at the level of the sole (base) of the foundation and at its upper cut. This solution will protect the structure from intense loads that occur during the rise and settlement of the soil.

For reinforced concrete strip foundations, reinforcement with a reinforced belt is also required, at least at the level of the sole. Rubble concrete is an economical, but not resistant to soil movement material, so it needs reinforcement. But the monolithic “tape” does not need an armored belt, since its basis is a steel three-dimensional frame.
There is no need for a device of this design and for continuous foundation slab, which is poured under buildings on soft soils.
Under what types of interfloor ceilings do you need an armored belt?
Beneath the panels that lean on expanded clay concrete blocks, gas or foam concrete, reinforced belt must be done in without fail.
Under monolithic reinforced concrete floor it can not be flooded, since it evenly transfers the load to the walls and firmly binds them into a single spatial structure.
Armor belt under wooden floor, which relies on light blocks (aerated concrete, expanded clay, foam concrete) is not required. In this case, under the beams, it will be enough to fill in the support pads of concrete 4-6 cm thick to eliminate the risk of punching blocks.
Someone may object to us, pointing to a number of cases when the armored belt is poured under the wooden floor of the floor. However, in this case, amplification is required not because wooden beams on concrete pads they are able to push through the masonry, and to increase the spatial rigidity of the building box.
How to make an armored belt?
The technology for constructing a reinforced stiffening belt is no different from the method of pouring a monolithic foundation.
In general, it consists of three operations:
- Reinforcing cage manufacturing;
- Formwork installation;
- Pouring concrete.
Certain subtleties and nuances in the work appear depending on the location of the armored belt.
Reinforced belt under the foundation
Answering the question of how to make a reinforced belt under the foundation (level 1), let's say that its width should be 30-40 cm more than the width of the supporting part of the main concrete "tape". This will significantly reduce the pressure of the building on the ground. Depending on the number of storeys of the house, the thickness of such a stiffening belt can be from 40 to 50 cm.

The reinforced belt of the first level is made under all the load-bearing walls of the building, and not just under the outer ones. The frame for it is made by knitting reinforcing clamps. Welding is used only for preliminary connection (tack) of the main reinforcement into a common spatial structure.
Armoias of the second level (on the foundation)
This design is essentially a continuation strip foundation(rubber concrete, block). To reinforce it, it is enough to use 4 rods with a diameter of 14-18 mm, connecting them with clamps with a diameter of 6-8 mm.
If the main foundation is, then there are no problems with installing formwork under the armored belt. To do this, you need to leave free space in it (20-30 cm) for installing the reinforcing cage, taking into account the protective layer of concrete (3-4 cm).
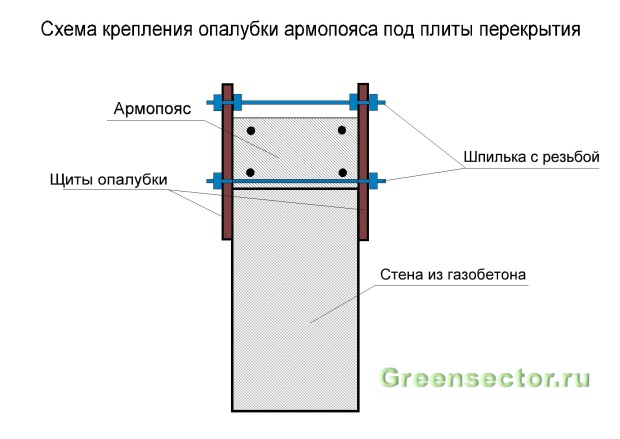
With the situation is more complicated, since the formwork is not set for them. In this case, wooden spacers should be used, which support the formwork panels from below. Before installation on the shields, trimmings of boards are stuffed, which protrude beyond the dimensions of the formwork by 20-30 cm and do not allow the structure to move to the right or left. To connect the formwork panels, short cross bars are nailed along the top of the boards.

You can simplify the mounting system by using threaded studs. They are placed in pairs in formwork panels at a distance of 50-60 cm. By tightening the studs with nuts, we get a sufficiently strong and stable structure for pouring concrete without wooden supports and crossbars.
This system is also suitable for formwork, which requires an armored belt for floor slabs.
Studs that will be filled with concrete should be wrapped in glassine or a little machine oil should be applied to them. This will make it easier to remove them from the concrete after it has hardened.
Armopoyas for floor slabs
Ideally, its width should be equal to the width of the wall. This can be done in the case when the facade will be completely lined with slab insulation. If for decoration it is decided to use only plaster mortar, then the width of the armored belt will have to be reduced by 4-5 centimeters in order to leave room for foam or mineral wool. Otherwise, a through cold bridge of very solid dimensions will appear in the zone of laying the stiffening belt.
When making an armored belt on aerated concrete, you can use another solution. It consists in installing two thin blocks along the edges of the masonry. In the space between them is placed steel frame and concrete is poured. The blocks act as formwork and insulate the belt.

If thickness aerated concrete wall 40 cm, then for this purpose you can use partition blocks 10 cm thick.

With a smaller wall thickness, you can cut it out with your own hands in a standard masonry block a cavity for an armored belt or buy a ready-made aerated concrete U-block.

Reinforced belt under Mauerlat

The main feature that distinguishes the armo-belt under the Mauerlat from other types of reinforcement is the presence of anchor studs in it. With their help, the beam is firmly fixed to the wall without the risk of tearing or shifting under the action of wind loads.

The width and height of the reinforcing cage must be such that, after the structure is monolithic, at least 3-4 cm of the concrete protective layer remains on all sides between the metal and the outer surface of the belt.
In this article, we will figure out why we need an armored belt on aerated concrete. The main requirements for this structural element, you will also learn how to properly make an armored belt for aerated concrete on your own.
Armopoyas for aerated concrete is a tape construction made of monolithic concrete, repeating all the contours of the wall of the building. In gas-block houses, this belt is necessary element, which significantly improves the strength characteristics of the entire building.
In order for the reinforcing belt not to be the weak link of the house in terms of thermal insulation, the technology provides for the creation of belts not for the entire width of the wall, but with an indent from its inner side.
In this case, the minimum width of the belt should be 25 centimeters for brick and 20 centimeters for concrete. The free space formed after pouring the armored belt is filled with heaters and closed with a foam block fitted to the size.

Here are the reviews of builders specializing in the construction of foam concrete houses, which will help you get a complete picture of the need to equip a reinforcing frame for expanded clay concrete blocks:
Igor, 49 years old, Moscow:
For the past seven years, my team has been using building material foam concrete, I heard only positive feedback from customers about our work.
The number of fans this material, since its appearance on the domestic market, has grown significantly. We install armored belts on aerated concrete in every house we have built.
I believe that the reinforcement frame is absolutely necessary for foam concrete, and the manufacturers' statements that the strength of the blocks is already sufficient for the installation of any floors do not correspond to reality. As for me, it’s better to play it safe once again and consolidate the work than to bite your elbows later.
Oleg, 45 years old, Rostov:We build houses from gas blocks. We install the armoframe without fail, especially for hanging rafters and to fix the overlaps from concrete slabs. Recently built on suburban area a utility room for poultry, used a cinder block as a building material.
It was equipped with a brick reinforcement frame, because I am sure that the “doctor prescribed” it to be fixed to all buildings made of building materials based on foamed concrete.
2.3 Do-it-yourself armo-belt arrangement (video)
They call it an armored belt reinforced concrete structure, which is designed to strengthen the walls of the house. This is necessary to protect the walls from loads arising under the influence of external / internal factors. External factors include wind exposure, terrain slope/hilliness, floating ground, and ground seismic activity. The list of internal factors includes all household building appliances used in interior decoration Houses. If it is wrong to make an armored belt, then because of these phenomena the walls will simply crack, and even worse, they will disperse. In view of this, it is very important to be aware of how to make an armored belt. The types, purpose and method of installing the armored belt will be discussed in this article.
There are 4 types of armored belt:
- grillage;
- basement;
- interfloor;
- under Mauerlat.

Before starting work, prepare tools / materials:
- Fittings.
- Cement.
- Sand.
- Rubble.
- Wire for bandaging fittings.
- Boards.
- Self-tapping screws.
- Brick.
- Shovel.
- Crowbar / crowbar.
In order for all the work you have done to be done with high quality, we suggest that you familiarize yourself with the technique of manufacturing an arm mesh / frame and formwork.

In order for the armo-belt to be of high quality, and, accordingly, the house is reliable, you need to know how to properly make the armo-mesh / frame. The connection of the reinforcement bars to each other is carried out with a knitting wire, and not with a welding seam. This is due to the fact that during welding, the place near the weld being made overheats, which leads to a weakening of the strength of the reinforcement. But you can’t do without welding seams in the manufacture of the mesh. The middle and ends of the frame are welded, while the rest of the connecting nodes are connected.

The rods are fastened to fix the reinforcement in the required position when pouring concrete. For these purposes, a thin wire is used; the strength of the mesh / frame does not depend on it.
For the manufacture of armored belts, only ribbed rods are used. Concrete clings to the ribs, which helps to increase bearing capacity designs. Such a belt can work in tension.
To make a frame, take 2 cores with a thickness of 12 mm and a length of 6 m, while for transverse reinforcement you will have enough rods with a thickness of 10 mm. The transverse reinforcement should be welded in the center and edges. The rest of the rods just knit. After making two meshes, hang them so that a gap forms. Weld them from the edges and in the center. Thus, you will get a frame. For the manufacture of the belt, there is no need to weld frames. They are overlapped by 0.2–0.3 m.

The installation and fixing of the formwork is carried out by several methods. To install wooden shields, it is necessary to pass anchors through them, mount plugs on them using electric welding. The purpose of these actions is to fix the formwork in such a way that it does not squeeze out under the weight of concrete.
To fix the formwork when pouring the interfloor armored belt, a simpler method is often used. A screw with a diameter of 6 mm and a length of 10 cm should be fixed on the bottom of the shield. The distance between them is 0.7 m. So, attach wooden shield to the wall, drill a hole through it, insert a fungus into it and hammer in a screw.
The hole in the shield should be a little more than 6 mm in diameter. This is necessary in order to freely install the fungus.

The upper part of the formwork is also fixed quick installation. But in this case, you should screw in the self-tapping screw, not the screw. So, make a hole in the facing brick. Then drive reinforcement into it. If the brick is solid, then the situation is simpler - just drive a nail / rebar into a vertical seam. Tighten the self-tapping screw and fittings with a knitting wire. The distance between the fasteners is 1–1.2 m. Such a fastener is able to withstand the upcoming loads.
After the armo-belt hardens, the formwork can be removed using a crowbar / nail puller. In the warm season, concrete sets in a day. In this case, the formwork can be dismantled the next day. In the cold season, this procedure is carried out after a few days.

Initially, you should determine the depth of the foundation. This parameter depends on the type of soil, the depth of its freezing, as well as the depth of occurrence. ground water. Then you should dig a trench around the perimeter of the future house. This can be done manually, which is long and tedious, or with an excavator, which is quick and efficient, but entails additional costs.
After special equipment, the bottom and walls of the trench should be leveled to solid ground. The surface should be as hard and level as possible.
Now you need to form a sand cushion, the height of which should be 50-100 mm. If it is necessary to backfill sand more than 100 mm, it must be mixed with crushed stone. This event may be needed to level the bottom of the trench. Another way to level the bottom is to pour concrete.

After backfill sand cushion, it must be tamped down. To cope with the task faster, pour water over the sand.
Then the reinforcement should be laid. During the construction process, under normal conditions, reinforcement of 4-5 cores should be used, the diameter of each rod should be 10-12 mm. It is important that when pouring the grillage for the foundation, the reinforcement does not touch the base. It must be embedded in concrete. Thus, the metal will be protected from corrosion. To achieve this, the reinforcing mesh should be raised above the sand cushion, laying halves of the brick under it.

If you are building a house on heaving soil or where there is a high level of groundwater, then the grillage should be made more durable. For this, instead of reinforcing mesh should be used reinforcing cage. He imagines 2 grids, consisting of 4 cores with a diameter of 12 mm. They should be laid below and above the armored belt. Granular slag is used as a base instead of a sand cushion. Its advantage over sand is that over time, granulated slag turns into concrete.
For the manufacture of the mesh, a knitting wire is used, not a welding seam.
For the grillage, concrete M200 should be used. In order for the pouring height to correspond to the specified value, install a beacon in the trench - a metal peg equal to the height of the grillage in length. It will serve as your guide.

Before erecting walls on the foundation, the base armored belt should be poured. It must be poured around the perimeter of the building along external walls, but this cannot be done along the internal bearing walls. The base armored belt serves as an additional reinforcement of the structure. If you have filled the grillage with high quality, then the basement belt can be made less durable. The height of the armored belt is 20–40 cm; concrete M200 and above is used. The thickness of two-core reinforcing bars is 10–12 mm. Reinforcement is laid in one layer.
If you need to strengthen the basement belt, then use thicker reinforcement or install more cores. Another option is to lay the reinforcement mesh in 2 layers.

The thickness of the basement and outer walls is the same. It ranges from 510 to 610 mm. When pouring the basement armored belt, you can do without formwork, replacing it with brickwork. To do this, it is necessary to make half-brick masonry on both sides of the wall. You can fill the resulting void with concrete, having previously laid reinforcement in it.
In the absence of a grillage, it is useless to make a basement armored belt. Some craftsmen, deciding to save on the grillage, reinforce the basement belt, using reinforcement larger diameter, which allegedly improves the bearing capacity of the house. In fact, such a decision is unreasonable.
The grillage is the foundation of the house, and the basement belt is an addition or reinforcement of the bearing capacity of the armored belt for the foundation. Collaboration grillage and basement belt guarantees a reliable foundation even on heaving soils and with high level groundwater deposits.

Between the wall and the floor slabs, you also need to make an armored belt. It is poured along the outer walls with a height of 0.2 to 0.4 m. The interfloor armored belt allows you to save on door / window lintels. They can be made small and with a minimum of reinforcement. Thus, the load on the structure will be distributed evenly.
If an armo-belt is installed on the walls of a material that does not take the load well, then the load from the floor slabs will be distributed evenly along the entire length of the walls, which will have a beneficial effect on their strength characteristics.

Reinforcement of the interfloor belt is carried out with a mesh of ribbed reinforcing bars 10-12 mm thick in 2 cores. If the wall thickness varies between 510–610 mm, then double-sided formwork can be used as formwork. brickwork, as for the basement belt. But at the same time, backing bricks should be used for internal masonry, and for external facing. In this case, the armored belt will have a width of 260 mm. With a smaller wall thickness, the backing brick should be laid on the edge or wooden formwork should be used instead, and with outside in the same way as in the previous case, the front brick is laid.

It is possible to fill in the armo-belt under the Mauerlat only after the glue / mortar for laying the walls has hardened. The technology by which the armored belt is laid on aerated concrete differs in the formwork device, but we will talk about this a little later. The manufacture of wooden formwork is carried out according to the scheme already familiar to you. Concrete is prepared according to the following formula: 2.8 parts of sand per 1 part of cement and 4.8 parts of crushed stone. Thus, you will get concrete M400.
After pouring, eliminate the remnants of air bubbles in the mass. To accomplish these tasks, use a building vibrator or pierce the liquid mass with a rod.

At monolithic device armored belts, you should follow the rules for attaching the Mauerlat. During the installation of the frame from the reinforcement, vertical segments should be removed from it to the height determined in the project. The reinforcement rods should rise above the armored belt by the thickness of the Mauerlat + 4 cm. It is necessary to make through holes in the beam equal to the diameter of the reinforcement, and threads should be cut at its ends. So, you get a secure mount, which will give you the opportunity to carry out quality installation roofs of any configuration.

Aerated concrete is an alternative to brick, which has high thermal insulation qualities along with low cost. Aerated concrete blocks inferior to brick in strength. If, when arranging an armored belt on brick walls it is not necessary to pour concrete, since the reinforcement is laid during the laying process, then things are different with aerated concrete. How to make an armored belt on wooden formwork already mentioned above, so in this subsection we will look at how to make a reinforced belt from D500 U-shaped aerated concrete blocks. Although it is worth noting right away that this technology is more expensive.
In this case, everything is extremely simple. Install the blocks on the wall in the usual way. Then reinforce their central part, and then fill it with concrete. Thus, the walls of your house will be more durable and reliable.
If you have any questions on the topic, then ask them to the specialist working on the site. If necessary, you can consult with our expert about filling the armored belt. Eat personal experience? Share it with us and our readers, write comments on the article.
Video
You can learn how to make an armored belt for a house from aerated concrete from the video:
Mauerlat is wooden structure, through which the roof is fastened to the walls of the house and on which the system of roof rafters is attached. Usually this is a wooden beam from conifers. Timber timber must be at least second grade. For the manufacture of used pine or larch.
The dimensions of the beam can be: 150x150mm.; 150x100mm.; 80x180mm.; 100x100 mm.; 200x200 mm.
Before fixing the Mauerlat wooden beam, it must be impregnated antiseptic. This will help prevent possible wood decay on the cinder block.
If you choose wood yourself, you need to take into account the knowledge passed down from generation to generation - a tree cut down in winter does not rot longer, and one cut down at the end of the month is better preserved than one cut down at the beginning of the month.
Wall mounting methods:
- fastening with anchor bolts;
- wire fastening;
- pin fastening.
Attachment to cinder block wall
Fastening with anchor bolts
 When building a house of brick or cinder blocks, it is better to use the most reliable Mauerlat fastening - with the help of anchor bolts fixed in the armored belt.
Armopoyas is a self-made reinforced concrete structure. It consists of a frame made of metal fittings and wire. This frame is immersed in a mixture of cement, sand and gravel. In other words, the armored belt is a reinforced concrete structure.
Here, doubt may arise about the need to create an armored belt in the event that the house is built from cinder blocks, which, by themselves, create enough solid construction. The thing is that the mauerlat is attached to the walls of the building with anchor bolts, and fastening anchor bolts to blocks is strictly prohibited. This can lead to cracking and breakage even of the cinder block.
Armopoyas will increase the resistance of the building structure to the existing deforming loads: wind, shrinkage of the house, seasonal fluctuations in the foundation, point loads from slabs or beams. When pouring an armored belt, you need to know that it is poured as a whole. It shouldn't have breaks.
Whether the Mauerlat will be able to fulfill its load-bearing function depends on how the armo-belt to which it is attached is correctly made. The strength of the armored belt depends on how the formwork was installed during its creation.
Mounting of the Mauerlat can be started after the formwork has been removed, when the concrete has completely hardened - this means 4 or 5 days after the concrete has been poured.
You need to decide in advance how many anchors you will install to attach the Mauerlat to cinder block walls. The number of anchors must not be less than the number of rafters that will be attached to the Mauerlat. We must not forget that the location of the anchor bolts should not coincide with the location rafter legs. This will reduce the rigidity of the structure. It is desirable that the anchors be located in the middle between the rafters.
It is very difficult to wall anchor bolts into concrete so that they stand strictly vertically and at the same distance from each other. To do this, it is necessary to pre-mark the distance between the anchors, taking into account the location of the rafters and the fact that the anchors should be located at a distance of 0.8 to 1 meter. Metal pins - must protrude above the concrete surface by at least 20 cm.
Some builders attach anchors to pieces of rebar that protrude at the bolt locations. Fastening takes place by welding.
In order to drill holes in the Mauerlat strictly in the place where the anchors will be located, two methods can be used:
- Take the board, fasten it to the extreme anchors and mark the location of the future holes. Then transfer this markup to the Mauerlat;
- Place the power plate over the anchors and hit it with a sledgehammer. Get the markup for drilling holes. They should be slightly smaller than the diameter of the bolt.
Before attaching the Mauerlat to the wall, you need to isolate concrete surface from a wooden beam. For this insulation, two layers of roofing material, polyethylene or other waterproofing material are used. The waterproofing material must not be damaged. Mauerlat is put on bolts and pressed as tightly as possible against the wall.

Fastening with wire
For this fastening method, steel wire with a cross section of 4 to 6 mm is used. It is twisted several times and laid in the masonry of the wall at a distance of one cinder block from the level of the Mauerlat. The wire can be fixed on the reinforcement of the armored belt - this will increase the strength of the connection between the wall and wooden beam. The length of the wire should be enough to pass through the holes in the beam or to completely wrap around it and tie the ends. When using wire, two holes are drilled opposite each fastener at a height of 25 to 30 cm. A wire is threaded into these holes, tightened and fixed, thereby pressing the Mauerlat to the wall.
Fastening with studs
Mounting the Mauerlat with construction studs is possible only if the house under construction is small. Metal studs are L-shaped metal products that are embedded in the wall masonry. The hairpin should be immersed in the wall by 45 cm and protrude above the wall and above the Mauerlat strung on it by 30 cm. The hairpin does not have to be embedded in the wall masonry. It can, like anchors, be poured into concrete during the construction of the armored belt. This will give the mount more strength. Stud threads must be clean.
After erecting the walls of the house from piece materials (bricks or blocks), the next important operation is usually the pouring of the reinforced belt. This element is of particular importance general design acquires during the construction of houses from gas silicate blocks - similar top harness is needed both to stiffen the entire “box”, and to fix the Mauerlat, that is, as a kind of “strip foundation” for the subsequent installation of the roof.
It happens that the leaders independent construction the owners of the plots, trying to save on everything, are looking for ways to do without an armored belt, what are the technologies for attaching the Mauerlat directly to block or brickwork. And although, yes, such methods theoretically exist, it is very difficult to call them absolutely reliable. Therefore, good advice: never give up a reinforced belt, especially since in some cases it will not require too much financial and labor costs.
To appreciate the scale future work, use the calculator for the amount of concrete for pouring the armored belt - it will not only show the amount of mortar, but also give a “layout” of the original ingredients for its self-preparation.
concrete mixer prices
concrete mixer
Some explanations for the calculations will be given below.