How to make flowerpots with your own hands - options and recommendations for making. How to make outdoor flower pots Homemade flower vases in the winter garden
Flowerpots – interesting option decoration of your site, giving wide scope for creative ideas. To bring these ideas to life, you can buy flowerpots, or you can... make them yourself.
First, here are some tips on using flowerpots.
Combine the shape and size of the flower pot with the size and appearance of the plant: do not plant miniature flowers in bulky tubs, and vice versa. Use massive flowerpots to decorate only large areas. By the way, large modules can be used to differentiate functional . Excessive pretentiousness when decorating the walls of a flowerpot can create disharmony with the composition of plants or with. Do not use a flowerpot finish that is brighter than the plant itself.
Making flowerpots for the garden with your own hands is not difficult. Let's consider the most popular materials and methods.
Concrete
A concrete flowerpot is durable and frost-resistant. Its walls retain heat and water in the ground for a long time. In addition, manufacturing does not take much effort and money. The heavy weight of concrete flowerpots deprives them of mobility, so it is necessary to carefully plan their placement. Only a truck crane can move a module filled with soil and plants.
In factory production, special molds are used. A pre-prepared cement solution is poured into them. To increase strength, a reinforcing mesh is installed inside the container. The material for the mold is polyvinyl chloride, silicone, plastic, gypsum, wax, etc. After the concrete acquires hardness, it is broken.
A mold for making a concrete flowerpot with your own hands can be made from a variety of materials. The main thing is that it does not get wet or change when filling it with solution. For small and medium-sized flower girls, thick packaging cardboard, plastic bowls and bottles, glasses, and trays are suitable. A bowling ball is an excellent solution for creating a round flowerpot: it is smooth and heavy, and will be easy to remove from hardened cement.
You can also assemble the mold yourself from wooden boards or plywood.
How to make flowerpots from concrete with your own hands?
You will need:
Optimal temperature for working with cement mortar from +20°C. High humidity is desirable.
Manufacturing process:

Result:

To prevent plant roots from rotting, a drainage layer of coarse sand 5-7 cm thick is placed on the bottom of the flowerpot.
Original flowerpots can be obtained by using decorative concrete . It can be found in stores under different names: architectural, artistic, acrylic concrete, art concrete, polymer concrete. It will vary according to appearance and composition. For example, small fragments of natural minerals and dyes are added to architectural concrete, making its surface more textured.
As an option, you can get by with just one container and sculpt the flowerpot by hand, see video.
The design of a concrete flowerpot will depend on the decorative methods used. You can use one of the following options.
- Finish the walls mosaic– ceramic tiles or pebbles are suitable for this. Carefully lay it on a layer of specialized glue 5-6 mm thick. Once dry, seal the joints with narrow tile joints.
- The flowerpot can also be decorated painted: Draw a pattern on the freshly primed surface.
- Another artistic technique - thread using a special tool. Apply the pattern to them a day after removing the mold.
- To create an unusual relief before the solution hardens, use wicker basket. Its prints will look original on the surface of the walls.
- You can also attach it to the inside of the form plant leaf with a pronounced texture. Hold it with your hands while pouring and remove it after hardening. Decorate the recess with acrylic paints.
Silicate blocks
You can make your own flowerpots from hollow building blocks. They look unusual and fit well into a garden style. When creating them, carefully consider the shape of the structure. It must be sustainable and fit well with the external environment. A sketch prepared in advance will greatly facilitate production.
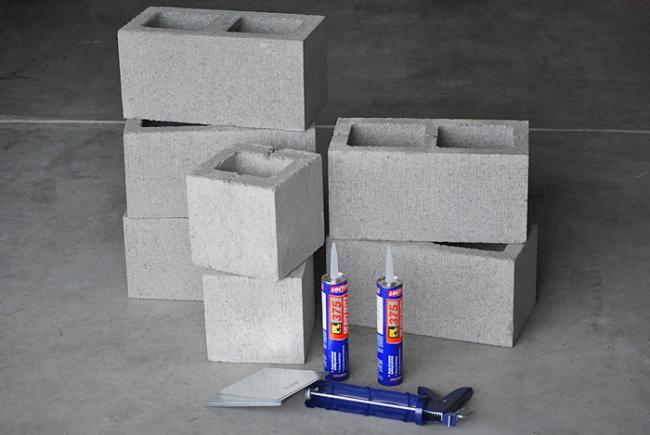
You will need:
- blocks;
- glue;
- plastic or wooden base.
Manufacturing process:
Gypsum
It’s easy to make cute flowerpots with your own hands from plaster. This material will allow plant roots to receive oxygen, but it does not retain moisture well. Therefore, it is better to choose a shady place for the gypsum module. It will not be difficult for you to vary the accents in the garden by rearranging the flower beds, because they are very light and mobile.
You will need:
- cardboard box in the shape of a cube or parallelepiped;
- sandpaper;
- plaster or medical bandage;
- gypsum powder;
- brush;
- white acrylic paint for the base;
- white enamel.
Manufacturing process:
- Measure the height of the flowerpot from the bottom of the box, adding 1.5 cm. Cut off the excess part.
- If the surface of the mold is too smooth, it is recommended to sand it for better adhesion to the plaster.
- Cut the plaster bandage into strips. Or make a solution of gypsum with water in a separate container. Its consistency should be like thick sour cream. And dip a medical bandage into the solution.
- Remove excess by passing the bandage between the index and middle fingers. Wrap the sides of the mold, starting from the top.
- Dry the workpiece. Remove irregularities with sandpaper. Pull out the form.
- Cover the surface with white acrylic paint. After it dries, apply white enamel.
- Apply a final coat of paint or varnish over the enamel.
- To decorate a plaster flowerpot, use pebbles, shells, buttons, beads, rope, pasta, etc.

This product can be used as a flowerpot for a plastic pot with plants. In order for flowers to be planted directly into a flowerpot, a drainage hole must be made in its bottom.
Tree
The natural origin of the material allows outdoor flowerpots to fit harmoniously into the garden setting. Wooden flower stands are easy to make with your own hands, so this budget option is widely in demand. It is important to remember that due to the high hygroscopicity of the material, finished products must always be treated with varnish and an antifungal solution.
There are several options for making this design yourself:
1. From a stump
A stump, log and other pieces of wood can serve as the basis for a flower plant. The sample must be selected in accordance with the plants being designed: the larger the root system, the larger the flowerpot itself should be. As a rule, the height is about 40 cm.

You will need:
- stump or log;
- saw;
- drill;
- chisel;
- polyethylene.
Manufacturing process:
- Cut the log to the desired length.
- Using a drill with a 25 cm drill and a diameter of 20 mm, drill several holes in the upper plane at the same distance from the walls. Make a series of nests in the center to destroy the core.
- Remove the wood with a chisel, forming a container for soil and plants. If the log or stump has a large diameter, use an ax or pick. Form smooth, strong walls.
- Treat the inside of the stump with a moisture-proof solution and cover it with polyethylene. Then fill in the drainage and soil mixture. You can place a plastic or ceramic pot in an untreated container to act as a moisture barrier.


2. From timber and boards
To ensure that the wood retains its original appearance for a long time and does not turn gray, use special oil. It will also protect your product from infection by fungi and insects. The shapes are divided into: rectangular, cubic (the most commonly used), hexagonal, trapezoidal.
You will need:
- timber from 20x20 mm;
- plywood or boards with a thickness of 10 mm;
- fasteners - nails, screws;
- wood glue;
- wood protection products;
- varnish or paint.
Manufacturing process:

When assembling the structure, it is necessary to take into account that when watering the tree will swell, so the boards are not nailed very tightly to each other.
A flower pot made entirely of timber also looks good.

3. From the vine
You will need:
- special willow vine for weaving;
- a small piece of plywood;
- awl;
- sharp knife;
- drill;
- round nose pliers.
Manufacturing process:
- Soak the vine in water until it becomes flexible.
- Cut a blank for the bottom from plywood. Using a drill, drill small holes at equal distances along the edges of the workpiece.
- Form a frame by inserting thick twigs into the holes.
- Place the vine between the twigs, pressing with an awl. There are many installation methods, combining which you can create different textures for the surface of the pots.
- Upon reaching required height, cut the frame rods.
- Dry, treat with moisture-proof impregnation and varnish.
- You can fill such a flowerpot with soil, having previously lined it with polyethylene, and plant plants, or simply put a plastic pot with a flower and use it as a flowerpot.
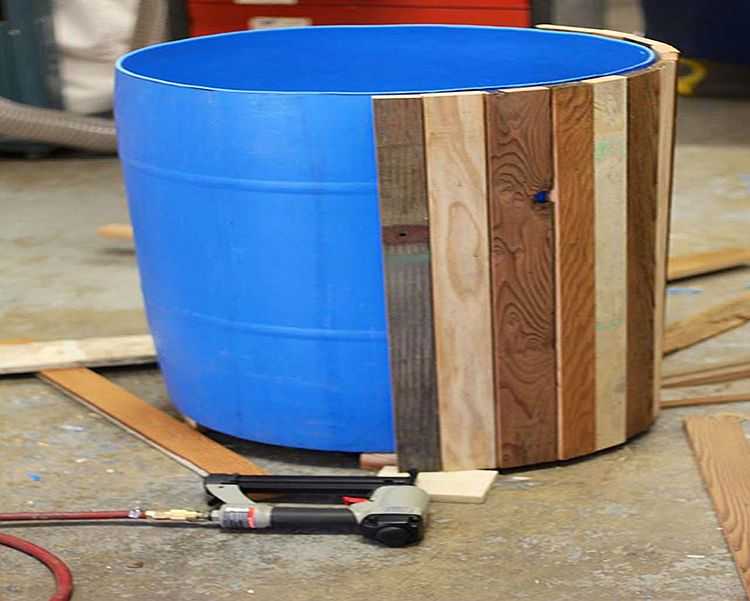
4. From a barrel or tub
You will need:
- barrel or tub;
- sandpaper;
- drill or grinder;
- varnish, paint or oil for wood;
- moisture-proof solution;
- saw.
Manufacturing process:
- Cut the barrel either lengthwise or crosswise. (If you cut it lengthwise, the planks are nailed together for strength).
- Sand the surface with sandpaper. This can be done manually or using a drill or grinder.
- Paint or varnish. Treat with a moisture-proof solution.
- Place a suitable sized pot of .


5. Made of plastic with wood paneling
You can also make flowerpots from plastic with wooden lining.
You will need:
- plastic container - bucket, tank;
- narrow wooden boards, matched to the size of the container to be glued;
- antiseptic;
- paint or varnish;
- drill;
- bolts;
- nails;
- nail gun;
- hammer;
- universal glue for gluing plastic and wood or nails, gun and hammer.
Manufacturing process:

5. Made from plywood
You will need:
- moisture-resistant plywood;
- self-tapping screws;
- drill with a drill diameter of 1-2 mm less than diameter self-tapping screws
Manufacturing process:
- Cut four identical pieces with a cross-section of 20-25 mm. Use them as ribs of the structure.
- Cut out the side boards.
- Place the sidewall against the rib and drill a hole at a distance of 1 cm from the edge.
- Fasten with self-tapping screws.
- Place a suitable sized pot with the plant in the barrel.
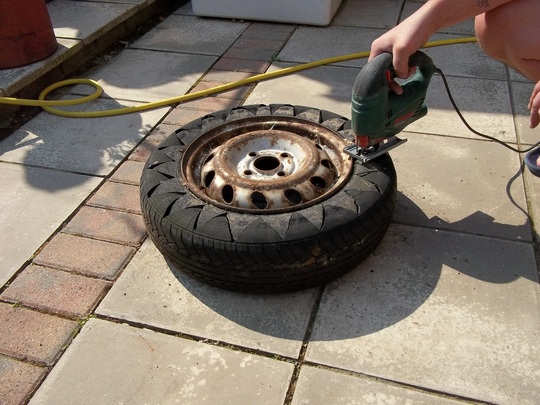
Car tires
In small gardens, near the entrances of residential buildings, flowerpots made of tires are often found. Elastic rubber allows you to give them a fancy shape. The creation process does not require special effort, skills and costs. This is the reason for their popularity.
So how to make these interesting flower beds that will decorate your garden? Studless summer tires are best. The wheel rim inside will serve as a stand.
You will need:
- car tire with a wheel rim inside;
- Sander;
- shoe knife or jigsaw;
- a piece of chalk;
- oil paint, enamel paint or nitro paint; car spray paint is also suitable;
- soap solution;
- paint brush;
- degreasing solution;
- primer.
Manufacturing process:
Stone
Flowerpots made of stone are highly durable and durable. They are very decorative and are able to retain moisture in the soil well. Their large mass allows them to remain stable, but deprives them of mobility. Choose the location of the stone flower girl in advance.
For hand made Making a stone flowerpot requires skill, patience and the appropriate tools. Below is a master class that should help a beginner cope with this task.
When choosing a stone, it is better to give preference to sandstone or limestone.
You will need:
- bushhammer;
- bit;
- a piece of sandstone or limestone;
- support for installing stone;
- pencil;
- brush;
- Bulgarian;
- Grinder.
Manufacturing process:
- Draw the outline of the recess in which the plants are supposed to be planted. To prevent the edge of the flowerpot from collapsing, leave 50 mm between the line and the border.
- Drill out the hole using a hammer and chisel.
- Use a brush to sweep away stone chips and dust.
- Using a grinder, make cuts, gradually deepening the tool along the edges.
- Make a drainage hole in the resulting bottom.
- Sand out rough grooves.
Stone processing is made easier by using special power tools, see video.
It is much easier to make flower modules decorated with smooth river stones.
You will need:
- river stones;
- plastic pot;
- glue gun
Manufacturing process:
- Turn the pot upside down.
- With help glue gun Gradually attach stones to the walls. Try to select them so that there are no empty gaps.

There are many in various ways make flowerpots with your own hands. Some are easy to make from scrap materials, others will require more preparation and experience. At self-creation Flower girls can use their imagination and develop a unique design that will suit your personal tastes.
They are not limited to planting plants. Thoughtful combinations of shape, color and texture change the arrangement and enliven a boring landscape. It is not necessary to order expensive designer products to create a fantasy garden on six acres: homemade flowerpots, correctly integrated into the landscape, look no worse than the creations of fashion designers.
Which material to choose?
Every summer resident has a small supply of building materials with an interesting texture - why not put them to use? It is convenient to make massive flowerpots for voluminous park compositions from stone, wood, concrete and plywood. Compare the advantages and disadvantages different materials and make an informed choice!
|
Material Properties |
Concrete | Tree | Moisture-resistant plywood | Stone | Natural clay |
Decorative clay |
|---|---|---|---|---|---|---|
| Strength | high | average | high | average | average; needs firing | average; does not require firing |
| Plastic | high | average | low | low | high | high; hardens quickly |
| Susceptibility to precipitation | average | high; material requires varnishing | low | high | low | low |
| Susceptibility to microbial deterioration and rotting | low | high; needs antiseptic treatment | average | low | low | low |
| Sensitivity to temperature changes | average; gains strength only at positive temperatures | high | low | average | average; glaze required | average |
| Methods for making flowerpots | casting | cutting, knocking down boards | cutting, knocking down planks | cutting | modeling | modeling |
Cast concrete flowerpots
The easiest way to cast large flowerpots of geometric shapes is from concrete by constructing a mold from two vessels of different sizes that you don’t mind throwing away. Lubricate the walls of blood vessels vegetable oil and place one container in another and pour a liquid solution of cement with sand and dye into a large container. Then take plastic pipe, cut into four parts, immerse the pieces in the solution and leave for a day. In the morning, carefully remove the smaller container and spray the set concrete with water. After a week, the pot needs to be removed from the mold and filled with soil.
The relief decor looks beautiful on the walls of the pot: small stones, colored glass, shells, beads and buttons. The video will show you how to cast figured flower girls and make patterns with a towel.
Irony is encouraged in landscape design. If you want to cheer yourself up, use plaster and concrete busts from the red corner as stands for flowerpots with hanging compositions. Modernized images of classics and revolutionary leaders in lush green wigs will amaze guests!
Prefabricated flowerpots made of timber and stone
If you are comfortable with a hammer and nails, it won’t be difficult for you to put together stylish vintage flowerpots that look like the boxes from our grandmothers’ balconies. Using pieces of timber as stiffeners, nail boards to them, leaving gaps between the planks so that the walls of the flowerpot do not warp after rain.
Boards treated with stain are connected with grooves. Half-thick cuts are made in the planks on both sides and the boards are connected like a construction set and the joints are secured with nails. From below, nail the bottom cut from plywood sheet. For reliability, you can also make the sidewalls from moisture-resistant plywood.
Luxurious stone flowerpots are assembled using the same scheme. Stone slabs cut into strips and joined with glue. Expensive types of stone, such as marble, jasper or onyx, can be replaced with cheaper and more pliable flagstone, travertine, and sandstone.
Decoration of the dacha area- it’s an interesting and lengthy business, and also entails significant material costs. In order to save money, you can make numerous accessories for decorating your site yourself. This time we will talk about how to make outdoor flowerpots with a flower stand. Let's consider the process of manufacturing products from different materials.
Flower vases and pots with a stand made of different materials for the street not only serve as a container for a suitable soil composition garden plants, but also assume one with best methods add bright accents to your summer cottage. Outdoor flowerpots with stand for various colors can have a variety of shapes, and their decor will complement the landscape composition.

 Wood may not be the best choice for the production of outdoor flowerpots for the garden, however, it is extremely inexpensive, pliable, and easy to process. That's why it's famous. Wooden flowerpots with a stand for various flowers can be made from scraps of planks, moisture-resistant plywood, wooden beam, tree trunks, stumps, barrels and tubs.
If you want a pot with a stand to retain its color for a long time and not turn gray, but you don’t want to paint it with any kind of paint (such as oil paint), you will need to purchase wood oil. It gives the wood color. At the same time, this oil “preserves” the surface, protecting it from fungi, mold, and insects.

The easiest way to make outdoor flowerpots is from planks rectangular or square shape for the garden, for what:
- you need to cut a certain number of pieces of the same length;
- make a box from them;
- nail the base so that the base of this flowerpot does not become moldy, it needs to be raised on its legs.
In its most basic form, 4 not very large pieces of board can be nailed to the bottom, in the corners. If you have the desire, you can try to make more decorating legs for pot.
When nailing boards, do not knock down the planks too tightly. When watered, they will expand and, if pinned tightly, they can lift. However, there is no need to maintain very large gaps - the earth can spill through the base.

DIY flowerpots made from tires
 Rubber is a malleable material, capable of taking different shapes. This feature of rubber makes it possible to form flowerpots with the most unusual shapes from it with your own hands. A cottage, beautifully decorated with flowerpots and amazing colors, will be a real piece of paradise. Unusual flowerpots for the garden, formed from used tires, can be decorated in such a way that few will guess that the original material was a tire.
The owners of the dachas use all their creative ingenuity to produce a work of country art from unnecessary trash. Planting flowers in this kind of flowerpot is done in early spring, and within throughout the dacha period, others can enjoy bright colors. Do-it-yourself flower beds and flowerpots are often created from old wheels. A simple option for flower beds is to fill a wheel with soil and plant flowers inside. It is the tire that has become the most popular material for creating garden flowerpots. Have no idea how to make flowerpots for the garden with your own hands?
We offer instructions for making a vase for the garden with old car tire:
- Select the type of shape of the pot.
- The chosen figure is drawn in the tire with chalk. To cut the tire you will need a sharp sharpened knife. It is permissible to use a galvanic jigsaw if a difficult pot model is needed.
- The cut tire is turned inside out. Additionally, it is allowed to partially trim the tire from the edge of the tread at some edges.
- The edge of the pot is processed with a sander, making it better aesthetic appearance products.
- We begin to decorate the legs of the vase. It is allowed to paint the leg, or keep it in its original appearance.
- Before applying paint to the finished product, it is important to prime the item being treated at the proper level. Preferred o choose bright hues , they will not fade in the sun.

Outdoor flowerpots for the garden: concrete, plastic, stone
 After selecting the purpose and size of the required flowerpot, you need think about materials from which it will be made. More famous are outdoor flowerpots made of concrete, stone and plastic. In addition, a material such as clay is often used. The plasticity of clay makes it possible to form unique large figures and textures, however, they must certainly be covered with a special glaze - to maintain moisture and increasing resistance to different temperatures.
Flowerpots made from stone are often placed in specialized fixed cabinets and stands, and are often embellished with intricate relief patterns. Their main advantages are reliability and special picturesqueness. Stone flowerpots for the garden hold water well, which prevents the soil from drying out.

Concrete flowerpots, due to their impressive size and heavy weight, are mainly useful for decorating large areas. You can make concrete street flowerpots in the form large vases, which seems quite aesthetic and practical method planting flowers, compared to ordinary flower beds. Often, concrete outdoor flowerpots are modular containers. Their design consists of a concrete base and plant vases made of concrete or stone chips. In addition, concrete flowerpots are made with using reinforcing mesh, which increases the reliability of products.
Using cement and other components, you can make a flower pot of both large and small size:
- for a large composition you will need plastic mold height and diameter 23 and 53 cm;
- the concrete mixture is prepared from several parts of high-moor peat and part of perlite;
- measure the capacity using a 1.5-liter. ladle;
- the 3-part composition is diluted with water until a dense consistency is formed.
Since the prepared concrete vessel will be quite heavy, it is recommended to begin its formation immediately in the required area.

After laying the mixture is completed, the structure is covered with film for 10 days. During this time, the concrete must completely harden and strengthen. However, if the structure begins to dry out too quickly, the product will need to be additionally moistened.

The most economical type of decoration garden plot There is a plastic flowerpot near the house. Flowerpots are often made in colorful, rich colors, and in themselves are presented as a self-sufficient element of decor. The price of plastic flowerpots and flowerpots is quite low. One of the indisputable advantages of plastic outdoor flowerpots and flowerpots is their mobility due to their low weight. And thanks to new technologies, plastic flowerpots are able to imitate different surfaces - clay, stone, etc. Flowerpots, outdoor flower pots and plastic pots can retain moisture well without allowing plants to dry out.

 If you have an irresistible desire to bring your own creative ideas to life, you need to think about how to make outdoor flower pot with your own hands. Suitable flowerpots can be made from boxes, barrels, tubs, wheelbarrows, large dishes, etc. The main rule is to treat the products with antiseptics and cover the surfaces with drying oil or varnish.
You can also make an outdoor pot with your own hands using clay. For the purpose of modeling, both clay and decorative white are suitable. and I. Such clay for pots has many advantages - it does not necessarily need to be fired, modeling can be done without blanks, and the speed of its hardening is extremely high. In addition, it can be easily and simply decorated.

When creating a large outdoor vessel for plants with your own hands, you need to think about its design. Parts of mirrors, small pebbles, shells, coins, beads, etc. are useful as decoration. All components of the pots must be fixed epoxy resin or glue.
Flowerpots made of silicate blocks near the house
 This type will look most unique and impressive in the countryside, interestingly transforming the most boring vegetation. The place formed inside silicate structures is well suited for planting and growing various plants and flowers. It should be noted that certain manufacturers today have even begun to deliberately produce hollow elements intended for the arrangement and diversity of landscape design in countryside areas.
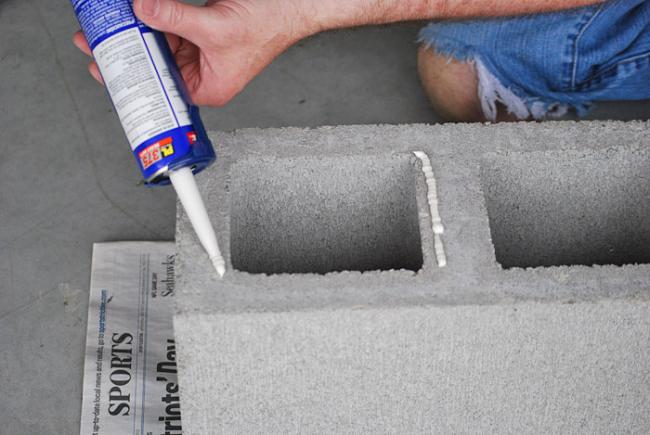
When using silicate structures to create an outdoor pot near the house with your own hands, you must first thoroughly consider the design of the upcoming landscape element so that it remains extremely stable and allows you to place the plants necessary for planting from the inside. After this it is taken required material. Do not forget about drainage, through which excess moisture will be eliminated. In addition, the base must also be reliable and strong.

The base is glued to the first blocks. After this, the structure is assembled. The structures are fixed using glue. In a similar way, tier by tier is gradually formed. For greater strength, the first rows must be filled with soil.
The area around the house is the calling card of any site. Its design is always given Special attention. An excellent decorative option are outdoor flowerpots with a variety of plants. With their help, you can create entire compositions of flowers, or place accents throughout the area.

Advantages and disadvantages
Flowerpots as landscape decoration, involving the manufacture with my own hands, have positive and negative sides.
The advantages include:
- Transportability. Thanks to their easy movement around the territory, you can create new compositions, and during bad weather or in winter, transfer plants to the attic or veranda.
- The ability to decorate a yard where the ground is covered with concrete or tiles and planting plants in the ground is impossible.
- Fencing function. With the help of outdoor containers, you can divide the area into zones and create a cozy corner.
- The ability to create favorable conditions in each flowerpot for an individual plant: special soil, fertilizer, watering.


- Low cost. Compared to many other garden décor items, containers save money. Handmade products allow you to do this twice as much.
- Space saving. You can place not only flower beds in containers, but also cultivated plants, and use them instead of beds for growing cucumbers, tomatoes, herbs, and berries. This is especially true for small areas in order to save space.


Flowerpots for the street have practically no disadvantages, however, depending on the material, several of them can be distinguished:
- Fragility. Applies to products made of plastic and wood.
- Plastic flowerpots are harmful to health as they can release hazardous substances into the air.
- Ceramic products are very fragile.
- Plants in ceramic and metal containers require frequent watering due to the soil drying out too quickly.
- Heavy weight. Products made of concrete and stone have this disadvantage.

Shapes and sizes
Outdoor flowerpots can come in a wide variety of shapes, sizes and colors. By making them yourself, you can be sure that you will get a product that meets all the required criteria. And its appearance may be determined by the material used and manufacturing technology.
When choosing the size for a future flowerpot, you should take into account the space on the site.


In a small area, large, massive containers will look awkward and cumbersome. Bulk compositions of plants should also be avoided. At the same time, in a spacious area, small, modest containers will get lost and will not fulfill their decorative function.
The container can be of any shape. It is limited only by technical capabilities and imagination. If the site is planned to be decorated in a certain style, then it will dictate the appearance of the street decor.


Choosing material
The choice of material is determined by such factors as the cost of the finished product, features of its manufacture, availability necessary tools for making and skill of the craftsman. Decorative flowerpots for a summer house or garden can be made with your own hands from wood, concrete, stone, plastic, ceramics, metal or from scrap materials.

Tree
It is a short-lived material, since outdoors the product is constantly exposed to moisture. Such a product must be treated with a special agent that prevents rotting. In this case, it can be used for several years. The most common option for a container for flowers made of wood is to make it based on a stump. The trunk is scraped out inner part, holes are made for drainage, and a plant is placed inside. It is better if the earth is first poured into another container and then placed inside the stump.


Concrete or plaster
Simple and inexpensive materials at work. Concrete and gypsum products durable, practical, impact resistant environment. With their help you can make almost any shape of flower girl. However, it will have a lot of weight, so it is better to do it immediately at the place where it is planned to be further located on the site. As a variation when mixing concrete, peat can be added to the cement. In this case, the product will be made from hypertufa, which in appearance is practically no different from real tuff or sandstone.


Stone
Stone flowerpots are heavy and expensive. They look very presentable and have a long service life. The process of making a container from stone is quite complex, so it is better to purchase such a product ready-made.


Plastic
Plastic products have a short service life and simple appearance. However, they are inexpensive and come in a wide range of colors, shapes and sizes. Plastic containers usually purchased ready-made.


Ceramics or clay
Such flower beds are fragile and break easily. You can make a ceramic or clay product with your own hands if you follow the technology correctly, including firing.


Metal
Metal flowerpots are durable and will last a long time. They look very original Forged Products, although they have a fairly high price. The process of making a metal flower box is labor-intensive and requires special equipment.


Available materials
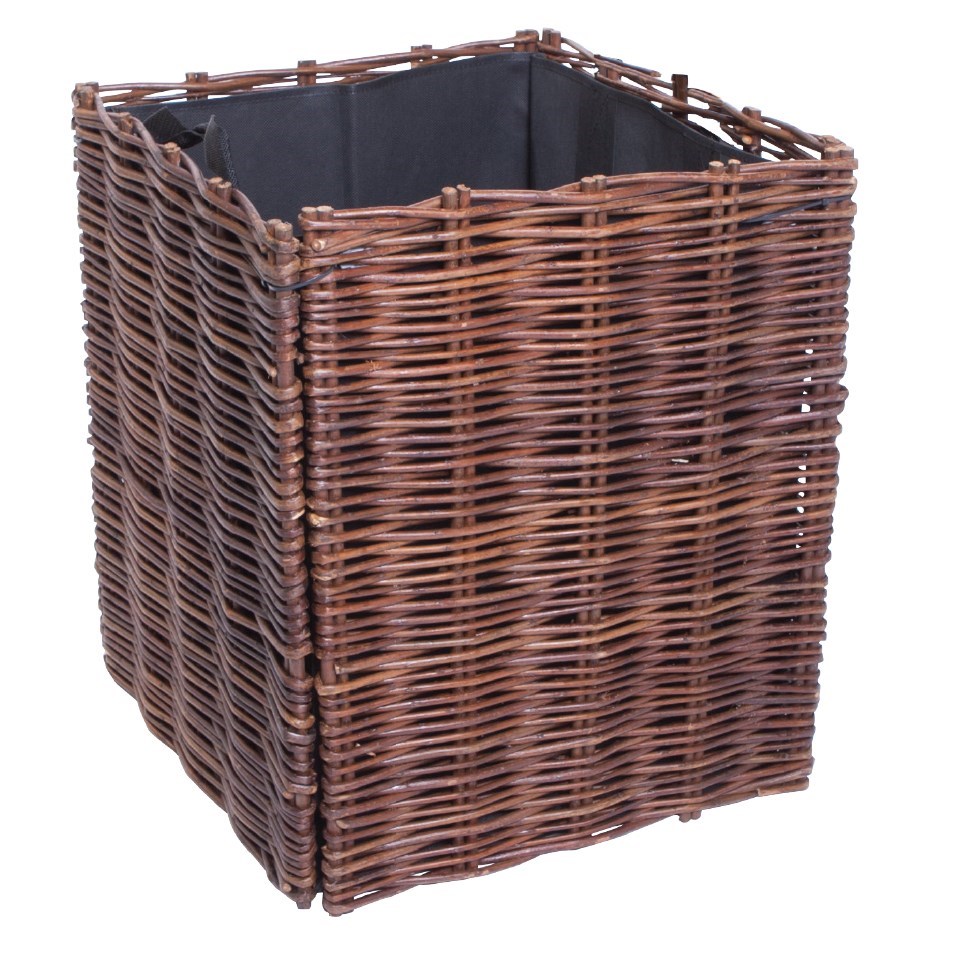
The choice of available tools for making a flowerpot is limited only by imagination. A container for flowers can be made from a huge number of things that are usually unnecessary in the household: tires, bottles, old barrels, carts, baskets, buckets, tires, polystyrene foam, rubber boots and bicycles. Such products will be distinguished by originality and uniqueness.


Master classes
You can make a beautiful flower pot from scrap materials.


Made of wood
The easiest way is a flowerpot made from part of a cut down tree or stump. Birch is best suited for this. Tools for work will require a drill and a chisel.
- You need to drill several holes on the surface of the stump. The more there are, the closer they are located to each other, the easier further work will be.
- Scrape out the inside of the stump to the desired depth.
- Place a container of soil in the hole.
- Treat the entire surface of the wood with a special anti-rot agent.


In addition to a stump, you can use regular boards or timber. In this case, you will need a hacksaw and a hammer.
If the source material is boards, you need to put together four separate panels from them and connect them together. This results in a rectangular container that needs to be processed protective agent and decorate as you wish.
If the material is supposed to be timber, the flowerpot is assembled according to the principle of a log house, like a construction set.
The bars are cut the right size, and on each side a cut is made to half their thickness.


Then the entire structure is assembled and secured using nails and self-tapping screws. The finished product is sanded and coated with a protective agent.
Made from concrete
Using cement, you can make flower boxes of a wide variety of shapes and sizes. For this:
- You need to prepare a form, most often it is plastic, that suits all parameters.
- Prepare the mixture to fill the mold. It consists of cement, agroperlite and peat in proportions 2: 1: 2. All components are poured into a suitable container and diluted with water to a thick consistency. There is a lot of mixture, it is very difficult to stir such an amount, so this should be done in several approaches, dividing the solution into parts. To make the flower container colored, dyes are added to it when mixing the solution.


- Line the bottom of the mold with cellophane. The main thing is that its surface is smooth, without wrinkles. Any unevenness will be imprinted on the finished flowerpot.
- Place the prepared mixture on cellophane. First, fill the bottom, making it about 5 cm thick. You can use a toothpick or straw to control the depth. A cork wrapped in polyethylene is first placed at the bottom of the future flowerpot to provide a drainage hole.
- Then spread the solution over the entire remaining surface of the mold.


- When the mold is completely filled, it must be left for 10 days to harden. If the mixture dries out, it needs to be moistened with water.
- Ready container to pass wire brush over the entire surface to remove all unevenness and give a slight relief to too smooth areas.
- After this, the flowerpot should be rinsed with water, dried, wrapped in film and left for about a week.
- When the product brightens, you can remove the film and put it in the right place. The weight of such a flower girl is very large, so it is better to start the process of making it immediately at the place where it is planned to be located further.


To increase the strength of the structure, a metal frame can be inserted into the concrete layer.
In addition, crushed fiberglass can be added to the mixture for the same purpose.

From car tires
Car tires, not used for its intended purpose - material that often lies idle or thrown away as garbage. You can easily make bright and original decor for your garden or cottage from them. It is better to choose winter tires without studs, they are softer and thinner.
To make a flower container in the shape of a flower, you need:
- Draw the desired outline on the sidewall of the tire.
- Cut out the part along the contour. To do this, you can use a rubber knife or a jigsaw.
- Next you need to turn the tire inside out. To do this, cuts are made throughout the tire every 5-10 cm.
- The flowerpot is ready. All you have to do is decorate it as you wish, cover it with soil and plant a plant.


From plastic containers
A very simple way to make flower pot– take a plastic bottle, barrel or any other container as a basis. It is enough to cut a hole in it for planting a plant, make several drainage cuts and fill it with soil.
However, in the case of a plastic pot, you should take care of its stability. If the container is small, you can simply fill its bottom with small stones or pebbles. If we are talking about a large container, it is better to make it stationary.
To do this, you need to dig a metal pin in the selected place.
The bottom of the bottle is cut off. Then the bottle is “put on” the neck of the metal pin and goes a little deeper into the ground. The finished flowerpot can be decorated as desired and covered with soil.


From pipes
An original idea is the use of plastic and metal pipes for making flower beds.
Pipes can be installed vertically. In this case, only their upper part is used for planting. If you install several pipes nearby, different in height and diameter, you will get an interesting composition.
You can install the pipes horizontally by making holes for plants on the surface.
Such original flower pots look beautiful along paths, lawns, along the perimeter of houses and greenhouses.


Finish options
For large outdoor flowerpots, you can choose original decor that will be the finishing touch to their design.
The easiest way is to paint the product with paint. You can use one shade for all the flower girls made, or you can create a multi-colored composition of all the colors of the rainbow. The main thing is that the planted plants harmonize in color with the painted container.
For areas with houses in ancient styles, artificially aged flower beds are suitable. To do this, they are coated with the chosen paint, and a layer of craquelure is applied on top.
In order for the paint to last for a long time, the surface must first be coated with a primer.


Another way to design an outdoor planter is to decorate it with various available materials. The decor can be created from cones, branches, small stones or pebbles, broken tiles, mirrors or colored glass, creating a mosaic effect. To do this, you only need special glue.
If it spills or stains the surface, it must be removed immediately, otherwise, after it has hardened, it will be impossible to do this.
After this, the pot should be allowed to dry. If tiles, glass or stones are used as decoration, the surface can be additionally treated with grout to complete the work. Except natural stones, you can use artificial ones, which will be perfectly sized and look more aesthetically pleasing than natural ones.

How to register a summer cottage?
When choosing containers for flowers as decoration for your site, you should first of all evaluate their safety for people. For example, commonly used tires from car tires- not the safest option. They can release toxic substances into the air and be dangerous, especially if there are small children in the family.
In addition to safety, the flowerpot must meet the requirements for appearance: match the size and style of the site.

Its size should fit harmoniously into the space. In addition, if the house and the entire site are decorated in a certain style, the flowerpots must correspond to it.
Not all plants are suitable for planting in outdoor pots. To register a plot flower arrangements, it is worth considering the characteristics of their root system, watering and need for sunlight.

The following plants are suitable for planting in flower beds:
- Petunia. These are easy to care for flowers of various colors that bloom all summer.
- Pansies. Their flowering continues for a long time. They are unpretentious, come in a variety of colors and varieties, and grow short but fluffy.
- Ageratum. It has a long flowering period and is unpretentious in watering.
- Fuchsia. Thanks to its cascading appearance, it creates the impression of being in a blooming, fragrant garden.
- Verbena. Suitable for planting in containers, has a modest root system, and can be combined with other plant varieties.


Beautiful ideas for inspiration
What designers and gardeners themselves have come up with:
- fabrics, napkins, filled with concrete and frozen forever;
- rubber boots of bright colors and different sizes as original flowerpots;
- ordinary bowls attached in rows to wooden fence or strung on a metal pin like a herringbone or pyramid;
- you can even build one out of tires alpine slide;


- Broken ceramic bowls should not be thrown away; the shards can serve original decor;
- old galvanized watering cans, buckets;
- mosaic from old ceramic tableware;
- a box made of boards with a trellis for climbing plants.


Decorating a yard, garden or cottage is a fascinating and time-consuming task, and also requires decent material costs. To save money, you can do many things to decorate your garden/plot yourself. This time we will talk about how to make outdoor flowerpots. Let's take a closer look at the manufacturing process from two materials - wood and concrete. These are the most flexible and inexpensive materials from which very good things can be made.
Wooden flowerpots
Wood may not be the best choice for making outdoor flowerpots, but it is very affordable, flexible, and easy to process. That's probably why it's popular. Wooden outdoor flowerpots can be made from scrap boards, moisture-resistant plywood, timber, tree trunks, stumps, old barrels and tubs.
From boards and plywood
If you want the flowerpot to retain its color for a long time and not turn gray, but you don’t want to paint it with some kind of opaque paint (such as oil paint), you will need to buy wood oil. It gives the wood a tint, but leaves visible pores (like a stain). Along the way, this oil kind of “preserves” it, protects it from fungi, insects, and mold.
The easiest way to make flowerpots is from rectangular or square boards. You need to cut several pieces of the same length, put them together into a box, and nail the bottom.

To prevent the bottom of such a flowerpot from blooming, it must be raised on its legs. In the very simple version Four small pieces of board can be nailed to the bottom, in the corners. If you want, you can try to make more decorative legs (as in the photo above).
When nailing the boards, do not try to knock the planks very tightly. When watered, they will swell and, if nailed tightly, they can lift. However, you shouldn’t leave very large gaps - the earth can spill out through the bottom.
Another way to make an outdoor flowerpot from wood is to cut four identical pieces of timber with a small section of 25-25 mm, for example). Use the bars as the ribs of the structure, nail boards to them, and attach the bottom to the bottom. This option is good because such flowerpots immediately have legs.

Using the same principle, you can make a flowerpot from moisture-resistant plywood. Cut out the sides from it and attach them to the bars. Wood screws are usually used instead of nails, and you will also need a drill. Before tightening the screw, drill a hole. Place the sidewall against the timber post and drill, stepping back 1 cm from the edge. The diameter of the drill is 1-2 mm less than the diameter of the screw. So, firstly, the block will not burst, and secondly, the fasteners fit into the plywood easier. Instead of wooden corners, you can take metal ones, preferably stainless steel.
The next version of a flowerpot is made of wooden beams (photo below). Here everything is even simpler - fold the beam so that the connection is in one plane, then in another. After laying each beam, it is nailed to those located below. Be sure to drive nails in the corners; you can also nail them once or twice on the long side.

It's simple. Difficulties can arise only with the first row. It can be attached to some kind of bottom, for example, a piece of waterproof plywood knocked down from boards with holes drilled in it for water drainage.

Any of these flowerpots can be combined with. It will be a wonderful place to relax. Such a group can be placed in the garden, near the entrance, somewhere on the site, near or a small homemade one.
From stumps and logs
In the garden or on summer cottage old trees have to be felled periodically. From their stumps and trunks you can also make outdoor flowerpots. First let's talk about how to use barrels. It is better not to peel off the bark, as this will make the flowerpots look more decorative. Depending on the idea, the trunks are cut into logs of some height. You can cut it normally hand saw, but faster - with a chainsaw. These logs can be placed standing or laid on their sides.

The main task is to remove part of the wood so that a container is formed that can be filled with earth. There are several methods for removing the core. Usually they take a drill and a large-diameter drill bit. A conical or blade-shaped drill (as in the photo) works better.

They make a number of holes to the depth you need. It depends on the type of plants you plan to plant in this pot, but usually 15-20 cm. You can make a lot of holes - the thinner the walls, the easier it is to remove them.
The walls are destroyed with a chisel or a wide chisel. The handle of these instruments is hit with a hammer, and sharp blade breaks off pieces. So, gradually, the core is released. Then the edges of the resulting container are slightly aligned using the same technique.

If the stump has a large diameter, you can use an ax or pick. You just need to work carefully so as not to destroy the walls. Near the walls, you can use a drill to finally decorate the inside of the flowerpot with the same chisel.
Another option is to make some cuts with an ax, crumble the wood, and make a fire inside. But whether it will be possible to extinguish it in time is the question. The charred insides are then removed with a chisel or chisel.

By the way, very interesting compositions can come out of a very old and rotten deck. It is cleared of very crumbling wood. In this case, the inside is picked out very easily - the inner part of the trunk is the first to decay. What remains can be coated with wood oil, stopping the destruction for a certain period.

Such hollowed out logs or stumps make excellent flowerpots. Some design ideas are collected in the photo gallery.
An interesting fence around the lawn - flowerpots made of stumps alternate simply with logs of Chornobrivtsy - unpretentious flowers with a long flowering period. Primroses will bloom earlier in the stumps - they receive more sun and are higher from the cold ground. And even a stump, on a spring day...
From barrels and other cooperage products
The easiest way to make outdoor flowerpots is from old barrels, tubs and other containers that are no longer used and cannot be used due to old age, but it would be a pity to throw them away. They can be sanded a little - manually or by attaching an appropriate attachment to a drill/grinder. Then they can be painted, coated with exterior varnish or wood oil. And you can plant plants.

Barrels are sawn, and in any plane. But if you cut lengthwise, you will have to nail the planks together. The barrels, cut crosswise, look like two identical (or almost) flowerpots.

Even old wood does not need to be treated. This way the composition looks more natural. But such a flowerpot will not fit into all styles. In this case, use a special paint for exterior use, which can be used on wood.

Outdoor flowerpot made of plastic with wooden lining
If you like the look of wood, but want to have a sealed container to avoid drips on the site after watering, you can cover the plastic container wooden planks. The planks are treated with antiseptics, painted, and dried. Then you can start converting a plastic container (bucket, tank, barrel) into a flowerpot for outdoor flowers.

First, holes are drilled in the bottom. The diameter is 10-14 mm. Leave the two opposite zones at the edges untouched. Here we will attach the “legs” - two strips, cut so that they do not protrude beyond the contour of the barrel. You can attach it with bolts, drill a hole under the head so that the fasteners are “recessed”.

We take universal glue, which is suitable for gluing plastic and wood, and glue the planks onto it. The narrower the planks, the more monolithic the surface will be. Such outdoor flowerpots do not shrink or swell.
Homemade concrete flower pots
The good thing about concrete is that it can be poured into any shape. Plastic, glass, metal, wooden, clay vessels and even cardboard boxes are suitable.

It is most convenient to work with plastic - it is easy to remove from it. It’s even easier with glass, but such forms are usually disposable. It was not possible to take them out - they are broken.
What concrete to use
To make outdoor flowerpots, you can use ordinary concrete consisting of cement and sand in a ratio of 1:3/4 (Portland cement of a grade not lower than M 400 and clean sifted river sand). The surface of such a flowerpot will be monochromatic, gray. In some cases it looks stylish, and grey colour does not distract attention from the main thing - from the colors. But not always.
Products made from decorative concrete look more interesting. It is also called artistic, art, architectural, acrylic, polymer - concrete. All this is a designation for the same product. In addition to cement and sand, architectural concrete contains polymer additives, small fragments of natural minerals, some contain dyes. The surface of a pot made of decorative concrete is smoother, more interesting, interspersed with natural stones. The specific type depends on the selected composition. Some types of decorative concrete are shown in the photo below.

The surface of a pot made of decorative concrete is smoother, more interesting, interspersed with natural stones. The specific type depends on the selected composition. Some types of decorative concrete are shown in the photo above.
What to make forms for pouring a concrete flowerpot from
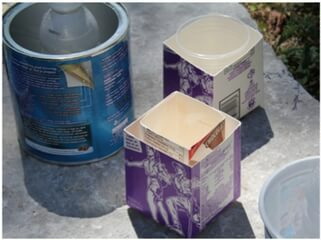
Any shape, from almost any material can be used. It is important that it does not get wet and keeps its shape for 4-5 hours. Then the concrete sets and holds itself. That’s why they even make molds from thick packaging cardboard, gluing them well with coal and tightening them with belts of tape. But caron can be used to make molds only for small flowerpots - for a small group of plants. But the form can be any.

Actually, you need two forms - one to form the outer surface, the second - much smaller in size - is inserted inside the first and forms a zone into which soil is then poured and plants are planted. Inner form is selected based on the dimensions of the planned flowerpot, but the wall thickness should not be less than 3 cm.

You can use plastic bowls, glasses, containers, trays, water flasks - large and small. You can knock down a shape from boards, plywood, pieces of other sheet material. It doesn't matter. Anything, anything that comes to mind to use.

Do you have an interesting shaped basin or bowl? This will do too. And to form the internal volume, you can find something heavy, preferably correct form, but this is absolutely not important. Even a bowling ball will do. It is good because it is heavy and smooth - you can take it out easily.

A metal bowl and a bowling ball make an excellent flowerpot.
Round flowerpots look best, but finding the right shape is not easy. Usually these are either plastic containers or glass balls, which are cut/broken after the concrete has set.
Manufacturing process
You can only work with cement at temperatures above +5 °C. Ideal conditions- this is +20°C and high humidity, but temperature is more important. The place where you will leave the concrete to “ripen” should be in the shade.
You have found suitable forms, stirred the cement. It should not be too liquid, not too thick. It shouldn’t drip off a spatula or spatula, but it shouldn’t be so dry that you can make something out of it.
You need to wear gloves when working - concrete corrodes your hands very quickly. You need a spatula or something similar to spread the solution, a long thin stick or a metal rod to remove air. You will also need either a large container of water or a piece of plastic film.

We take the molds and treat them with some kind of lubricant. This is necessary so that the pot can be removed from the mold easily. The following drugs can be used:
- Non-stick cooking spray. Harmless and effective.
- Special sprays for concrete. They cost much more, but the effectiveness is the same.
- Engine oil.
- Universal lubricant VD-40.
Maybe other compositions work, but these have been tested.
We process the forms with one of the compounds. The big one is inside, the small one is outside. In a large mold, pour the solution into the bottom in a layer of 3-4 cm, level it. This will be the bottom. If you want to be in the day drainage holes, insert the tube pieces. You can use metal ones, cut them into pieces 3-4 cm long, and also treat the outside with lubricant. In this case, the thickness of the bottom should be equal to the height of these tubes. And place them strictly under the bottom of the second form.

Place the second mold on the solution. If it is light, we fill it with small stones, crushed stone, pebbles, and sand. Fill the gaps between the two walls with solution. If the material allows, we knock on the walls with a hammer, then take a rod or thin stick, pierce the solution to the bottom, and swing it from side to side. With these actions - knocking and piercing - air bubbles come out of the concrete, and it settles down a little. This procedure can be repeated a couple of times. Then we take some smooth object (a spoon, for example), spray it with lubricant and level the top of the wall. try to make the side as even as possible - then it’s difficult to do anything with it.
Cover the form filled with concrete with a piece of polyethylene and leave it in this form for at least a day. After a day, the form can be removed, but the flowerpot cannot yet be used. It can be placed in a container of water and left there for a week. Another option is to cover with film and sprinkle with water three or four times a day. Spray generously until completely darkened. Remember to cover with film each time. After about 10-14 days you can start planting plants. That's all, now you can make concrete outdoor flowerpots with your own hands.
Finishing a concrete flowerpot
If you don't like the surface of the flowerpot, you can decorate it. Don't make the flowerpot too bright. It is only a background for the flowers and greenery that will be planted in it. Eat traditional methods- painting, there are more exotic ones - finishing with mosaics, pieces of broken ceramic tiles or pebbles.
When painting, choose a paint that is suitable for concrete; first prime the surface (so that the paint sticks better and does not peel off in flakes).
To finish with tiles or pebbles, a layer of tile adhesive (for exterior use) 5-6 mm thick is laid on the surface, and the pebbles are pressed into it. You have to work carefully, immediately erase traces of glue on the pebbles - it doesn’t come off later.

The finished flowerpot is left to dry until the glue dries (time indicated on the package). The seams can then be grouted using standard tile grout. It is inconvenient to work, the gaps between the stones are too narrow. You can try using thin plastic strips or narrow tile joints.
Flowerpots made from building concrete blocks
Hollow concrete blocks with large cells are suitable for planting plants. Soil is poured into the cells and flowers are planted. You can lay out an entire wall from such blocks. The recipe is simple but very effective.

A low and wide bowl - can be made from a basin
And finally, a video master class on how to make a flowerpot from a tire.