Suspended ceilings arrangement and installation. Installing suspended ceilings with your own hands (video). Some facts you need to know
Suspended ceilings have long ceased to be a luxury; you can see them in many homes.
Design diagram suspended ceiling.
Installation suspended ceilings Not only specialists can do it, everything can be done with your own hands.
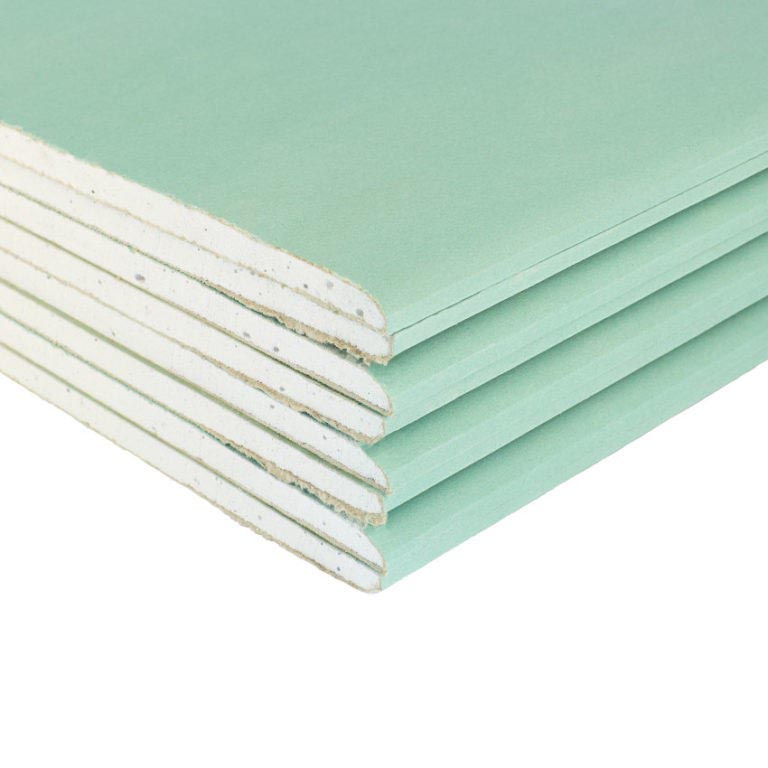
Such ceilings make it possible to perfectly hide all unevenness and communications. Installation of ceilings is quite simple, it is possible to arrange a variety of lighting options, and you can introduce sound and thermal insulation. Installing a ceiling with your own hands will not cause much difficulty.
To install suspended ceilings you will need the following tools:
- building level;
- self-tapping screws;
- roulette;
- pliers;
- roulette;
- drill-driver;
- Bulgarian.
How to Design a Suspended Ceiling Installation

Suspended ceiling assembly diagram.
- You should start by marking the boundaries of the suspended ceiling. To be as accurate as possible, you should use a spirit level or laser level. You should be careful when working with such tools; they require the use of special glasses. As for the ceiling height, it all depends on preferences and what kind of pipes.
- Electrical wires should be tightly secured with special ties, then they will not interfere with work.
- Before strengthening the profiles, it is necessary to check with a sensor whether there are pipes and wires on the surface. If this is not done, everything can be destroyed with sharp screws.
- The angle from which you plan to start the installation should be determined. It is recommended to stand in the doorway and look at the view. The area that is most visible should be finished first. In most cases, the installation of such ceilings is done so that the pieces of slabs are located above the doors in the most inconspicuous place.
- Now, along the perimeter of the room, the wall profiles should be strengthened; they are connected to the wall with 100 mm self-tapping screws. If the wall is framed, then the screws can be screwed directly into the racks. If the surface is made of concrete, then first of all you should drill holes for the dowels, then they are driven into the base, and then you can screw in the screws.
- Now it’s time to mount the frame base; T-profiles are used for this; they will be needed to fix the new ceiling panel.
The nuances of installing a new ceiling

Scheme of a multi-level suspended ceiling.
- If you plan to use drywall, then profiles with a length of 60 cm and 120 cm should be used. Using the corner profiles for two reverse transactions, you need to measure a distance that is equal to the length of the middle profile (this is 120 cm). You should put marks, and then use a tape measure to clarify the distance between them.
- The resulting distance is transferred to the transverse profile, what remains is then simply sawed off with a grinder. Now you can install the transverse profile; it needs to rest on the corner ones.
- You can start assembling the cells for ceiling tiles: first of all, a profile 120 cm long is strengthened; it should be located parallel to the corner guides. If the question arises of how to record profiles, then there is nothing complicated here. Before installing it, you should bend the petal in a certain direction. If the profile is secured properly, a slight click will be heard, which indicates successful operation.
- When installing the ceiling, you must ensure that it does not sag in the middle. To do this, the transverse profile should be attached to the old ceiling or floor supports. In this case, you need to use special metal cables. It is not necessary to sculpt hangers on all areas. They need to be fixed through two fastening openings. This is quite enough to hold the frame firmly. The top suspension plate is bent 90 degrees using pliers.
Additional Information
Now the loop must be attached to the surface of the ceiling, after which it is fixed to the ceiling with screws. To do this, use a screwdriver; the lower end of the suspension must be bent with a hook into the profile hole. As necessary, the suspensions simply need to be subjected to a process of squeezing and tightening, thus adjusting the height of the ceiling.
To do this, press on the curved narrow plate, which is located in the central part of the suspension. After the work with the suspensions is completed, the creation of the cells should be completed; for this, transverse profiles of short length are mounted.
You should check the horizontalness of the frame, and then move on to the next section of the room. If the old ceiling has a junction box for lighting fixture, it must be dismantled (it must be taken into account that the electricity must first be turned off). The wire is extended so that the socket can be installed again on the new ceiling.
Ceiling panels are laid alternately in pre-made frame cells. Before doing this, be sure to wear clean gloves, otherwise you will have to wash the drywall later. And this is not the easiest or most enjoyable task. When the work has come to an end, the dust needs to be washed off from the new suspended ceiling.
The suspended ceiling has been installed. Thus, doing all the work with your own hands is not as difficult as it might seem at first glance. The good thing about installing such ceilings is that if any problems arise emergency situation you can simply change a few ceiling tiles. There is no need to redo the entire structure from the very beginning. When installing the ceiling, you should be especially careful and careful, then everything will definitely work out and you won’t have to redo anything. Due to the ease of installation, suspended ceilings are becoming increasingly popular.
Installing suspended ceilings is a good solution for city apartments (especially with low ceilings). They will help create a feeling of airiness, volume of space, while hiding flaws and defects of the previous ceiling, protecting it from leaks and noise from the upper floors. And all this - without debris and dust. In addition, these designs look very impressive. You can choose from more than 300 color shades - with effects of mirror, fabric, wood, marble, velvet, Venetian plaster, with a simple, smooth matte surface.
If we talk about the material of the canvas, then we distinguish:
- made of polyester fabric, which is specially impregnated with polyurethane. All CLIPSO ceilings belong to this type;
- ceilings made of polyvinyl chloride, which does not contain cadmium and is quite soft (all other ceilings).
Variety of PVC films for suspended ceilings
Depending on how the frame is attached, there are:
1. Harpoon stretch ceiling
A fairly rigid PVC edging is stretched and welded on all sides of the ceiling. If you look at it in cross section, it resembles the shape of a harpoon hook. Hence the name of this method of fastening. This type includes ceilings from well-known brands, for example, EXTENZO, BARRISOL, NEWMAT, CARRE NOIR, NOVELUM. Recently, this list has been supplemented by several brands that have appeared on the market in Russia, such as DPS, DECKENFEST, DECOMAT.

Scheme of installation and fastening of suspended ceilings
2. Harpoonless stretch ceilings
They are divided into several categories-subclasses. For example, MONDEA ceilings from the Netherlands are fastened using a wedge method. In this case, the edges of the canvas are heated and straightened, then clamped using a special spacer profile. This method is somewhat similar to the process of embroidering on a hoop. When PVC film is attached to two surfaces shaped like a semicircle. These fastening "cams" fit into the fastening profile, so this method is called the cam method. When the film is pushed with a spatula, these “cams” diverge, and when they try to pull it back, they automatically compress. This method is used to install ceilings of the SKOL and PRESTIGE DESIGN brands.
Fastening profile, which is used when this method, there is a real opportunity to reduce the loss of ceiling height by 8 mm. French CLIPSO ceilings made of polyester are attached using a flexible cord.

Scheme of fastening and hanging the ceiling structure using harpoonless technology
What else you should know about PVC
A fairly large number of requirements are imposed on a suspended ceiling. Which include:
- its strength, odorlessness, environmental safety and lightness;
- It is also very important that the material used can be painted in any color without any problems. Polyvinyl chloride film and polyester fabric meet all these requirements perfectly.
You also need to know (about PVC) that
- polyvinyl chloride film weighs from 180 to 320 g/sq.m., and the thickness usually does not exceed 0.35 mm;
- weighted average sound absorption coefficient - no more than 0.4;
- the pressure that the film can withstand reaches 1000 Pa;
- tensile strength reaches a limit of 30 N equally in the longitudinal and transverse directions;
- relative elongation to break reaches 220%;
- The light absorption coefficient depends on the type of ceiling. If the ceilings are “varnish”, then the coefficient is 30%, and if “velvet”, then 95%;
- this film is waterproof and fire-resistant;
- depending on the temperature it can change its physical properties. For example, if you drop the temperature below 0 degrees Celsius, it becomes brittle and hard. However, if you increase the temperature again, it will still be flexible and elastic. If the film is kept at temperatures less than 40 degrees Celsius, it begins to deteriorate;
- PVC film is quite resistant to heat and can withstand temperatures, while maintaining its properties, up to 90 degrees Celsius;
- this material can be dyed wonderfully, and the color range includes up to 100 shades;
- The surface of the film can also be almost any: from matte with or without shallow embossing, with a leather effect, marble, wood, metal, with holes, with a satin fabric effect or a glossy surface. In general, the presence of various color solutions depends on the brand of the canvas;
- the film can be from 1.3 meters to 2.2 meters wide, depending on the nature and characteristics of the production;
- due to the fact that it can be easily welded, it is very easy to make canvases even up to 6 or 8 m wide. In this case, the seams are practically invisible. It is not recommended to make more than 8 m of canvas. Otherwise, it is not possible to avoid sagging of the canvas in the middle part.

The advantage of polyester fabric ceilings is stability, lack of deformation and sagging
What you need to know about polyester fabric is that it:
- thinner and lighter than PVC. Its weight does not exceed 200g/sq.m, and its thickness is no more than 0.25 mm;
- advantage of this material is that it is impregnated with a special composition, thanks to which the dimensions of the fabric are more stable than those of the film;
- the elasticity of the fabric is maintained even at a temperature of minus 30 degrees Celsius;
- Usually the canvas is made 4 m wide, but upon special order it is possible to produce a five-meter cloth. And even in this case there will be no seam on the ceiling;
- polyurethane does not undergo a welding process, so if there is a need to make the fabric wider than standard, it is usually stitched or pieces of material are connected using a special profile;
- The main disadvantage of polyester fabric is that it cannot be dyed until installation. Typically, such a ceiling is left matte white or painted after all installation work is completed, for example, a drawing is applied or the entire surface is simply tinted;
- It is also not possible to choose the texture of the ceiling surface.
Technology for installing suspended ceilings
Stretch ceiling various types have their own characteristics and subtleties of installation technology.
1. First of all, the specialists of the company installing the ceiling take measurements.
2. Then the canvas is brought to the site (this usually happens within 1 to 30 days).
3. At the same time, at the facility itself by this time it is necessary:
- in those places where ceilings will be fastened, the walls must be strong, in the same plane, straight and undamaged;
- All Decoration Materials such as drywall, ceramic tile etc., must be very securely fastened;
- if you intend to install ceiling molding, then the ceiling itself must be in the same plane.
- finish everything construction works, all garbage must be removed, summed up cable lines to the installation sites of lamps that provide voltage switching on and off;
- the premises should be in mandatory be heated during the operation of the ceiling and maintain a certain temperature regime at the time of its installation;
If all these conditions are met, the installation of the ceiling begins.
Main stages of work
- First, using a hydraulic level and a paint cord, mark the mounting points on the base ceiling and walls.
- Next, the fabric in the package is heated using a heat gun and gradually straightened.
- Then, using special clips, the canvas is attached to the baguette.
- Using a special spatula, the first - the so-called “red” corner of this canvas is harpooned into the baguette.
- Then the canvas is heated diagonally to 70 degrees Celsius and the already soft film is stretched.
- Next, insert the harpoon into the groove of the ceiling profile in the opposite corner.
- This whole procedure is done with each diagonal and on all sides of the edging.
- After the film has cooled, it is already securely connected to the fasteners around the entire perimeter.

Installation of suspended ceilings: standard sequence of technological steps
Wedge installation
- If the ceiling is installed using a wedge method, then the exact dimensions and calculations are not so important. It is necessary to know the width and length of the room, because the canvas itself should be wider than the distance between the walls by about 10 - 15 cm.
- They always make a rectangular canvas, and the fitting is carried out directly in the room itself.
- In a special profile, which can be mounted on both walls and ceilings, the pre-hung canvas is secured using special plastic wedges.
- Excess fabric that may protrude from under the fastening profile is cut off, and the jammed areas are covered with a special decorative strip, reminiscent of an elegant plinth. It has a flexible sealed part that snaps into the profile, so that the canvas fits tightly to the wall.
If you strictly follow the entire sequence during the installation of the ceiling, you will ensure the absence of folds and straightness of the seams.
This method of installing the ceiling is much more complicated than the harpoon method, and dismantling it is also more difficult. But it also has a number of undeniable advantages.
- For example, if you need to make a ceiling as a single canvas, and the area exceeds 100 square meters, then this is the only option, since it is possible to adjust the degree of tension.
- Also, if there are difficulties in accurately determining the size of the room, or changes in the size of the ceiling are expected, which also makes it difficult to specify certain parameters, this method is perfect.
- When fastening occurs using the cam method or using a flexible cord, the whole process is quite similar to the wedge method. The only difference is in the fasteners themselves. And the canvases are also made with a reserve, and during the installation process they are adjusted to size.

Classification of suspended ceiling structures according to fastening methods and fabric materials
- Depending on the material and installation technology of the ceiling, sagging is possible, which forces you to limit the size of the ceiling, and the amount of permissible sagging itself does not exceed 1% of the length of the diagonal of the canvas. In other words, if the canvas measures 5 * 6 m, then the edges can be only 4 cm above the center. But if an additional support is installed at the place where the chandelier is attached, then the center sags even less.
- Several canvases are made if the ceiling is supposed to be multi-level, the area of cam and harpoon ceilings is more than 50 m2, and for wedge ceilings is more than 120 m2. An intermediate support is made, to which individual sheets are attached using a special profile.
- But the most difficult in terms of labor intensity is the three-dimensional or 3D ceiling. First, the frame is designed. It is then ordered from individual parts aluminum profile. Then such a frame is installed at the bottom of the walls and ceilings. Initially, this design is somewhat reminiscent of an openwork bridge. The process and technology for manufacturing individual canvases in this case is much more complicated and takes longer than during installation flat ceiling.
- To prevent the accumulation of moisture and condensation between the old ceiling and the canvas, holes are made in the profile for ventilation. Ideally, you need to install it in the canvas ventilation grates. In this way, forced exhaust will always occur. And if the room area is more than 35 sq. m., then such a measure is simply necessary.
- When installing a stretch ceiling, you can use halogen lamps, fluorescent lamps or conventional incandescent lamps. When installing lamps in the ceiling, it is necessary to limit their power. For example, for a regular and fluorescent lamp the power should not be higher than 60 W, for halogen lamps it should not be higher than 20 - 35 W.
- You also need to comply with certain requirements when installing 12 W lamps. There is a need to use special transformers, otherwise the ceiling may sag due to the increased softness of the PVC film.
- Eat different variants for mounting high-power lamps that are used during work. To limit heat transfer, it is necessary to ensure a distance between the lamp and the ceiling of at least 1 mm. If transformers are used, they are mounted in the lower plane of the structure, and then the mounting profile needs to be lowered by 5 - 7 cm.
- The company that installs the ceiling usually guarantees its work for up to 10 years, provided that the temperature is maintained within the range of 0 - 50 degrees Celsius. The guarantee covers color preservation, absence of cracks, wrinkles and sagging of the canvas. Even if the ceiling was flooded from above with water or was accidentally pierced.

Fastening the stretch ceiling begins from the corner of the room
If you follow all the technologies according to the instructions, then you have every chance of installing the suspended ceiling correctly, without defects. Special attention Pay attention to the selection of high-quality certified material.
In this article we will look at methods of attaching suspended ceilings of the three most popular designs:
- plasterboard;
- PVC panels;
- rack and pinion
The CD profile is mounted in two ways. The first involves creating a square in 60 cm increments over the entire ceiling area. The second one requires installing a profile in increments of 40 cm, but only along the length of the drywall sheets. In this case, the frame will be more economical, since a smaller amount of profile is needed to create it.

After fixing the frame, the plasterboard is hemmed to it with self-tapping screws. The seams between adjacent elements are reinforced with reinforcing mesh or serpyanka. All irregularities, as well as holes for self-tapping screws, are puttied in at least two passes. Before subsequent finishing (painting or wallpapering), the surface of the sheets is primed.
The frame itself is fixed to the concrete floor using 60*4 mm screws and plastic dowels. In this case, it is worth excluding the use of wooden choppers, since they can change their size with changes in humidity. If the ceiling is wooden, then the frame is secured using ordinary self-tapping screws with a length of 50 to 100 mm.
If you want to make a multi-tiered structure, then the lower levels of the ceiling are hemmed to the profiles of the upper tier. But don't even think about fixing the bottom tier to drywall. Over time, such a ceiling will simply collapse.
Useful little things
The design of suspended ceilings made of plasterboard and galvanized profiles is not complicated and therefore you do not need special knowledge to install it. But still, during the work some nuances should be taken into account.
It takes from 60 to 100 screws to fix one sheet of plasterboard. On straight sections, the step between fastenings can be 25 cm, on curved sections - 15 cm.
The edges of adjacent sheets are always fixed to one profile. If this is impossible to do, then you can do the following. First, one sheet is hemmed to the profile. Then the profile is hemmed to its edge so that half of its width protrudes beyond the edge of the drywall sheet. After this, the next sheet of material is hemmed to this protrusion.

The seams must be reinforced. Otherwise, you will experience cracks in the ceiling. If you don’t have serpyanka or reinforcing mesh on hand, you can get by with regular paper tape.
In order to obtain a curved surface of a large radius, a sheet of drywall is moistened with water. For small radius bends, the cardboard on the reverse (outer) side of the bend is cut or pierced with a special perforating roller.
In order to get a multi-tiered ceiling, it is not at all necessary to install a second-level frame. To do this, simply hem it to the main level next row sheets of drywall, cut to the desired shape. Of course, such a tier is attached to the profile, and not directly to the sheets of plasterboard of the first level.
PVC panels
The next type of suspended structure that we want to consider is PVC panels. This ceiling is made independently using plastic wall panels (more details: "").

Compared to drywall, the material does not offer many possibilities, but at the same time it is very cheap and easy to install. Often such ceilings are mounted in damp areas, that is, in bathrooms and toilets.
Installation diagram
First let's look at wooden houses, since the method of fastening in them differs from other types of buildings. The most in a simple way For the ceiling lining, the panels will be fastened to a sheathing made of timber with a cross-section of 30*30 mm. Of course, this method is only suitable for dry rooms.
If height ceiling beams is large enough, then the sheathing can be not assembled, but the panels can be hemmed directly to the beams. The step between fastenings should not exceed 50 cm, the recommended step is 40 cm. If the cells are fastened less frequently, the panels may sag over time.

How to fix a suspended ceiling in an ordinary city apartment with concrete floor?
- In rooms with constant temperature and low humidity levels, you can install wooden sheathing. The beam is hemmed directly to the ceiling, with a fastening step of 40 cm. In this case, the frame is placed perpendicular to the direction of the panels without the use of additional hangers. Minor differences in the height of the main ceiling can be compensated by placing a gasket of appropriate thickness under the block. The horizon of the sheathing is checked with a level. It is recommended to process wooden elements antiseptic, then the ceiling is guaranteed to last for many years, not succumbing to deformation and rotting.
- For rooms with high humidity or unstable temperatures best mount for PVC panels there will be a galvanized profile. The principles of its installation are almost the same as the design used for gypsum boards. A UD profile is installed around the perimeter of the room (read: ""). The CD profile is mounted perpendicular to the panels. The fixation step is 40-50 cm. In this case, the profile can be attached both to the ceiling itself and to hangers.
Useful little things
To fix the frame, plastic dowels and 60*4 mm screws are used. If you need to secure a large section of the ceiling to a small number of hangers, then it is better to replace the screws with anchors. In this way, greater reliability of fastening can be achieved.
PVC ceiling edged with both a special profile and the most ordinary plinth. Moreover, in the case of baguettes you should not have any difficulties with fixing last panel. It is simply fastened with screws, and the fastening points are covered with a plinth.

Slat ceiling
Another equally popular way to create suspended ceilings is the use of aluminum slats. The suspended ceiling is fastened to factory traverses, which cannot be replaced by timber or profiles.
What, then, is such a ceiling good for if it does not allow the use of other types of frames and costs significantly more than the systems listed above?
The material of the slats is aluminum. It is not afraid of corrosion even in conditions of high humidity. Over time, the panels do not change their physical properties.

Suspended ceiling fasteners are aluminum profiles or galvanized steel structure. The service life is almost unlimited. At the same time, throughout its use, you are unlikely to encounter a situation requiring surface repair.
Aluminum slats are not afraid of flooding by neighbors above. It will be enough to wipe the ceiling surface with a sponge and detergent.
Installation diagram
How to fix such a ceiling? The work steps resemble the assembly procedure of the previous two types of suspended structures. Guide rails are attached along the perimeter of the wall, which will also hide the edges of the panels. Traverses are hung on the suspended ceiling mount, which are aligned strictly horizontally. It is to them that the slats are attached. The type of suspensions themselves largely depends on the distance to the base ceiling and the material of the traverses. Therefore, the same direct hangers that are used for the ceiling frame made of gypsum plasterboard can be used here.
But often the aluminum ceiling is hung on special spring hangers, which, at a large distance to the ceiling, are installed on springs. The free ends of such knitting needles are bent for greater reliability of fastening.

How to attach slats to traverses? To do this, they are simply inserted into place and snapped into place. At the walls, ceiling elements are cut both in length and width.
If you use perforated slats, then in this case there is no need to remove ventilation duct below ceiling level. But similar solution is unacceptable for kitchens with gas stoves.
Slat ceilings will be an excellent solution for bathrooms, toilets and kitchens. But for the bedroom and living room it is better to choose a different type of hanging structure. This is where the purely aesthetic side comes into play. Although some caveats may be made here. For a living room interior made in high-tech style, an aluminum slatted ceiling with mirror surface could be an ideal option.
Installation of a suspended ceiling, detailed in the video:
Conclusion
You can read more about each type of suspended ceiling on the pages of our website. There you will also find photos of certain constructive and design solutions. And remember that we have reviewed only a small part of the suspension systems available on the market today. Each of them has its own advantages and disadvantages. Therefore, the most important point when installing ceilings is right choice appropriate design.
We hope that this article helped you understand how a suspended ceiling is attached. We wish you success in your renovation.
A suspended ceiling is a structure that is attached to the base surface, but located at a distance from it. This type of finishing is very popular, as it does not require leveling the main ceiling. Designs developed different types, from them you can create complex multi-level or standard flat surfaces. It is thanks to the variability and perfection of the finished ceiling that suspended systems are used very often. Install simple designs you can do it yourself.
The structure of a suspended ceiling consists of a frame and cladding. The base, as a rule, is metal, it holds all the finishing. Sheathing can be made of different types of materials: slabs, plasterboard sheets, PVC panels, slats.
Advantages of hanging structures:
- There is no need to level and repair the base;
- You can hide protruding communications and beams;
- The suspended ceiling provides additional sound and heat insulation;
- This finish does not require repair for a long time;
- The structures can be given an unusual complex shape, thus zoning the room or visually changing the proportions of the space.
The cost of finishing with suspended structures is slightly higher than plastering and painting the base ceiling, but the investment will quickly pay for itself, since repairs will be required in at least ten years.
Preparing the base surface for installation of a suspended ceiling
In this case, alignment is not required. The only thing that needs to be done is to check the reliability of the base ceiling, its strength and ability to support a heavy structure.
If there are damaged areas of plaster on the ceiling or peeling paint, then the surface must be cleaned so that fallen pieces do not clog the space between the base and the finish.
It is necessary to install electrical wiring lines in advance, mark the location of lamps, ventilation, fire protection system, video surveillance and other communications.
One of the most important stages work - determining the level of installation of a new ceiling. A hydraulic level will help you cope with this work. How to use it, watch the video.
Suspended plasterboard ceiling
Plasterboard structures can be given any complex shape. It is this material that is preferred when constructing multi-level ceilings. The frame for such structures is made from special profiles. There are two main types: ceiling guide (it is attached along the perimeter of the walls) and rack ceiling (connects guide elements and creates a plane for attaching plasterboard sheets). To fix the racks to the base ceiling, special elements with perforations for self-tapping screws are used - hangers. 
To make a curved frame, you can use a special arched profile or make notches on the sides rack profile and give the desired bend. 
To create corners, you need to make V-shaped cuts in the sides of the rack profile and bend them to the desired degree.
How to make a frame:

Next, you need to cover the resulting frame with sheets of plasterboard. To do this, you need to measure the area on the ceiling, cut off the required fragment from the plasterboard and secure it with self-tapping screws on the guide and rack profile. 
To make an even cut, you need to mark a sheet of drywall with a pencil, attach a rule or a long ruler to it and cut the top layer with a stationery knife. Then bend the sheet so that the gypsum filler bursts along the intended line, and cut the second sheet of cardboard. 
The plasterboard box needs additional finishing. First it must be primed, then the joint lines of the sheets, screw heads and corner connections. Next, the surface can be painted with enamel, water-based or oil paint. 
Suspended ceiling made of PVC panels
Most a budget option suspended ceiling finishing – PVC panels. They do not require additional finishing or repairs during operation. Plastic can withstand high humidity and low temperatures well, so this type of finish can be used in the bathroom, on the balcony or veranda. Panel structures are very easy to clean - any dirt can be removed from them with a damp cloth. The width of standard parts is 25 and 50 cm. 
The panels are equipped with grooves into which each subsequent sheet is installed and hides the place where the previous one is attached to the frame. This ensures not only ease of installation, but also tightness and durability of the finish.
To make a frame you can use metal profiles for drywall or wooden beam. The sheathing pitch should be no more than 50 cm. The panels are very light, so only perpendicular posts are enough. 
Don't forget about fire safety. Electrical wiring lines under the ceiling made of PVC panels must be hidden inside the corrugation.
The kit for installing a suspended ceiling consists of a U-shaped guide plastic profile and the panels themselves. The guide elements need to be installed around the perimeter of the room; the ends of the panels will be installed in them.
Panel installation:

At the final stage, a decorative plinth is installed. You need to glue it on liquid nails. Apply glue only to the side that will be adjacent to the wall.
Armstrong type suspended ceiling
Armstrong ceilings consist of a suspended base and slabs. The frame remains partially open during installation, so it visible parts give an attractive appearance. The materials for making plates can be: pressed mineral fiber, glass, plastic. The convenience of this design lies in free access to communications hidden under the ceiling. 
The frame structure, made of load-bearing and transverse profiles, is supported by spring hangers, which are easily adjusted in level. Instead of spotlights or chandeliers for Armstrong, it is advisable to use special built-in lamps, which are selected according to the size of the cells and plates. 
Armstrong ceiling installation:

When laying mineral slabs in cells, clean gloves must be used. This is due to two reasons: the surface of the parts gets dirty easily, and mineral fiber can be irritating to the skin.
Slat ceilings
The slatted ceiling design consists of narrow and long panels and a suspended frame. Reiki are made from metal and plastic. The frame is assembled from adjustable hangers and universal support rails. Along the walls, the structure is held in place by guide angles. The panels are fixed to the rail with special latches, so no additional fasteners are required. 
Reiki are presented in a huge assortment. You can choose elements of different shades, materials and textures that will harmoniously complement the interior of the room. There are two types of rail fastening possible:

Ceiling installation is carried out in several stages:

At the final stage, you need to install a decorative profile, if you used open system fasten the slats, and glue the baseboard around the perimeter.
The choice of design and materials for a suspended ceiling depends on many factors. If the installation is done by hand, then its complexity matters. Play a big role performance characteristics material. For rooms with high humidity and low temperatures, it is necessary to select a material that is resistant to these influences. The difficulty of maintaining the structure also matters; for example, in the kitchen it is better to install a ceiling made of plastic, metal or glass. It will be difficult to remove grease and fumes from the painted surface of drywall.
In order to understand how to install a suspended ceiling, let's consider what it is, what main types and types exist. Suspended ceilings are elements made of a variety of materials that are attached to a hard wooden frame or a lightweight frame, durable metal, which is then attached to the existing ceiling.
The most common option is to use hangers, but if hangers are not used, the frame is attached directly to the ceiling, then such a suspended ceiling is called a suspended ceiling.

There are two main types of suspended ceilings: modular And solid.
Modular ceilings have in their set a variety of modules that form a ready-made complete structure. The following type of ceilings can be cassette or slatted.
Cassette ceilings They are square modules (plates or so-called cassettes), these plates are inserted into rectangular or square niches made of metal slats. Most Popular cassette ceilings- this is Armstrong and Albes.
Advantages:
- easy to assemble and install;
- easily follows the irregularities and curves of a room or room;
- environmental friendliness;
- safety.
Flaws:
- bulky;
- hides up to 30 cm of room height.

Slat ceilings consist of narrow slats that connect to each other. This type of ceiling is most often installed in bathrooms or kitchens.
Advantages:
- heat resistant;
- moisture resistant;
- environmentally friendly;
- fireproof;
- practical to use.
Flaws:
- steals up to 20 cm total area premises;
- not aesthetically pleasing, not cozy enough.

A solid plasterboard ceiling is sheets of plasterboard that are suspended on a metal structure.
The main pleasant qualities of working with this type of suspended structures are:
- hiding all irregularities;
- possibility of creating multi-level ceiling;
- convenient hiding of all communications;
- the ability to conveniently fit all the lighting directly into the ceiling;
- the ability to create smooth curves and shape the ceiling.
Preparatory stage
Before proceeding with the direct installation of the selected suspended ceiling, it is necessary to carefully carry out mathematical calculations so as not to make mistakes in size and shape, buy the necessary building material and prepare the tools necessary for further work.
What materials are needed?
- screws, dowels (plastic inserts that are attached to the wall);
- pendants;
- support profiles – stringers;
- fastening corners (U-profile);
- brackets, thanks to which the suspensions are installed;
- panels (slats), interpanel inserts;
- lamps, wires (if you plan to add built-in lighting).

What are the main tools needed for the job?
- pencil or marker for notes;
- metal scissors;
- laser level (or regular bubble level);
- drill with a varied set of attachments;
- reliable tape measure;
- standard size hammer
Constituent system elements
The suspended frame generally consists of several specific types ceiling profiles:
- corner wall 19/24 profile;
- transverse profiles with lengths of 0.6 and 1.2 m, types T15 and T24;
- carriers with a length of 3.6 m, types T15 and T24 (from of this type depends on the width of the profile).
Tiles are the main finishing. Depending on the size, they can be divided into two types: 595 x 595 mm (single tiles) and 1190 x 595 mm (double tiles). The first option is more popular because rectangular shape not always practical.
Let's figure out what a knitting needle is. A knitting needle is a double device consisting of three main elements:
- a knitting needle at one end enclosed by an eye;
- a knitting needle ending at the end with a hook;
- spring, the so-called “butterfly”.
In order for the profiles to be supported reliably in a hanging state, certain spokes are used as fastenings, which are reliably spring-loaded and with the help of which it is possible to conveniently change the height frame installation. For professional horizontal alignment of the ceiling structure, high-quality adjustment of the length of spring-loaded spokes is used.
Exist various classes of suspended ceilings, it all depends on prices, customer desires, ideas for beautiful interior. The main classes that can be distinguished (using the example of the Armstrong suspended ceiling):
- economical option - microfiber boards do not have very high quality properties, but the price is the most reasonable. They have low moisture resistance, therefore, it is not recommended to install such ceilings in rooms with high humidity or an unreliable roof. The main models of this option are: Baikal, Oasis and Tatra products;
- “prima” class – more high performance, related to technicality, moisture resistance is already here high level, such ceilings are durable and have high strength ratings. Various design reliefs and varied colors, the thickness of the tiles depends on the wishes of the buyer, but in general up to fifteen mm;
- acoustic ceilings - the following products will delight you with high quality materials, reliable relief and, most importantly, protection from any penetration of unwanted noise. Also, this design will be incredibly reliable in operation and environmentally friendly;
- design classes- the most expensive, but unusual and daring, such ceilings are made from high-quality material and have many advantages.
Important point! If you plan to work in a room with high humidity, you should choose a moisture-resistant material for the cladding so that the structure will serve for a long time and will not cause premature breakdowns. Very often, after the final covering, certain finishing work is carried out, for example, filling the joints between ceiling sheets with putty, after which the surface is painted with certain paints for the back work. Also play an important role correct calculations.
It is necessary to carry out calculations on the following important details premises:
- ceiling size;
- required quantity profiles;
- how many hangers are needed;
- the number of sheets of drywall or other base material.
During necessary preliminary calculations you should use the data that is on outside different packages building materials, this is explained by the fact that the packages indicate the approximate material consumption per 1 m2. Such information will greatly simplify calculations, so it is very useful to pay attention to them.

 One of the main tasks is correct calculations
 First stage - marking
The marking is applied directly to the ceiling and walls of the room being measured, and the frame will then be formed according to it. Determined required level structures that will be created in the future, for this purpose the height of the room is measured in each corner. From the lowest corner of the room, the distance of the lowest point of the future ceiling is determined. In the case of planning the creation of lighting simultaneously with the finishing of the main work, it is necessary to take into account that the distance between the suspended structure and the base should be more than ten cm; in other cases, it is possible to use a smaller distance.
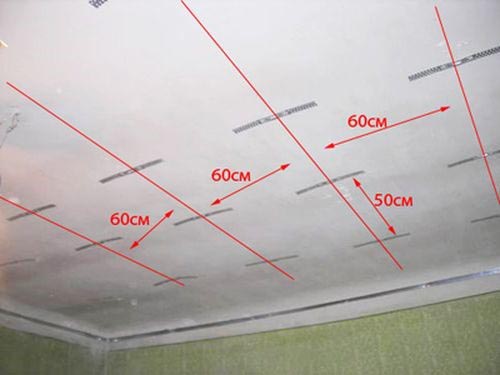
A baseline is drawn in one of the four corners, which will serve as a guide for the starting profile. It should be noted that to obtain the desired result, the most effective would be to use laser level(if you don't have one, a regular bubble level will also be useful). The markings are then applied directly to the ceiling, which will determine the subsequent locations for fixing the necessary suspensions. One important point, a distance between them of 60 cm will be more optimal and effective.
When the necessary markings have been made, the main work begins. That is, the direct formation of the structure. In the process of systematically applying markings, in order to ensure that the final result does not have distortions and other unpleasant situations, an ordinary standard tape measure will not work; for an ideal result, professional measuring devices are required. This should be taken into account.
The second stage is the creation of the main frame
When installing a frame, the sequence of actions is very important. To begin with, a metal starting profile is attached to the walls, so it is important to focus on the markings made in advance. To ensure reliable fastening of the profiles, special anchor bolts are attached to pre-made holes (here you can use a hammer drill or any other suitable tool).
The same anchor bolts Suspensions are attached directly to the ceiling. The most commonly used are plate hangers, which can be bent so that they are perpendicular to the ceiling. In the case of using rod hangers, they are attached to the rings, and after that the optimal and desired length of each rod is adjusted separately.

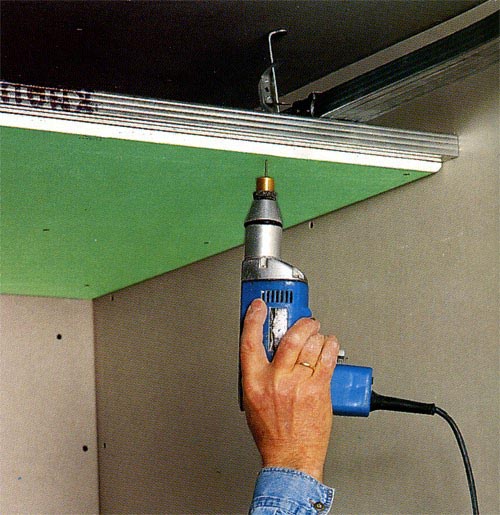
Using short self-tapping screws, we attach the main profiles to the hangers. Self-tapping screws are used for working with metal materials.

To work in wide rooms, we connect the longitudinal elements of the finished frame to each other. Using a level, all parts of the prepared frame are leveled and checked. The main profiles with their ends are inserted into the starting profile, after which they are fixed using working screws.

The third stage - lighting and wiring
In order for the design to be truly rich, complete, and unusual, it is better to think through the lighting and do it in advance, using built-in high-quality lamps. At this stage, it is necessary to make the electrical wiring, then fix the lamps themselves. We determine the connection point to the main electricity network and apply markings to the ceiling.

These points will indicate the installation location of each lighting fixture. Following this, a cable is connected, which is fixed securely to the very base of the structure, provided that the cross-section is more optimal.

In places where the lamps will be installed, the cable is passed through; here it is very important to calculate the correct length of the cable so that the use of lighting devices is comfortable and easy for humans. The luminaires are connected and checked so that in case of a malfunction the error can be corrected.
Installation of suspended ceiling sheathing
The next stage is the installation of the casing, which is plastic panels, drywall or other elements, it all depends on wishes, design, financial capabilities.
Depending on the distance between the hangers, the sheets are cut, for which a regular knife is used. For variety, you can apply markings to avoid damage to the material. One person holds the sheet, another fixes it, usually a screwdriver is the best tool for this. It is necessary to screw in the screws so that the surface is level and the screw head is not visible.

Final actions
After sheathing is done final finishing, joints, irregularities, screw heads are filled with putty material. Dry material is corrected and removed sandpaper. Use decorative finishing materials, for example, paint, varnish coating, decorative plaster, wallpaper, any covering. Everything depends only on imagination and desire.

As you can see, installing a suspended ceiling yourself is not at all difficult. Just follow the instructions and have necessary materials, desire and inspiration!