Installing PVC windows in a wooden house with your own hands. Features of installing windows in stone, frame and wooden houses. Important installation details
If you or someone you know has previously used the services of companies installing double-glazed windows, then you know that installation can be normal and in accordance with GOST. The second option is more expensive, but if all the requirements are met, the quality will be much higher than in the first (you can read more about the standards in GOST 30971-02).
Consists of several stages.
Note! Manufacturers do not provide a guarantee if the measurements were not carried out by their employees. If installed incorrectly, the windows will soon begin to freeze, and if even the slightest mistake was made in the calculations, the structure simply will not fit into the opening.
However, if you study all the intricacies of the process, then no difficulties will arise during installation. Moreover, this way you can save a decent amount of money.
Video - Installation of PVC windows according to GOST
Stage 1. Measurements
In most apartments there are openings without a quarter.
Note! A quarter is an internal frame 6 cm wide (or ¼ brick, hence the name) that prevents the window from falling out and strengthens the structure as a whole.
If there is no quarter, then the frame will be installed on anchors, and the foam will be covered with special covers. Determining the presence of a quarter is quite simple: if the internal and external widths of the frame are different, then there is still a quarter.

- First, the width of the opening is determined (the distance between the slopes). It is recommended to remove the plaster for a more accurate result.
- Next, the height is measured (the distance between the slope above and the window sill).
Note! The measurements must be repeated several times and the lowest result taken.
To determine the width of the window, two installation gaps are subtracted from the width of the opening. To determine the height, the same two gaps plus the height of the profile for the stand are subtracted from the height of the opening.

The symmetry and straightness of the opening are checked, for which a mounting level and plumb line are used. All defects and irregularities must be indicated in the drawing.
To determine the width of the drainage, add 5 cm to the existing drainage for bending. Also, the width of the insulation and cladding is taken into account (subject to subsequent finishing of the facade).

The dimensions of the window sill are determined as follows: the width of the opening is added to the size of the overhang, and the width of the frame is subtracted from the resulting figure. Regarding the offset, it should cover the heating radiator by a third.
Note! measured after installation is complete.
Stage 2. Order
After measurements, the finished drawing should be taken to the window manufacturer, where all the details will be selected. necessary fittings. It is worth remembering that installation can be performed in one of two existing ways:

In the first option, you will have to pull the package out of the frame, insert it into the opening and install the glass back. In the second case, the entire structure is attached as a whole. Each option has disadvantages - if you pull out the package, it can; and vice versa, if the window is installed assembled, it can be damaged due to its heavy weight.
Prices for a popular line of windows
Stage 3. Preparation
This stage of installation begins only after delivery of the ordered windows. Released first workplace, all furniture is covered plastic film(there will be a lot of dust).


Step 1. If required, the glass unit is removed from the window. To do this, the glazing bead is slightly pryed with a staple and pulled out. First of all, the vertical beads are removed, then the horizontal ones. They're in mandatory are numbered, otherwise gaps will form after installation.


Step 3. The bolts are unscrewed after the plugs are removed from the canopies. The handle is turned to the “ventilation mode” (in the center), the window is opened slightly and removed. All that remains is the frame with imposts.
Note! Imposts are special jumpers designed to separate the sashes.
Then you need to make a marking for the anchors and make holes along it - two on the bottom/top and three on each side. To do this, you will need ø1 cm anchors and a drill of the required diameter.
If the material from which the walls are made is not dense (for example, cellular concrete), then the fastening is carried out using anchor suspensions. The latter should be fixed to the wall and frame with hardened self-tapping screws (eight pieces for each).
Note! To avoid the formation of a thermal bridge in the window sill profile, it should be filled the day before installation. This way the element will not freeze.
Stage 4. Dismantling work
This procedure is recommended to be carried out immediately before installing a new window. In most cases, the old ones are thrown away, so the structure can be torn out along with the fastening, and if necessary, the frame can be sawed.


Step 1. First, the seal and thermal insulation are removed.
Step 3. The window sill is removed and the cement layer underneath is cleaned off.
Step 4. Adjacent surfaces are treated with a primer material (by the way, many installers forget about this). In the case of a wooden opening, a layer of waterproofing material is laid around the perimeter.


Note! Installation can be carried out at a temperature not lower than -15ᵒС. Polyurethane foam must be frost-resistant.
Stage 5. Installation of a plastic window

Step 1. First, wooden wedges are placed around the entire perimeter, a window is installed on them (this will make it easier to level the structure), only after this is it fastened to the wall. You can leave the backings - they will serve as additional fasteners.


Step 2. Lack of profile-supports and can be considered gross violation GOST standards, since it is not only needed for stability, but also makes it possible to install a low sill with a window sill. In the absence of a profile, they are attached directly to the frame, which violates its tightness.
The correct location of the stand profile is shown in the diagram.

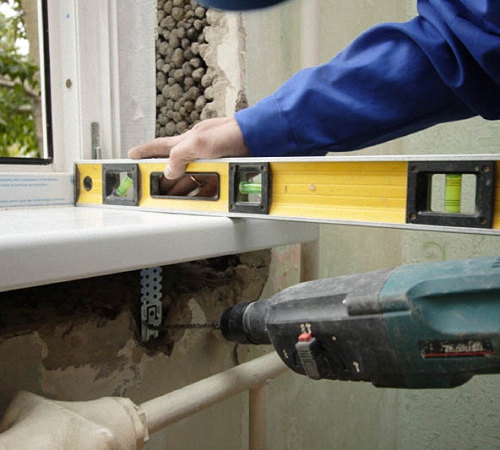
Step 3. Next, the evenness of the window is checked in three planes, for which a mounting level and plumb line are used. It is typical that traditional bubble levels are not suitable for this due to insufficient measurement accuracy, so it is better to use.


Step 4. If the window is level, then it is secured with anchors. To do this, a wall is drilled using a hammer drill through pre-prepared holes in the structure (approximately 6-10 cm). The lower anchors are fixed (not completely), the evenness of the package is checked again, after which the remaining points are attached.
Note! The final screed is made only after the final inspection. Do not tighten too much, otherwise the structure will “skew”.
Prices for mounting foams and cleaning gun cleaners
Polyurethane foams and cleaners for construction guns
Stage 6. Drainage

From the outside, the ebb is attached to the stand profile with self-tapping screws. The joints are carefully sealed with sealant to prevent moisture from penetrating into the structure.

The edges of the ebb are recessed several centimeters into the walls, having previously made indentations using a hammer drill.
Note! Before installation, the bottom gap is also sealed.
Stage 7. Window assembly


After attaching the anchors, the glass unit is inserted back.
Step 1. The glass is inserted and fixed with glazing beads (the latter should snap into place, for which you can lightly tap them with a rubber hammer).
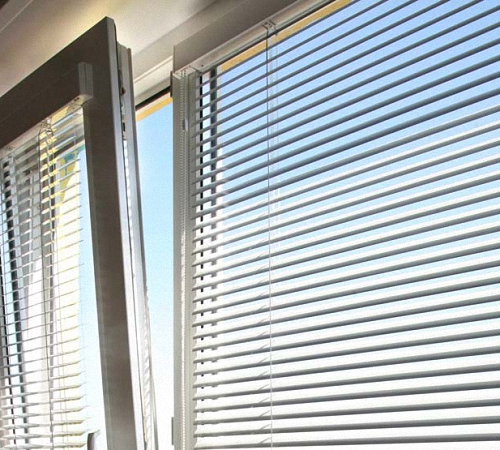
Step 2. The doors are opened and their tightness is checked. IN open position arbitrary opening/closing of the sash cannot happen if the window is installed level.
Step 3. The sides are sealed installation seam. Polyurethane foam will provide high-quality waterproofing and prevent glass fogging. Before and after sealing, the seams are sprayed with water to improve polymerization.
Note! The seams are filled to no more than 90%, otherwise the structure will “lead.” If everything is done correctly, after drying the foam will protrude out a few centimeters.
Step 4. The perimeter of the window is glued with a special vapor barrier tape, and a material with a foil surface is used below.
Stage 8. Installation of the window sill

Step 1. The window sill is cut so that it fits into the opening and at the same time rests against the lining profile. There remains a small gap (about 1 cm) for thermal expansion. Subsequently, the gap is hidden by plastic
Step 2. Wooden wedges are placed under the window sill. It needs to be laid with a slight slope towards the room, and then applied with something heavy until the foam dries. Additionally, the window sill can be fixed with anchor plates.

Video - Instructions for installing plastic windows
conclusions
Now you know how plastic windows are installed, so you can safely get to work. The final check of all elements can be carried out only 24 hours after completion of installation (then the foam will have already “set”).
The described technology is also quite applicable to, although it also has its own nuances - such as, for example, installing a parapet to create a partition.


Find out how to do it correctly from our new article.
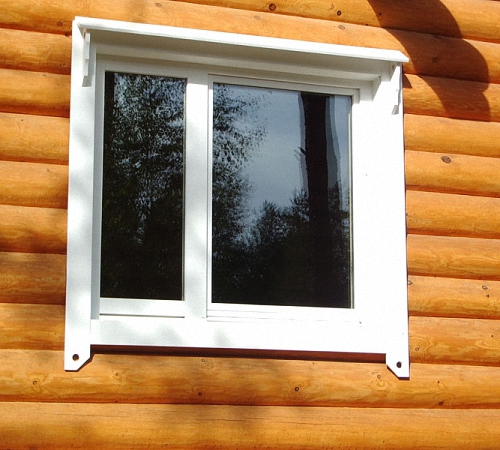
Thanks to your operational characteristics Double-glazed windows made of PVC material have gained particular popularity among the population. They are installed in buildings and structures made of concrete, brick, and wood. Insert plastic windows into wooden house necessary by following certain rules.
Important installation details
When starting the installation, you need to prepare the equipment you will need: a building level and a plumb line, and also know how to insert a plastic window. It is necessary to install a PVC window strictly observing the placement in a level plane. This will ensure correct work all elements, the doors will not open or close spontaneously.
The technology for installing a PVC window involves its correct placement in a level plane
When purchasing plastic structures, you need to buy additional special fasteners for installation. The frame is fixed in the frame of a wooden structure using self-tapping screws and special fasteners. Observing technological process and by correctly installing plastic windows in a wooden house, you are guaranteed to receive window units that will last for a long time.
 Consolidation window frame produced using anchor plates
 If you dismantle the sashes, the structure will become much lighter and it will be easier to move it, but mounting metal-plastic windows It is still not recommended to go alone in a wooden house. To remove the doors, you need to remove the pins from the hinges.
How to install PVC double-glazed windows
Do-it-yourself installation of plastic windows in a wooden house is carried out in stages:
- preparatory activities before installation;
- installation of PVC windows;
- control and verification of location in space;
- blowing with foam.
To understand how to install plastic windows both in a wooden house and in a timber or log house, let’s look at each stage in more detail.
Carrying out preparatory work
First of all, you need to remove exact dimensions, measuring the opening, and order a window structure from a trusted manufacturer. To do this, most often they invite a representative of a company that produces plastic frames. You can take measurements yourself. After this, they determine the color of the structure and the completeness of the fittings necessary for the functioning of the window.

When the manufacturer delivers the product to the site, the following steps must be completed:
- if a decision is made to replace the installed windows in the old opening, first of all, it is necessary to dismantle the structure;
- after which they clean dust, dirt and remove debris that got into the opening from dismantling;
- It is worth aligning the opening if its geometry is broken.
Having completed the preparation, they insert a plastic window into a wooden house with their own hands.
Fastening the window structure into the prepared opening
We install the window sill first; it will be the base for the double-glazed windows, so it needs to be placed strictly level (horizontally). For fastening strength, notches are made on the sides of the box approximately 8 mm deep. Adjustment is carried out using plastic plates or boards. Fastening occurs with self-tapping screws to the bottom of the box. When screwing in, you should place washers under the screw head; this will prevent damage to the surface.
 The window sill is installed strictly horizontally
 The next step will be correct installation pens. The film that protects the structures should not be removed; it protects them from damage when the windows are installed. When attaching, the handle must be placed horizontally. When all the fittings have been assembled, the installation of metal-plastic windows begins.
First you need to level the PVC frame. A frame is placed on two-centimeter bars and leveled horizontally, using a water level. After this, they move on to vertical alignment.
Having obtained ideal parameters at the water level, they fix the frame with self-tapping screws to the frame, using mounting fasteners that were specially purchased in the store. It is important not to get the self-tapping screw into the ridge of the log where the socket is installed.
 Secure the frame with self-tapping screws
After attaching the window element, we get 2-centimeter gaps around it for the mounting foam.
Before using polyurethane foam, you need to hang the shutters so that after foaming the frame profile does not bend and damage the window. It is important to remember that foam can only be used when the sash is closed..
Control and foaming of the structure
After hanging the sashes, you need to check how the double-glazed window opens and closes. If a window that is half open does not close or move further, then the frame is considered to be installed correctly and the alignment is correct. After closing the sash, foam it with installation foam and leave it for complete fixation for a day.
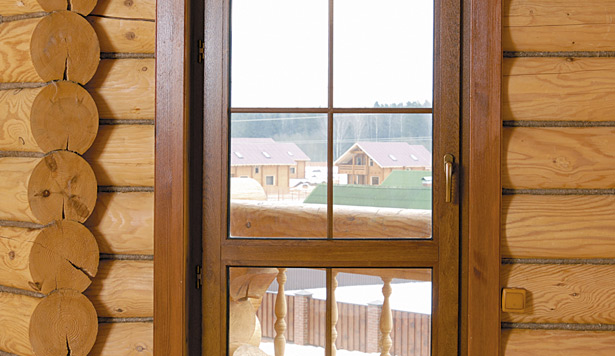
Why is casing made for plastic windows in a timber house?
To obtain quality windows PVC in a wooden house, you must strictly observe the installation features, that is, install it to a special frame (base). The need for such a design is due to the characteristics of wooden buildings. Unlike a building made of stone (concrete or brick), a wooden panel house unstable over a long period.
 The casing prevents frame deformation when the house shrinks
 The building will be completed within the first five years after its construction. In this case, the walls dry out up to 6 cm. This important nuance must be taken into account during installation plastic window V frame house. It is clear that you cannot simply insert a plastic window into a wooden house; you need to create a structure for the opening, which is called a casing, or they also say a window frame. Its direct purpose is to prevent the frame from being affected by wall shrinkage, so the socket:
- strengthens the opening;
- bears the load;
- prevents the effects of shrinkage.
The pigtail looks like a box made from thick boards. The structure is attached to the side rack on a groove, no fasteners are used. There is a gap left above the jamb to compensate for shrinkage for a wooden house. There are several options for installing it:
- A groove is cut in the log into which the block is placed. Self-tapping screws are screwed into the last element of the embedded beam;
- a groove is cut out in the racks on the sides of the structure, a tenon is cut out from the end of the log in the opening;
- A groove is made at the end of the logs, and a tenon is placed on the side posts of the box.
 Casing options
 To get a high-quality design, you need to follow the technology for installing plastic windows in a wooden house. To begin with, cover the ridges of the logs with insulation and secure it with staples or small nails. This stage is necessary to insulate the house and eliminate creaks. Then the lower crossbar of the casing is mounted, and carriages (side posts of the frame) are stuffed onto the ridges, and the upper jumper is placed in the upper groove of the posts. After collecting the box, carefully connect it with self-tapping screws, it is important that they do not get into the logs.

The gaps that are visible in the opening after installing the casing must be filled with tow or insulation. Then the standard installation of plastic windows in a frame house or log house takes place.
 The cracks are sealed with insulation or tow.
 The compensation gap is filled with flat boards pre-wrapped with tow. As the walls shrink, they are gradually knocked out. To do this, remove the top casing and, having knocked out the board, put it back.
The final stage when glazing a wooden structure
Finishing after PVC installations windows in a log house are made in the same way as wooden ones, that is, after installation frame structure and insulation is installed with wooden platbands. When ordering PVC windows in a wooden structure, you should take a closer look at the option with a wood texture, this will allow them to look harmonious against the background of the felled structure.
Many manufacturers of PVC structures offer not only classic white version frame colors You can order any shade that the customer desires. Colored plastic frames will cost a little more, but will be more suitable option for a home made of natural materials.
When ordering, it is important to take the correct measurements of the opening and not make a mistake in the width of the window sill. Self-installation PVC windows in a wooden house are not such a complicated process if you know all the nuances. You can do it yourself, without resorting to the help of expensive installers.
Plastic windows can be installed in any kind of structure: stone, concrete, wood. But installation in a wooden structure requires more attention, since wood is prone to shrinkage due to drying out. Wood that dries turns into a powerful press capable of deforming window unit. As a result, the window structure ceases to function correctly and may become askew. Let's look at how to avoid this situation and install windows without errors. Let us dwell on the specifics of window construction made of polyvinyl chloride, its strengths and weaknesses.
Advantages of PVC windows
PVC windows are window structures made of polyvinyl chloride. This material-chemical synthetics based on petroleum ethylene and chlorine. This polymer is resistant to various influences and lasts a long time. Window structures made from the specified material are resistant to:
- sun rays;
- high humidity;
- exposure to insects;
- exposure to organisms invisible to the eye.
PVC for window designs hard and durable material. The strength of the polymer is several times greater than that of wooden structures and can withstand changes of one hundred degrees - from fifty degrees below zero to fifty degrees above zero.
Polyvinyl chloride consists of the following components:
- stabilizers;
- modifiers;
- dyes;
- fillers;
- lubricants

The material lasts a very long time, manufacturers give a twenty-year guarantee, but it is still impossible to verify whether this is true. The service life of the first ones has not yet passed installed windows. Statements that even after fifty years windows will not lose their properties are possibly real. But window seals fail much faster. As practice shows, they need to be changed every eight to ten years. In general, the service life of the seal depends on the temperature of each specific area.
Among the advantages plastic structures the following can be distinguished:
- high quality material and resistance to various types of influences;
- tightness of the structure - while staying in the room, a person is reliably protected from noise, dust, gases and harmful substances;
- high sound insulation ability - windows can significantly dampen extraneous sounds;
- reliable thermal protection - complete protection from drafts and reliable heat retention;
- efficiency - saving heat resources;
- attractiveness of designs - you can use not only standard windows, but also implement design ideas in life.

Basic properties of window structures made of polyvinyl chloride
Supporters and opponents of plastic windows argue about the safety of these structures for health. Those who claim that structures are unsafe for human health argue that this is due to the presence of lead in the base of the raw materials. But lead in windows is completely safe, and most manufacturers have replaced this material with others. The fact that PVC window structures are quite economical and environmentally friendly is confirmed by certificates:
- thanks to PVC windows, heat is retained in the room and this allows you to save resources and money;
- Plastic structures save wood resources and thereby prevent deforestation.
In some countries, the government pays money to residents who install plastic structures for their personal contribution and concern for saving natural resources.
Opponents of plastic structures argue that over time, plastic becomes unsightly, as it turns yellow and fades. But nowadays the technologies for the production of plastic windows have improved and the color is not lost under the influence of natural forces.
In case of fire indoors, window structures of this type“hold” the fire, since the plastic structure has high thermal insulation abilities.
Types of plastic windows
The construction segment offers a huge variety of plastic windows. They differ in many ways: shape, size, number of sashes, options for opening them, types of double-glazed windows, types of profiles. Currently, manufacturers offer windows with various types of decoration and varying degrees of transparency.
Based on the number of sashes, windows are divided into one, two and three-leaf windows. The chosen option depends on the location, the size of the structures and the individual characteristics of the home. For small window It will be convenient to have one sash. For typical apartments It is recommended to install windows with a pair of sashes.
Regarding opening windows, the following options are distinguished:
- a blind design is the most ill-conceived window regarding its functional tasks;
- rotating elements;
- folding elements;
- combined elements.

Its operational capabilities depend on the characteristics of the profile. PVC itself has low thermal conductivity, but chambers with air inside the structure help retain heat several times better. The thermal conductivity of the window and the air temperature in the home depend on the number of chambers. There are from three to seven cameras.
Three-chamber windows are installed in rooms that do not require heating: outbuildings, sheds.
As for six and seven chamber windows, they do not perform their functions better than four or five chamber windows, so there is no point in overpaying for the design.
As for marking profiles with letters, there are types: A, B and C. Type “A” is used in homes. “B” and “C” are recommended for use in factory or warehouse premises.
The glazing of the structure itself can be done using two, three or four sheets of glass. They are fixed at the required distance from one another and form chambers.
Double-glazed windows can be one, two or three-chamber. This point can be confusing when buying a window. It is necessary to clarify which cameras are meant in the frames or double-glazed windows themselves.
Plastic structures for wooden houses
With the installation of plastic windows in wooden walls you will have to study the theory of the issue to do everything correctly. Some people think that in old buildings wooden type It is impossible to install plastic windows. But in fact, no, this can be done in any type of premises. You can install windows yourself, provided that you have minimal knowledge of construction basics. The main thing is to take into account the characteristics of wood as a material and take into account the fact that the wooden frame of a house can also sag.
After you have selected windows for a wooden house, you need to familiarize yourself with the “jam” technology. This technique is aimed at preventing deformation of window structures, regardless of the selected material.
Statistics show that a wooden house shrinks up to thirty-five centimeters. Depending on the foundation of the structure, twelve months after the construction of the house it settles in any case; this is a natural process. The maximum error will be provided that the house is built from rounded timber, the minimum - from laminated veneer lumber. Regular timber can sag by thirty to forty centimeters. This is taken into account as a factor that can deform window structures. Deformation may manifest itself in the impossibility or difficulty in opening and closing the window.
Builders advise not to install plastic structures in new houses until they shrink. But as experience shows, old buildings can also cause windows to become deformed. But what to do, is it impossible to install plastic metal structures in wooden houses? In fact, experienced builders have developed installation technology that will allow you to use PVC windows to their full potential.

Installation instructions for plastic windows
For successful implementation installation work It is important to plan and carry out competent preparatory work; they consist of the following actions:
- it is necessary to dismantle the old window structure;
- clean the recesses from construction waste and dust;
- correctly measure the window opening, write down the calculations;
- If the window opening does not match the dimensions of the new window frame, it should be adjusted to the dimensions using special solutions for working with wooden surfaces.
At the preparatory stage, a decision is made on the shape of the window, the number of sashes, in what color scheme it will be in how many packages.
When all decisions have been made, double-glazed windows are ordered according to the requirements.
The pigtail is the next stage in installing a metal-plastic structure.

The window structure can be finally installed in a wooden structure after preparing the frame. This is a building made of wooden beam aimed at maintaining weight load-bearing walls and preventing the window from deforming. The required timber size is ten by fifteen centimeters. Using a chisel, connecting grooves are made on these bars, about five centimeters wide. Cuts are made longitudinally using a chainsaw. All manipulations are controlled by the building level.
Plastic structures are inserted into the prepared pigtail system and secured with fasteners. The installation procedure is as follows:
- with the help of fasteners the pigtail system is fastened into a single frame;
- a small distance is left below using a wooden wedge;
- a window frame is inserted into the system of the manufactured frame and secured with fastening structures;
- pre-removed window sashes are installed;
- all gaps must be filled polyurethane foam;
- the wooden wedge placed previously is removed.
A pigtail specially installed in a wall made of wooden material, performs several important tasks:
- does not allow the wooden structure to move vertically;
- does not prevent the log from shrinking vertically;
- strengthens the wall at the window opening.
Experienced builders insist on installing a frame even when installing plastic windows in an old wooden house. They argue that this measure is simply necessary. A structure made of wood constantly changes its size to one degree or another - it swells during rain, and dries out during heat.

Tool for installation of plastic structures
The most important process is the process of installing plastic structures in their intended place. To do this, it is advisable to prepare in advance all the tools that will be needed during the installation of the structure:
- drill for woodworking;
- screwdriver;
- fastenings: anchor bolts and plates;
- polyurethane foam;
- spray bottle with water.
Naturally, during work you will need other tools. Ideally, such work should be carried out with a partner who can supply the tool and hold the structure when necessary.
Installation plastic elements - difficult type construction activities. If you are installing plastic windows yourself, take into account all the recommendations of specialists.

Calculation of plastic windows
Correctly calculating the dimensions is not easy; it is a very difficult process that is best entrusted to a professional from a window workshop. Recently appeared online calculator plastic structures, allowing you to find out the exact cost. It is very comfortable. The sites offer various filters:
- you can choose the layout of the future window structure;
- decide on the configuration;
- in the configuration, a choice is made by type, profiles, types of double-glazed windows;
- after that, just click on the button and the plastic structures will be calculated.
The cost of window structures is affected by the number of sashes, the choice of additional fittings, additional functions glass unit, profile color.
To imagine how plastic metal structures are installed in wooden houses in practice, watch the video. In fact, you can install windows on our own, for this you need to take into account the specifics and features this method and follow the recommendations of specialists.
Repair work in a wooden house differs significantly from similar buildings in other types. Most companies do not provide a guarantee for installations carried out here, especially for windows. Isn't this a reason to think about DIY installation? Armed step by step video, you can achieve high-quality results while significantly saving the family budget.
Features of installing a window system in a wooden house
There are many prejudices about wooden houses. The service life of the windows installed here depends entirely on the quality of the structure itself and compliance with the technology of the installation process.
You cannot start working on a window opening in a new wooden house right away. To avoid deformation in the future, it is recommended to wait some time for the structure to stand, the wood to dry and evaporate excess moisture, the walls became static. Thus, the chance of the opening being undermined is minimized.
Not chosen as a place under the window outer part wooden house. The opening may be in the center or closer to one of the corners, but not in contact with it.

Window opening cutting diagram
The installation process itself is not too labor-intensive: it can be done with one pair of hands in a few hours. Subtleties of carrying out preparatory work depend on whether the windows have already been installed before or whether the casing needs to be created from scratch. Similar technology can be used for PVC installation to any wooden building: bathhouse, gazebo, etc.
Preparing the workspace
To install plastic windows yourself, you need solid foundation- frame. If the previous windows were installed over the past few years, did not have time to acquire physical damage and were not touched by rot, then you can use the box from them as a frame for new system. With this option, measurements are made according to the new size of the opening, focusing on the preserved box.
If PVC is installed in a new building, then you will have to take care of the piping. This is the name given to the design that prevents the window system from deformation. There are several types:
- With a mortgage block;
- In the groove of the log wall;
- On a spike in the wall;
- With a quarter.

Window trimming is one of the necessary steps installing a plastic window in a wooden house
Using a rag, you can remove dirt, dust and start taking measurements. The reliability and expediency of all further work depends on their accuracy: inattention to at this stage may jeopardize the entire installation.
Advice. If the opening is distorted, then to create a plan diagram with measurements, they are guided by the supposedly correct geometric shape and right angles, and the deformations are removed using sealant or ordinary putty.
Window sill installation and window preparation
It is the basis of the entire window system, so its installation must be carried out with a level: the horizontal surface must be ideal from both longitudinal and transverse positions.
To do the work yourself, the following algorithm of actions is used:
- Small recesses (at least 5 mm) are made in the window frame for additional fixation of the window sill.
- Using plates made of fibreboard, plastic or treated wood antiseptic, level the window sill.
- The window sill is installed using self-tapping screws. It is necessary to place a gasket or washer under the caps to prevent cracks. For self-tapping screws, you need to choose a place where they will be hidden by the future window. Typically, it is located at a distance of 2-4 cm from the end.
- After installing the window sill, check its horizontalness using a building level.

In general, installing a PVC window in a wooden house does not cause any particular difficulties if you familiarize yourself with all the nuances of the work in advance
As for the window itself, before installation it is necessary to attach the handle in the down position (closed state).
Attention! No need to take off protective film completely: just open it slightly at the place where the handle is attached.
Window installation
Installing a window in a prepared area of a wooden house is no different from installing it in another structure. The process is performed in the following sequence:
- Marking the window frame and drilling mounting holes. The procedure is carried out using a 6 mm drill for a corresponding self-tapping screw 1 mm smaller in diameter.
- Installation of the system in the opening. In this case, they focus on the window sill, the even level of which, thanks to additional control, is beyond doubt. The center is determined using a measuring tape.
- Level relative to the wall. To ensure that the window is parallel to the surface of the wall, use a plumb line. If it is finished with siding, which allows you to place a level between the trim and the wall, then you can use it.
- Fixing a beam that would completely fill the space between the window and its frame. It will become a stop for further installation. Installation without it may lead to blocking of the window opening/closing mechanism.
- The window is fastened using self-tapping screws from the bottom and top of the side posts, so that they do not interfere with the free opening of the window in the frame.
- Foaming cracks and removing excess foam.
Installing a PVC window yourself can save up to 60% family budget. Following detailed instructions their installation will make the structure resistant to seasonal deformations of the wood, extending the service life of the system for a long time.
Video: Installing plastic windows in a wooden house
Photo: Installation of plastic windows in a wooden house


Before starting direct installation, it is necessary to carry out a series of preparatory activities:
- dismantling the old window (if replacement is taking place);
- cleaning the opening from dirt and residues construction waste;
- produce necessary measurements and calculations;
- drawing up a drawing and recording the opening measurement parameters;
- aligning the contours of the sides of the window opening if the hole has an irregular shape;
- leveling is performed using putty or sealant;
- decide on the design and functionality (number of doors, their size, which of them will open);
- decide on the manufacturer and color of the product.
Only after completing all of the above manipulations do we order a window from the manufacturer, taking into account individual wishes.
Stage No. 2. Installation
Once the windows have been delivered and the necessary preliminary work has been carried out, you can proceed directly to installation. Tools:
- drill;
- construction level;
- chisel;
- screwdriver;
- roulette;
- mallet;
- pliers;
- anchor plates and bolts;
- window adjustment key;
- polyurethane foam;
- spacer wedges;
- spray bottle with water.
Important! It is not recommended to install a plastic window in a wooden house during strong wind and at low temperatures(not lower than -10 degrees).
Casing: purpose, types and design
The casing is a box-shaped structure, which is made of three or four boards and installed around the perimeter inside the opening.
The system allows you to install a plastic window yourself, so that the window is fixed independently of the main structure of the wall and has a floating character. The window system is secured using grooves on the side, which are placed on tenons protruding from the end of the logs and beams.
To fix and seal the casing, only tow, flax batting or fiber insulation are used. Never use polyurethane foam.
Attention! A gap is left at the top based on the wood's settlement.
Thus, wall shrinkage wooden structure does not affect the window in any way, much less damage it. Depending on the fastenings, casings can be classified into the following types:
- into a thorn This design is characterized by the presence of a tenon, which is mounted on the side parts of the casing, and a groove, which is located in the logs of the opening;
- in the embedded beam. The basis of the fastening is considered to be a block, which is placed in a groove at the ends of the opening and passes through the casing posts;
- into the deck. The tenon is located at the ends of the window opening logs, but the groove is in the casing posts.
The box is a floating mechanism, which prevents deformation of the plastic window during operation, regardless of the type of installation of the casing.


Calculations should be made with high accuracy, since even a minor mistake can lead to deformation of the window frame or leakage of the structure. Besides, correct installation– this is the key to the quality of the plastic window itself.
How to make a pigtail (casing)
The design can be of two types: complex and simple. A simple window frame is the system described above, with bars and grooves. Complex design It is performed somewhat differently: a ridge is cut out in the window opening, onto which a carriage with grooves is placed. This option is more reliable. When the walls shrink, the ridge can slide and does not allow vertical deviations, eliminating pressure on the window frame.
The casing is usually made of timber. Using a wood chisel, a 0.5 cm groove is knocked out in the center of the beam, and a tenon (0.5x0.5x.25 cm) is cut out from one end. A ridge with 0.5x0.5 cm spikes is cut out from the end of the opening logs. You can use a saw or chisel for this.
Important! Ridge markings – important point. The quality and reliability of the design depends on the accuracy of the markings.

After the ridge is ready, we proceed to install the risers and form the structure of the opening between them. The beams are installed level, taking into account the gaps for wall shrinkage (1 cm on the sides and 0.5 cm on top). The frame made of beams is strengthened with the help of grooves with the main fabric of the walls and dowels between them. The gaps left are sealed with tow or other fiber. That's all, now you can start installing the plastic frame directly. You can watch the process in more detail in this video:
Stage No. 3. Installation in the prepared opening
After carrying out the necessary preparatory work and installing the frame, you can begin installing the window.
Attention! Installing plastic windows in a wooden house without casing is the wrong option.
To begin with, we check the dimensions and location of parallels, the gaps between the casing structure and the frame. The margin for foaming should be: 4-5 cm at the top, 2-3 cm in width and height, 3-4 cm in the window sill area. Having made sure that the stock corresponds to these indicators, we proceed directly to installing the plastic frame.
The window is secured using special fasteners, which are sold in any hardware store. They are metal plates with holes.
Installation of a plastic window should be done level. If you neglect this factor, then you risk getting a structure with a slope, which significantly reduces the operational and aesthetic objectives of the window.
Advice! Before installing windows, the sashes are removed. This simplifies the design and makes it much more convenient to install it in the opening.
After the window is secured in the opening, it is necessary to fill the gap with foam. To avoid displacement of the structure during foaming, blocks are placed that will maintain the position of the frame without deviation. After drying, do not forget to remove it.
Fastening the window to the casing is done with care. In this case, you must select correct location tightening screws. Under no circumstances should a window be secured in the ridge area!
That's all, we finish the process by completely foaming the opening. We put the sashes on and let the foam dry.

We presented The right way installation of a plastic window in a wooden house. This process can be difficult, so if you are unsure of your abilities, it is better to turn to professionals.
However, installing a plastic window yourself is a significant cost savings. We invite you to watch a video tutorial on how to install a window yourself: