What is the best way to install a hood in the kitchen? Installation and connection of a kitchen hood. What you need to connect the hood
Installing a hood with your own hands is a task quite feasible for a home craftsman, even when the kitchen design is completed. The main condition is reliable grounding and grounding of the device (connecting metal parts to a “solid” neutral). You also need to decide in advance on the choice of a specific type of hood.
How to choose a hood
When purchasing a device, you must take into account the size of the kitchen and the equipment for which it is intended. The width of the hood must be no less than the surface of the stove.
Second important point is the power of the device. For a small kitchen, you can purchase a medium-power device, and for a kitchen big size powerful units are suitable.
Attention should also be paid to the compliance of the design of the hood with the interior: it should fit harmoniously into it. With today's wide choice of models, this is not difficult.
According to installation options, devices are divided into the following types:
- Dome ones are the most powerful; they look like an umbrella with a pipe extending from it.
- Built-in - the exhaust pipe of this model is retracted into the cabinet, while the panel itself extends during cooking. This option is an excellent solution for a small kitchen.
- Flat – exhaust pipe replaces the filter, as a result of which the device is more compact, but has low power.
Calculation of the installation height of the hood
The height is determined depending on the selected model. The device comes with instructions that indicate the distance at which the device must be mounted. As a rule, installation is carried out approximately 65-90 cm from the stove. Exceeding the lower threshold is unacceptable, since it can lead to melting of the hood or its individual parts. As for the upper threshold, you can choose it in accordance with your height.
Using electric stove the threshold is lower (it is 65-70 cm), and in the case of a gas stove the threshold is higher - from 75 to 90 cm.
Dome hood options and installation process
Dome-type devices are:
- Wall-mounted (fireplace) – they are mounted on the wall surface. The design is similar to ventilation systems designed for fireplaces.
- Corner – used in rare cases, when the slab is located in a corner.
- Island - their installation is advisable in kitchens large sizes, in particular in dining rooms, where the stove is in the center of the kitchen. Such hoods are attached directly to the ceiling.
The material for the manufacture of hoods in most cases is stainless or enameled steel, sometimes there are models made of plastic or wood. Dome hoods work in different modes. When installing an air duct facing the street or into the ventilation system, the function of the device is to remove air from the room.
- To install a dome hood, you need to bring the corrugation to ventilation system home and connect to the power grid. Sometimes it becomes necessary to build up wiring or corrugation.
- At independently conducting Before work begins, it is necessary to finish equipping the kitchen with furniture. Then you can proceed to marking the location of the device, taking into account the recommended height.
- To attach the hood, you need to hollow out or drill holes for the dowels. The supports are bolted to them. The base of the exhaust device is put on them.
- A special outlet of the hood is connected to the corrugation of the air duct while maintaining maximum tightness.
- The functionality of the device is checked, after which the upper casing is put on.
Installing the built-in model
Installation of the built-in hood is carried out inside kitchen cabinet. It is also possible to install an exhaust panel on retractable mechanism, making the device completely hidden, but such work requires certain skills and some professional training.
The installation option without sliding/retracting is more simplified. To implement it, you need to do the following:
- First of all, you should assemble the cabinet in which the hood will be located. It is also possible to use an existing one, although it will have to be slightly rebuilt. When manufacturing and installing a cabinet, it is necessary to take into account the size of the kitchen and the level of the hood.
- The bottom of the planned cabinet rises to the height of the device itself. In the future, the hood should be attached to this bottom. The side walls are firmly attached to the cabinet lid, the bottom is secured with Euroscrews.
- A slot is made at the top for the air duct. To do this, you can use a hacksaw or jigsaw.
- The hood body is being fastened. The bottom of the cabinet must be removed and the pattern of holes required for the corrugation and mounting bolts must be transferred to its surface.
- After drilling and cutting the holes, the body is attached to the bottom. Then you need to firmly fasten the entire structure and install it in its original place.
- The last step is to pull the duct through and seal it tightly. The cable is pulled out to a pre-prepared socket, after which the device can be tested.
A telescopic hood is installed in a similar way: in essence, it is the same built-in model, which has several design features (they do not relate to installation).
How to install a flat hood
Flat (suspended) models, as a rule, do not have an air duct. They are equipped with a filter for air purification. Any type of exhaust device can be started in the re-circulation mode (air purification using a built-in filter) or in the mode of air output to the street. Filters need to be changed at least twice a year.
The installation process of the exhaust model itself is not difficult. The device has a special fastening - all that remains is to transfer the marks to the wall surface. The distance between them should correspond to the holes on the mount. Having drilled the wall, you need to hammer in the dowels and attach the canopies using a screwdriver or screwdriver. An exhaust device is attached to them, after which the connection to the network is made.
Installing corrugations on the hood
- If the ventilation hole is located above the stove, its connection to the hood is made using a small adapter. However, in many cases they are separated by a large distance. In this case, it is necessary to install a special air duct for exhaust, which is a smooth pipe made of plastic or a corrugated pipe made of plastic or aluminum.
- When choosing smooth pipe round or square shape additional purchase of connecting elbows is required to bypass corners. In addition, two adapters are needed: one is used for mounting on the exhaust device, the second is used for the ventilation hole.
- Connections and joints are carefully coated with sealant.
- If the air duct can be hidden in a wall cabinet, it is recommended to use corrugation: it will cost less, and it is much easier to install. In this case, there is no need to use adapters: the corrugation goes around corners perfectly.
- Before installation, the corrugation must be stretched as much as possible: this will significantly reduce the noise produced during operation of the hood.
- When choosing a pipe diameter, you need to focus on the parameters of the exhaust outlet.
- The corrugation is fixed on the hood pipe using a clamp, and on the ventilation opening using a special grille.
Since over time, fumes accumulate in the air duct, preventing the free passage of air, it must be cleaned or replaced with a new one at least twice a year.
Connection to ventilation
Every home has a system natural ventilation, to which you can connect kitchen hood.
The connection work is simple. It will require a special shield equipped with a hole for attaching a pipe, which is fixed in place of the ventilation vent grille.
The problem may be the following: in old multi-storey buildings installation of exhaust devices is not provided. For this reason, there are no individual ventilation ducts: there is one common channel. When residents connect hoods in the ventilation system, the air pressure changes. As a result, odors are drawn into the ventilation holes neighboring apartments or (when installing an exhaust device and a check valve) the devices “compete” in power. In such cases, there are several solutions:
- A radical solution is to change housing. New buildings have individual ventilation ducts.
- You can seek the help of a ventilation specialist who will assess the condition of the ventilation and give advice on choosing a model that can be installed without harming your neighbors. If necessary, the ventilation technician will clean the shaft air ducts.
- An excellent solution is to purchase a recirculation device.
- You can also create individual system ventilation, in which a ventilation hole is installed or small window, leading to the street. A hammer drill is used for work. It is necessary to calculate the flow of the air duct in the kitchen and determine the most appropriate place. Finished window sealed with a lattice shield. The corrugation is discharged into it.
Choosing a place to install a socket for a hood
The preparation of a new socket for the hood must be carried out before installing the device. When choosing a socket, you must take into account that most models exhaust devices equipped with three-wire wires.
It is prohibited to install an outlet near the sink or near the stove. The best option is to install it above wall cabinets - approximately at a height of 2 meters. The socket must be moved to the left or right of the center of the hood. When choosing more open space you can decorate the outlet using a special box. It should not be hidden behind bulky appliances or hanging cabinets.
Sometimes voltage surges occur in homes, as a result of which the hood motor can burn out or be damaged to a certain extent. To prevent such a situation, it is necessary to ground the outlet.
A modern kitchen is no longer just a place for cooking, but also a beautiful, neat, functional corner of an apartment or house. Every housewife wants it to be beautiful here, and during cooking, steam and foreign odors do not fill not only the room, but also do not spread to other parts of the home. A modern, quiet and efficient kitchen hood can help in solving this problem.
Even a beginner can install such a device in the kitchen with his own hands. You just need to choose the right one necessary materials, tools, do everything carefully and use a few tricks. And then the kitchen hood will not only function reliably, but also not spoil, but even decorate the interior.
Types of kitchen hoods
Regardless of which kitchen hood option is chosen, installation is generally the same. There are three types of such electrical appliances:
- recirculation ones, which do not need an air duct, they use carbon filters or, in the cheapest option, mesh filters that can be removed and cleaned;
- with an air duct, intended for connection to the home ventilation system, but not having a rigid outlet for the outlet of the air flow;
- dome or fireplace. Equipped with a rigid, beautiful body, such kitchen hoods look very presentable, but they have a fairly long air duct, which imposes requirements on the placement of the device.
Many models of dome hoods are designed to be mounted to the ceiling. There are several options, similar installation In the kitchen it is better to entrust specialists. We are interested in models that can be installed with your own hands without any special skills. In the following video you can see the types of kitchen hoods that are most popular on the market.
What tools and materials will be needed
We will describe a complete set of materials and tools that will allow you to correctly install a hood in the kitchen with your own hands. So, you will need:
- impact drill or hammer drill (high power, if we are talking about installing a kitchen hood on a reinforced concrete wall);
- drills and drills;
- fastener Both “novosel” mounting kits (plastic plug and screw) and “Euro nail” type fasteners can be used. But optimal results are achieved when using so-called spacer reinforcement.
- screwdrivers and keys (depending on the type of fasteners used);
- small hammer;
- roulette;
- building level;
- marking tool - marker or pencil.
Small tricks for working with the tool. Experienced craftsmen Use screwdrivers and bits in accordance with the type of screw heads. Beginners who want the screwdriver not to slip and the fasteners to spin smoothly and clearly will need little advice. Wood screws (black, with a cross-shaped recess on the head without additional notches) are tightened with bits marked PH. Self-tapping screws for dense materials (chipboard, plastic, metal) are usually white or yellow, have notches on the head located at an offset of 45 degrees relative to the main recess for a Phillips screwdriver. This type of fastener is ideally tightened using bits marked PZ or similar shaped screwdrivers. Using the right tool, you can significantly speed up the work and tighten the fasteners more tightly without damaging the heads.

By varying the types of fasteners, you can correctly install them yourself on any walls. Yes, for brick wall in the kitchen, the “new settler” or “euro nail” sets are ideal (it needs to be driven in, so some models of hoods will not be able to provide enough space in the body for the hammer to move, this must be taken into account), work on reinforced concrete is best done using spacer tubes, according to wooden wall Black self-tapping screws will suffice.
A little trick. For work in the kitchen on a wall finished ceramic tiles, you can’t use a hammer drill right away - it will split the decorative element. First, you should go through the tiles with a drill along the glass, and then use a hammer drill to make a hole through the adhesive and the wall material itself.
What you need to connect the hood
To install a kitchen hood with your own hands correctly and achieve a neat appearance, you will need:
- clamps for connecting air ducts if a corrugated hose is used;
- metal screws or a rivet gun with consumables of the required type, if a plastic or tin box will be used as an air duct;
- decorative grille for the ventilation duct of the house in the kitchen;
- If you install a kitchen hood with a rigid air duct, adapters (corners) will be required to install the air passage channel.
If there is no outlet near the hood in the kitchen, you will have to make a connection.
Electrical connection
In any case, whether there is an outlet near the hood or not, it is correct to place the electrical connection cable with an entry from above. This will ensure that it does not overheat with heat from the stove, and will also reduce the possibility of accidental damage. The ideal and correct way is to run the cable behind the air duct, placing it on the wall in mounting boxes. This type of connection is invisible and guaranteed safe. The following video shows the connection and wiring of the cable.
Attach the hood to a flat wall
In order to correctly attach the kitchen hood to flat wall, just follow a few simple steps:
- Mark the locations of the fastening elements in accordance with the location of the corresponding holes on the kitchen hood body.
- Drill holes to the required depth.
In the case of a wooden wall, it is not worth drilling holes to the full length of the self-tapping screw. A depth of 1/3 is sufficient. However, it is still worth working with a drill - this is correct, the self-tapping screw will not create excessive mechanical loads in the surface area and at the same time will firmly fix the structure.
- Carry out the necessary communications for the electrical connection of the kitchen hood.
- Install fastener or immediately fix the device body with them.

The subtlety of the marking is to ensure that the hood is positioned clearly horizontally. To do this, mark the point closest to the wall directly along the body of the device, for example, after attaching a kitchen hood to the wall. The rest of the markings are done using a building level and a tape measure, correctly marking the locations of the fasteners and observing the level of the device.
After the hood is screwed on “roughly”, without tightening the bolts or screws, you can install the body in the ideal position by checking the horizontal and vertical. Only after completing this operation can the fasteners be tightened tightly.

Fastening tricks. The body of the kitchen hood is made of thin metal. Therefore, when tightened with maximum force, fasteners will necessarily deform the housing wall. To avoid this situation and ensure good contact with uniform distribution efforts to larger area, you can place a plastic lining under the flat head of a triangular screw (sold at any hardware store, widely used in furniture making as a lining for fastening handles). For a flat surface of the heads of fasteners (it’s correct to choose this type of bolts or screws), you can place a wide washer with an outer diameter of 16, 22 mm or more, under which (on the body of the device) a rubber pad is placed, for example, intended for flexible taps hoses or other water fittings.
Air duct installation
Installing an air duct in the kitchen is the easiest thing to do. If a corrugated hose is used, it is put on the outlet pipe of the hood and carefully routed to the ventilation hole in the wall of the apartment. A decorative grille is installed there, to which the corrugated sleeve is attached. First draw the channel correctly, check that the corrugated pipe is not pinched or deformed, cut off the required length and then secure the inlet and outlet parts with clamps on the socket of the kitchen hood and decorative lattice on the ventilation of the apartment.
A plastic or tin box looks neater and can be laid more discreetly. First you need to cut off the parts required length, which are sequentially installed in their places, connecting to each other with corner or straight adapters. The following video shows the process of assembling a rigid duct.
Installing a hood on an uneven wall

If there is a gas pipe or ledge on the wall, you can resort to tricks. Bolts with two thread zones (studs) are used as fasteners. One side of such an element is screwed into plastic stopper located in the wall. On the other side there is a support nut.
Nuts on several mounting bolts are positioned so that they form a single surface, located on at different distances from the wall. After completing this work, the kitchen hood body is put on the fasteners and can be secured with another set of nuts, using the tricks described above.
If the distance that needs to be compensated is very large, you can correctly install the kitchen hood on metal corners. However, in case of such difficulties, it is better to consider the option of using a built-in hood, when all the unevenness of the wall is compensated by the design of the cabinet in which it will be installed.
Installing a hood with your own hands is quite a feasible task home handyman, even if the kitchen has already been decorated and renovations are not expected in the near future. Under one condition: the hood must be secure (metal parts are connected to a “solid” neutral). You also need to decide in advance what type of hood would be better suited for your kitchen. Let's start with this.
Types and classification of kitchen hoods
Based on the principle of operation, hoods are divided into evacuating and circulating. The first ones exhaust the air outside, the second ones pass it through a filter with an odor absorber and release it back into the room. An evacuation hood can be turned into a circulation hood by replacing the air duct with a carbon filter, similar to those used in gas masks.
Circulating hoods do not interfere with the operation of standard ventilation, but they are not particularly popular: they are more expensive, the filter does not provide 100% cleaning and requires periodic replacement. In addition, an evacuating hood also releases excess heat, but a circulation hood does not.
Depending on the location of installation, hoods are divided into built-in (integrated), tabletop, fireplace and ceiling island. Table hood is a horizontally located elongated socket, which is part of the technological kitchen equipment. Used in professional kitchens.
A fireplace hood is a separate device and an integral part of the kitchen design. Fireplace hoods are installed in luxury kitchens and are often designed individually. Ceiling island hood - several air intakes in the ceiling. The device requires a false ceiling and a developed air duct system; installing it yourself is complicated and requires considerable costs.
Thus, for a city apartment or private house of a moderately wealthy owner, the only acceptable option is built-in kitchen furniture above hob hood-hood In essence, this is the same fireplace hood, only simpler and cheaper.
Video: a little about choosing a hood
electrical safety
A kitchen hood belongs to the category of electrical appliances that create an increased risk of electric shock. Fat and moisture will certainly settle in the hood, this creates conditions conducive to electrical breakdown from the fan motor to the metal casing. The kitchen, in turn, is, from the point of view of electrical safety, a room with increased danger: in it often heat air is combined with high humidity.
Therefore, kitchen hoods are connected to the power supply network with three wires: phase, neutral, and ground, in yellow insulation with a longitudinal green stripe. Before installing the hood, it is necessary to ensure its reliable grounding.
If the house is equipped with a grounding circuit and Euro sockets, there are no problems: during installation, the grounding wire is connected to the “ground” terminal of the plug; it is indicated by a special icon in the form of three parallel lines different lengths. But most residential buildings do not have a grounding loop. In this case, you need to provide grounding yourself.
Protective grounding device
For protective grounding, you do not need to dig a trench and drive pins into the ground. And under no circumstances should the hood be grounded to a water supply, heating, or even more so to a gas pipe. You need to connect to a dead neutral.
Open the input panel in the apartment or in the entrance (just be careful - there is 220 V!) You will see that the electrical wires into the panel come out of a pipe walled up in the wall. Most likely, there will also be a threaded pin with some kind of ground connections already connected. This is a solid neutral: this pipe is perfectly grounded. From it you need to bring a flexible stranded wire with a cross-section of at least 2.5 sq. mm, and connect the hood to the network through a 6.3 A circuit breaker.
Warning: If other ground connections are connected to the solid neutral, under no circumstances disconnect them in order to “ground” yours. This is dangerous to the lives of both yours and other consumers. Throw your terminal over the top and tighten with a nut. If the neutral pipe is smooth, carefully clean it and tighten the ground wire with a clamp. It is best, of course, to agree on this directly with the housing office electrician.
Ventilation issues
Installing a kitchen hood almost always disrupts the normal ventilation in the apartment. Most often it is recommended to break through an additional window for it, leading either to the ventilation duct or to the street. Both of these methods do not solve the problem.
From additional window in the ventilation passage its cross-sectional area does not increase. In the best case, the hood will throw three-quarters of the kitchen fumes into the ventilation, and a quarter will go back into the apartment. And when strong wind or the pull from the lower floors can return back. Or get to neighbors who, as you know, are not always tolerant and benevolent.

The release to the outside, firstly, requires a project agreed upon with the building operator, since it affects bearing wall. Secondly, condensation inevitably settles in the air duct and on the fan motor, which brings the probability of breakdown closer to 100%.
Meanwhile, the way out of the situation has long been known: an additional section of the air box with a clapper valve. Its structure is clear from the figure. Let's just give some clarifications:
- The window for the exhaust air duct is square with a side equal to 3/4 of the diameter of the air duct. In this case, its area cross section will be equal to that of the air duct, the perimeter will be slightly less than the circumference of the air duct, and the connection will not cause difficulties.
- The damper is made of 0.5 mm aluminum (better) or a thin and rigid sheet of non-flammable plastic: fiberglass, also 0.5 mm thick, or fluoroplastic. But the best damper is aluminum. The less specific gravity damper material, the more clearly the firecracker operates.
- The flap is tightened by a thin, weak spring so that, when it is forcibly raised to the upper position and released, it smoothly falls into place. A stiff, weakly tensioned spring is not suitable. The diameter of the wire from which the spring is made is recommended 0.2 - 0.3 mm, the diameter of the spring is 3-5 mm, and its length is 120-150 mm.
Note: Craftsmen familiar with electronics sometimes make a damper controlled by an electromagnet that is triggered when the hood fan is turned on. There is no point in this: the spring-loaded damper is self-regulating. If the natural outflow of air increases when the hood is turned on, the damper, raised all the way, will lower to a certain intermediate position, and the ventilation passage will always receive as much air as it can pass.
About odor neutralizers
The hood above the stove is often equipped with an odor neutralizer. There are three types of neutralizers on sale: chemical, electroionization and ultraviolet. Let's consider which one is preferable.
- Chemical neutralizers require periodic and quite frequent replacement: they active element is covered with a film of fat, having not yet exhausted its resource. In addition, chemical neutralizers themselves emit vapors into the air that have no odor, but can be harmful to health.
- Electroionization neutralizers are designed on the same principle as a conventional air ionizer. But, since the concentration of impurities in the air above the hob is much higher than in the living room, the discharge has to be created stronger, right up to the “crown” visible to the eye. The ionizer itself is closer to the person working at the stove, and he may be exposed to electric field with tension higher than permissible.
- Ultraviolet neutralizers require periodic cleaning of the lamps from burning residue. Lamps have to be changed approximately every two years, but their price is not cheap. But the ultraviolet neutralizer is completely harmless and safe: the lamps emit several times less ultraviolet radiation than the Sun on a clear summer day. At the same time, the issue of illuminating the hob is also resolved: in addition to ultraviolet light, the lamps also emit visible white or slightly bluish light.
Air duct
Kitchen hoods are not equipped with an air duct. Its best option is corrugated aluminum pipe diameter equal to the diameter of the upper hole of the hood. The aerodynamic resistance of a corrugation with a length of up to 1.5 m is completely lost against the background of losses from random turbulence in ventilation. But the corrugation can be cut with ordinary scissors and simply shaped into a square with your fingers to mate with the clapper. And most importantly, the corrugation will never ring or hum, while in a rigid box the resonance properties may unexpectedly change, and the housewife will have to cook to the accompaniment of a monotonous itching sound.

Often, the corrugation of the hood looks completely unaesthetic, so it is better to think in advance about the location of the stove or where to hide the nondescript element.
How to make a hood in the kitchen
Tool
To install the hood, you will need to buy or rent a jigsaw with a clean cut saw. The rest of the instruments are ordinary household ones.
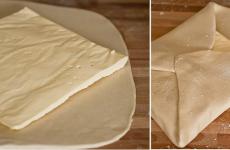
Firecracker
We begin the installation of a kitchen hood by making a box with a firecracker. Material – thin aluminum, tin or galvanized. For ease of use, the cracker should lie on the cabinet above the stove. In the future, the firecracker will be placed in the ventilation window on mounting foam and glued to the cabinet assembly adhesive or silicone; this will eliminate resonance.
But first we just try on the cracker, and on the top board of the cabinet we mark a hole corresponding to its lower window. This can be done with a pencil directly from inside the firecracker, temporarily removing the flap. We also outline the sides of the firecracker - this is necessary for precise final installation.
Closet
Next, we empty the cabinet, remove it, and use a jigsaw to cut out a notch in the bottom board that fits the size of the lower frame of the hood. For cutting, first, inside the contour of the hole, drill an auxiliary hole with a diameter of 8-12 mm, insert a jigsaw file into it and cut along the contour. If you are not a very skilled craftsman, do not be upset by the flaws: with the installation method described, they will not be visible.
Next step: cut out the top board of the cabinet square hole under the cracker window, with an allowance of 3-5 mm to the sides. Here a certain amount of accuracy is required: if the corrugation “moves” too far from the firecracker window, you will have to “smear” it a lot with silicone. True, it still won’t be visible from below.

Typical kitchen hood layout
Corrugation installation
We place the cabinet “on its back” and insert a piece of corrugation of the required length into the round holes. We shape its upper end with our hands into a square (or into a rectangle, if due to the configuration ventilation window the damper and its window had to be made oblong), we insert it into the upper hole. We cut the corners by 1.5 - 2 cm with scissors and bend them outward.
Firecracker installation
We hang the corrugated cabinet in place. We apply a “sausage” of silicone without breaks to the bent strips of corrugation at the top, and to the wood in the corners between them. Having tilted the box with the clapper up, we insert it into the ventilation window and lower it onto the cabinet board exactly between the marks. If too much silicone has been squeezed out on the sides, immediately remove the drips with a cloth moistened with table vinegar.
After about half an hour (construction silicone sets quite quickly), we blow foam into the gap between the edges of the cracker box and the edge of the ventilation window. It is better to do this with a foam gun: it has a long spout and produces a thin stream.
Hood installation
We insert the hood from below into the cabinet cutout. There is no need to put the corrugation on right away: the exhaust pipe will simply press it upward. We attach the hood with self-tapping screws to the cabinet through the mounting holes. We put the corrugation on the exhaust pipe and secure it with a clamp or simply wrap it with soft wire. There is no need to seal it: this will complicate disassembly for cleaning, and at the point where the pipe transitions into the corrugation, according to the laws of aerodynamics, the pressure will always be less than atmospheric. In addition, the protrusions of the corrugation, crumpling under the clamp or wire, themselves will already provide a fairly tight connection.

If there is no cabinet and the socket is large
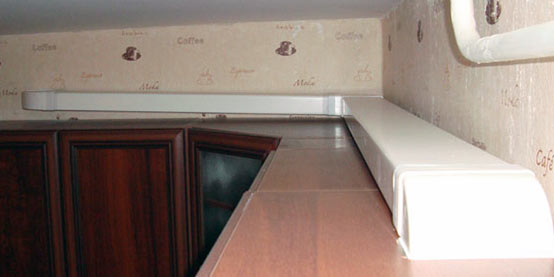
Not everyone hangs a cabinet above the stove for fear of fire. And the hood works better if its socket matches the size of the slab. In this case, under the socket, a U-shaped frame from a 20-25 mm corner is attached to the wall using five self-tapping screws in dowels. If the wall is covered - also on 5 collet pins with a diameter of 4-6 mm.
The air duct is hidden in a PVC box of the appropriate size; it is then covered with self-adhesive film of the desired color and pattern. Making a groove in the wall for a pipe with a diameter of more than 100 mm is unrealistic with modern wall thicknesses, and the firecracker fits on the top edge of the box no worse than on a cabinet.
Electrical installation
The wiring for the hood must be laid in advance. How - depends on the design of the kitchen. If the hood is plugged into a socket, you can simply throw it behind the furniture. If the connection is permanent through an automatic machine, then the wiring must be hidden in a PVC box, under the baseboard or behind the wall sheathing.
With a permanent connection, the machine MUST be switched on in phase break, and during installation the machine is turned off and the ends of the supply wires, even if they are not bare, are wrapped with electrical tape.
When connecting the hood, the grounding is connected first. If, suddenly, the hood is connected with two wires, the grounding wire must be connected by loosening several screws at the back, inserting the bare end of the grounding wire under the frame of the hood and tightening the screws tightly. Main principle Protective ground connections: connect where there is a risk of shock.
Cleaning and care
The hood must be cleaned of any fumes about once every six months, otherwise a fire may occur. To clean a hood mounted in the described manner, loosen the clamp holding the corrugation on the pipe, remove the corrugation, unscrew the screws holding the cap, and remove the cap. Now all parts of the hood are easily accessible for cleaning from the inside. Only the corrugation needs to be cleaned carefully: it is thin and can be easily damaged. But replacement, if necessary, will cost pennies. The silicone joint at the top is without special effort cut with a thin sharp knife.
Video: example of installing a kitchen hood with your own hands
When preparing food, the air in the kitchen requires constant recirculation. Steam from the stove, burnt milk, food odors, or just steamy windows do not bring joy, even if you have done an excellent renovation. Today we will tell you how to install a hood in the kitchen to get rid of these problems. Anyone can connect it if they know the rules of grounding and wall mounting. It is also worth deciding in advance which type of kitchen hood is right for you, and what the power of the device should be. Let's start with this.
The installation of a hood in the kitchen will depend on the type of model chosen. The following types are distinguished:
- hanging (also called flat and standard) - mounted under the cabinet above the stove;
- built-in – installed inside wall cabinet, so they fit perfectly into any design;
- wall-mounted - mounted on the wall above the stove, can have a different body design;
- corner – installed in a corner;
- island hoods – designed for a kitchen with an island (you can fix it anywhere by hanging it from the ceiling).
Advice! Regardless of the type, installing a kitchen hood above the hob is only possible at a height of 70 cm, and above the gas stove you need to retreat 80 cm.
Hood operating mode
In addition to the type of fastening, hoods differ in ventilation modes.
- Flow-through - pull polluted air from the kitchen into ventilation shaft. This method of ventilation is called air exhaust (exhaust mode). It is the most efficient and productive.
- Circulating hoods - pass air through carbon filters in the housing, receiving fresh air at the outlet. This model does not require ventilation in the kitchen in the apartment, so its installation can be called simpler, but less effective in terms of cleaning.
Required power
An important parameter when purchasing a hood is its cleaning performance, which is measured in cubic meters at one o'clock. As you might have guessed, this value shows how many cubic meters of air the hood will pass through itself per hour of operation.
According to the standards established in Russia, the air in the kitchen must be renewed 12 times per hour. Therefore, you can easily calculate how much power you will need using this simple formula:
Kitchen area * Ceiling height * 12 times
It is also worth considering the margin for power loss due to bends in the air duct, the length of the ventilation shaft and other parameters. To do this, add 30% to the result obtained.
For example, if your kitchen has an area of 6 square meters. m. and the ceiling height is 2.5 m., then the calculation will look like this:
6 * 2.5 * 12 * 1.3 = 234 m3
Advice! Also, when purchasing, you should take into account the noise emitted when the ventilation is on, which manufacturers indicate in decibels. Do not buy models that produce noise above 50 dB. There are practically silent hoods with two fans or one external. In addition, some models are equipped with a sound-absorbing casing.
Grounding and grounding
Before we tell you how to make a hood in the kitchen, it is worth mentioning electrical safety. Since a lot of grease splashes and moisture accumulates inside the cabinet, the risk of electric shock increases when incorrect connection hoods to the electrical network.
Therefore, a kitchen hood installed by yourself must be connected to the network with three wires: phase, ground and zero. The standard grounding wire has yellow with a green stripe. Before installation, please provide grounding for safe use electrical appliance.
If the house has a grounding loop and Euro-type sockets are installed, there will be no problems: when connecting, the wire is connected to the grounding terminal, which is indicated by strips of different lengths or the word Ground (GND). If your equipment does not have a grounding connector, you can make one yourself by screwing the wire to a metal part of the case.
 A Euro socket with connected grounding in Russia is found only in new apartments
 But many may not find Euro-sockets, and will wonder: how to connect a hood in the kitchen if there is no grounding? In this case, you can do the grounding yourself, but under no circumstances connect the neutral wire to pipes and batteries. You need to connect it to a dead neutral.
To do this, open the electrical panel with the meters and find a bricked-up pipe in the wall where the wires come from (be careful, the wires are 220V!), or a special bus, as shown in the photo. Most likely, you will find a ready-made pin on it and neutral wires already attached. This is a solid neutral, the pipe is perfectly grounded. You need to run a stranded wire with a cross-section of at least 2.5 mm2 from it to the kitchen, and connect the hood through a 6.3A automatic separator.
 Zero tire on the panel at the entrance
 Note! If there are already wires connected to grounding, then under no circumstances disconnect them! This may result in an electric shock. Throw your wire over someone else's and tighten the nut. If there are no wires and the pipe is smooth, strip it and secure the wire contact to the clamp. If you do not understand this matter, it is best to contact a professional electrician.
Ventilation in the apartment
 Diagram of a homemade anti-return box with valve
 Installation exhaust ventilation in the kitchen almost always disrupts the normal ventilation of the apartment. To install it, it is often recommended to punch an additional hole for air removal, but this will not solve all problems. The fact is that if you enlarge the window of the ventilation shaft, its cross-section will remain the same, so the quality of air exchange will not improve.
The way out of this situation is quite simple: it is the installation of an additional box with a clapper valve, the device of which is shown in the photo.
As you can see, there are 2 holes on the box. The valve is marked in red. When it is closed (in a horizontal position), air can easily escape through the window, providing natural ventilation to the kitchen.
When pressure arises during fan operation, the valve changes its position and closes the first window, thereby providing ventilation using an exhaust hood.
The main advantage of this connection scheme is the absence reverse thrust and maintaining natural ventilation when the hood is turned off.
The valve is adjusted using a weak and thin spring. In the diagram it is shown as a broken line. For the valve cover, a lightweight material such as aluminum or plastic is best.
Duct selection
There are several types of kitchen air ducts for household ventilation:
 The plastic air duct is more compact and inconspicuous
 - PVC plastic air ducts are durable, lightweight and silent, as they create almost no air resistance due to their smooth surface. There are both rigid narrow plastic boxes and elastic pipes.
- A corrugated aluminum pipe is a fairly simple material for DIY installation; it can be freely bent to fit right size. Another quality of corrugation is the absence of hum or vibration, unlike rigid boxes. However important drawback such an air duct is ugly appearance, so figure out where to hide the ventilation, for example, in.
Hood installation process
Of course, installing a kitchen hood with your own hands depends on its type and the location of the ventilation shaft. First, we will look at installation using the example of a built-in device in a cabinet.
Anti-return mechanism
 Anti-return valve will prevent air from returning back into the kitchen
 - If you decide to do everything conscientiously, then start by making a box for the firecracker. The body can be made of aluminum, galvanized sheet or tin according to the scheme given above. Or, to avoid hassle, just buy an anti-return valve that opens like a butterfly. It is placed in front of the ventilation shaft.
- For convenience, install the housing on a wall cabinet above the stove. Then secure it more tightly, sealing all the cracks polyurethane foam and gluing it to the cabinet to avoid resonance.
- First, just try on the body of the firecracker and make markings on the cabinet for the hole. After this, you can remove the cabinet from the wall and cut a hole for the frame in the bottom wall with a jigsaw. To do this, drill a hole inside the marking area with a large drill bit, then insert a jigsaw blade into it and begin cutting out the shape you want in the cabinet.
- Next, in the same way, make holes in the internal shelves (if any) for the air duct. In the upper wall you need to make a square hole with a margin of 3-5 mm for the firecracker.
Duct connection
- The next step is connecting the air duct. Insert the corrugation into the holes made, and in the upper wall of the cabinet give it the desired square shape. Trim the corrugation with a small margin, cut the corners and bend them outward.
- Now the corrugated cabinet can be hung on the wall. Don't forget to treat all duct joints silicone sealant so that power is not lost.
- Attach the homemade box to the cabinet so that it connects the corrugation to the ventilation shaft. We also glue it onto silicone, and large gaps seal with foam.
- After this, you can secure the hood in the cabinet. Screw it onto self-tapping screws, or onto dowels - if the mount is intended for a wall.
- Securely attach the corrugation to the hood and secure it with a clamp. It is not necessary to coat the joint with sealant at this point.
- If you connect the hood directly, then simply connect the air duct to the ventilation shaft. To conveniently dock them, use a special grille with a round hole, which is shown in the photo.
 Attaching the corrugation to the ventilation
 - When using PVC air ducts, the installation is similar: we simply connect the pipes with the component corners and carry them through to ventilation.
 Accessories for plastic air duct
 Advice! When installing ventilation, try to minimize the number of bends in the pipe so that the air draft remains sufficiently good. With each turn, power is lost by about 10%.
Wall mounting without cabinet
- Not everyone places wall cabinets above the stove, fearing their rapid deterioration from steam and high humidity. Moreover, wall cabinets are usually narrow, which does not allow wide hoods to be mounted inside. If there is no built-in fastening, then for this purpose a U-shaped frame made of corners on dowels is attached to the wall. This mount acts as a support for the body.
- How to install a kitchen hood if you can’t fix it to the wall with regular dowels? Such problems often arise among owners gas stoves when the pipe interferes with normal fastening.
- In this case, you can buy long plumbing self-tapping screws, which, on the one hand, look like a self-tapping screw, and on the other, have a thread with a nut. You simply screw them into the wall like dowels, and attach the hood body to them at the required distance from the wall.
 Mounting the hood next to gas pipe
 - Installing a hood in the kitchen - video instructions:
- And in the end, all that remains is to connect the hood to the network, through a socket, or with a permanent connection through a circuit breaker. Don't forget to connect the ground connection first; it will remove possible voltage from the case when the fans are running.
- If everything works, you can put on a decorative cap and rejoice fresh air when cooking!
Conclusion
About 2 times a year you need to clean the hood from burning to prevent fire. Now you know how to attach a kitchen hood and you can do it yourself without any problems. Please remember to follow the safety rules when electrical work, and if you are not good at them, it is better to invite an electrician.
While cooking food, fumes and various fumes rise from the stove to the ceiling. After some time, it becomes difficult to breathe in the room - this means that the polluted air is not drawn out well enough through the vent. Therefore, it is necessary to install a kitchen hood for forced air circulation. But first you need to decide what operating mode of the unit is required in your case, and then how to install the hood in the kitchen correctly.
Devices forced ventilation for the kitchen differ in operating mode. The units are:
- They pump contaminated air through a block of filters, consisting of a preliminary filter (for rough cleaning) and a carbon filter (for cleaning the air from odors). This unit does not require connection to ventilation duct, so in this case the installation will be the simplest. But, in terms of the quality of air purification in the room, this type of device is inferior to flow-through devices.
- effectively pump out polluted air from the room into a ventilation shaft or channel, which is discharged outside (if you install a hood in a private house).
Required device power

Connection neutral wire to dead neutral
There are several types of air ducts for domestic ventilation on sale:
- PVC (plastic) air ducts They have good strength and a light weight. Thanks to the smooth coating, they do not create noise when flows move along them.
- Aluminum corrugated the air duct bends freely, stretches and is easily adjusted to any size. It does not create vibration or hum, but has an unaesthetic appearance, therefore, it is usually hidden in a closet, a special box, or hidden by a suspended ceiling.
Before installing a hood in the kitchen, make sure that you do not cover the only standard vent in the room with a pipe. In the case of one vent, they often make another exit from the mine and place check valve, which will close the stream into it when the device is turned on.
There is also the option of using a special box with a clapper valve.

On the image installed valve has a red color. When the fans are turned off, it lies horizontally, and air can freely flow through the box naturally. When the fans are turned on, the valve rises and blocks the air outlet back into the room, thereby directing it into the shaft. The material can be some lightweight material, such as plastic or aluminum. But this option is not suitable if a built-in hood is installed, since it is mounted in a wall cabinet.
For private houses, the best option would be to punch an additional hole in the wall for the channel and not affect the existing vertical one. The air duct from the device must be routed into the additional hole. But at the output it must be installed check valve, preventing outside air from entering.

Check valve
If in ordinary apartment there is no additional channel, and punch a hole in external wall is not possible, then this channel can be expanded and a special adapter, having two holes.
Through the lower grille, air from the room enters the shaft due to natural draft. At the same time, there is a visor in the upper hole that prevents the air flow from the unit from escaping through the grille back into the room. Although there is of course a return leak, it is minimal compared to the outgoing flow.
The figure below clearly shows how the air duct is connected to the adapter, while maintaining natural draft.

Thus, installing a kitchen hood with your own hands is only possible for home craftsmen. Completing the task requires accuracy and attention. Well, for those who do not have the skills to use tools, or do not have free time, the best option would be to invite a specialist to resolve this issue.