How to make a homemade snowmobile from a friendship chainsaw. Do-it-yourself chainsaw snowmobile - instructions on how to make various chainsaws. The numbers on the diagram represent
With the onset of winter, especially snowy, there are problems associated with movement. Few people know that a snowmobile can be constructed from improvised means as an alternative means of transportation in winter conditions.
At the same time, there is no need for serious expenses. Moreover, in the presence of a large amount of snow, you won’t go far by car, but a snowmobile will allow you to move around in such conditions without any problems.
The assembly of any structure begins with the development of drawings. All the necessary units can be placed on them, after which you can proceed to the practical implementation of the idea. Therefore, at this stage, you should decide which brand of chainsaw is suitable for the implementation of your plan.
Choosing a chainsaw
In retail outlets, you can find several models of chainsaws. The most popular of them are the Druzhba chainsaw, the Ural chainsaw and the Shtil chainsaw. Before choosing, you should think carefully by comparing their specifications.
Chainsaw "Friendship"
This is the simplest chainsaw that can be used as a snowmobile engine. The result is an elementary design without anything superfluous.
The only drawback is the large weight with relatively low power. In addition, there are no parts for attaching safety covers to the structure. In addition, this design is outdated in all respects.
Specifications:
- Power - 1 kW;
- Weight - 12 kg;
- Engine (two-stroke);
- Tire length - 45 cm;
- Fuel (gasoline).
Chainsaw "Ural"

This is a specialized model that has greater reliability, power and less weight in relation to power. This is an environmentally friendly unit that can work in extreme conditions.
If you decide to use the Ural chainsaw, then this is a good choice. Her specifications fully comply with the declared.
Specifications.
- Power - 3.68 kW;
- Weight - 11.7 kg;
- Engine (petrol two-stroke);
- Overall dimensions - 46x88x46 cm;
Chainsaw "Calm"

It is also suitable for creating a snowmobile with your own hands. This is an environmentally friendly device, absolutely harmless to humans. The main advantage of the chainsaw is its low weight and quietness in operation, compared with the Ural chainsaw, and even more so when compared with the Druzhba chainsaw.
Do-it-yourself scheme for making a snowmobile from a Ural chainsaw

Schemes for assembling a snowmobile from a Ural chainsaw: 1 - steering wheel; 2 - fuel tank (from the Druzhba chainsaw; 3 - power unit (from the Ural chainsaw); 4 - steering ski stand bushing (pipe with a diameter of 30-2 pieces); 5 - steering ski (2 pieces); 6 - caterpillar drive gear (nylon, sheet s15, 2 pcs.); 7 - caterpillar (from the Buran snowmobile, shortened); 8 - frame; 9 - track roller (from potato sorting, 18 pcs.); 10 - brace back-limiter (pipe ½); 11 - stretching device caterpillars (2 pcs.); 12 - tension gear of the caterpillar (kapron, sheet s15, 2 pcs.); 13 - bearing No. 80204 in the housing (4 pcs.); 14 - box-trunk bottom-plywood s4, board board s20); 15 - seat (cover-plywood s4, foam rubber, leatherette); 16 - 1st stage of chain transmission; 17 - 2nd stage of chain transmission; 18 - seat back-limiter (pipe ½ inch); 19 - driven sprocket of the 1st chain drive (large sprocket of the creeper, intermediate shaft); z=38; 20 - drive sprocket of the 2nd stage of the chain drive (small sprocket of the creeper), z10; 21 - driven sprocket of the 2nd degree of the chain drive (drive sprocket of the caterpillar drive shaft), z18; 22 - drive sprocket of the 1st stage of the chain drive (sprocket of the gearbox output shaft), z12; 23 – steering knuckle lever; 24 - steering rod (2 pcs.); 25 - steering shaft with bipod; 26 - front axle beam (pipe with a diameter of 30); 27 - caterpillar drive shaft; 28 - track tension axle.
Without creating a diagram and drawing, it is unlikely that it will be possible to connect together the main units of the structure, such as:
- Engine;
- transmission;
- Skis and caterpillars.
To simplify the design process, you should take the caterpillar from the Buran all-terrain vehicle. If designed children's version, then skis will be enough.
Racks

steering ski: 1 - skid (kapron, sheet s20, from a children's snow scooter); 2 - spring (normally stretched, from the rear shock absorber of the moped); 3 - spring bearing; 4 - undercut (duralumin corner 20x20); 5 - spring cover (corner 35x35); 6 - fastening the spring to the cover (M8 bolt with washer); 7 - support lever (pipe 30x30); 8 - spring for fastening the rack - fork to the ski lever (steel, sheet s2); 9 - spring for attaching the support arm to the ski (steel, sheet s2); 10 - axles (M8 bolt, 2 pcs.); 11 – steering knuckle strut (bicycle steering strut with a crown and part of the fork); 12 – steering arm (steel, sheet s4); 13 - fastening of the steering arm (type M16); 14 - fastening the thrust bearing of the spring and the spring of the lever to the ski (M5 bolt with a countersunk head, 7 pcs.); 15 - lever bushing (steel pipe with a diameter of 30 mm); 16 - plain bearing (nylon bushing, 2 pcs.); 17 - stand bushing (steel pipe with a diameter of 30 mm). In the top view, the parts 11, 12, 13 of the steering knuckle are conventionally not shown.
Snowmobile racks can be made from 3x3 cm corners. They are connected to each other by steel jumpers. As a result, there is a relatively small portal. To create a platform, you need to take a sheet, 2 mm thick and connect it to the portal and the middle of the right side of the vehicle elements. This platform will serve as a place for attaching the chainsaw gearbox and chain drive shaft.
On the part of the rear portal and the middle of the snowmobile, a small place should be formed for the seat structure.
The front of the frame and the front axle traverse are connected by a beam. The usual beam acts as a beam water pipe, with a diameter of 1.5 cm. At the end of this pipe, steering ski bushings are attached by welding, and a rack is installed in the center. The stand will serve as a support for the motor subframe.
Particular attention should be paid to the attachment points of the racks. For greater reliability, the attachment points are reinforced with steel scarves, 2 mm thick. This approach will strengthen the vehicle and make it more reliable and durable.
Caterpillar

Snowmobile frame with track block: 1 - the rear part of the side member (steel sheet s2, with flanges, 2 pcs.); 2 - tension device (4 pcs.); 3 - rear portal (corner 30x30); 4 - the middle part of the spar (corner 50x63, 2 pcs.); 5 - bracket-fork for mounting the axis of the road wheels (steel sheet s2, 10 pcs.); 6 - middle portal (corner 30x30); 7 - platform for mounting the gearbox of the power unit and the intermediate shaft-creceler (steel sheet s2); 8 - scarves (steel sheet s2, 4 pcs.); 9 - front portal (corner 30x30); 10 - front component of the spar (steel sheet s2 with flanges); 11 - axis of tension gears; 12 - track tension gear (2 pcs.); 13 - the axis of the track rollers (steel, circle 10, 5 pcs.); 14 - axle mounting (M10 nut and spring washer, 20 pcs.); 15 - remote sleeve (duralumin pipe); 16 - skating rink (18 pcs.); 17 - bearing assembly (4 pcs.); 18 - caterpillar drive gear (2 pcs.); 19 - caterpillar drive shaft; 20 - drive sprocket of the drive shaft (driven sprocket of the 2nd degree of chain transmission), z=18; 21 - steering knuckle bushing of the steering ski (pipe with a diameter of 30 mm, 2 pcs.); 22 - front axle beam (pipe with a diameter of 30 mm); 23 - scarves, 4 pcs.; 24 - under-engine stand (pipe with a diameter of 30 mm); 25 - roller bandage (rubber ring, 18 pcs.).
To assemble a mini-version of a snowmobile, you can take the tracks from the old Buran and modify it, shortening it by almost a meter. Gears can be made from a sheet of nylon, 1.5 cm thick.
Drive shaft

Track drive shaft (the idler shaft is the same, only item 4, replaced by item 1): 1 - left (along the way) tip (steel, cylinder 22); 2 - shaft (steel pipe 0.28x20; 3 - flange for fastening the gear to the shaft (steel sheet s4, 2 pcs.); 4 - right (along the way) shaft tip (steel, cylinder 29); 5 - caterpillar drive gear (2 pcs.); 6 - frame spar, 2 pcs.); 7 - bearing housing cover (steel, 2 pcs.); 8 - bearing 80204 (2 pcs.); 9 - bearing housing (steel, 2 pcs.); 10 - drive shaft sprocket; 11 - fastening the sprocket to the shaft (M12 nut with wide and spring washers); 12 - key (steel 20); 13 - seal (felt, 2 pcs.); 14 - fastening of the bearing housing to the side member (bolt M6, with grover 4 sets); 15 - fastening of the bearing housing to the side member (M6 bolt with spring washer, 4 sets).
The drive shaft is made of a steel pipe with a diameter of 1.4 cm. Special flanges are attached to the shaft, to which gears are attached. At the end of the drive shaft, by welding, trunnion tips are mounted. The trunnions must be provided with a place for installing bearings.
Engine

This unit is considered the most responsible snowmobile mechanism. Compared to other structural elements, such as a tire or chain, the engine must work properly and without it the snowmobile will not even budge. Therefore, the long-term performance of the device will depend on the reliable and trouble-free operation of the engine. If you want to install an engine from a chainsaw, imported, then you can purchase a used "Calm".
Another important structural element on which the trouble-free operation of the snowmobile depends is the gearbox.
Asterisks

Immediately striking is the fact that the right handpiece has a keyway for installing and securing the chain sprocket. This is the track shaft sprocket, which is securely fastened with a nut. To make fastening possible, a corresponding thread is cut on the tip.
The tip of the tension shaft has the same dimensions, and the fastening of the structural elements is carried out similarly to the fastening of the caterpillar shaft sprocket.
The sprocket with the largest gear ratio (number of teeth) should be in the first gear stage. On the engine of the Ural chainsaw, 38 teeth can be counted.
Steering

On a homemade device, you can install a steering wheel of any design, and even from a bicycle. In this case, it is very important to bring manual engine speed control to the steering wheel. In order not to bother much, it is better to use the steering wheel from a moped, scooter, etc., where an engine power control mechanism is already provided. This will make the design more reliable and easy to manage.
Brake system
Usually, such a vehicle does not have a braking system, and it is not necessary, since the snowmobile does not develop high speeds, especially homemade. Although, if you take this problem seriously, you can build a primitive braking device.

It is immediately worth noting that homemade design, no matter what it is, it is unlikely that it will be possible to register (legitimize) with the relevant authorities. And therefore:
- According to the law, homemade snowmobile does not belong to the vehicle category. Therefore, its further application, as well as responsibility for the consequences, lies solely with the person who made it. It is better if it is operated somewhere in the outback and does not catch the eye of the relevant services.
- A snowmobile and a floating all-terrain vehicle are completely different vehicles, although they have a certain similarity.
- Since the engine has a low power, then transport this vehicle cargo is not desirable. Better to ride it alone.
- For movement at night, lighting (headlights) can be installed on the snowmobile. This will increase the functionality of the device and comfort when moving.
Conclusion

Due to the fact that most people do not have the skills to make any structures on their own, they find it quite difficult to assemble a snowmobile with their own hands. And if you manage to build something similar to a snowmobile, then it is unlikely to go, and if it does, it will stop very soon. And it will not look like a snowmobile at all, but like a pile of spare parts assembled together. Fortunately, this is not the case, and with the proper approach and level of imagination, you can assemble a similar design from improvised means, which are at least a dime a dozen in any garage. And if there is at least some experience with these spare and improvised materials, then the task is simplified altogether. The principle of desire is already beginning to operate here, and if it is not there, then it is unlikely that it will be possible to assemble anything at all, not to mention a snowmobile.
The fact that the problem is relevant in our time is not just a statement, but a conviction based on the problems of today. Unfortunately, the state does not meet the needs of a wide range of consumers, but has set a course for the production of only expensive equipment intended for sale to the consumer with money.
DIY snowmobile - Video
A chainsaw is a device that is most popular with craftsmen. It can be used as a kind of universal drive in order to produce a walk-behind tractor with my own hands. This tool perfectly combines important qualities:
1. Sufficiently solid power;
2. Light weight;
3. The most compact dimensions.
With the help of a chainsaw, you can create and aggregate winches, bicycles and other items.
A chainsaw allows you to make a wide variety of interesting designs with your own hands. For general activities, you will need knowledge in drawing, designing, and so on. These skills are important for the subsequent high-quality assembly, summarizing exact dimensions and just for a normalized workflow.
How to make a walk-behind tractor from a chainsaw with your own hands
Having small plots available, it is, in fact, unjustified to purchase a walk-behind tractor for big money. In addition to the direct device, you have to regularly buy other necessary elements:
1. Spare parts;
2. Additional equipment;
3. Lubricants;
4. Combustible substances.
That is why, in order to facilitate financial waste, it is worth trying to create a walk-behind tractor from a chainsaw on your own.
The direct active process begins with the manufacture of the frame. It has the shape of a cube with corners of 32 * 32 millimeters. The main engine is attached to the transverse upper frame corners. The fuel tank is mounted slightly lower on the brackets. The vertical racks of the foreground have intermediate shaft supports. In order to install running shaft bearings, it is necessary to connect specially designed supports to the longitudinal angles.

As a result of the entire process described above, an excellent walk-behind tractor with a center of gravity located above the wheel bearing surface is obtained. It is quite possible to use a metal weight on the front frame element. Using pipe bars with a diameter of thirty millimeters, you can get a wonderful manual control. A rubberized roller can become a material for the direct manufacture of wheels.
The do-it-yourself walk-behind tractor uses two specialized sprockets. One of them plays a leading role, and the second affects the intermediate shaft.
Do-it-yourself chainsaw walk-behind tractor
When creating a walk-behind tractor from a chainsaw of the Druzhba brand, it is necessary to use only locksmith skills. In this case, turning work is not needed. The usual high-speed mode of the created device in first gear will be equal to 2.5 kilometers per hour. In this case, the engine power is equal to four horsepower. For milling the soil, these indicators are quite enough.
In essence, the structural component of the walk-behind tractor is as simple and accessible as possible. A collar flange RU-32 is carefully mounted on the main shaft. It allows you to freely screw the gearboxes of the bridge type. It is quite possible to take it from the Uazovsky bridge. There, the diameter of the element in question is approximately thirty millimeters. In order to increase the total distance from the ground to the gear axle, it is necessary to use a two-row chain together with two sprockets from the VAZ vehicle. Timing stars allow you to increase the distance to the ground by a full fifteen centimeters.
The case-type bearings must be attached to the main axle. Direct bearings are endowed with an internal diameter of thirty millimeters. The moped motor from the Karpaty brand acts as a gearbox, as well as a gearbox. In this case, the centrifugal standard clutch is actively used. Chinese models of Delta mopeds are perfect for their chains and sprockets for installation on a walk-behind tractor.

The steel tube is mounted on the wheel axle or cutter.
A fully completed workflow will allow you to enjoy the created masterpiece.
The main advantages of a self-assembled walk-behind tractor are:
1. Complete absence of the requirement of lubricants;
2. Complete absence of the requirement of combustible materials;
3. Autonomous activity;
4. Use anywhere.
The chainsaw is a versatile device. Homemade chainsaws can be a real salvation for the owner of a summer house or a personal plot. To do this, you need to have only certain skills. manual labor and some technical knowledge. Everything that can be made from a chainsaw can almost completely meet the needs of the average summer resident in auxiliary mechanisms for a wide variety of work on the territory of his land. With your own hands, you can make a cultivator, a lawn mower, and a snow blower out of a chainsaw. But the first thing to make out of it is homemade walk-behind tractor.
Making a homemade walk-behind tractor
A walk-behind tractor from a chainsaw should be done first. The saw can act as universal drive, which combines small dimensions and weight with a fairly serious power. If you assemble a walk-behind tractor on its basis with your own hands, an attachment can be installed on it to perform a variety of agricultural work. This will require knowledge of disciplines such as design and drawing. With exact observance of dimensions, it is possible to assemble a home-made walk-behind tractor that is not inferior in its characteristics and capabilities to its factory-assembled counterparts.
The cubic shape of the frame is welded from steel corners measuring 32 by 32 mm. A chainsaw engine is suspended from the inside to the transverse corners of the top, and a gas tank is attached under it with brackets. Supports must be welded to the front vertical struts, on which the intermediate shaft will lie. On the longitudinal corners, you need to weld the same supports for fastening the bearings of the running shaft. From iron pipe a crossbar for manual control is welded with a diameter of 3 cm. You also need to install the drive sprocket and sprocket on the intermediate shaft, connected by a chain. All this can be taken from a moped or car. Rubberized rollers or wheels from a baby stroller are quite suitable as wheels. After that, a prefix for various purposes is attached to it.
On the basis of such a walk-behind tractor, you can make a simple motor-cultivator. Cultivating the soil in the country with good reason is considered the most tedious task, requiring time and effort. A chainsaw cultivator will reduce the time it takes to complete it and save energy. To do this, cutters are mounted on the axis of the walk-behind tractor on the sides. A structural addition should be the presence of a reduction gear, which V-belt transmission from the engine on one side, and on the other there is a chain to the drive shaft.
How to make a lawn mower out of a chainsaw
A unit such as a lawn mower can be considered the second most important after a walk-behind tractor, which can be made from a chainsaw with your own hands. And its value increases as the area of the summer cottage grows. To make it, the steering wheel and tire are removed from the working chainsaw. Then, from a steel corner 25 by 25 mm, a frame measuring 50 by 60 cm is welded, to the corners of which wheels from an old baby carriage are attached. And a cart handle is bent from a metal pipe to suit your height, which is bolted to the frame or welded. The motor gearbox is turned at a right angle so as to ensure that the shaft is at the bottom, and together with the motor is attached to the frame, for which the hole through which the tire was attached is used.
The steering wheel is attached to the handle, the “gas” cable and the gasoline supply hose are lengthened. After that, you can install cutting knives. To do this, a piece of steel pipe with a length of 8 and a diameter of 5 cm must be welded to the chainsaw sprocket. The same piece is put on it, but with a diameter of 5.8 cm, and connected with bolts and locknuts, which should be located opposite each other. An iron disk 4 mm thick and 18 cm in diameter is welded to the second pipe. 3 holes are drilled in it at the same distance through which the knives will be installed.
They are made from old linen. hand saw on wood. Holes are made in segments of this web at the same distance from the edges, through which they are attached to the disk with bolts and locknuts so that they freely rotate 360 °. When colliding with hard objects in the grass, this will allow them to avoid breakage. Such a lawn mower from a chainsaw can easily mow not only tall grass, but also small shrubs. If necessary, the chainsaw can be easily removed, put back the removed parts and use it for its intended purpose.
Making a snow blower
In the vast majority of the country's area, every visit to the dacha in winter leads to an urgent need to at least partially clear the territory of snow blockages. This brings the question of how to make a snow blower to the fore. A chainsaw snow blower is best made rotary. Making it is somewhat longer and more difficult, but in terms of efficiency, all other varieties lose to it. With a movable auger, it feeds a mass of snow onto a shovel, which throws it to the side through a pipe. The design must be such that in the event of failure, any of the parts can be easily replaced. The work is done as follows:
- To begin with, a box of the required dimensions is assembled from a metal sheet. A hole with a diameter of 160 mm is cut in it for connecting a pipe that removes snow.
- The screw shaft is made of a steel pipe, to which 2 steel blades 100 by 140 mm in size must be welded. On both sides of them, you need to screw 2 blades in the form of two-link spirals from sheet metal 2-3 mm thick. This shaft should consist of 2 halves, for which it is easiest to use a cut steel pipe. To mount this auger, you will need bearings of the appropriate diameter.
- To protect the driving auger and the electric motor, protective covers must be installed.
- The blades must be placed in the hole in the outlet pipe, and the auger itself inside metal box. To connect them, an asterisk from an old bicycle is quite suitable.
- The snow blower is equipped with a chainsaw as an engine and mounted on the main supporting frame, welded from steel corners.
- The chainsaw sprocket is connected by a chain to a gearbox, from which another chain drive goes to the auger shaft. To cover the mechanisms from snow, side screens made of thick plywood or OSB with a thickness of at least 10 mm are installed.
A snow blower from a chainsaw is best installed on skids from segments wooden beam that are attached to the sides. For better sliding on them, you can make nozzles from plastic boxes from electrical wiring. Such a device can greatly reduce the time required to clear the paths in a snow-covered area, and even a woman or a child can manage it.
Winch manufacturing
It is quite possible to manufacture such a useful device as a winch from a chainsaw. A support frame is welded from a steel corner, which has hooks and loops for fastening to a fixed base. A chainsaw motor is attached to it, which is connected to a gearbox. The gear shaft should be equipped for cable tension with a pulley, a cord belt that transmits torque to the coil. Such a winch is capable of developing a force of up to one and a half tons, and with its help you can lift weights or pull out a stuck car.
Conclusion
Homemade chainsaws on all of the above are not exhausted. Based on this simple and lightweight tool, you can make an engine for a snowmobile, a motor boat, or even a portable helicopter.
The main thing is that for this you do not need to make any global design changes to the chainsaw.
If necessary, by installing the removed parts, it can be restored to its previous functional purpose.
About a hundred people a week come to my blog from Yandex with such an interesting query "Homemade from a chainsaw." At first I did not give special significance this request, until the number of visitors looking for these same homemade products began to grow. It is clear that I have considered quite a lot of homemade products on my blog, but there is not a word about the chainsaw anywhere except for the article. But let's skip the wisdom of search indexing and return to our topic.

I thought, but really, what can be done from a chainsaw? Not with a chainsaw, but from itself. If you think about it, then the most useful detail in a chainsaw it is the engine. An engine is needed to move something, yeah. So the very first homemade is a means of transportation. A vehicle can be:
A - land with more than one wheel, common types of moped, tarantass, all-terrain vehicle, snowmobile.


B - a waterway water vehicle in the form of a variety of boats and ferries.


B is an air vehicle. This type of vehicle is generally limited to paragliders and small model aircraft. True, there are stories on the Internet about one prisoner who made a helicopter out of a chainsaw and even managed to fly over the prison fence on it, but this is more suitable for the MythBusters program. You and I are prudent people and we do not need unnecessary risk.


G - a space vehicle - such homemade chainsaws are not represented in the open spaces for obvious reasons.
So, we seem to be done with vehicles. For what else can you use the gasoline engine of our sawing tool. Naturally, for a cutting tool such as a mega grinder.

And I can assure you, this is not photoshop. Moreover, the idea turned out to be so popular that chainsaw manufacturers themselves began to produce attachments that turn their tools into cutting machines.

But a portable power plant cannot be called a tool. But if her ancestor was a chainsaw that passed through the hands of our Russian “Kulibin”, then you can’t definitely answer whether it’s a tool or not.

A chainsaw can be put to good use if you turn it into a pump. And what, for example, the basement was flooded with spring floods, the plugs were knocked out, there was no electricity. And then you take out your gasoline pump, chainsaw pump, and in no time and three liters of gasoline you drain the basement.

Another homemade (as it turned out, this is not homemade, but the brainchild of the Knight's Armament Company). By the way, it’s not domestic and it seems that in childhood he greatly outplayed DOOM2. So he didn’t leave much of a chainsaw at all, but look at what a nice toolbox he got, even with a grenade launcher. In general, men will appreciate. And thanks to our reader with a modest nickname oo for clarification!

This machine gun “from a chainsaw” has only a name and a similar layout of handles.
In general, this is a modification of the KAC Stoner 99 LMG. And it doesn’t smell like “homemade” here - Knight’s Armament Company is a serious arms company, albeit a private one.
This model was presented at the SHOT Show 2009 (this is an exhibition of equipment and equipment for hunting and shooting sports, and firearms in general).And the name "chainsaw" - Chainsaw - in this case, still beats the abbreviation SAW - Squad Automatic Weapon, found in the names of light machine guns (for example, M249)
As you can see, my dear reader, there are a lot of homemade chainsaws. But I, unfortunately, did not find out what exactly you were looking for. Perhaps my review will give you the idea to clarify your search query and you will find what you were looking for, even if on another site. If my review lacks any of the homemade products, write about it in the comments and I will expand my review to the delight of all readers.
And finally, I left one incredible homemade product. How can you use all the parameters of a chainsaw at 100%? What kind of homemade can be so great that it was given a name? Meet!

Tire sawmill Murka.
A snowmobile is a very necessary vehicle for residents of the northern latitudes of Russia. Not always road conditions allow you to drive close, for example, to a fishing place or to a remote village. Some purchase ready-made copies, while others make a homemade snowmobile. You can take an engine from a chainsaw, the power of which will be quite enough to move the entire structure at high speed. In addition, several people can be seated on it and a couple of suitcases can be stowed. How to make a homemade snowmobile with your own hands?
Saw selection
In fact, the brand of the engine is not important for such a device as a snowmobile. Is it an imported unit or a domestic one - it doesn’t matter, the main thing is that it pulls well. big difference meanwhile, whether a home-made snowmobile will be made from the Shtil chainsaw or the Russian Ural is practically non-existent.
How correct should it be?
The most critical element in this unit is the engine. All other details, such as a chain or a tire, do not play a significant role in the design of such a vehicle, so the main thing is to keep track and control the operation of the motor. If it is serviceable, the snowmobile will always be on the move. If you decide to take the engine from imported chainsaws, you may not purchase a new machine under warranty in the store. A used version is fine too.
The only part in a chainsaw that must also be in working order along with the engine is the gearbox. It will also help us in our work.

We make a chainsaw "Ural": drawings
You should also take care of the diagrams. On paper, you need to draw the location of such important components and assemblies as:
- Engine.
- Transmission.
- Skiing.
- Caterpillar.
You can not design the last part from scratch, but take the old one from the Buran snowmobile. The same applies to skis - tools from a children's snow scooter are quite suitable.
How to make a homemade snowmobile from a chainsaw?
First, we make a frame. Here we need several 50 x 36 millimeters and two steel plates 2 mm thick each. To stiffen the sheets, it is necessary to wrap the edges at an angle of 90 °. Make through holes in each of the plates. In the front, it is needed under the drive caterpillar shaft, and in the rear - under the axis of the idler gears. Latest Devices must be mounted at both ends of the spar.
From below, weld several additional brackets to the frame, observing equal intervals between their location. Mount the axle of the track rollers in the grooves open from the bottom side. There should be 18 rollers in total. They should be placed on 5 axes (in the center in a checkerboard pattern). Rollers can be made of nylon and "shod" in rubber tires. Can go over simple way and take the finished part from the potato sorter.
The axle of the rollers can be borrowed from a potato digger. Their ends need to be released a little. This is done so that the axes can be machined and threaded to 10 mm. When making a homemade snowmobile from a chainsaw, do not forget about the remote bushings. They should be placed directly on the axes of the unit. It is best to take bushings from a duralumin pipe. Next, the axles are fixed with fixing bolts or locknuts. By the same principle, a home-made snowmobile is assembled from the Druzhba chainsaw.
Racks
At the next stage, 3 racks made of a steel corner must be welded to the spar. Most the best option corners measuring 30 x 30 mm will serve. They also need to be connected steel crossbars. So the design will form a small portal. Make a platform between its front part and the middle on the right side - weld a 2 mm steel sheet. After that, place the chainsaw gearbox and the intermediate chain drive shaft here.
In the place between the rear portal and its middle part, you can install a box. What for? It will serve as a support for the seat, which must be welded there at the final stage.
The front of the frame must be connected to the front axle cross member. As a beam, you can use an ordinary water pipe with a diameter of at least 30 mm.
Weld steering ski bushings to the ends of this pipe. In the middle of the beam, attach a rack that will serve as a motor subframe. All these parts must also be made from a pipe, and at the joints on the uprights and the beam, gussets from a 2 mm steel sheet should be additionally welded. So the design will become strong and, accordingly, reliable.
Caterpillar
Those who made homemade mini-snowmobiles from chainsaws take tracks from the old Buran. However, in order for it to function normally, it needs to be shortened a little (by 500 mm) and sewn with a transport tape. make from a 15 mm nylon sheet.
Drive shaft
It will be tubular type with a diameter of 28 mm. It should be put on a round flange with holes for gears. Press and weld full-bodied trunnions into the ends of the drive shaft. The latter must be machined for bearings.
It should be noted that the left tip should be slightly shorter than the right one. On the extension, make a keyway for landing the driven star of the second stage of the chain drive. This part is also called the track drive sprocket and is secured with a 14mm nut. Previously, an appropriate thread should be made on this part.
The dimensions of the tips of the tension shaft must be the same and fastened in the same way as the drive devices.

About the engine
It is best to make a homemade snowmobile from the Ural or Druzhba chainsaw. Although the imported "Calm" is also suitable (although it costs as much as 5 of our domestic devices). So, how to make a homemade snowmobile? The power unit must be fixed on the engine stand, on which the gas tank should then be placed. The whole structure is welded to the cross beam. As for the gearbox, it will be deployed 180 o in opposite side and fixed together with the "creeler" on the site of a two-stage chain transmission. The latter is the entire gearbox.
Asterisks
The driven star of the first gear stage must have the largest number teeth. On the engines of the chainsaw "Ural" given value is exactly 38 pieces. The second stage drive sprocket has 10 teeth. The step of these devices is the same - 15.875 mm. By the way, the same step is installed on the Minsk motorcycle.
![]()
Steering
It will consist of support-steering skis and be connected by rigid rods to the steering shaft bipod. The steering wheel itself can be taken from any Soviet motorcycle. The main thing is that it should be 3-lever. Install a shifter near the right handle - a small lever that performs the same functions as the gas pedal on a car.
It doesn’t matter if you are making a homemade snowmobile from a Stihl or Ural chainsaw, there should be a shifter, as it is an integral part in the design of this unit.
Brake system
It is not necessary to install it, since in most cases a homemade snowmobile from a chainsaw does not develop high speeds and stops by itself. However, for safety, you can make brakes, but this will significantly complicate its design.
At all times there were "Kulibins" who could make something truly innovative and useful out of ordinary things. In the event that there are no ideas in your head, and the desire to do something with your own hands does not give rest, then you can start with the already existing and proven developments. Do-it-yourself homemade chainsaws are perfect for this. Especially for those who are not used to sitting idly by, our editors have prepared a review with detailed photos and video instructions on how and what you can make from an old chainsaw.
Not sure how best to use a chainsaw? Read site recommendations
Read in the article
What and how can be made from a chainsaw with your own hands
The chainsaw is a versatile machine. The size of the tool is small, but the power of the motor allows you to use it for almost any purpose. The "Rotor Heart" will feel great when transplanted into an ice ax or any other device where an autonomous drive is needed. Let's take a closer look at some know-how.
How to make a snow blower from a chainsaw
If you have a chainsaw and parts from an old car, then you can start designing. Typically, a rotary drive is used to drive the screw. This is a special shaft designed in a special way to collect snow.
| Illustration | Action Description |
 | As the main shaft, we use rods from the front pillars of the VAZ 2110, welded together. |
 | To connect the joints, we use just such a coupling. |
 | These are sheets for welding auger blades. Size - 140 × 100 mm, traditional thickness - 2 mm. |
 | For the drive, you can adapt a star from the Voskhod motorcycle. The back of the part is welded with a prepared 5 mm metal disc. With a hole made for the diameter of the shaft. |
 | This is what the details looked like before. |
 | We make the blades of the auger from a metal sheet of 2 mm. To do this, a circle is cut out on the outside with a diameter of 300 mm, and inside - 220 mm, and stretched from the star to the shoulder blade. |
 | We cook the frame from the same "two" and bearing strips with a radius of 160 mm. |
 | We bend the body from a sheet of 1 mm. We weld with sidewalls. |
 | This is the screw we ended up with. |
 | The diameter of the hole for the "ejector" of snow is 160 mm. For the rotary mechanism, you can use a plastic pipe. |
 | But the gutter itself is best made from a galvanized sheet of 0.75 mm. |
 | We remove everything superfluous from the saw, clean it, paint it black. We disassemble the saw star. |
 | We clean all the details, center, weld the star from the Java motorcycle. |
 | The chainsaw engine is laid on rubber cushions. |
 | We put the frame for mounting the motor on the shock absorbers. |
 | We paint the whole structure and do a test run. Everything works! |
Do-it-yourself chainsaw snowmobile
To make a homemade snowmobile from a chainsaw, you will need some factory-made parts (for example, a gas cable to the steering wheel) and a children's snow scooter.
| Illustration | Action Description |
 | To create a snowmobile from the Druzhba-4 chainsaw, we need a children's snow scooter. |
 | To create a caterpillar, take 25 polypropylene pipe, cut off by 20 cm, cut in half lengthwise. |
 | As a tape for a caterpillar, you can take old tire from a car tire. |
 | In our work we use sprockets of the MHC elevator drive. |
 | Further, in this way, with the help of screws and prepared plastic pipes create our caterpillar. |
 | We begin to assemble the drum with the shaft. |
 | We fix the plastic stars and the Karpatka driven from the moped. |
 | We take tensioner rollers from the Ryazanets potato harvester. |
 | The next step is to manufacture track tensioners and the frame itself. |
 | We install the chainsaw on the frame, and now you know how to make a snowmobile out of a chainsaw. |
 | We remove the plastic from the snow scooter and modify the frame, attach the "motorized dog". |
 | The connections are fastened like a rear fork, like on a motorcycle, only without shock absorbers. |
Homemade chainsaw sawmill
Craftsmen offer dozens different options how to "adapt" a chainsaw for. Most often, such structures require a frame to be connected to install a “carriage” under or a so-called tire. As guides, improvised tools are used, for example, an ordinary ladder.

The most important thing is to firmly weld the frame, controlling yourself by level. Rivne and solid foundation help to avoid distortions and vibrations during operation. Consider also at what distance and height the chainsaw will be fixed. The durability of its work depends on this. Carriage attachment too close to working area will lead to clogging of the chain mechanisms and failure of the motor.
If you do not plan to cut large logs, you can make a manual version of the sawmill. More in this video.
How to make an ice drill from a chainsaw with your own hands - diagrams
The drill is an indispensable thing for those who know how and love to work around the house: it is used when construction work, installing supports for the vineyard, and, as well as ice fishing to prepare holes.
To make an ice drill from a chainsaw with your own hands, you need a diagram and the following devices:
- Chainsaw motor.
- Gearbox for a chainsaw for a drill.
- Boer himself.
- Metal pipe.
- Drill.
The most important thing is to choose the right gearbox for the motor, make necessary calculation compatibility of their characteristics. The chainsaw motor may be too "frisky" for a simplified gearbox design.

The first thing to do, if you put aside the humor and take the task seriously, is to determine the dimensions of the input shaft and choose the correct mounting points for the drive gear. Fixation around the perimeter is best done with studs and dowels. Such a mount will simplify the process of changing nozzles in the future. If you do not have the skills of a turner, then a turner and our schemes will help you make a special adapter for the auger auger.

Do-it-yourself boat motor from a chainsaw
It can be expensive to buy a ready-made sample of a boat motor, and if you have an old motor from the Druzhba chainsaw lying around and you are friends with and, then making such a homemade product is not difficult.
| Illustration | Action Description |
 | Remove the clutch and tire from the chainsaw. Only a shortened crosspiece remains. |
 | On the rod we make a groove under this cross, put the bearing. |
 | Below we also install bearings, the clamps are taken from the Soviet outboard motor. |
 | From the grinder we take a 250 gearbox, screw and keel. Everything is fixed on silicone with additional glands. Transmission grease is filled inside. |
 | And the water engine is mounted on the base with a slight movement of the hand along the guides, the structure is fixed with standard nuts. |
Among the main advantages of homemade products are high power, which provides a decent speed of movement across the water surface, and economical consumption of fuel material. For an hour, a homemade chainsaw consumes 1 liter of gasoline at a speed of 20 km / h.
How to make a moped from a chainsaw and a bicycle
For manufacturing you will need:
- chainsaw;
- old hand winch;
- a rigid frame on which everything will be installed;
- two sprockets and a durable motorcycle chain to transfer torque from the saw engine to the gear of the gearbox.
Options for attachments for a chainsaw with a winch function: 


If you have not yet found a homemade option for yourself, read further in the review of our editors what else can be done from the Druzhba chainsaw.
How to make a motor drill from a chainsaw with your own hands
Consider the option of assembling a nozzle on a chainsaw using a part from a conventional drill.
| Illustration | Action Description |
 | We disassemble the electric drill, dismantle the working gearbox. |
 | We bore the anchor from the drill, from the parts of the sleeve and the head we weld the structure, which will transmit the rotation to the shaft. |
 | We make the mount for the gearbox from a piece of metal and a pipe. |
 | The design is fixed to the saw body with two bolts. |
 | This is what it looks like finished construction bushing gearbox. |
 | We insert a drill into the sleeve, it will continue to transmit torque to the drill. |
By the same principle, it is also made from a chainsaw, only a plow is used as an additional device for it.
Do-it-yourself petrol cutter from a chainsaw

However, such models will cost much more. homemade nozzle, which you can do with your own hands.
| Illustration | Action Description |
 | We disassemble the electric drill, the main task is to remove the asterisk, which will be replaced by a pulley in the future. |
 | We put the pulley, bearing and plate. After that, install the "native" clutch. |
 | In order to fix the piston in a dead center and facilitate the assembly and disassembly of the pulley, you can use a regular cord with knots. |
 | Next, install the starter and close the lid, you just have to attach the nozzle with the disk. |
A homemade gas cutter is much more powerful than a grinder. It can be used for cutting metal pipes large diameter, as well as their polishing.
RC car powered by a chainsaw
If your child really wants a radio-controlled car, but what is sold in the store, he considers a toy "for girls", you can try to make a real racing car with a chainsaw engine.
| Illustration | Action Description |
 | We get such a piston, we assemble a carburetor. |
 | They took a ready-made racing car as a basis. |
 | Our task is to make the drive and exhaust pipe and ensure that stones or bolts do not get into the piston. |


In winter, movement is difficult, because you need a universal transport to drive through snowdrifts. Using improvised means, you can begin to design a snowmobile. With the right approach, a homemade snow scooter will become indispensable assistant in winter.
You can start assembling the structure after the development of drawings. The reliability of the future vehicle depends on their accuracy.
You can make a snowmobile using one of the chainsaws as a basis:
- Friendship. Acts as a power plant. It will turn out a simple device without unnecessary details. Such transport will have a fairly large mass with little power, and there are also no safety covers. The saw engine has a power of 1 kW, runs on gasoline. Tool weight 12 kilograms;
- Ural. More reliable option with more power and less weight. The tool is environmentally friendly, works even when sub-zero temperatures. Two-stroke saw motor with a power of 3.6 kW. Tool weight 11.7 kilograms;
- Calm. The advantage of this saw is its environmental friendliness and low noise level.
Having decided on a chainsaw, you can take up the design of a snowmobile machine. 
The design consists of the following parts:
- Rudder;
- Fuel tank;
- The power plant of the petrol tool;
- Steering ski rack bushings (two pipes with a diameter of 30 cm);
- Control ski;
- caterpillar gear;
- caterpillar track;
- Support base;
- Track roller;
- Brace back-limiter;
- Track tensioner;
- Track tension gear;
- bearing;
- trunk;
- driver's seat;
- 1st part of chain transmission;
- 2nd part of chain transmission;
- Driver's seat back holder;
- Driven sprocket 1st gear;
- Leading sprocket 2nd gear;
- Sprockets for the 2nd stage of the chain drive;
- Sprockets for the 1st stage of the chain drive;
- Steering arm;
- Traction steering rack;
- Bipod with steering shaft;
- Front axle beams;
- Caterpillar mount shaft;
- Axes of a tension of a caterpillar tape.
How to make a snowmobile from a chainsaw?
The manufacturing scheme and drawings will allow you to correctly connect the power plant, transmission, lizh or caterpillar. There is no need to make the latter yourself - they will fit from Buran. And for children's transport, an ordinary ski track is quite enough.
Sequence of work:
- Frame. Spot welding connects a sheet of steel of two millimeters in the middle of the structure. It will house the gearbox and chain drive shaft;
- Also in the middle is mounted a small module under the operator's seat;
- The front of the support base and the traverse of the front axle are fastened with a beam. For the connecting element, you can take a water pipe with a diameter of 1.5 centimeters or more. At the end of the pipe, weld the bushings under the steering wheel, mount the rack in the middle;
- Rack. Suitable steel corners 3 * 3 centimeters. They are connected by steel crossbars - scarves of two millimeters, which ensure the reliability and durability of the structure. The stand is needed to secure the motor;
- Caterpillar. Using the finished element from Buran, you need to cut the workpiece by 0.5 meters. The transport tape fixes the finished caterpillar. For the manufacture of gears, sheets of cardboard 1.5 centimeters are suitable;
- Drive shaft. Suitable pipe 1.4 centimeters thick. The upper flange fixes the gear wheels. Behind the drive shaft, trunnion tips are welded;
- Motor. A snow scooter with a chainsaw engine, so the installation itself must be serviceable. Even an old gas tool requires competent maintenance and use. The gearbox must work without interruption. The power of such a snowmobile is not enough to transport goods and more than one person;
- Asterisks. The right tip will be longer than the left. The elongation is necessary for the production of a keyway that fixes the chain star. The nut with the necessary thread pre-made on it secures the caterpillar shaft sprocket;
- Steering. Suitable steering wheel from a scooter or a bicycle. The main thing, correct installation- the central axis should be able to adjust the traction force to be able to control the skis and, accordingly, move easily;
- Brake and lights. There is no special need for a braking system, since the vehicle does not pick up high speed. To travel at night, you can install simple system lighting.
 A self-made design is not registered, therefore it is worth using the vehicle away from public roads.
With the onset of winter, especially snowy, there are problems associated with movement. Few people know that a snowmobile can be constructed from improvised means as an alternative means of transportation in winter conditions.
At the same time, there is no need for serious expenses. Moreover, in the presence of a large amount of snow, you won’t go far by car, but a snowmobile will allow you to move around in such conditions without any problems.

The assembly of any structure begins with the development of drawings. All the necessary units can be placed on them, after which you can proceed to the practical implementation of the idea. Therefore, at this stage, you should decide which brand of chainsaw is suitable for the implementation of your plan.
Choosing a chainsaw
In retail outlets, you can find several models of chainsaws. The most popular of them are the Druzhba chainsaw, the Ural chainsaw and the Shtil chainsaw. Before choosing, you should think carefully by comparing their technical characteristics.
Chainsaw "Friendship"

This is the simplest chainsaw that can be used as a snowmobile engine. The result is an elementary design without anything superfluous.
The only drawback is a lot of weight with relatively low power. In addition, there are no parts for attaching safety covers to the structure. In addition, this design is outdated in all respects.
Specifications:
- Power - 1 kW;
- Weight - 12 kg;
- Engine (two-stroke);
- Tire length - 45 cm;
- Fuel (gasoline).
Chainsaw "Ural"

This is a specialized model that has greater reliability, power and less weight in relation to power. This is an environmentally friendly unit that can work in extreme conditions.
If it is decided to use the Ural chainsaw, then this a good choice. Its technical characteristics are fully consistent with those declared.
Specifications.
- Power - 3.68 kW;
- Weight - 11.7 kg;
- Engine (petrol two-stroke);
- Overall dimensions - 46x88x46 cm;
Chainsaw "Calm"

It is also suitable for creating a snowmobile with your own hands. This is an environmentally friendly device, absolutely harmless to humans. The main advantage of the chainsaw is its low weight and quietness in operation, compared with the Ural chainsaw, and even more so when compared with the Druzhba chainsaw.
Do-it-yourself scheme for making a snowmobile from a Ural chainsaw

Schemes for assembling a snowmobile from a Ural chainsaw: 1 - steering wheel; 2 - fuel tank (from the Druzhba chainsaw; 3 - power unit (from the Ural chainsaw); 4 - steering ski stand bushing (pipe with a diameter of 30-2 pieces); 5 - steering ski (2 pieces); 6 - caterpillar drive gear (nylon, sheet s15, 2 pcs.); 7 - caterpillar (from the Buran snowmobile, shortened); 8 - frame; 9 - track roller (from potato sorting, 18 pcs.); 10 - brace back-limiter (pipe ½); 11 - track tensioner (2 pcs.); 12 - track tension gear (kapron, sheet s15, 2 pcs.); 13 - bearing No. 80204 in the housing (4 pcs.); 14 - box-trunk bottom-plywood s4, board board s20); 15 - seat (cover-plywood s4, foam rubber, leatherette); 16 - 1st stage of chain transmission; 17 - 2nd stage of chain transmission; 18 - seat back-limiter (pipe ½ inch); 19 - driven sprocket of the 1st chain drive (large sprocket of the creeper, intermediate shaft); z=38; 20 - drive sprocket of the 2nd stage of the chain drive (small sprocket of the creeper), z10; 21 - driven sprocket of the 2nd degree of the chain drive (drive sprocket of the caterpillar drive shaft), z18; 22 - drive sprocket of the 1st stage of the chain drive (sprocket of the gearbox output shaft), z12; 23 – steering knuckle lever; 24 - steering rod (2 pcs.); 25 - steering shaft with bipod; 26 - front axle beam (pipe with a diameter of 30); 27 - caterpillar drive shaft; 28 - track tension axle.
Without creating a diagram and drawing, it is unlikely that it will be possible to connect together the main units of the structure, such as:
- Engine;
- transmission;
- Skis and caterpillars.
To simplify the design process, you should take the caterpillar from the Buran all-terrain vehicle. If a children's version is being designed, then skis will be enough.
Racks

steering ski: 1 - skid (kapron, sheet s20, from a children's snow scooter); 2 - spring (normally stretched, from the rear shock absorber of the moped); 3 - spring bearing; 4 - undercut (duralumin corner 20x20); 5 - spring cover (corner 35x35); 6 - fastening the spring to the cover (M8 bolt with washer); 7 - support lever (pipe 30x30); 8 - spring for fastening the rack - fork to the ski lever (steel, sheet s2); 9 - spring for attaching the support arm to the ski (steel, sheet s2); 10 - axles (M8 bolt, 2 pcs.); 11 – steering knuckle strut (bicycle steering strut with a crown and part of the fork); 12 – steering arm (steel, sheet s4); 13 - fastening of the steering arm (type M16); 14 - fastening the thrust bearing of the spring and the spring of the lever to the ski (M5 bolt with a countersunk head, 7 pcs.); 15 - lever bushing (steel pipe with a diameter of 30 mm); 16 - plain bearing (nylon bushing, 2 pcs.); 17 - stand bushing (steel pipe with a diameter of 30 mm). In the top view, the parts 11, 12, 13 of the steering knuckle are conventionally not shown.
Snowmobile racks can be made from 3x3 cm corners. They are connected to each other by steel jumpers. As a result, there is a relatively small portal. To create a platform, you need to take a sheet, 2 mm thick and connect it to the portal and the middle of the right side of the vehicle elements. This platform will serve as a place for attaching the chainsaw gearbox and chain drive shaft.
On the part of the rear portal and the middle of the snowmobile, a small place should be formed for the seat structure.
The front of the frame and the front axle traverse are connected by a beam. An ordinary water pipe with a diameter of 1.5 cm acts as a beam. At the end of this pipe, steering ski bushings are attached by welding, and a rack is installed in the center. The stand will serve as a support for the motor subframe.
Particular attention should be paid to the attachment points of the racks. For greater reliability, the attachment points are reinforced with steel scarves, 2 mm thick. This approach will strengthen the vehicle and make it more reliable and durable.
Caterpillar

Snowmobile frame with track block: 1 - the rear part of the side member (steel sheet s2, with flanges, 2 pcs.); 2 - tension device (4 pcs.); 3 - rear portal (corner 30x30); 4 - the middle part of the spar (corner 50x63, 2 pcs.); 5 - bracket-fork for mounting the axis of the road wheels (steel sheet s2, 10 pcs.); 6 - middle portal (corner 30x30); 7 - platform for mounting the gearbox of the power unit and the intermediate shaft-creceler (steel sheet s2); 8 - scarves (steel sheet s2, 4 pcs.); 9 - front portal (corner 30x30); 10 - front component of the spar (steel sheet s2 with flanges); 11 - axis of tension gears; 12 - track tension gear (2 pcs.); 13 - the axis of the track rollers (steel, circle 10, 5 pcs.); 14 - axle mounting (M10 nut and spring washer, 20 pcs.); 15 - remote sleeve (duralumin pipe); 16 - skating rink (18 pcs.); 17 - bearing assembly (4 pcs.); 18 - caterpillar drive gear (2 pcs.); 19 - caterpillar drive shaft; 20 - drive sprocket of the drive shaft (driven sprocket of the 2nd degree of chain transmission), z=18; 21 - steering knuckle bushing of the steering ski (pipe with a diameter of 30 mm, 2 pcs.); 22 - front axle beam (pipe with a diameter of 30 mm); 23 - scarves, 4 pcs.; 24 - under-engine stand (pipe with a diameter of 30 mm); 25 - roller bandage (rubber ring, 18 pcs.).
To assemble a mini-version of a snowmobile, you can take the tracks from the old Buran and modify it, shortening it by almost a meter. Gears can be made from a sheet of nylon, 1.5 cm thick.
Drive shaft

Track drive shaft (the idler shaft is the same, only item 4, replaced by item 1): 1 - left (along the way) tip (steel, cylinder 22); 2 - shaft (steel pipe 0.28x20; 3 - flange for fastening the gear to the shaft (steel sheet s4, 2 pcs.); 4 - right (along the way) shaft tip (steel, cylinder 29); 5 - caterpillar drive gear (2 pcs.); 6 - frame spar, 2 pcs.); 7 - bearing housing cover (steel, 2 pcs.); 8 - bearing 80204 (2 pcs.); 9 - bearing housing (steel, 2 pcs.); 10 - drive shaft sprocket; 11 - fastening the sprocket to the shaft (M12 nut with wide and spring washers); 12 - key (steel 20); 13 - seal (felt, 2 pcs.); 14 - fastening of the bearing housing to the side member (bolt M6, with grover 4 sets); 15 - fastening of the bearing housing to the side member (M6 bolt with spring washer, 4 sets).
The drive shaft is made of a steel pipe with a diameter of 1.4 cm. Special flanges are attached to the shaft, to which gears are attached. At the end of the drive shaft, by welding, trunnion tips are mounted. The trunnions must be provided with a place for installing bearings.
Engine

This unit is considered the most responsible snowmobile mechanism. Compared to other structural elements, such as a tire or chain, the engine must work properly and without it the snowmobile will not even budge. Therefore, the long-term performance of the device will depend on the reliable and trouble-free operation of the engine. If you want to install an engine from a chainsaw, imported, then you can purchase a used "Calm".
Another important structural element on which the trouble-free operation of the snowmobile depends is the gearbox.
Asterisks

Immediately striking is the fact that the right handpiece has a keyway for installing and securing the chain sprocket. This is the track shaft sprocket, which is securely fastened with a nut. To make fastening possible, a corresponding thread is cut on the tip.
The tip of the tension shaft has the same overall dimensions, and the fastening of the structural elements is carried out similarly to the fastening of the caterpillar shaft sprocket.
The sprocket with the largest gear ratio (number of teeth) should be in the first gear stage. On the engine of the Ural chainsaw, 38 teeth can be counted.
Steering

On a homemade device, you can install a steering wheel of any design, and even from a bicycle. In this case, it is very important to bring manual engine speed control to the steering wheel. In order not to bother much, it is better to use the steering wheel from a moped, scooter, etc., where an engine power control mechanism is already provided. This will make the design more reliable and easy to manage.
Brake system
Usually, such a vehicle does not have a braking system, and it is not necessary, since the snowmobile does not develop high speeds, especially homemade. Although, if you take this problem seriously, you can build a primitive braking device.

You should immediately pay attention that a home-made design, no matter what it is, is unlikely to be registered (legalized) with the relevant authorities. And therefore:
- According to the law, a homemade snowmobile does not belong to the category of vehicles. Therefore, its further application, as well as responsibility for the consequences, lies solely with the person who made it. It is better if it is operated somewhere in the outback and does not catch the eye of the relevant services.
- A snowmobile and a floating all-terrain vehicle are completely different vehicles, although they have a certain similarity.
- Since the engine has low power, it is not advisable to transport goods with this vehicle. Better to ride it alone.
- For movement at night, lighting (headlights) can be installed on the snowmobile. This will increase the functionality of the device and comfort when moving.
Conclusion

Due to the fact that most people do not have the skills to make any structures on their own, they find it quite difficult to assemble a snowmobile with their own hands. And if you manage to build something similar to a snowmobile, then it is unlikely to go, and if it does, it will stop very soon. And it will not look like a snowmobile at all, but like a pile of spare parts assembled together. Fortunately, this is not the case, and with the proper approach and level of imagination, you can assemble a similar design from improvised means, which are at least a dime a dozen in any garage. And if there is at least some experience with these spare and improvised materials, then the task is simplified altogether. The principle of desire is already beginning to operate here, and if it is not there, then it is unlikely that it will be possible to assemble anything at all, not to mention a snowmobile.
The fact that the problem is relevant in our time is not just a statement, but a conviction based on the problems of today. Unfortunately, the state does not meet the needs of a wide range of consumers, but has set a course for the production of only expensive equipment intended for sale to the consumer with money.
DIY snowmobile - Video
Often, excessive rainfall in winter blocks any movement of transport. However, in this case, you should not be upset - after all, you can make a snowmobile from a chainsaw with your own hands, and enjoy riding in a snowy area. Let's study the design of the unit and its algorithm step by step manufacturing at home.
The principle of making a snowmobile from a chainsaw
The design of a homemade snowmobile from a chainsaw is not difficult. However, to avoid possible errors in its manufacture, you will need to prepare and study the procedure. A snow scooter with a chainsaw motor is made in the following order:
- First, you need to install and secure the chainsaw engine on the snowmobile frame;
- Then, elements of movement are attached to the front of the unit - one or two skis;
- A control mechanism is mounted on the snowmobile frame - steering wheel or handles;
- At the rear of the chainsaw snowmobile, you will need to install caterpillars that will set the unit in motion;
- The drive disk from the caterpillar design must be connected to the chainsaw engine sprocket;
- At the end, you will need to install a wooden or steel case on the motor, and on top of it - a driver's seat.
Some components can be made with your own hands, but there are also those elements that are best bought in ready-made form - this will save a lot of time and effort. It is better to take a caterpillar and skis for a homemade snowmobile from a chainsaw from the old Soviet Buran unit.
As controls, a steering wheel from an old bicycle or moped is suitable. When mounting the steering wheel on a snowmobile from a chainsaw, you will need to fix it in such a way that when you turn the axis in the center of the steering wheel, the skis turn by moving the snowmobile rods.
Scheme for making a homemade snowmobile from a chainsaw
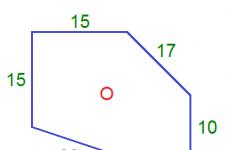
To make a snowmobile from a chainsaw, you will definitely need a plan by which you will navigate in all your next steps. The diagram does not have to be detailed, you can draw it by hand and use it in your work. The most important thing is that you understand it well. Below is an exact diagram of a homemade chainsaw snowmobile with the numbering and decoding of its main parts. 
The numbers on the diagram are:
- 1 – steering wheel;
- 2 - tank for filling the fuel mixture;
- 3 - engine from an improvised chainsaw;
- 4 - steering rack sleeve;
- 5 - steering ski;
- 6 - caterpillar gear for driving a snowmobile;
- 7 - shortened caterpillar;
- 8 – base frame of the unit;
- 9 - support roller;
- 10 - brace restrictive back;
- 11 – caterpillar tension mechanism;
- 12 - caterpillar tension gear;
- 13 - bearing inside the housing;
- 14 - luggage compartment in the form of a box;
- 15 - seat for the driver;
- 16 - the first part of the transmission;
- 17 - the second part of the transmission;
- 18 - limiter for the back of the driver's seat;
- 19 - driven sprocket for first gear;
- 20 - an asterisk that drives the second chain drive;
- 21 - driven sprocket of the second gear;
- 22 - an asterisk that activates the first gear;
- 23 - lever for steering knuckle control;
- 24 - thrust steering rack;
- 25 – bipod with a steering shaft;
- 26 - a beam in the front axle;
- 27 - shaft driving the caterpillar;
- 28 - track tension axis.
If you like night driving and you want to equip your homemade chainsaw snowmobile with various lights, then for this you need an electronic circuit for connecting them. 
With all the necessary drawings at hand, you can begin to manufacture snowmobile elements from a chainsaw and install them on the base frame of the unit.
Choosing an engine and gearbox for a snowmobile
Choosing a chainsaw for a homemade snowmobile is important. As practice shows, chainsaws from the brands Stihl, Husqvarna and Partner are best suited for these purposes - they are of sufficient quality and reliability, therefore they can easily withstand prolonged loads.
The main requirement for a chainsaw motor is that the power unit must be fully operational. Before building a snowmobile, be sure to flush the engine throttle, replace all filters, and clean the inside of the cylinders.
Next important detail a snowmobile from a chainsaw is a gearbox, which must also be fully functional and ready to go. Before work, it will need to be cleaned of old oil, and after manufacturing, pour new lubricant into the mechanism.
Homemade chainsaw snowmobile - manufacturing procedure

To make a homemade snowmobile from a chainsaw, you will definitely need a set of locksmith tools, welding machine, Bulgarian, and also steel sheets, pipes, corners and fasteners. The procedure for making a snowmobile with your own hands is as follows:
- First you need to make a frame of welded spars. Their middle part is made of strong corners of hardened steel, and the front and back parts are made of 2 mm plates. The front and back plate parts should be bent at a right angle. Holes will also need to be made in these elements for connection with the drive shaft and the gear-shaped caterpillar wheel. Brackets must be welded to the bottom of the side members, into the grooves of which the road wheels will be mounted to move the snowmobile from the chainsaw;
- Next, corners should be welded to the finished spars, with a section of 3 × 3 cm, which will serve as supports. Between one of the pairs of racks, it is necessary to fix the platform for the gearbox and the shaft in the interval between gears;
- If for a home-made snowmobile from a chainsaw you use a caterpillar mechanism from the Buran unit, then before installation they must be shortened by 50 cm, and then connected with a shipping tape. During installation, the caterpillar gears are attached by means of transverse shafts, after which the caterpillar track is installed on the gears;
- At the next stage, you need to install and connect the engine from the chainsaw to the homemade snowmobile. It must be mounted on a strong, stable stand, and a fuel supply tank must be installed on top of the engine. The rack itself must be securely welded to the transverse beam of the unit. After that, you need to turn the gearbox from the chainsaw by 180 ° and fix it on the site. Be sure to take care of the reliable protection of the motor and chainsaw gearbox from moisture and snow getting inside these elements. Otherwise, this will lead to an inevitable breakdown of the motor, the formation of corrosion inside the gearbox and a deterioration in the quality of the oil poured into it;
- Next, you need to take care of the comfort of driving a snowmobile from a chainsaw. For comfortable operation, the driver will need a seat. Often this element of a chainsaw snowmobile is made from several boards and fabric, however, in order to save time and effort, you can also use the seat from an old moped.
A do-it-yourself snowmobile made from a chainsaw is a compact unit of medium power that can overcome snow embankments up to 1.5 m high.