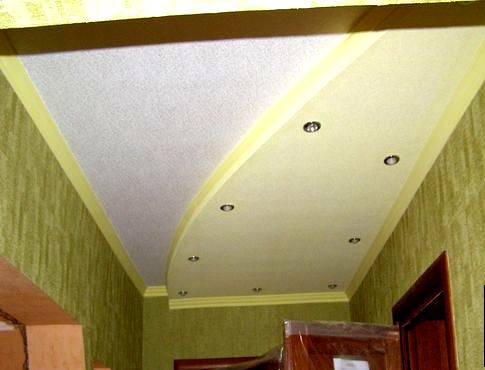
The design of the ceiling in the hallway is L-shaped. The ceiling in the hallway - the rules for the perfect combination and design (50 photos). Stretch ceilings in the hallway
It is no secret that the repair of the ceiling in the corridor is considered one of the most difficult tasks. The reason is simple - their evenness and height are often far from ideal. So when it comes to finishing and choosing materials, it's worth asking yourself: how to mask imperfect ceilings in the hallway and make a good impression on guests?
Market modern materials is so rich and diverse that the question of what kind of ceiling to make in the corridor is no longer as acute as it was 10-15 years ago. All options for arranging the ceiling surface can be divided into two types:
- installation of materials on the base (main) ceiling;
- fastening to already assembled structures.
The first type includes whitewashing and painting, as well as wallpapering. Even with the advent of modern materials, these classic ways finishes do not lose their popularity. Also, ceiling tiles and decorative plaster are attached to the ceiling. Before installation, the base surface needs pre-treatment. The previous finish is removed, the ceiling is primed.
 Whitewash option
  With wallpaper
  Painted variant
In the second group, we include plastic panels as a practical and inexpensive type of finish. Plasterboard and stretch ceilings, as well as multi-level structures compete with them. All of them involve a decrease in height by a few centimeters, but do not require special surface preparation.
We will consider each of the materials listed above in detail. This will allow you to compare your expectations with the actual result, help you make the final decision.
 With stretch fabric
  From drywall
  From plastic panels
Whitewash
When the ceiling is perfectly flat, and special requirements no one presents to him, the whitewash becomes truly good choice. She has two weighty advantages: low cost and ease of execution. However, the quality leaves much to be desired. Just white ceiling in modern apartments Ah, it's getting rarer.
Painting
Compared to whitewash, it looks more presentable. If you search well, you can find interesting shade, choose the right texture. Once again, the paint will look good only on a pre-aligned ceiling.


 Ceiling paint options
Decorative plaster
A good choice for a corridor with a flat surface. Many choose decorative plaster for the reason that you can create an original drawing without serious financial costs.


 Finishing options with decorative plaster
Wallpaper
You can stick wallpaper on the ceiling in the corridor yourself - and this is the first plus. The variety of the pattern, limited only by the imagination of the consumer, is the second advantage. By the way, if the coating is of high quality, it will look no worse. expensive species ceiling finish. Keep in mind that to achieve the desired result, the plane must be leveled.


 Ceiling wallpaper options
pvc tiles
Each of us has heard the phrase "cheap and cheerful." So, it is very suitable for the corridor, in which the ceiling is made of PVC tiles. You will properly care for the material - and you can forget about the next repair for many years.
 pvc tiles in the corridor
Drywall
A material that puts all previous finishing methods on both blades. How to make the ceiling in the hallway beautiful, reliable and at the same time unusual? That's right - use GKL. The advantage is that spectacular Spotlights.
And if you do the installation yourself (by the way, every owner can do it), you can significantly save costs.


 Drywall design options
Rack construction made of aluminum
Aluminum panels are no better or worse than drywall, they are just different. They are stylish and practical. By the way, here you will also have the opportunity to install spotlights spots. Aluminum is good because it does not let water through and is resistant to high temperatures.


 Rack aluminum structures
Slatted wooden structure
Even in narrow corridor wooden slats create a warm, homely atmosphere. The quality of the material plays a huge role. You can get both a simple and unremarkable surface, and an expensive, luxurious surface. With the installation of lighting fixtures, too, there will be no problems.

Rack wooden ceiling together with false beams
Stretch fabric
We declare with all confidence: this year stretch ceilings remain the most popular, attractive and practical option ceiling finishes in the hallway. They haven’t come up with a better one yet - except perhaps multi-level structures with a combination of drywall and stretch ceiling.
Really, given material It is durable and has an endless choice of textures and colors. If you turn to professionals, installation is carried out quickly enough and relatively inexpensively. You can do the installation yourself, but it will take a lot of time.

Stretch ceiling "Wave"


Rules for registration - everyone should know
Whatever material you choose, do not forget about simple design tricks that affect the overall perception of the ceiling. For example, in narrow corridors it is recommended to install a glossy stretch ceiling. Together with well-organized lighting, it significantly expands the ceiling space.
If the ceilings in the room are very high, and you want to visually underestimate them, the surface is painted in dark colors.
In a large hallway, it is better to give preference to multi-level structures. They will allow you to create a three-dimensional drawing, and they look interesting. A real classic is considered a matte finish with several bright spots. It looks expensive and elegant. A dark, shiny ceiling gives the room a fantastic, mysterious atmosphere.
Remember that people are greeted by their clothes, and the apartment is greeted by the atmosphere in the hallway. That is why it is so important to think over all the details, from the interior to the ceiling. Get to know the most successful options ceiling in the corridor you can in our gallery.
Slideshow of the design of narrow hallways
Photo gallery of ceilings in the corridor
Starting repairs in the house, we all think about the design of the hallway, so the question often arises of how to decorate the ceiling. Its area is usually small, so modern technologies finishing to master on it is much easier and much faster. In addition, you can see the result of the work very quickly.
ceiling design
Often, when designing a ceiling in the hallway, people completely forget about the role of design. And absolutely in vain. It has long been known that using design tricks, you can decorate a small room, hiding, and sometimes correcting the existing shortcomings.
Finishing secrets
When decorating a low ceiling in the hallway, light colors should be used. They will go well with light walls and darker floors. Thus, you visually increase the height of the room.
In the case when the ceiling in the hallway is too high, the room has a somewhat disproportionate appearance. The situation can be corrected dark color, then the hallway will become more comfortable and harmonious.

Choosing a finishing method, you can leave the area of \u200b\u200bthe room unchanged. For example, if you choose and position the ceiling tiles correctly.
In any case, before starting work, you need to think about the embodiment of the design idea - it can radically change the room.
Plastic ceiling in the hallway
This material won the recognition of many of our compatriots. It is widely used in the design of residential premises, offices, shops.

For those who are afraid of various innovations, you can offer to paint the ceiling quality paint(fortunately, her choice is now huge), whiten or paste over with foam panels. The last method, probably the most affordable, does not require complex installation. And the assortment of such plates in stores selling finishing materials is quite diverse.

They do not require complex surface preparation before starting work. It is only necessary to clean it well from the previous coating (if any), from dust and dirt. Mark the middle of the ceiling and glue the first four tiles from it in the shape of a cross. And then, focusing on them, glue the next plates. detailed instructions for this material is on the packaging.
Such a ceiling does not require complex maintenance - it is enough to wipe it with a damp cloth when dirty. In addition, anyone can do it with their own hands, even very far from construction.
Do not be afraid to experiment - your hallway will only benefit from this. The main thing is that the result of your work pleases you for many years.
It is not news that the ceiling in the corridor is considered one of the most difficult surfaces to repair. Very often in houses their height, and often evenness, wants to wait for the best. To competently disguise the imperfection of the corridor and produce good first impression on guests, it is necessary to properly approach the repair and decoration of the ceiling. So how to make a ceiling in the corridor with your own hands? More on this later in the article.
General ceiling design
Very often, when making a ceiling in the corridor with our own hands, we forget to use design techniques. This is a mistake, since it is they who are able not only to decorate, but also partially eliminate the defects of the room.
For example, the low ceiling of the corridor is best designed in light colors combined with darker walls, this will visually enlarge the space. For a higher corridor, on the contrary, you need to select darker tones of the ceiling finish.
For visual expansion or reducing the area of \u200b\u200bthe corridor, they also often use techniques using a variety of patterns on wallpaper or with correct location ceiling tiles.

Types of ceilings in the corridor
Well, the ceiling in the corridor is supposed to be repaired. First you need to figure out what methods of finishing the ceiling exist and which are the most relevant today.
Ceiling whitewash
This finishing method is the simplest and most economical, but the least durable and stain resistant. The ceiling is whitewashed only after plastering and puttying, since it is in this way that all surface irregularities can be smoothed out. This method is considered the most outdated and not relevant for finishing the ceilings of modern apartments and houses, but with a narrowed budget and unwillingness to spend special efforts this may be the best way.
ceiling painting
This method is the second easiest. As in the first option, before starting the finishing work, you need to plaster and putty the ceiling, but for painting this stage needs to be done much better. The reason is that painting focuses more on all surface irregularities, so you need to hide defects in advance. This finishing option significantly saves the height of the ceiling, therefore, with a perfectly flat surface and the desire to save time and money on finishing, this method will be the most suitable.

Decorative plaster
In this finishing method, the evenness of the surface is not as important as in the previous two options. Special Relief decorative plaster perfectly masks all the defects of the ceiling, so that in the end you can get an incomparable ceiling with minimal physical costs for putty.
Decorative plaster is produced as follows. Initially, we apply a layer of a couple of millimeters of decorative mixture on the plastered surface. Then we make a relief on the plaster in the form of various points, lines, grooves, waves using a grater, spatula, sponge or other tools. It's over here absolute freedom action and flight of fancy. After drying, the surface is painted or tinted.

Wallpapering
This method of finishing at the same time can be both costly and quite economical option. It all depends on the type of wallpaper itself.
For the corridor, experts advise using vinyl, non-woven or glass wallpaper. They not only look very attractive, but also have excellent durability. It is also worth paying attention to the wallpaper for painting. This option is very practical, since from time to time you can experiment with shades and change the entire style of the corridor.
The most economical, of course, are wallpaper on paper bases. However, they are less durable and attractive than the previous options.

Pasting with special plates
This finishing option involves pasting the ceiling with special plates measuring 50 x 50 cm made of foam or polystyrene foam. Ceiling tiles is the most widely used finishing method among budget options. The thing is that this material is very easy to work with, it does not require special pre-training ceiling (it is enough just to clean off the old finish), and the tile looks very attractive and aesthetically pleasing. You need to fix the plates to the ceiling using special glue, and the installation process itself will take only a few hours.

Suspended plasterboard ceilings
Plasterboard ceilings are very popular, as they can not only radically transform the corridor, but also themselves. installation work do not require special efforts and thorough processing of the base surface, and this method of finishing the ceiling does not require huge financial costs. Drywall sheets are attached to the ceiling using a special frame. However, the plasterboard ceiling "eats" about four or more centimeters of the height of the corridor, so for low ceilings this method of finishing will not be the best.
Stretch ceiling
Today, stretch ceilings are the most relevant, since with their help you can realize any design idea, for example, print a picture or a family photo on a canvas. In addition, this method of finishing does not particularly reduce the height of the room, unlike suspended ceilings. In stretch ceilings, a special PVC film is used, which is stretched using special clamps. Of course, this finishing method is more expensive than the others, but as they say, "the game is worth the candle."

Getting the ceiling ready for renovation
Before finishing work the ceiling surface must be prepared. Initially, it is necessary to dismantle the lighting fixtures and insulate the wires. If there is a plinth on the ceiling, then it should also be carefully removed without damaging the walls. Then the old finish must be removed from the surface. After that, the ceiling of the corridor is treated with a primer.
If you plan to paint the walls, then this stage should be taken with special responsibility, since with insufficient primer on high-quality painting may not be counted. The primer of the ceiling should be done in two layers, and the second must be applied after the first one has completely dried, after about three hours.
But the suspended and stretch ceiling in the corridor does not require a mandatory primer, but it is better to treat the surface with an antifungal mixture.
The next step is plastering the ceiling. At this stage, it is best to attach special small metal strips to the ceiling and then align the ceiling with these beacons using plaster mixture. After the plaster has completely dried with the help of putty, we complete the alignment of the ceiling in the corridor.

As mentioned earlier, stretch and suspended ceilings are the least demanding for surface preparation, but it will be necessary to putty the ceiling with special thoroughness for painting and wallpapering. Now you can move on to the very finishing of the ceiling surface.
Multi-level ceiling in the hallway
With the help of multi-level ceilings, defects in the volumes of the corridor space can be significantly corrected. For example, in a corridor with low ceilings, you can make the effect of a “raised ceiling”, which will visually increase the height of the room and eliminate the impression of “pressing” low ceiling. If you use glossy mirror photo printing in a multi-level ceiling, for example, a sky with clouds, then you will get the impression of bottomlessness, infinity and a very high ceiling.
To restore a high ceiling in a narrow corridor, it is better to use two levels with graphic lines and matte or satin shades. A rectangle or a square will visually expand the boundaries of the corridor.
Also, do not forget about well-thought-out lighting, which can make the space more spacious.
Multi-level ceiling - installation of a stretch ceiling in a plasterboard structure
There are several ways to build multi-level ceilings:
- stretch ceiling;
- dropped ceilings;
- combination of a stretch ceiling with a plasterboard form.
We will consider the third finishing option in more detail, since it is the most relevant and attractive today.

A multi-level ceiling should be mounted in a corridor with a height of at least 2.5 meters, otherwise it will be too low and not look very nice. You can set several levels, but two are most often used.
The first step in the installation of a multi-level ceiling is the fastening of the box.

Initially, it is necessary to measure the entire perimeter of the ceiling using laser level. Then accurately calculate the required amount of finishing material, which will significantly save its consumption, and as a result, your financial investments.
Together with the measurement of the room, it is necessary to mark the places where the guides will be mounted in the future.
After that, make holes in the places of marks with a puncher, after which dowels will be inserted into these holes and, therefore, self-tapping screws will be screwed. The whole frame includes two types of profile: guides and frame.
Fastening of horizontal guides must be carried out strictly along the marking line.
Next, these guides need to be fixed rack profile using self-tapping screws. If you want to produce additional noise or heat insulation, then this should be done at this stage of installation. Material with these functions should be installed between the ceiling and the frame.
You also need to remember about lighting fixtures and attach all the required wires between the ceiling and the frame.

Now you can move on to mounting. drywall sheets. These are best done with a partner, as their weight and size are quite large. When installing drywall to the frame, additional nozzles for a screwdriver should be used. This is necessary so that when fastening the screws "do not fall" into the drywall.
Well, the first level of the multi-level ceiling is installed, let's move on to the installation of the second. To do this, we first draw drywall frame second level boundaries. In the marked places, we attach special clamps for the stretch ceiling directly to the box.

After that, using a spatula made of plastic or other the right tool carefully wedge the edges of the canvas into the grooves of the clamps.
Before installing stretch ceilings, the canvas should be heated to a temperature of about 60 ° C using a thermal pad. After the canvas cools down, a tension effect is formed, or rather a perfectly flat surface, and that's it, the ceiling is ready.
As a rule, when performing repairs in the hallway, most people wonder which ceiling is better in the hallway.
Highly good way update the interior of the hallway is to use suspended ceilings.

They help to hide the following shortcomings of the base ceiling: uneven surface, curvature, various flaws on the floor slabs. Of course, the installation of a false ceiling does not exclude other types of finishes.

Get to know more a variety of options finishes can be seen in the photo of the ceiling in the hallway presented in our gallery.

Hallway ceiling options
When making repairs, everyone wants the ceiling in the corridor to look as good as in other rooms of the apartment or house.

At the same time, it is very important that it does not visually reduce the already small area of \u200b\u200bthe hallway.

The most common ways to finish the ceilings in the hallway are:
- Drywall finishing;
- Stretch ceiling;
- Ceilings made of cement;
- Finishing with PVC panels;
- Finishing with foam tiles.

Each person can choose the method that fully satisfies his needs and wishes.
Hallway ceiling design ideas
There is currently a large number of design options for the ceiling in the hallway, which often confuses many apartment owners.

You can decorate the ceiling with foam tiles, or you can significantly transform the design of the hallway with the help of two-level ceilings.

Consider a few ideas for decorating the ceiling in the hallway.

Minimalism
Can be done beautiful finish ceilings in the corridor, without spending huge money.
Plastic panels or foam tiles are perfect for finishing the ceiling in a small hallway, which will help hide defects in the base surface.

Maximalism
For large hallways high ceilings ceilings with a 3D effect, stretch ceiling, glossy stretch ceilings with photo printing are perfect.

Lighting
Here the choice is quite wide, it all depends on the preferences of the owners of the apartment and the dimensions of the room. You can make a choice in favor of LED suspension, or you can use several spotlights.

These are just a few of the many finishes available.


An attractive-looking ceiling will perfectly complement the design of an apartment or house. In order for the ceiling to please the owners for as long as possible, it is necessary to provide for all the little things even at the initial stage of work on installing the ceiling in the hallway.

You can not ignore the height of the ceiling. If the ceiling is not very high, then you do not need to use multi-level ceilings and a very large chandelier. The choice of pattern should be based on the area of \u200b\u200bthe hallway. It is impractical for a small room to use a ceiling with a large pattern.

The color of the ceiling in the hallway largely depends on its width. It must be remembered that for a ceiling device in narrow hallway Dark colors are not allowed.

Light shades can visually expand the space.


Finishing the ceiling in the hallway with plasterboard
Not all people can boast of perfectly flat ceilings in the apartment. Plasterboard ceilings in the hallway will help hide ceiling defects and level its surface.

This finish has a lot of advantages:
- it hides all the flaws of the base ceiling surface;
- can be hidden under drywall different kinds communications;
- simple installation;
- simple design;
- affordable cost of the material;
- the ceiling is suitable for repeated painting;
- does not hide the height of the ceiling.

Today, this option for finishing the ceiling is very popular.

Stretch ceiling for the hallway
Stretch ceilings in the hallway today are another favorite way to finish ceilings.

A very important role here is played by the fact that due to the huge competition, the prices for this material have decreased and the stretch ceiling has become affordable for a greater mass of people.


Stretch ceiling has a number of undeniable advantages:
- excellent external characteristics;
- slight loss of base ceiling height;
- the ability to hold a large volume of water in case of leaks from above;
- a two-level design of a stretch ceiling in the hallway and the use of combined ceiling coverings are possible;
- acceptable cost;
- long service life;
- environmental safety of the material.

However, along with the advantages of a stretch ceiling, there are some disadvantages:

Such a coating does not have high strength indicators. It can be easily damaged by moving high furniture or even by children playing.

Unprofessional installation of a stretch ceiling can lead to poor water retention on its surface.

If we compare all the pros and cons of a stretch ceiling, we can conclude that there are much more pluses. And this means that the stretch ceiling is the most preferred type of ceiling surface finish.

Ultimately, the choice of finishes for the ceiling depends on the tastes and capabilities of the owners of the apartment.

Photo ideas for decorating the ceiling in the hallway


Many property owners pay insufficient attention to the design of the ceiling in the hallway and in vain, because this room is considered to be the hallmark of an apartment or house. When a person enters a dwelling, he sees exactly the corridor. Therefore, the hallway and the ceiling surface in it should look decent.
Ceiling design options
As in other rooms, the ceiling in the hallway can be painted, whitewashed, and inexpensive polystyrene foam tiles can be glued onto it. Despite the fact that all these finishing methods are financially affordable, they do not always suit the owners from an aesthetic point of view.

Currently, there are more effective, but at the same time inexpensive and original variants ceilings in the hallway:
- rack;
- plasterboard suspended;
- tension;
- from plastic panels;
- coated with decorative plaster;
- covered with mirror tiles.
Features of drywall constructions
Creating false ceilings for a corridor from plasterboard sheets requires a lot of money and time compared to other finishing methods. For such structures, one needs metal profiles assemble the frame and then sheathe it with slabs of material.
If you choose the right pattern for such a ceiling, then it can visually increase small space premises. When installing a two-tier plasterboard ceiling, having a niche around the perimeter and a figured recess in the middle, the hallway will seem higher.

Suspended ceilings made of plasterboard are good because they are finished using different methods - painting, applying decorative plaster, wallpapering or tiling. To create a cozy atmosphere in the corridor, lighting is built into the niches.
It is not difficult to make a classic single-level ceiling structure from gypsum boards on your own, but such work requires the help of at least two people who have the skills to carry out construction work.
The nuances of arrangement in the hallways of stretch ceilings
Installing such a ceiling in the corridor will not cost as much as it seems at first glance. This does not require significant time and financial costs. You can create a stretch ceiling in a small hallway with your own hands, following the detailed step-by-step instructions.
The fact that this version of the design of the ceiling surface is efficient and a great variety color solutions, know many owners of real estate. Therefore, you need to choose a color of the film canvas that will be in harmony with the interior design in this room.

Despite the fact that the glossy surface looks good in the corridors, as it visually expands the space, owners often choose frosted ceiling in the hallway, as it is more affordable, has no reflectivity, makes it more comfortable.
The work on its installation consists in the fact that a light, durable film or fabric made from high-quality material must be fixed in a framing structure that keeps the panel taut.
Characteristics of plastic panel coverings
This finish option is attractive to many homeowners with its affordable price, not bad appearance and ease of maintenance. To make a ceiling in the hallway from panels, you will need a certain amount of this material and wooden bars. They build a crate that serves as a support for laying plastic elements.

With such a task as assembling panels, every novice home craftsman is able to cope, even without the skills of such work. On each plastic element on the one hand there is a protrusion, and on the other - a recess, due to which the “thorn-groove” principle is used during assembly.
Using mirror tiles to decorate ceilings
The reason mirror tiles are so attractive is because of their reflectivity. Due to the presence of such a feature, any corridor visually becomes more spacious. What is important is that mirror ceiling in the hallway it is able to reflect light, as a result of which the room seems brighter and more comfortable.

This modern finishing material differs in reasonable cost, sufficient durability and small weight. So mount mirror tiles simple and convenient. They are glued on a completely flat base, so the ceiling must be leveled by using plaster or putty compounds. The most convenient to use are gypsum-based mixtures.
Ceilings in the corridor with decorative plaster
Modern techniques for applying plaster mixtures allow you to create a different atmosphere in the room, for example, an old castle or unusual house. These repair techniques are easy to perform and even novice craftsmen can do them.

To finish the ceiling in the corridor, a small amount of plaster mixture is required. Of the tools you need only a spatula. As part of decorative plasters there is a coloring pigment. But if you wish, you can purchase a white composition and paint the ceiling surface as needed for a particular room.
A spectacular technique is the varnishing of decorative plaster, and besides this, this protective covering will give the ceiling finish additional strength and make it look more attractive. The plastering of the ceiling surface is carried out in two stages.
Features of ceilings from rails
When choosing which ceiling is best done in the corridor, the owners often prefer rack structures, since this is one of the most profitable ways design ceilings. They are mounted from rails, for the manufacture of which a thin profile is used.

There are two types of rack structures: slotted and slotless, or they are also called open and closed. The first of them have no gaps between the panels, so such coatings look like a continuous web with almost imperceptible seams. The structures of the second type have small gaps between the laths, as a result of which it seems that these are type-setting surfaces.
Ceilings from slats in the hallway
As evidenced by the design of the slatted ceiling in the hallway, it is a great interior decoration option in this small space. The most popular are plastic and aluminum rack systems. As with any surface finishing method, they have advantages and disadvantages.
The advantages of plastic rack structures are as follows:
- Inexpensive price.
- Easy Installation Because the material is flexible, the planks are easy to cut.
- The surface washes quickly.
At the same time, there are also disadvantages:
- Decor looks cheap.
- Since the material is fragile, it is problematic to transport and store the panels.
- Poor-quality plastic quickly loses its original color and changes shape, and quality products not easy to find.
- The material is flammable and flammable.

The advantages of aluminum rails include:
- Durability, fire safety, strength.
- Greater reflectivity compared to plastic.
- A wide range of textures - gloss, mirror surface, imitation gold or silver.
- The ability to mount a complex false ceiling in the hallway.
At the rack aluminum construction the following disadvantages:
- High price.
- Labor intensive installation.
- The need for frequent cleaning of the surface.
The choice of material for the assembly of rack ceilings
Ceiling systems from rails are different design features component parts. The slotted rail has a U-shaped profile, and the slotless product is equipped with a stepped protrusion, thanks to which it is connected to the adjacent rail.
Reiki are made from:
- aluminum;
- plastic;
- steel.

Metal elements are always produced with lacquered, regardless of the color of them pose in the hallway glossy ceiling. This feature makes them reflective. These rack systems are often installed in bathrooms, kitchens and hallways.
When buying them, you should take into account the length of the panels, usually this parameter is 4 meters. Such products are difficult to transport and lift to the upper floors. Most often, the planks are sawn in half and 2-meter products are obtained.
They must be transported carefully, avoiding impacts, otherwise dents remain on the aluminum rails that can spoil the design of the ceiling in the hallway - they will be clearly visible on the mounted surface due to its reflective ability.
Features of the rack ceiling structure of an open type:
- Planks form a single flat surface.
- The absence of depressions ensures ease of care.
- To hide the space between the panels, a layout is used, which is a special profile.
- You can collect multi-color planes.

Distinctive characteristics of ceilings closed type:
- Planks create a textured relief ceiling plane.
- The presence of slots provides high-quality ventilation of the space available under the panels, which has great importance when installing recessed luminaires.
- To cover the cracks, you do not need to use a profile.
- Colored panels with gaps between them look less attractive.
Accessories for rack ceilings
You can purchase ready-made rack ceilings in the hallway or place an order for an individual package. Manufacturers of such structures offer to purchase kits for installation in bathrooms measuring 1.7x1.7 meters or 1.35x0.9 meters.
To arrange a ceiling of a different size, you must either select the elements yourself, or contact the manager of the trade enterprise.
The standard package of rack ceilings includes:
- Ceiling strip having a width of 50, 84, 100 and 150 millimeters. You can choose any color of the ceiling in the hallway according to the RAL table.
- Tire (other names stringer, comb, traverse). This bar is needed to fix the elements to the base floor. She has special notches.
- U-shaped profile. Designed for installation along the walls of the room along the perimeter and fastening the ends of the rails. On sale there is a U-shaped profile with applied perforation for fixing to surfaces.
- H profile. It is used for joining the ends of panels with double or more laying in length.
- Installation instructions from the manufacturer.

In addition, to cover the gaps between the slats on the ceiling of a closed type, layouts are used, which are also called decorative inserts. Can be realized original ideas ceiling in the hallway by buying strips of one color and inserts of another. But even layouts of the same color can provide a spectacular play of light and shadows on the ceiling plane.
It also does not come standard with hangers that are required for leveling. suspended structure if there are significant elevation changes and other shortcomings on the base basis. You can purchase a corner perimeter profile used to decorate joints.
Manufacturers pack standard kits in boxes with plastic handle. Taking care of consumers, CESAL announces the contents of the package by attaching a sample rail to its handle.
Design of rack ceiling structures
For beautiful ceilings in the rack-type corridor, depending on the shape of the planks and layouts, there is a certain classification:
- German;
- French (S-design);
- design.
French-designed structures are produced by the following companies: CESAL, Alconplas and Albes. In these ceilings, the panels are rounded, their width is 100 or 150 millimeters, and the thickness is 0.5 millimeters. They produce such ceilings of both types. Included in the package open version Includes 25mm wide inserts.

When it is planned to install a German-made structure when decorating the ceiling in the hallway, it must be borne in mind that it will have a strict geometry of forms. At the panels of this type there is a rectangular profile of the edges and this gives the ceiling surface conciseness. German models of rack ceilings are produced in open and closed versions.
Design designs are made to order according to technical specifications provided by consumers.
Creating slatted ceilings in corridors
To complete the installation, you will need the following tools:
- level;
- tape measure and marker;
- drill and drill;
- grinder with a thin disk or scissors for metal work;
- hammer.
The assembly of the rack ceiling is carried out step by step.
The first step is to determine the design level. When the overlap is even, the U-shaped profile can be attached to the corner joints of the walls. But even then you need to make sure that the walls have the same height. This is done by taking measurements with a tape measure.
AT apartment buildings it is rare to find the correct geometry of a room. For this reason suspended ceilings in the hallway they are mounted on suspensions that allow you to adjust the height of the frame.
It is most convenient to determine the height with a self-leveling laser level. The fact is that when using it, you do not need to take measurements. This device shows the horizontal with a red line. If you focus on it, you can begin to mount the U-shaped profile around the perimeter of the room.

In the absence of a laser level, old methods are used, using a marker, tape measure, thread and bubble level. When lines are beaten in this way, you must first determine the height of the corners and measure the distance down at the lowest. It should be enough to hide electrical wiring and various communications.
At this point, a self-tapping screw with a thread is screwed in, pulled along the adjacent wall and leveled with a bubble level relative to the horizontal. A self-tapping screw is also screwed in the other corner and a thread is attached to it. Similarly, threads are stretched throughout the room, including all the protrusions, and a straight line is drawn along them.
To determine the amount of indentation from the base floor and the length of the self-tapping screws, a built-in lamp and a suspension are laid out on the table to one side - its length must exceed the body lighting device by 5 - 10 millimeters. The length of the self-tapping screws is selected so that it is 7–10 millimeters more than the height of the lamp, taking into account the fact that the fastener cap will go into the recess on the tire.
Step two - installation of a U-shaped profile. Instead, you can use aluminum corners. The profile is cut to the required length with scissors for metal. If there are no holes in the product for fastening to the wall, they are drilled at intervals of 40 - 50 centimeters. The profile is applied to the wall so that its lower edge is located on the marking line.
On the wall, mark the places of the holes on the profile with a marker. Then holes are drilled and driven into them. plastic stoppers so that their upper cut is flush with the surface of the walls. Self-tapping screws are attached to the wall profile. With the aim of corner connection the ends of the profiles are cut at an angle of 45 ° or lead into one another.
Step three - installing stringers. The main load from suspended ceilings in the hallway falls on the tires. When the room has big sizes, the length of these guides may not be enough, so they are built up. This is done as follows: one stringer is placed on top of the other so that the notches for fixing the rails are completely aligned. Metal screws are used to connect the planks.
To ensure the rigidity of the suspended ceiling structure, it is installed on stringers, placing them at intervals of 70 centimeters. Side rails should be placed at a distance of 1 - 2 centimeters from the walls. Hangers are attached to the base base as described in step No. 2.
To align the stringers relative to the level, two methods can be used. The first of them - threads are pulled between opposite U-shaped profiles. When using the second, stringers are attached to the base surface with self-tapping screws - this option is more convenient if the floor is wooden. The height is adjusted by screwing and unscrewing the fasteners.
Step four - wiring and installation of fixtures.
Step five - fastening the panels. One end of the rail is inserted into a U-shaped profile. Having shifted the panel diagonally, its second end is also inserted into a U-shaped profile located on opposite side. The rail is shifted so that it is located under the notch of the stringer. The panel is lifted and pressed against the stringer so that it snaps into place with a characteristic sound.
Install the following bars in the same way. When the panel is located under the place of installation of the lamp, appropriate markings are applied to it and a hole is drilled with a crown of a certain diameter. After mounting the rail in place, the housing of the lighting device is fixed in it.
Step six - installing the last bar. When it does not fit completely, it is cut with metal scissors.
Step seven - installation of layouts. Insert strips are compressed and inserted into the gaps between the panels, they should snap into place. At the end of the work, the operability of the lighting is checked. The ceiling is wiped from dust and stains with a damp cloth.
Regardless of the types ceiling structures and ceiling design in the hallway - stretch fabrics, rack or suspended drywall systems are chosen taking into account many nuances.