Do-it-yourself roof made of ondulin. How to lay ondulin: characteristics, similar materials, technology and installation procedure How to attach ondulin tiles to the roof
Laying ondulin is one of the most common methods of roofing.
This is explained by the fact that ondulin combines the most attractive qualities of a roofing covering - low cost, ease of installation and noble appearance.
The use of ondulin is universal option both for country private houses and for low-rise residential and non-residential buildings.
To correctly approach the choice of material and its installation, it is proposed to study useful information in the article.
What is ondulin?
Ondulin (Euro slate) is a lightweight and durable roofing material made from cellulose pulp, bitumen, hardening resins and various fillers.
Cellulose and bitumen undergo deep cleaning. Euroslate was invented in France just half a century ago.
Ondulin is offered in the form of corrugated sheets that have a high degree of protection from the effects of adverse natural factors.
The material is lighter than regular slate, so it is much easier and faster to install. The production method and composition of ondulin directly affect the properties of the roofing material.
Advantages of using ondulin:
- low cost due to the production method and availability of manufacturing materials;
- lightness, due to which there is no need to design reinforced rafter system before putting ondulin;
- ease of care and cleaning - you can water it with a hose or wait for heavy rain;
- material does not enter chemical reaction with a large number of acidic, alkaline and petrochemical irritants;
- the formation of mold and mildew is excluded;
- environmentally friendly and safe material due to its composition;
- resistant to precipitation;
- service life will be 15 – 20 years;
- installation of ondulin can be carried out on the old roof covering, while saving on dismantling.
It is worth mentioning the disadvantages of the material in order to ensure the objectivity of the choice of roofing:
- over time, ondulin fades under the sun, which will negatively affect general view Houses;
- the guarantee for hydrophobicity applies only for the period specified by the manufacturer;
- at the time of buying large quantity the color of the material may not match; there may be bitumen stains on the sheets;
- You cannot walk on a roof with an ondulin coating, as dents and damage will certainly remain. Care will be required during transportation, lifting and installation;
- exists only in 4 color options: green, brown, black and red;
- when wet, the material does not hold its shape well, so the sheathing must be even and in the same plane.
All the pros and cons of the material indicate that its choice as a roof covering should be carefully considered.
Features of the roof structure
Before attaching ondulin, you need to familiarize yourself with the recommended composition roofing pie, which is suitable for this type of coating.
Due to the lightness of the material used during construction truss structure you can do without reinforcing elements.
The coating will consist of the following parts:
- rafter system of any complexity;
- insulation;
- vapor barrier;
- waterproofing;
- counter-lattice;
- sheathing.
The sheathing is fastened to rafter legs made of natural beams, the cross-section of which and the installation pitch are calculated in accordance with the region of residence.
Before installing the ondulin coating, a heat-insulating layer is laid, calculated in accordance with the standards of the region of residence.

Glass wool is usually used as insulation, basalt wool or polystyrene foam. The heat insulator is laid in blocks between rafter legs.
The step-by-step instructions for laying a roofing pie involve the use of a vapor barrier layer, which will protect the thermal insulation layer below from moisture and steam penetration.
To protect the rafter system, sheathing and thermal insulation layer from condensation, a waterproofing layer is applied.
The waterproofing material is attached to the rafters from above using a construction stapler.
Before installing the roofing covering on the waterproofing layer, wooden planks are laid along the rafter legs to create small space, in which air will circulate.
Ondulin is placed on a sheathing made of even boards laid in the same plane in increments of 45 - 60 centimeters. The longitudinal lathing is attached to the counter lathing.
The small distance between the lathing slats is due to the tendency of the material to deform when wet, which requires good support.

The roofing material itself is attached to the sheathing with special nails, the color of the heads of which is selected according to the color of the sheets. The technology for laying ondulin assumes an overlap of sheets of 15 - 20 centimeters.
Before laying the roofing pie wooden frame V mandatory treated with antiseptic and fireproof solutions.
Installation of ondulin coating
Installation of roofing includes preparation for installation and the installation itself.
Laying ondulin with your own hands is done at a certain temperature.
The best temperature conditions the interval is considered to be from 0 to 30 degrees Celsius: if the material is installed in frost, ondulin will become brittle and crumble from mechanical stress, and if installation is carried out at very high temperatures, then there is a high probability that the sheets will be deformed from heating.
When laying the material at temperatures close to the maximum permissible, it is necessary to maintain the original shape of the Euro slate.
If ondulin stretches during installation, then when frost sets in it will decrease in size due to physical properties. This process will lead to damage to the roof.
When installing the coating, you will need to cut the material. This is done using hand saw, lubricated in advance with oil, or with a grinder, which will require additional effort and caution.
Before installation work, you need to prepare special fastening nails in advance. About 20 nails are used for each sheet: half of them are attached to the bottom part of the sheet, ¼ goes to the middle part, and the remaining quarter goes to the top part.
The pitch of the sheathing depends on the slope of the slope on which the ondulin needs to be placed. Slopes of up to 10 degrees are covered with a continuous sheathing of plywood or boards.
With a tilt of 10 - 15 degrees, the sheathing is laid in increments of 45 centimeters. If the angle of inclination is higher than 15 degrees, then the step increases to 60 centimeters.
Installation process
Work begins on the ground, cutting sheets of material to the required sizes. After this, following the rules for laying ondulin and precautions, the sheets are applied to the sheathing in the direction from bottom to top on the leeward side of the roof.
The initial sheet is aligned strictly relative to the lines of the cornice and the end of the slope. Ondulin should not protrude beyond the cornice by more than five centimeters.
The arrangement of sheets in a checkerboard pattern implies horizontal and vertical overlaps between the sheets. In this case, be sure to constantly check the level of laying sheets.
When performing overlaps, the following requirements must be observed:
- at an angle of inclination of the slope, the value of which is not higher than 10 degrees, the vertical overlap is no more than two “waves” of the sheet, the horizontal overlap is at least 20 centimeters;
- when the angle of inclination of the slope is 10 - 15 degrees, the overlap level is reduced to one “wave” vertically and 17 centimeters in the horizontal plane;
- one “wave” of overlap in the vertical plane is maintained when the slope is tilted more than 15 degrees. Horizontally, the overlap is reduced to 15 centimeters.
Install fasteners strictly according to the instructions for the material. Special nails with protective heads are driven along the markings into the lower crest of the “wave”.
Observing a certain sequence of how to correctly place ondulin, the final stage cannot do without installing additional decorative and protective elements.
To install an ondulin valley, you will need additional lathing. The valley is installed under sheets of roofing material.
Fastening the ridge decoration begins on the leeward side, with an overlap of at least 13 centimeters on the sheets.
Nails are attached to each lower “wave” of the sheet into additional sheathing slats installed in advance.
The end joint of the roof and the wall is made with a valley, which is thoroughly sealed with silicone.
To properly design the sides of the overhangs, gable or ridge parts for ondulin are used.
When choosing ondulin as a roofing covering, we can conclude that it is cheap and reliable material, but for a certain period of time.
You can do the installation yourself, to your taste, or entrust this task to specialists.
With proper installation, you can be sure of the comfort and warmth that a new roof will provide.
Ondulin is one of the most commonly used roofing coatings. In its production, the technology of saturating organic fibers with bitumen under conditions of high pressure and high temperature is used. The material is distinguished by its strength and durability, and thanks to the dyeing performed before the process of processing and impregnation of the fibers, it is completely not susceptible to the destructive effects of negative external factors.
Subject to the right technology Made from ondulin, it can withstand both severe frosts and hot tropical sun. You can even install ondulin sheets yourself.
Characteristics, pros and cons of the material
Ondulin is a material of organic origin, made from cardboard, coated on both sides with bitumen, with various additives. This is a slightly rough, very light corrugated roof covering. After installation, it is painted in the required color.
Ondulin has a number of advantages, the main ones being:
- strength;
- ease;
- plastic;
- length of service life (50 years or more);
- resistance to chemical compounds;
- non-susceptibility to the development of microorganisms, fungus, mold;
- ease of cutting and installation;
- wide choice of colors (red, green, brown, black);
- ease of storage and transportation;
- noiselessness;
- long-lasting color retention even when exposed to strong ultraviolet irradiation.
The main disadvantages of the material are:
- the need to create lathing to prevent sheet deformation;
- flammability;
- The fragility and plasticity of bitumen significantly complicates repair work and roof maintenance.
Preparatory work
When installing ondulin sheets important point is the correct implementation preparatory work in compliance with basic recommendations.
When implementing any construction work The first stage is the selection of basic, consumable and auxiliary materials and their preparation. You also need to stock up necessary tools. High-quality styling roofing is largely determined by the thorough implementation of the preparatory stage.
Calculation of materials and selection of tools
It will not be an exaggeration to say that the selection and calculation of materials, the choice of tools in this case is more difficult than the work itself. But it is careful calculation and selection of material that makes it easy to carry out subsequent installation of the coating.
First of all, you need to buy the required amount of ondulin. To do this you need to know total area roofs. The standard sheet size is 2000 x 950 mm. It is also necessary to take into account the overlap that will need to be made when laying the sheets. The overlap in width will be 9.6 cm, in length – from 10 to 15 cm. As a result, the useful area of one ondulin sheet will be approximately 1.6 square meters. m. By dividing the total roof area by this value, you can get the approximate number of sheets needed to create a roofing covering. The calculation rules change to a certain extent as the roof slope angle decreases until the parameters of a flat roof are achieved.
In addition to ondulin sheets, you also need to purchase a set of design components. It includes:
- skate;
- edge forceps;
- valleys;
- special steel nails with propylene heads various forms and colors: the choice depends on the original color of the material. The base of these fasteners resembles screws, thanks to which they are firmly attached to the wood. A rubber gasket is attached to the top, providing additional waterproofing at the attachment points.
At the junction of ondulin sheets with a wall (any other vertical plane), it is necessary to use valleys specially designed for this purpose. In these parts, waterproofing must be carried out with special care.
If the house has chimney, when covering it with roofing material, special rubber aprons are used. This is done to create the correct joint.
To obtain a reliable roof covering, the joints should be thoroughly processed to ensure effective waterproofing, warnings negative impact moisture on roof frame and its decay.
To cut, then nail the sheets, and lay the material, you will need the following tools:
- circular saw or hand file;
- hammer;
- nail puller;
- stepladders;
- stairs;
- special ladders for fastening to the roof ridge.
The process of creating an ondulin coating
 In the case where the roof is already covered with roofing material ( flat slate, metal, roofing felt), it does not need to be removed: you just need to slightly deform the ondulin sheets.
If the sheets are larger required size, they can be cut using a jigsaw or hacksaw.
Ondulin is the final coating, which should protect against moisture penetration. The function of thermal insulation must be performed by another material.
Waterproofing and vapor barrier
1. When creating an ondulin coating, the first step is to take care of the waterproofing, which is installed under finishing coat. For this you can use any vapor-permeable waterproofing membrane, But optimal choice will be the branded ODUNTIS membrane.
The material is laid on top of the rafters with a 2-centimeter sag. The rolls are rolled out in a direction transverse to the roof slopes. In this case, the top sheet should overlap the bottom sheet. Determining the amount of overlap is not difficult: for this purpose, factory markings are applied to the membrane. The joint areas must be glued using double-sided fabric tape.
The original ODUNTIS membrane can be laid directly onto the insulation. The material has the ability to transmit water vapor, but, on the contrary, retains water.
2. The next step is to lay the counter-lattice. This point is very important, since the counter-lattice performs an important function: it provides the creation of ventilation ducts, through which air masses circulate along the insulating membrane. As a result, moisture is removed from the roof. Thanks to the presence of ventilation, as well as the use of antiseptic impregnations, the wood will last much longer.
When using other waterproofing materials in case of creating warm roof it is necessary to perform a vapor barrier on ondulin. Laying of vapor barrier layers is carried out during the installation of covering sheets. If you plan to create cold roof, you can skip this part of the work.
Lathing
The manufacturers of ondulin themselves recommend using a continuous type of sheathing underneath it, since the material does not provide a sufficient level of rigidity and can sag, sag when heated in the hot season, or break under pressure snow mass in winter.
But in principle, the choice of type of sheathing depends on the roof slope angle. Three lathing options are available for ondulin:
- With a flat roof (with a slope angle of 5-10 degrees), continuous sheathing is required. It can be made from shalevka boards or chipboard sheets.
- If the angle is 10-15 degrees, the lathed boards or bars should be placed at a distance of 45 cm from one another.
- If the angle of inclination is steeper than 15 degrees, the bars are laid at a distance of 60 cm from each other.
The sheathing bars are fixed to the counter-lattice elements using self-tapping screws (nails) while maintaining an equal interval between them.
Preparation of sheets
The first step is to make markings on the ondulin sheets, which is quite problematic due to their wavy shape. For this purpose, ordinary pencils are used. A straight line can be drawn using another sheet.
To cut the sheet along the line, you can use a grinder or a hacksaw. To avoid jamming, the tool is periodically lubricated with oil.
Installation stages
 If the sheets weigh no more than 6 kg, they can be easily lifted onto the roof. The use of such material will ensure the creation of a fairly light roof.
The installation process itself is carried out in the following order:
- Fastening the sheets should begin from the windless side. Sheets begin to be mounted from the bottom. To do this, you need to pull the cord, nailing it to the nails so that the lower edge of the roof protrudes 6-8 cm from the wall - subsequently, drains for sedimentary moisture will be installed at this distance.
- When installing the first sheet, you need to drive in nails, starting from the second wave from the end edge of the roof, and then continue driving nails through the wave, observing a checkerboard pattern. This order is very important for creating presentable appearance roofs, since the nails will stand out on the roofing surface due to their large curly heads.
- The second sheet is laid overlapping (in one wave). During installation, it is necessary to strictly ensure that the sheet does not deviate from the tensioned cord, through which the horizontal arrangement of the elements is adjusted.
- After laying the first bottom row to the opposite edge of the roof, it may be necessary to saw off part last sheet. For this you can use circular saw or a hacksaw for wood. Sawing ondulin is very easy. Sawing off the final row must be done from the inside of the roof (where the last row will overlap).
- The second row is located in relation to the first in a checkerboard pattern. For this purpose, the first sheet (of the second row) is sawn longitudinally into two parts. The second row is laid with an overlap of 10-15 cm on the first. The value may be greater in the case where the size of the roof allows for a greater overlap of one sheet onto another without loss in the amount of material.
- After completing the installation of sheets over the entire surface of the roof, you can proceed to attaching the design parts that perform protective and decorative functions. Also sold with ondulin sheets is a semicircular ridge, very convenient for fastening, equipped with flat protrusions on the sides. Its flexibility makes it possible to adapt to any angle formed by intersecting roof planes. A wind board is nailed to the end sides of the roof, to which the ondulin sheets are attached using a standard edge forceps.
Basic rules for laying ondulin
 To perform the work efficiently and ensure a long service life of the roof, you need to know some of the nuances of installing this material:
- The most favorable temperature conditions for work are temperatures in the range from minus 5 to plus 30 degrees. If the temperature is higher or lower, it is better to postpone the work until another day.
- When attaching one sheet, use at least 20 nails included with the sheets. This measure is necessary to create a sufficiently durable coating that can withstand strong gusts of wind. When installing by hired workers, it is necessary to strictly control the correctness of the fastening.
- To create the sheathing, beams with a cross section of 60 x 40 mm are used. The sheathing pitch has a direct impact on the service life of the roof without the need repair work and is determined depending on the slope of the roof.
- Ondulin stretches well. This property can be used by unscrupulous workers: to reduce work time, they can nail sheets stretched to the limit to the sheathing bars, which through certain time leads to the appearance of waves on the roof surface. Such waves can only be eliminated by completely covering the roof. To prevent this phenomenon, before installation, you need to make sure that the ondulin is in normal condition.
- During the installation of sheets, it is necessary to take measurements with particular care, in particular, pay attention to the overhangs: with their significant length, the ondulin can bend, which will spoil the appearance of the roof. And when creating overhangs that are not long enough, precipitation and various debris can get under them.
- Strict adherence to the linearity of joints in both horizontal and vertical directions is necessary. Before fastening, you must once again make sure that the sheets are laid evenly, and then make the final fastening.
- Overlapping of four sheets in one corner is unacceptable. For this reason, the second tier must begin with half a sheet. The approximate overlap between tiers should be 15 cm.
- And, of course, you should remember about safety measures. If, while performing work, it becomes necessary to walk on the mounted ondulin, you should only step on the crest of the wave: the part between the crests cannot support the weight of a person. Considering the characteristics and properties of the material, you can only walk on it in soft shoes.
CONCLUSIONS:
- Ondulin is one of the most commonly used roofing coatings.
- Ondulin is a material of organic origin, made from cardboard coated on both sides with bitumen.
- The main advantages of ondulin: strength, lightness, durability.
- When installing ondulin sheets, an important point is the precise implementation of preparatory work.
- First of all, you need to calculate the required amount of ondulin. To do this, you can use a ready-made formula.
- When creating an ondulin coating, the first thing you need to take care of is waterproofing. To do this, you can use any vapor-permeable waterproofing membrane or the original ODUNTIS membrane.
- The next step is to install the counter-lattice required to create the ventilation products.
- Manufacturers of ondulin recommend using continuous sheathing.
- The choice of type of sheathing depends on the roof slope angle.
- When installing sheets, you must follow the prescribed procedure.
- To create a durable coating, at least 20 nails should be used when attaching one sheet.
- If while performing work there is a need to walk on the onduline, you can only step on the crest of the wave.
Find out how to properly connect the ondulin roof to the wall of the building so that the roof does not leak from the video.
Cellulose-bitumen roofs are distinguished by their affordable price, long service life and ease of installation. That is why roofs are increasingly being built with one’s own hands from Ondulin, and not from materials that are more difficult to process. By following the installation technology, you can be sure that the roof will last for more than one generation!
Advantages of building a roof with your own hands from Ondulin
The reliability of the material is evidenced by the unprecedentedly long warranty period for water resistance from the manufacturer - as much as 15 years! At the same time, bitumen sheets do not deform in the sun and withstand high-degree frosts. A rough surface Ondulina allows the snow to melt directly on the roof, preventing the convergence of large layers.

If you re-roof your house yourself, then only with Ondulin. And there are several reasons for this:
- the material is practically non-flammable;
- the roof can easily withstand medium-sized hail;
- For installation you only need a hammer, a wood saw and a construction knife.

Types of roofing from the manufacturer Ondulin
Before buying corrugated bitumen sheets, you should familiarize yourself with their types and purchase the ideal option:
- Ondulin Smart - sheets measuring 1.95x0.96 m and weighing 6.3 kg;
- Ondulin DIY - sheets are 2 waves narrower, which reduces their weight to 5 kg;
- Ondulin tiles – sheets standard size 1.95 x 0.96 m, imitating real tiles, weighing 5.9 kg.
The thickness of Ondulin sheets has remained unchanged for more than 70 years and is 3 mm. So, in the case of reconstruction of only part of the roof, you can be sure of the interchangeability of the sheets.

General rules for constructing roofs from Ondulin
When purchasing a roofing covering, you should pay attention not only to the integrity of the sheets and the quality of their painting, but also to the accompanying documents. Thus, all Ondulin materials are accompanied by instructions for their installation and requirements for the installation of the sheathing. Strict adherence to the instructions guarantees the durability of the roof and the strength of the fastenings.
Lathing requirements
The first thing you need to decide is whether the roof will be insulated and whether a waterproofing film is needed? If not, the sheathing can be installed directly onto the rafters.

If additional waterproofing of the roof is planned, between the roofing covering and the film it is necessary to make ventilation gap. To do this, the waterproofing is rolled out along the rafters, fixed on top with a counter batten, and only then the sheathing is filled.

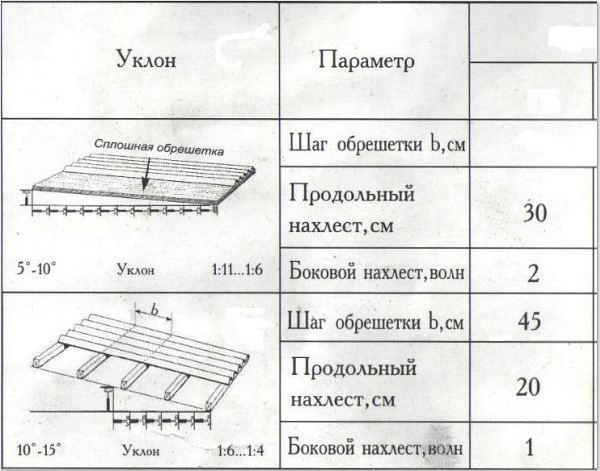
The frequency of lathing under Ondulin depends on the angle of inclination and slope of the roof:
- for roofs with a slope from 1/11 to 1/6 and an angle from 5 to 15 degrees, a continuous sheathing is required;
- for roofs with a slope of 1/6 to 1/4 and an angle of 10-15 degrees, you can make sparse lathing with a maximum pitch of 45 cm;
- for other roofs with a large slope, the maximum sheathing pitch is 61 cm.
Ondulin is not suitable for flat roofs. As continuous sheathing You can use OSB boards, plywood, fiberboards or boards nailed without a gap. For sparse lathing, you can use a board with a thickness of 2.5 cm or bars with a thickness of 5 cm.

To increase the reliability of the roof, it is better not to use the maximum pitch of the sheathing and do it more often. This is especially true for areas with hazardous natural phenomena.
How to install Ondulin on roofs depending on the slope angle
Thanks to the markings applied to Ondulin sheets, you no longer need to make your life difficult by measuring distances for correct fixation of the roofing material. The applied markings are suitable for all roofs with a slope angle greater than 15 degrees; the installation process itself is extremely simple:

The top of the wave of the outermost sheet should be on the wind board. In order not to stretch or shrink the sheets, an additional external beam is attached to the protruding sheathing at the required distance.
For roofs with a slope angle of less than 15 degrees, the installation process is slightly different:
- lateral overlap of sheets for roofs with a slope of up to 10 degrees - 2 waves;
- end overlap (top row over bottom) for roofs up to 10 degrees - 30 cm, for roofs 10-15 degrees - 20 cm;
- In this case, you should not be guided by the markings on the sheets; the distance between the rows of nails fixing the center of the sheet, for roofs with a slope of up to 10 degrees - 55 cm, for roofs of 10-15 degrees - 45 cm.
In other words, the nails nail the roofing sheets to the sheathing, so for thin sheathing it is especially important to calculate the distances accurately so that the nails do not end up being driven into the air. The principle of fixing sheets is shown more clearly in the diagram.

Don't skimp on the number of nails! The bottom of the sheet is always fixed along each wave, otherwise the reliability of fastening of the roofing material cannot be guaranteed. Despite the fact that you can walk along Ondulin, during the installation process it is better to use stairs and construction walkways.

Otherwise, the flexible sheet may stretch under human weight during fixation and subsequently collapse.
Design of individual roof elements
When installing a roof, the main problem is to correctly connect the material to the chimney or to the wall of the house, as well as to close the edges and ridge. But thanks to ready-made additional elements and accessories, it is very easy to give the roof a complete look, even for people who have not yet gotten their hands on construction.
So, to decorate the top edge pitched roof A tong or wind strip works well. After installation bitumen sheets A cornice board is nailed to the end so that it is level with the top edge of the sheets. The selected corner element, and the gaps between the gable and the roof are closed with a special filler. After this, the tong is fixed with nails along each wave. The sides of the roof with the wind board are closed in the same way.

You can also use a ready-made skate. It is laid after the roof is completely covered with sheets on both sides. Its installation begins on the same side from which the laying of the roofing material began - on the opposite side to the wind direction. The overlap of the ridge element is 12-15 cm, but you need to ensure that its end completely overlaps the top of the sheet wave. After filling the gaps between the ridge and the roof, you can begin to fix the ridge with nails in each wave.
If you need to seal the joint between the chimney pipe and the roof, you can use a special sealing tape and a covering apron. To do this, after the Ondulin sheets have already been laid, on Front edge The pipe is laid from below and the apron is cut so that it extends beyond the pipe by one wave on each side. The apron is nailed into each wave.
A sealing tape is glued to the top of the apron and extends to the chimney. The tape is glued to the sides and back so as to cover the junction of the roof and the chimney.

There is no need to lay an apron here, just fix the tape with nails every 30 cm or at the top of each wave. The upper edge of the tape is pressed against the chimney with a metal strip.

At the back of the chimney, an additional sheet of Ondulin is laid and fixed, cut in width so as to extend beyond the edges of the pipe in one wave.
The side junctions of the roof and the wall are also sealed with joint tape. The self-adhesive tape begins to be laid from top to bottom so that its lower edge completely covers the wave of the sheet. The upper edge of the tape is pressed with a metal strip, and the lower edge is nailed to the wave in increments of 30 cm.
But for the horizontal connection between the roof and the wall, you will again need a covering apron. It is laid on top roofing sheets close to the wall and fixed along each wave.

A sealing tape is glued on top, extending onto the wall and the apron itself, and its upper edge is pressed with an aluminum strip. Interestingly, it is not necessary to attach an apron, it is decorative element. The sealing of the seams is ensured by butyl rubber tape on an aluminum base.

Restoring an old roof in a couple of days
If roof repairs are constantly postponed due to the fact that the family has nowhere to move while the new roof is removed and installed, you can use the “hood” technology invented by Ondulin. Due to the light weight of bitumen sheets, they can be laid on top of the old roofing without fear for the strength of the rafters.
On top old roof the sheathing is stuffed, and on it standard scheme Ondulin sheets are laid. At the same time, you can live in peace in the house, because the roof is not going anywhere! The process of restoring a roof with old slate is shown in detail in the video:
Onduline is one of the most popular roofing coatings. Demand is determined by its strength, aesthetically pleasing and durability of use. If you want to improve your own home, we will tell you how to cover a roof with ondulin with your own hands as efficiently and quickly as possible.
What is the material
Initially, before proceeding with installation, you need to study the properties of the material. Ondulin is similar to slate, however, it has a flexible base. This roof consists of the following layers:
- main board - cellulose-fibre board;
- mineral additives and filler, which are responsible for strength;
- bitumen resin, which guarantees resistance to moisture;
- pigment is responsible for the aesthetics of slate.

The price of 1 m 2 of ondulin starts from 200 rubles, so the cost of a sheet with a width of 0.95 m, a length of 2 m, a thickness of 3 mm, a wave width of 9.5 m and a weight of 6.3 kg is 395 rubles. You can buy the material at any hardware store, many also provide home delivery.
Advantages of ondulin
Modern onduline material is produced on the basis of bitumen. The advantages include the following:
- lightness - because of this, there is no need to construct a reinforced rafter system before laying the roof;
- budget cost is ensured due to the manufacturing method and available component materials;
- Elementary care - just spray it with a hose or wait for the rain;
- the material is resistant to acidic and alkaline irritants;
- there is no risk of mold on the surface and inside the layers;
- roofing made of ondulin is environmentally friendly due to the characteristics of the components;
- resistant to precipitation in the form of snow and rain;
- the manufacturer determines the service life of 15-20 years;
- installation of ondulin is possible on top old roof, which will save on dismantling.

Disadvantages of operation
It is necessary to note the disadvantages of the material in order to ensure the possibility of an objective choice of roofing:
- sun and rain can cause the roof to burn out, which will negatively affect the appearance of the coating;
- resistance to water is ensured only for the service life specified by the manufacturer;
- if you intend to purchase a large volume of slate, then it may turn out that some sheets differ in shade;
- fragility - the surface should not be walked on, as most likely dents or other damage will remain on it; the same criterion should be taken into account during transportation;
- As you can see in the photo, the limited color range currently includes only 4 colors: brown, green, red and black.

The technology for laying ondulin is similar to fastening slate, but before starting work you should do a little preparation.
Features of working with ondulin
To correctly attach ondulin to the roof, you should learn some of the intricacies of working with this fashionable material. After studying them, you will be able to lay sheets on the roof of any structure yourself.
- If you still need to go through the required material, then it is better to step on the crest of the wave.
- To renew the roof for a long time, it is better to carry out all installation work at a temperature environment in the range from -5C to +30C. If the temperature is above normal or, conversely, below -5C, reschedule the work to another time.
- Approximately 20 nails are used to fasten one sheet. This is exactly how many nails the sheet can hold in case of gusts of wind.

- Due to the nature of the composition, the coating may stretch. This leads to the appearance of waves over the entire roof area, which will only have to be removed by dismantling. To prevent stretching, the ondulin fastening scheme involves the use of sheets that are perfectly even in shape.
- Check that the overhang is long enough. Too long will look unsightly, and too short will lead to the collection of debris and dust under the roof. The most dangerous thing is that precipitation will constantly fall under the short overhang.

What you need to prepare initially
Note that a smart choice the right tools and materials are much more responsible than the installation itself.
Make an accurate calculation of the required amount of coverage. The dimensions of a standard onduline sheet are 200 x 95 cm. Be sure to take into account overlap allowances in your calculations. For overlap you will need to leave 9.5 cm in width and 10-15 cm in length. It turns out that the useful area from one sheet will be 1.6 m2. If you know the total roof area, you can simply divide it by 1.6. So you can do it practically exact number necessary sheets. Please be aware that results may vary depending on the roof angle and roof shape.
Preparation requires the availability of the following tools:
- hand saw for wood;
- hammer;
- nail puller;
- ladder;
- roof ladder.
In addition, you should purchase auxiliary parts, without which the work will not be of high quality:

- tong elements (protective shields) for the edge;
- cornice filler (foamed polyethylene, which prevents debris from getting between the sheets and the sheathing);
- skate (flexible);
- rubber drip aprons;
- specialist. nail fasteners with a rubber cap.
Making lathing and its features
- Laying ondulin on the roof involves arranging a continuous sheathing. It is extremely necessary so that the material does not sag later. For installation, waterproof plywood or OSB boards, and the step should be 40-45 cm.
- If the roof slope is more than 15 percent, then the sheathing pitch can be increased to 60 cm. And for areas with a lot of snow in winter, the sheathing pitch should be minimal. To build the frame, bars with dimensions of 4 x 5 cm, 5 x 6 cm or 5 x 5 cm are used.
- Install additional lathing under the tong and ridge. The sheathing under the ridge is installed at a distance of 5-10 cm from its axis. This distance varies depending on the degree of slope of the roof slopes.
- The cornice is formed using a rubber apron, which can bend, enveloping the sheathing of the cornice at any angle. The apron is attached to the sheathing with ordinary self-tapping screws, and the overlap between the elements is 5 cm.

Important! Immediately before the construction of the sheathing, it is necessary to carry out waterproofing work.
- The last thing to install is the wind board, which should protrude 3 cm from the sheathing frame.
- After the frame is erected, be sure to check the entire structure for compliance with the geometry. To do this, measure the diagonal of each roof slope. If the values differ, all errors should be eliminated.
Ondulin installation instructions
To properly cover a roof with ondulin, you must adhere to a certain algorithm.
Important! Initially, you should take care of your own safety.
Here are the instructions for laying ondulin with your own hands:
- Attaching the first sheet should begin on the side farthest from the wind, and always from the bottom of the slope. To align the sheets, pull the cord along the bottom edge, taking into account that the sheet overhang should end at a distance of about 5 cm from the drip apron. The extreme wave of the sheet should go onto the wind board. Place the filler in the space of the waves between the sheet and the sheathing, using a screwdriver to free the ventilation holes in it. If this is not done, birds may fly into the holes under the waves, and even hornets may take up residence.

- Special nails are equipped with special heads, so fastening is carried out like this: with a hammer you punch a nail with an open head at an angle of 90 degrees, and after driving it in, put on a decorative cap.
- Remember that you will have three lines of fasteners on each sheet. To get a nail into the sheathing, either mark the sheet or stretch a rope along the sheathing line. It is important to remember that the indentation of the lines along which the nails are driven in will depend on the pitch of your sheathing, however, there cannot be less than 3 lines of nails on the sheet. Next, carry out the fastening according to the diagram below.

- Lay the second sheet overlapping 1 wave, and you will nail its first wave together with the overlap, that is, immediately into the sheathing through two sheets. During the process, make sure that the second sheet does not protrude beyond the boundaries of the lace that regulates the horizontalness of the bottom of the roof. In any other situation, the sheets will lie askew. If you need to cut off the tip of the sheet, you can use a hacksaw.

- Second- next row relative to the first one lies in the order of a chessboard. To do this, take and cut the sheet lengthwise in the middle. Install an overlap between the rows of 10-15 cm. If the roof slope allows, then the overlap can be reduced, thereby achieving savings in material consumption.

- After completing the installation of the last segment, you can proceed to attaching roofing accessories that perform the functions of protection and decoration.
- The gable elements are installed on the wind board, which is pressed closely to the ondulin. The overlap of the pliers is about 15 cm. It is nailed to the end with the same nails.
- The ridge for ondulin is attached to the edge of the roof opposite the predominant wind direction, just like the sheets. The ridge is nailed into each underlying wave, on both sides alternately. The overlap of the ridge elements is also 15 cm.

Important! Pay extreme attention to the quality of nail fastening. Their caps will be very visible on the surface, so initially take care of their correct geometry.

Now that you know step-by-step instruction installation of ondulin, here is a video instruction for a more detailed introduction to the installation process.

Now you can easily cover your roof using ondulin. Perhaps you already have experience working with this material? Share your impressions with the readers below.
Ondulin is a common roofing material that has a considerable number of worthy qualities. The installation of such a coating has its own characteristics and, nevertheless, a simple technique. Therefore, quite often the roof is covered with ondulin with your own hands.
This roof covering material is made from cellulose fiber, mineral chips and bitumen. Two types of ondulin are used for roofing:
- Slate. It is used for laying roofs of a fairly simple shape. The material is 3 millimeters thick, 95 centimeters wide and 200 centimeters high. One product weighs no more than 6.5 kilograms. The original onduline slate has ten waves.
- Roof tiles. This material consists of small flexible tiles 1 meter long and 35 centimeters wide. Tiles are successfully used for complex roof structures. Unlike slate, bitumen tiles are made from fiberglass. When installing the roof, there is significantly less waste from ondulin tiles.
Several types of ondulin are produced:
- “Smart” – coating with a special hydro-barrier lock;
- "Classic" - material for flat roofs"
- "Compact" - ondulin for small roofs complex design;
- “DiY” is an easy to install roofing covering with small sheets.
To ensure a strong coating, you should purchase high-quality ondulin. When purchasing material, you need to consider the following points:
- ondulin can have 10 or 8 waves, material with 9 waves is considered fake;
- in a batch, all sheets must be the same size and the same thickness;
- high-quality material is clean - without stains or bitumen residues;
- all sheets of the same color must have the same shade;
- to material with high technical characteristics A quality certificate is always included.
You can purchase good material from official dealers of well-known and trusted manufacturers. The price for high-quality ondulin cannot be lower than the market value. Low price on roofing sheets often means fake.
Calculation of ondulin on the roof
For simple rectangular design roofs, it is not difficult to calculate the consumption of roofing material. To do this, you need to measure its area. The width is multiplied by the length of a given rectangle, and the resulting value is multiplied by the cone of the roof angle.
Having the indicators of the area being treated, it is easy to determine the required number of ondulin. Counting is carried out only usable area sheet - parts that are used for overlaps during installation are subtracted from the total value.
To determine the required volume of ondulin for roofs of complex structures, you must:
- the roof structure can be divided into geometric shapes - triangle, rectangle, square or trapezoid;
- according to measurement formulas, calculate the area of each specific figure;
- The angle of inclination relative to the ground of each geometric element is also taken into account.
To obtain the roof area, all identified values should be summed up.

Installation of lathing under ondulin
In order for the laying of ondulin sheets to be strong and reliable, the frame base must be properly prepared. Before installing the sheathing, two layers are laid waterproofing material and the main parts of the counter-lattice are nailed along the rafter legs. Installation of the base for ondulin is carried out in several stages:
- cornice is being installed wooden plank, the diameter of which must exceed the cross-section of the constituent parts of the sheathing;
- the second board is attached parallel to this plank with an interval of 28 -30 centimeters;
- the following wooden parts of the frame base are mounted according to the step established by the project.
If the roof slope exceeds 20 degrees, then the distance between the sheathing bars should be 60-80 centimeters. In cases where the gap increases, additional wooden slats are installed.
Long screws or nails are used to fasten the boards together. After securing the entire structure of the frame base, you should check its tightness by taking measurements of the diagonals of the slope. In a correctly constructed sheathing, the values should coincide.
After this, wind strips are installed at the ends of the roof slope. Such a board is nailed 3.5 centimeters above the level of the sheathing. Wooden blocks for the ridge are installed parallel to the cornice. Each sheathing board should be spaced at the same distance.

Installing the valley strip
To design the valley, an additional solid frame is installed. It is made of plywood or OSB.
When constructing a valley sheathing from boards, it should be taken into account that the material must be more than 20 centimeters wide. The bars are mounted from the valley axis at a distance of 5 centimeters. The procedure for constructing a valley starts from bottom to top. Installation of parts is carried out using special clamps.

Installation of ondulin sheets
At the beginning of the installation of ondulin sheets, it is necessary to determine the location of the roof relative to the wind rose of the given region. It should also be taken into account that laying ondulin is carried out only within temperature regime from 0 to 30 degrees.
Such air temperature indicators significantly reduce the risk of cracks forming in the material and eliminate its stretching under the influence of heat.
Ondulin is fixed using nails with heads matched to the color of the material. 20 pieces of such fasteners are driven into one sheet. Nails are placed at the end of each sheet and in each place where the ondulin parts overlap.

The sheets are laid in a checkerboard pattern. In this case, both transverse and longitudinal overlaps must be performed. It is recommended to start laying the second row of bitumen sheets with half a sheet.
Installing ondulin is similar to laying simple slate. It’s quite easy to lay sheets of such roofing material yourself:
- the first strip of ondulin sheets is laid from the lower right corner;
- when installing the second row, half sheets are used;
- roofing sheets are connected with an overlap - the second one is superimposed on the first;
- ondulin is attached horizontally with self-tapping screws;
- sheets are fastened to the beam in the vertical direction;
- the transverse overlap is made at least 15 centimeters, and the longitudinal overlap is made at least the size of one wave;
- the ridge elements are fixed to the crest of the sheet and also overlapped.

When laying ondulin, it is necessary to take into account that the slope of the slope affects the size of the overlap:
- tilt angle up to 10 degrees - transverse is not less than 20 centimeters, longitudinal is performed at 2 waves;
- from 10 to 15 degrees - the longitudinal overlap covers 1 wave, and the transverse overlap - 16 centimeters;
- slope with an angle of more than 15 degrees - longitudinal is measured by 1 wave, transverse - at least 14 centimeters.
To install the ondulin correctly, you must correctly install the first sheet. It is thoroughly leveled along the cornice and end.
Advantages and disadvantages of ondulin
The main advantage of ondulin is its environmental friendliness. Therefore, its use for residential buildings is quite in demand. In addition, roofing sheets based on cellulose fiber and purified bitumen have a number of other advantages:
- Plastic. The material bends easily, so it can be given any shape. This property is especially appreciated when installing roofs of complex structures.
- Moisture resistance. Ondulin manufacturing technology provides maximum waterproofing protection for roofing sheets. For this purpose, special impregnations are used, which, in addition to moisture resistance, contribute to a stronger connection of the material when heated under the sun's rays.
- Easy to install covering. Installation of ondulin sheets is completely simple, so you can do it yourself.
- High noise insulation characteristics. Ondulin can be laid on the roof without additional soundproofing protection. Inside a building with such a roof, you will not hear the sound of raindrops or noise from strong gusts of wind.
- Lightness of the material. The weight of ondulin canvases does not exceed 6.5 kilograms. Therefore, such sheets are easy to transport and install at heights.
- Ease of processing. This roofing material can be easily cut with a simple wood hacksaw.
- Aesthetic appearance. Ondulin looks beautiful on the roof. It is produced in four shades - black, green, red and brown.
- Low cost. The price of the material is significantly lower than metal tiles.
In addition, ondulin does not corrode and does not rot, but still, over time, the surface can acquire green tint as a result of the formation of fungus and overgrowth with moss.
The disadvantages of using the material include:
- ability to ignite at temperatures above 250 degrees;
- allocation unpleasant odor at high air temperatures;
- fading of the coating when exposed to direct sunlight;
- relatively short service life - from 15 to 20 years.
The average strength of ondulin sheets is also often considered a disadvantage. It can sag under snow loads and when a person walks on the roof. But such a negative property can only be observed if the sheathing is constructed incorrectly and the roofing material is laid in poor quality.
Due to its numerous advantageous characteristics, ondulin is successfully used to cover the roofs of residential buildings and outbuildings. The duration of use of the material, its strength and reliability depend only on the quality of the coating itself and proper installation of the roof.