What are greenhouses made of? Do-it-yourself greenhouse: the best projects from A to Z. Which polycarbonate to choose
First of all, the greenhouse is designed to protect various garden and garden plants from the effects of negative atmospheric factors(hail, rain, snow, wind, etc.).
A favorable atmosphere is created inside the structure, which makes it possible to grow various fruit crops, and their yield in such conditions increases several times.

As for vegetables and herbs, their harvest time comes much earlier compared to the same species if they are grown outdoors.

A huge advantage of installing greenhouses on garden plot is the fact that an excellent harvest, and in the case of some crops and more than once, can provide vegetables and herbs for the entire winter-spring period.
This can be very cost-effective, especially considering that the price of these products in stores during the indicated period of time is quite high.

A place to install a greenhouse
The idea to build a greenhouse with their own hands comes to the mind of many gardeners and gardeners. But before starting work, you must first familiarize yourself with the stages of construction of this structure and, most importantly, determine the shape of the greenhouse and its location.

It must be remembered that it is not set for one year. The average time of its operation can be almost ten years.

The best option in this matter would be to consult with specialists. Their advice can be obtained either directly (if such a master is included in the social circle) or via the Internet.

- The place where the greenhouse will be installed must be flat, protected from wind loads. At the same time, the sun's rays must completely cover and heat the structure.
- No need to arrange a greenhouse in dark places, near a fence or trees.

- When winter version greenhouses and growing plants during the cold season, it must be taken into account that snow that has fallen on the structure cover may prevent penetration sun rays. Therefore, it is necessary to ensure that this does not happen and remove the snow caps in time.
In addition, due to insufficient supply of light and water heat to the greenhouse, it is possible to organize the supply of electricity and arrange irrigation in the greenhouse by installing an irrigation system.

Where to start building a greenhouse?
When building any structure, including greenhouses, it is best to start the process with design. Create drawings of the greenhouse, reflecting its external forms and the main materials that will be used for its construction.

The structure itself can be small, with an area of about two by three meters and a height of two and a half meters. Or large, three by six meters in area with a similar height.

Of the most popular configurations that are used when installing greenhouses, arched and gable greenhouses stand out. When choosing one of the species, not the last, and perhaps the most important role is played by the factor of choosing the types of crops that will be grown in the greenhouse in the future.

For example, the arched type is more suitable for planting undersized crops, that is, tomatoes, eggplants, peppers. The gable type will contribute to the better growth of tall crops (tomatoes of this species, cucumbers and flowers).
In general, creating a good greenhouse project is not difficult. If you can’t do this on your own, then on the Internet there are always various standard projects of such structures at your disposal.

Selection of materials for coating and frame
One of the most common base materials used in the construction of greenhouses is polycarbonate. Its attractiveness comes from a number of characteristics, the advantages of this material in comparison with other types of materials used in the construction of similar garden structures, such as film or glass.

Note!

Among the main characteristics are: light transmission, thermal conductivity and strength. One of the main advantages of the material is its lightness and plasticity. The internal composition of polycarbonate allows you to bend sheets without the risk of destruction.

In addition, an additional advantage is the price component. Polycarbonate is considered a cheap material, which further increases its demand.

Already in the direct process of installing polycarbonate sheets, it is best to use a double sheet fastening system. Rigid and with opening. Thus, a ventilation system is formed in the greenhouse.

Having decided on the material for covering the greenhouse, you can proceed to the selection of the frame. There is a wide range of profiles that can be used when installing a frame system. This includes metal pipes with a round, rectangular or square section.

Each designated type has its own advantages and disadvantages. The most suitable are galvanized square pipes. This profile is perfectly characterized by high strength, as well as the presence of galvanization, which protects the structure from corrosion.
However, plastic is gaining wide popularity among materials today. Metal pipes are in many ways inferior to plastic pipes, and this has already been appreciated by many.
Note!


A plastic greenhouse is a modern, high-quality construction, characterized by many positive qualities due to the special properties of the material.

Of these, it is worth noting that plastic pipes are easy to cut, glue and weld. This is an environmentally friendly material that is not subject to corrosion, mold, and can withstand various atmospheric loads.

Considering appearance greenhouses, you can choose either rigid PVC pipes for gable or shed structures, or flexible PP or PVC for arch types.

In the end, no matter what the choice of someone for whom a do-it-yourself greenhouse made of pipes is an already made decision, he can always compare and choose the most optimal frame option.

Foundation for a greenhouse
Of course, it is not worth installing a greenhouse on clean ground. A foundation is needed. In the expectation that the structure itself belongs to lightweight types, however, requiring stability, the basis for it is made as follows:
Note!


- A trench is being dug.
- Sand bedding is arranged with tamping 20 centimeters thick.
- Formwork is placed along the trench around the entire perimeter on both sides.
- A reinforcing mesh is laid on the bottom of the trench over the entire area of the sandy base.
- The trench is filled with concrete. The upper level mark of the concrete is equal to the width of the installed formwork board.
When performing these works, it must be remembered that if the greenhouse itself is installed very quickly (within one or two days), then it will take almost a month for a good setting when laying the foundation. Therefore, such work should be done in advance.

Final stage
When the design is completely ready, it will be possible to proceed to the internal equipment. Placing beds and passages, determining the places for piping for irrigation, and so on.

Many people like to take pictures of their work. Some prefer to shoot the whole process of work, while others like to take pictures of the results of work.

But with special pride, friends and acquaintances are always presented with a photo of a greenhouse made by their own hands, where tomatoes, eggplants and other various vegetables and greens are already ripening to their full height.

DIY greenhouse photo


Polycarbonate greenhouses in trading network presented widely - for every taste and size. But many people prefer to do it themselves. Because a do-it-yourself polycarbonate greenhouse is many times stronger and more reliable. At the same time, the costs are less or the same.
How to choose a design
If you decide to build a polycarbonate greenhouse with your own hands, it is advisable to choose a design that allows you to use the main advantage of this material - its ability to bend. These are two types with curved roofs with arched supports.
In one design, the arcs extend from the ground itself. If they are curved in the form of a radius, a lot of area is lost along the edges, since it is very inconvenient to work there due to the small height.
Another design solves this problem - with a composite frame welded from several pieces. Straight racks emerge from the ground / from the base, which rise to a height of at least one and a half meters. An arc is welded to them. With this device, the roof is rounded, the walls are straight. Even along the walls you can work without problems, straightening up to your full height.

But the rounded roof of the greenhouse has several disadvantages. The first - it is more difficult in it than in a straight line to make vents for ventilation. You can solve the problem if you make transoms in the walls, and not in the roof. The second minus of a rounded roof in a polycarbonate greenhouse is that snow comes off it worse than from flat inclined surfaces. If you live in a region with snowy winters, you will either have to make reinforced farms, or make a pitched roof - with one or two slopes.

There is a third solution - to make the rounded part of the roof from two arcs welded at an angle, which forms a kind of ridge. With this structure, the snow melts well and the skate can be protected with a wide strip of metal. This will improve the snow removal and protect the joint from leaks.
Do-it-yourself polycarbonate greenhouse: frame material
The choice of materials for the frame is not very large. Suitable profiled (rectangular) pipes, metal corner and wooden beam. Also use galvanized profiles for drywall.
Wood
The beam is used for small greenhouses, and the design is chosen with a single-pitched or double-pitched roof, since it is difficult and time-consuming to bend wood arcs. The cross section of the beam depends on the size of the greenhouse and the snow / wind loads in the region. The most popular size is 50 * 50 mm. Such supports are placed in middle lane. For greater reliability corner posts can be made from a bar 100 * 100 mm.
Moreover, to save money, you can not buy a bar, but make a composite one - from boards. Take two boards 50 mm wide and 25 mm thick, three boards 15 mm thick. Fold, knock down on both sides with nails. The resulting racks are stronger, better tolerate loads, less prone to torsion, since the wood fibers are directed in different directions.
Another option is a larger one.
If a do-it-yourself polycarbonate greenhouse is being built on a wooden frame, all boards / beams must be treated / impregnated with antiseptics, and those that are intended for the street. Treat the ends that are buried in the ground with compounds for direct contact with the ground. Without such treatment, wood, firstly, will quickly collapse, and secondly, it can become a source of plant diseases.
When connecting racks to the strapping (bottom bar), for greater rigidity and reliability, use steel reinforced mounting angles. They are in construction stores. To increase the bearing capacity of the roof, additional jumpers are installed.
Profiled pipes and steel angle
Most of the polycarbonate greenhouse frames are made of profiled pipes. If you have the skills to work with it, it’s easy to do everything yourself - cooking a square or rectangle is easier than round pipes. Another plus is that with the help it is easy to make arcs yourself.
The cross section again depends on the size and environmental conditions. Most often made from rectangular pipe 20*40 mm. But options are also possible. For that material, another parameter such as wall thickness is also important. It is desirable that the metal was 2-3 mm. Such a frame endures significant loads.
A steel corner is also a good option, but bending it is a difficult task, therefore greenhouses are assembled in the form of a house - with gable or shed roofs. The dimensions of the shelves are 20-30 mm, the thickness of the metal is from 2 mm.
Galvanized profiles
Do-it-yourself polycarbonate greenhouse with a profile frame is the most unreliable option. It is good in areas with little snowy winters, and even without strong winds. The advantage of this option is that welding is not needed. And the minus is not the biggest bearing capacity.
One of the frames
The technology is used standard - as for the construction of walls and partitions made of drywall. The only difference is that the frame is sheathed on one side and polycarbonate is attached. It is advisable to make the racks double - splicing two supporting profiles, turning them “back to back” and twisting them with self-tapping screws. For greater rigidity of the frame, make slopes, connecting adjacent racks with inclined jumpers. It is desirable to make the roof pitched, and not rounded, to strengthen the trusses.
Foundation
If you are wondering whether or not you need a foundation for a polycarbonate greenhouse, there is only one answer - you need it. And reliable. They fly very well. Therefore, the foundation should “anchor” the building well.

Belt type
This foundation is for buildings that are planned for more than one year. The most expensive, but also the most solid option. If you plan to use the greenhouse all year round, the foundation is made deep - to a depth just below the freezing of the soil. For seasonal use, concrete-brick or just from a bar is suitable.

Concrete-brick - one of the most common
Concrete-brick (concrete-beam)
Most often they make a concrete-brick version. It is optimal in terms of costs, complexity and duration. Work is carried out as follows:
- By the size of the greenhouse, they dig a trench. Its width is about 20 cm, the depth depends on the type of soil.

- A dense oilcloth or roofing material is spread on the prepared bottom. This is necessary so that moisture from the solution is not absorbed into the soil. It is also desirable to cover the sides, but there formwork panels partially solve this problem. Without this layer, the concrete will not gain strength and will collapse.
- The solution is poured into the resulting ditch. The proportions are as follows: for 1 part of cement (M 400), 3 parts of sand and 5 parts of aggregate are taken. Aggregate - preferably crushed stone of small and medium fractions. Expanded clay should not be used - it absorbs moisture, can cause high humidity.
- The surface is leveled "under the level". You can smooth it out with a wooden block.

- Mortgages are installed in the foundation, at the corners and with a distance of 1 meter - studs or pieces of reinforcement with a diameter of at least 12 mm. Studs are placed if it is necessary to attach timber to them, reinforcement - if brick is to be laid. They stick out above the level of the foundation by at least 15 cm.
- The poured foundation is covered with a film, stands for at least a week (at temperatures below 17 ° C, two weeks should pass). If the weather is hot, it is watered a couple of times a day. To preserve moisture in this case, under the film, it is better to cover it with a coarse cloth (burlap).
- If the bottom strapping is a beam, waterproofing is rolled over the concrete base. You can - roofing material in two layers, but now it is quickly collapsing, so it's better to take Hydroizol or something similar. You can smear concrete with bituminous mastic a couple of times. The result will be more reliable.
- A row of strapping is laid:

- Next comes the assembly of the frame.
There are options for this type of foundation. It is possible to install small sizes in the prepared trench, fill the space between them with mortar. They must be installed so that their edge is below ground level. A layer of concrete is poured on top, leveled. Mortgages are fixed in the seams.
Empty bottles can be used as building material. They are laid in rows, poured with concrete. It turns out a very economical and warm foundation. Its bearing capacity is quite enough for a more serious building.
Timber foundation for a polycarbonate greenhouse
This option is suitable as a temporary solution - it can last two to three years. It depends on the humidity in the area, the quality of the wood and the processing. A beam is used with a large section - 100 * 100 or more (can be made composite, from several boards). It is treated with compounds for wood in contact with the ground. The order of work is as follows:

This option is only suitable for dry areas with a low location. ground water. In this case, we can hope that the foundation will live for at least a few years.
Pile-grillage
Another type of foundation that will not protect against frost. But it is reliable and will serve for a long time. Complete, and we will give a short list of works.

Next, you can fasten the strapping, or you can build on a couple of rows of bricks and only after that install the frame. After that, we can say that the do-it-yourself polycarbonate greenhouse is almost ready. It remains to fix the polycarbonate.
Which polycarbonate to choose
How long a polycarbonate greenhouse, bought or built with your own hands, will last, how well it will “work”, depends on the parameters and quality of the polycarbonate. His choice must be taken responsibly - the amount is considerable.

Types of polycarbonate
There are three types of this material:

What type of polycarbonate is better to use for the construction of greenhouses? Depends on the mode of operation of the greenhouse. If it is heated, you need a cell phone. If this option is exclusively for the warm season, corrugated (or monolithic) is more suitable. Monolithic is also not bad, but corrugated has more rigidity. For greenhouses that are planned to be used from early spring or throughout the winter, cellular polycarbonate is installed. Due to its structure, it has a large% against its high thermal insulation characteristics- it retains heat better, although it transmits light worse (86% versus 95%).
Choosing cellular polycarbonate
It is not difficult to choose corrugated or monolithic - we are guided by the declared characteristics. It is only important that there is UV protection. There are no other pitfalls. But with a cell phone, there are many nuances. You need to pay attention to the following:

The easiest way to check the quality of cellular polycarbonate is to try to squeeze it between your fingers. If it is not pressed through, even if you make considerable efforts, you can take it. If it squeezes easily, look for another one.
Mounting Features
According to the technology, polycarbonate is mounted using starting and connecting profiles. First, profiles are installed on the frame, a sheet of cellular polycarbonate is inserted into them, which is fixed to self-tapping screws with special press washers, which at the same time protect the attachment point from leaks. Profiles, in addition to holding the sheets in place, also protect the cuts from dust and dirt getting into the bottom. The system looks neat, works well, but all components cost decent money.

Aesthetics for the greenhouse - not the most desired property, therefore, if you need to save money, they prefer to mount in a simple way, without profiles and press washers. Here's how they do it:

This is what concerns directly the fastening of cellular polycarbonate. There is one more point that became clear during the operation of polycarbonate greenhouses. Polycarbonate should not be placed close to the ground. It is desirable that it starts at least half a meter from the surface. Why? Because firstly, it gets dirty anyway and almost no light passes through it, so it does not affect the overall illumination. Secondly, it begins to deteriorate - blacken exfoliate. It is not clear what causes this reaction, but it occurs frequently. So when developing a do-it-yourself polycarbonate greenhouse layout, provide half-meter walls from another material - brick, building blocks. Doesn't matter.
In summer cottages, you can find various forms of greenhouses in which both vegetable and flower plants are grown. Thanks to this, you can cultivate non-seasonal crops throughout the year. The success of the business will depend not only on the design of the greenhouse, but also on what material was used in its manufacture. Our goal is to tell you what types of greenhouses are, and what material can be used in their construction, and we will also look at how the process of building a greenhouse takes place in a summer cottage.
Depending on the design features, greenhouses can be:
- arched;
- lean-to;
- gable.
The construction of the first type is characterized by a roof in the form of an arc, which allows the plants growing inside the greenhouse to receive more daylight. The big advantage of this form will be the lack of snow in winter period, so the deformation and breakage of the structure does not threaten you. 
If you decide to install a greenhouse close to any summer cottage, then the option with pitched roof. This model is very economical, since you, in addition to reducing the cost of materials, save free space on the site. The only drawback of this design will be the accumulation of snow in winter, which will have to be cleaned off to protect the structure from deformation. 
The most common option is the gable shape of the greenhouse, which is very spacious for plants and humans. In some cases, summer residents equip a semblance of a recreation area in such buildings, which allows you to combine business with pleasure. 
Types of greenhouses, their advantages and disadvantages
To date, summer residents are presented with several options for materials that can be used to cover greenhouses and greenhouses. They differ in their structure, price and operational characteristics, so you can choose the material according to your capabilities and requirements.
The most popular material for covering greenhouses will be:
- glass;
- polycarbonate;
- film.
If you are not limited in funds, then the best option there will be glass and polycarbonate greenhouses, which differ in their strength and performance characteristics. Film is a budget option for greenhouses that has been used for several decades.
About what your greenhouse should be, you can see in the video below:
Advantages and disadvantages of greenhouses from various materials
To figure out which material for greenhouses is better, you need to consider the advantages and disadvantages of each of them.
Glass
This material is considered the most suitable option.
Its advantages include:
- transparency, which allows you to provide the greenhouse with daylight;
- resistance to chemicals, even if they get on the glass, they are easily washed off;
- when exposed to sunlight, the material does not emit harmful toxic substances;
- wind resistance.
Its disadvantages include:

Polycarbonate
Polycarbonate is a polymeric plastic that is increasingly being used in covering greenhouses.
Its advantages include:
- strength;
- transparency;
- high rates of thermal insulation;
- protection of plants from UV rays;
- unpretentiousness in care.
Its disadvantages are:

Film
This material is distinguished by its ease of use and budgetary qualities, especially since the experience of using such material has been confirmed for decades.
Its advantages include:

Its disadvantages include:
- windage;
- poor resistance to frost, which is why it has to be removed after summer use;
- short service life.
Do-it-yourself greenhouse construction
Summer residents are forced to build greenhouses for growing vegetable or flower crops, firstly, in order to get a harvest earlier than usual, secondly, in order to grow crops that do not suit this or that climate, and, thirdly, to increase the amount of harvest.
Greenhouses allow you to create favorable conditions for the growth of any plants. If it is not possible to purchase a finished structure, then you can always build it yourself, using all your skills for this.
The first question you will have is how to get started? So that you do not have to rack your brains for a long time, we have compiled an action plan for you, following which you can easily build a greenhouse on your site.
Place for a greenhouse
The first thing you need is to choose a place for the location of the greenhouse. To do this correctly, pay attention to the following requirements:

Dimensions and shape of the greenhouse
The second question that you need to decide is the size of the greenhouse. To calculate everything correctly, consider how much and what you will plant in the greenhouse. If you plan to plant tall plants, then the best shape of the greenhouse will be arched or gable, the height of which will provide you with convenient crop care. You can calculate the dimensions yourself, or take as a basis the proposed version of a rectangular greenhouse with a gable roof. 
The base of the greenhouse can be anything, round, square, rectangular or trapezoidal, it all depends on your capabilities.
Greenhouse frame
The frame is the main part of the greenhouse, so there are special requirements for the choice of material. It must be strong and durable, so for its manufacture choose:
- galvanized profile;
- steel profile;
- profile made of galvanized steel, with a square section;
- wooden beams.
The choice of material also depends on your capabilities, even the most budget option - wood, can stand for quite a long time.
How to make a greenhouse from cellular polycarbonate can be seen in the video:
Greenhouse foundation
In addition to its direct purpose, the foundation plays the role of a pocket in which several high beds. If its construction was carried out incorrectly, then this can lead not only to its destruction, but also to cracking of the greenhouse cover. To avoid this, you need to listen to our advice:
It is necessary to install formwork around this trench, lay metal bars of reinforcement into it and pour it all with concrete. The height of the foundation must be at least 20 cm.
If you follow these rules, you will create a solid and reliable foundation for the greenhouse, which will not be subject to soil movement.
Frame fabrication and coating
The manufacture of the frame begins with the marking of the future greenhouse. You have already calculated what size your structure will be and even poured a foundation under it, now you can start assembling the main structure:

Ventilation
Inside the greenhouse, under the influence of sunlight, a greenhouse effect is created. To create an ideal microclimate for plants, greenhouses have to be equipped with a ventilation system.  Vents located on the sides of the greenhouse, or doors can act as ventilation. Airing contributes to the fact that plants planted in a greenhouse get sick less after transplanting into open ground. But drafts must be avoided so as not to harm them.
When placing such vents in the roof of the greenhouse, you can ensure the movement of warm air to the street, and open doors will ensure the passage of cool air. There will be no draft, and the air will change.
If you have a small greenhouse, then two vents located on the roof of the greenhouse will be enough for good air exchange.
In order for air exchange to take place faster, instead of roofing vents, it is better to equip side ones, which will be located above the ground.
For the cultivation of tropical plants, conventional ventilation cannot be used, therefore, vents can be equipped as ventilation according to the principle of blinds.
Greenhouse Tricks
Summer residents who have been involved in greenhouses for more than a year can tell a lot of tricks on which the yield of vegetable or other crops depends. But everyone, without exception, will answer that the cultivation of plants depends on the crop itself, on the amount of heat supplied, on the duration daylight hours, from ventilation, from proper watering and regular top dressing.
With some of these subtleties and tricks, we will share with you:

From the foregoing, we can conclude that several types of material can be used to make a greenhouse, each of which has its own advantages and disadvantages. If you are thinking of making a greenhouse yourself, then by adhering to our action plan, you will do it without much difficulty. Remember that equipping a greenhouse with vents is as necessary as watering plants.
The efficiency of the greenhouse is determined by the cost of construction, ease of operation and high returns. Those who have seen enough of the finished structures made of metal and polycarbonate and were impressed by their cost cannot believe that the same ones can be built independently from improvised materials. Available technologies there is a lot to build a greenhouse with your own hands - what to choose, from what material and what design to make more profitable and easier. Study the theory, look at the photos and videos to choose the best option.
home greenhouse
What can you make an inexpensive greenhouse
To create an inexpensive and functional greenhouse, the remains of various building materials, both new and used, are excellent. For example, a frame can be built from window frames remaining after installation plastic windows, a metal profile of a suitable section or plastic water pipes. What about coverage? To replace expensive glass and polycarbonate, alternative materials should be used as it.

Greenhouse building from window frames
Frame materials
To make a decision on the suitability of a particular type of recyclable material, analyze its properties in terms of new operating conditions:
- strength, evenness and stability;
- environmental safety for humans and environment;
- maintainability and susceptibility to machining;
- ability to endure high humidity and temperature fluctuations.

Arched wood frame
Most likely, the material that is ideal in all respects cannot be found, but with some assumption for mounting the frame of the greenhouse with your own hands, you can use:
- lumber - round timber, timber, board, sleepers;
- metal profiles - round or open section with sufficient (from 1.5 mm) sheet thickness;
- water pipes- made of polyvinyl chloride, polypropylene, low-pressure polyethylene, conventional or reinforced with a metal mesh;
- case products to be disposed of - wooden containers, construction pallets, wooden or plastic barrels, old refrigerator, window frames.

Mini greenhouse in the refrigerator
Each option has its pros and cons, and you need to take them into account at the beginning of the design:
- wood is environmentally friendly and accessible to most summer residents, however, before and after installation, it must be carefully treated with an antiseptic. But even in this case, the service life of a wooden frame does not exceed 5–7 years;
- subject to the correct selection of the section and the corresponding loads, the metal frame serves for a long time, but is subject to corrosion. It must be regularly coated with an anti-corrosion compound;
- it is easy and quick to build a tunnel greenhouse from plastic pipes. However, the indicators of its rigidity and wind resistance are small, so it is necessary to install such a structure in a quiet place and cover it only with a film.

Creative approach to construction
Use in construction non-traditional materials and even household items contributes to the discovery of new ways of economical arrangement of amateur greenhouses. Of course, their service life is short, but in the absence of any costs, nothing prevents repeating the experiment at the right time.
Greenhouse covering material
From inexpensive offers on the market, summer residents traditionally choose a film or one of the varieties of non-woven covering material - Spunbond, Lutrasil, Agrospan or another. As for the very popular polycarbonate, if it is not possible to purchase high-quality sheet plastic, do not spend money on cheap ones. Due to almost zero protection from solar radiation, it crumbles literally in the first season of use.

Reinforced film
Someone will argue that the film is unprofitable, since it needs to be removed and changed every season with your own hands. Indeed, this disadvantage is inherent in conventional polyethylene film, but today there are more durable types of film coatings:
- light-stabilized - they contain additives that protect against ultraviolet radiation, which increases their service life up to 36 months;
- reinforced - have a special mechanical strength due to a 2- or 3-layer structure with a reinforcing mesh made of strong polyethylene threads;
- air-bubble - also consist of several layers of polyethylene, which gives them additional strength, and specific bubbles filled with air help to retain heat inside the greenhouse;
- hydrophilic - prevent the accumulation of large drops of condensate on inner surface and do not let them fall on the plants.

Two in one: shelter and insulation
When buying film, pay attention to its labeling - look for a transparent light stabilized (ST) material, preferably with infrared protection (IR).
Non-woven fabrics last longer than film ones, are well ventilated and have better heat-insulating properties, but are of little use for covering stationary greenhouses. Varieties with a density sufficient for full cycle growing crops, almost do not let light through, and thinner and more transparent ones are not very durable. Save this option for additional covering of the film greenhouse during the frost period.
Types of greenhouses for summer cottages
If you are planning to build a greenhouse from inexpensive components with your own hands, plan in advance which design best meets the requirements:
- Arched - due to the minimum number of joints of the frame parts and the ability to cover it with a solid canvas, it is considered ideal solution For early growing vegetable crops by summer residents-beginners.
- Gable - a sufficient angle of inclination of the roof and ease of installation of ventilation windows allow you to operate the greenhouse-house throughout the year.
- Shed - the simplicity of installation and the rational use of usable space are best suited for owners of small plots or those who wish to install a wall-mounted greenhouse.
- Greenhouse on a mittlider - a special roof design allows you to effectively retain heat and provide comfortable ventilation for plants in the interior space.
- Thermos greenhouse - its principle of operation is to save thermal energy due to its insulation, full or partial deepening and a double or even triple coating layer. At proper organization tropical vegetables and fruits are grown in such thermoses year-round minimal cost for heating.
There are many other types of greenhouse structures - the so-called "drop", greenhouses according to Fedorov, semi-arches, and so on. But not all of them can be built with your own hands, using improvised materials and without building skills. So, grab a greenhouse made of plastic pipes if an arched seasonal structure suits you, requiring dismantling in winter time.
To build a fairly large one- or gable greenhouse from window frames, there will be few stocks of your own - take a closer look at which of the neighbors is changing windows, or arrange for the removal of dismantled frames with construction companies. And also keep in mind that drawings will be needed for the successful construction of greenhouses from the profile with your own hands - without them it is difficult to maintain the given dimensions and accurately determine the amount of materials.
Construction Highlights
After studying photos of various greenhouses and typical projects or developing your own drawings, proceed to action. It is important to take a responsible approach to the choice of a site for a greenhouse, to choose a kit the right tools and consumables, determine the type and depth of the foundation.

Layout example
Choosing a place for a greenhouse
Do not put a greenhouse where it seems convenient. Evaluate the site from the point of view of the grower:
- where is its southern zone, and where is its northern one;
- which of the free areas is on the leeward side;
- is there any nearby tall trees or buildings that obscure the space;
- whether the new building will cast a shadow on the neighbor's yard;
- how fertile is the soil in the area, whether it requires cultivation;
- where will you get water for irrigation, if its source is located too far.

South side of the future greenhouse
So that the greenhouse receives in early spring and in late autumn there is enough heat and light, choose a site on the south side of the plot, protected from drafts if possible, away from the red line and tall objects. If you do not exclude that in the future you will expand the greenhouse economy, provide a place in advance to increase the structure.
It is hard to find a site that perfectly meets all these requirements. But in most cases, you can smooth out some of the shortcomings - clear the site from old trees, enrich the soil with fertilizers, equip wind protection, organize drip irrigation. However, there are places where it is definitely impossible to install a greenhouse:
- on the northern slope of the site - the structure will turn out to be cold, and the lower parts of the frame will experience an unforeseen increased load;
- near (less than 0.5–0.8 m) fences and tall plants - such a neighborhood threatens to form an air funnel and accumulate snow in winter, which will lead to excessive heat loss;
- next to another winter greenhouse - a snowdrift formed between them can squeeze out the adjacent wall of the structure.

Greenhouse facility drainage
It is unacceptable for rain or melt water to flow into the greenhouse, so do not place it in a lowland. As a last resort, organize a drainage system with your own hands from sewers, and, possibly, earthen ramparts made around the perimeter of the building.
Necessary tools and materials
The speed and quality of construction of any object, whether it is a residential building or a greenhouse, largely depends on the timely and competent selection of all necessary tools and building materials. If simple frames made of timber and film can be built with only a hammer, a hacksaw and nails, then for a welded structure made of a metal profile and polycarbonate, you will need a whole arsenal of tools:
- measuring tape, building level, pegs, twine, square, black marker - for marking;
- grinder, cutting wheels, welding machine, electrodes, wood saw, extension cord - for the frame;
- drill, drill bit, cutting knife - for roofing.
No less impressive is the list of materials:
- concrete and reinforcement, brick or slate - for the foundation;
- square tube 20x20x2 and a similar size corner, edged board 25x200, door hinges, metal paint, antiseptic - for the frame;
- polycarbonate, roofing screws - for roofing.
Calculate the quantity based on the desired dimensions and shape of the greenhouse, as well as the standard sizes of building materials. So, for the construction of a gable greenhouse with dimensions of 3x6x1.7 m with your own hands (see its drawing below), stock up on:
- at least 125 m of a square pipe and 48 m of a corner;
- six boards 6 m long (for organizing beds);
- 3 kg of paint for metal;
- five polycarbonate sheets 6x2.1 m;
- self-tapping screws 2.5 cm and 4 cm long - 100 and 40 pcs. respectively.

Drawing gable greenhouse size 3x6x1.7
In order to save money, you can cover the frame with a film or spunbond, putting polycarbonate on the roof only.
Foundation arrangement
For small greenhouses, in most cases, a foundation is not needed, but for full-sized greenhouses, it performs a number of useful functions:
- ensures the stability of the frame and the integrity of the coating;
- protects against penetration of rodents and weeds;
- improves the internal microclimate provided that it is insulated with insulating boards.
As you can see, it is not worth refusing to build a foundation even for the sake of savings - this will certainly affect the durability of the entire structure. Another thing is if you build a greenhouse with your own hands for one or two seasons or plan to transfer it to another place. In this case, it is quite possible to get by with the arrangement of a light base from the following materials:
- bricks or foam concrete blocks;
- wooden beam 100x100 mm;
- metal pipes (for a columnar foundation).

Brick laying scheme
Quite reliable bases are obtained from old railway sleepers or failed brake discs (they are easy to purchase or even ask at your local car service).
A tape shallow foundation is famous for its quality factor, but its construction is a costly business. To build strip foundation for a greenhouse with your own hands, follow the algorithm:
- Clear the site and make markings according to the size of the greenhouse.
- Dig a trench 30–40 cm deep and wider than the width of the foundation by the size of the formwork.
- Level the bottom of the trench and backfill sand cushion 8–10 cm thick.
- Moisten the sand, compact it and install a formwork on top of it, the above-ground height of which is equal to the height of the future basement.
- Lay the belt connected from the reinforcement into the formwork.
- Prepare a dry mixture of cement, sand and gravel in a ratio of 1:2:4 and fill it with water so that a creamy solution is obtained.
- Pour it into the formwork, periodically bayoneting it with a shovel or a piece of reinforcement for uniformity.

Shallow concrete base
After a week and a half, you can remove the formwork, but you should not mount the frame on it yet - wait at least 28 days until the concrete gains strength.
Greenhouse assembly
Before you build a greenhouse with your own hands according to the above drawing, cut the profile into a certain number of parts:
- 300 cm - 2 pcs.,
- 298 cm - 6 pcs.,
- 294 cm - 8 pcs.,
- 170 cm - 18 pcs.,
- 170 cm with a cut corner - 14 pcs.,
- 160 cm - 4 pcs.,
- 90 cm - 4 pcs.,
- 92 cm - 1 pc.,
- 20 cm - 14 pcs.,
- 40 cm - 16 pcs.,
- 130 cm - 3 pcs.,
- corner 100 cm - 44 pcs.,
- 130 cm - 4 pcs.
Use thin wheels for cutting and one thick wheel for deburring. After that, proceed to welding work:
- Weld the front end and side walls.
- Weld the intermediate support.
- Check the diagonals, set the level and install the skate.
- Attach the rear end and intermediate strips for the roof, including the transom.
- Once again, refine the diagonals and weld the braces at the corners and under the ridge.

Welding a greenhouse from a profile
Clean the finished frame from carbon deposits at the welding points and paint with primer-enamel light color. At the same stage, you can mount the beds from edged boards.
- In the places where the sheets are attached, mark the drilling points with chalk and make 4 mm holes with a drill.
- Cut polycarbonate sheets into sheets for ends, roofs and walls.
- Make a skate by simply folding a long strip 20–30 cm wide in half.
- Attach the plastic blanks to the frame - first the end ones, then the side ones, the roof and the ridge.

Polycarbonate mount
In order not to wrinkle the polycarbonate cells, supplement the self-tapping screws with special thermal washers with a rubber seal. For the same purpose, it is impossible to overtighten the hardware when drilling. For the convenience of working on the roof, use a device in the form of a board with planks stuffed across. Be careful - a fall, even from a small height, is fraught with injury and damage to the polycarbonate.

Types of washers for fixing polycarbonate
An example of an assembly of an arched structure
If you need not a stationary greenhouse, but a small tunnel greenhouse, the fastest way is to order it on the website from the manufacturer, and it’s cheaper to make it yourself from plastic pipes. Metal pipes can also be used, but in order to bend them well, you will need a pipe bender. To increase the structural rigidity of the pipe cavity, it is recommended to fill it with sand and install them on the ends of reinforcing pins driven into the ground by 20–30 cm.
Summer residents often complain that such mini-greenhouses fly away from the slightest wind. To make them more stable, build a plank base, which can also serve as the sides of the beds:
- From inch boards, knock down a rectangular box according to the size of the future greenhouse.
- Cut the pipes into segments so that after bending they form an arch of the desired height.
- Set in 1 m increments finished arches in a box, attaching them with outer side metal clamps and screws.
- Cover the resulting tunnel with a film, spunbond (polycarbonate or glass such a frame will not withstand).
- Fix the covering material - at the bottom with an earth embankment, on the arches with special or home-made clips, you can use elastic string.

arched construction from polypropylene pipes
When it gets hot, organize ventilation by lifting a covering sheet on one side, and, if necessary, shade the plants with gauze or thin spunbond.
Attached greenhouse and thermos greenhouse
The warmest, even in winter, are greenhouse extensions and thermos greenhouses. Their construction cannot be attributed to budget projects, since they are made of polycarbonate and metal, must stand on a solid foundation or be deepened several meters deep into the ground.
The attached greenhouse better stores heat by adjoining the southern wall of a capital structure - a bathhouse, a garage, a residential building. In an unheated outbuilding, the temperature in winter does not drop below 2-4 ° C, which is enough for early forcing of tulips, the production of vegetable and flower seedlings, and the preservation of outdoor plants from severe frosts. The advantages of the extension greenhouse are obvious, but there are several nuances in its arrangement:
- the wall adjacent to the heated room must be insulated;
- the completed foundation cannot be rigidly connected with the foundation of the main building;
- it is undesirable to rigidly nail the support harness to which the frame of the greenhouse is attached to the house;
- it is important to ensure that snow or ice does not fall from the roof of the house onto the extension.

Underground thermos greenhouse
The geometric shape of the attached greenhouses can be different - single or gable, arched, with straight or sloping walls.
Key Feature thermos greenhouses are located underground - only part of the walls with a translucent roof are above ground level. The deepening allows you to maintain a microclimate like in a cellar, when, with frosts of tens of degrees, a positive temperature is maintained.
The algorithm for erecting buried structures with your own hands looks like this:
- Digging a pit 1.5–2 m deep and laying the foundation.
- The construction of walls from moisture and frost-resistant materials, for example, thermoblocks.
- Installation metal frame for the roof and its covering with cellular polycarbonate.
- Carrying out internal work on the installation of heating, lighting, ventilation systems.

Greenhouse extension as part of the architectural ensemble
Thermos greenhouses built in this way are effectively used for growing melons and exotic plants, even in the middle climatic zone.
Video: do-it-yourself budget greenhouse
There are many ways to organize a greenhouse economy in a summer cottage, and among them there are budget decisions. The appearance in stores of inexpensive modern building materials and mass practical advice contribute to the growth of public interest in this type of activity. More and more people, starting with small homemade greenhouses and moving on to a full-fledged greenhouse business, are finding a profitable business to their liking.
Video 1: A budget greenhouse with a simple design
Video 2: Installation of a foundation from a bar
Video 3: Welding frame elements
Video 4: Covering the greenhouse with polycarbonate
Put a little time into studying the projects and a little more effort into the implementation of the one that seemed most suitable, and you will have a successfully operating mini-factory of fresh vegetables. The main thing is not to neglect the nuances and absorb as much information as possible, which is actively shared by experienced vegetable growers.
Greenhouses are the best facilities for growing fruit and horticultural crops on protected ground. By design, it consists of a frame and a coating that transmits light (propylene, glass or film). In addition, the building must have windows, doors and vents for maintenance and ventilation. Also, some walls can be sheathed with boards or lined with bricks for additional protection and insulation.
Do-it-yourself greenhouses from improvised materials are easy to build, but at the same time, such structures have a fairly high functionality and allow you to grow vegetables, fruits and herbs year-round.
How to make a greenhouse at home
Many greenhouse owners are interested in the question of whether it is possible to use a conventional design in the cold season. It should be noted right away that without special equipment for heating and ventilation, the usual design will not be suitable for growing vegetables and fruits (Figure 1). Based on this, it is worth wondering how to build a greenhouse for winter cultivation fresh vegetables and herbs.
 Figure 1. Types of winter greenhouses
 In general, all greenhouses are built according to the same principle: first they build the foundation, then the frame, after which they proceed to sheathing and installation necessary equipment. But during the construction of winter types, there are certain features that we will describe below.
Conditions
A winter greenhouse can be made both single-sided and double-sided, and the building can both adjoin the house and be at some distance from it. But it should be borne in mind that wall structures are more suitable for small farms, since the wall of the house will protect the structure from the cold and reduce heating costs.
Before construction, you need to choose a site that is as much as possible illuminated by the sun. To do this, it is better to place the building from east to west: this way the plants in it will receive a sufficient amount of light, although lamps for additional lighting will still have to be used. In addition, if cold winds are often observed in your area, you need to provide wind protection: place the room near another building or plant a hedge a few meters from it.
Peculiarities
The construction technology of a winter greenhouse is typical, but still has some features that help to keep warm for the normal growth of crops.
If you are interested in how to make a heated greenhouse with your own hands, be sure to take into account these rules:
- The foundation must be strong and high enough so that the cold from the ground does not penetrate into the building;
- Inside, it is desirable to equip warm beds with a special soil mixture (sand, soddy soil and humus);
- Heating and lighting set necessarily to create an optimal microclimate inside. It is also necessary to install a ventilation system, and heating is best done by stove or gas.
 Figure 2. Marking the foundation
 At the same time, it is necessary to equip all life support systems with automation so that growing crops in closed ground requires minimal human intervention.
Do-it-yourself greenhouses from improvised materials
The construction of the greenhouse begins with marking the place for the foundation. To do this, take a cord and a few stakes and mark one of the side walls. Having stuck the stake into the ground, measure the required length and pull the cord. After that, with a square, determine the location of the end wall, measure its length and stick another peg. The rest of the stakes are placed according to the same principle, and a cord is pulled between them. Next, we check the corners and measure the diagonals (they should be the same). detailed instructions for marking and building the foundation is shown in Figure 2.
What covering material is better
It is impossible to build a greenhouse without the correct selection of covering material. Many people prefer to use ordinary polyethylene film for this purpose, but this material is far from the most successful one on the market today.
 Figure 3. Types of covering materials: film, glass and polycarbonate
 Let's try to figure out which material is better to use as a coating for the frame (Figure 3).
The use of glass is considered a fairly popular way of making cladding. For example, you can make a small greenhouse out of old window frames, but if the greenhouse is large, you will have to order glass for it separately, and they are quite expensive. Despite the high cost, such a design will last a very long time, and the glass itself is not afraid of sudden temperature changes, perfectly withstands the heavy weight of snow and helps maintain a stable temperature inside the building.
Note: A film coating is considered a more economical option, but at the same time it is not durable enough. Ordinary film can last only one season, so for more durable buildings it is better to choose reinforced film, which does not need to be replaced within 6-8 years. In this case, it is desirable to fasten the film so that it is not damaged by sharp corners.
by the most the best coverage considered polycarbonate. It's lightweight and durable material, which transmits a sufficient amount of sunlight, while retaining heat inside the structure. Since it is quite expensive, it is worth buying it only if the room will be used constantly.
Greenhouses: how to make land for planting
The abundance of the crop largely depends on the quality of the soil that is used to grow plants. It is impossible to pour ordinary soil from the garden onto the beds, as it may contain weed seeds and pathogens of dangerous diseases that will destroy the plants.
Note: If it is not possible to prepare a special soil mixture for the greenhouse, and ordinary garden soil will be used for the beds, it is advisable to disinfect it using special preparations (for example, Inta-Vir).
But, if you want to get a really rich harvest, you still have to spend a little time making a suitable soil mixture. The most fertile substrate is considered, which includes one part of peat, humus, soddy land and sawdust. Such soil is quite light and fertile, so additional fertilizer is required only at the stage of direct cultivation of crops. But, as is the case with ordinary garden soil, it is advisable to disinfect the mixture before laying it on the beds.
How to build a greenhouse with your own hands from wood
Depending on the design, greenhouses can be single-slope, gable, tent, arched, wall-mounted, pit, or be part of the house. In addition, they can be stationary (the design is not disassembled) and portable.
Additionally, they are divided according to the type of coating (film and glazed) and the method of heating (heated by the sun or equipment).
When choosing a form, one should take into account the location of the building relative to the parts of the world, other buildings on the territory, as well as the purpose and shading. The optimal location is considered in which the southern part of the horizon is visible from the entrance. To do this, imagine that you are standing with your back to the entrance. When positioned correctly, the sun will travel from east to west in a clockwise direction. The transparent wall should be oriented to the south, as in this case the maximum amount of light will get inside.
Note: The location of the greenhouse on the cardinal points has importance only if the walls (all or several) are made of opaque material. If it is completely covered with film or glass, these indicators do not play a decisive role.
If the building is shaded by trees or neighboring buildings (for example, on small area), its north side is made of an opaque material that will not allow hypothermia inside the building. To improve the reflection of heat and light, the roof is made transparent, and one of the walls is covered with white paint or a reflective screen.
Each type of greenhouse has certain characteristics, advantages and disadvantages.(picture 4):
- Single and double- one of the most popular. They are rectangular, and they can be placed in any part of the site, and inner space while being used almost completely. If the design of this type built on a foundation and equipped with heating devices, crops can be grown year-round. The only drawback of one- and two-slope types is the rather complicated construction and the need to purchase a large amount of materials.
- Arched easier to build, but they are not designed for long-term use due to insufficiently strong frame. However, the streamlined shape makes it resistant to gusts of wind, and the condensation that collects inside drips onto the ground, not onto the plants. In addition, it is difficult to grow garden plants in an arched greenhouse (special shelves are equipped for them). Additional costs will be incurred by ventilation equipment, since standard side ventilation is not suitable for this type.
- wall greenhouses and buildings that turn into a residential building are mainly used as winter gardens. They are economically more profitable, since the heat in them is maintained by heating the house. The disadvantage is that additional lighting equipment is required to grow full-fledged plants.
- Pit are single and double. Their main feature is that the side walls are laid out of brick and immersed in the ground. This results in significant savings in heating costs.
 Figure 4. The main types of greenhouses: 1 - single-sided, 2 - double-sided, 3 - arched, 4 - wall-mounted
 If the greenhouse will be used not only for growing crops, but also as a decor for a personal plot, it can also be made polygonal. But in this case, construction costs increase significantly.
What is needed for this
Building a greenhouse with your own hands from wood is quite simple, because it requires a minimum of knowledge, tools and materials (Figure 5).
A frame is built from wood, which is later sheathed with glass or film. The main condition is to properly prepare and process the wood. The bars that will be used to build the frame are cleaned of dust and dirt, washed with clean water and dried. After that, they need to be cleaned with emery and treated with an antiseptic solution that prevents early decay.
 Figure 5. Do-it-yourself wooden greenhouse construction
 The bars are fastened together with nails or self-tapping screws, and after the structure is completely ready, it needs to be painted, painting over not only the wood, but also the metal parts.
Where is the best place to place
When planning the location of the greenhouse on the site, you need to take into account the prevailing winds and the movement of the sun. In order for the plants inside the structure to be as much as possible illuminated by the sun, it is better to place it from east to west.
If in your area there are often strong winds, it is advisable to install the structure near other buildings or large trees. At the same time, too much shading of the structure should not be allowed.
Foundation
When marking the site for the foundation, use the level, since the ground must be absolutely flat. Otherwise, it will be difficult to install the frame, and if its parts can be adjusted and mounted, the structure will be overloaded and the frame may be deformed.
Note: According to the rules, the room should have a slight slope for water flow, but this rule can be ignored when building small structures.
After marking, you can start building the foundation. It must be very durable, because it not only bears the weight of the greenhouse itself, but also protects the plants from cold air and pests. As a rule, ready-made collapsible structures in the kit have materials for the construction of the foundation (beams or pipes). But they are not strong enough and do not protect against frost and rodents. Therefore, it is recommended to lay it out of concrete or brick. The width should be at least 10 cm, and it should be placed below the freezing level of the soil.
For the construction of the foundation, you can also use special blocks. They are hollow inside, so after installation inner part poured with concrete. A curb stone laid on a layer of concrete is also used. Foundation construction options are shown in Figure 6.
 Figure 6. Options and procedure for building the foundation
 If the foundation is high (for example, located at a height of 30 cm from ground level), it will be inconvenient to bring in or carry fertilizer and water inside. In this case, floorings are equipped at the entrance or the door is lowered to the ground level, using the free space for equipping shelves, on which seedlings can later be grown.
Additionally, it is covered with waterproofing material so that heat is retained inside. During construction, care should also be taken to equip a container for draining excess water. It is better to bury such a container in the ground so that it does not occupy the interior space. The drain must be tightly closed so that condensate and water for irrigation do not get into it. Practical recommendations for marking and building the foundation - in the video.
Stages of construction
For the construction of the basement, several methods are used.:
- WITH inside stack sheets thermal insulation material, lay the binding wire and pour the surface with concrete;
- Cast blocks with gravel are laid on the base. Such material perfectly retains heat and has a high bearing capacity. But if it is assumed that the wall will be high, it is additionally reinforced with reinforcement;
- Lay wooden materials impregnated under pressure protective compounds. In the future, the tree is additionally insulated.
The choice of material and method for building a basement depends not only on your financial capabilities, but also on the type of soil and type of foundation. In addition, certain types of plinths require additional processing. Eg, concrete plinth you can not paint, but if it is built from concrete or sand blocks, the surface must be plastered and covered with moisture-resistant paint (Figure 7).
As a rule, a frame is included in the package of finished products, which only needs to be mounted. But if you build with your own hands, the frame is most often made of wood or metal.
 Figure 7. Basement construction technology
 For this, planed lumber or a metal profile is used. When choosing materials for the frame, you should pay attention to several important details:
- Lumber intended for construction is treated with a special green compound, so the frame will have to be additionally painted. Such wood is quite expensive, but its service life is higher than usual. It is important that the impregnation composition is poisonous, so the roots or leaves of plants should not be allowed to come into contact with the tree.
- Pillars, ceilings and other vertical elements can be made from boards (50 x 100 or 50 x 125 mm). For the installation of beams, a beam is used, the size of which depends on the length of the building.
The construction of the frame begins with the fact that roofing material or rubberized material is laid on the base. On lumber intended for horizontal fastening, mark and drill holes for bolts and arrange them around the perimeter of the plinth. After that, we outline the attachment points for the vertical beams. Detailed scheme frame installation is shown in Figure 8.
After attaching the horizontal elements to the plinth, check them for level, saw the vertical beams into pieces of the desired size.
Note: Sawing vertical beams in advance is not recommended, because when installed on a plinth, they can give an error.
In the next step, attach the vertical posts to the top beams. Having outlined the position of each board or beam, fix it obliquely with a driven nail. The optimal distance between vertical posts is 30 or 60 cm, since in this case it is easy to carry out glazing.
 Figure 8. Scheme of mounting the frame for gable greenhouses
 At the final stage, the vertical posts are attached to the lower and upper beams with nails, and to reinforce the structure, it is recommended to tie the joints with steel brackets, wire or tape with an anti-corrosion coating. After that, facing boards and gutters are attached. In the process of work, all places of cuts and holes for fastenings must be treated with an antiseptic. You will learn detailed recommendations for mounting the frame from the video.
How to make a greenhouse out of old window frames
Do-it-yourself greenhouses from improvised materials practically do not differ in functionality from expensive polycarbonate structures. Of course, they are not very suitable for winter crops, but they will successfully last for several seasons under operating conditions in spring, summer and autumn.
One of the most simple designs a greenhouse made of old window frames is considered (Figure 9). For her to do concrete foundation, and if the building will be located on clay or swampy soil- additionally equip a pillow of gravel.
 Figure 9. Building a greenhouse from old window frames
 But most milestone is the preparation of the raw material itself - the old window frames. To do this, they remove all handles, latches, hinges and other metal parts. The old paint is removed, the wood is treated with an antiseptic and repainted. In most cases, the frames are fastened together with nails. Therefore, it is advisable to remove the glass in advance so as not to damage them during installation.
The frames are attached to the frame wooden beams. You can leave a few vents for ventilation, and make their roof polycarbonate. The remaining windows that will not open during operation are carefully sealed with sealant.
How to make a foundation
The choice of material for the construction of the foundation depends on the characteristics of the soil and the type of greenhouse itself. Consider the most popular options.
- Concrete
Suitable for homogeneous soil with medium bearing capacity. In this case, a support is made directly at the construction site: a wooden formwork, and the space is filled with liquid concrete. The bottom of the pit should be flat and covered with a layer of gravel or sand. If the site has rocky soil, a hole is dug to the rock and its surface is thoroughly cleaned (Figure 10).
The formwork must be square (side length - 30 cm). The boards must be tied together so that they do not deform when poured. Reinforcement is laid inside the formwork and concrete is poured.
- From piles
For areas with soft soil, a pile foundation is more suitable. As a rule, piles are made of concrete and buried or driven into the ground. However, this method of construction is too expensive and requires the use of special equipment. Therefore, other methods of building a pile foundation can be used on a personal plot:
- Drive old rails or other metal beams into the ground;
- Use sleepers impregnated with special compounds for longer operation.
 Figure 10. The procedure for the construction of a strip concrete foundation
 Metal piles can be freely driven into the ground without fear of deformation. When doing this, choose beams long enough so that their lower part reaches the soil layers with high bearing capacity.
Note: Before driving piles, mark the site so that enough space is allocated for the foundation. This is necessary, because in the process of driving the pile may stumble upon a stone or other hard rock, and you will have to change its direction.
You need to drive piles while standing on a special stand. But even if you decide to build a small greenhouse on piles, it is better to consult with a specialist in advance.
- From concrete slabs
The foundation, built of concrete slabs, is quite expensive. But its cost pays off with high strength, reliability and bearing capacity even on soft soils.
It is based on a reinforced concrete slab 20 cm thick, which evenly distributes the load. However, concrete slabs must not be laid on loose ground. If, nevertheless, this is necessary, the soil layer is removed and replaced with crushed stone or gravel. Styrox is laid on the crushed stone (thickness 10 cm) and the surface is poured with concrete. The technology for building a foundation from piles and concrete slabs is shown in Figure 11.
 Figure 11. Foundation construction based on piles and concrete slabs
 The selection of the foundation is especially difficult for clay areas or soil, which changes its composition in depth. In this case, it is better to consult a specialist so that the greenhouse does not deform after construction and has sufficient thermal insulation.
Construction steps
To make a greenhouse out of old window frames correctly, you need to follow certain rules.
Step-by-step instructions for building a greenhouse include the following steps:
- Foundation construction: since this structure is quite heavy, it is advisable to make the corner of the foundation of stone, and between them to make a structure of concrete on a pillow of gravel and sand.
- Prepare construction material : remove all metal fittings from old frames, remove old paint, treat wood with an antiseptic and repaint.
- Make the floor: for this, the ground is first tamped, and then a concrete screed is made on it, on which the beds will be located in the future
- Frame construction and sheathing: the base to which the frames will be attached is made of bars of the same thickness as the frames. The parts are fastened together with nails, and the roof can be made of film or polycarbonate.
After the greenhouse is completely ready, beds are equipped in it or racks are installed. It is also desirable to provide a vestibule in which inventory and necessary equipment will be stored.
How to make a greenhouse from a profile pipe yourself
Profile pipes are widely used in construction, and since this material is light and durable, it can also be used to make a greenhouse.
Since it is difficult to bend a profile pipe at a right angle without the use of special equipment, it is best to build arched models with it.
Where is the best place to place
You can place a greenhouse from a profile pipe on almost any part of the site. Since such light construction, it does not carry a large load on the soil, and they can be built even in swampy and clay areas.
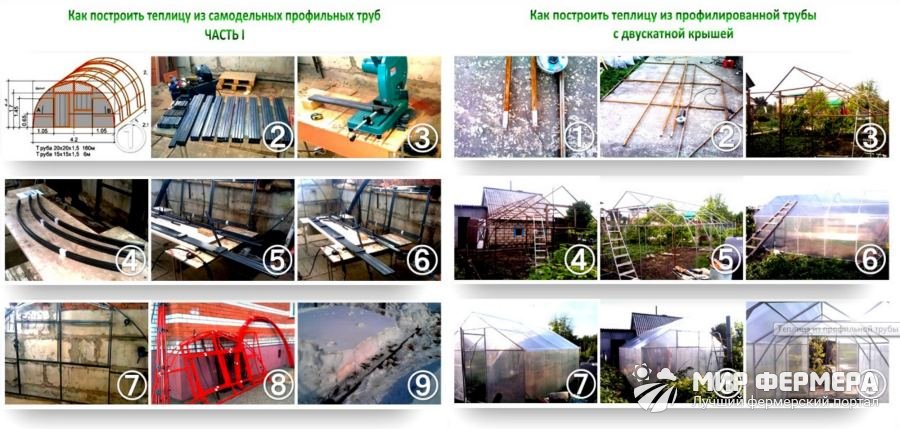 Figure 12. Recommendations for the construction of a greenhouse from a profile pipe
 At the same time, it is important to take into account that the same requirements apply to greenhouses from a profile pipe as to buildings made of other materials. To protect the structure from strong winds, it is advisable to build a greenhouse under the protection of other buildings or hedges. And to provide plants with optimal lighting, it is advisable to place the building from east to west.
Foundation
The profile pipe is much lighter than wood, so the foundation for a greenhouse from it can be anything. However, if you plan to operate the building for a long time, it is better to make a concrete foundation.
If the greenhouse from the profile pipe will be used only in summer, you can get around without a foundation by installing the frame supports directly into the ground. But in this case, it is necessary to provide the plants with additional protection by installing wooden formwork around the perimeter.
Stages of construction
The construction of a greenhouse from a profile pipe begins with the preparation of the site (Figure 12). It is advisable to choose a flat area with sandy soil. If there is no such place, the soil is leveled manually, and drainage is arranged on marshy soils.
Next, proceed to the manufacture and installation of the frame. If you want to build a rectangular greenhouse, you will have to buy special equipment with which the pipe can be bent to the desired angle. To avoid additional costs, it is better to build arched structures. In this case, the pipe can simply be bent in an arc and dug into the ground from both sides.
At the final stage of construction, the frame is sheathed with film, glass or polycarbonate, the floor and beds are made, or shelving is installed.
Make a polycarbonate greenhouse with your own hands drawings
The most modern and functional option is the construction of a polycarbonate greenhouse (Figure 13). It is lightweight, durable and wear-resistant material that will last for many years. Its only drawback is the high price, so it is worth building such greenhouses only if it will be used for a long time.
You can make a polycarbonate greenhouse with your own hands according to the drawings, but many prefer to buy ready-made structures and carry out installation on site. We will tell you how to save money and build a protected ground structure with your own hands.
What is needed for this
First of all, for the construction you need to buy polycarbonate. Another advantage is that the sheets have a standard length and width (12 and 2.10 meters, respectively). This allows you to build a greenhouse 3.5 meters wide and cover the roof with one whole sheet.
In addition to the polycarbonate itself, for the construction you will need materials for the foundation, accessories for attaching sheets and plastic U-profile, which cover the edges of polycarbonate to protect its honeycombs from dust.
Peculiarities
In addition to the high cost of polycarbonate, the material has no other significant drawbacks. Of course, its honeycombs can become clogged with dust, and the coating will lose transparency, but this problem can be easily solved with a plastic profile that is attached to the edges of the sheet.
 Figure 13. The order of construction of a polycarbonate greenhouse
 As with other types of structures, polycarbonate greenhouses require a foundation, but its purpose is not to strengthen the building, but to protect plants from the external environment.
Where is the best place to place
In addition, it is desirable to install the greenhouse so that the plants receive the maximum amount of sunlight. To do this, you need to arrange the structure from east to west.
Foundation
To build a foundation that will exactly match the size of the greenhouse, you need to place the site by setting pegs and pulling a rope between them. After that, you can proceed to the installation of the foundation.
Note: Since polycarbonate is a lightweight material, the foundation can be built both as tape (made of concrete) and wooden - from beams and supports.
As a support, you can use asbestos-cement pipes, which are installed at the corners of the greenhouse. The soil around them is compacted, and the foundation is mounted from wooden beams. It is better to treat the tree with an antiseptic and paint it so that the structure does not rot.
Stages of construction
The steps for building a polycarbonate greenhouse are the same as for other materials. First, mark the site and build the foundation. After that, proceed to the installation of the frame. It can be made from wood profile pipes or aluminium. The latter option is considered preferable, since aluminum is quite light, but at the same time durable.
At the final stages, the frame is sheathed with polycarbonate sheets, equipment for irrigation, heating and ventilation is installed inside the structure, and the beds are equipped.
How to make a heated greenhouse with your own hands
The design of a heated greenhouse practically does not differ from conventional structures. But at the same time, several important nuances must be taken into account. First, you need to carefully seal all the cracks so that heat does not leave the greenhouse.
Secondly, you need to install heating equipment. You can make warm beds by arranging them according to the principle of a warm floor, and laying pipes under the ground. But a more popular option is the installation of heating: gas, electric or furnace boiler.